











Ultramodern Wargaming – Ukraine 2024




Recommendations: 13004
About the Project
Lately, I've been running war games every weekend with members of the community via web conference. Players log on and play wargames with each other in real time, regardless of location, and we usually have at least a couple spectators as well. Many times it’s been Darkstar, but we’re also running wargames in Panzer Leader, Arab-Israeli Wars, and now Valor & Victory.
BoW/OTT community members @brucelea, @damon, @davehawes, and @rasmus have taken the plunge, leading battalions across thousands of meters of desert, starfleets in pitched battles across the heavens, or vicious firefights in the jungles of Vietnam, all without leaving the comfort of their home.
Hard-core, old-school command-tactical wargames can now be run (complete with spectators and recordings) in real time, with BOTH PLAYERS moving pieces across THE SAME virtual game board, thus maintaining player agency, speedy and instant results (no play by e-mail), interwoven turn sequences, any questions / feedback instantly received and addressed, and with the game being virtually recorded as it goes, a ready-made battle report can actually be created as we go.
All of this without the players having to install any new software on their computer, on any platform (PC or Mac). All that's needed is to agree on a time, a handful of dice, and a bellyful of courage!
Every weekend can now be a boot camp! All without costing me thousands of dollars in airfare, too!
Related Game: PanzerBlitz
Related Genre: Historical
This Project is Active
Gold Beach Commemorative 75th Anniversary Panzer Leader
My friends @brucelea and @damon are gearing up for a 75th Anniversary wargame of Avalon Hill’s classic Panzer Leader – recreating part of 50th Northumbrian Division’s landing at “Jig” sector, Gold Beach, 07:20 hours, 06 June 1944.
Initial waves will be made up of 1st Bn / Hampshire Rgt and 1st Bn / Dorsetshire Rgt, followed up by 47th Royal Marine Commandos, Royal Engineers, 2nd Bn / Devonshire Rgt, RFA batteries, and Sherwood Rangers (Sherman DD tanks).
They’ll be up against elements of Infantry Division 352 (Grenadier Rgt 916), and elements of 441 “East” Battalion, Rgt 726, 716 Static Infantry.
At least two of us have walked these battlefields, so there will be something of a connection in the design and play of this wargame.
The game will be played on-line on Saturday, June 8.
This thread will record some of the research, design, and of course game play that goes into this small week-long project.
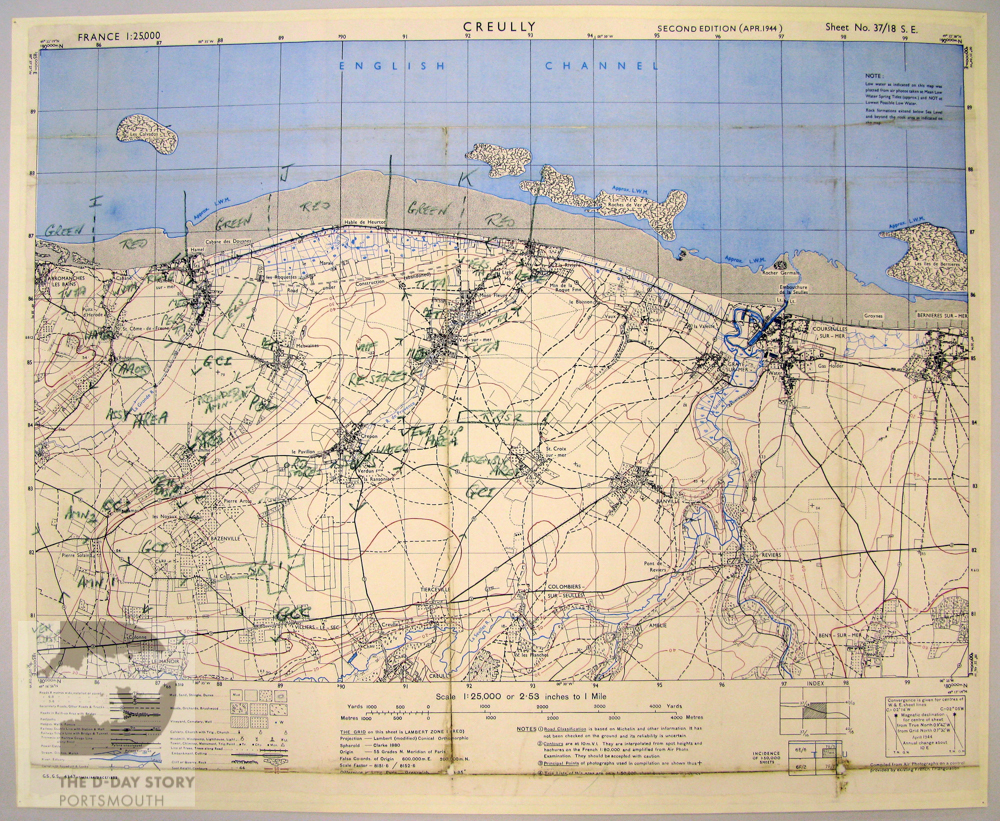
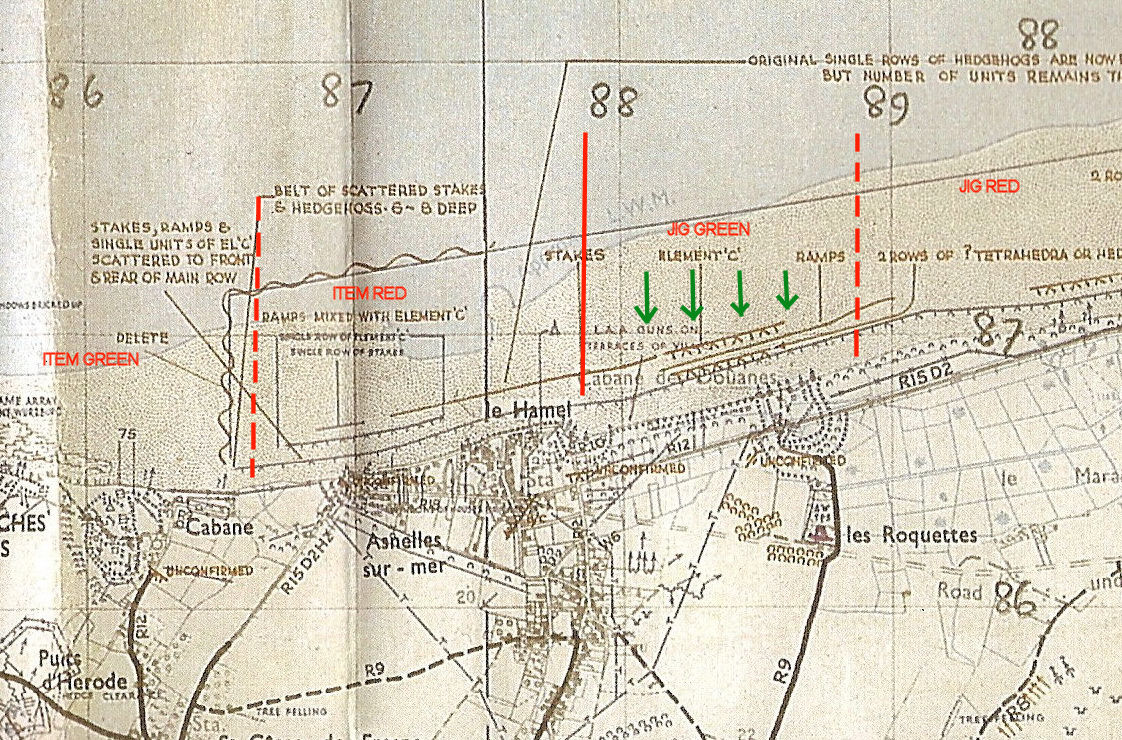
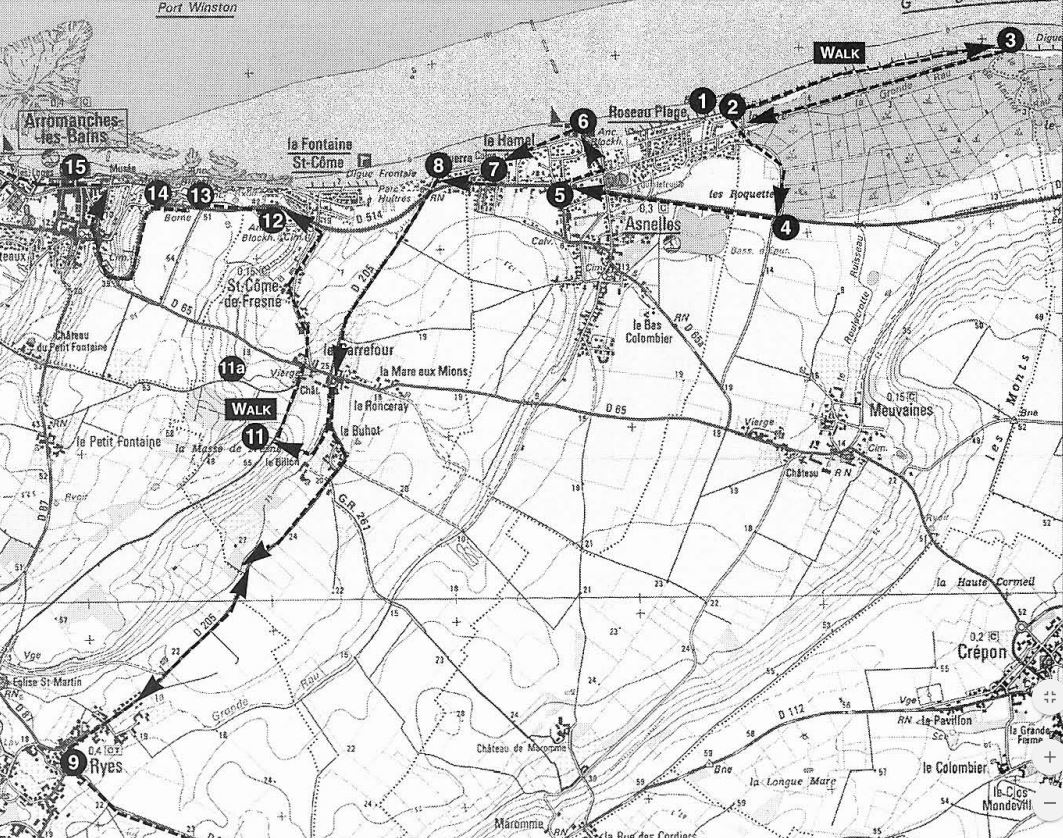
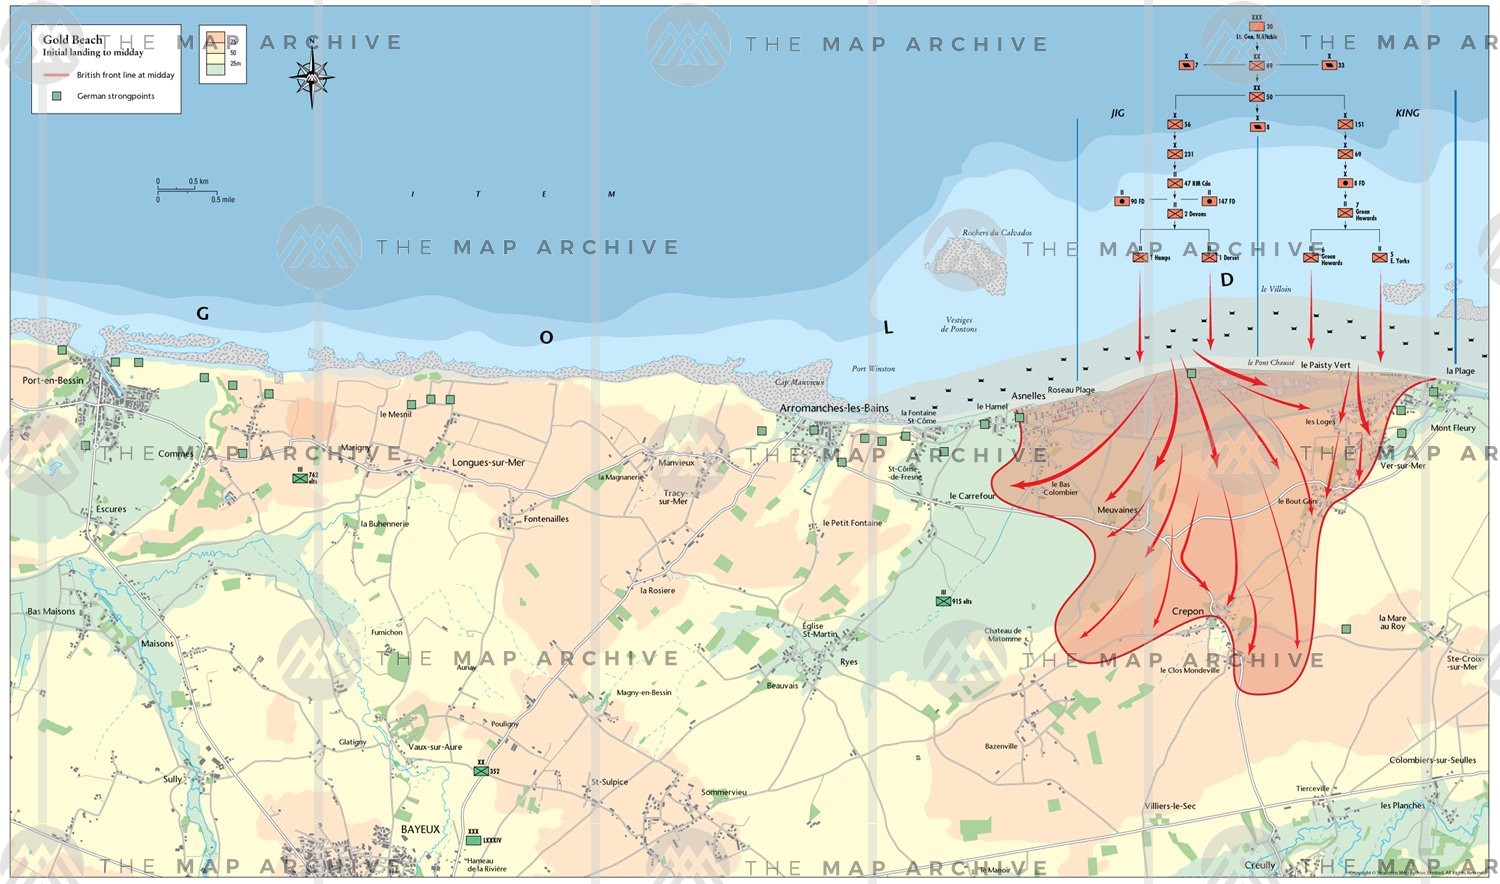
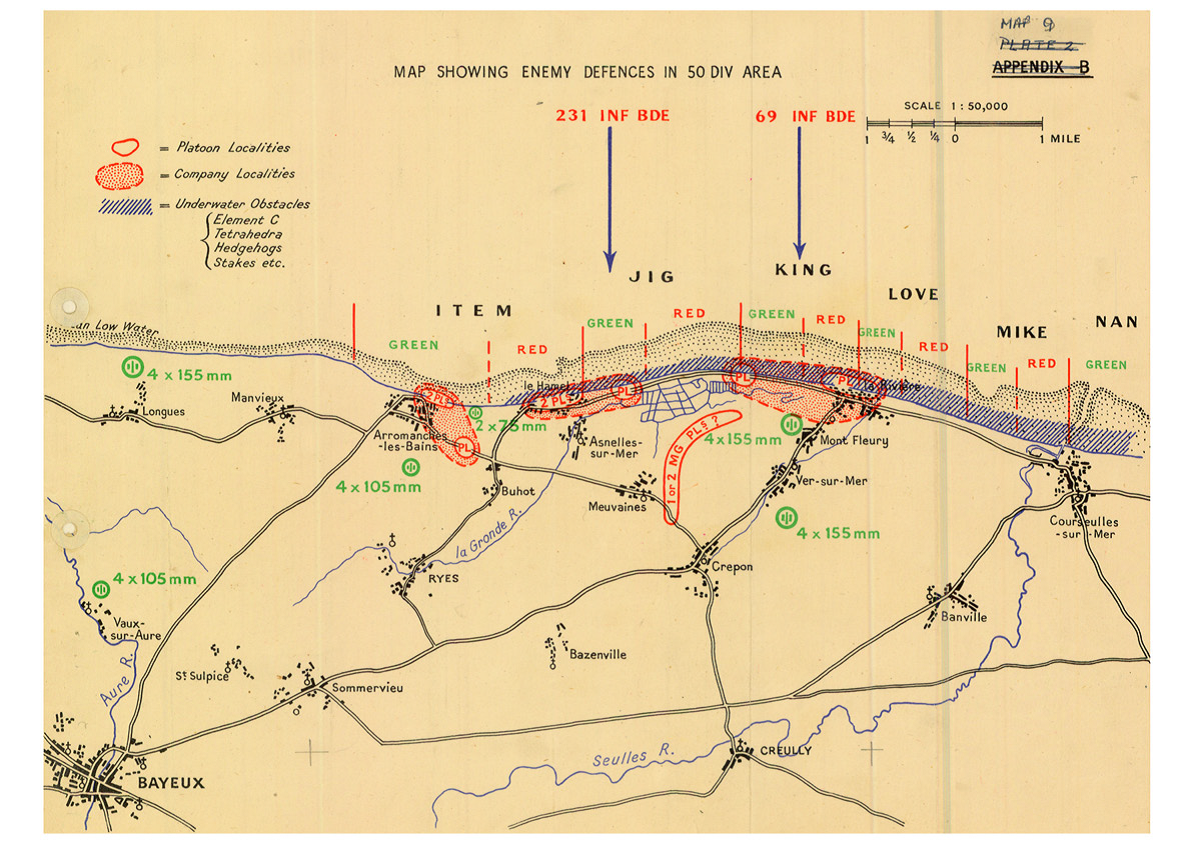
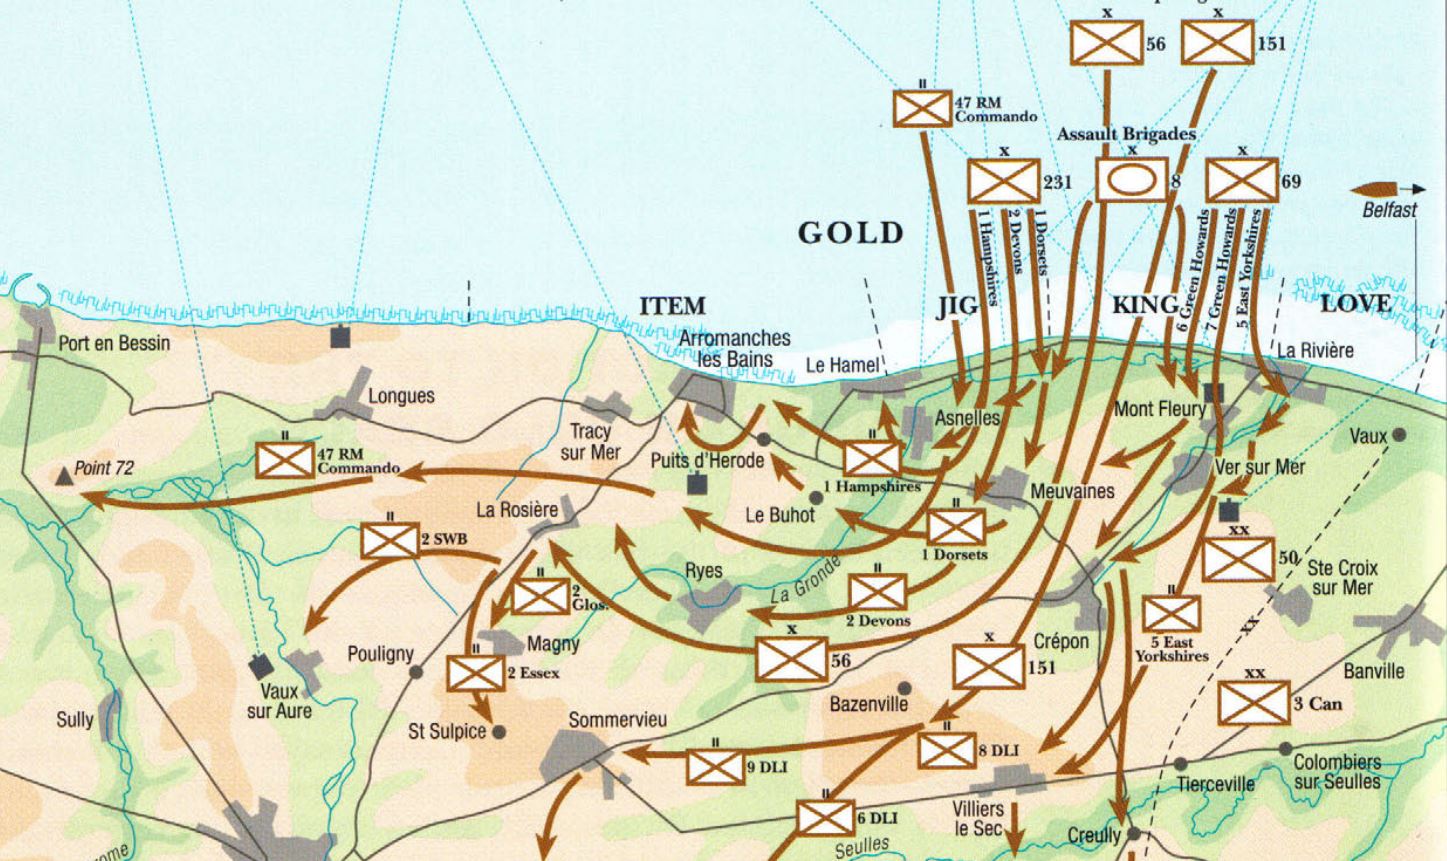
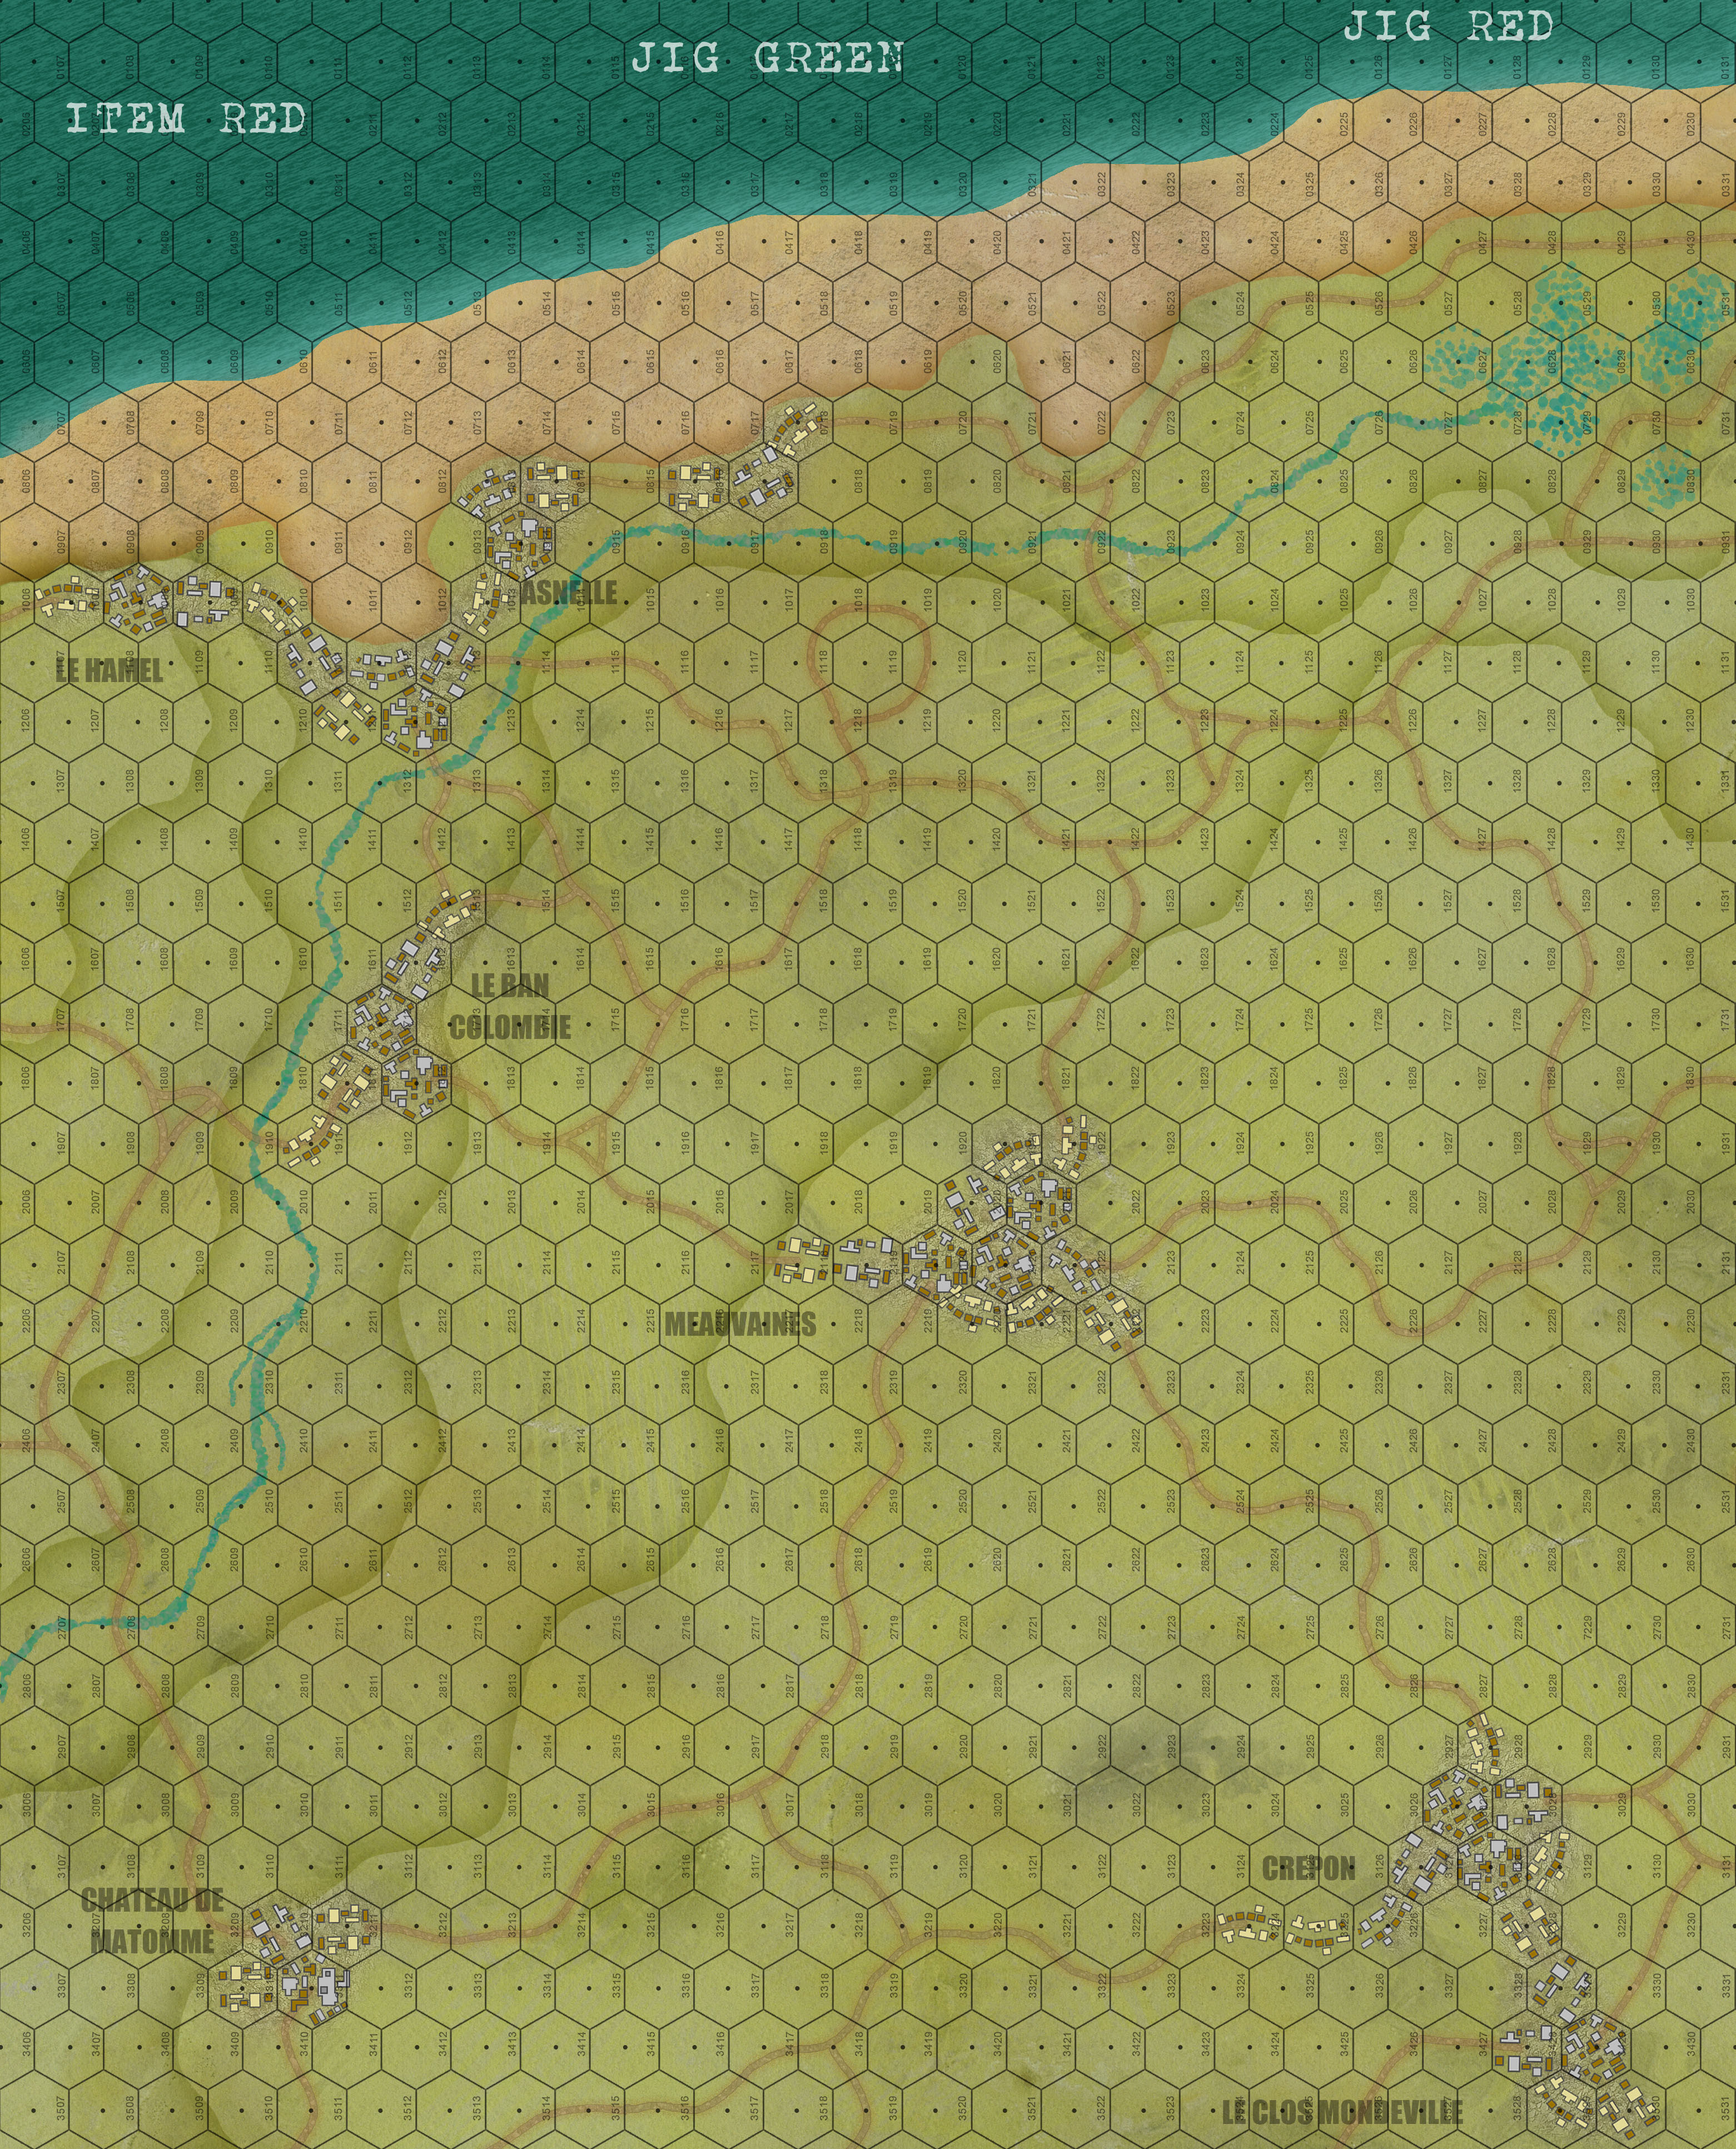
And finally, the first work-in-progress of the Panzer Leader map board. She’s not quite finished (no trees, a few labels missing, and of course one of the German beach defenses on here yet). But she’s on her way. My goal is to finish the map by Tuesday and get started on counters Wednesday and Thursday. Friday we’ll hammer out a few special rules and design the workbook by which @brucelea and @damon and I will play the game (I’m taking the Germans) …
… and Saturday we hit the beach!
Falklands Land Ops - Argentinians, Snipers, Medics
So as shown below, we now have enough for a beginning game in Valor & Victory for the Falklands 1982.
Please join us at 8PM UK time, 3PM East US time for another live stream on the Sitrep’s Twitch Channel, where we’ll be trying out these counters in a quick demo game!
New counters, new map, new setting, new expansions for a great game system, new options for historical wargaming!
The Sitrep never sleeps!
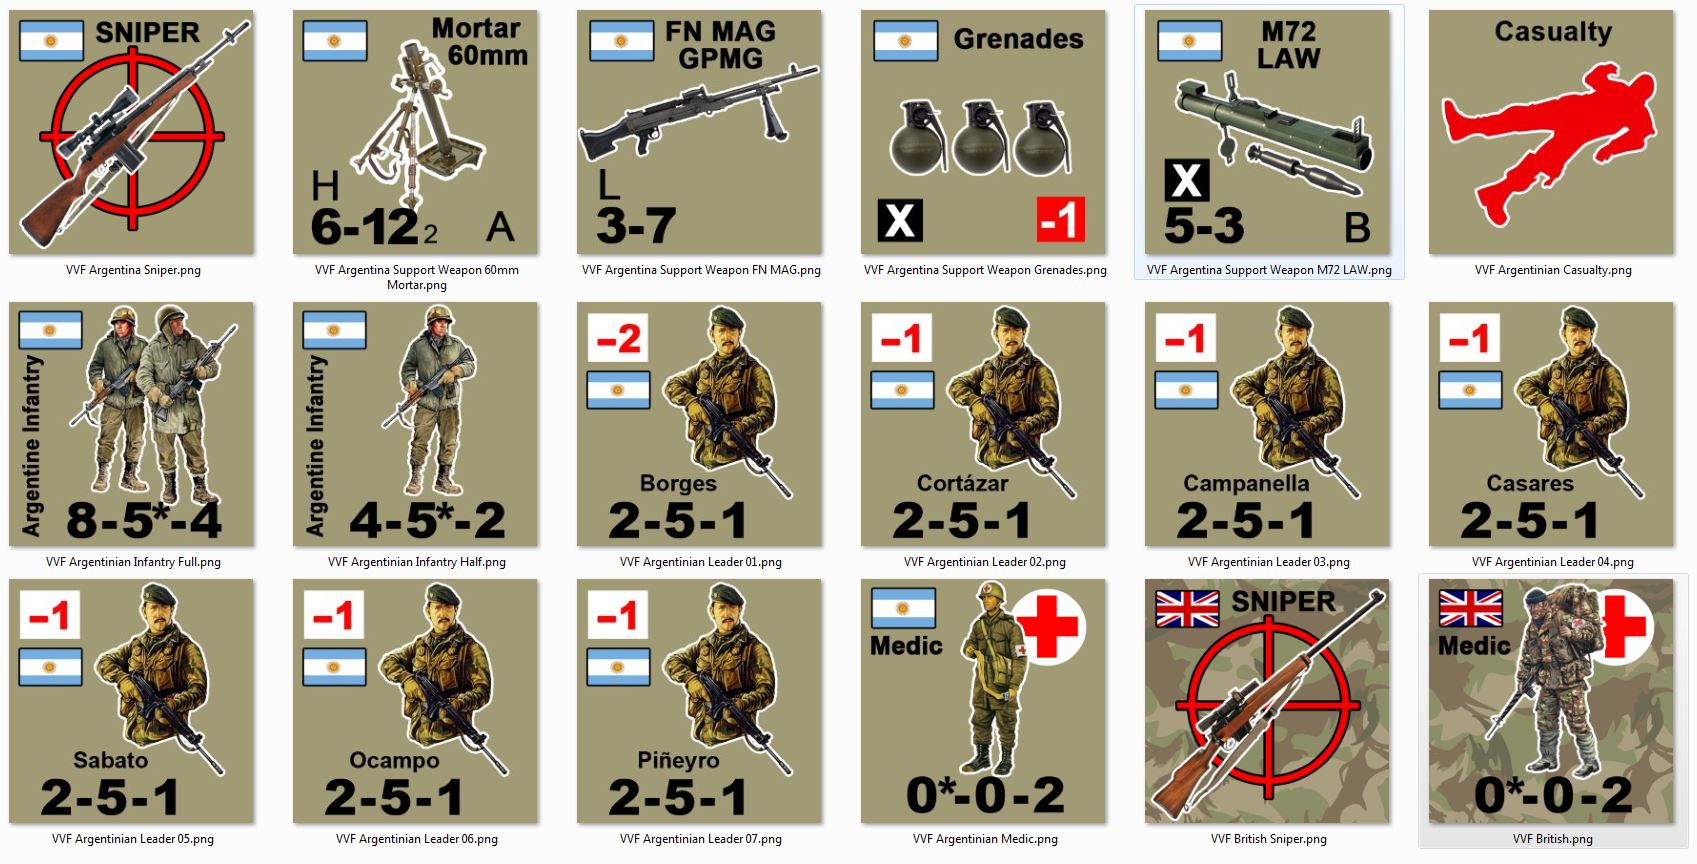 So here are Argentinian infantry conscripts, commanders / leaders, support weapons, British snipers and medics, Argentinian snipers and medics ... pretty much the rest of what is needed to run a beginning Valor & Victory game in the Falklands, 1982. Hey, anyone ELSE build two whole armies in the last 6 hours? =D
Falklands Land Ops - Building Armies in Valor & Victory
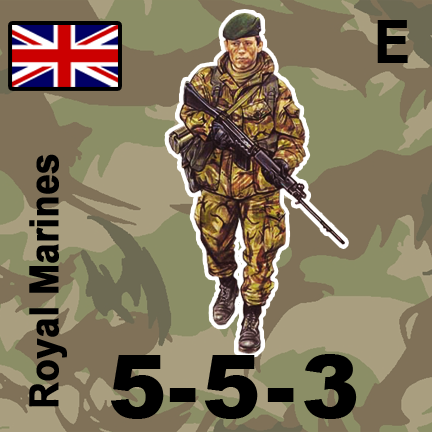
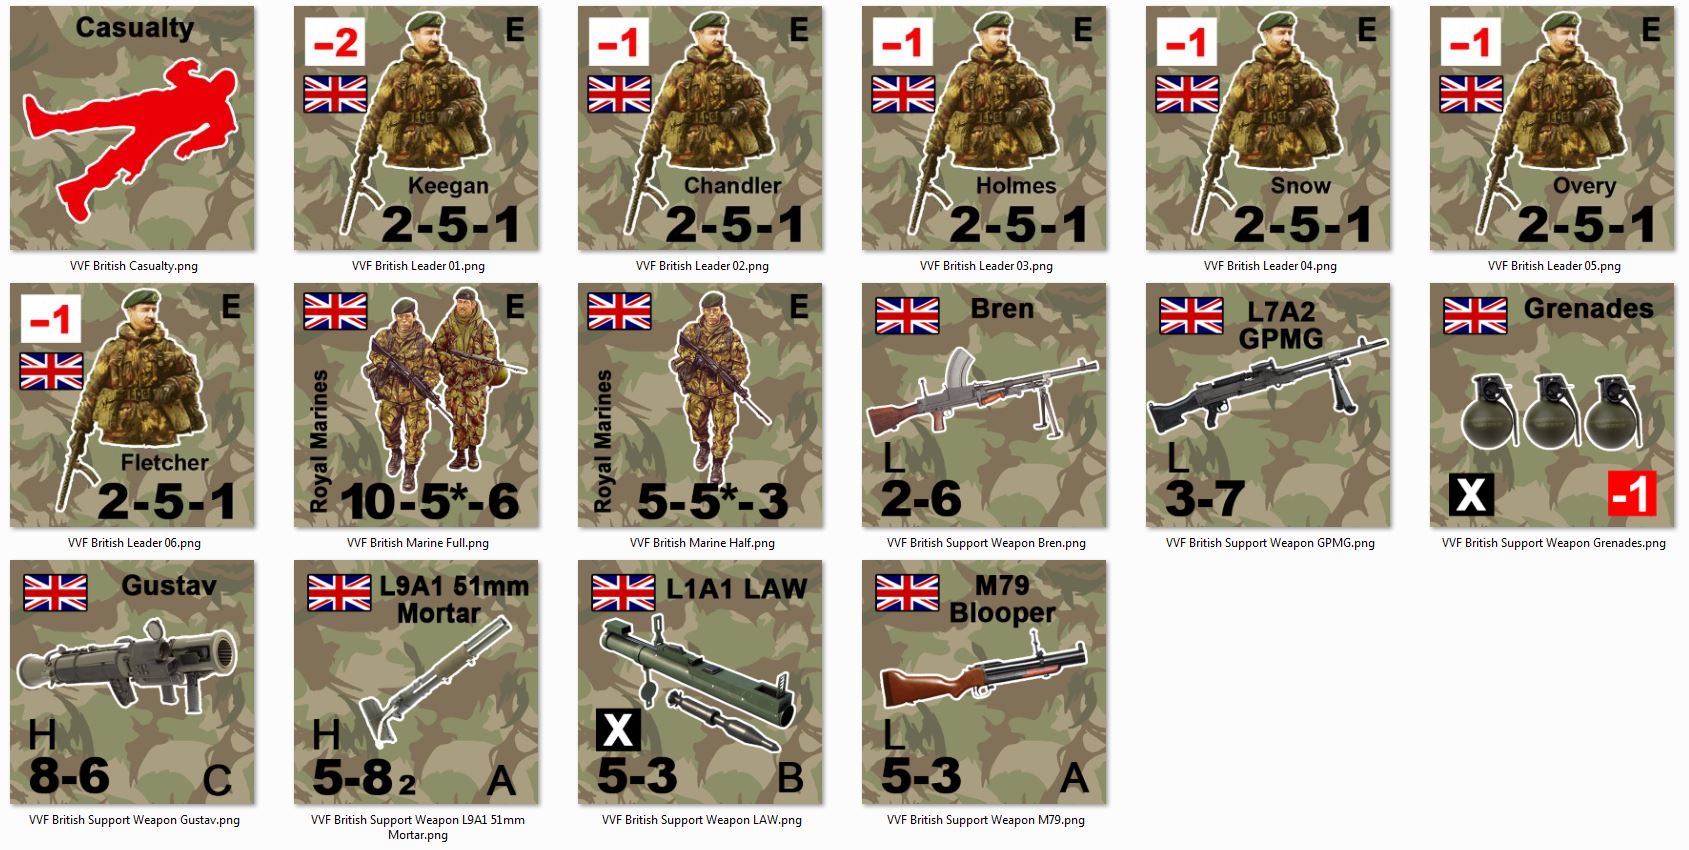 We're underway with a complete Valor & Victory force for Royal Marines in 1982 Falklands. I know I want to build at least another force for Paras, and then of course Argentine infantry that opposed them. Other options might eventually include Scots Guards, Welsh Guards, Gurkhas, depending on community support. I hope to stream a demo game UK vs. Argentinian infantry battles in Valor & Victory of this sometime on Sunday, May 26 - again, depending on community interest. Stay tuned.
 Open Invite: Wargames on the Weekend
Once again it’s time to “stiffen the sinews, summon up the blood, disguise fair nature with hard favor’d rage ” … and take your dice to the wargame table.
As always we’ll be running wargames on the web this weekend!
If anyone wants to play in any of the games listed below, please let me know what game, what day and time, and which faction you’d prefer, as soon as you can so I can start building the scenario.
Options (Saturday at 17:30 UK time or Sunday 17:00 UK time):
- Darkstar (please let me know what faction you’d prefer)
- Valor & Victory (VWW1, WW2, Vietnam, Lebanon, or even Falklands if I can get some counters and maps put together)
- Arab-Israeli Wars (1956, 67, 73, or 82 Lebanon)
- Tactical Combat Middle East (Panzer Leader in 1991)
- Panzer Leader WW2 as always, virtually any theater or campaign. 😀
- AirWar C21 for the Falklands, 1982.
- Naval Command for Falklands, 1982
Again, if interested – either in playing or in spectating, please let me know with a PM.
On Sunday, I would actually like to give Falklands 1982 a swing in Valor & Victory if anyone is interested. This would help facilitate the last Falklands episode for the Ops Center, but of course I’ll run whatever the players are most interested in.
First come first serve, and I need time to build the scenarios.
Hope to see some of you there! Either way, have a great weekend!
JIM
Sitrep Twitch Live Steam, 8PM UK Time
Good afternoon, everyone!
The Sitrep Podcast Channel is hosting another live stream on twitch this afternoon.
Time: 8PM UK Time / 3PM East US Time
Game: AirWar C21 (Wessex Games)
Setting: Falklands War 1982
Scenario: Argentinian bombing attempt on British warships conducting shore bombardment on Port Stanley Airport. Mirage III EAs escorting A-4 Skyhawks on attack run, intercepted by FRS1 Sea Harriers in Combat Air Patrol and air defense systems of HMS Glamorgan and HMS Alacrity.
Check us out on Twitch and see how we do!
We hope to see some of you there!
Naval Command: Falkands Game Report!
This weekend my friend @elessar2590 and I took our first swing at a new game in a new genre: Modern naval combat. Well, virtually a new genre for me, at least, I remember playing Harpoon back in the 1980s and early 1990s but haven’t really looked at modern naval operations in wargaming since then.
But Sunday we tried “Naval Command” – specifically for a scenario in the 1982 Falklands conflict.
Sitrep followers will certainly know that we’ve been running a lot of Falklands content lately, in support of our ongoing Ops Center video series on the topic. I started looking at Naval Command as a system that could quickly and easily give us a look at the overall naval, maritime, and littoral operations involved with the British landings on the Falklands. Harpoon is probably the “gold standard” for this kind of thing, but it’s also a very detail-intense and heavy-investment game from a research, prep, and paperwork perspective.
Accordingly, Sunday’s game was sort of a “live playtest” for the system, available for viewing in its 5-hour entirety on the Sitrep Twitch Channel. But here are the highlights of the battle report.
 So here was our title slide for the stream. Was the game system good? I … THINK so. We’ve only had one live game so far so I can’t say too much right now. I think the BOOK needs a “come-to-Jesus” moment with a hard-eyed copy editor and data-checker, but the concepts presented, turn sequence, level of detail, and scope of study are great. It’s not too much, not too little. In addition to what we explore in this particular game, Naval Command addresses aspects like submarines, sonar, airborne sonar (dipped, sonobuoys), landing operations, anti-piracy operations, rules of engagement in areas not in declared warzones, etc. So I THINK I can recommend the game, but honestly need a few more tried to be 100% sure. We definitely had some fun (and admittedly, some difficulties) with this one, though.
 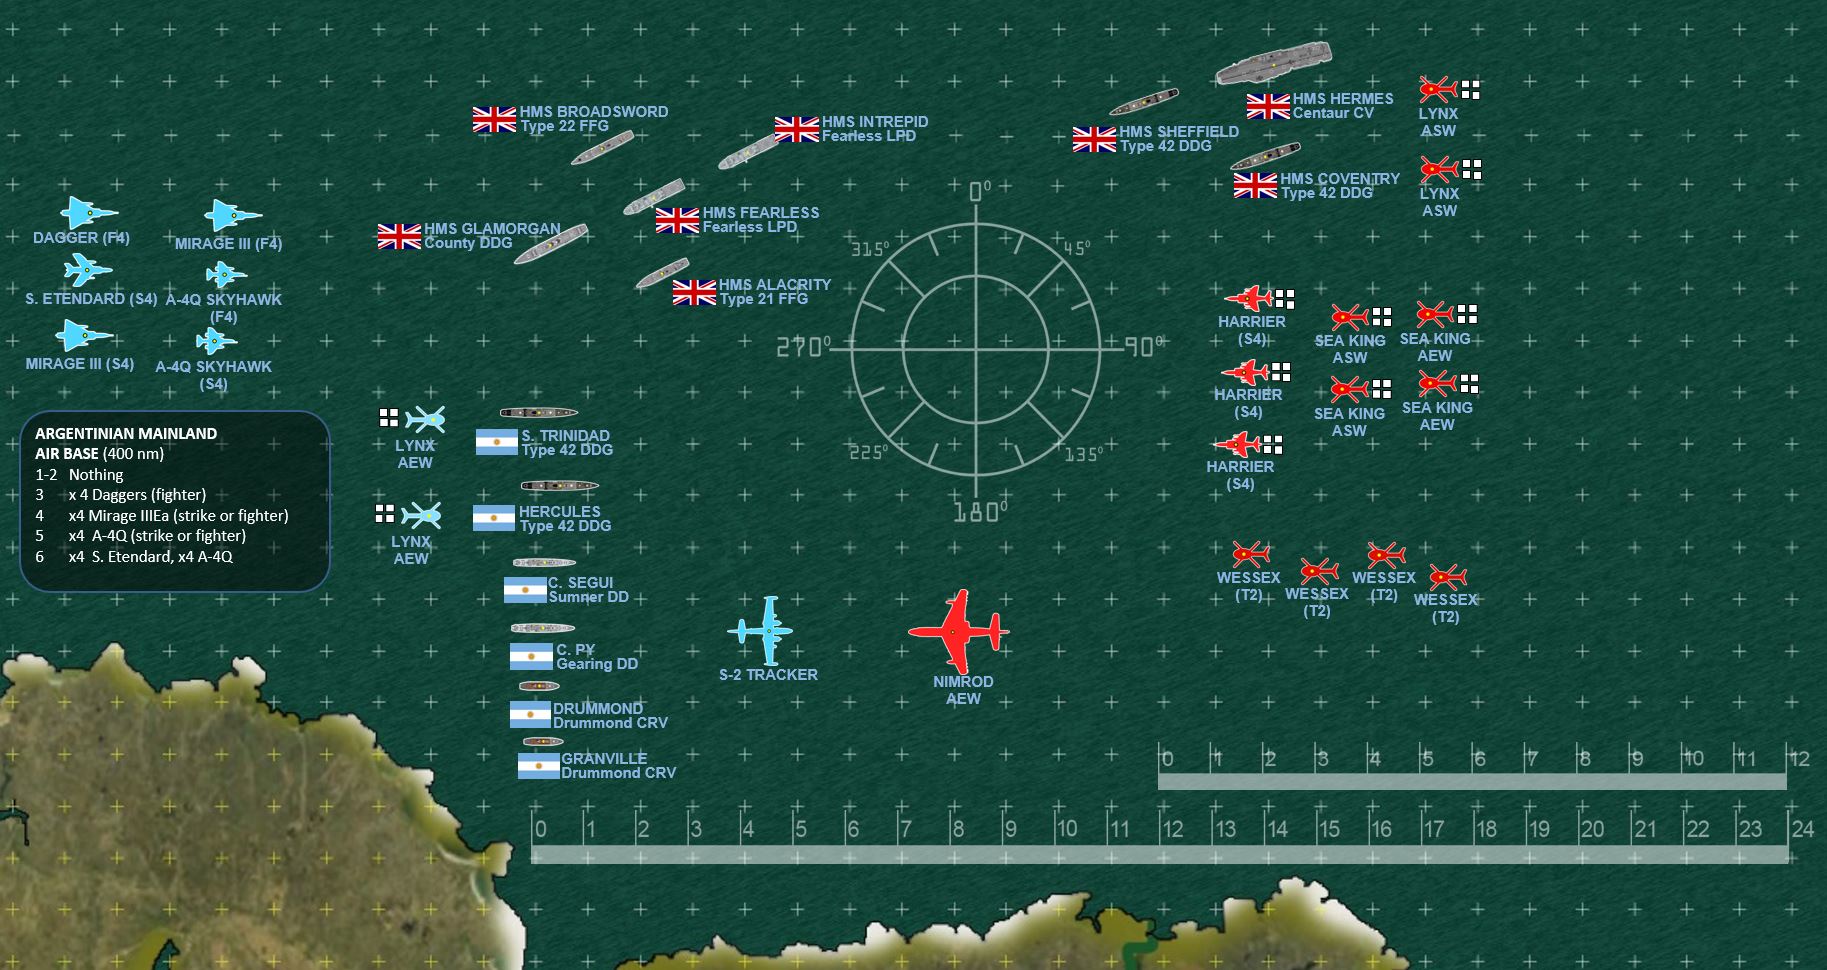 So here are the forces on a partial map. Right off the bat, some viewers are going to see a major curiosity here … why is the Argentinian Navy even on the table? At least their surface fleet was withdrawn to port after the sinking of the light cruiser ARA General Belgrano. Well, again … this is a playtest game, and we wanted to test warships against each other. So we’re trying out a little alternate history here, postulating what initial British landings at San Carlos would have looked like had the Argentinian Navy actually had some surface ships making a stand at the Falklands. The British force is two basic task forces, a landing force (LPDs HMS Fearless and Intrepid) and their escorts, and a carrier support force (CV HMS Hermes and her two Type 42 escorting destroyers). The Argentinians have a small force of destroyers, two Drummond-class corvettes, a squadron of “Pucara” counter-insurgency aircraft at Port Stanley Airport (unable to operate larger craft in the wake of Blackbuck bombing missions and follow up strikes on the airport. MOST IMPORTANTLY for the Argentinians, they have air strikes that SOMETIMES come in from the Argentinian mainland, per d6 rolls on the small mini-table on the left. If any aircraft do arrive, they have no “fuel” tracker, they are assumed to already be at the turn-around point after flying 400 nautical miles from the Argentinian mainland. They get one attack phase on the table and then must leave. Next turn the Argentinians can roll for new aircraft.
 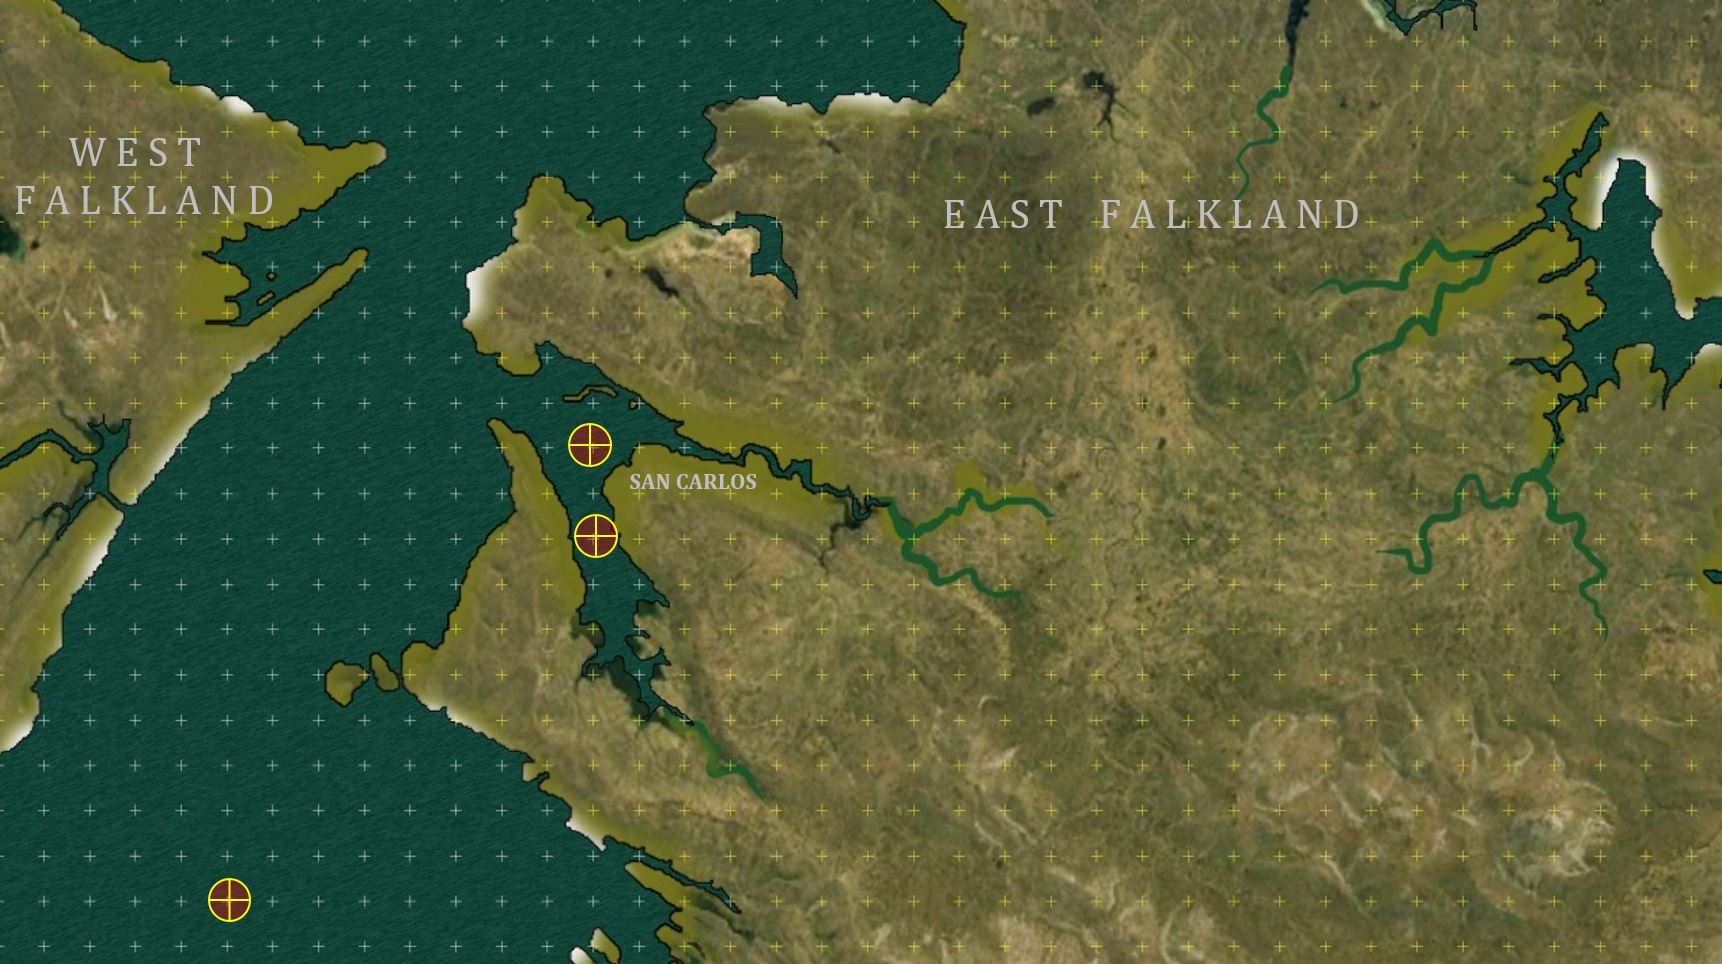 Here are the objectives. Historically the British made two landings at the San Carlos inlet, as we show here. Also, at least one surface warship must end the game at the southern target marker, to reflect the historical mission of probing Falkland Sound to see if it was mined and safe for British naval, littoral, and maritime surface traffic.
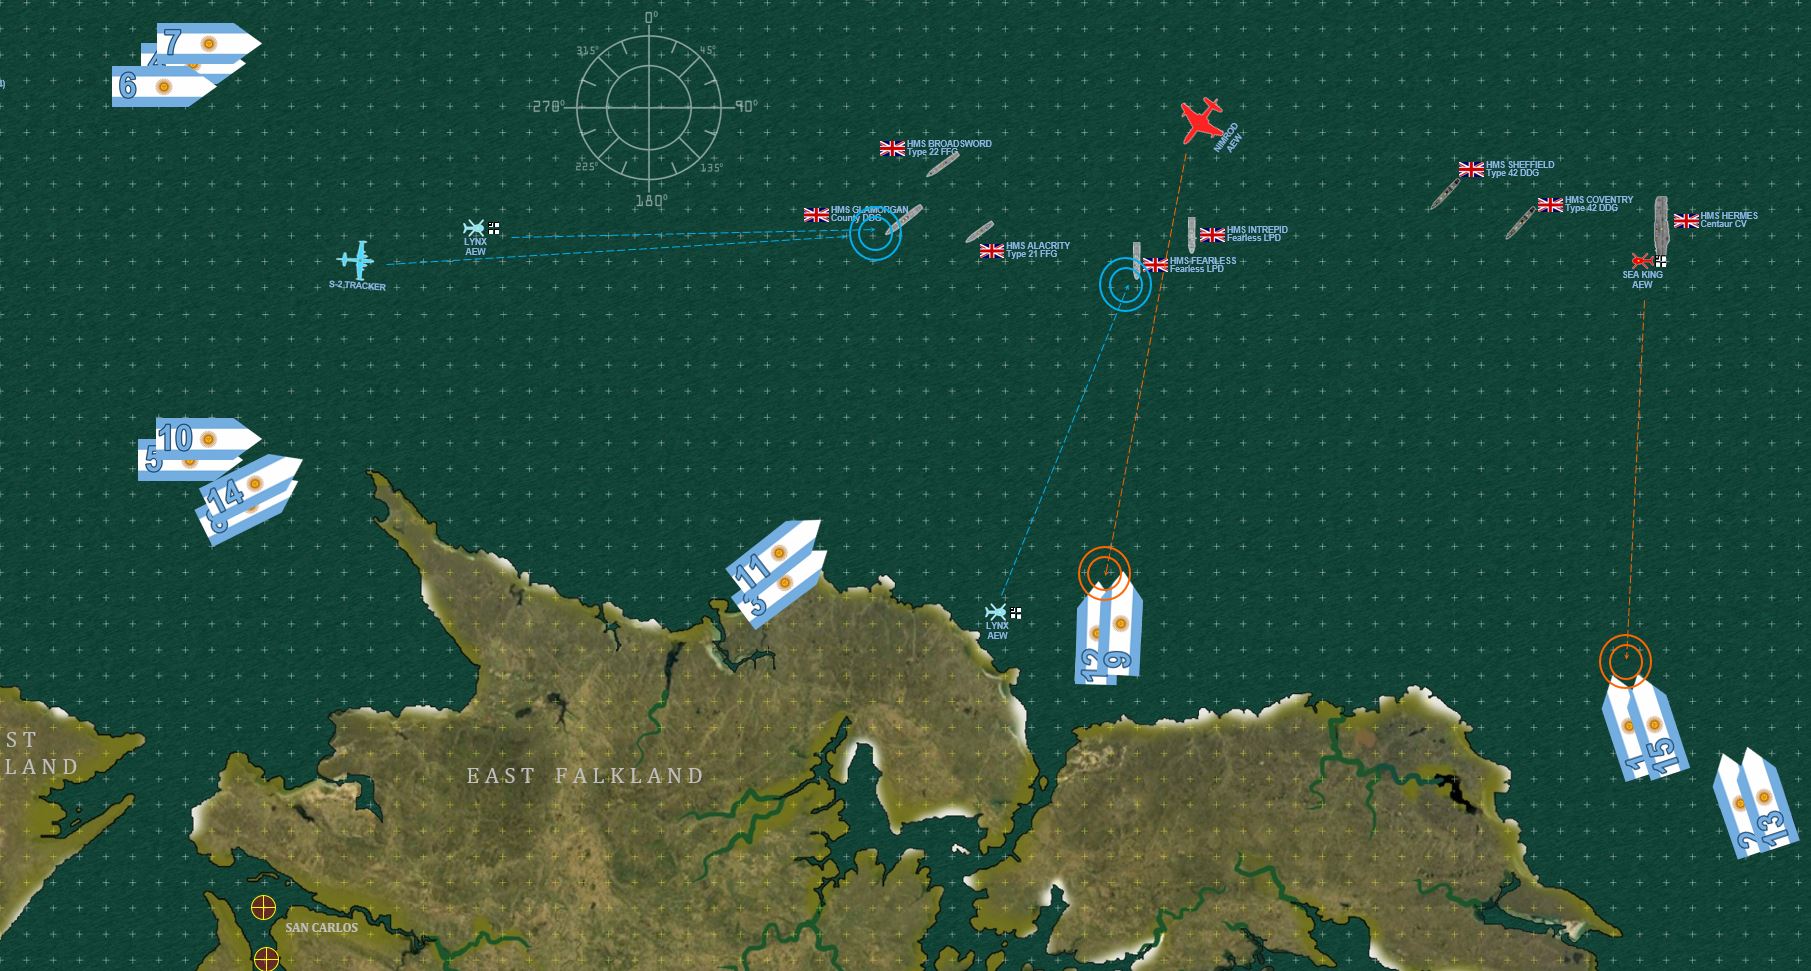 The end of movement on Turn 01. Notice that the Argentinian warships are under “blind” markers numbered 1-15. There are only six Argentinian warships on the table, which means nine of these are false. Elessar2590, as the British player, has to launch Sea King AEW helos and use his Nimrod AEW search aircraft to fix and identify these potential targets, filtering out the false signals and locking down the true targets, then engaging with surface warships or aircraft from HMS Hermes. The Argentinian player (me) must also “detect” British warships or LPDs before they are eligible to be attacked. Detection is EVERYTHING in modern naval warfare, the ranges of modern missiles and the lethality of modern payloads are such that everything hits, everything kills, everything dies … the only real protection you have is electronic warfare and keeping yourself hidden while fixing the enemy first. This means, in a word … HELICOPTERS. Given the scale of modern naval warfare engagement ranges (up to 600NM) and the speed of ships (30+ knots), the only way for a warship to conduct any kind of meaningful search is AEW-equipped helos (AEW = Airborne Early Warning).
 Just to have a bit of fun, those nine “false” Argentinian ship positions, when their signals are detected by Elessar’s AEW / search assets and revealed, have funny little “Easter Eggs” beneath them that show what he has in fact found … instead of any of my Argentinian destroyers or corvettes. :D Here’s hoping for lots of “Sexy Mermaids.”
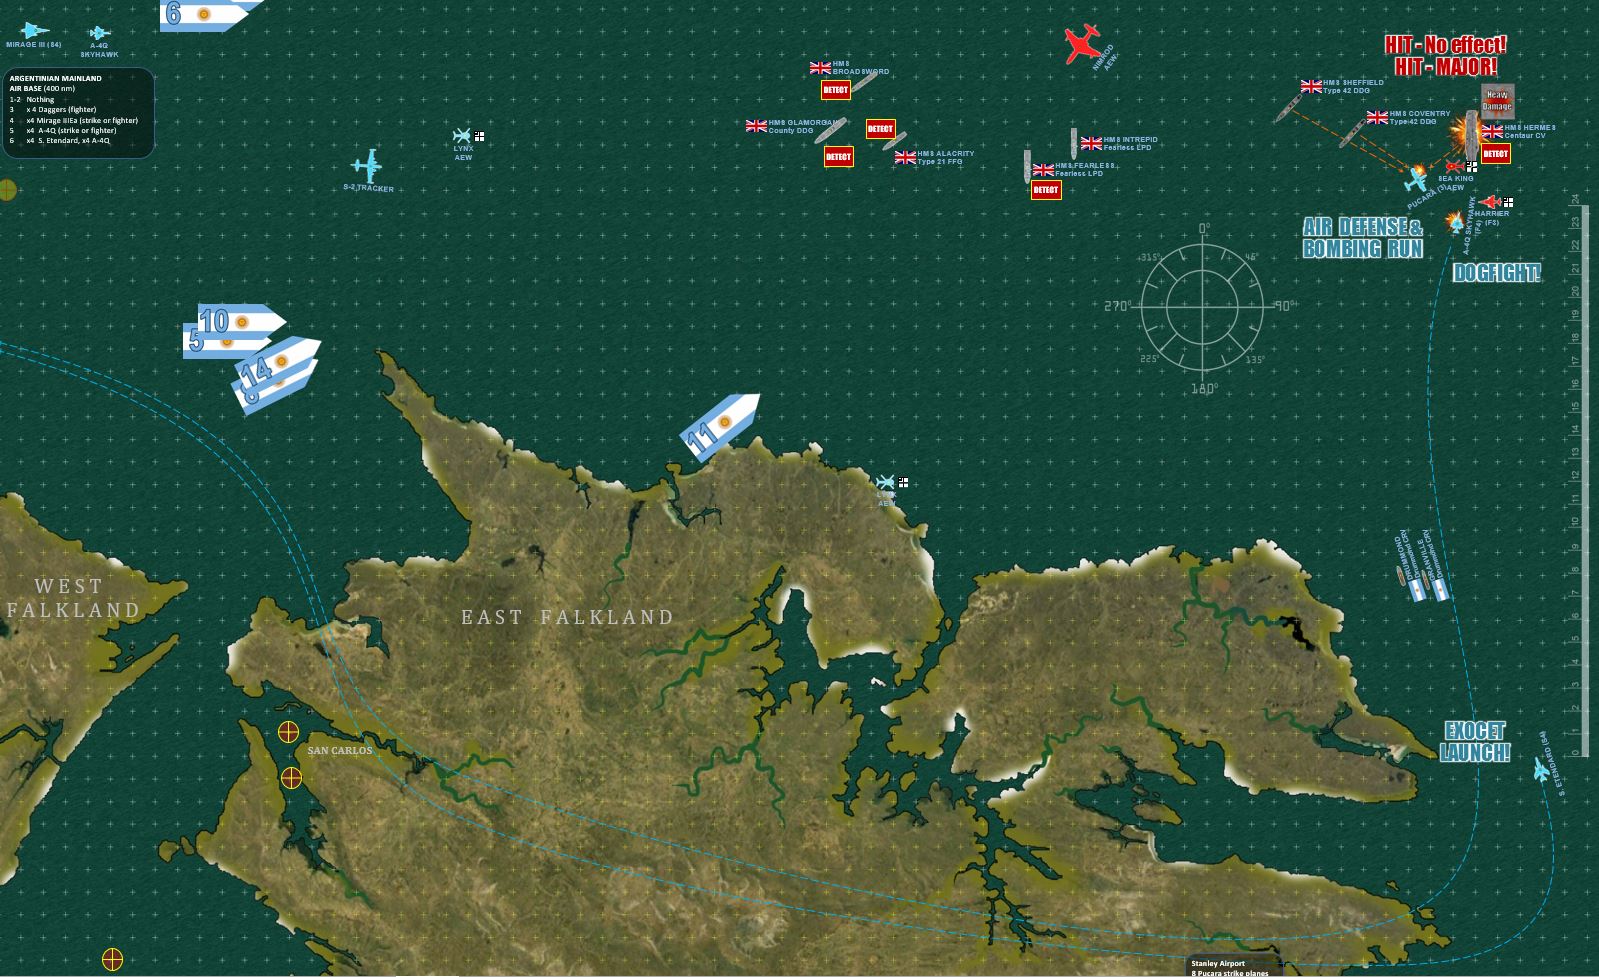 So this game loses NO time in getting started. After our initiative, detection, and navigation phases, the Argentinian attack phase begins with a “6” on that aircraft arrival chart. Rolled on camera, and yes, it’s the best possible roll. I’ll never get an opportunity like this again, so I go for broke. The four “Super Entendard” naval strike craft and four A-4Q “Skyhawk” carrier fighter-bombers streak in, dip way south over East Falkland Island, and turn north over the Port Stanley Airport at lower right. This circuitous route is to stay more than 24” away from the three Sea Harriers Elessar launched from the deck of HMS Hermes (CAP interception range). I also launch four Pucara COIN aircraft from Port Stanley and put all twelve aircraft on a do-or-die strike on HMS Hermes. Again, I’ll never get another chance like this, not only does Elessar not really have a lot of Harriers launched yet, but almost no one has their active sensors switched on (a conscious choice to remain hidden as long as possible). While this would normally help Hermes stay hidden, it h ow hampers her air defense systems. GOOD NEWS FIRST – the four Super Entendards launch their four AS-39 “Exocent” antiship missiles. Note they launch from more than 24” inches away from the Harriers (Exocets have an 80” range). One fails to lock on and splashes. Two are shot down, one by HMS Hermes and one by HMS Sheffield. The fourth one hits, but I only roll a “2” on 1d10+3 damage, resulting in 5 total, not enough to cause significant damage to HMS Hermes. She can still make full steam, has full weapons and sensors, and more importantly, operate a full flight deck.
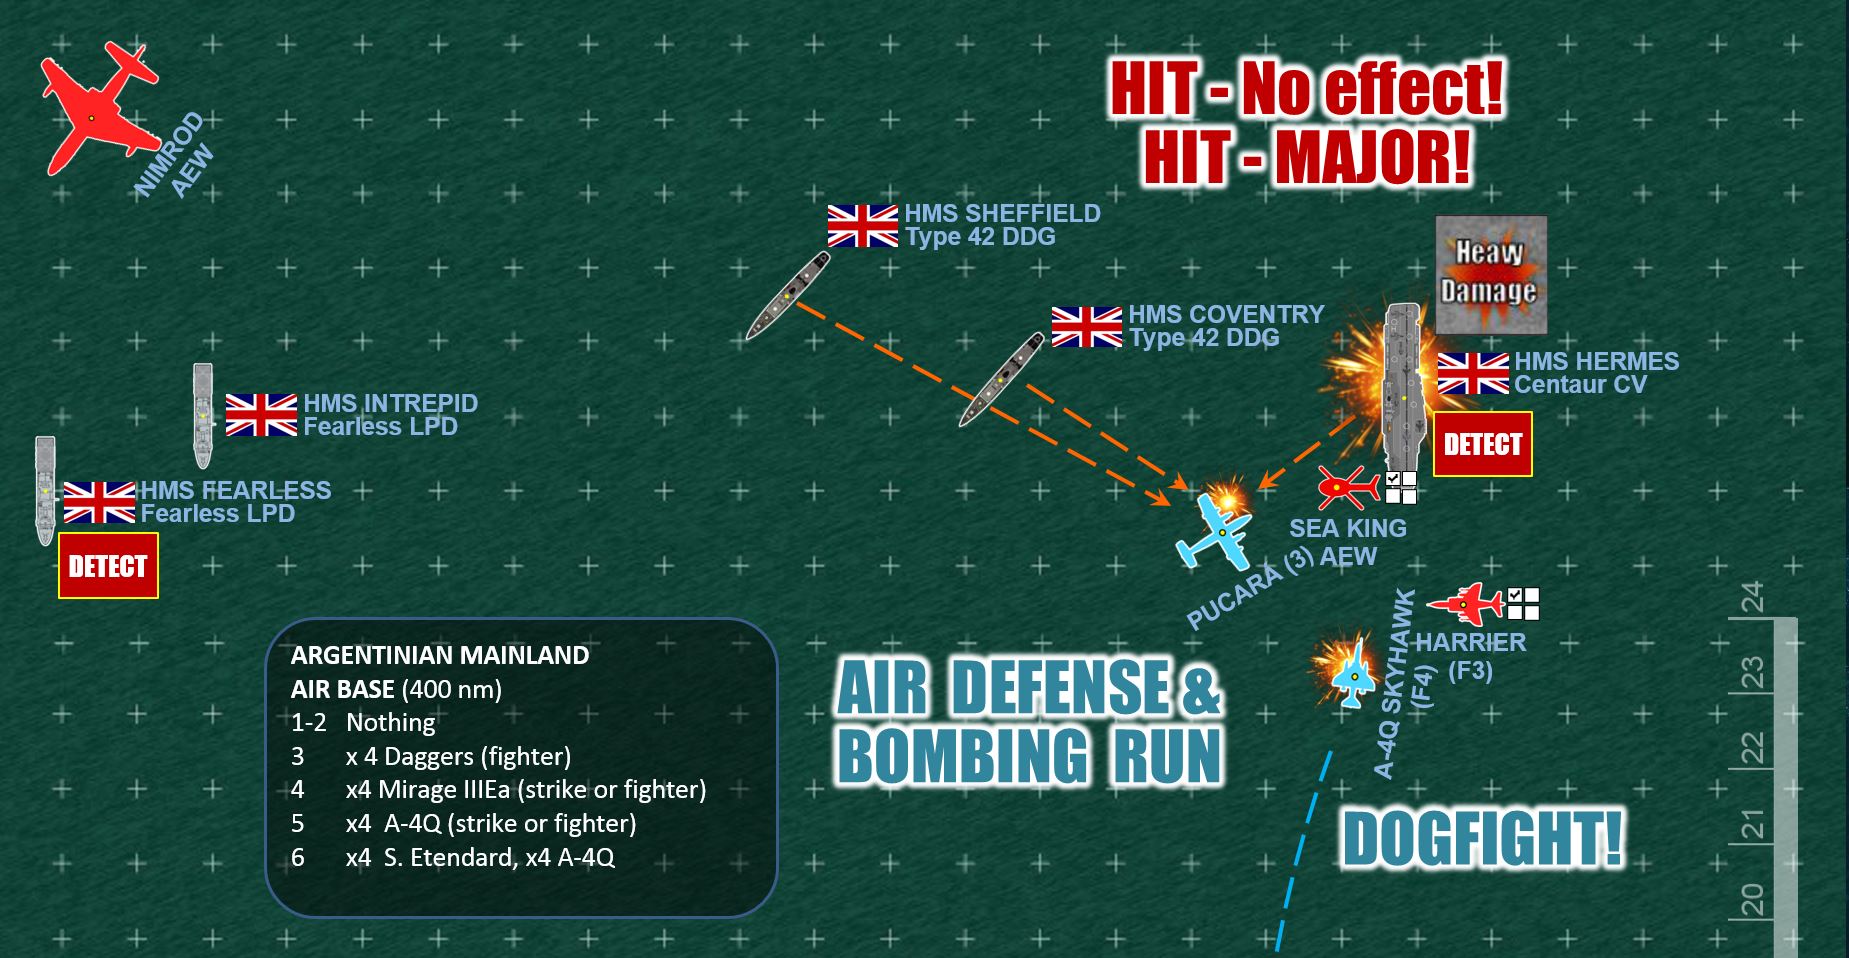 Zooming in, however, we can see where the Hermes’ luck runs out later that same attack phase. The escorting Skyhawks go in for a bombing run. They are intercepted by the Harriers (the Skyhawks can’t avoid this, bombing range is 0”). The Harriers win the dogfight, fending off the Skyhawks and shooting one of them down. But this means that there’s no one to stop the Pucara counterinsurgency aircraft. The Hermes, Sheffield, and Coventry all get an air defense roll, which is now -1 because this is their second air defense roll (first was shooting down those Exocets). One Pucara is shot down but three more get through, and all three hit with bombs. Two bombs don’t do enough damage to register (each ship has a “light damage” and a “heavy damage” threshold) – but the third bomb rolls a 10, +4 = 14, easily enough to cause a HEAVY DAMAGE counter on the Hermes. BOOM. Hermes isn’t sunk, but she’s definitely got major issues including half speed, and NO FLIGHT DECK. She can’t even recover the Harriers and Sea Knight helos she’s already launched.
 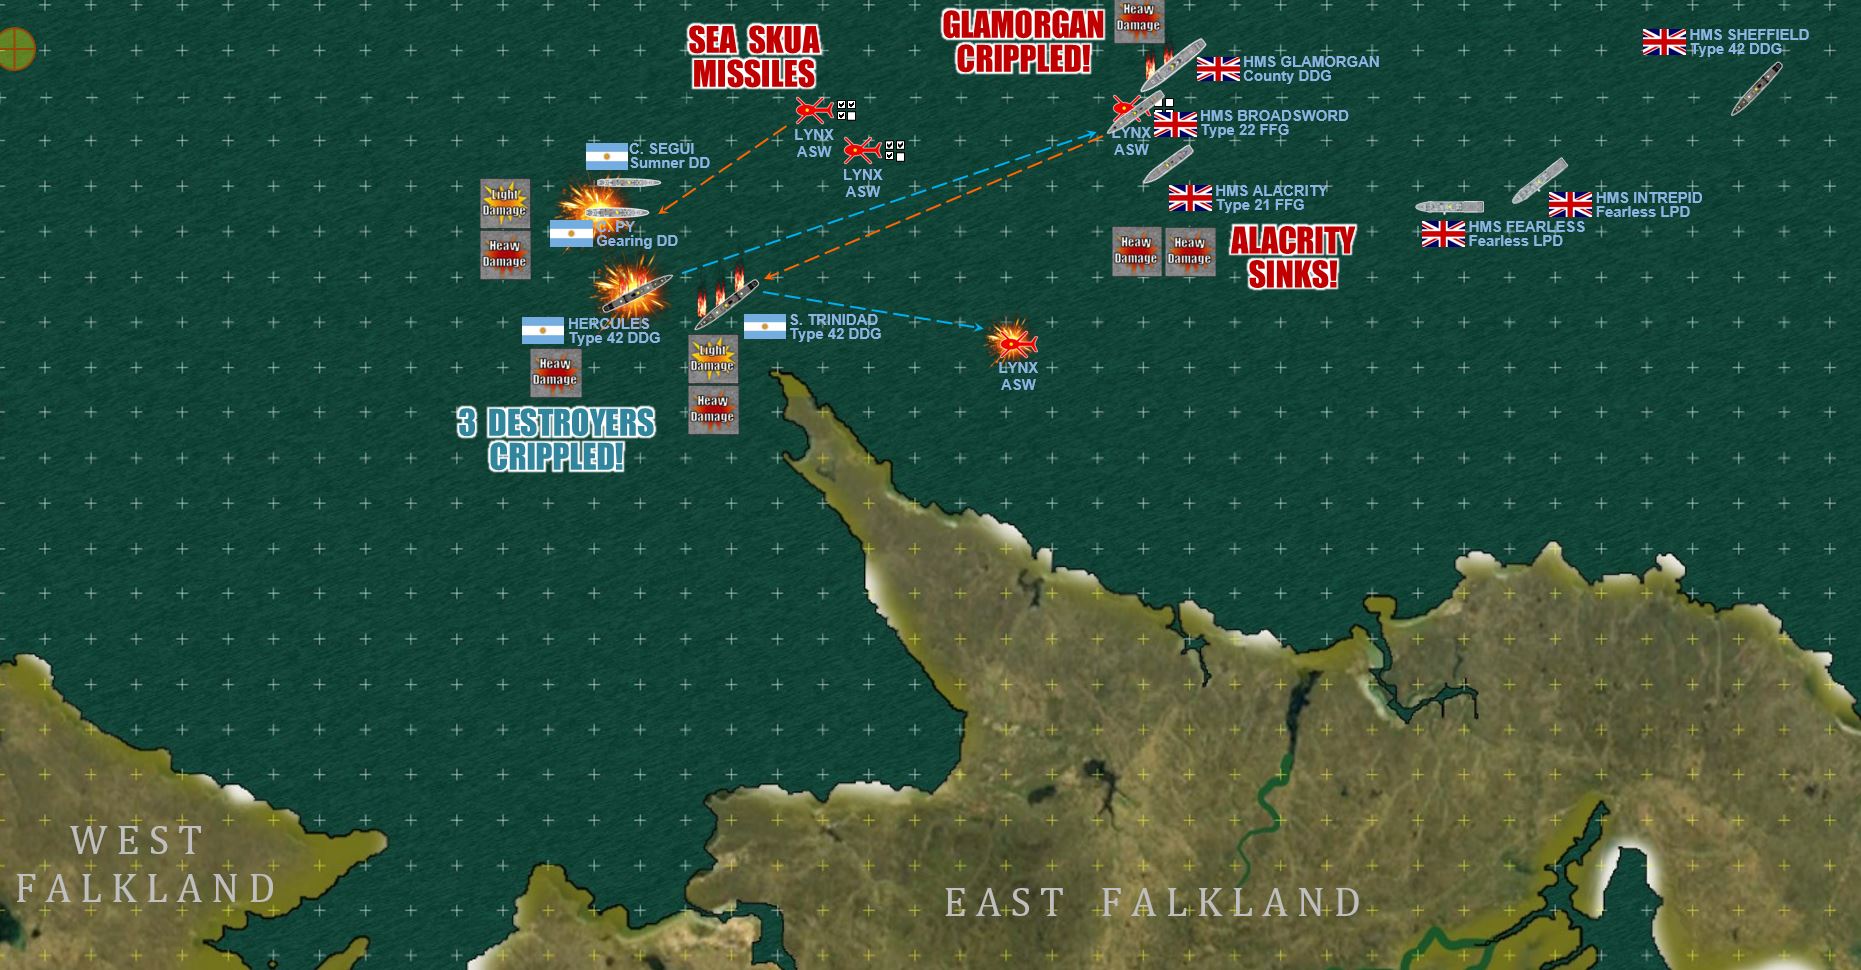 By the end of Turn 3, another major battle has erupted near the opening of Falkland Sound (generally speaking, the channel of water between East and West Falkland Islands). Here, Argentinian destroyers (one Allen M. Sumner Class, one Gearing Class, two Type 42 Class) actually engage in SURFACE combat against destroyer HMS Glamorgan, and frigates HMS Broadsword and Alacrity. I honestly wasn’t expecting this, but oddly both sides are more or less devoid of aircraft right now. The Argentinians rolls a 1 and a 2 on the next two aircraft arrival checks. The Hermes is burning, and the Harriers that are airborne are protecting her and were launched with an interception mission package anyway. The first Pucara element (3 survivors) have landed at Port Stanley on Turn 2. Turn 3 sees the other four Pucaras launched (Port Stanley can only launch / recover four aircraft a turn) but the Harriers and HMS Coventry make short work of them. This means that here, we have, almost unbelievably, a SURFACE GUNNERY duel in 1982 between British and Argentinian destroyers and frigates (4.5” guns, 5” guns, and guided torpedoes). The one exception are the Lynx helos launched from Alacrity, Broadsword, Glamorgan, and the approaching Sheffield, carrying “Sea Skua” short range missiles. The Argentinian destroyer Hercules is something of a hero ship here, shooting down one of the helos, other missiles, and outright SINKING frigate HMS Alacrity. But the British are of course responding, especially HMS Broadsword, and they quickly cripple many of the Argentinian warships. Note that once a ship has a single “Heavy Hit” counter on it, it can no longer use any primary weapons. So Elessar’s objective here is to put at least one Heavy Hit on all my destroyers, while maintaining at least one of his ships without one. That’s going to be the winner here, and what determines whether HMS Fearless and Intrepid get into Falkland Sound and San Carlos Water.
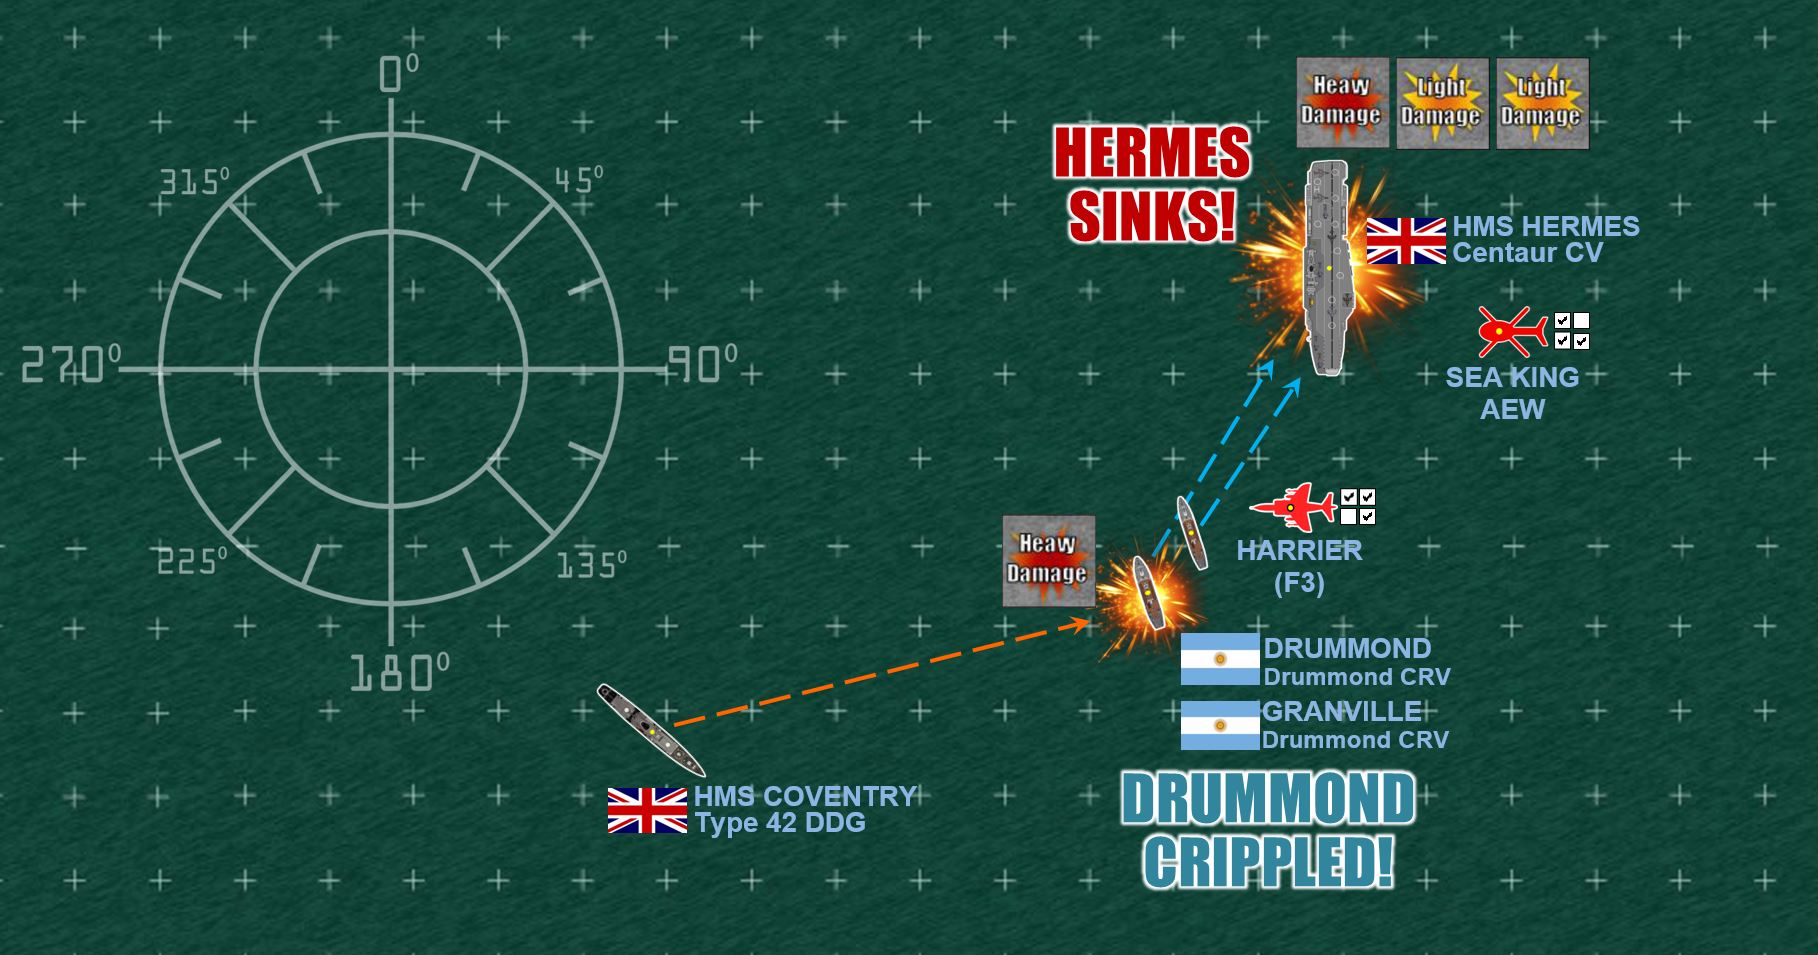 Pretty sure that I will lose that destroyer battle to the west, I send in my two corvettes on a mad attempt to win a moral victory by putting just one more “Heavy Hit” (or two “Light Hits”) on the damaged HMS Hermes. It’s probably going to cost me both ships in the end, but I do get two more Light Hits, and Hermes fails both damage control checks (you can make damage control checks on light damage but not heavy damage). Hermes is an irrecoverable wreck and will probably be scuttled in the coming hours or days, if she’s not sinking already. One more flight of four Mirages arrives on Turn 4, I decide on two fighters and two strike loads. The two strike loads are shot down long before they reach the HMS Fearless, and the fighters don’t want to tangle with three Harriers (even if the Harriers will have to pull out this turn due to fuel to make it back to emergency landings on HMS Invincible somewhere).
 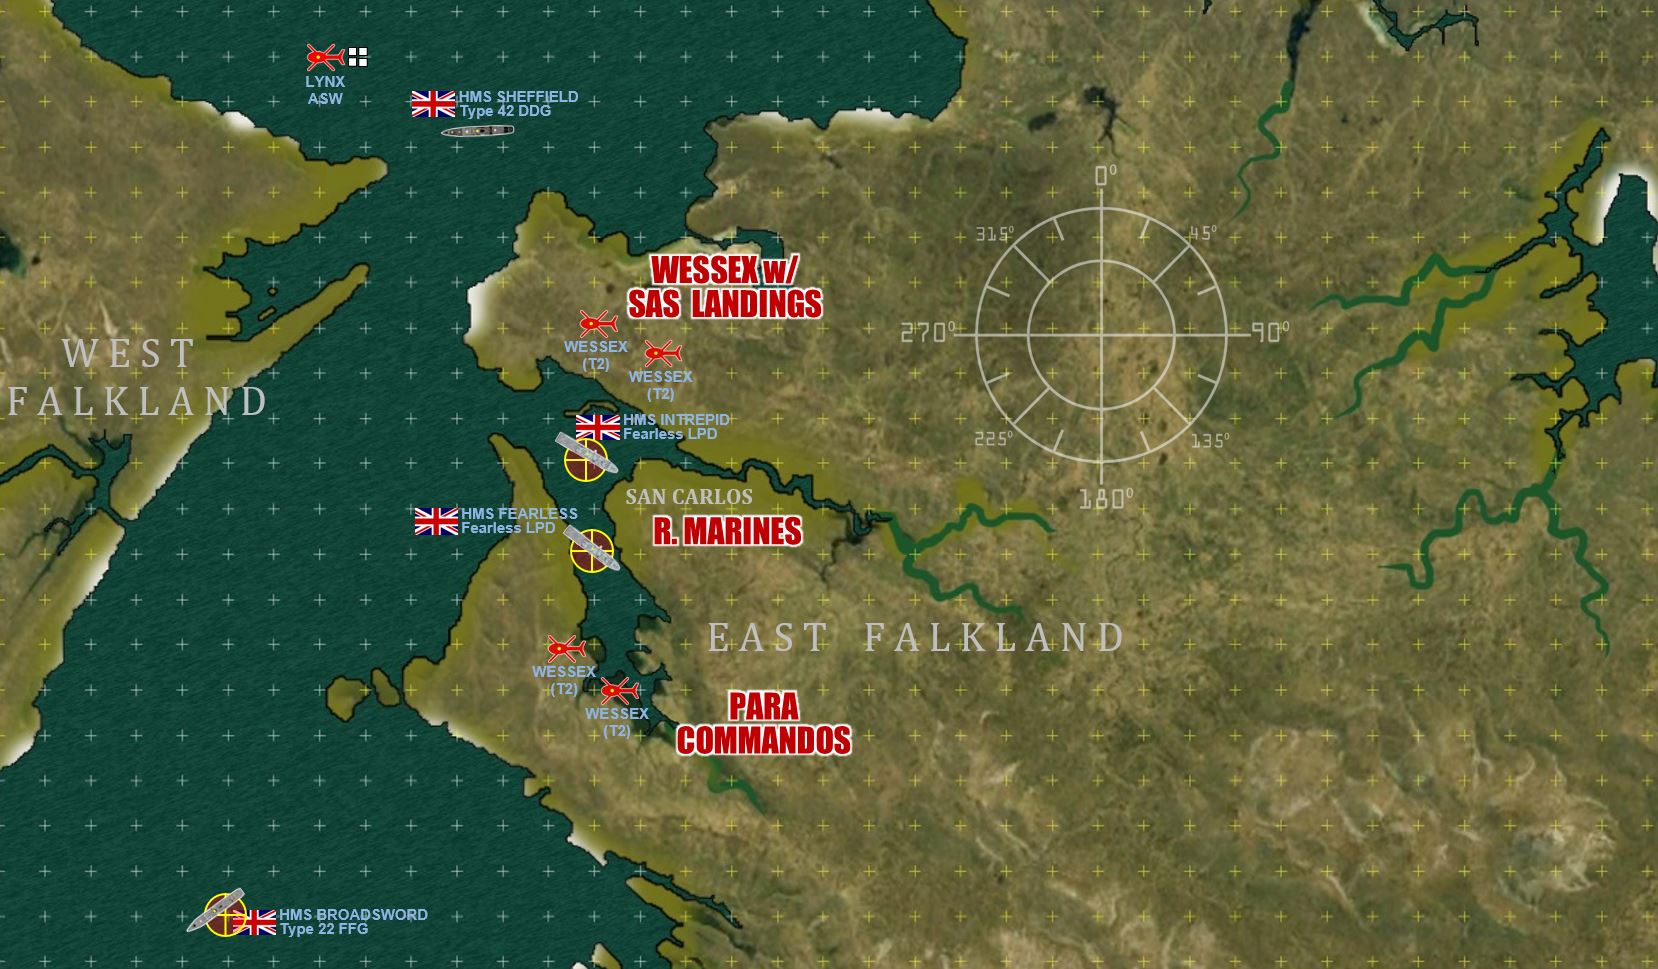 Sure enough, HMS Broadsword puts more damage into the old American WW2 Sumner-class destroyer ARA Comodoro Segui (my last destroyer) and finally leaves her crippled without guns. While no Argentinian ships actually sink (at least not yet), all four destroyers are now bereft of main armament and basically helpless before HMS Broadsword and even worse, HMS Sheffield right behind. This leaves the channel open for HMS Fearless and Intrepid to raise steam for flank speed into the channel, launching Wessex transport birds to carry SAS teams to the high ground overlooking the landing zones. The objective hexes are all reached, with HMS Broadsword confirming that Falkland Sound is NOT mined and HMS Sheffield north mouth of the south in case the Argentinians send in more warships or (more likely) aircraft. This was Sheffield’s role more or less historically, and air defense picket ship engaging Argentinian aircraft and missiles from a standoff range from more vulnerable assets of the task force.
 So how did the game play out overall? The game was definitely an Argentinian win, but with some serious apologies and caveats. The Argentinians won because the British managed to make all the historical objectives (landing HMS Intrepid and Fearless at San Carlos, complete with Wessex transport birds dropping SAS on the high ground overlooking the landing zones for Royal Marines and Paras). British losses in San Carlos were a basically a frigate, which almost matches historically (in our game the British lost HMS Alacrity, historically it was her sistership HMS Ardent). The big difference was the loss of HMS Hermes, which obviously did NOT happen historically.
So here are the apologies and caveats.
One, this was totally an “alternate history” game where the Argentinian Navy mounted any kind of a stand at the Falklands. Historically, their surface fleet was withdrawn to port after the loss of ARA General Belgrano (2 May 1982). Just in putting ships like Santissima Trinidad and Hercules on the table, or really any Argentinian warships at all, is a massive break from the historical situation and a big “upgrade” to the Argentinian Navy’s performance in the war.
Two, HMS Hermes never really should have been this close to the combat zone. Carriers by definition stay hundreds of miles away from the enemy, launching aircraft. Harriers in this system have a 300” combat radius, meaning that HMS Hermes really should have been 200” further northeast, clearly off the table.
Three, even if HMS Hermes decided for whatever mad reason to come anywhere near this close to the actual Falklands, she would have had some aircraft already up, in a CAP role if nothing else. I should have stipulated that @elessar2590 could have started with some aircraft already airborne. This way, even if Hermes’ flight deck was devastated on Turn 1 as we’ve seen above, we would still have more Harriers available (at least as long as fuel allowed) to wreak devastating response on the Argentinian fleet. Although let’s be clear, with 8-10 Harriers up instead of 3, there’s just no way those Super Etendards or Pucaras land those hits.
Four, the Argentinians just got damned lucky. On camera I rolled that first “6” for the Argentinian aircraft arriving from the mainland, and then rolled 7s, 8, and 9s for damage (except that first Exocet). We mixed up the rules a couple of times and so ran the resolution several times until we got it right, the Hermes would up with two “Heavy Damage” counters every time. The old girl just could not catch a break.
So thanks very much to @elessar2590 for being a great sport, and helping out in our “guinea pig” experiment. 😀
LIVE STREAM AT 8PM EASTERN US – BUILDING ARMIES IN PHOTOSHOP
Visit our Sitrep Twitch Channel to check out our live streams, or catch up on hobby, battle reports, painting, and other great content!
UPDATE TO POST:
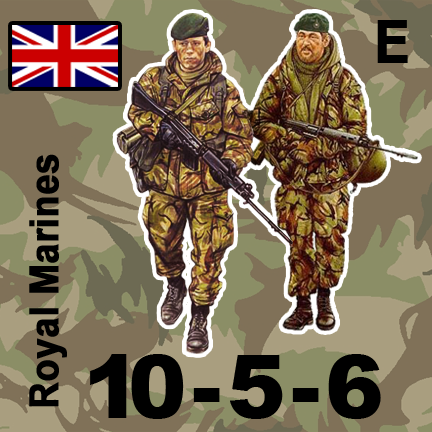
These are the two counters we created in the live stream. Many more to come! I still need to do:
- British Para Commandos (full and half squads)
- Leaders for Marines, Paras, (12 counters in all)
- British Support Weapons
- Argentinian Conscripts (full and half squads)
- Argentinian Officers (6 counters)
- Argentinian Support Weapons
- About 32-36 counters in all.
Falklands Live Game - 9PM UK time, 4PM US Eastern Time
Okay, the stage is set for our first play-test of Naval Command by Rory Crabb. I’ll be playing live against @elessar2590 tonight at 4PM US Eastern Time, 9PM UK time. If all goes well, the game will be streamed live on the Sitrep Podcast Twitch channel as well, so swing by and check us out! See if the British can repeat their success, or if the Argentinians will repel (or at least critically damage) the initial British landings on the Falklands!
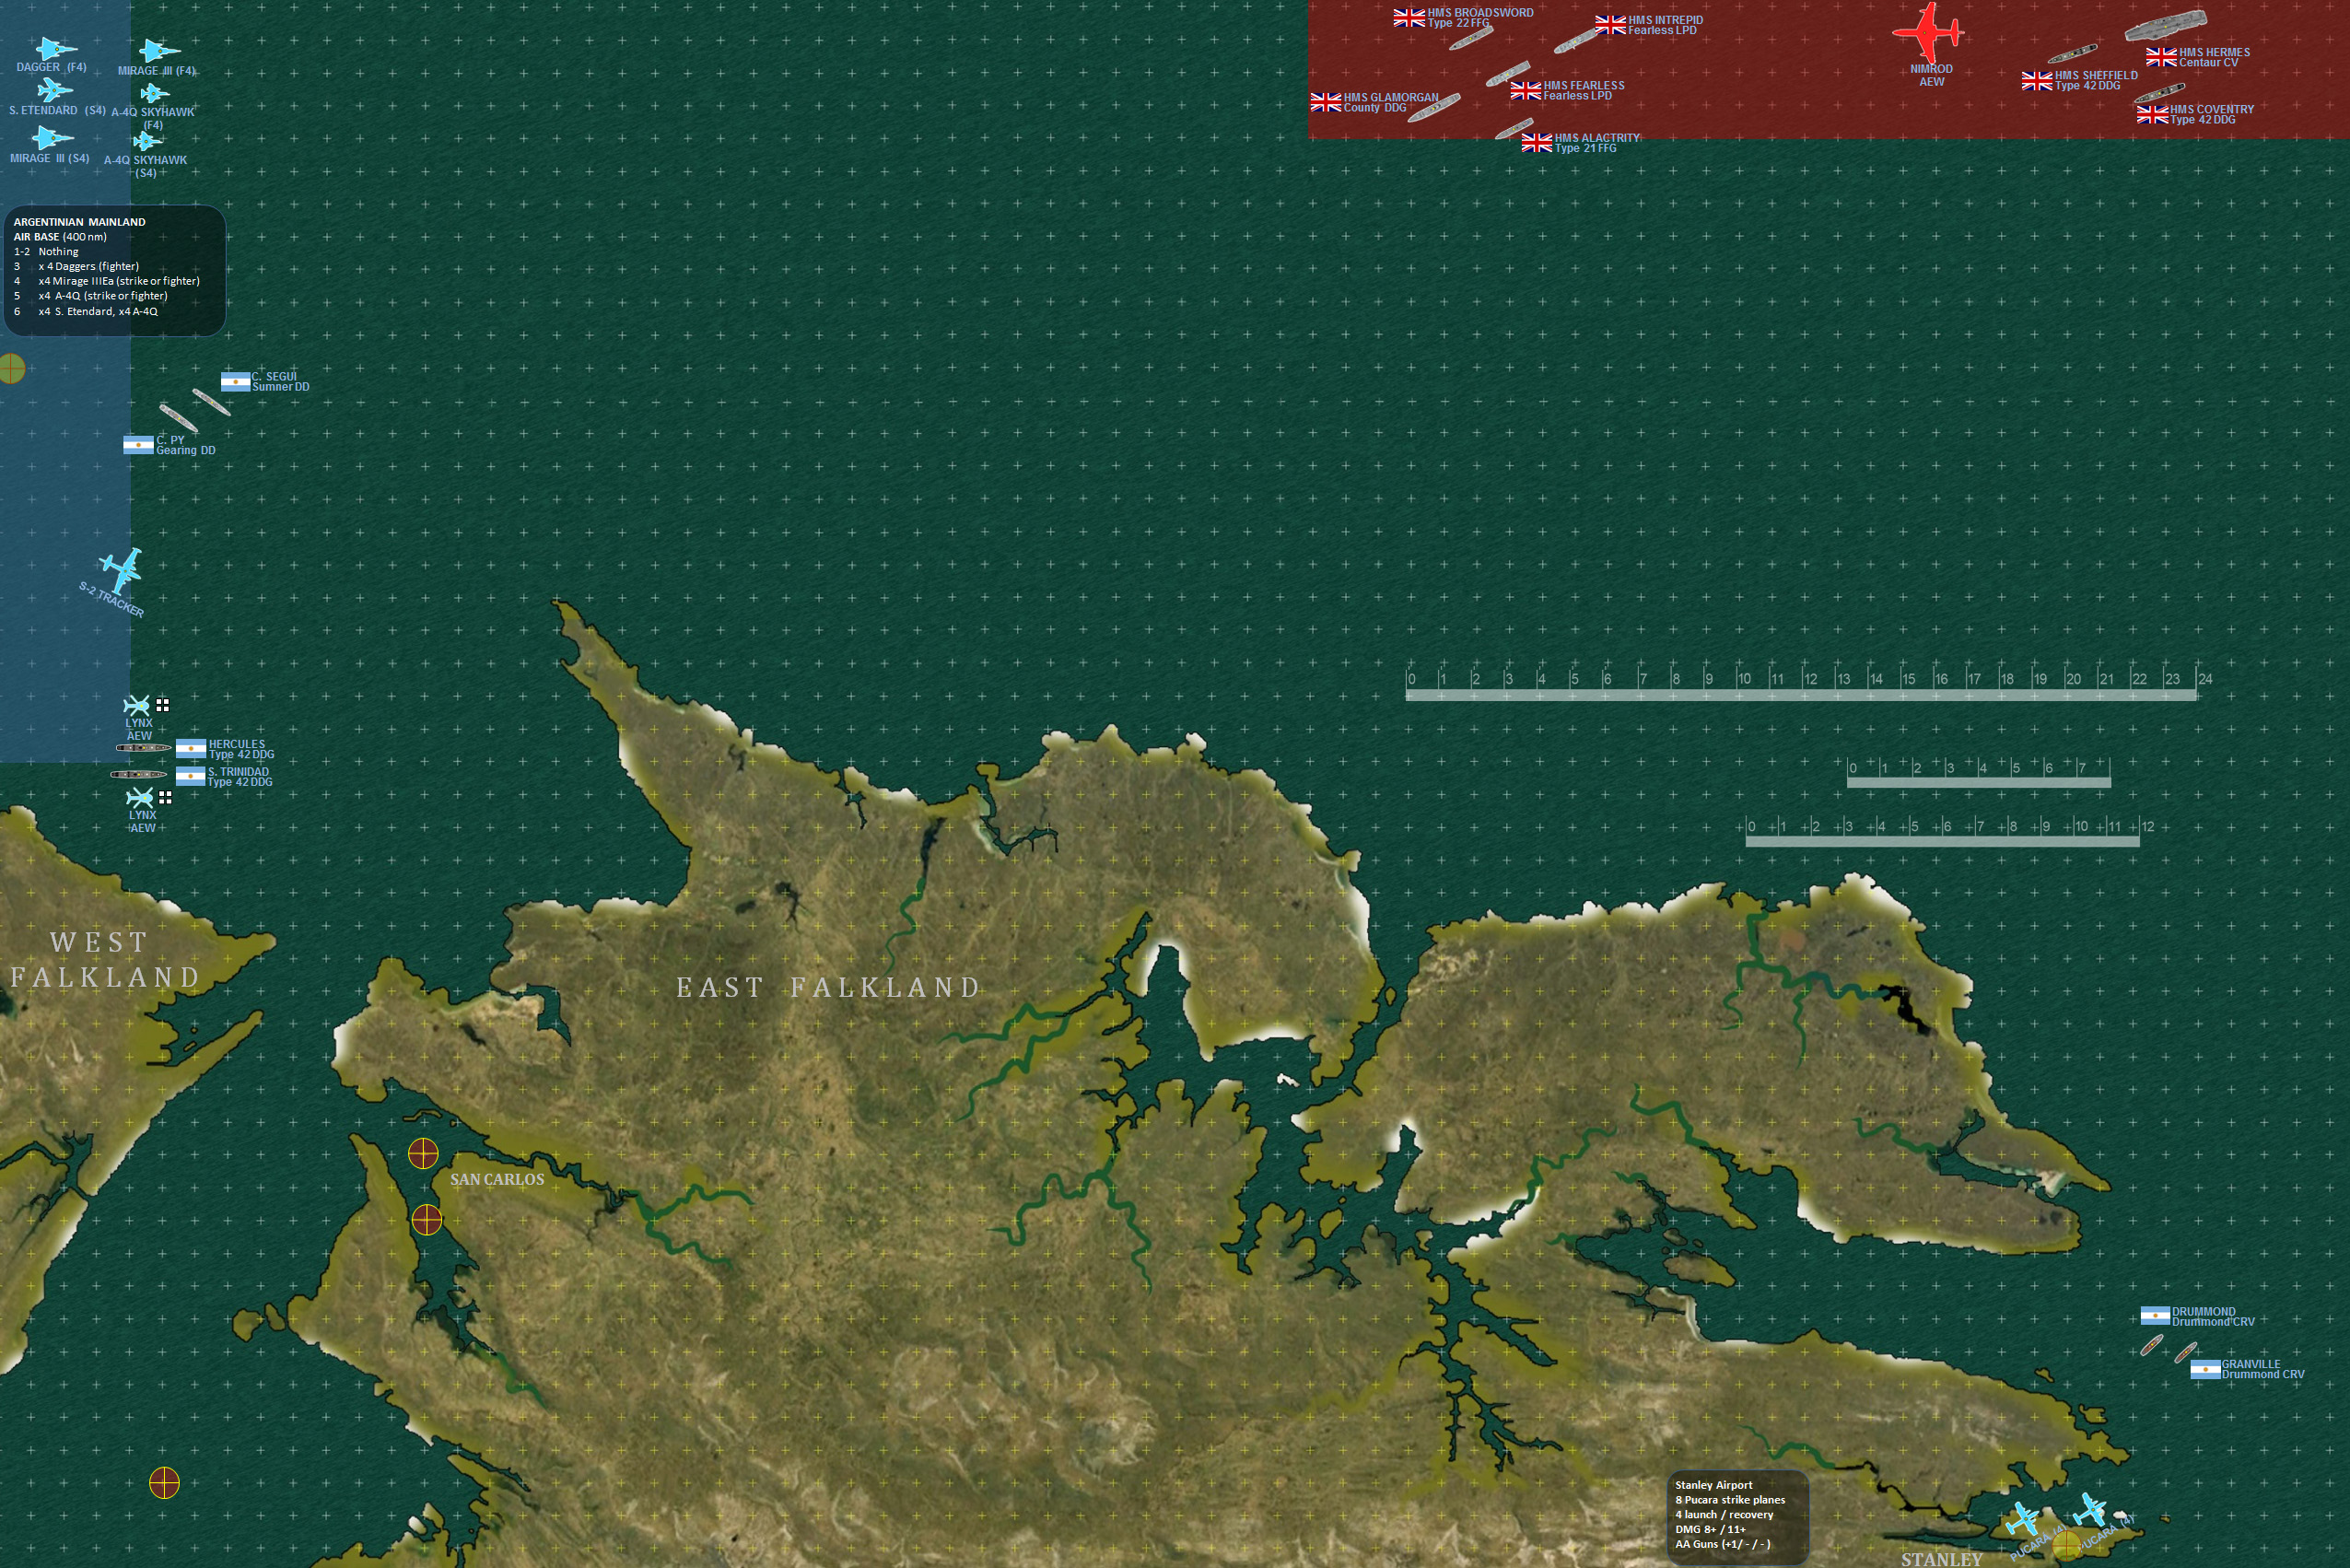 Our 6' x 4' (72 x 48 nautical miles) table for NAVAL COMMAND system. The British are trying to get the LPD assault ships HMS Fearless and HMS Intrepid into the San Carlos Channel off of Falkland Sound, where the initial historical landings took place. Argentinians have Pucara strike aircraft based on the damaged Port Stanley airport, lots more aircraft on their distant mainland bases almost 400 nm to the west. We're also giving the Argentinians a little buff here, putting a few ships in these waters when historically they had been withdrawn to port after the sinking of ARA Belgrano (2 May, 1982).