


75th Anniversary of the Battle of Monte Cassino and Northern Italy (Gaming The Battles)


Recommendations: 781
About the Project
BEST READ IN REVERSE ORDER! The project charts and recreates the battles of Monte Cassino, fought between January 1944 to May 1944, and the onward Allied push through Northern Italy.
Related Game: Flames of War: The World War II Miniatures Game
Related Company: Battlefront Miniatures
Related Genre: Historical
This Project is Active
Anzio - Second Table Top Battle Report (Turns 1 and 2)
Turn 1:
The Germans are attacking and so have the first turn.
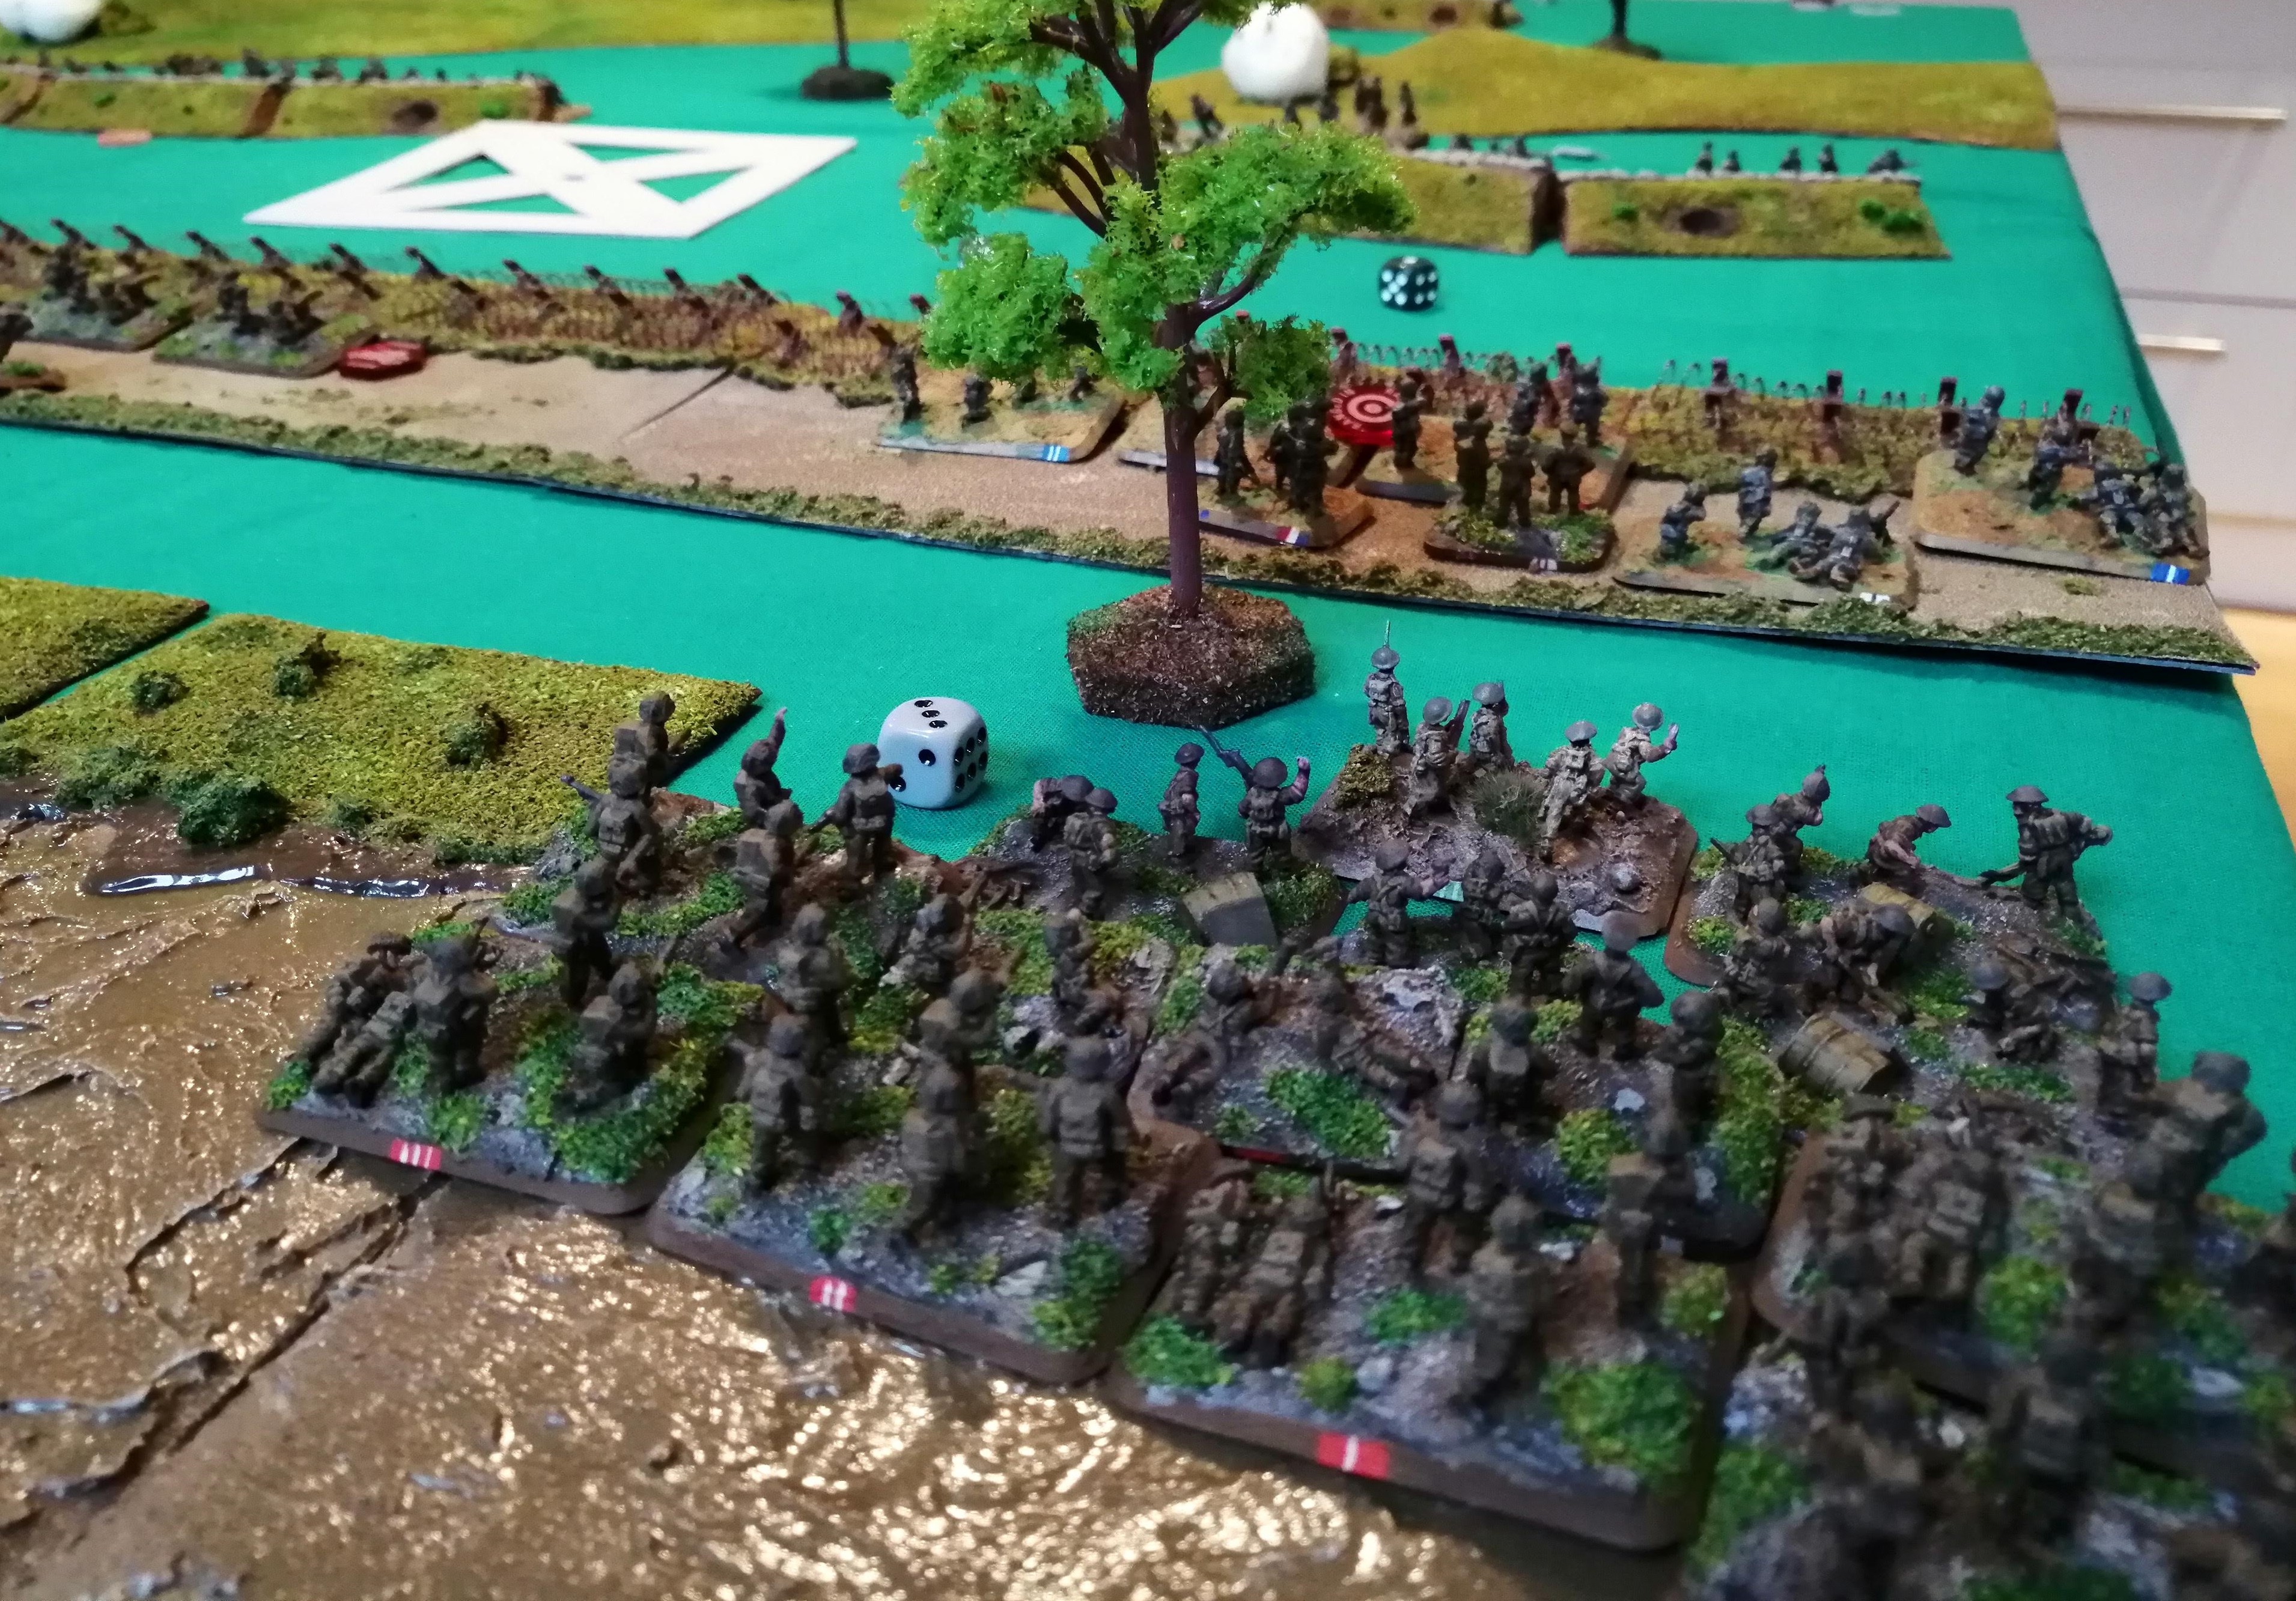
The immediate move is to push out of the pocket deployment zone. The two panzer platoons advance down the road. FBP advances toward the tree line and FGP advances southward toward the British cowering within the trees.
FBP is out of range so cannot shoot. FGP is able to lay some fire down upon SFOP but, thanks to the British being dug in, is unable to cause any damage. The lead tanks focus their fire upon the British units that can punch back, namely the anti tanks guns on the hill, but fail to cause any damage.
The British are well dug in and choose not to move their main forces apart from the Universal carriers that use their Dash Movement to charge ahead 32”.
Frustratingly for the British, their 6 pounder anti tank guns are just out of range of the German Panzers, so cannot fire this turn. SFOP is able to fire back from their fox holes in the woods upon FGP and with 6 shots, causes 1 base to be removed.
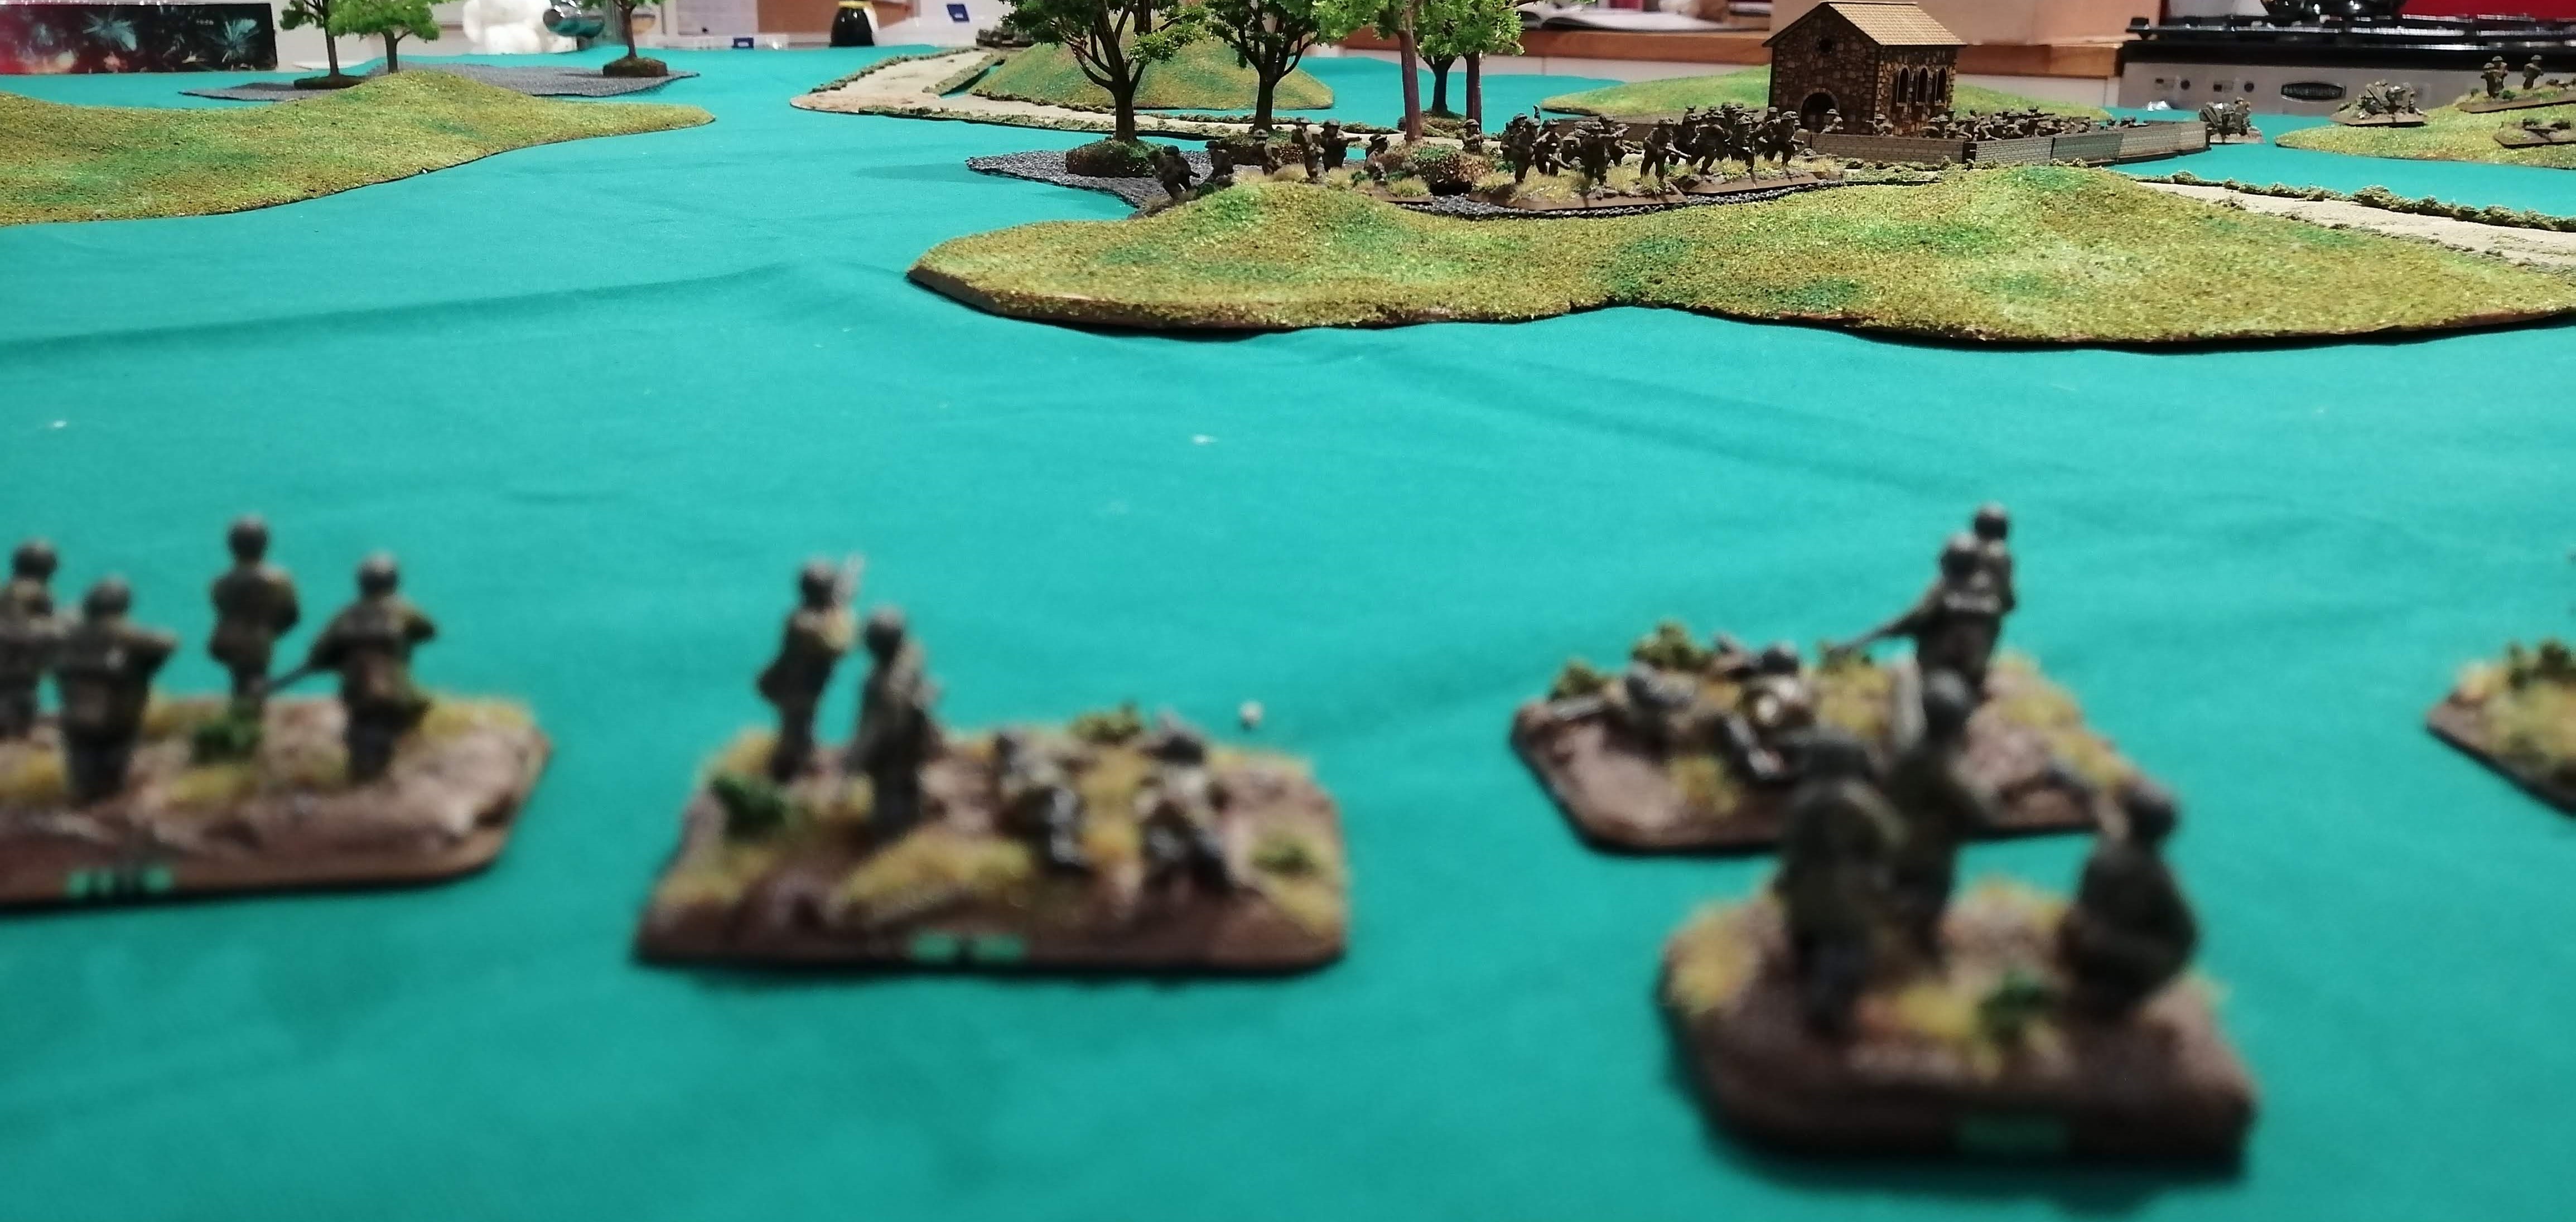
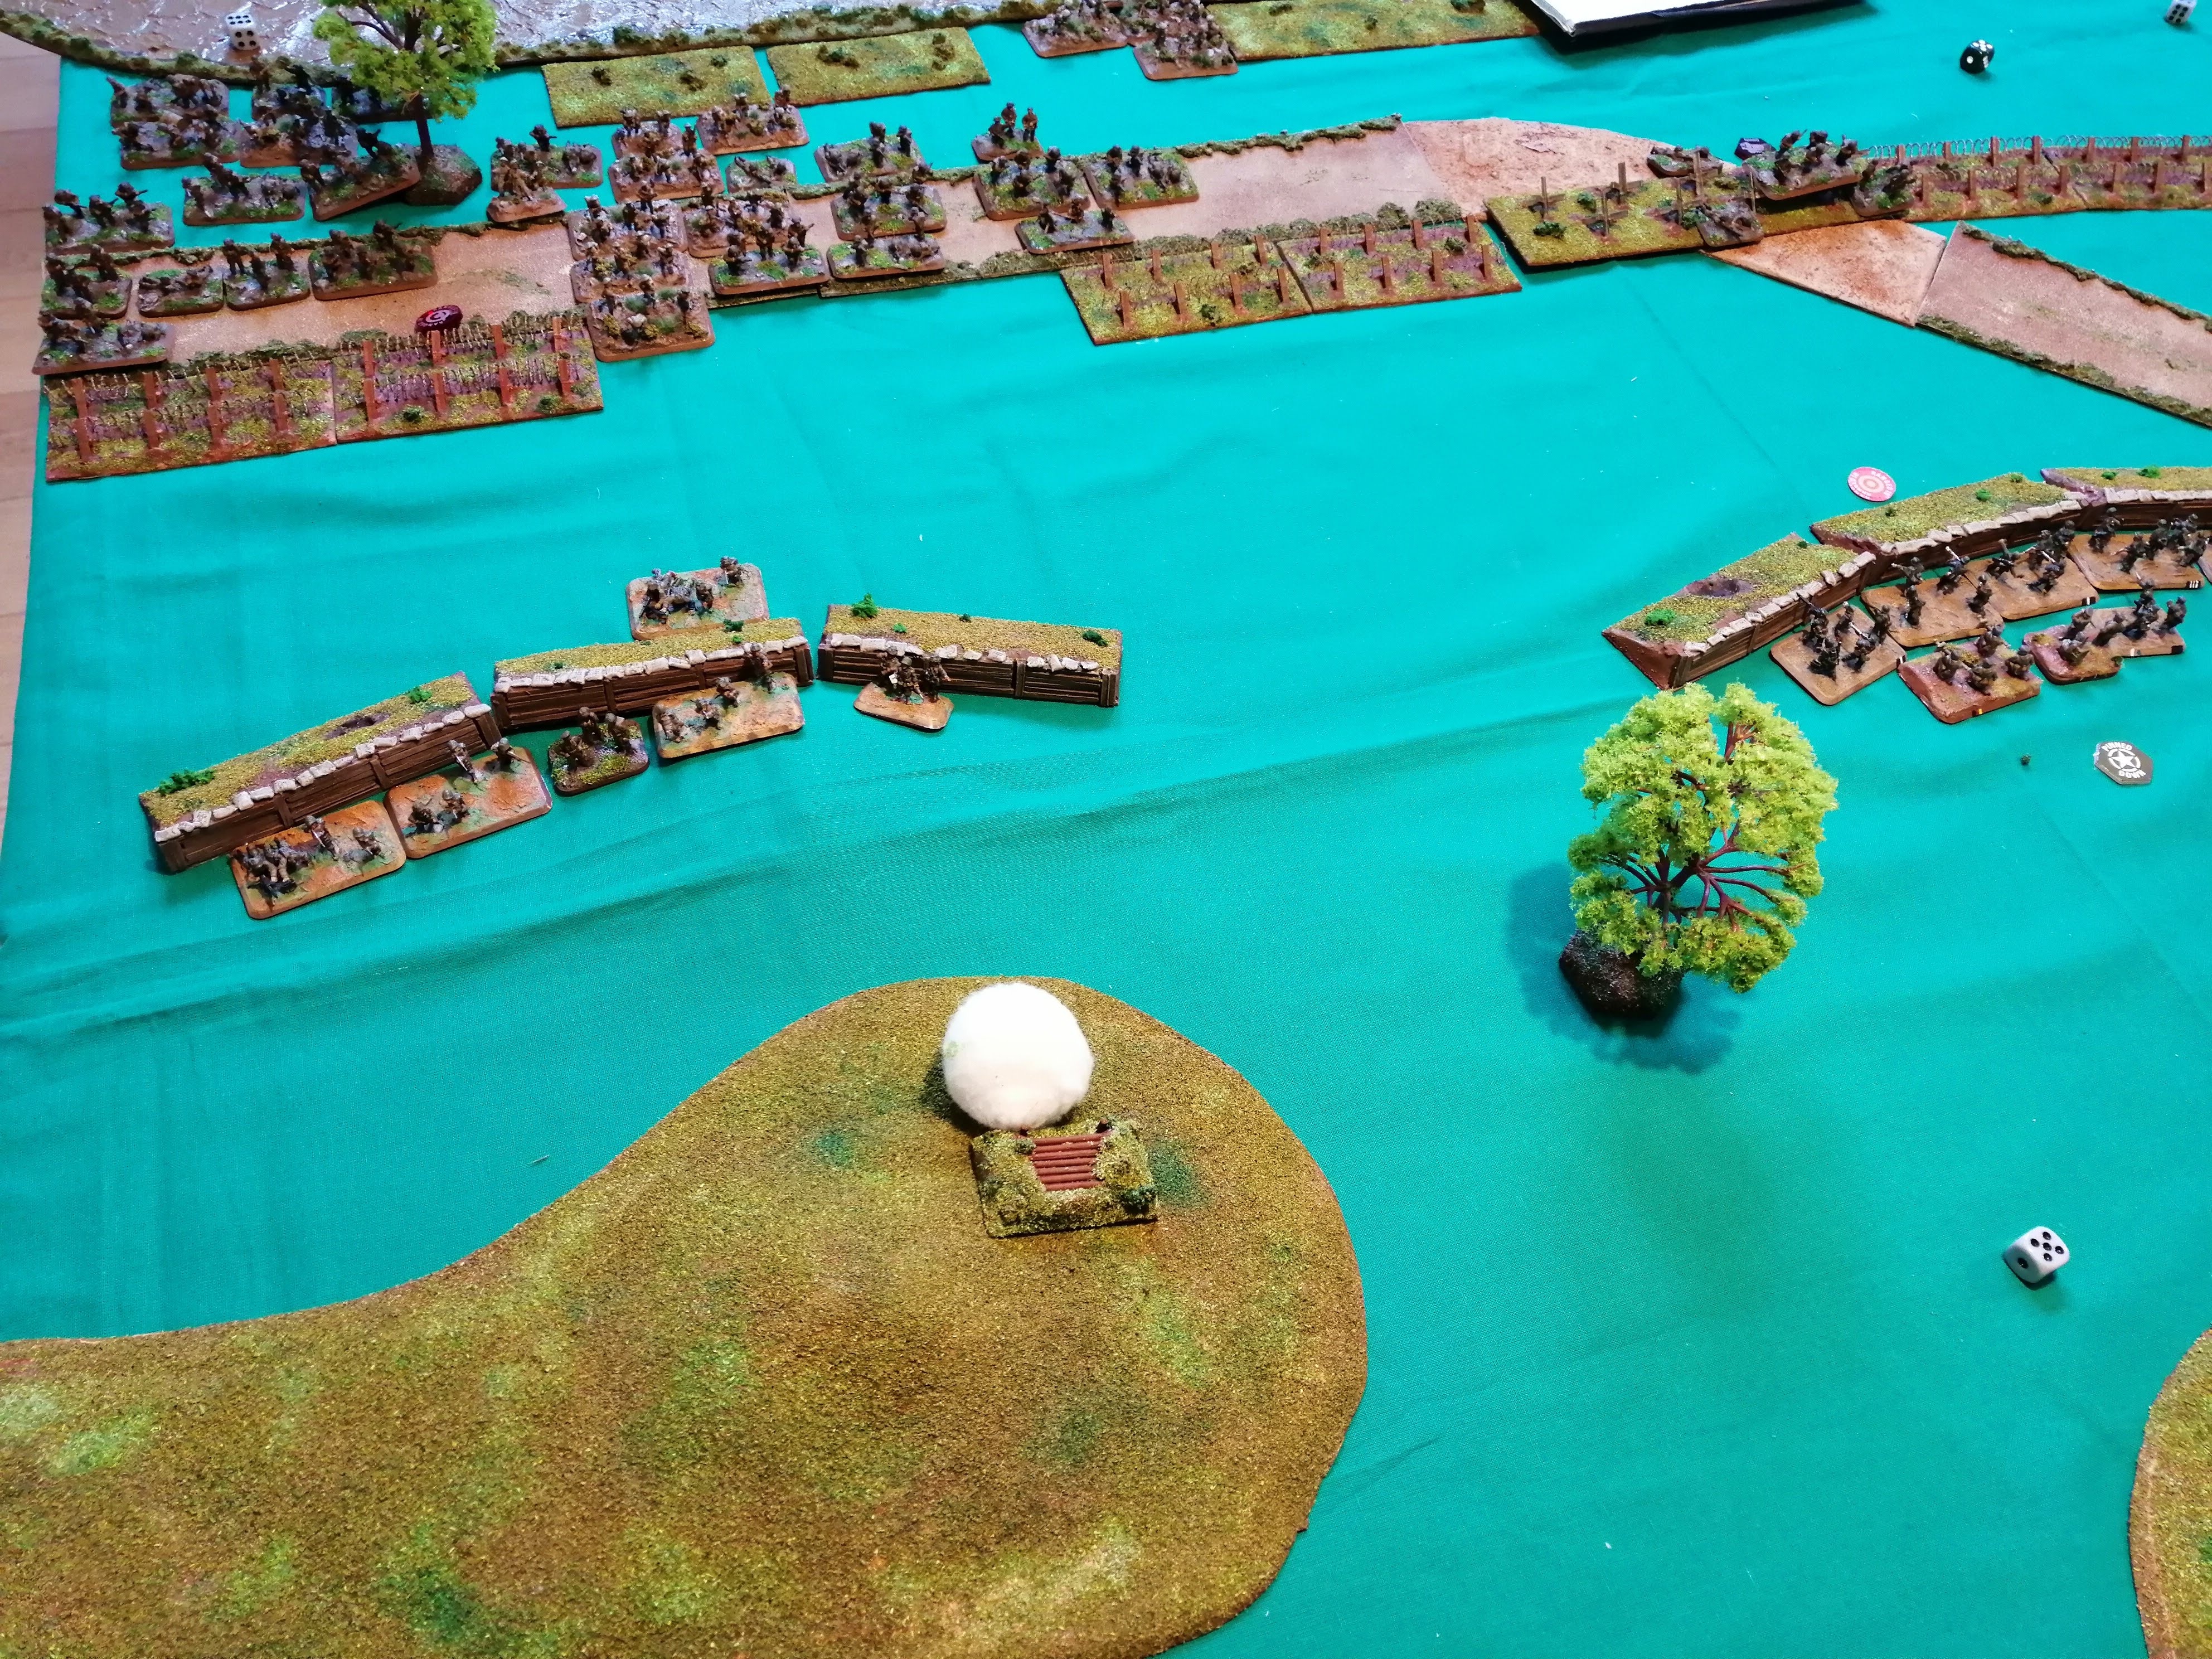
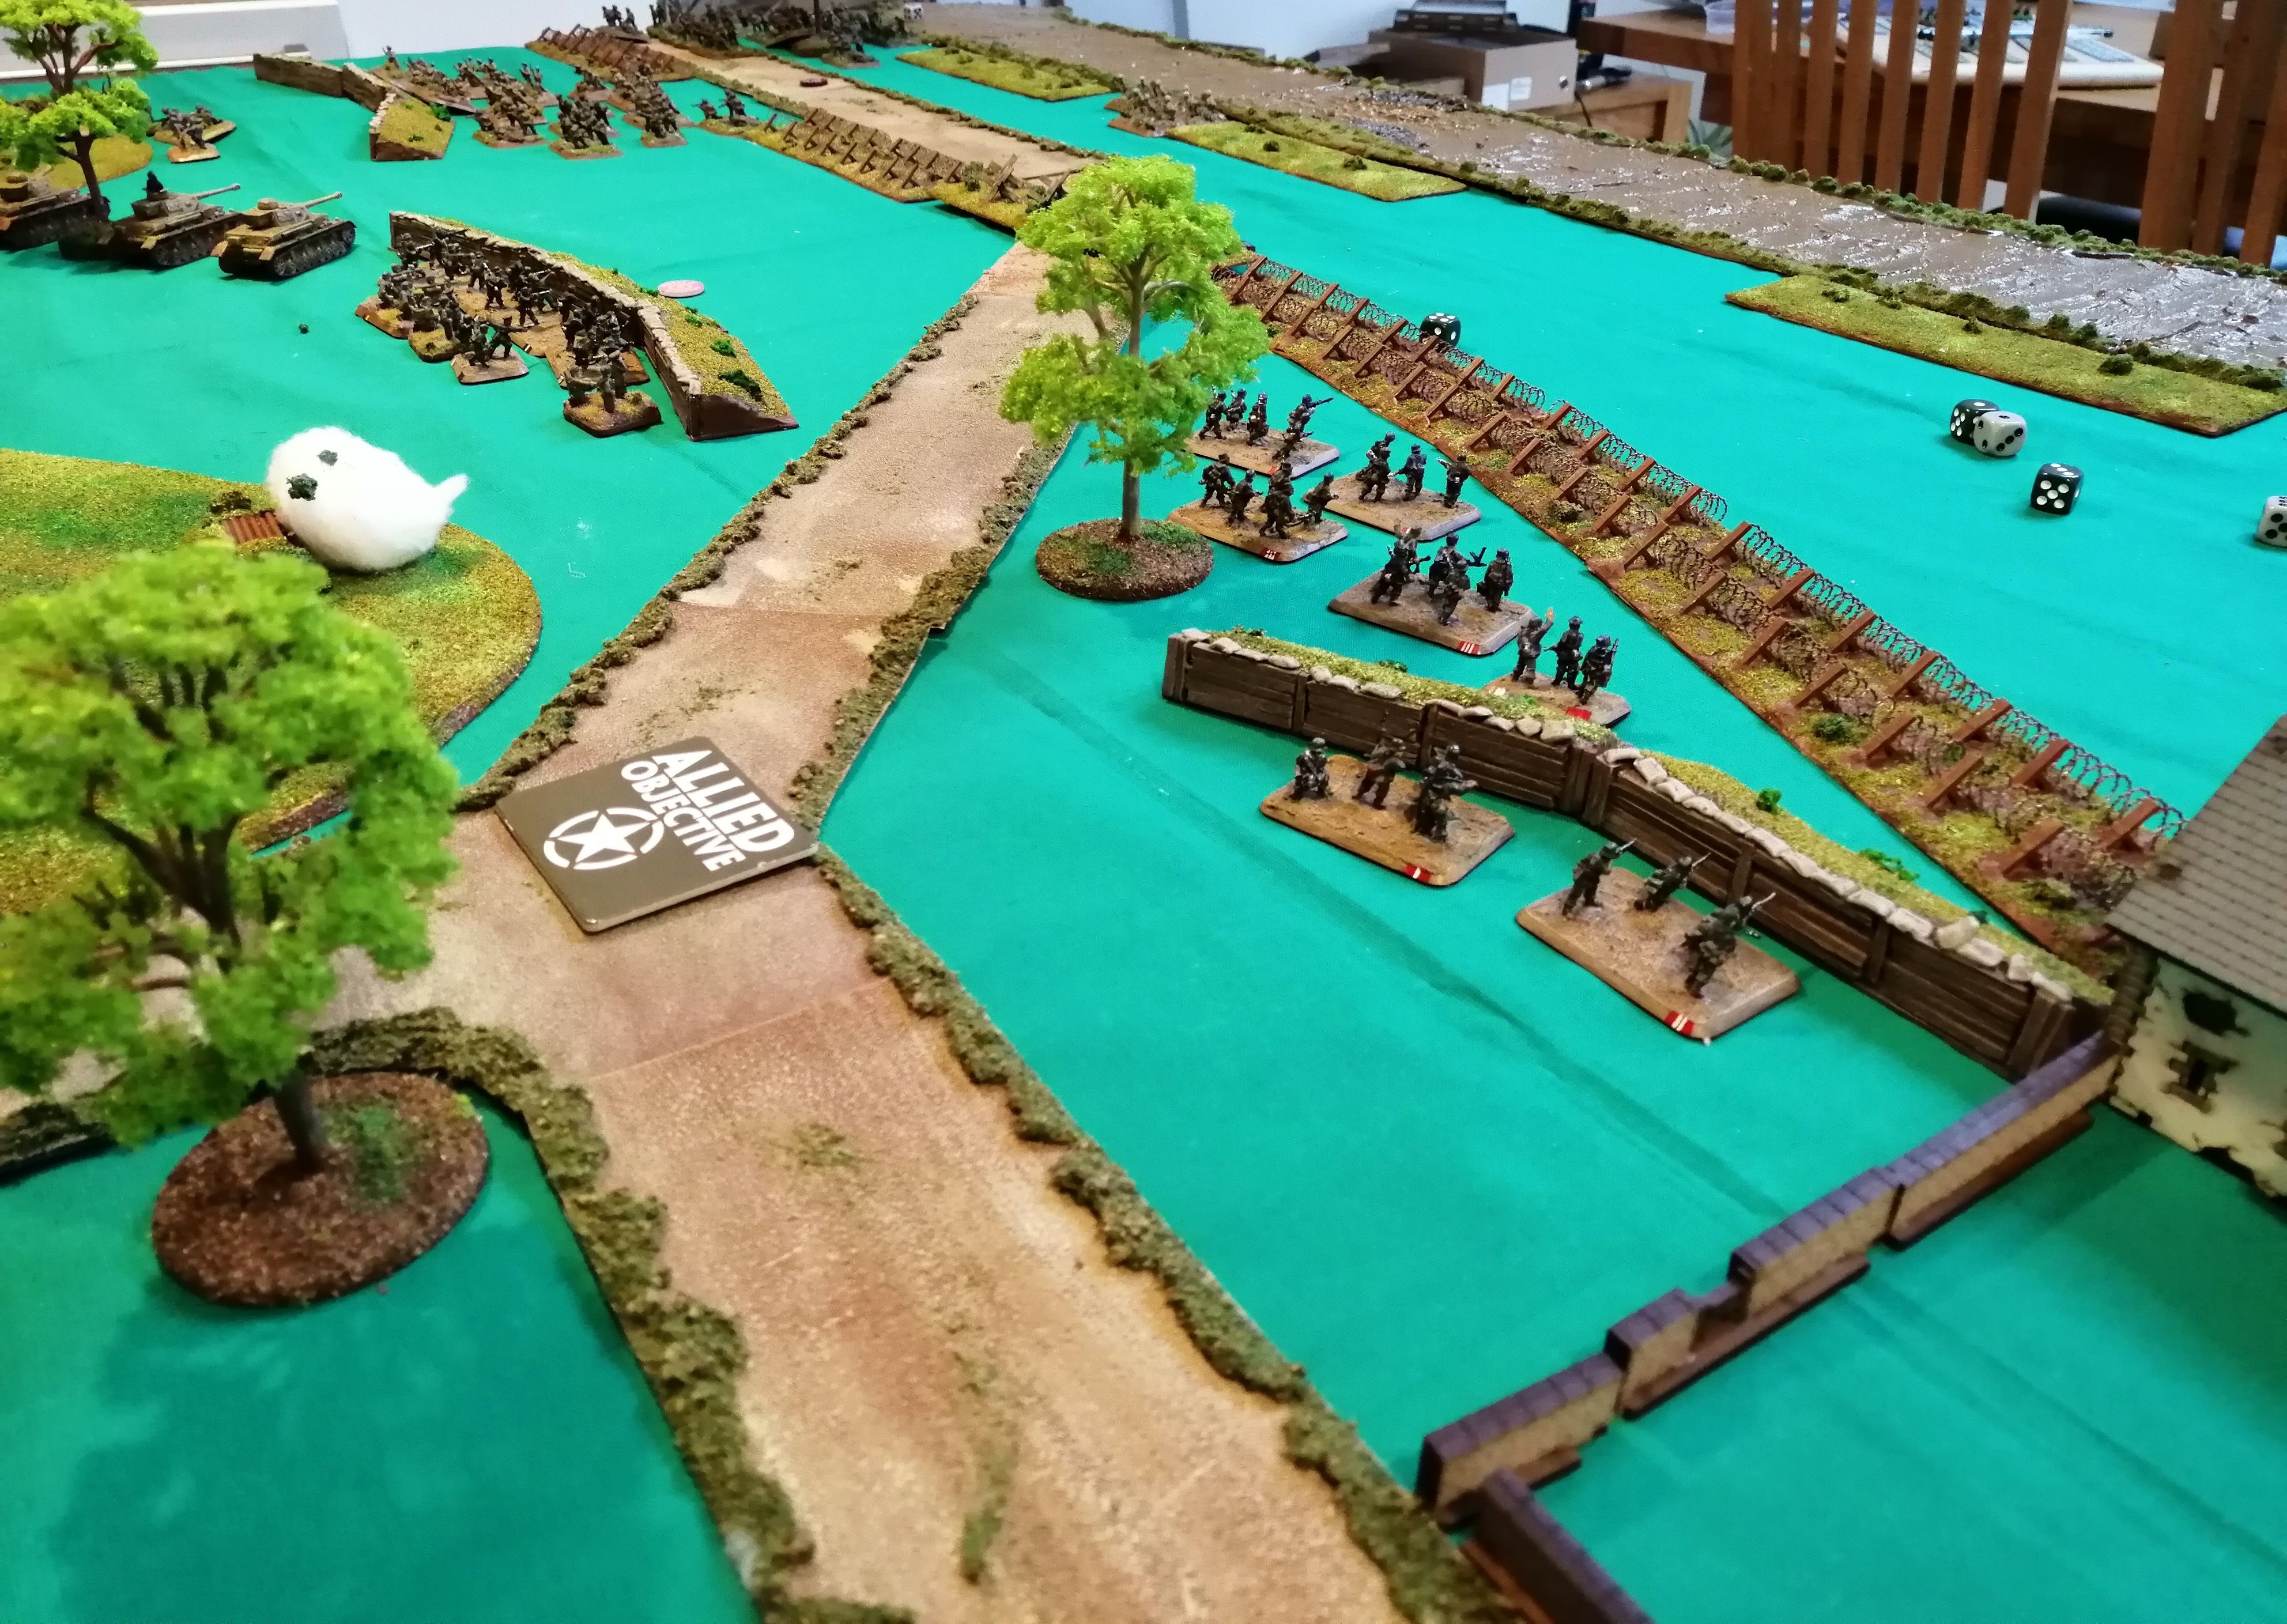
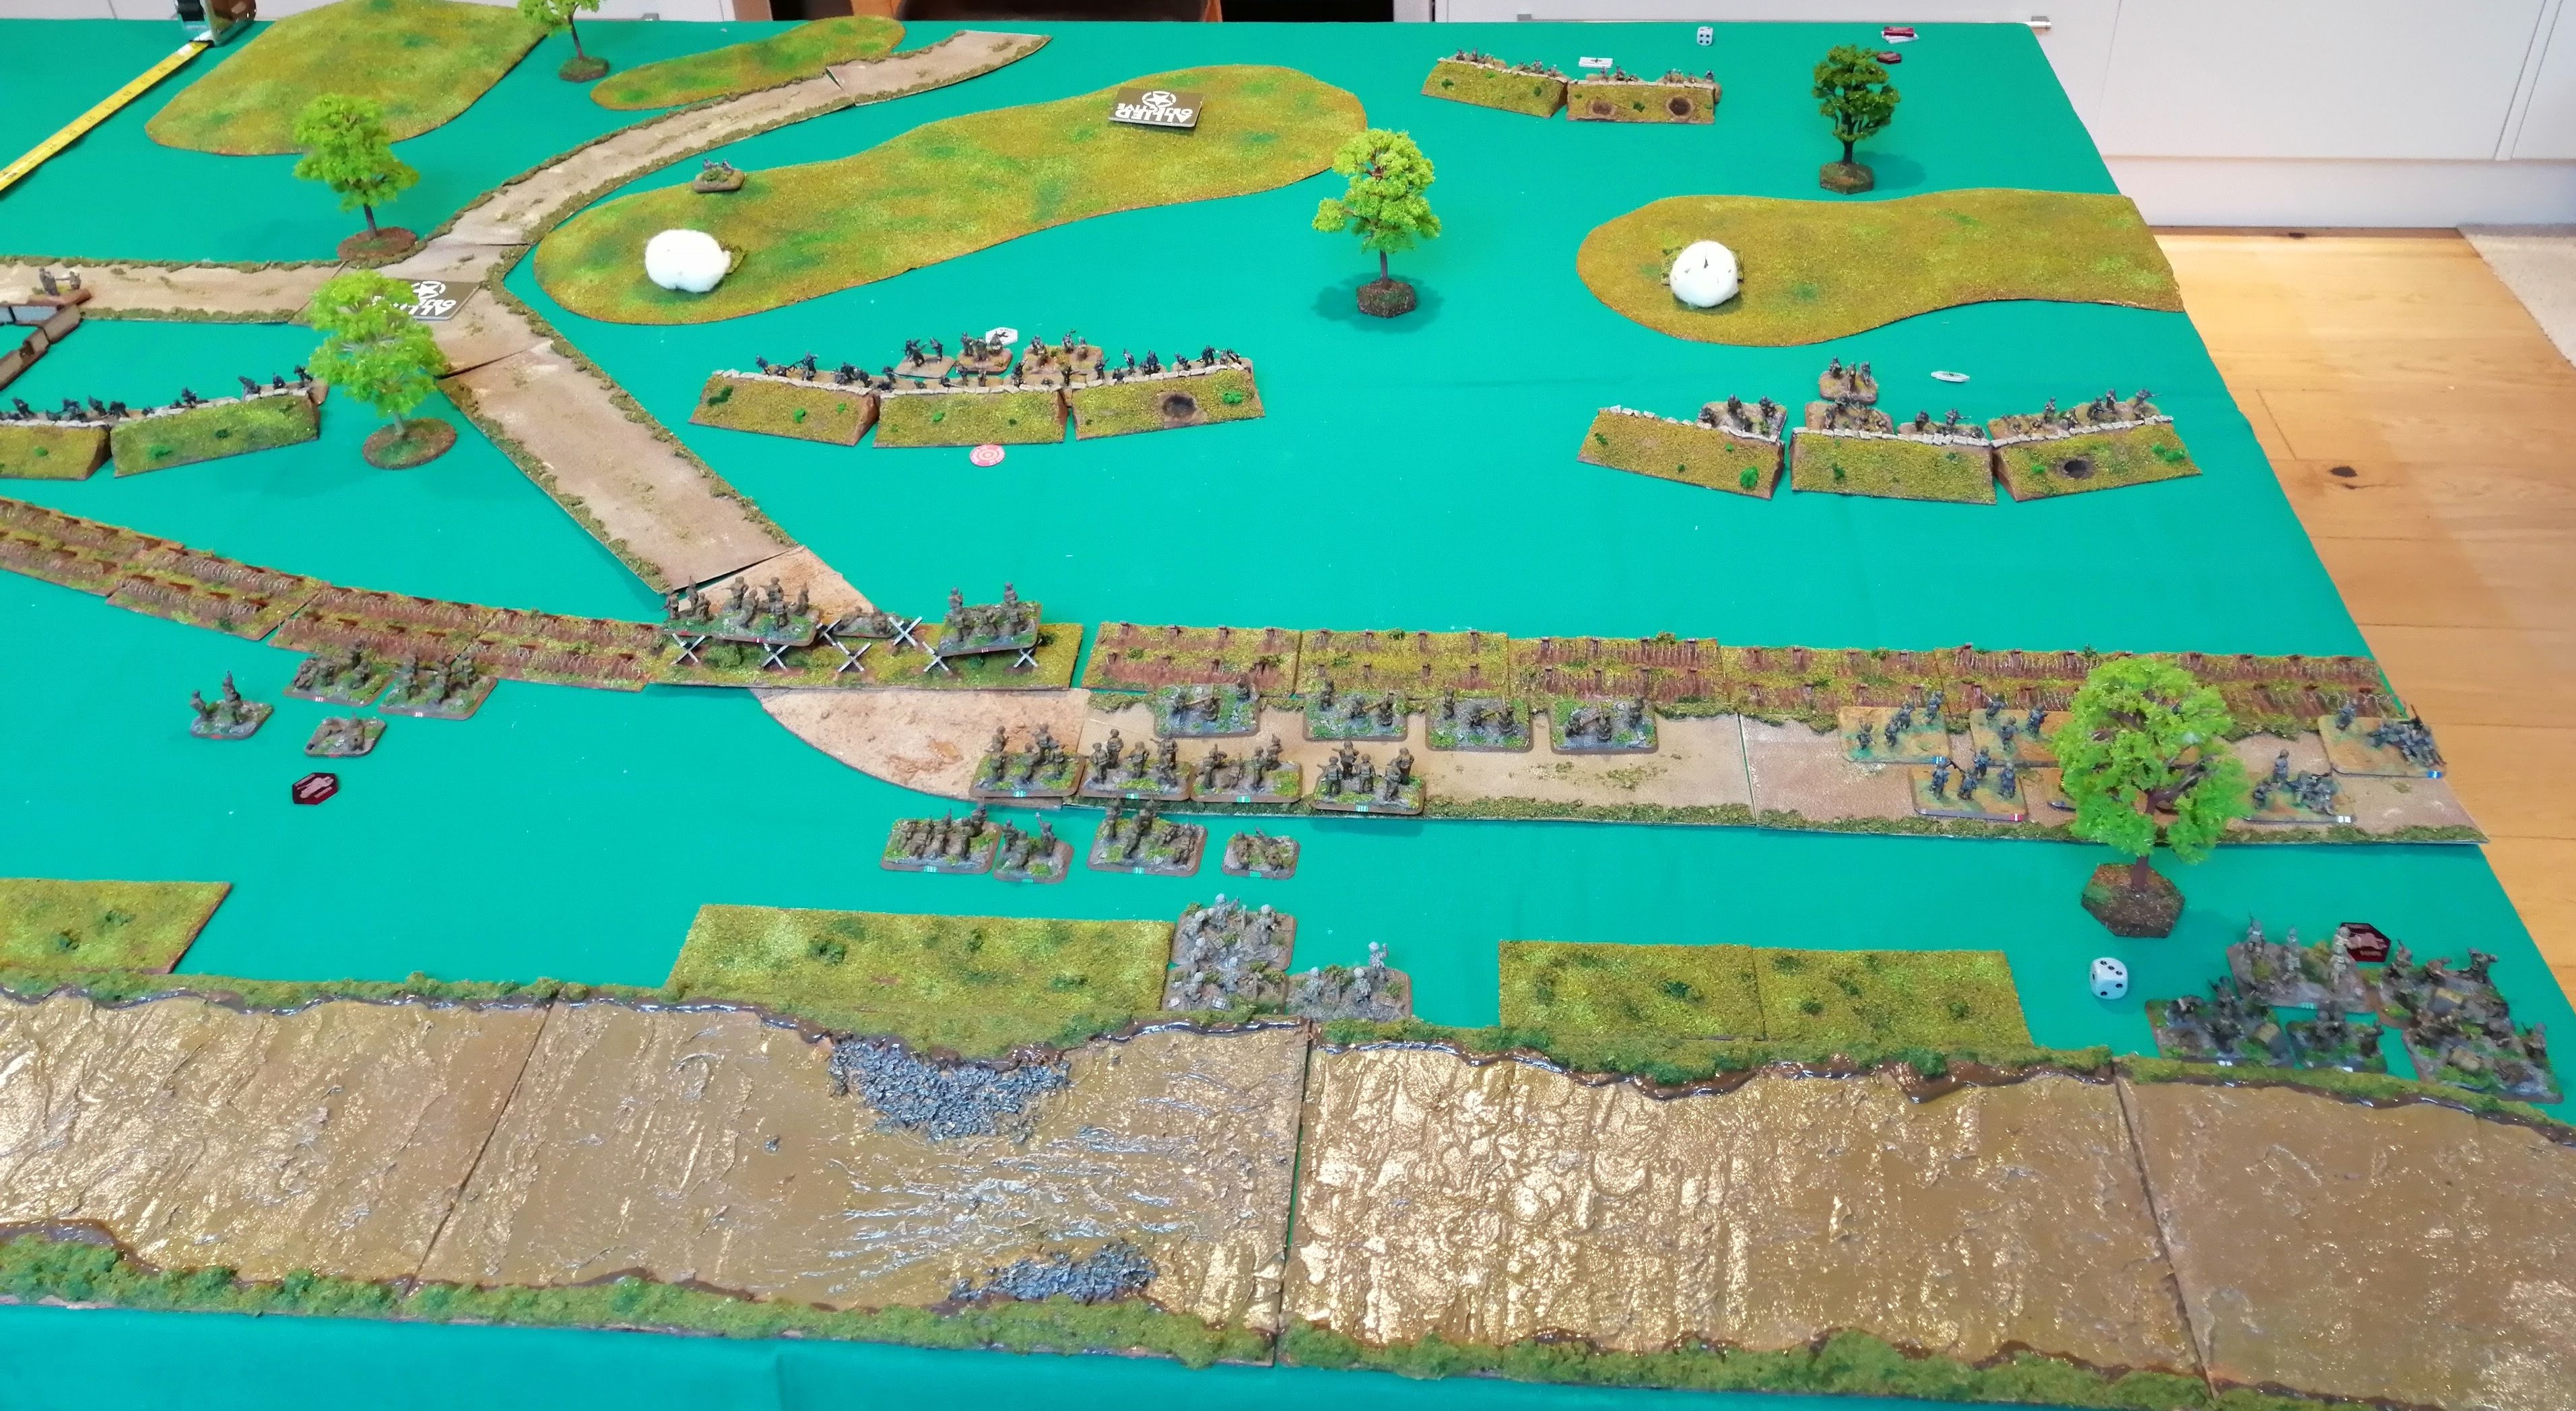
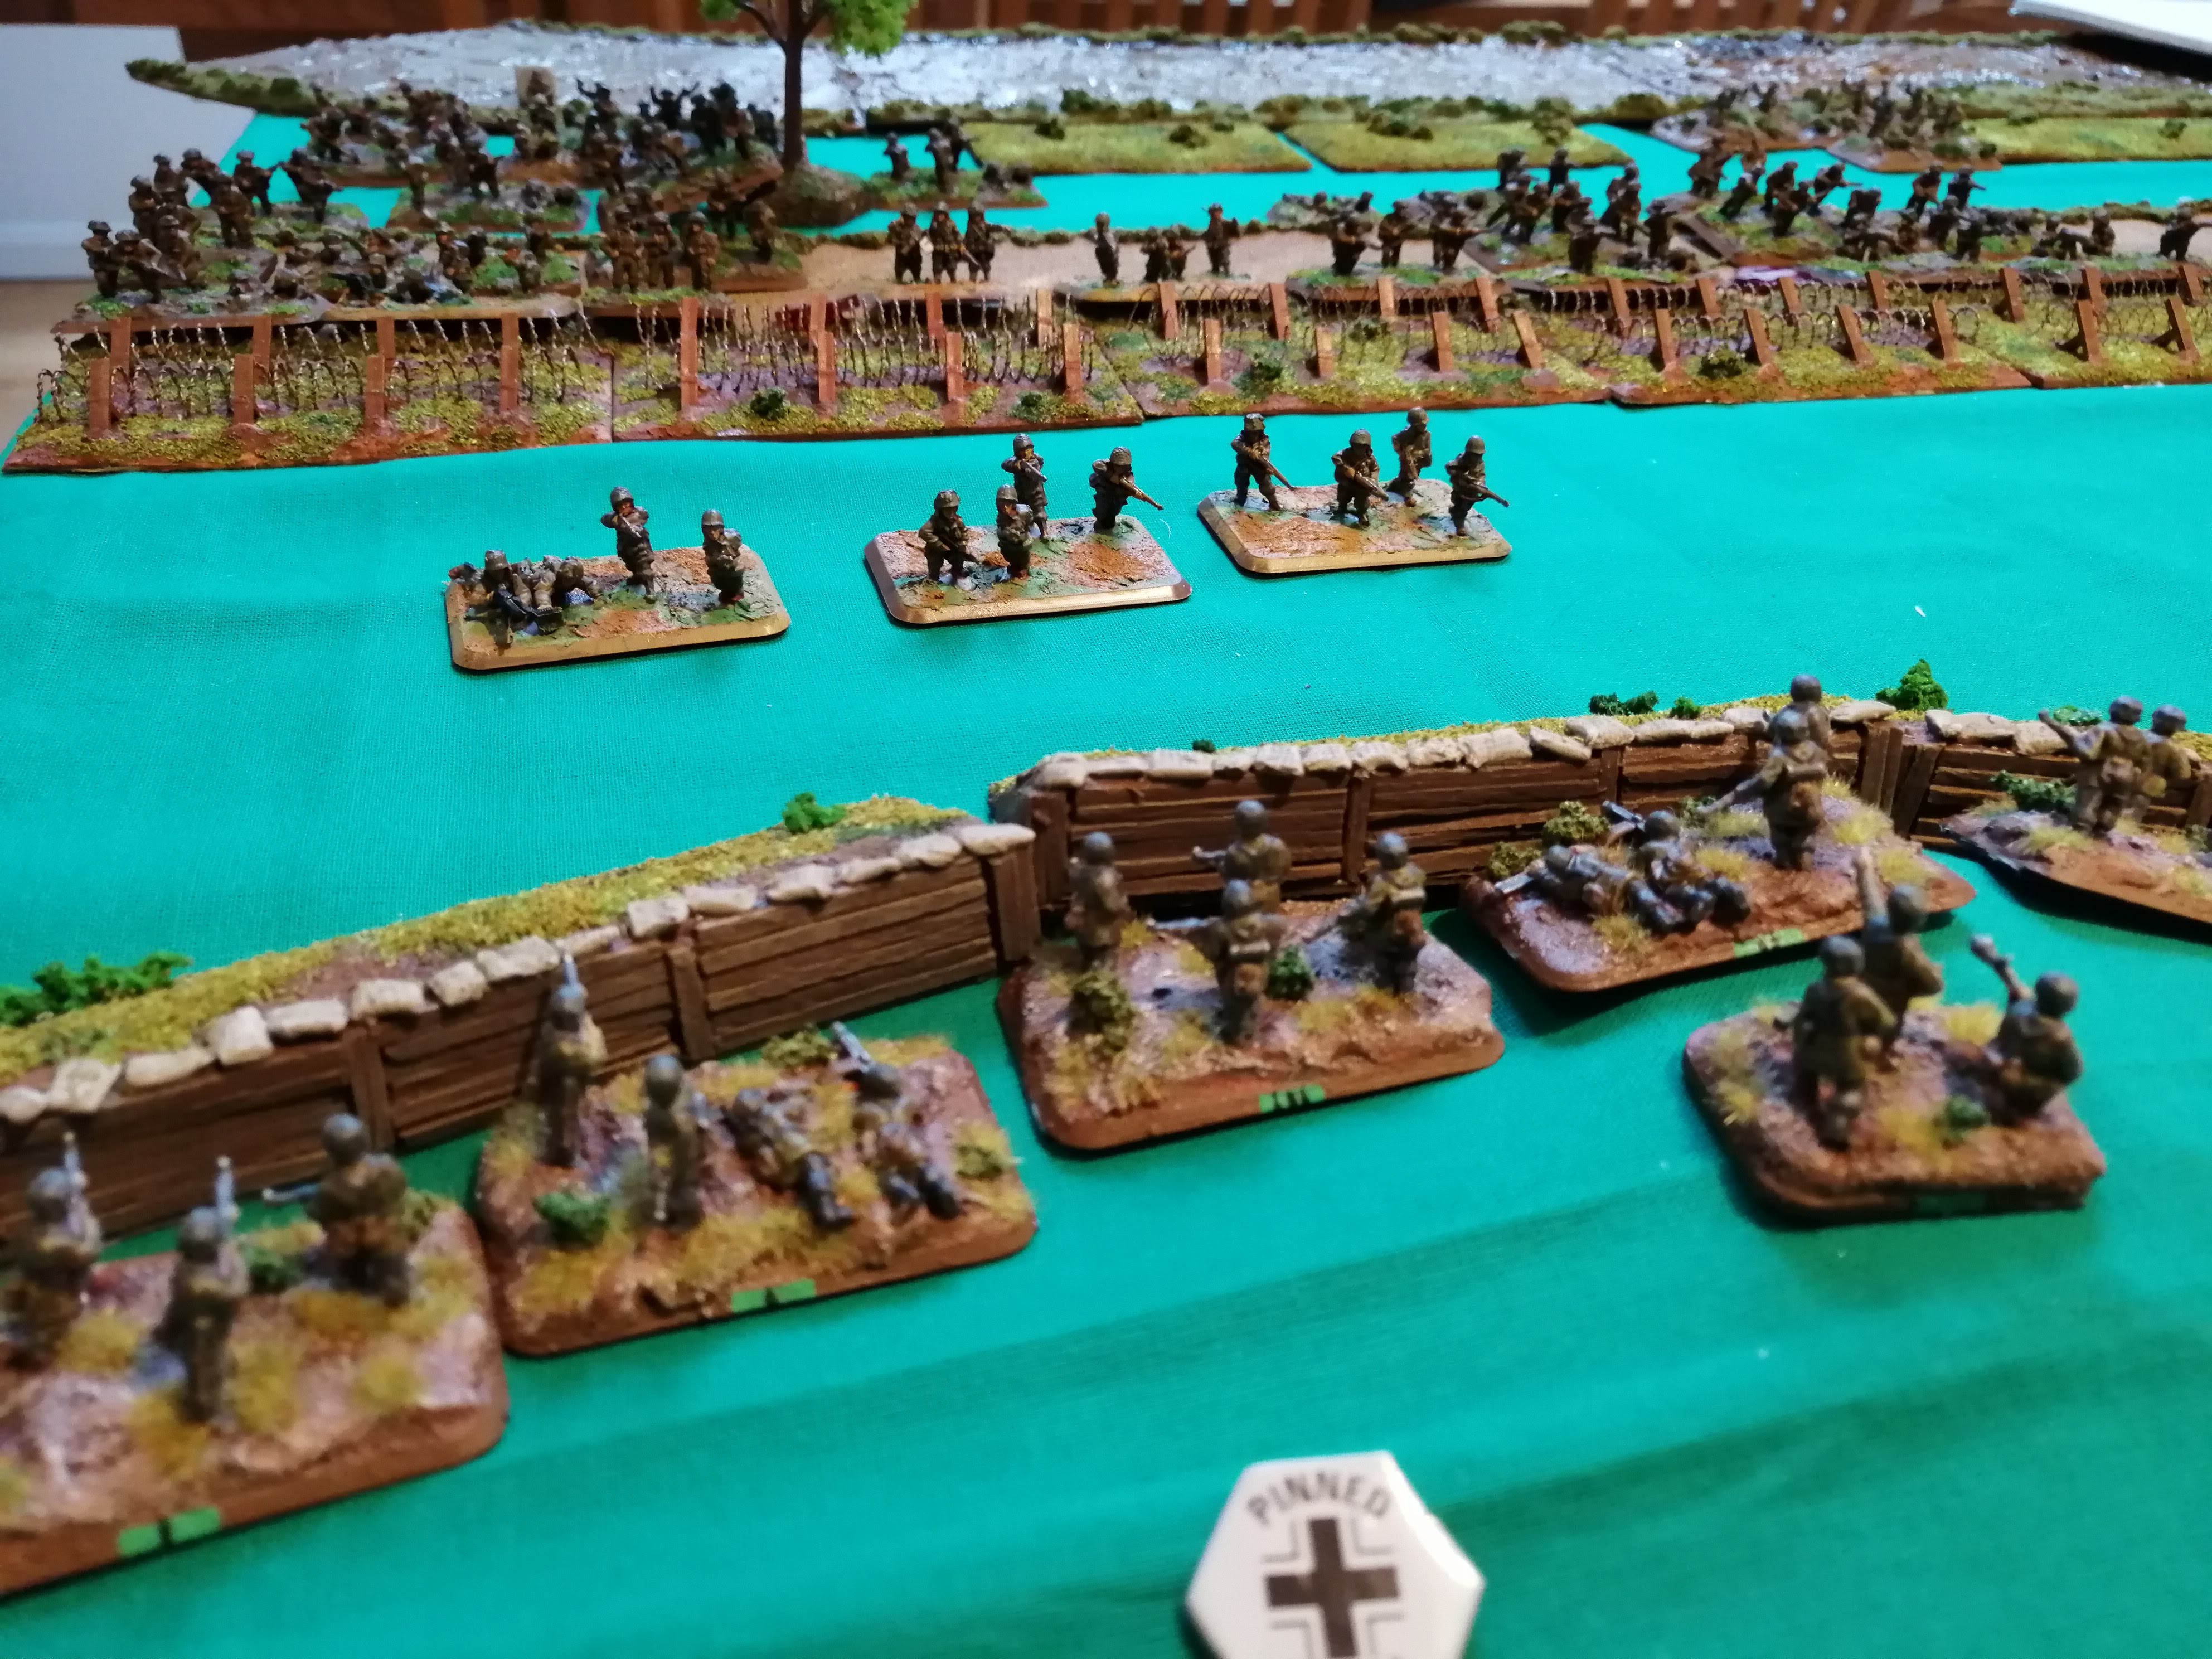
 The tactical view at the end of Turn 1
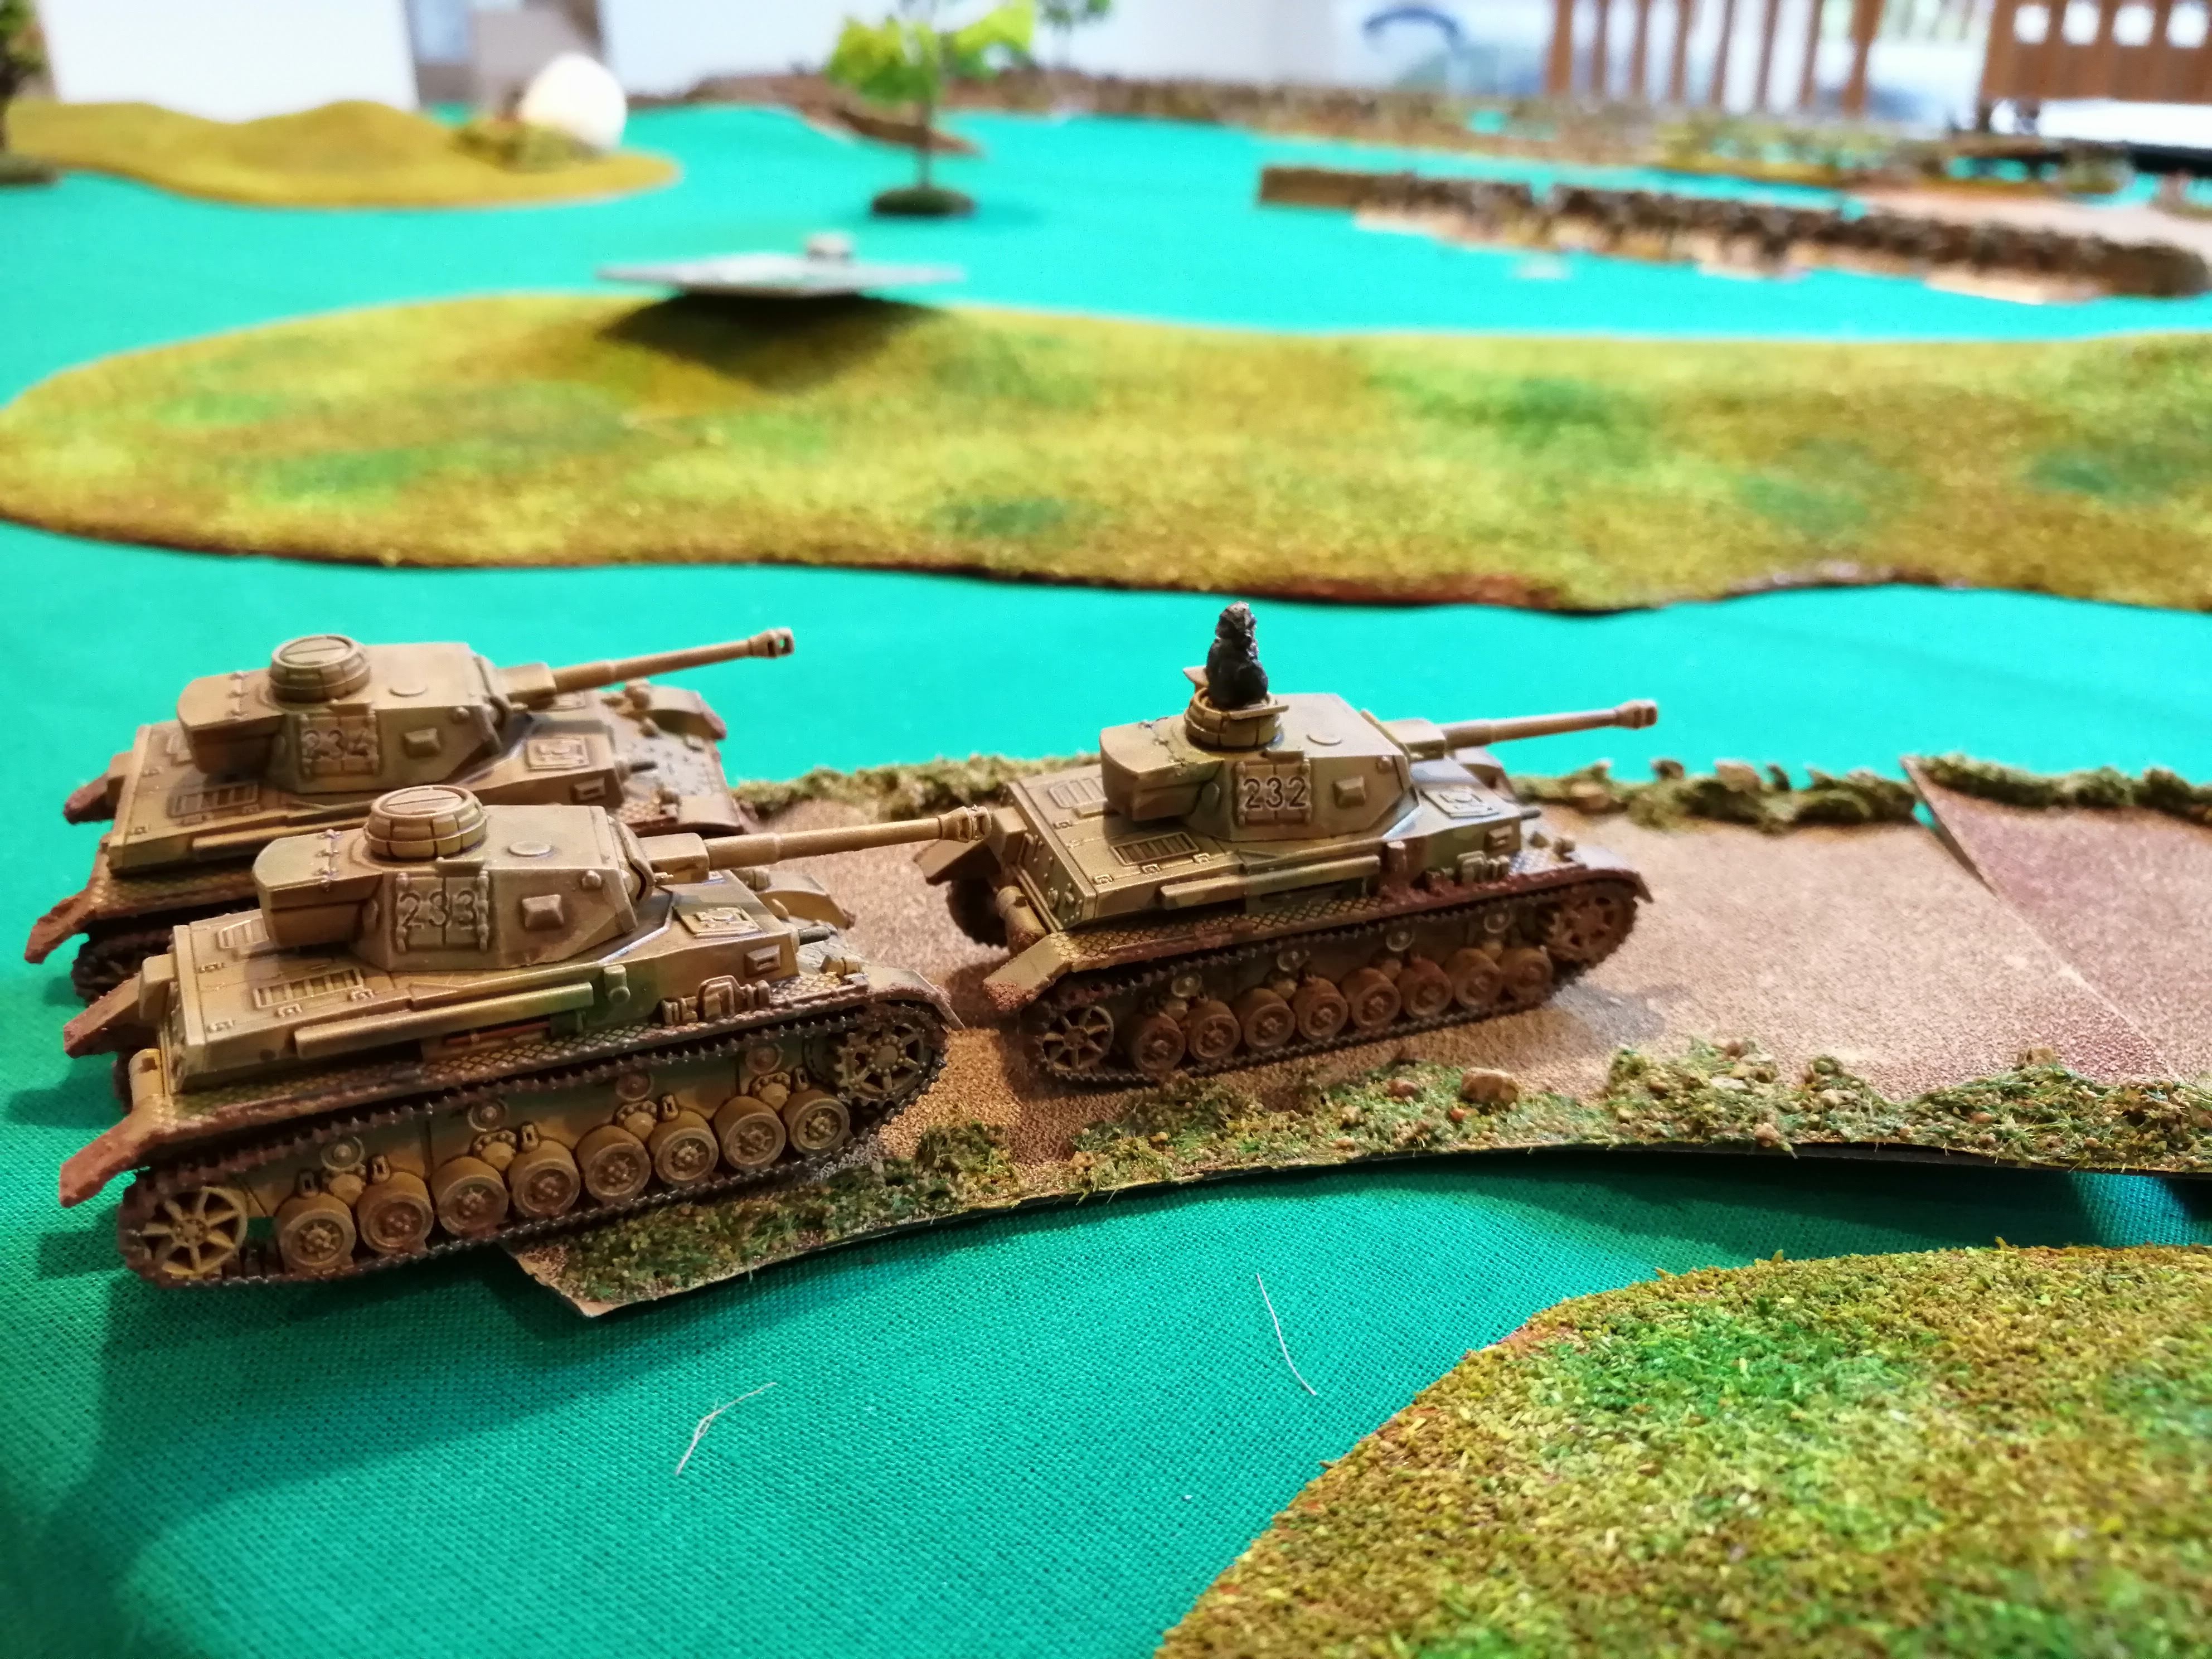
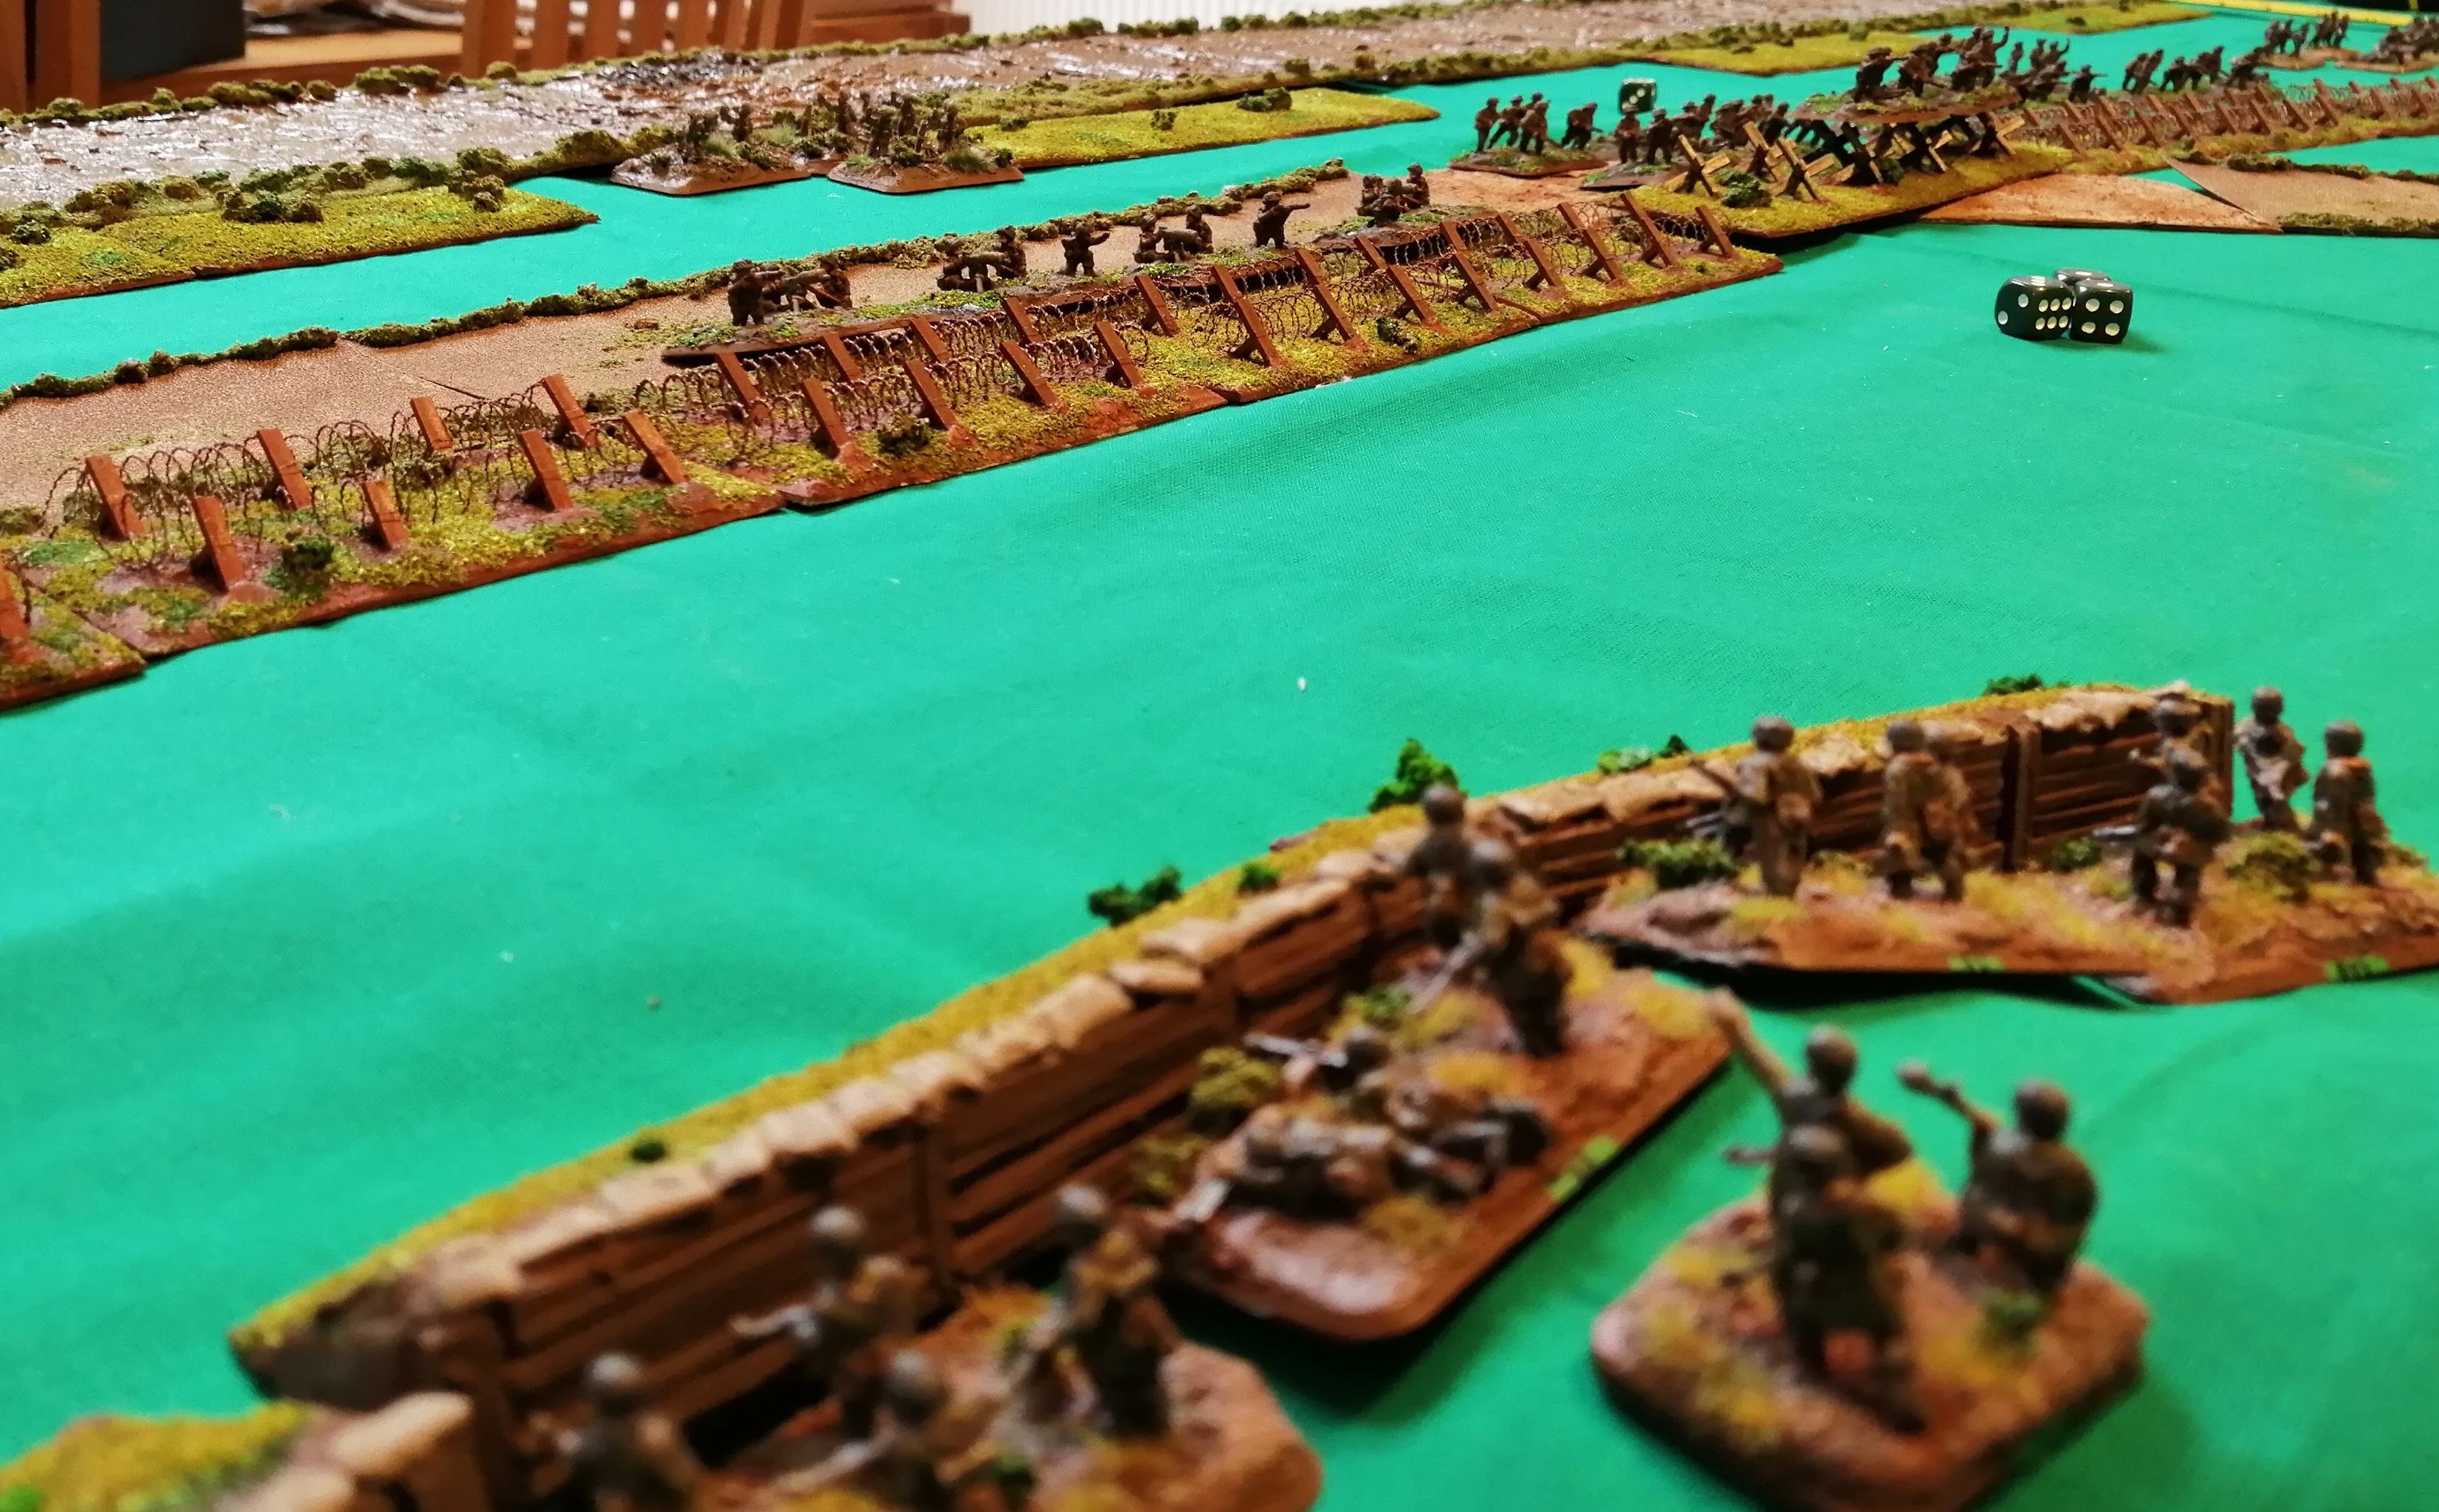
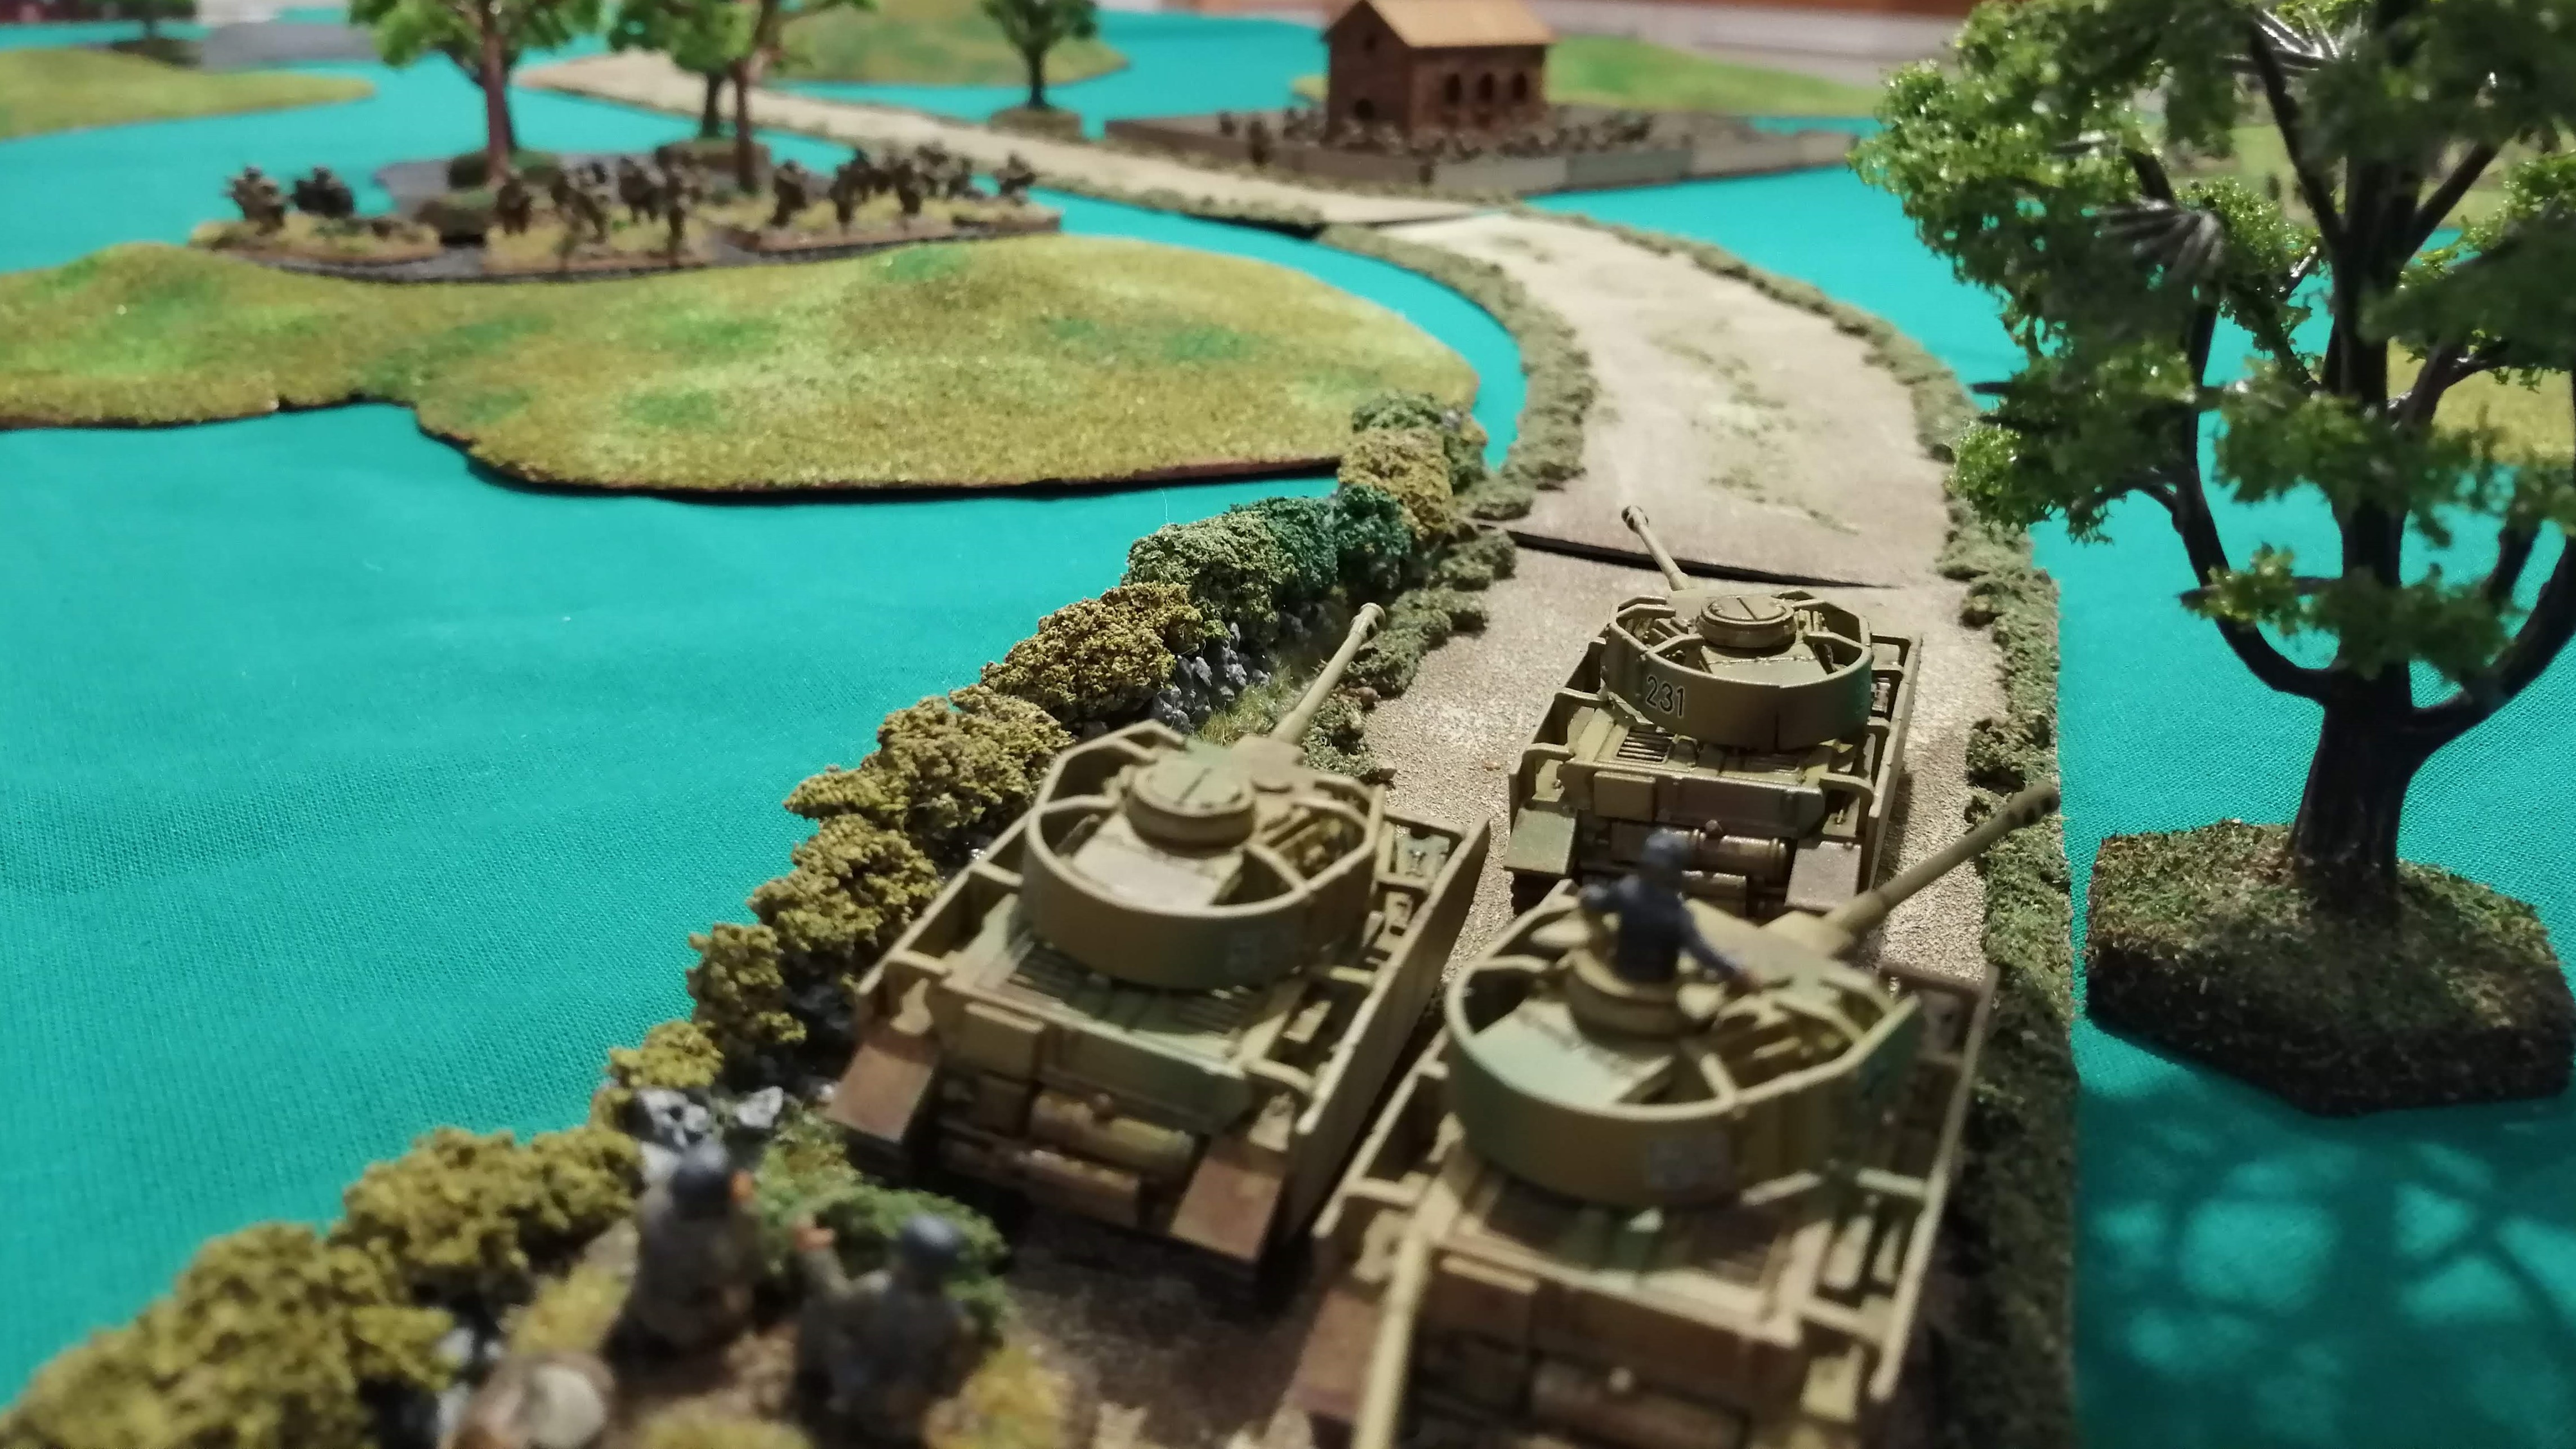 The view from the Panzers as they advance up the Via Anziate
Turn 2
The 1st Panzer Platoon takes a Blitz move successfully giving them a 4” move while being considered stationery. The 2nd Panzer Platoon tries the same but fails their check leaving them stationery. The other platoons advance up to their full move including the Mortar Platoon as they are currently out of range of most of the British targets. Red Platoon also deploys next to the road this turn (FRP)
1st Panzer Platoon is able to apply some pressure to the defenders. With a Blitz move, they can freely apply their full rate of fire with their main guns to the Anti Tank gun platoon. They score 3 successful hits but two are saved and the remaining hit doesn’t pass the fire power check leaving the defenders unharmed and ready to fight back!
FGP continues to fire upon SFOP, scoring 2 hits but given the Forresters’ dug in positions, FGP fails to cause any damage.
At the end of an ineffective turn, the German commander orders the 2nd Panzer Platoon to ‘Follow me’ and advance 4” to keep up with the 1st Panzer Platoon.
In reply, the Universal Carriers advance up behind the Chapel but otherwise, the Sherwood Foerresters don’t move from their dug in positions.
The 6pdr anti tank guns fire upon the 1st Panzer Platoon. With their 4 shots, they hit twice. The left tank is able to bounce the shot but the right tank is not so lucky and ‘brews up’.
From the tree line, SFOP continues to defend their position and fire upon FGP, scoring 3 hits and one kill.
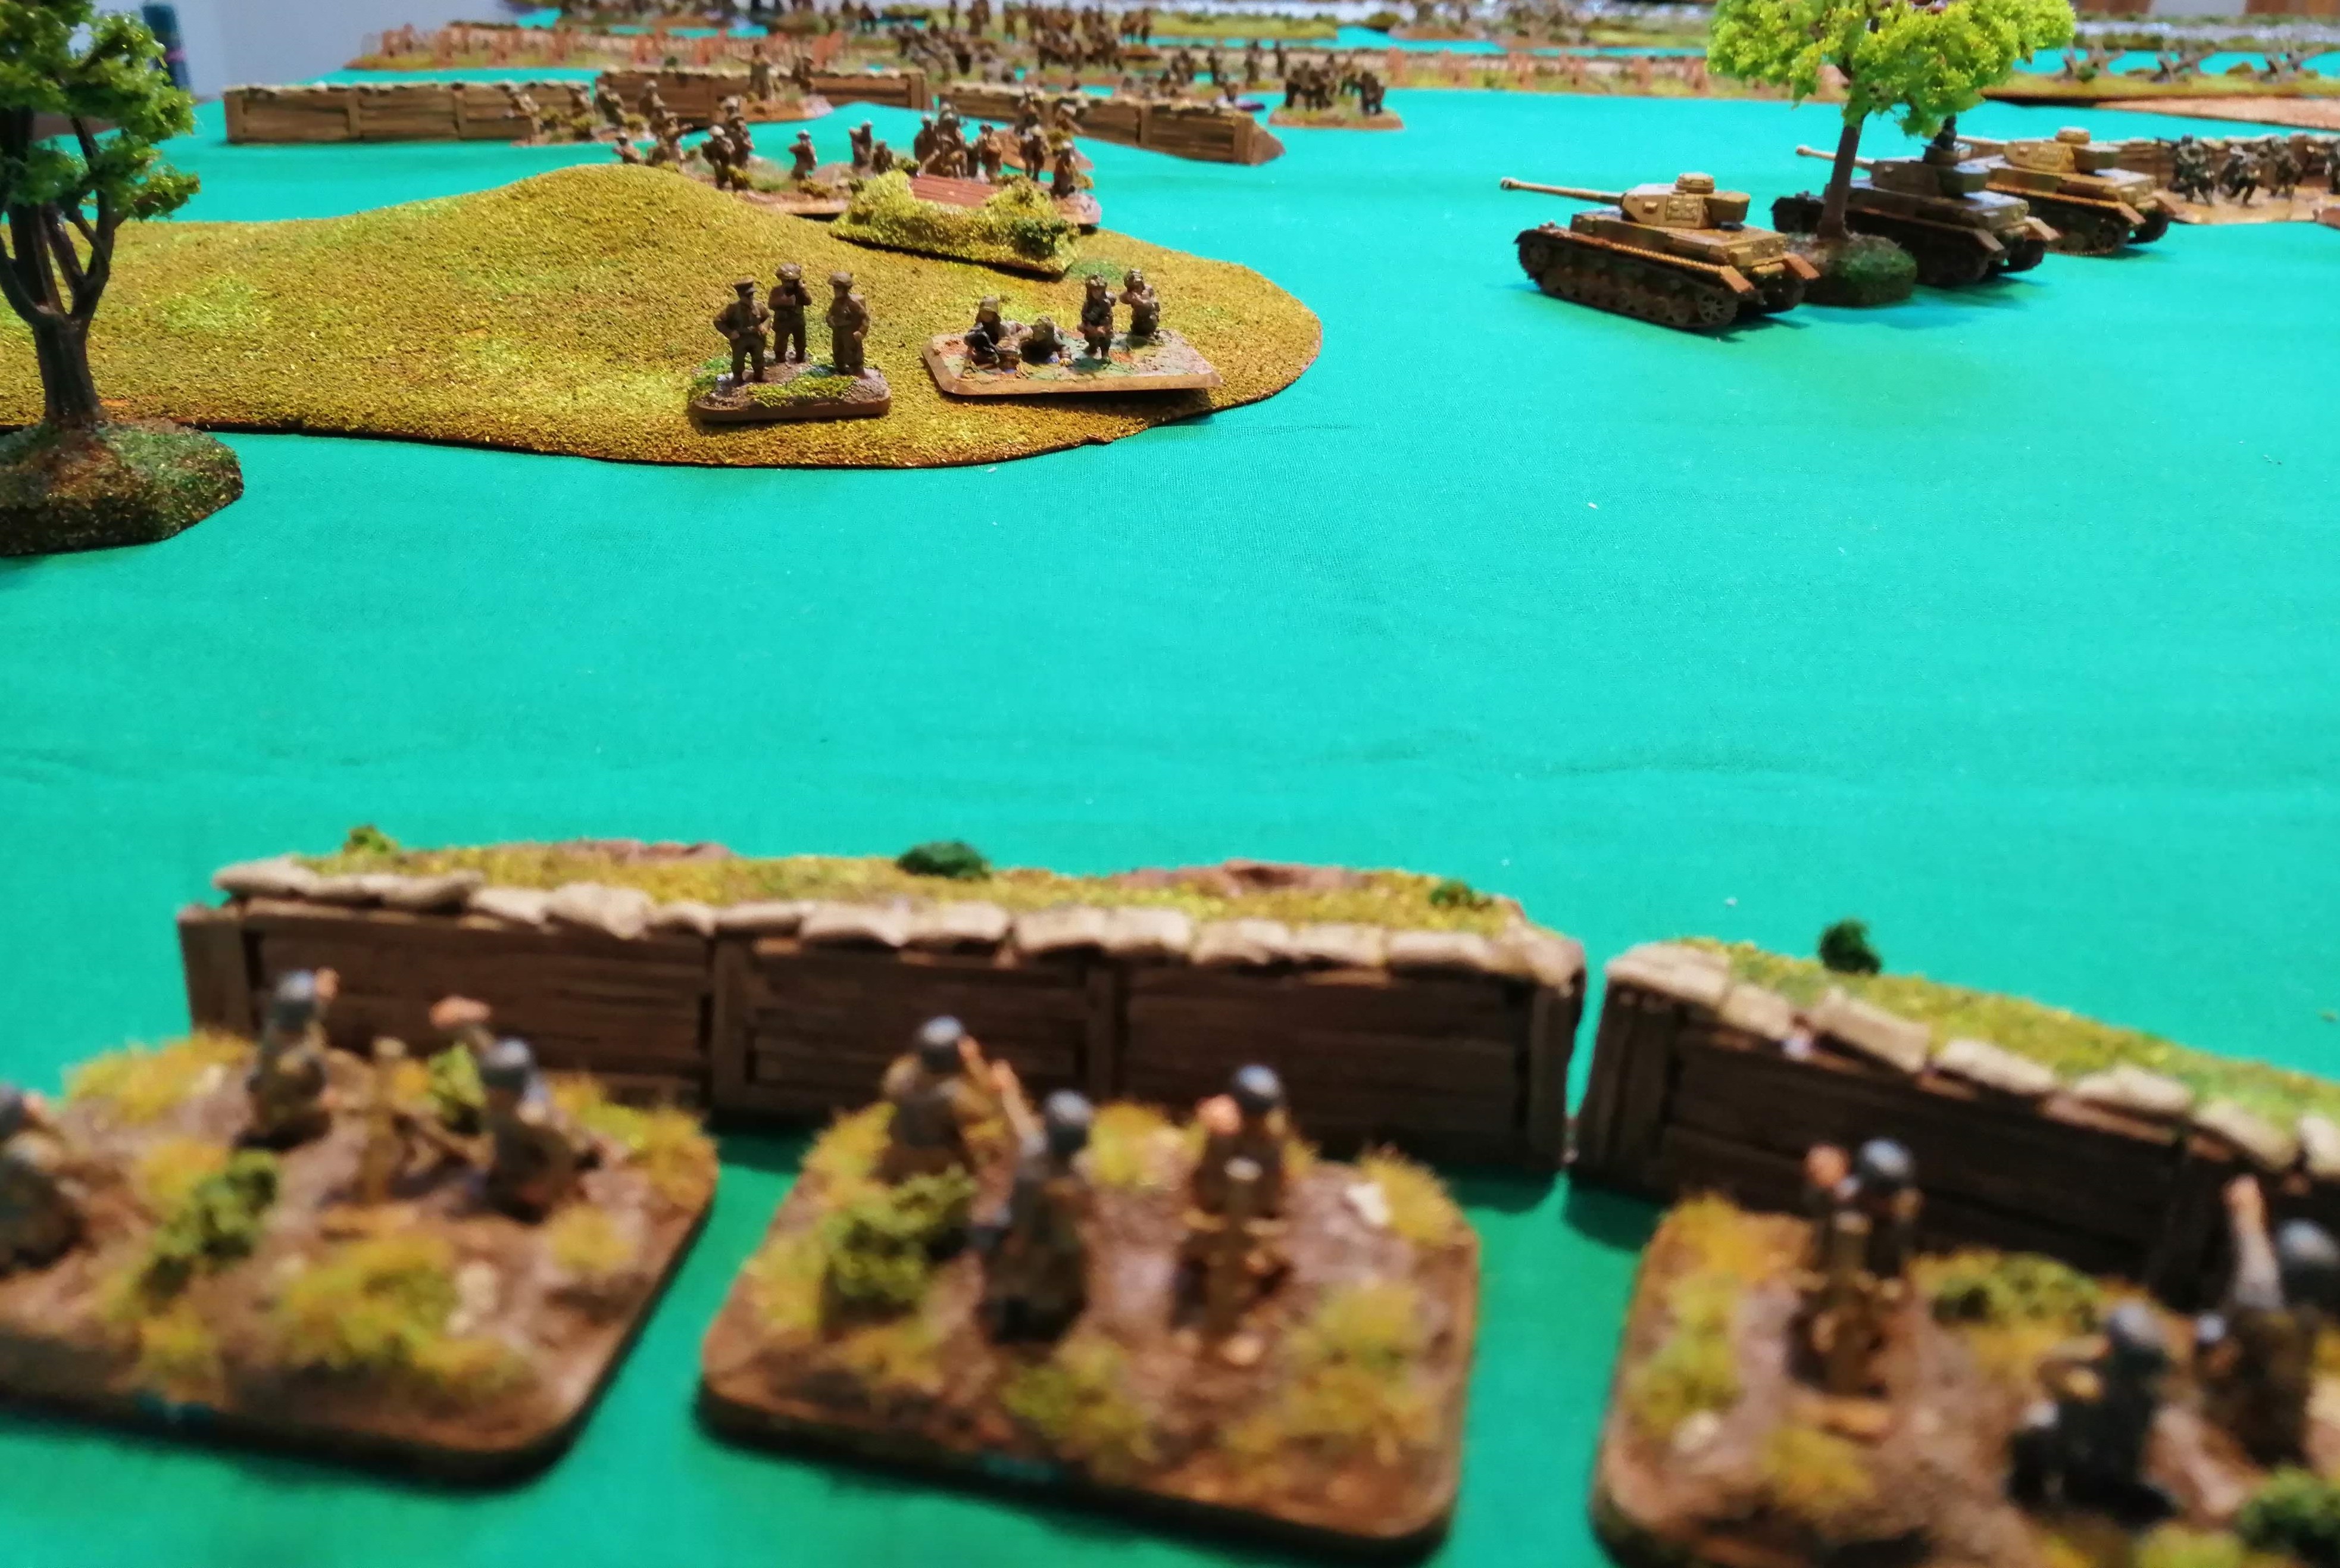
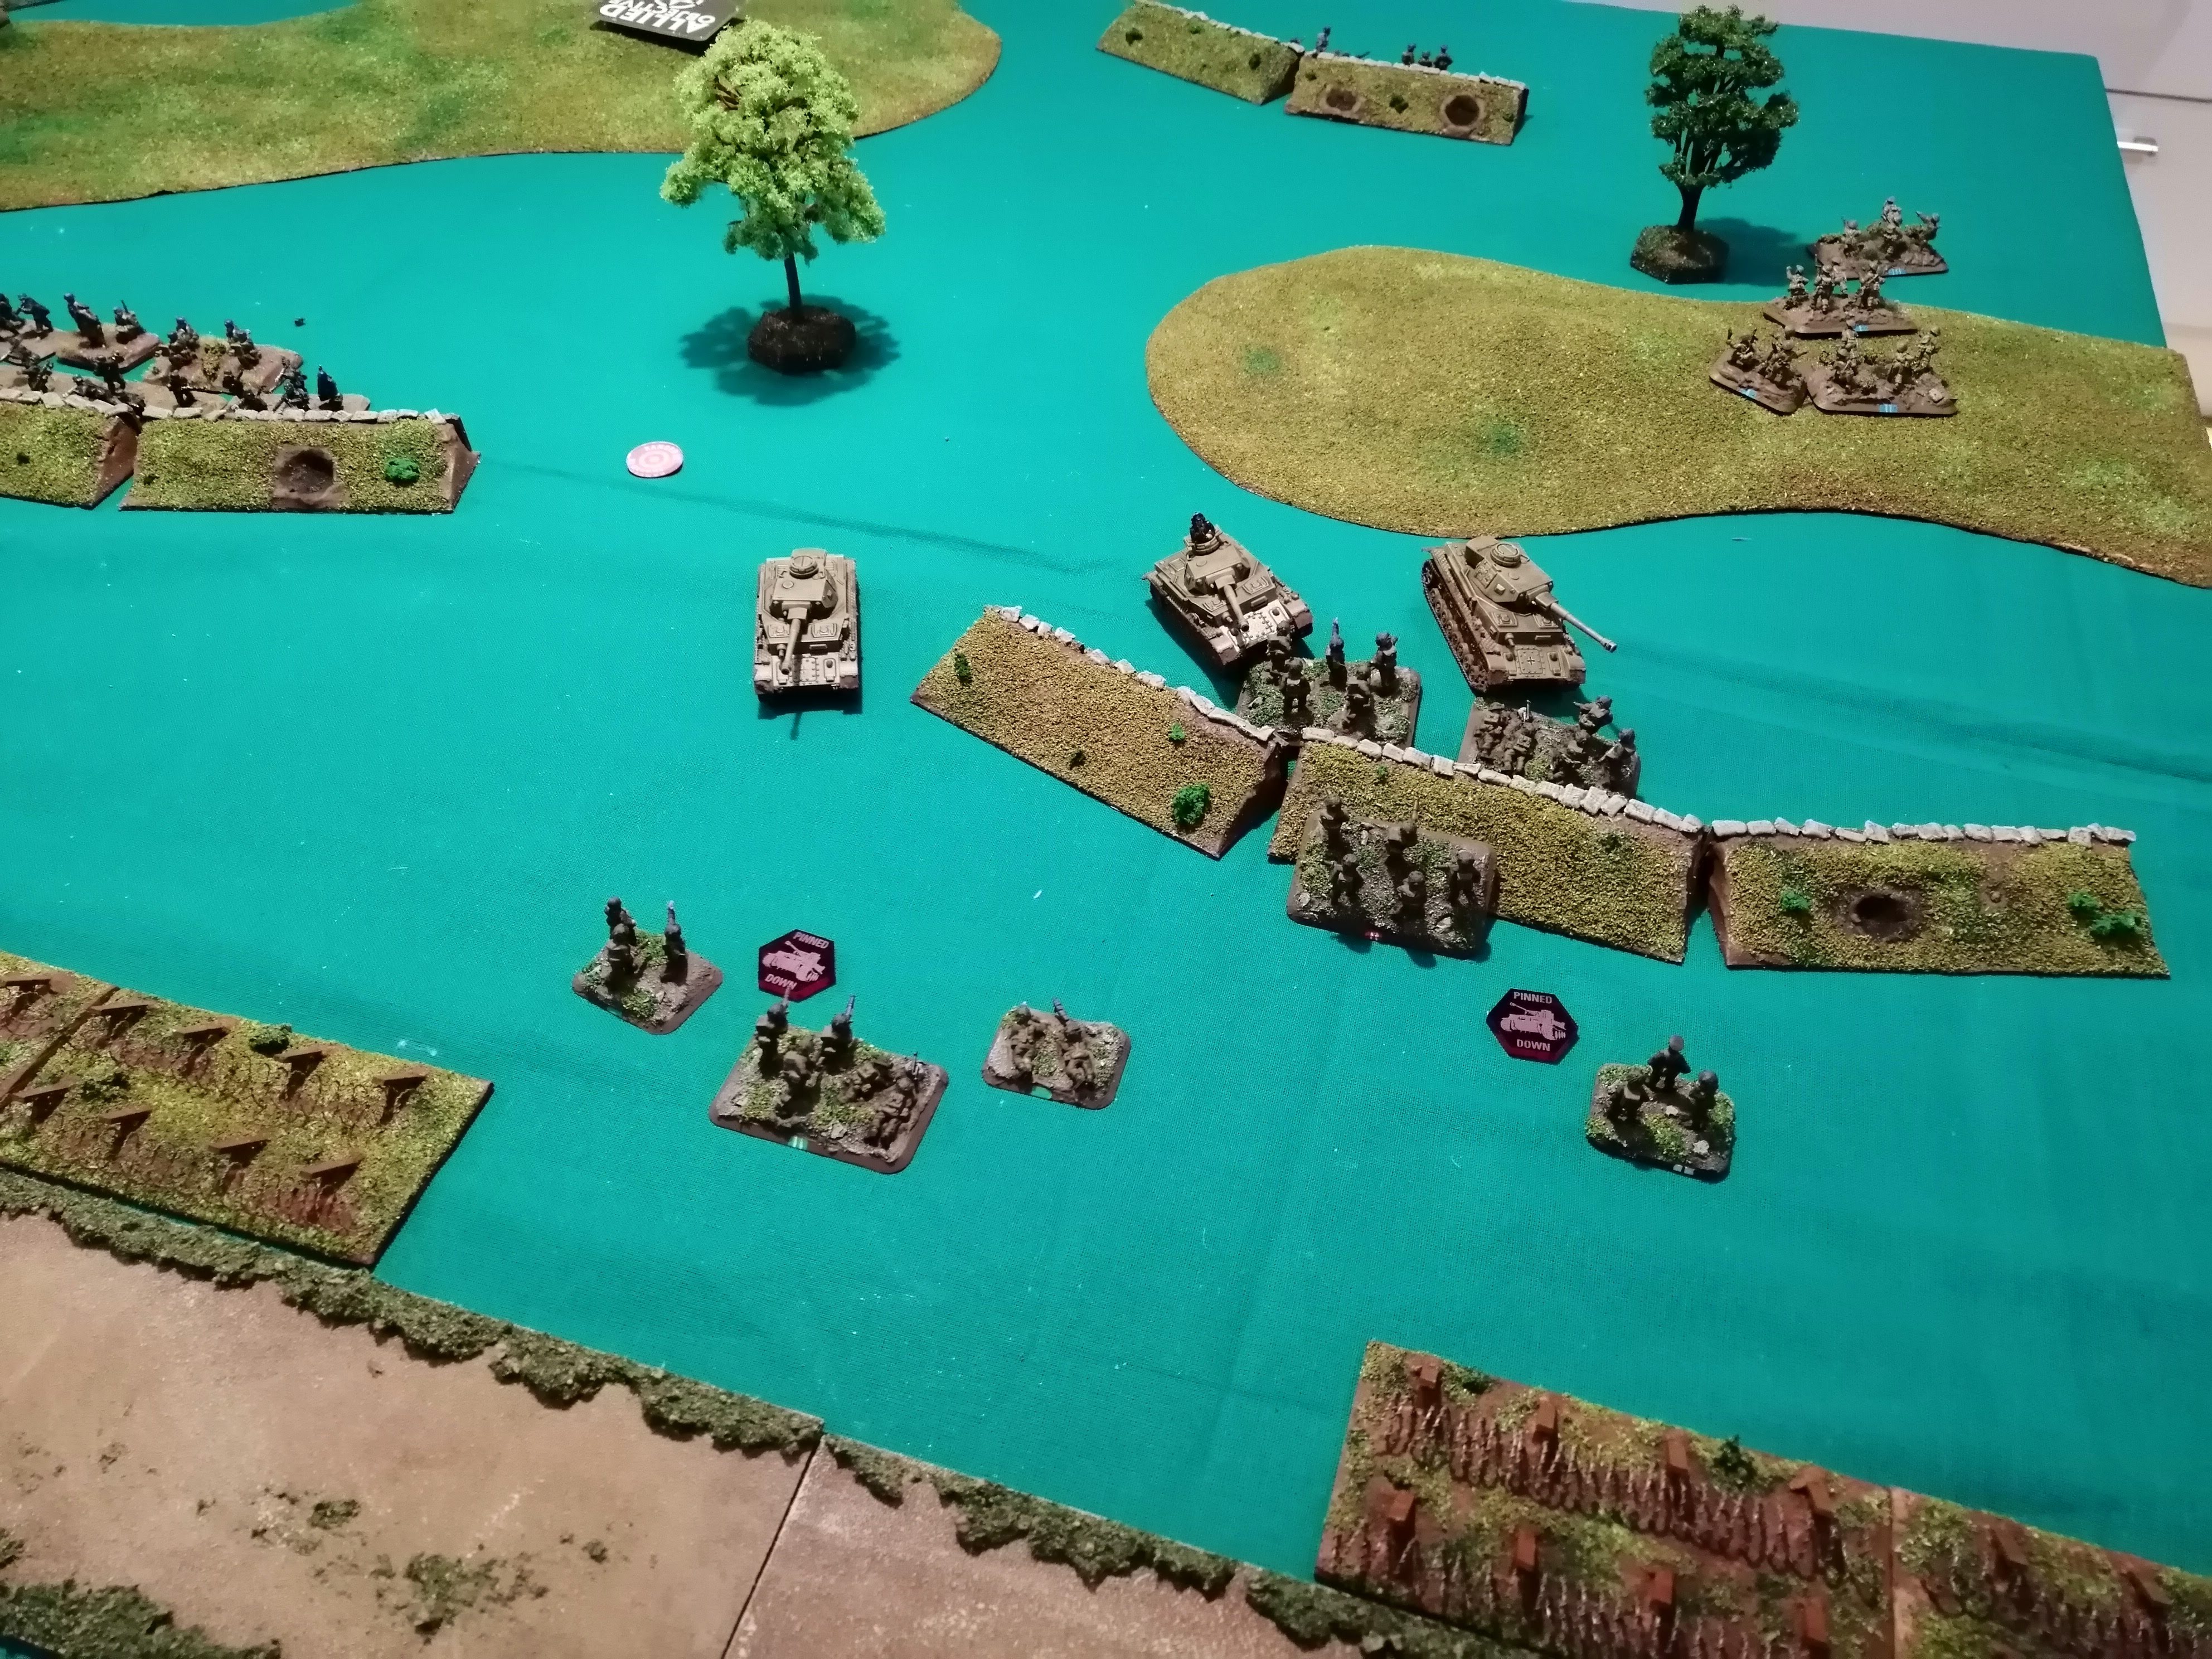
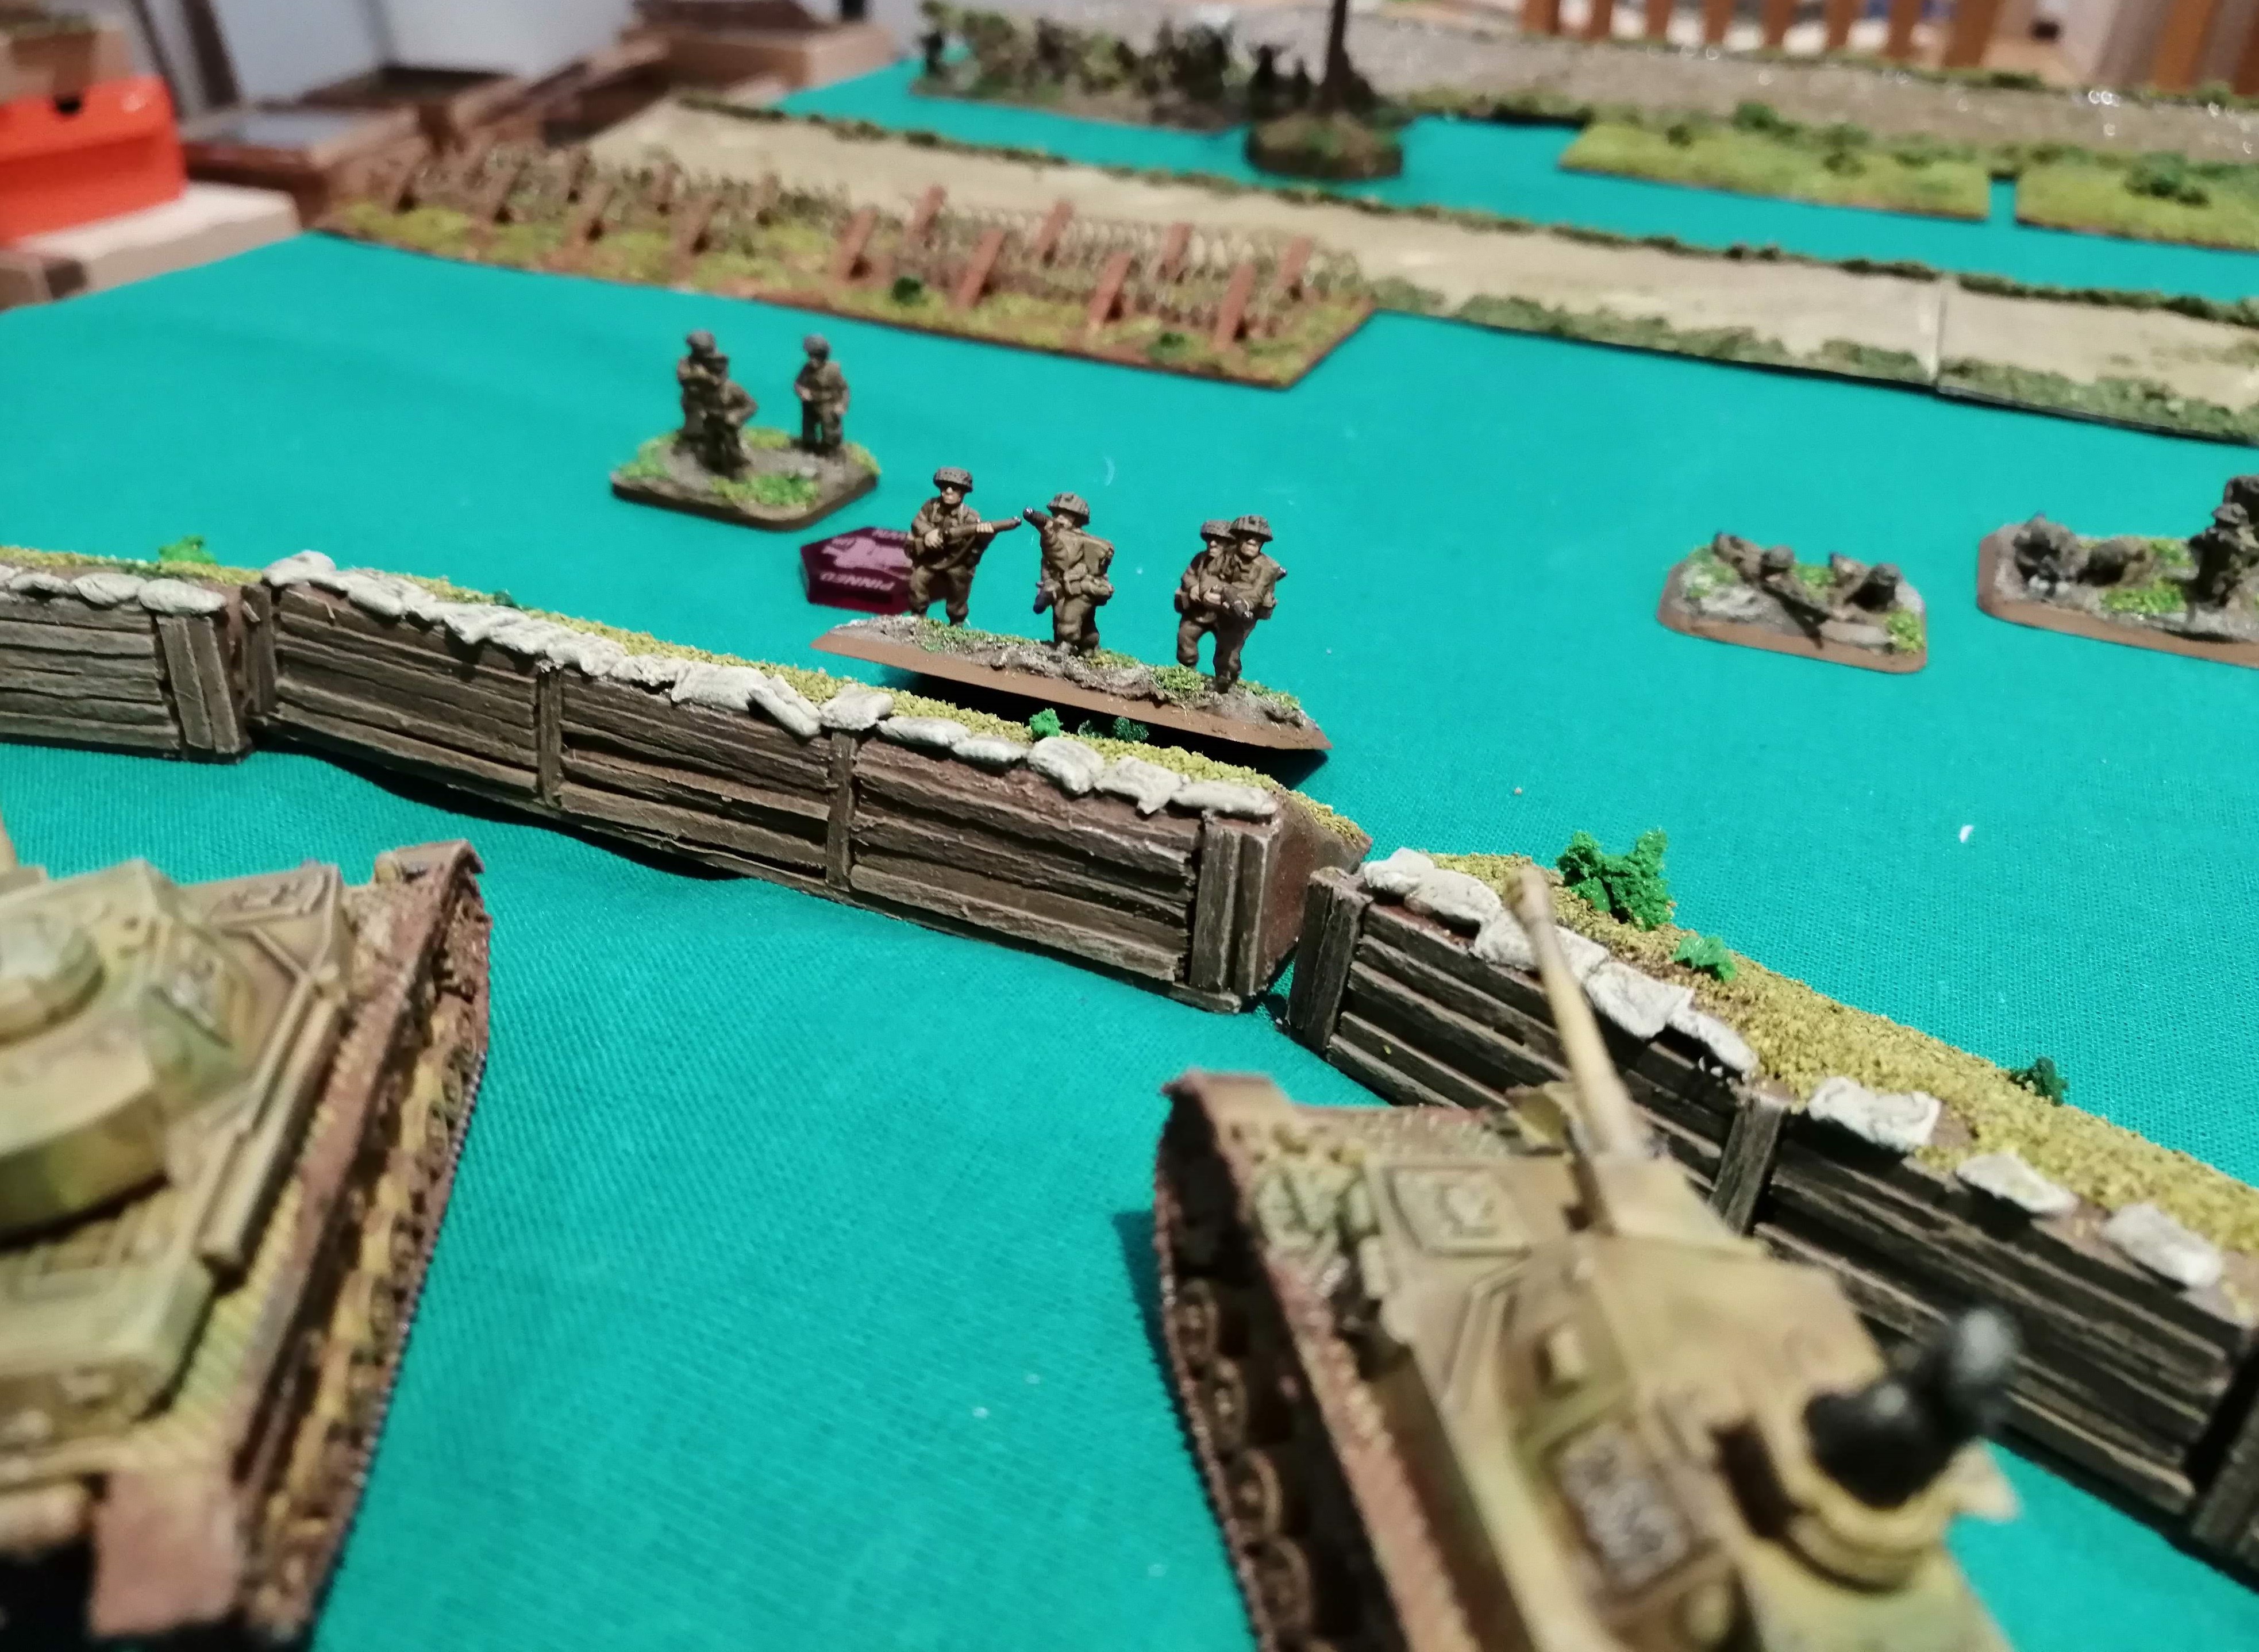
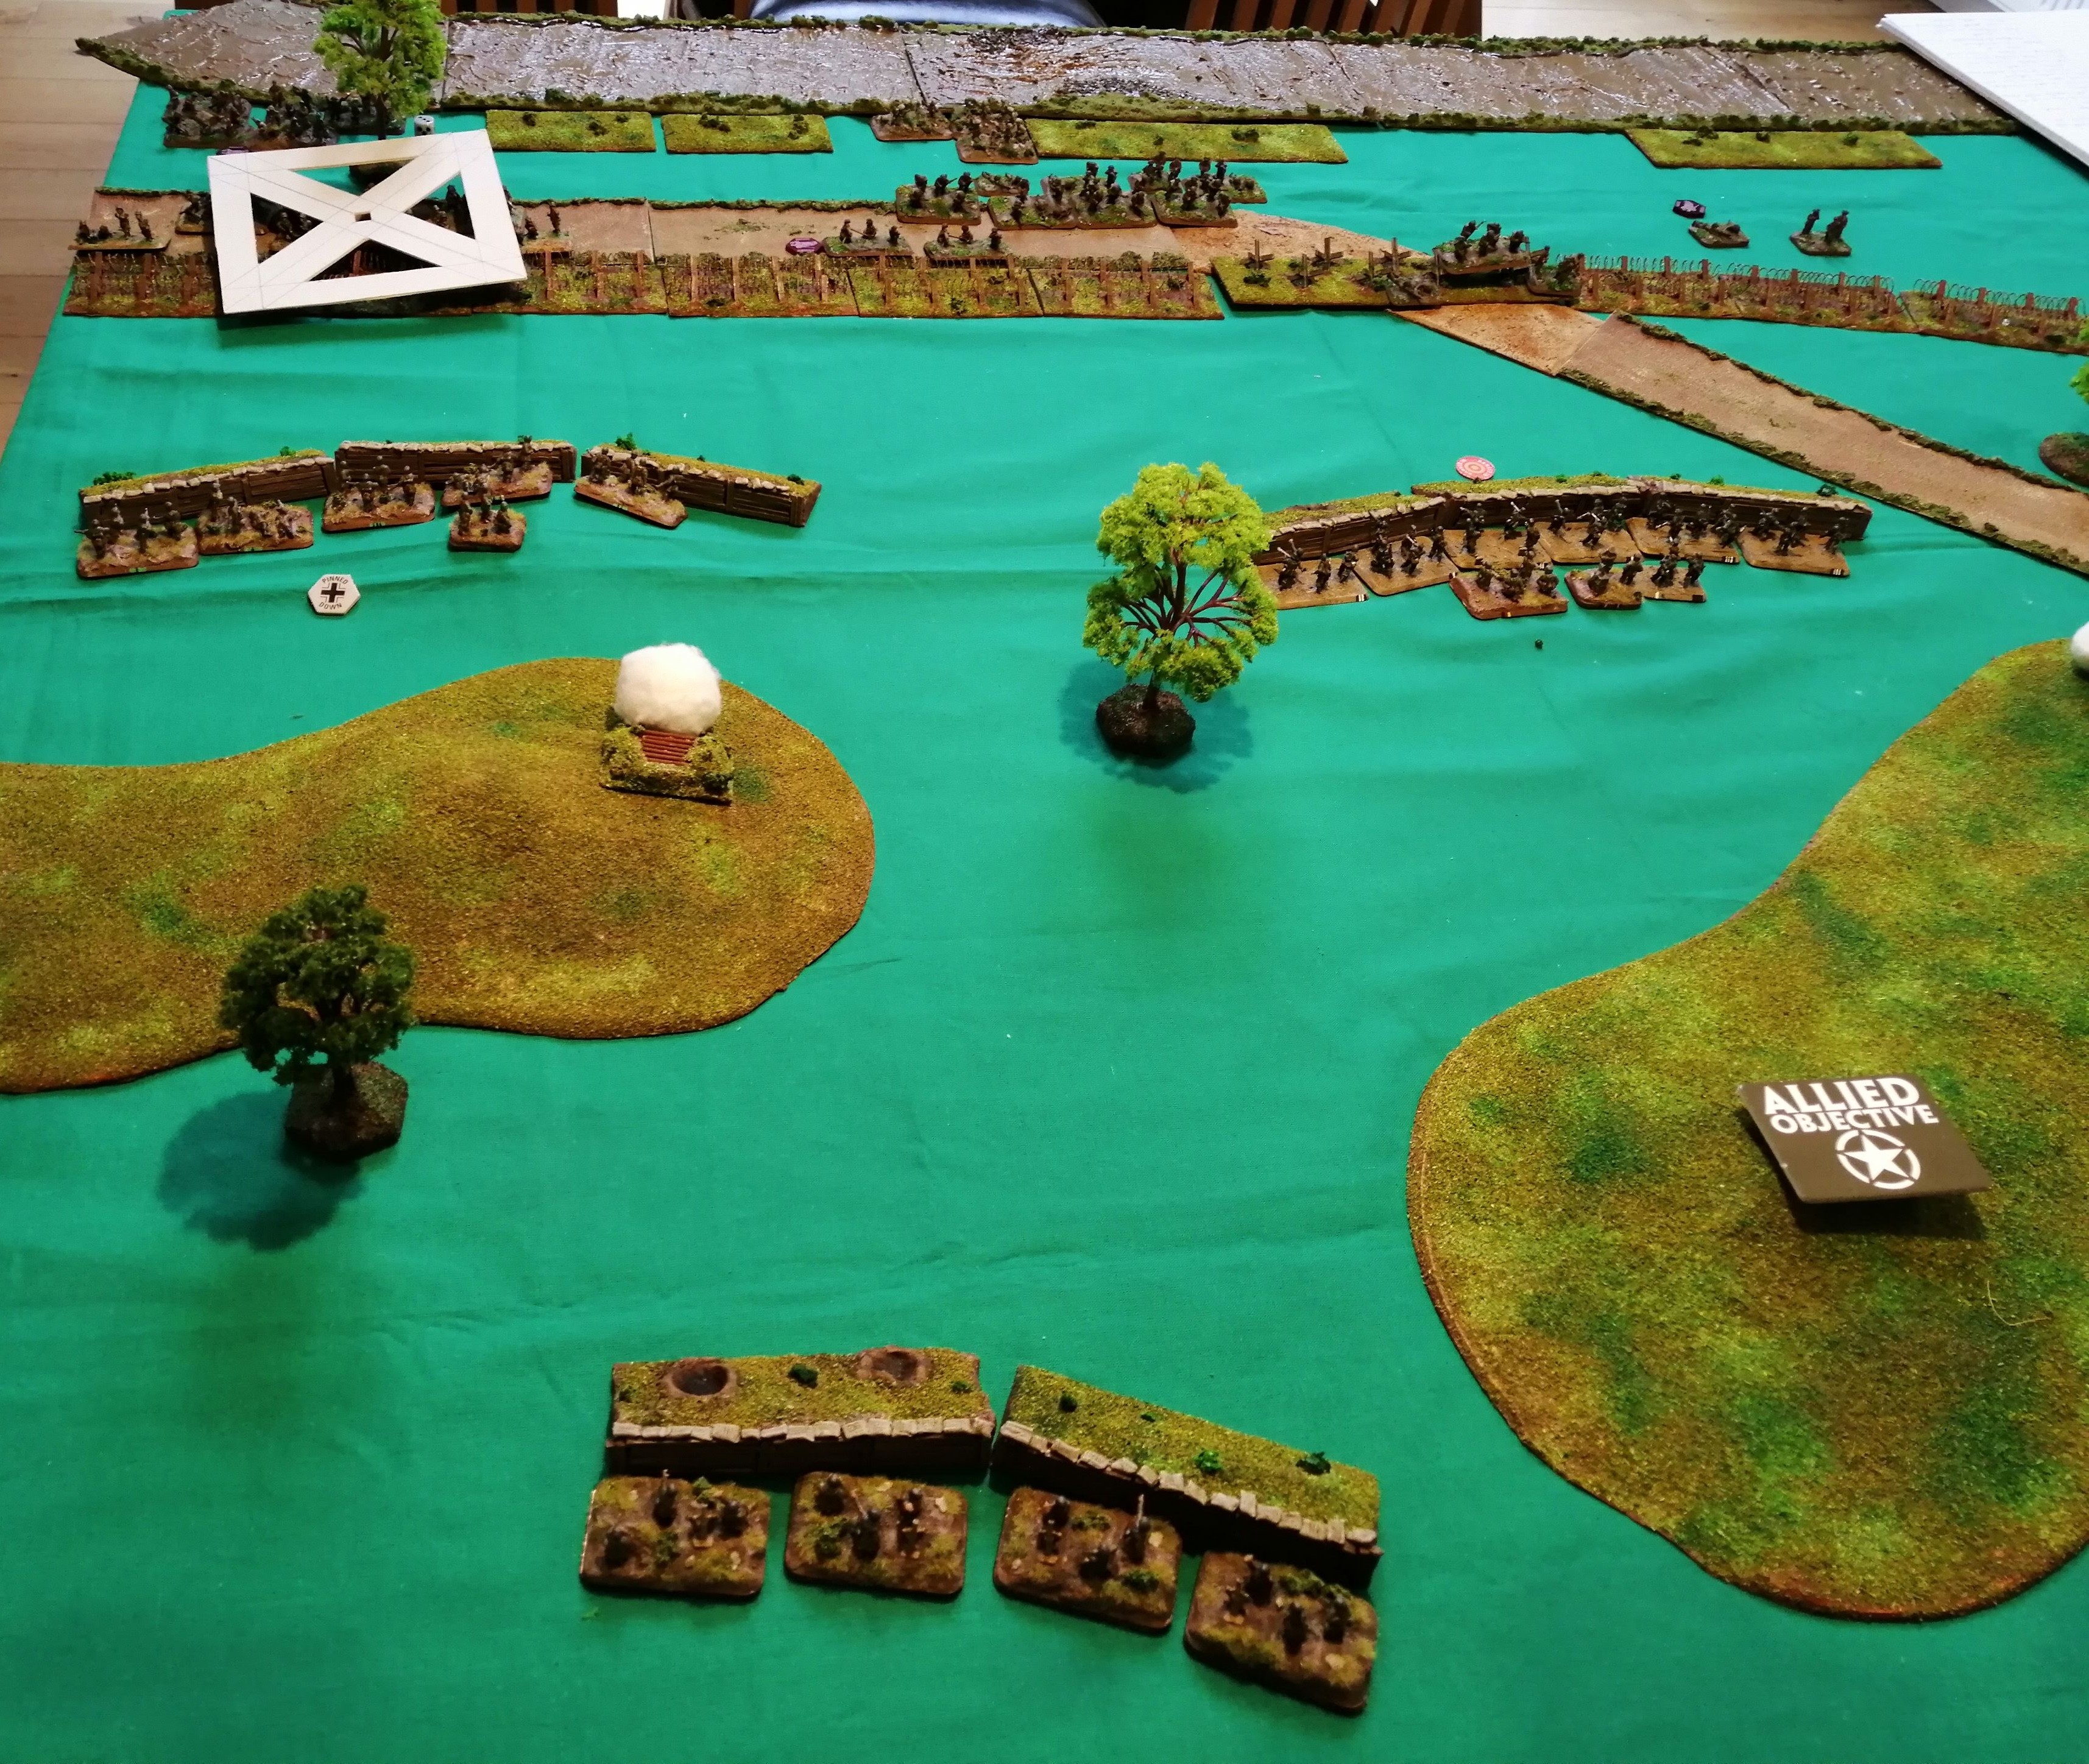
 End of Turn 2
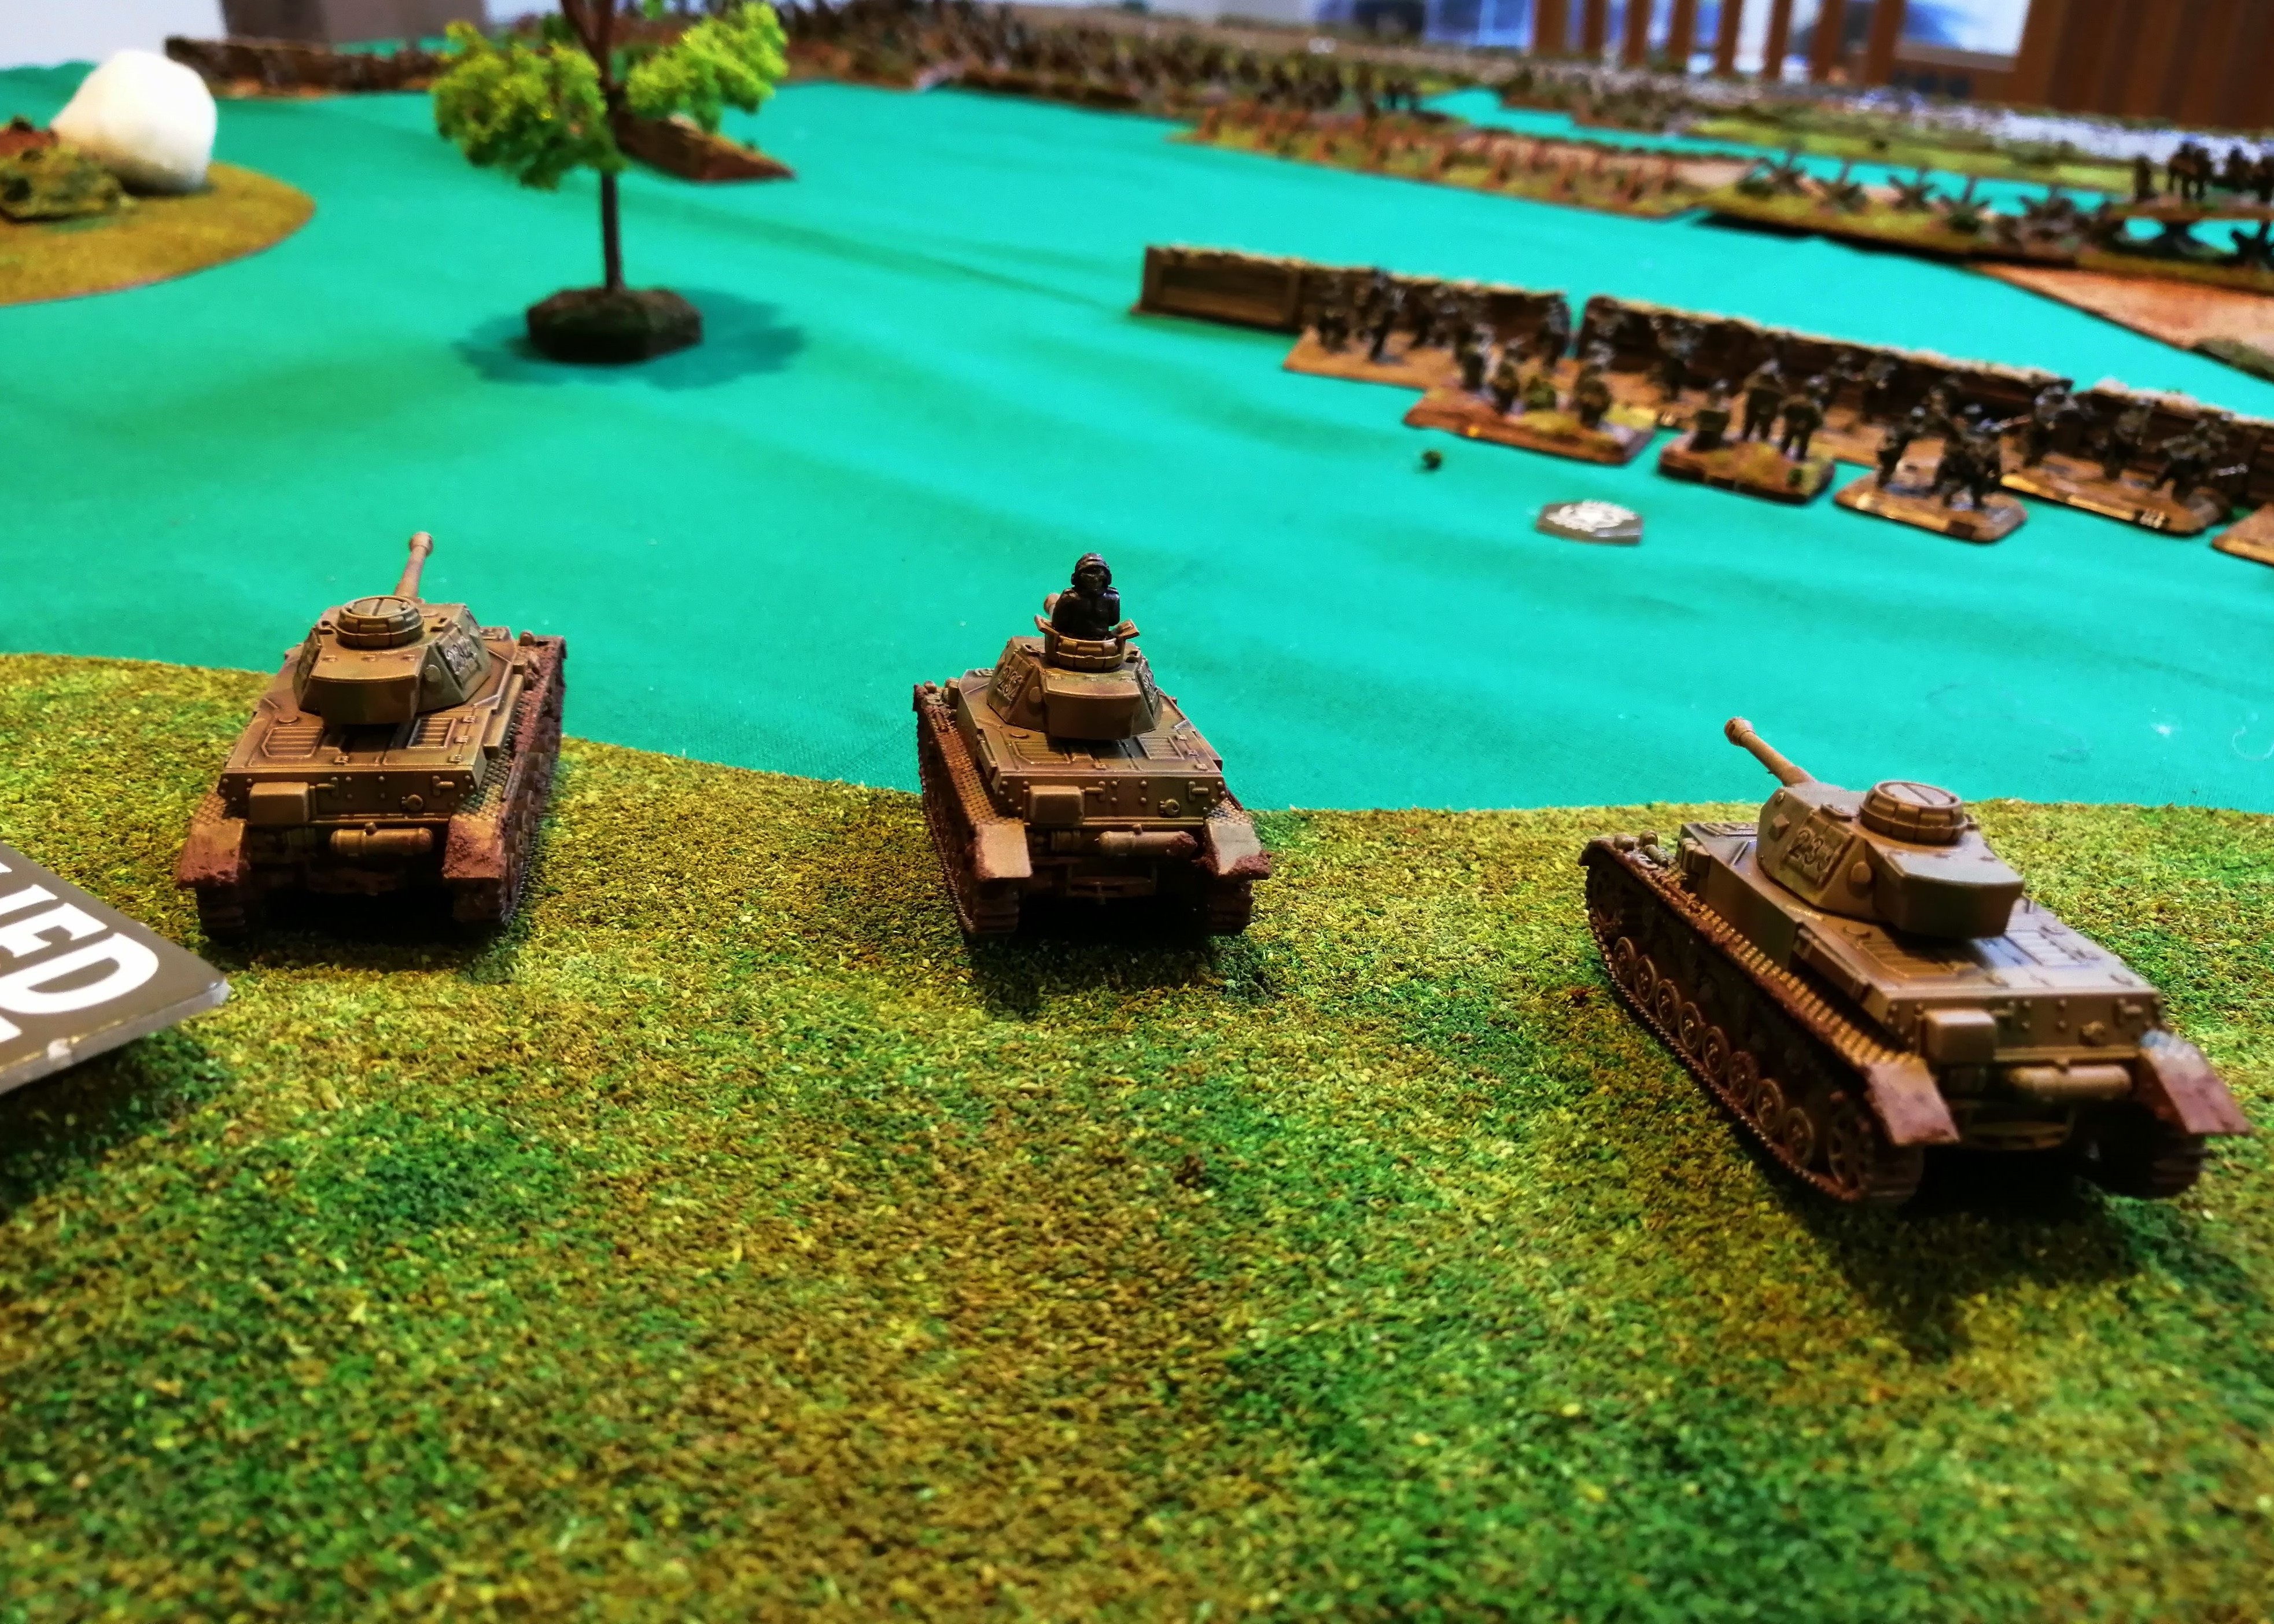
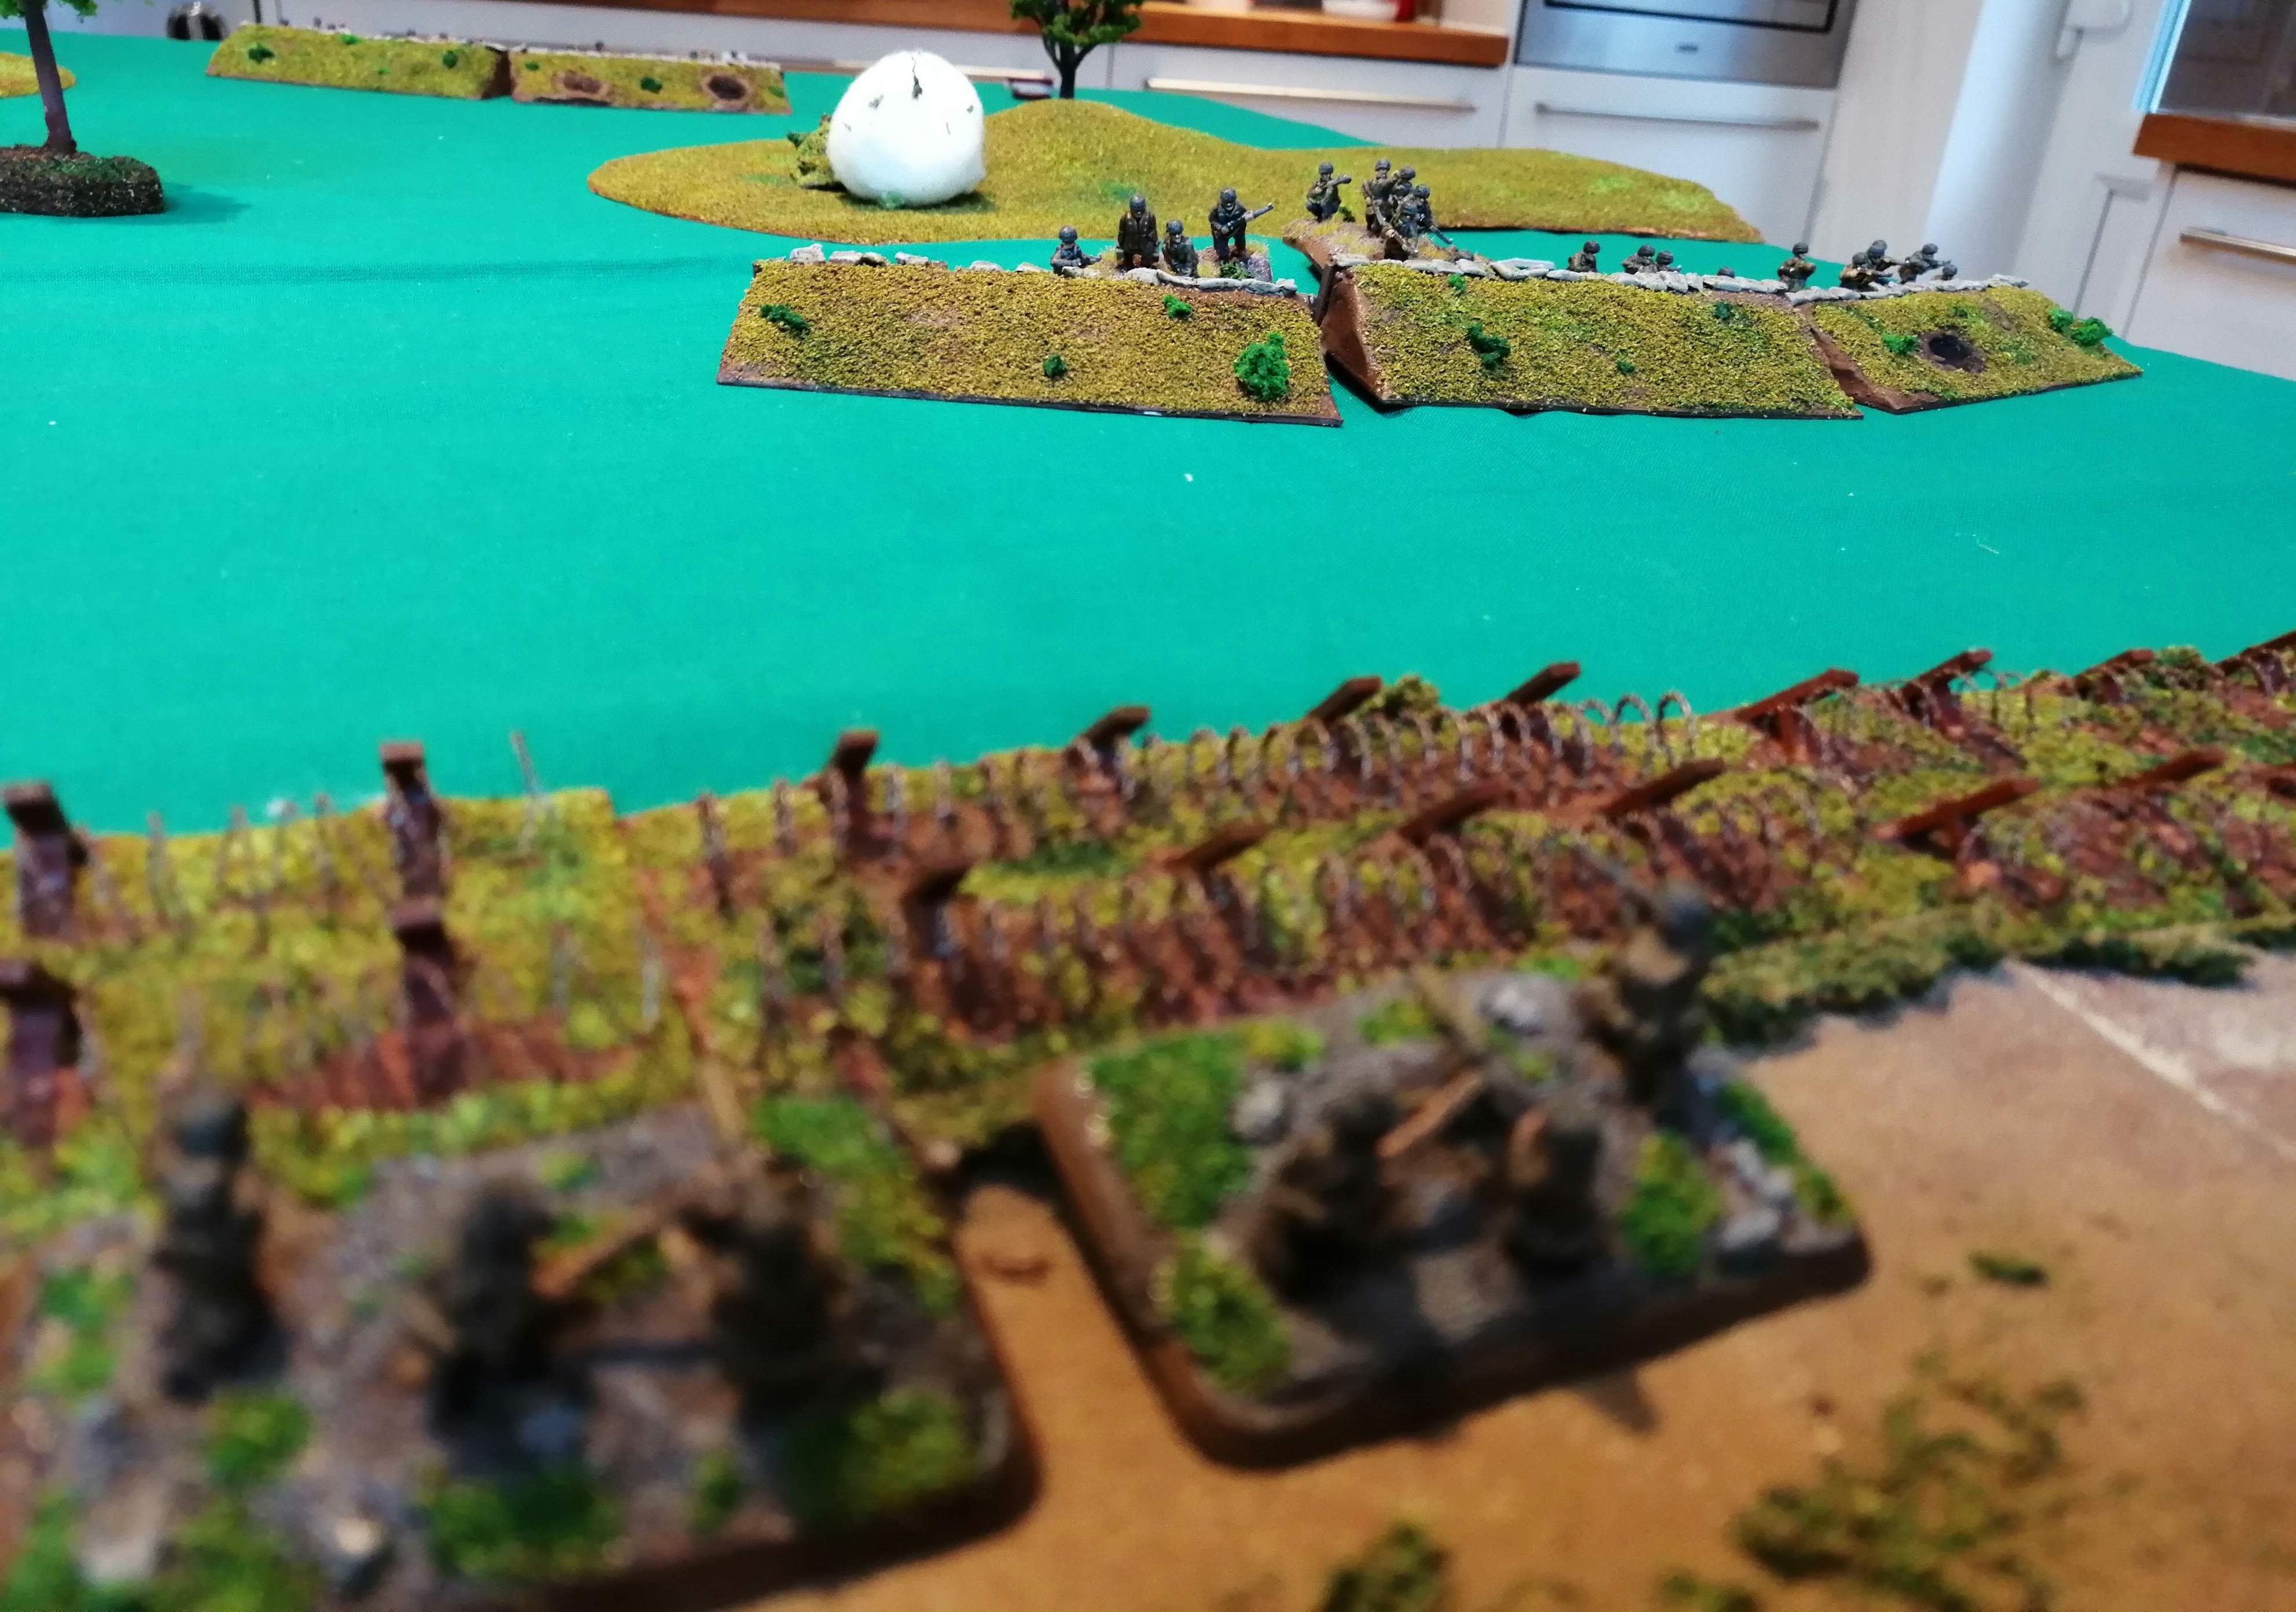
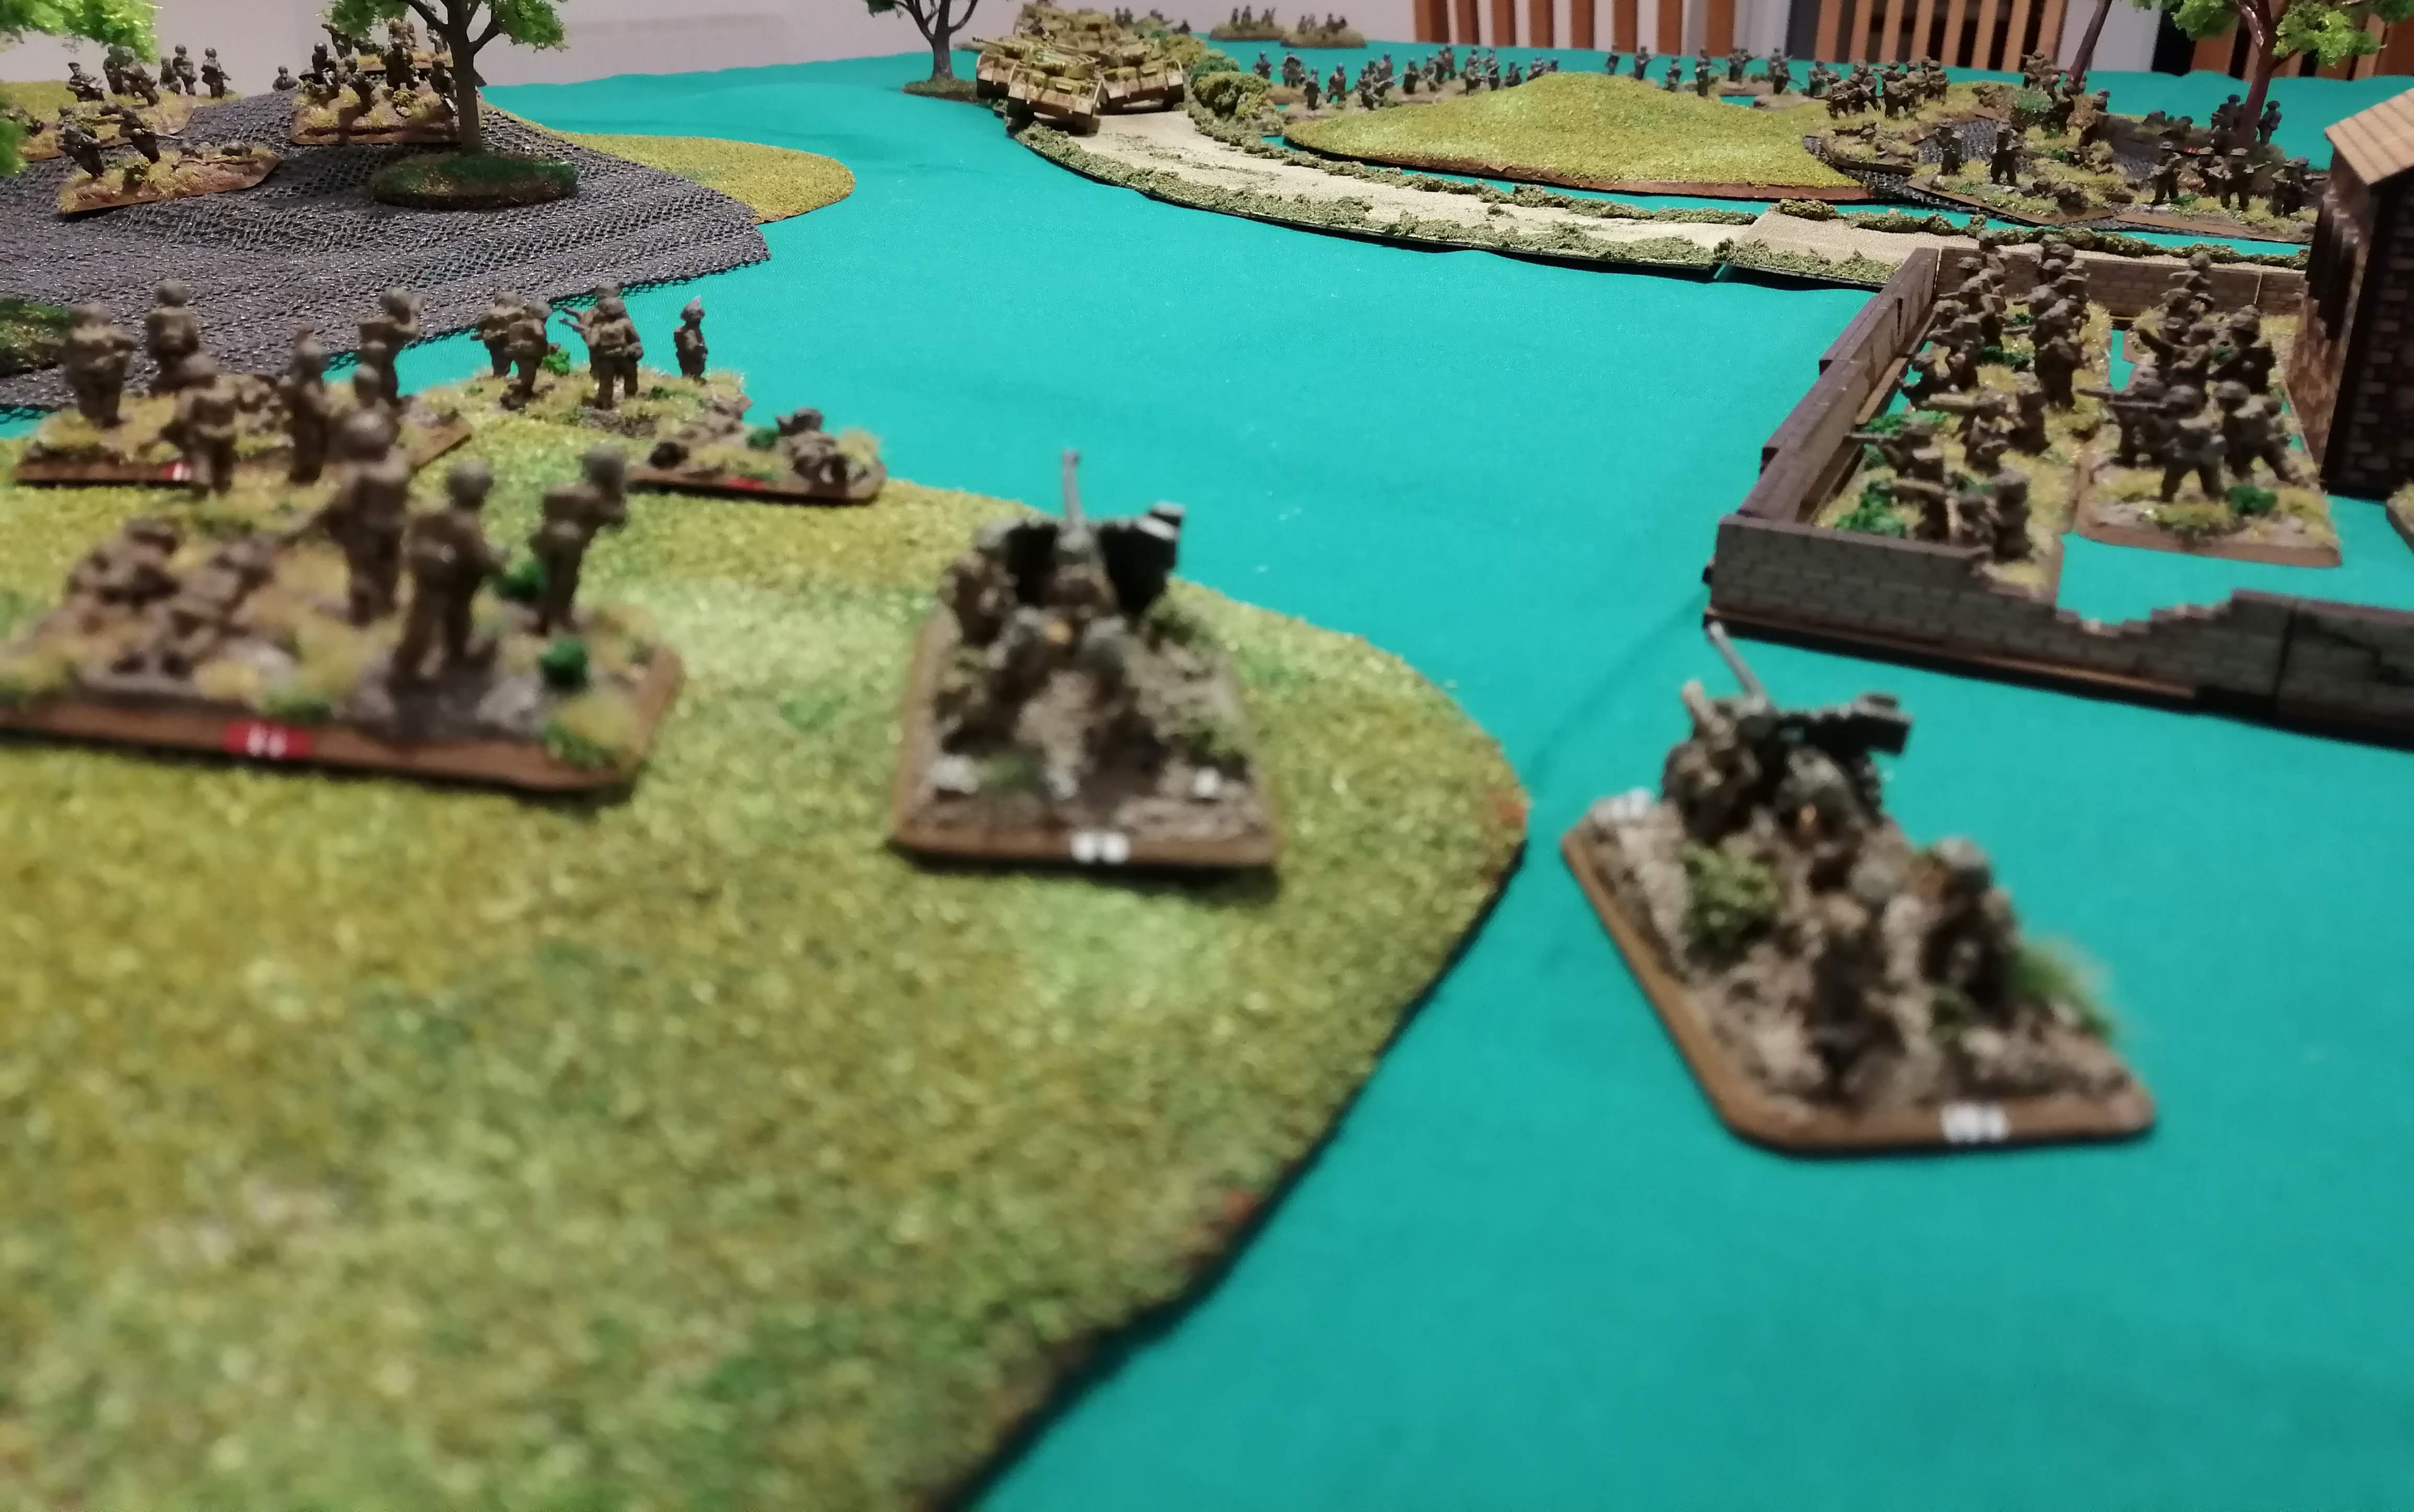 The 6pdr guns have an excellent view down the Via Anziate
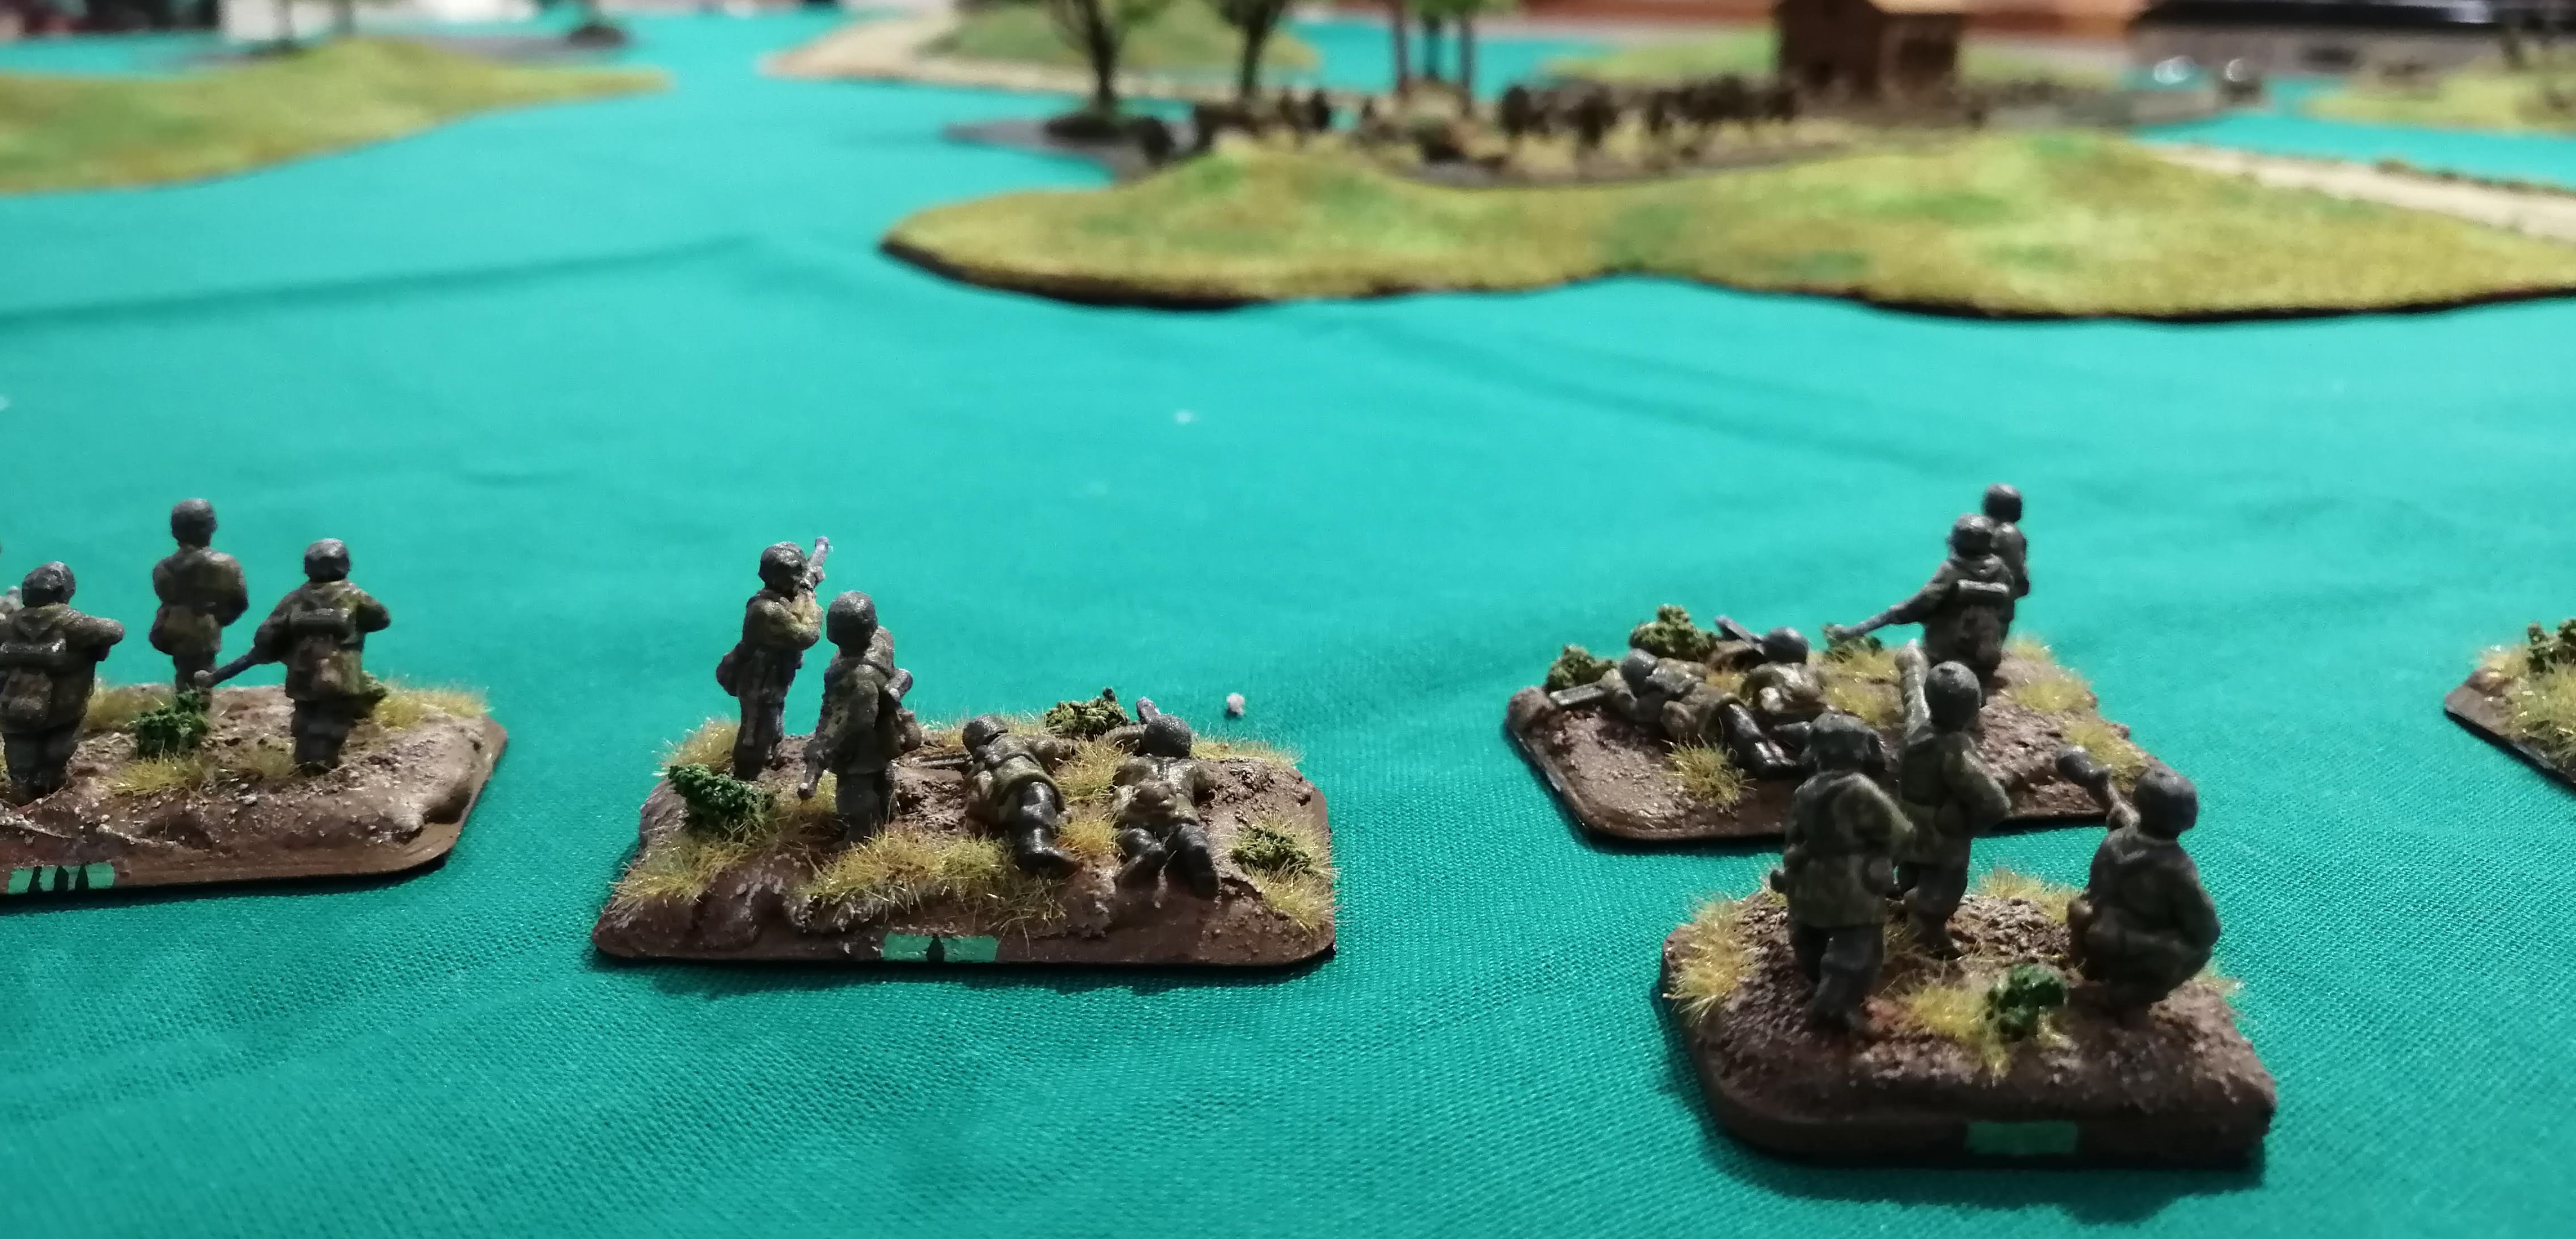
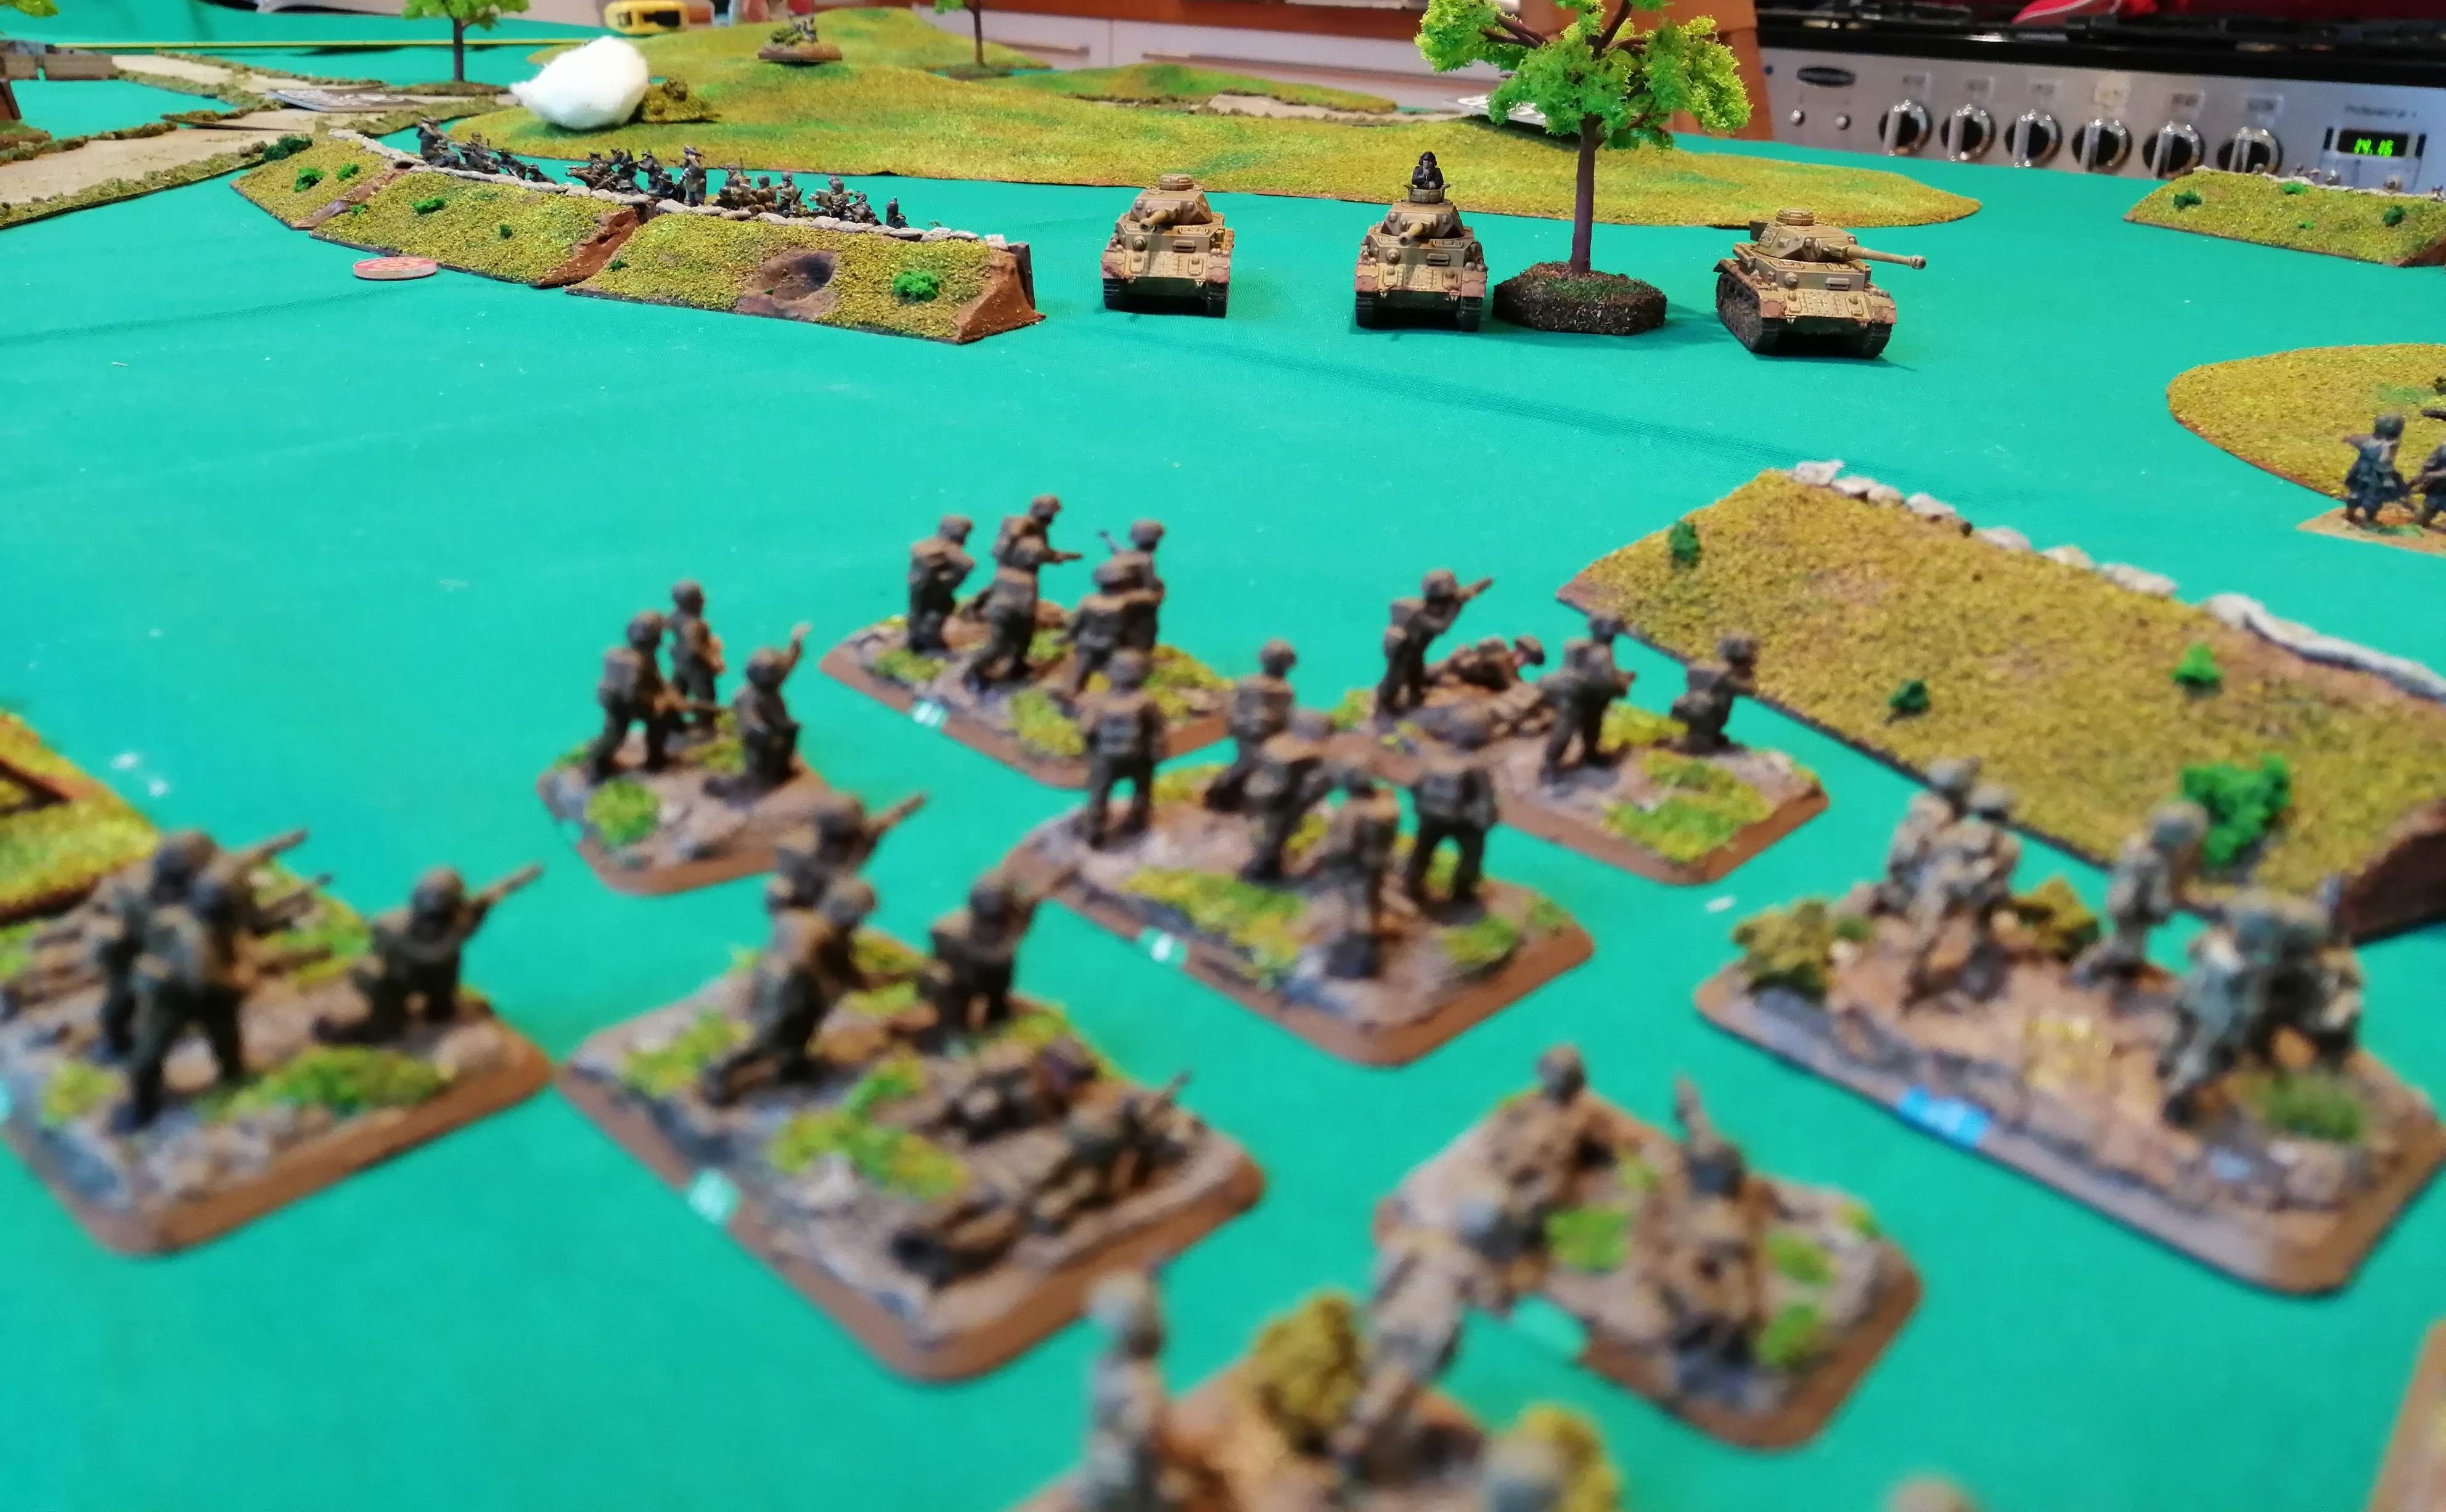
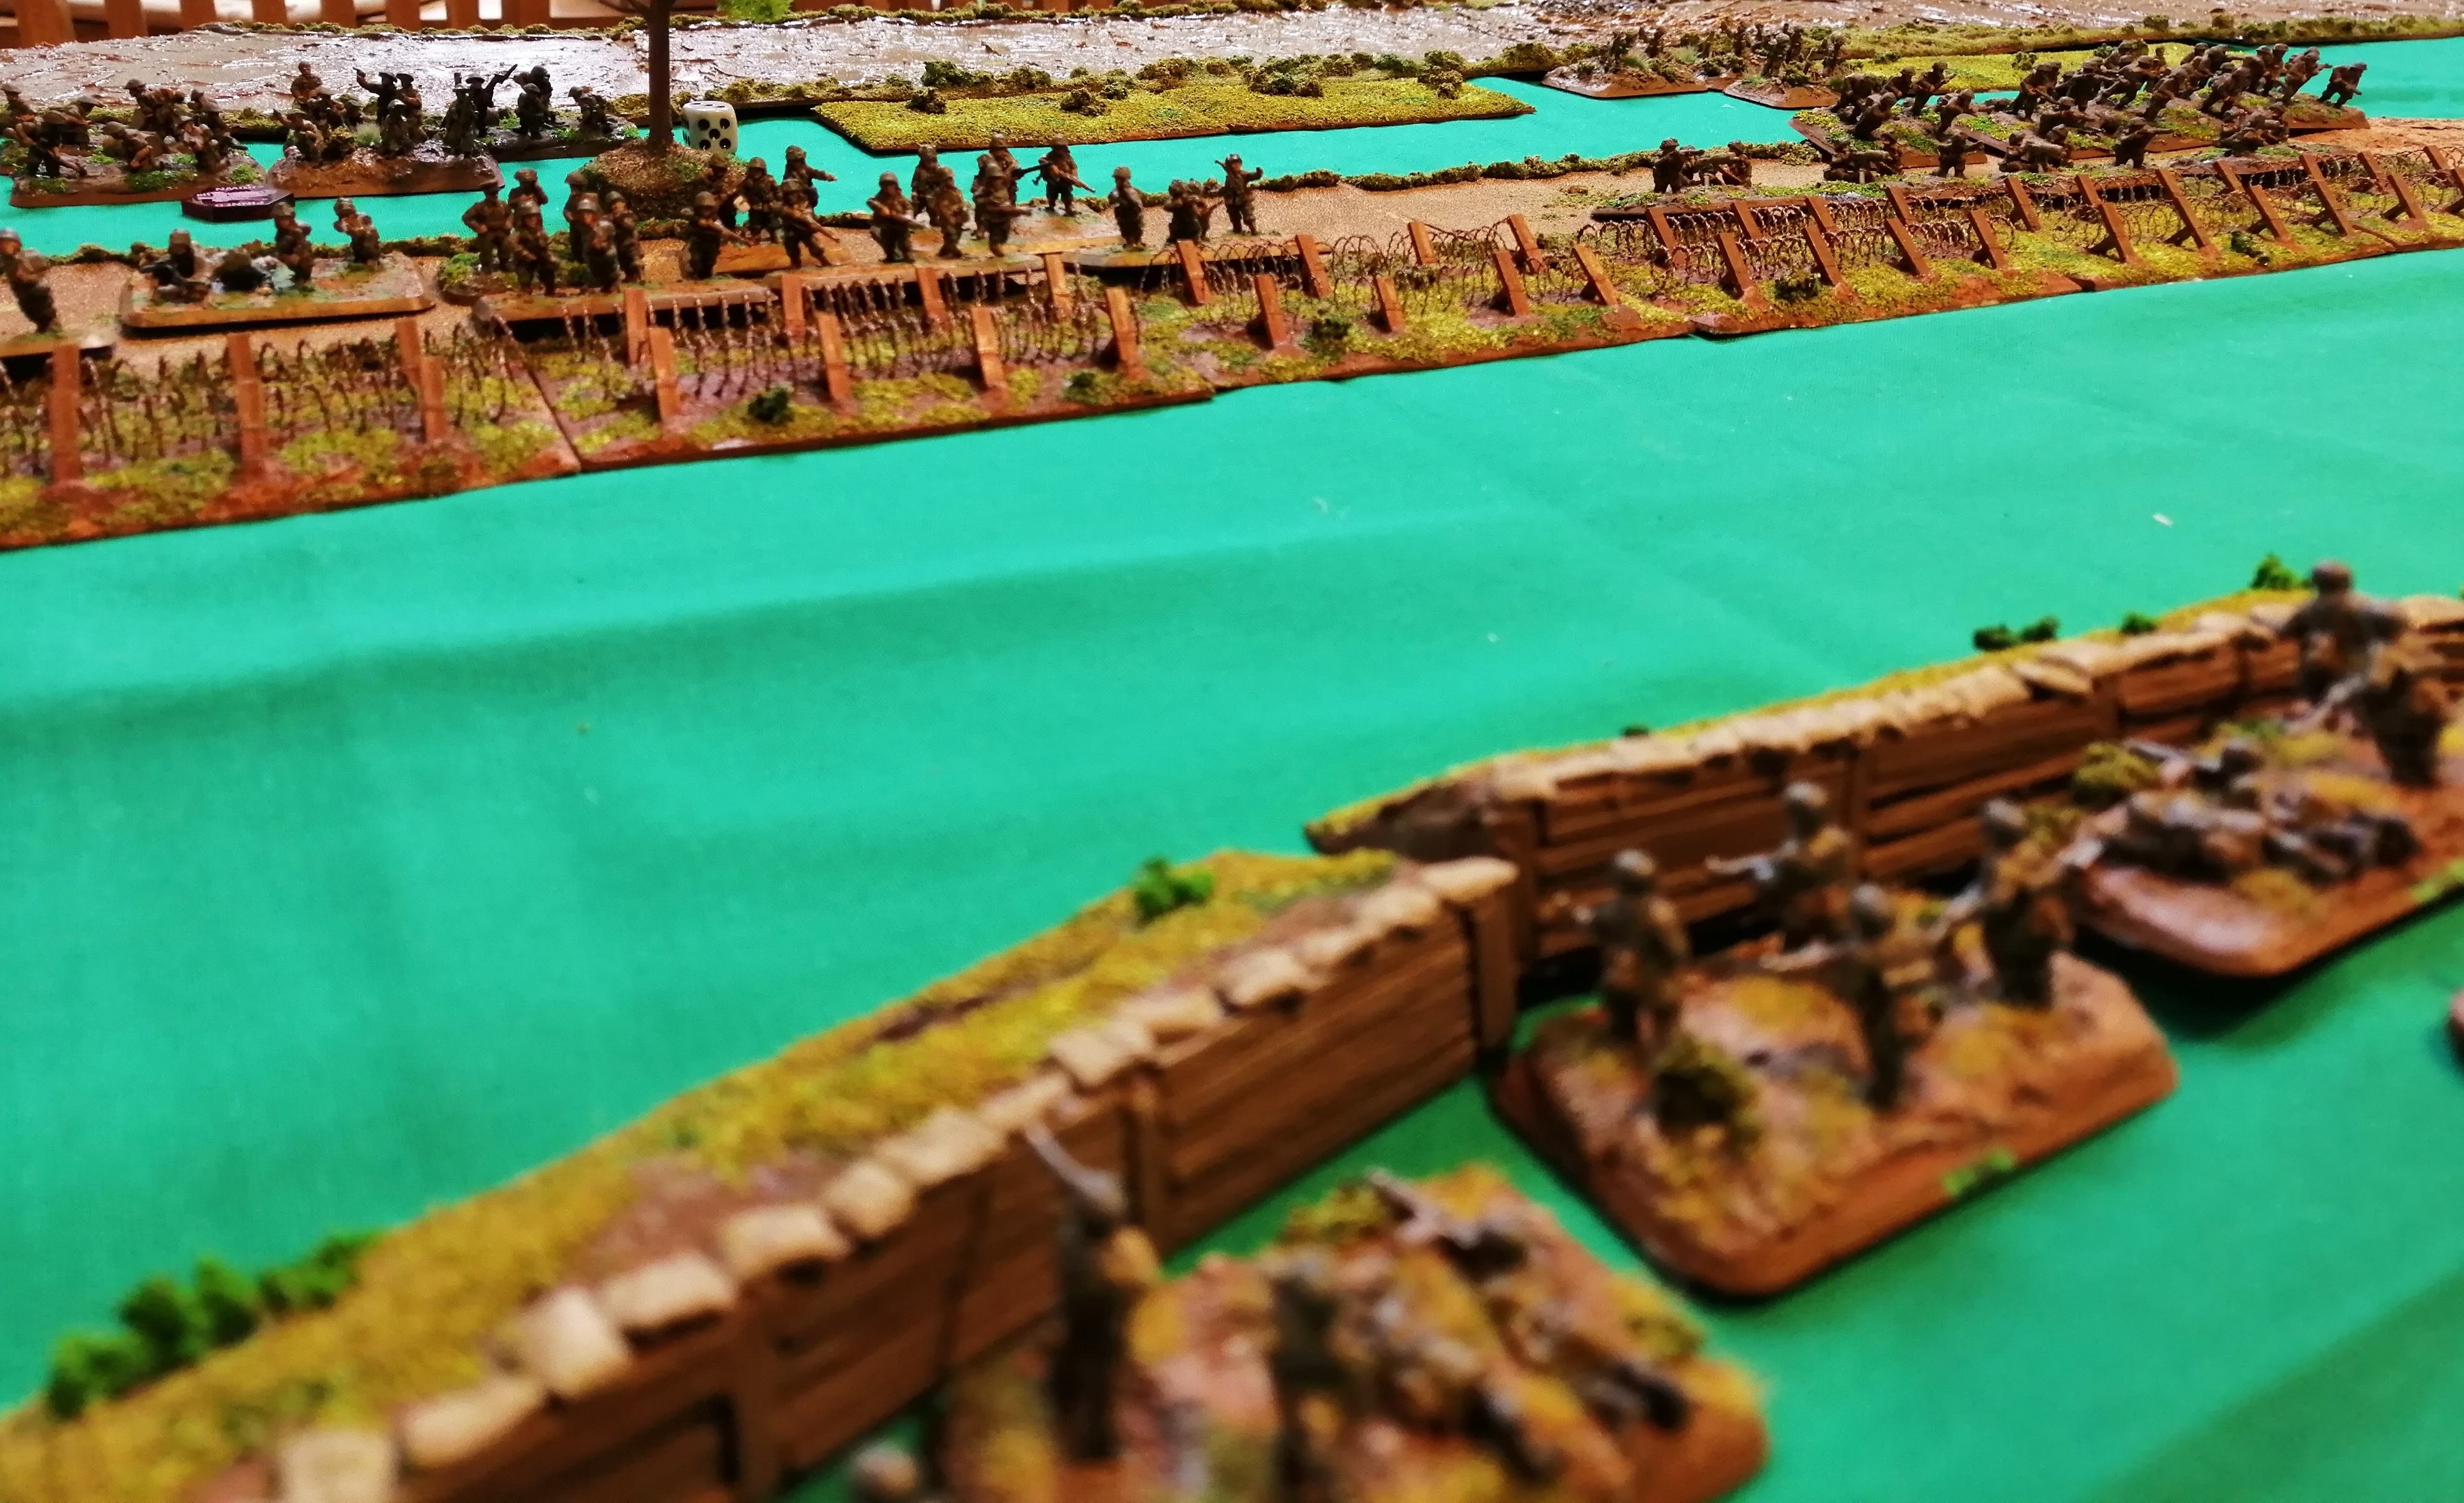
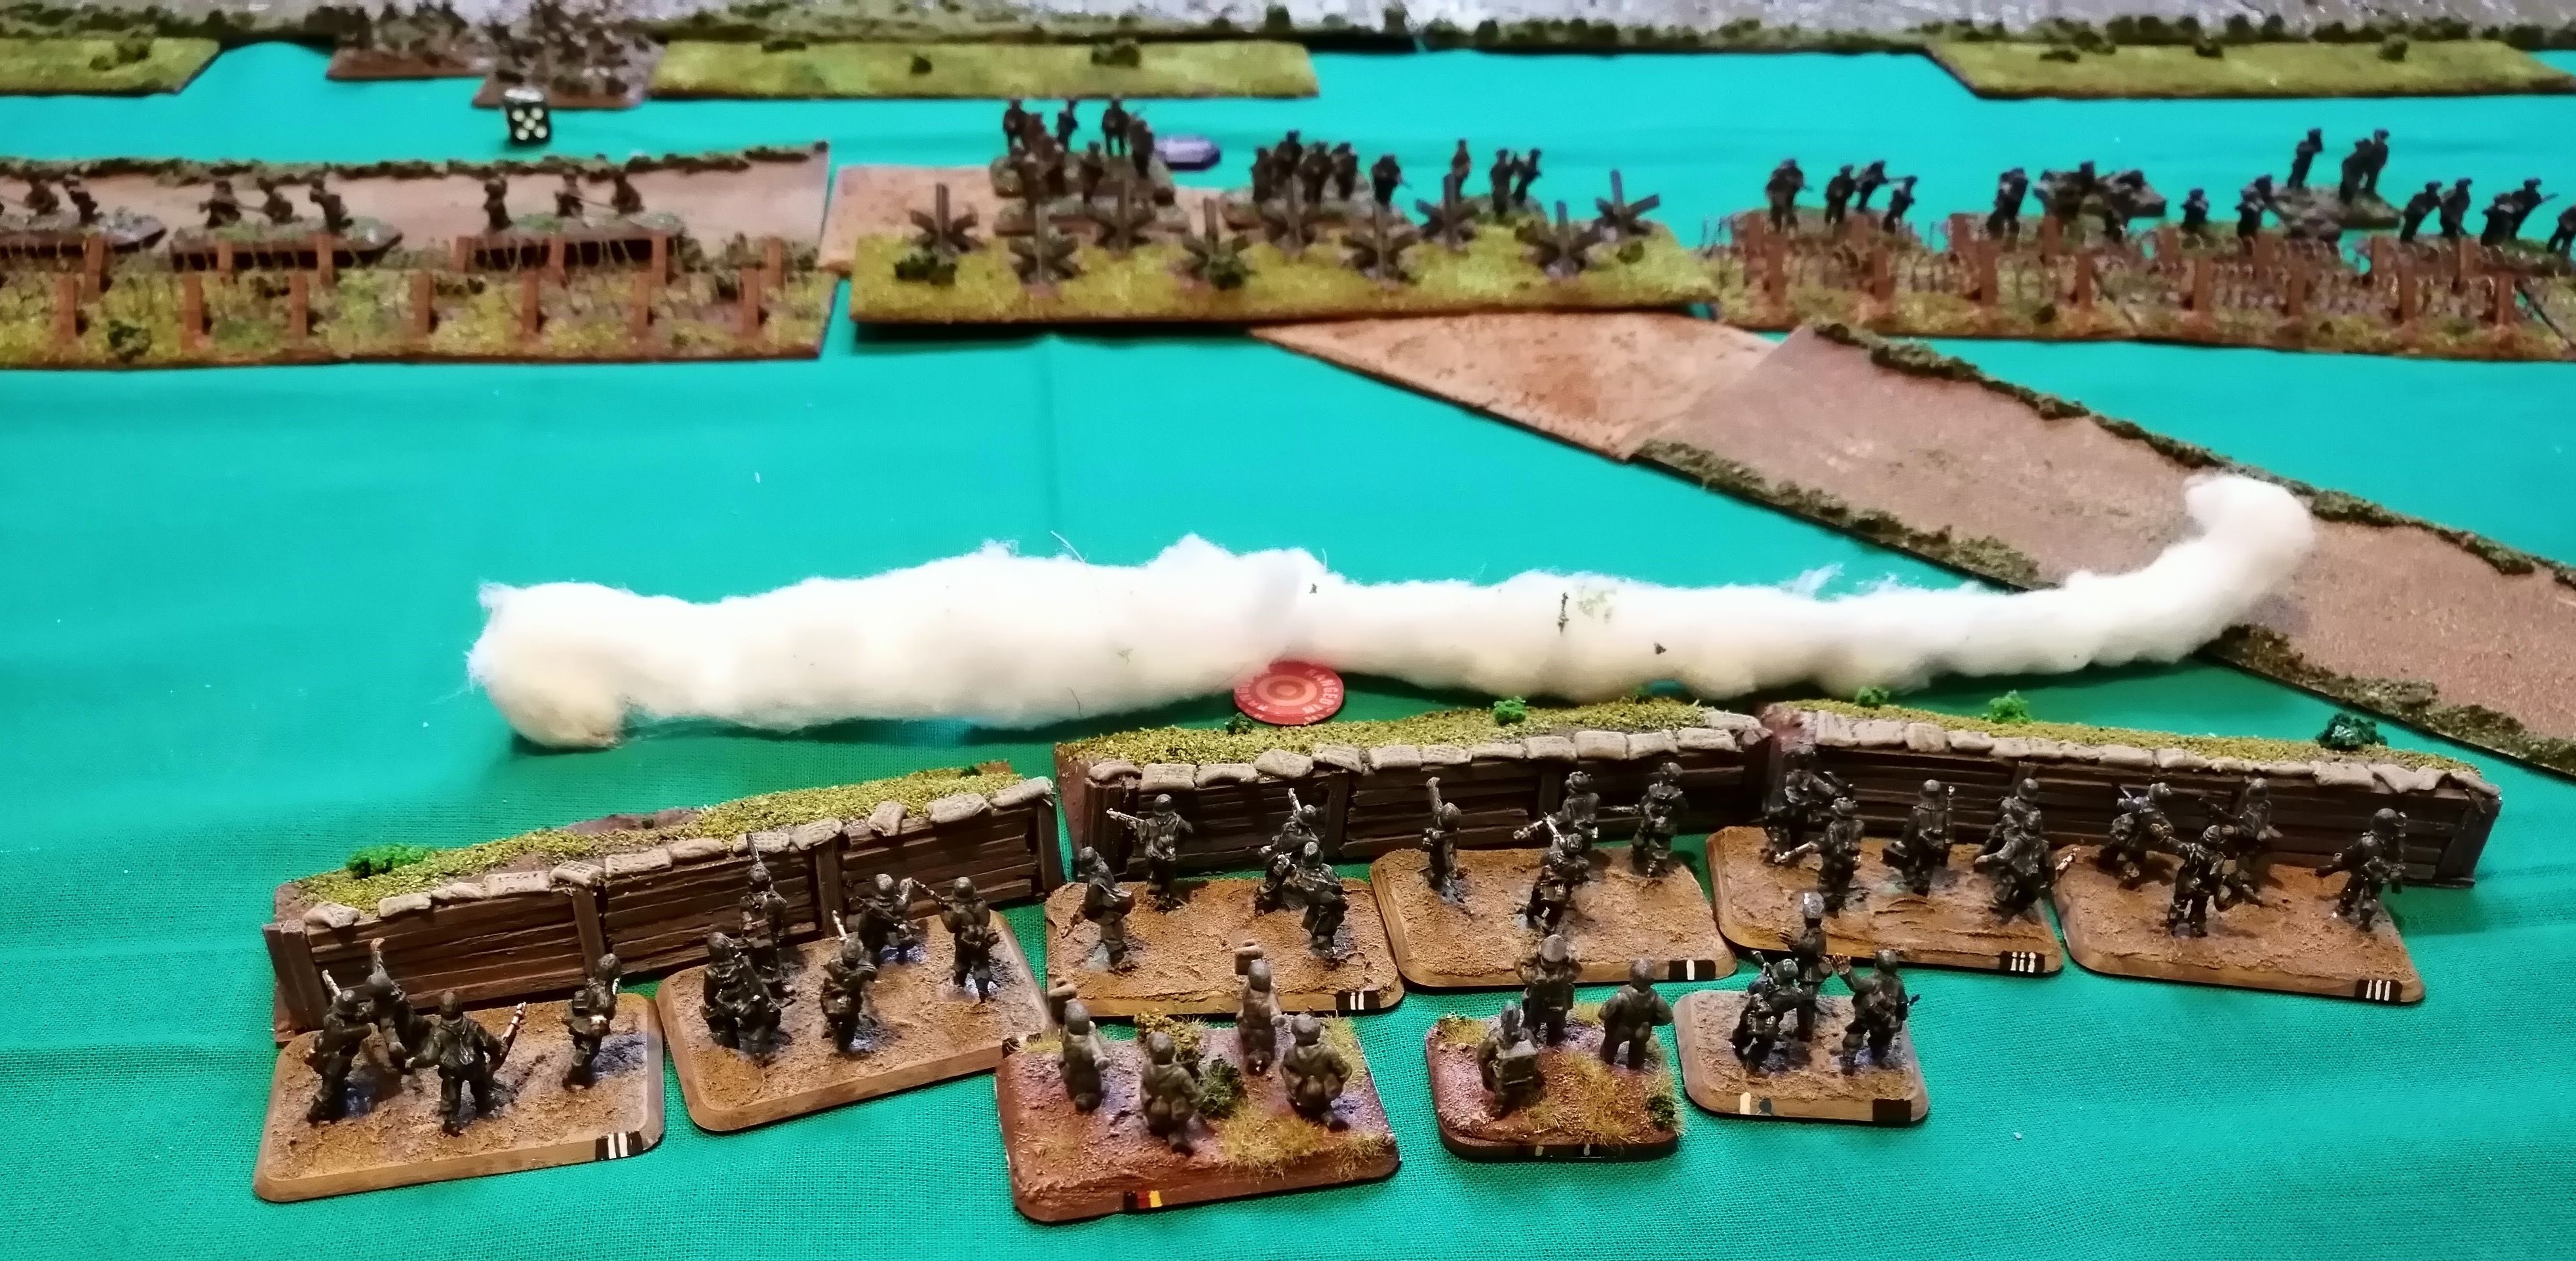
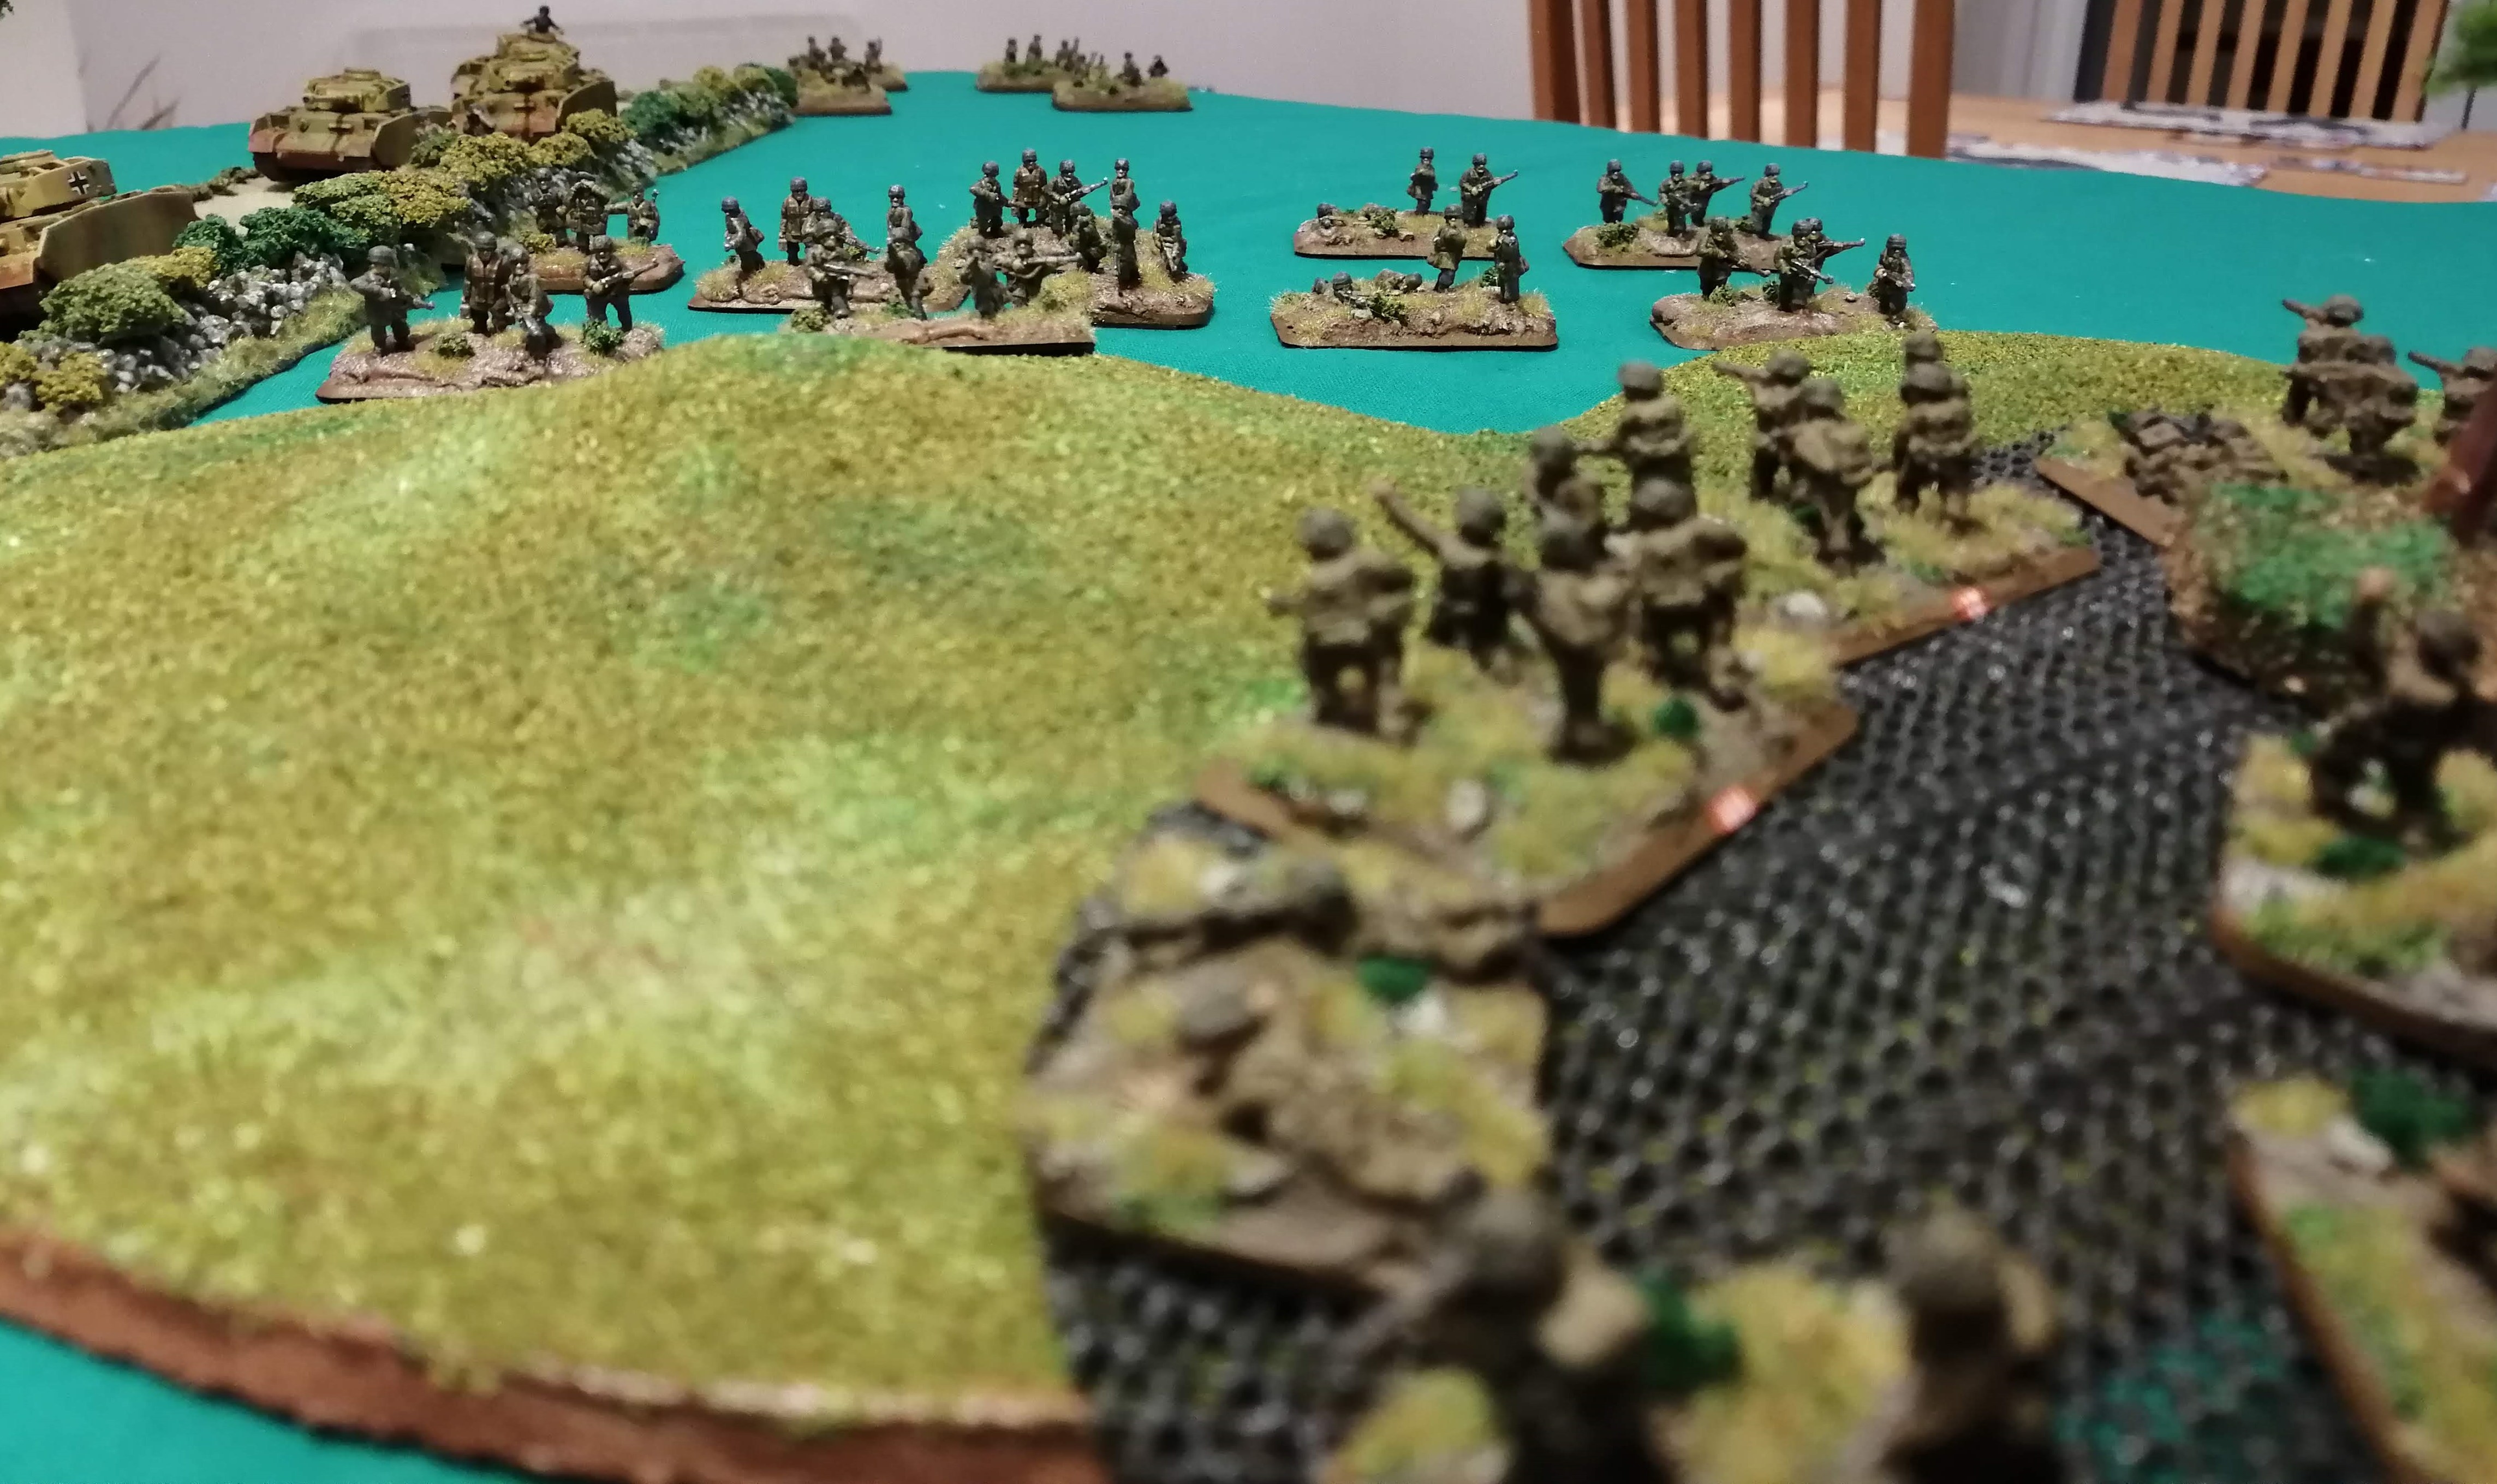 The Sherwood Forresters peer out from their foxholes at the advancing Fallschirmjager
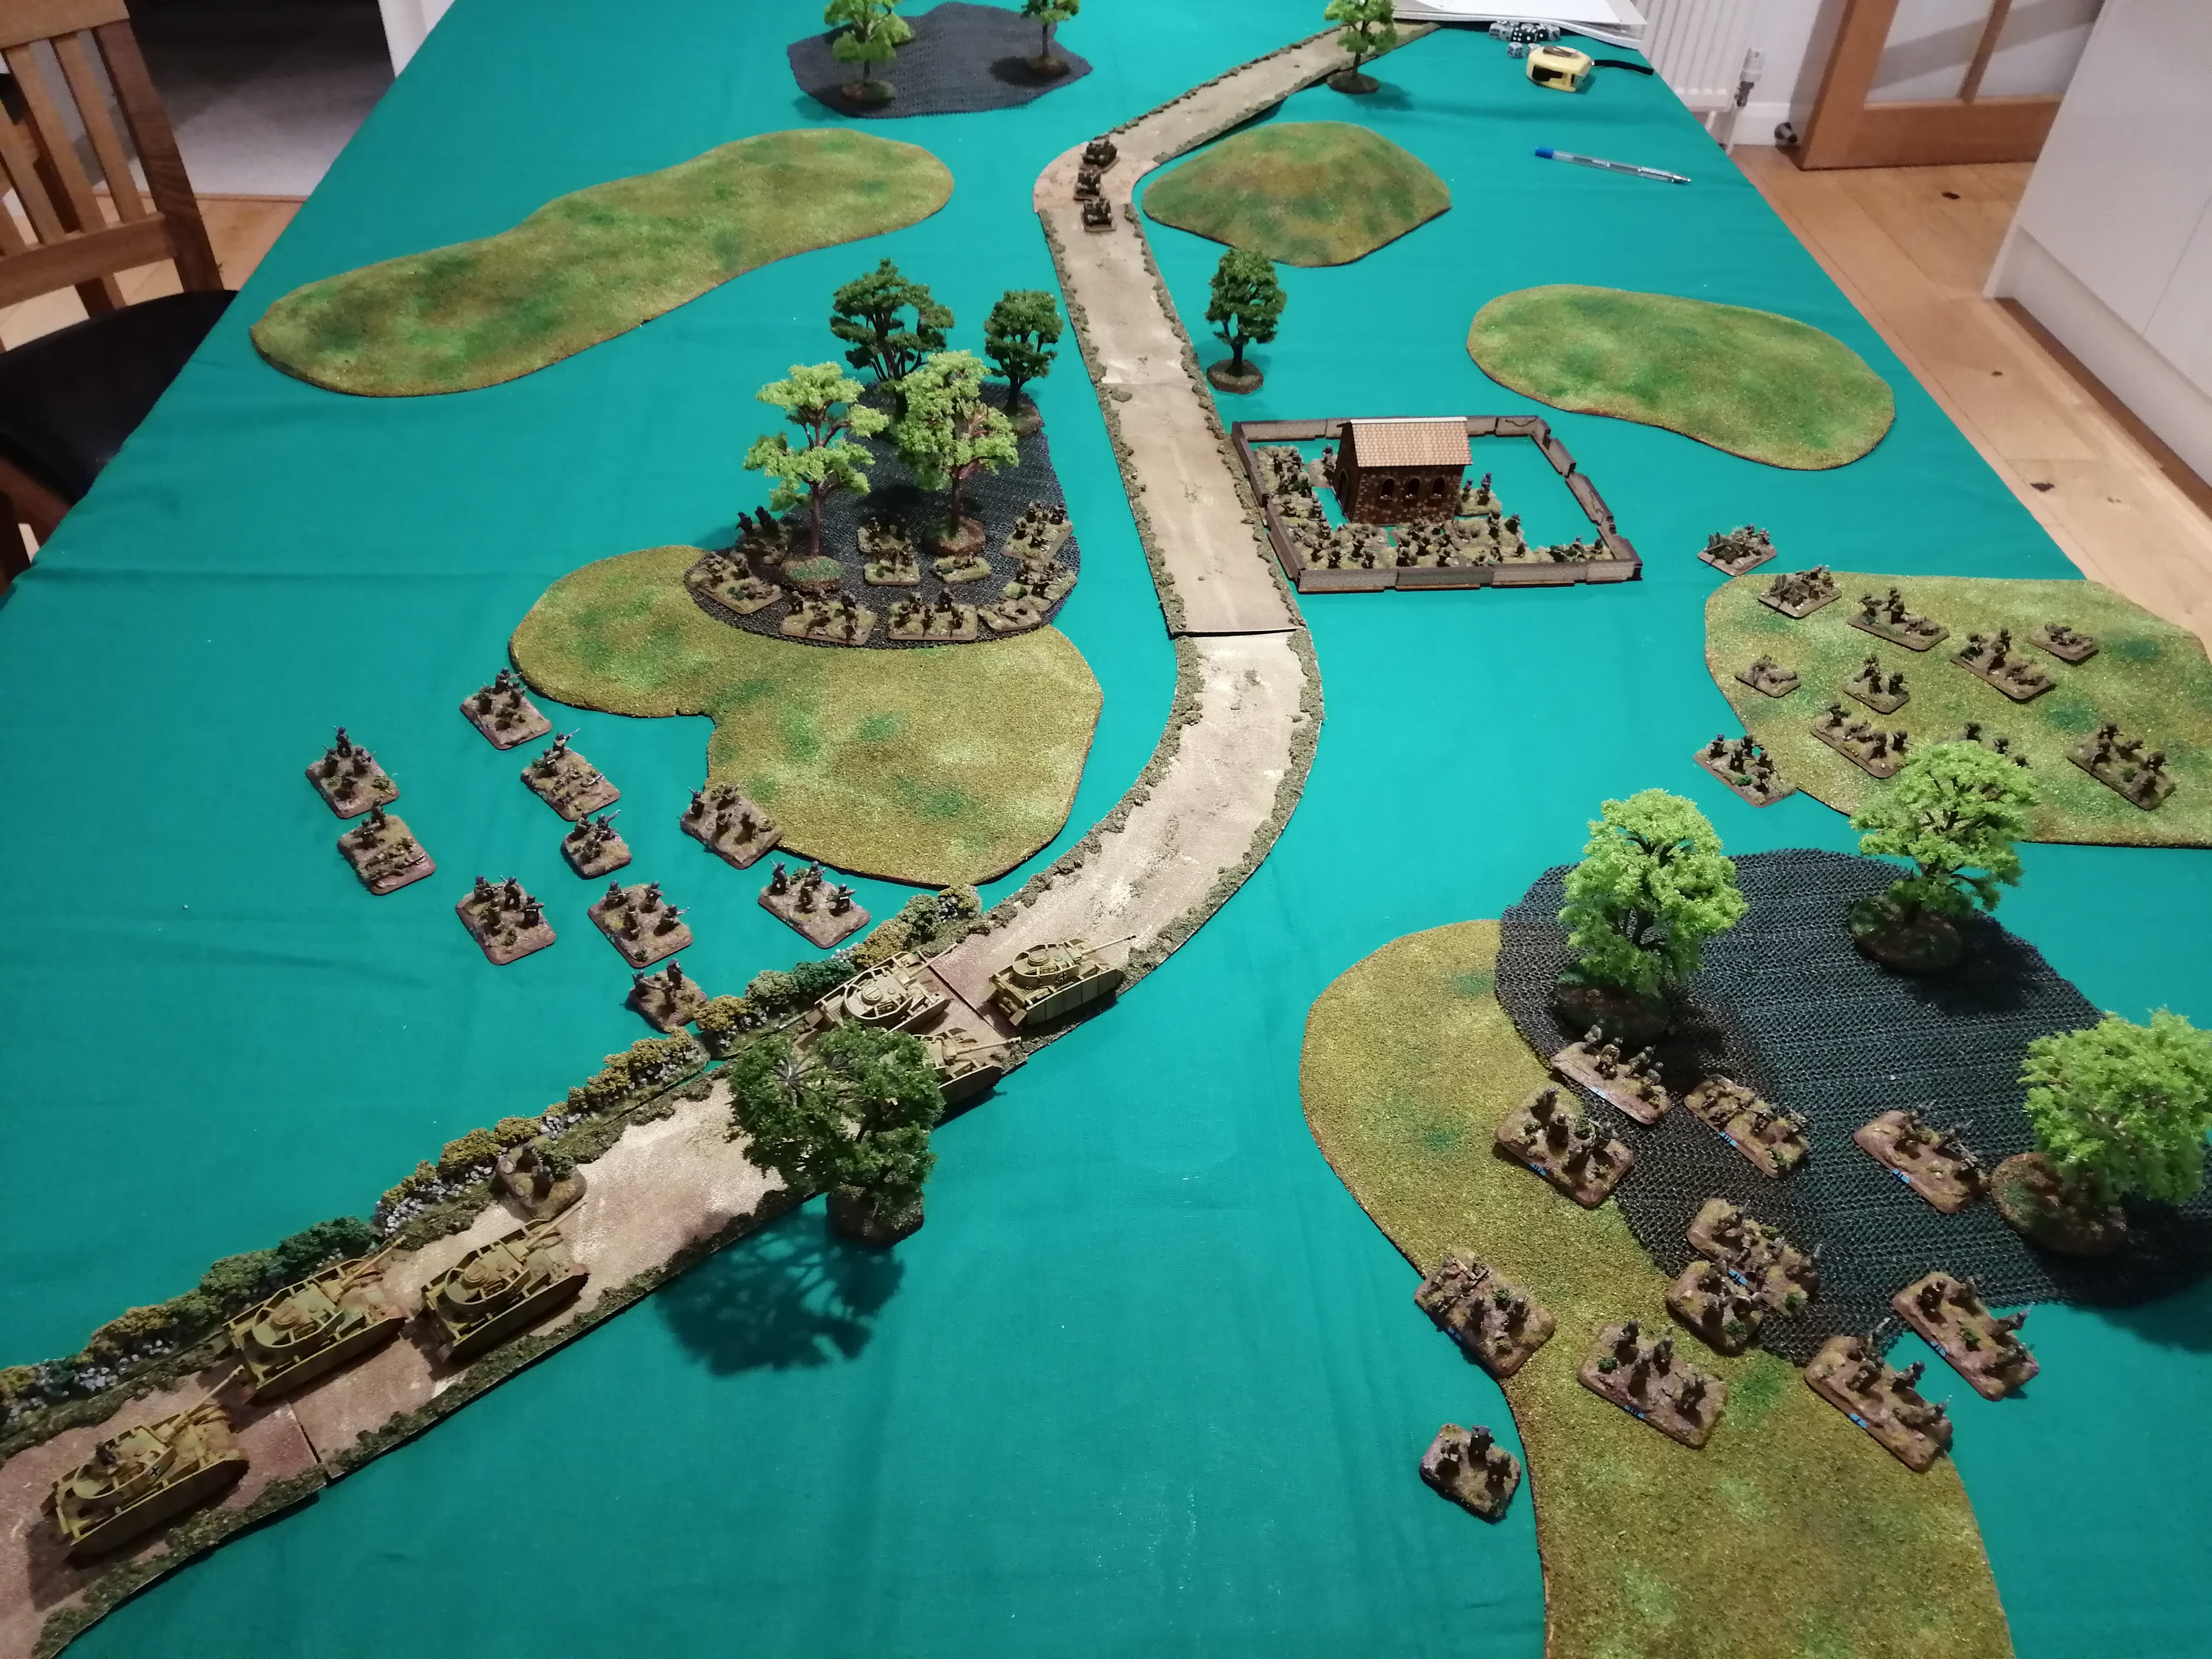
Anzio - Second Table Top Battle (Part 1)
Our second table top battle takes place to the North of Anzio, on 4th February 1944.
British 1st Division – 1st Battalion Sherwood Forresters vs 4th Fallschirmjager and 26th Panzer of 76th Panzer Corps
Background to the battle:
On January 30th 1944, Lucas launched a two pronged attack from the Anzio beach head. British 1st Division thrust North East toward Campeleone up the Via Anziate and, after several days of fighting, they were unable to progress. Worse, British 1st Division had created an exposed, narrow salient stretching up the road. The German forces had continued to gather and by late on 3rd February launched a counter offensive against the troops dug in just South of Campeleone.
By midday on 4th February the situation was deteriorating quickly for the British as their organisation and defensive line crumbled. Many units found themselves cut off and surrounded and were fighting desperately. A number of battalions, including the Sherwood Forresters, found themselves isolated and tried to hold their ground. As the day wore on, losses mounted and at 5pm, they were ordered to enact a fighting withdrawal. The 168th Infantry Regiment, supported by the 46th Royal Tank Regiment, punched through the surrounding Germans to support the withdrawal.
In this battle, we focus upon the 1st Battlion Sherwood Forresters who have been cut off toward the tip of the salient and have dug in around a small chapel just off of Via Anziate. Heading down the road from the North are the 4th Fallschirmjager supported by two panzer platoons, with orders to remove the British as quickly as possible.
Game Scenario: This game hinges around the British ability to extract as many troops as possible from the front line. The Germans need to push forward and destroy as many of the British forces as quickly as possible.
The British deploy within 12” of the chapel and start the game dug in, concealed and gone to ground. The lead element of 168th, three universal carriers, are placed on the road at the Southern table edge at the start of the game and can move freely from turn 1
The British must hold their positions until the end of Turn 3. From Turn 4 onwards, the British can begin to with draw to the road on the southern edge of the board. When within 6” of the road and board edge, they are removed and considered successfully extracted.
At the beginning of Turn 4, a platoon of Shermans from 46th RTR arrives at the Southern edge of the board on the road. A second platoon of Shermans arrive at the start of turn 5. The Shermans do not count toward the victory conditions and are not extracted.
The Germans start the game on the Northern edge, deployed within 12” of the road and table edge. This will place the two forces very close together at the start of the game. At the start of Turn 2, a third platoon of Fallschirmjager arrives.
Victory Conditions.
The British receive 1VP for each platoon they successfully extract (not including the Universal Carriers or Sherman Platoons).
The Germans receive 1VP for each British Infantry or Gun platoon they destroy (not including the universal Carriers or Sherman Platoons)
Order of Battle:
British: 1st Battalion Sherwood Forresters (rated Confident/Trained)
1st and 2nd in Command (1iC, 2iC) Rifle Teams
3 Rifle Platoons (Cmd team, 2” mortar team, Piat Team, 6 Rifle/MG teams)
1 MG Platoon (2 teams armed with Vickers Medium MG)
1 Anti Tank Platoon (2 teams with 6pdr anti tank guns)
3 Universal Carriers
2 Tank Platoons (3 identical Sherman Tanks) held in reserve
German: 76th Panzer Division (Fallschirmjager rated Fearless/Veteran. Tanks Rated Confident/Veteran)
1st and 2nd in Command (1iC, 2iC) SMG teams
3 Fallschirmjager Platoons (Cmd team, 9 Rifle/MG teams) 1 Platoon in reserve
1 Fallschirmjager Mortar Platoon (4 teams with 8cm mortar, Spotter team)
2 Tank Platoons (3 identical Panzer IV H)
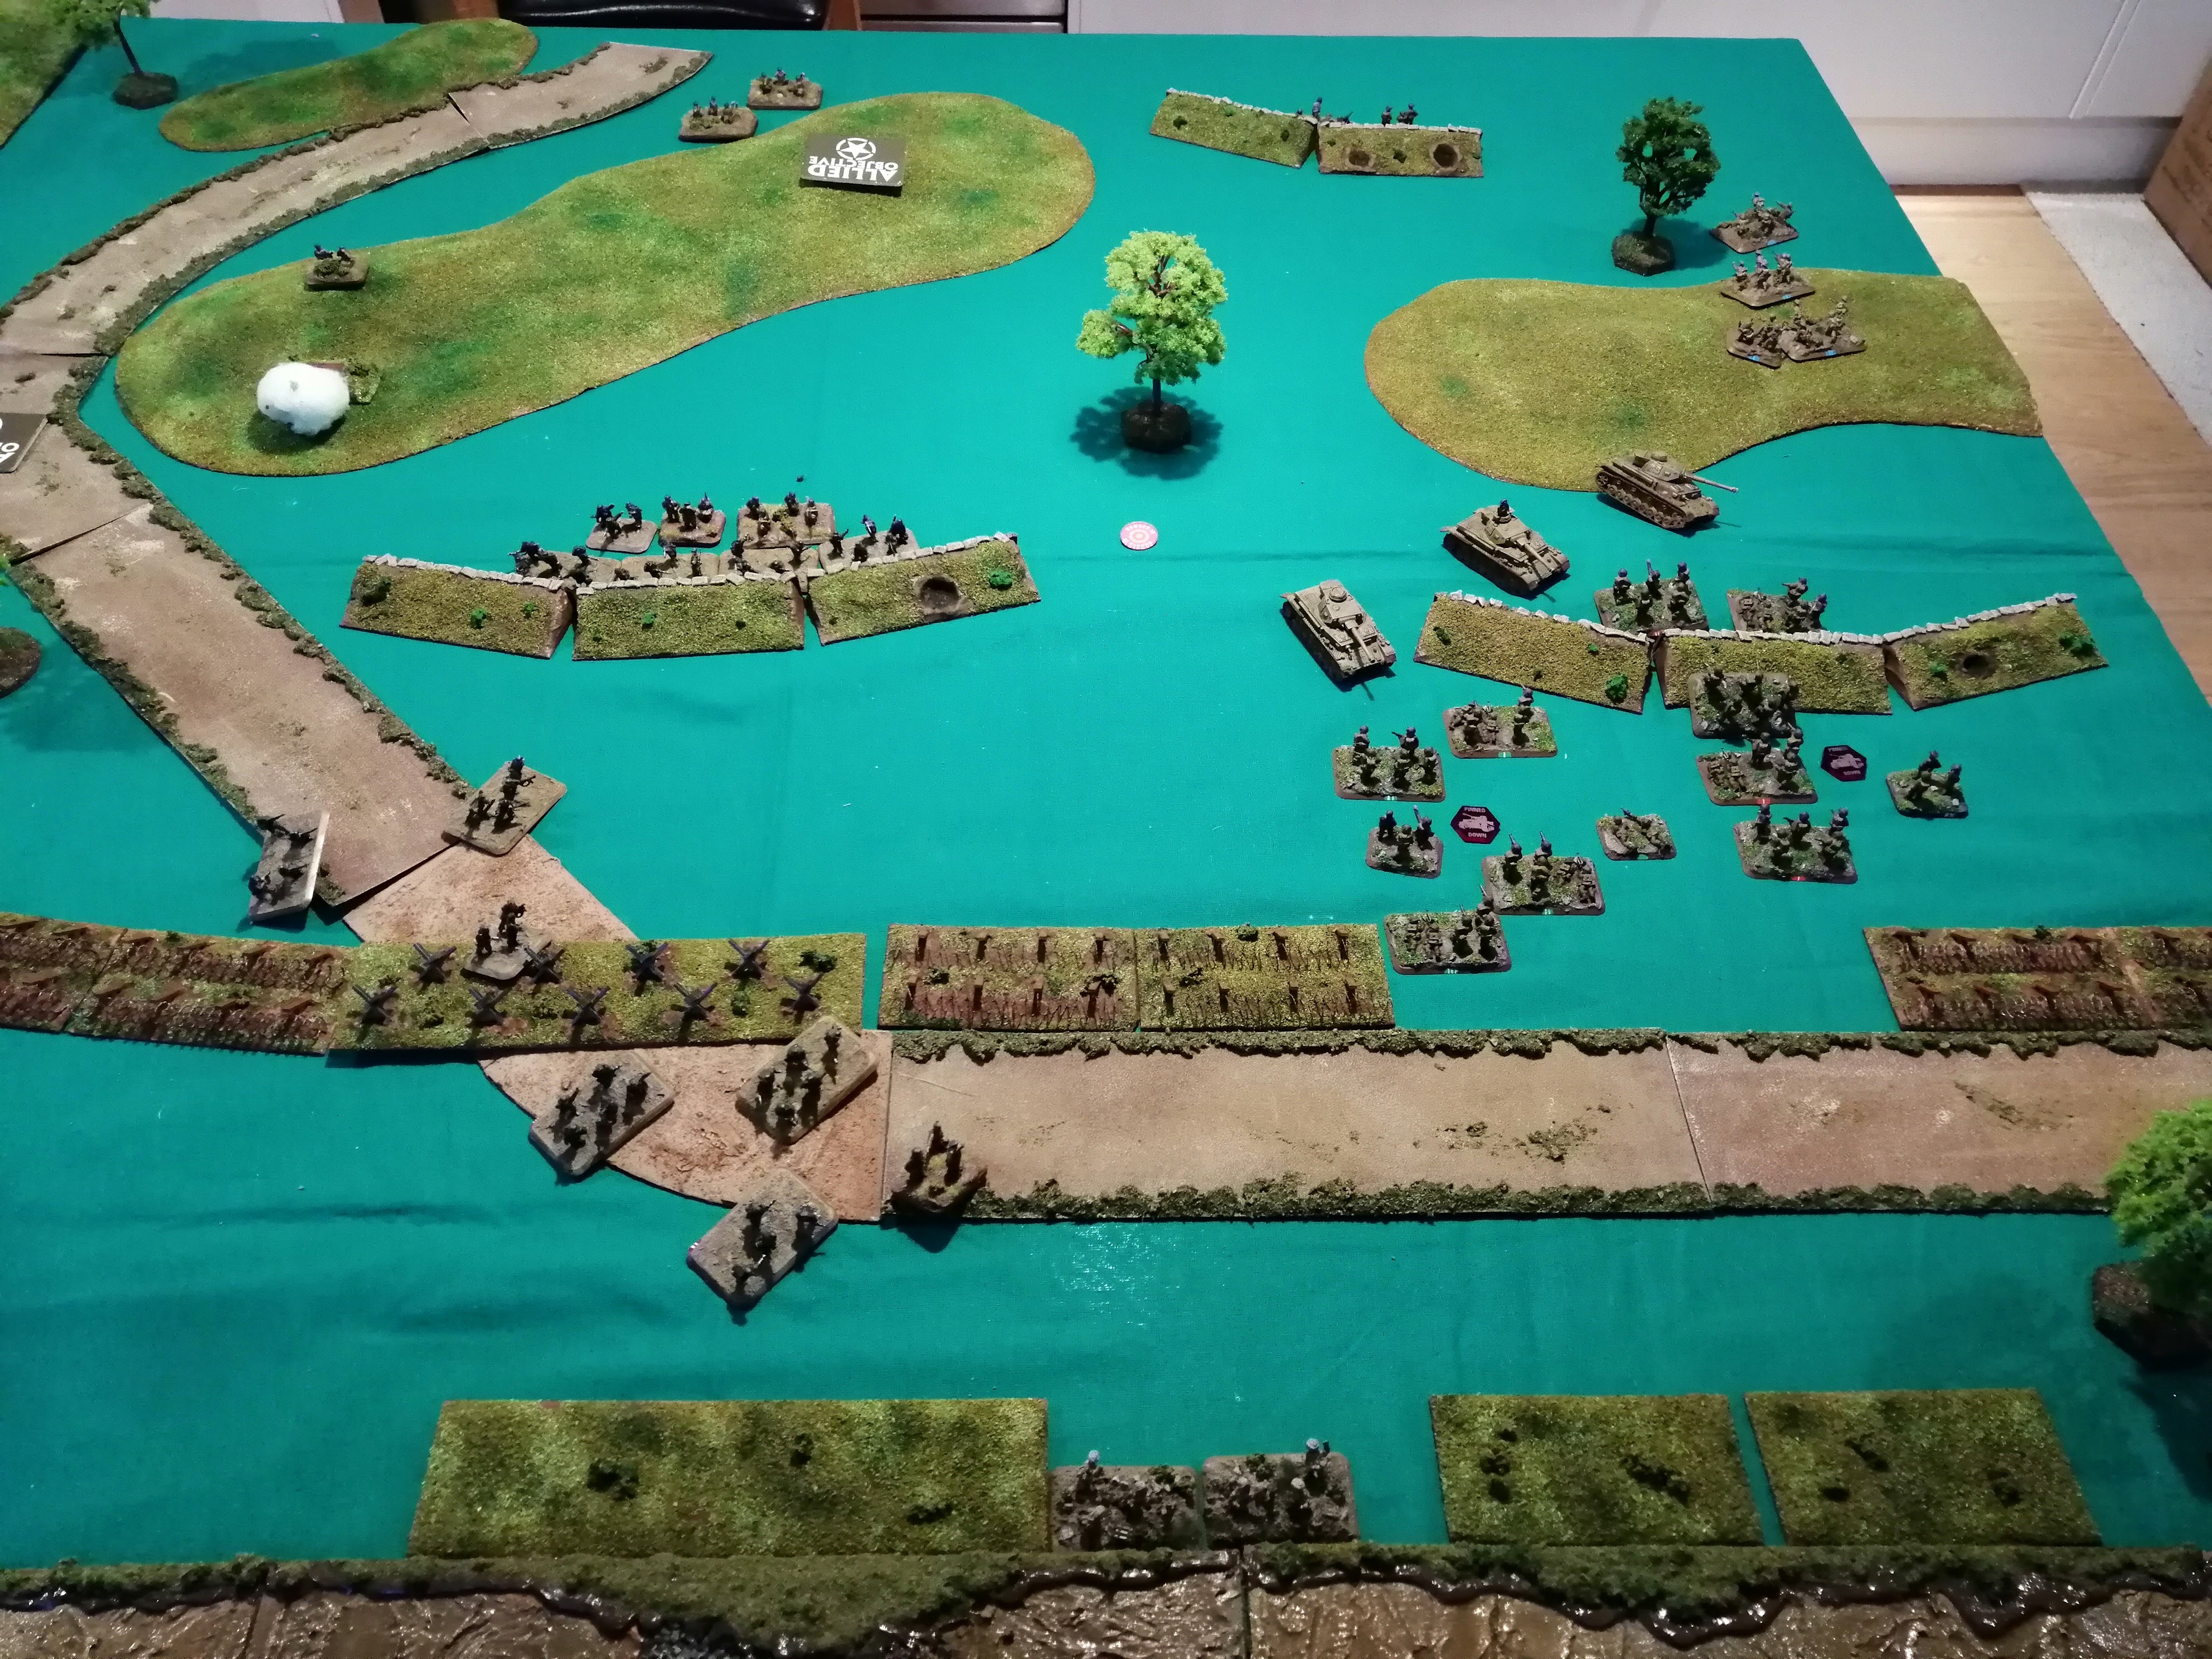
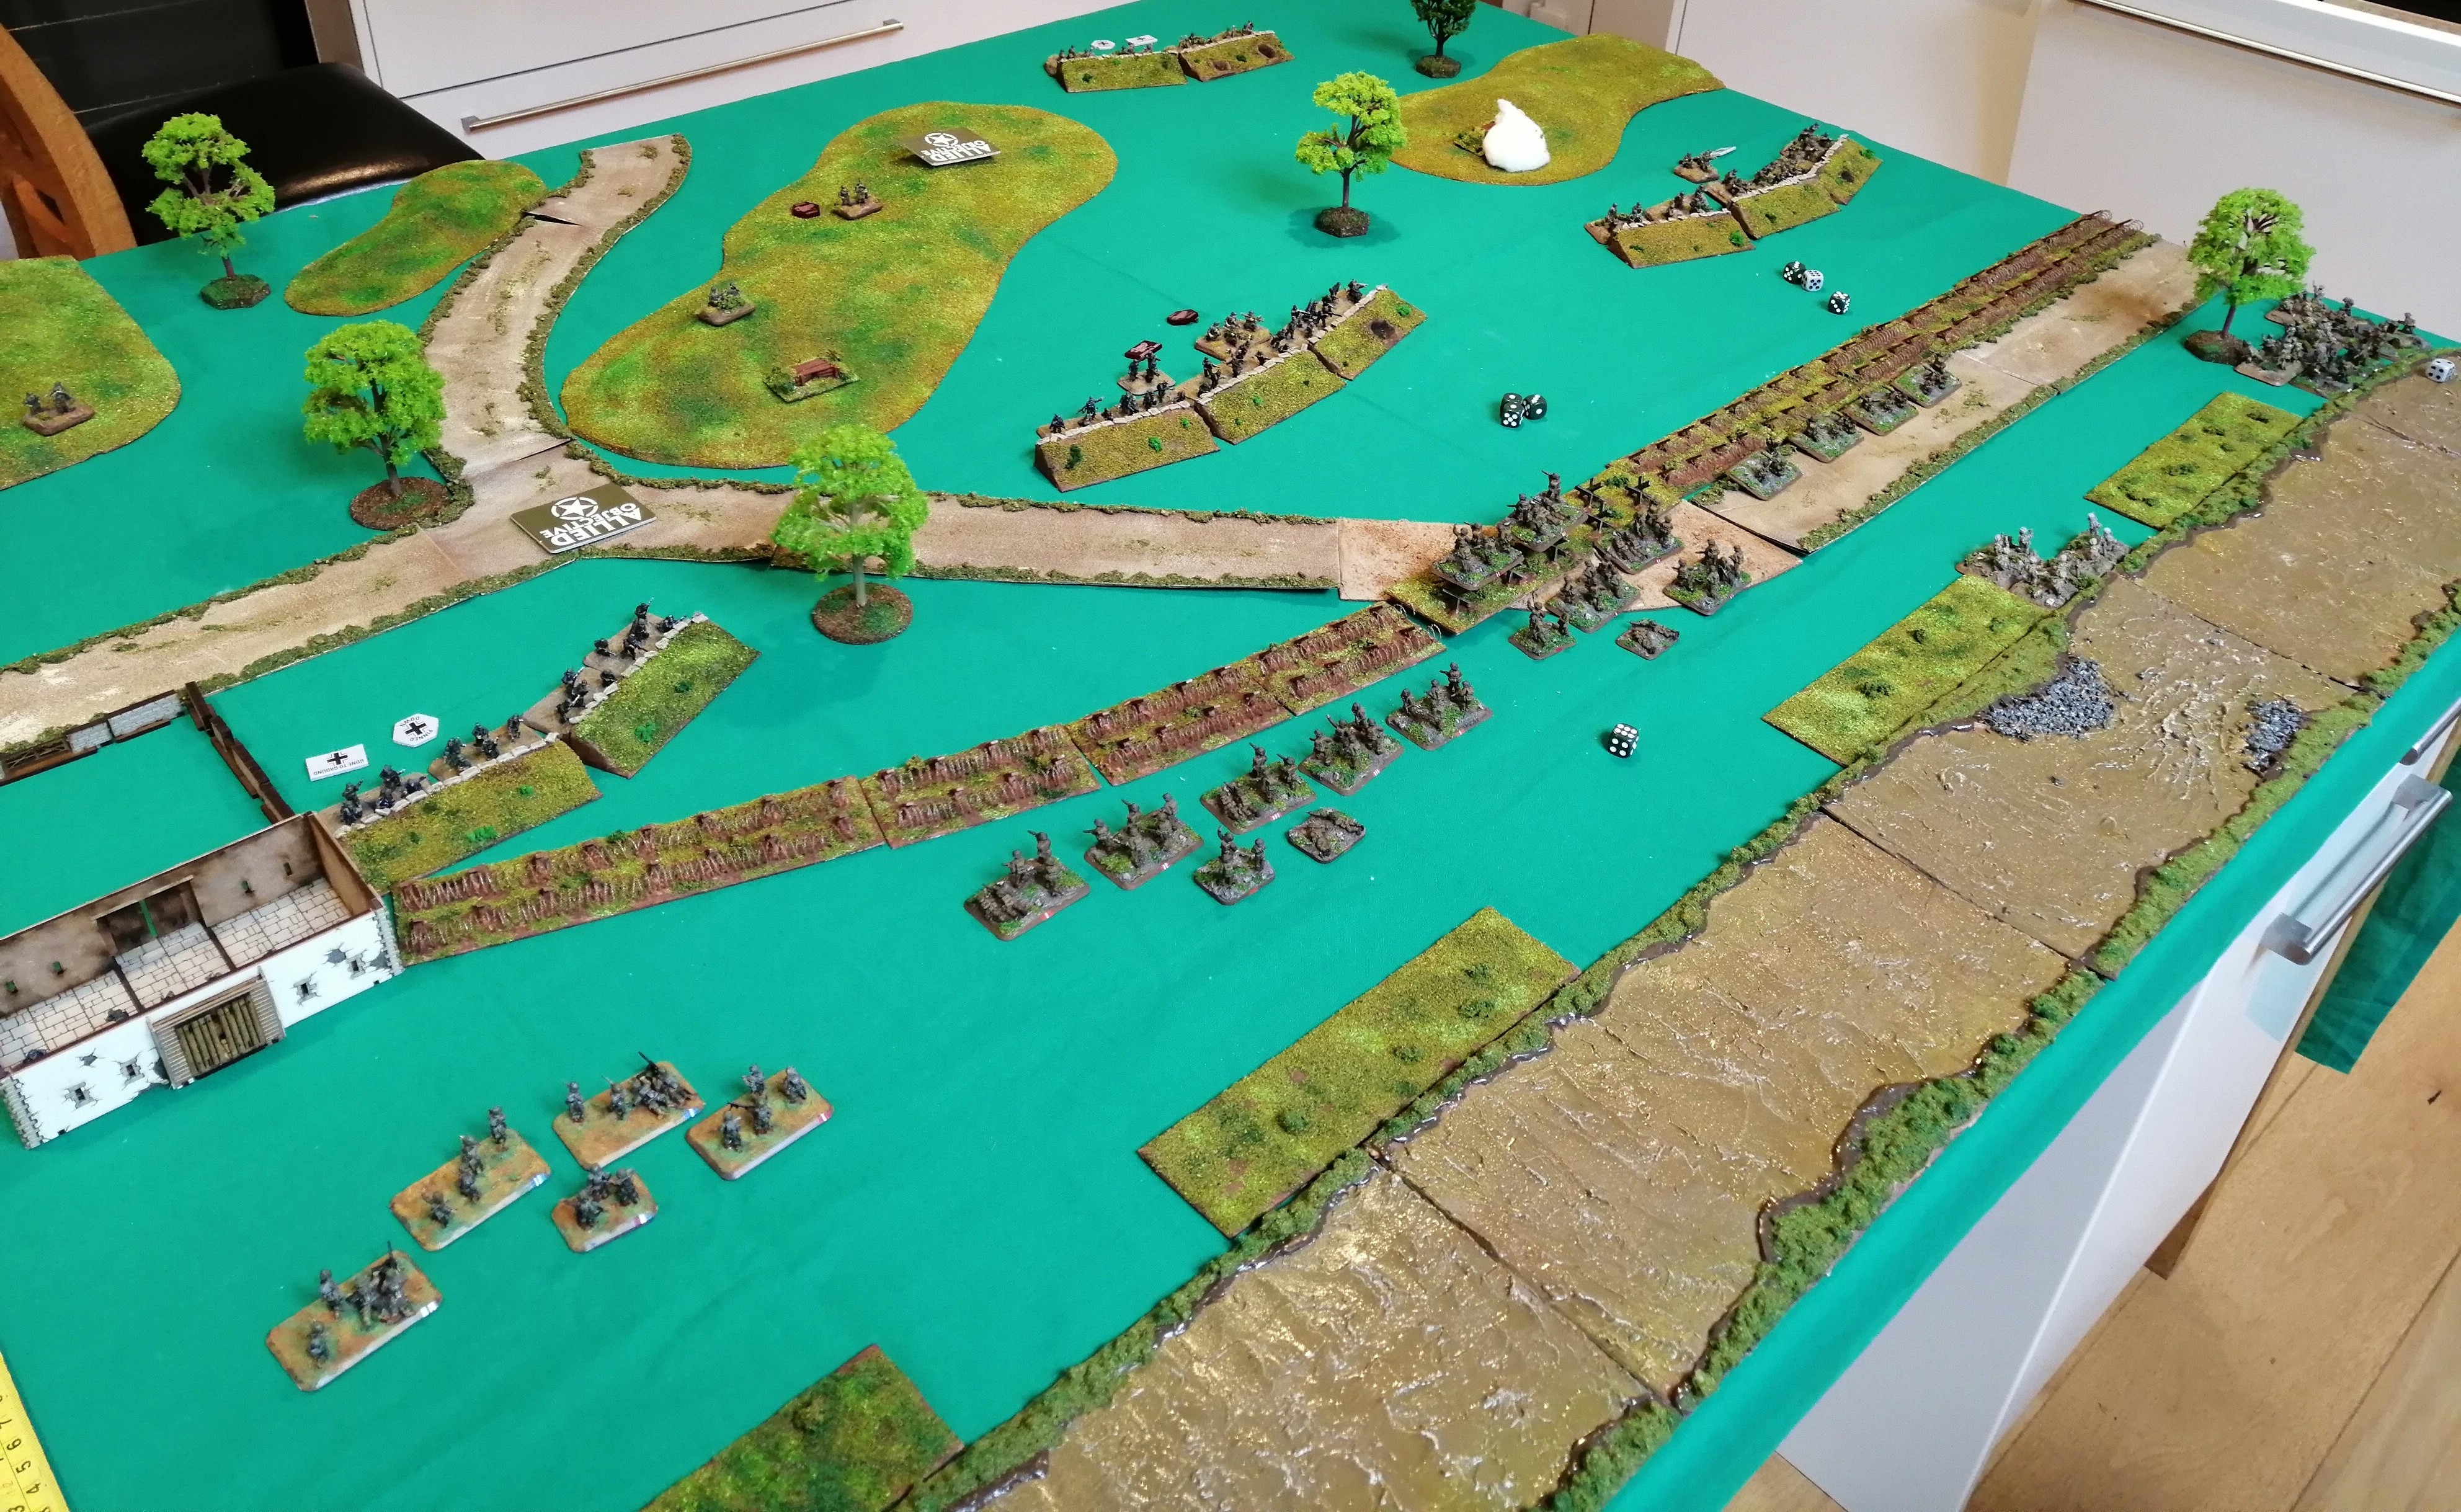
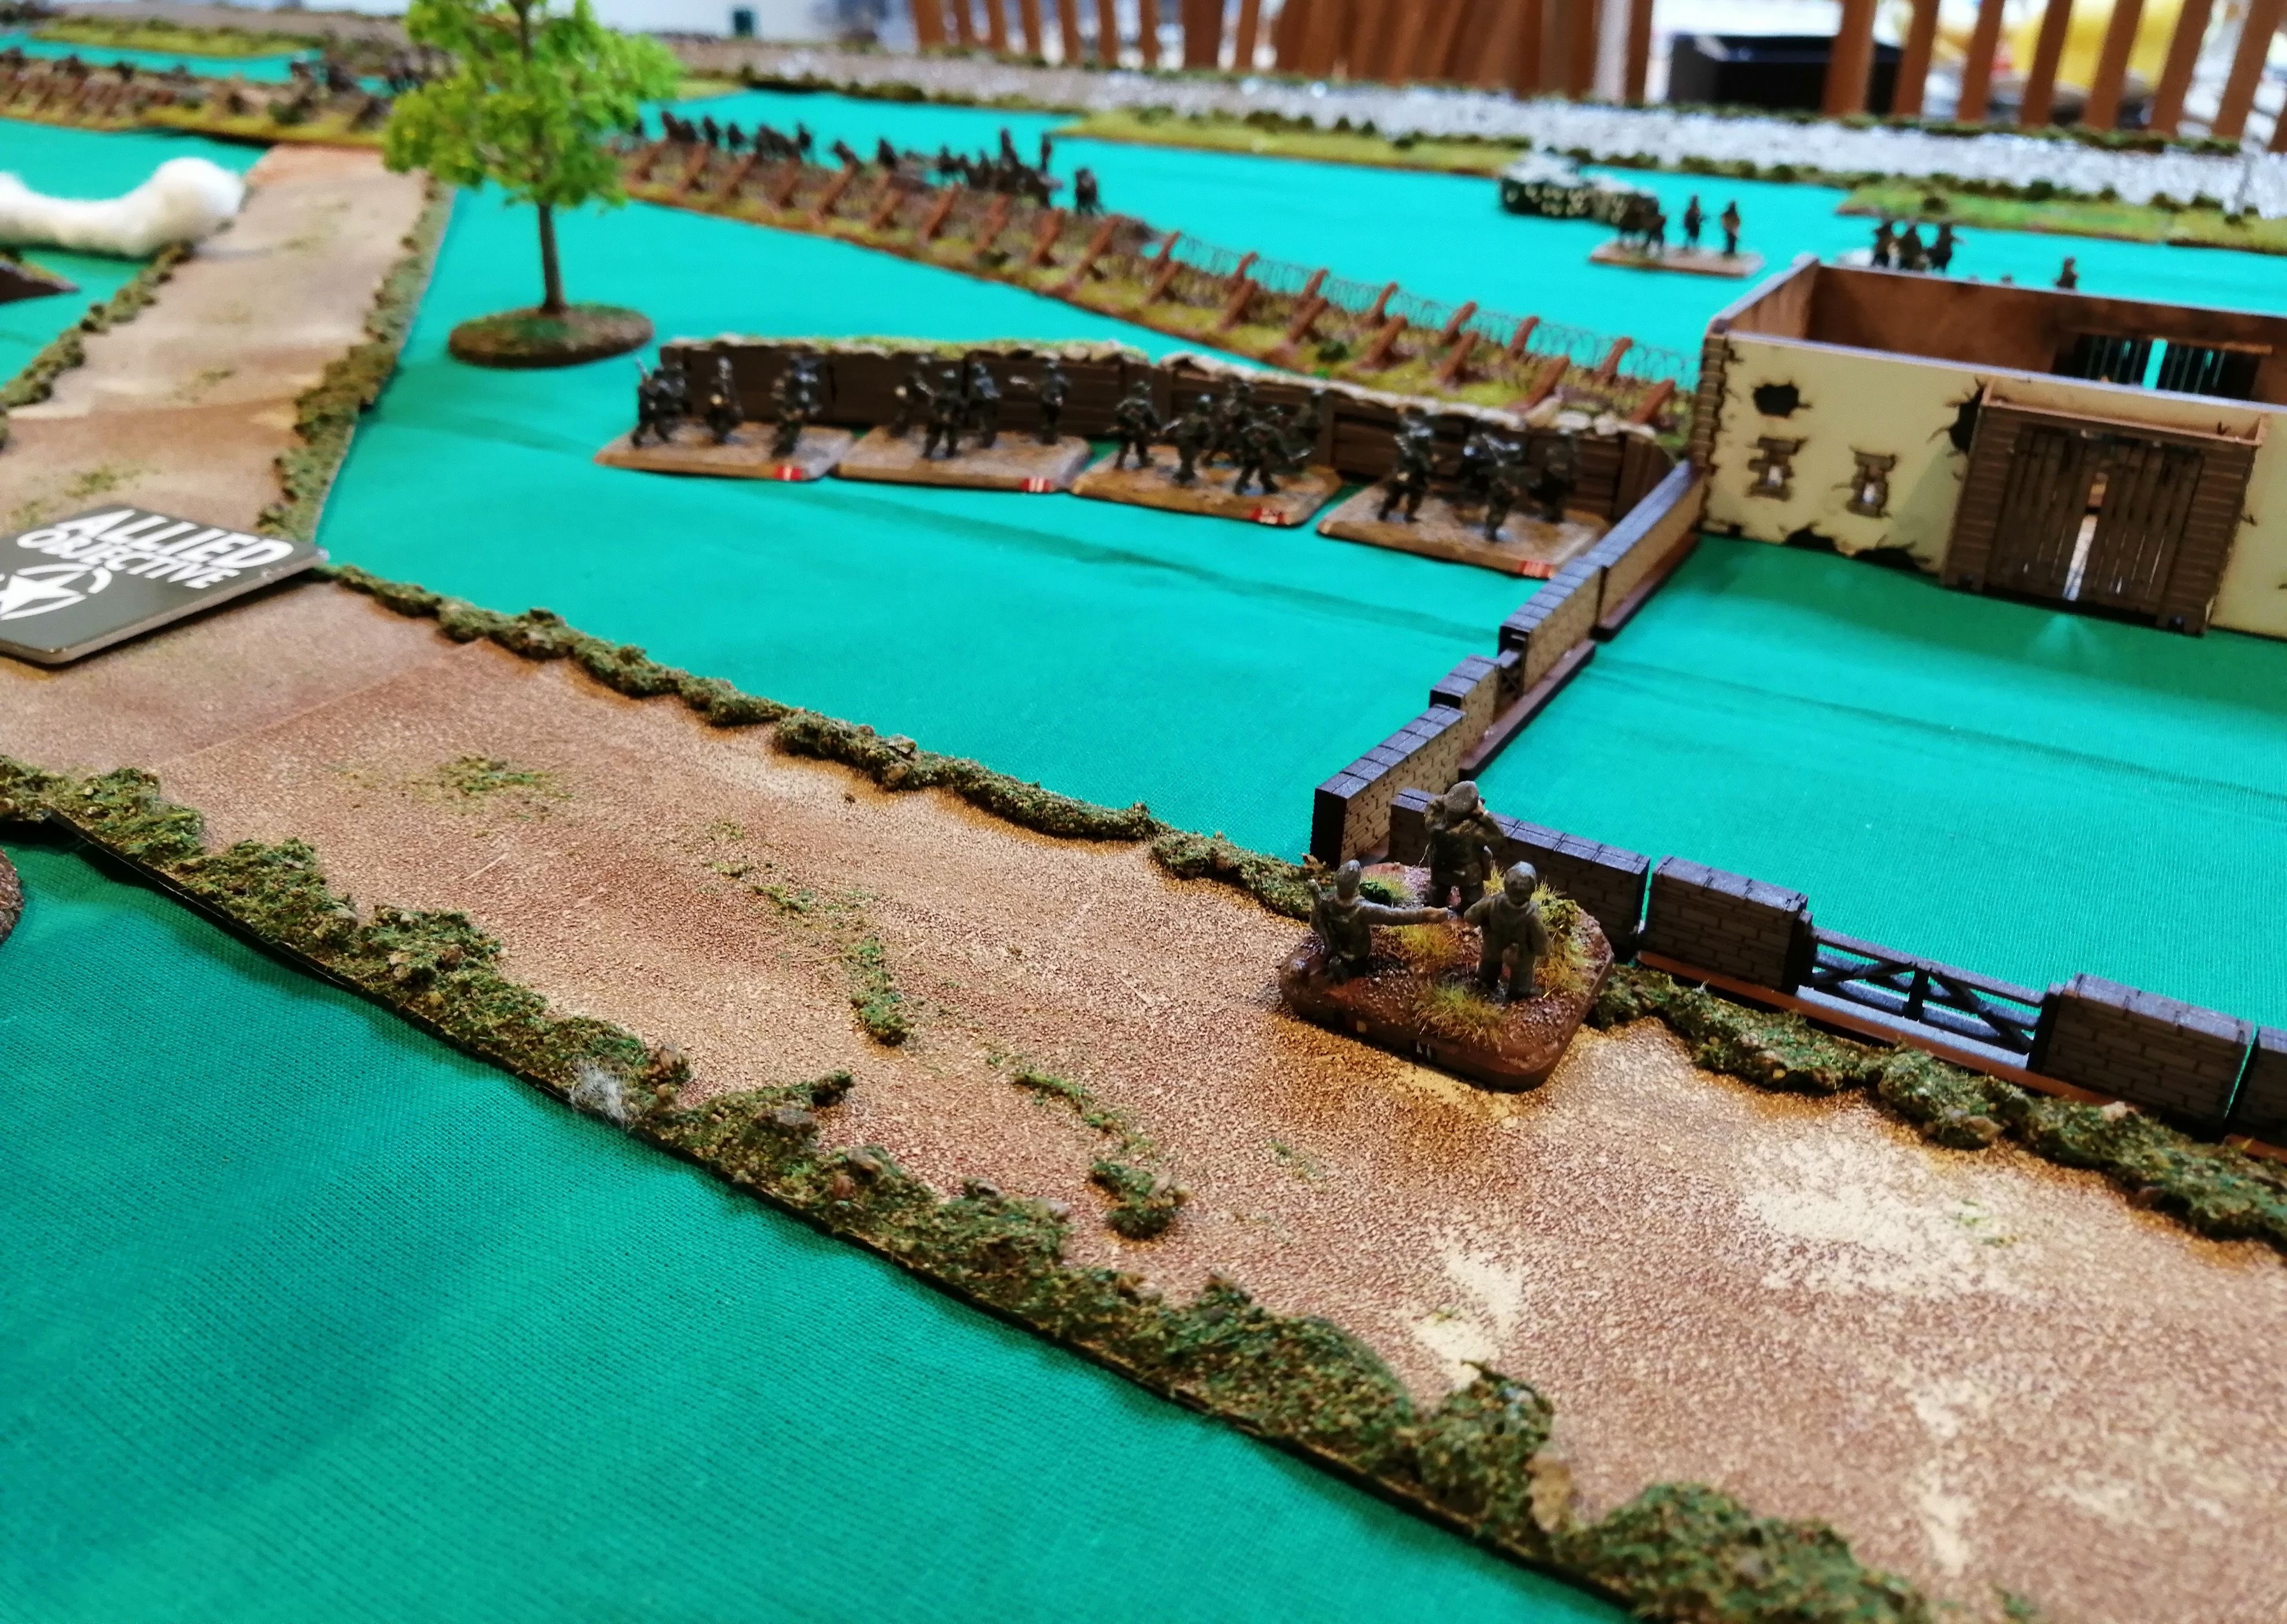
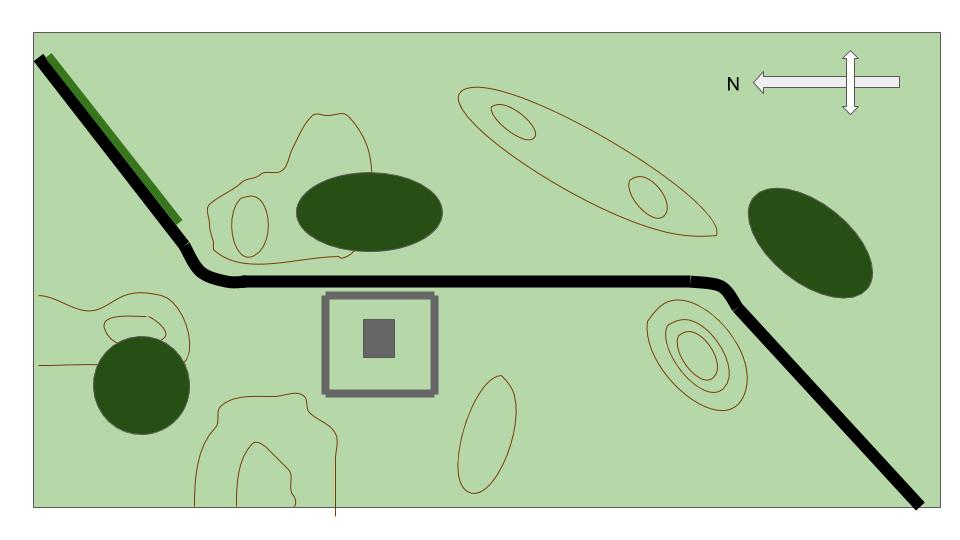 The battlefield prior to deployment
Deployment:
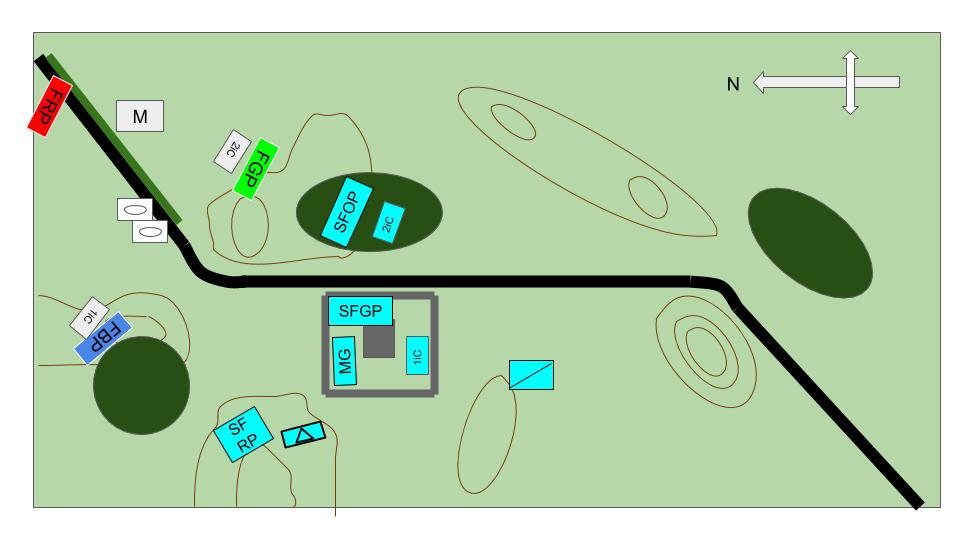
The British deploy their MG Platoon (MGP), 1iC and Sherwood Forrester Green Rifle Platoon (SFGP) behind the stone walls surrounding the chapel. 2iC deploys with SF Orange Rifle Platoon (SFOP) along the edge of the woods to the east of the road. SF Red Rifle Platoon (SFRP) and the anti tank gun platoon (ATP) deploy on the hill to the West of the chapel.
The Germans deploy their Fallschirmjager closely together either side of the road with Fallschirmjager Green Platoon (FGP) on the East with 2iC and Fallschirmjager Blue Platoon (FBP) with 1iC deploys to the West of the road. The two tank platoons deploy on the road itself, with Tank Platoon 1 (TP1) in the lead. The Fallschirmjager Mortar Platoon (FMP) deploys at the corner of the board.
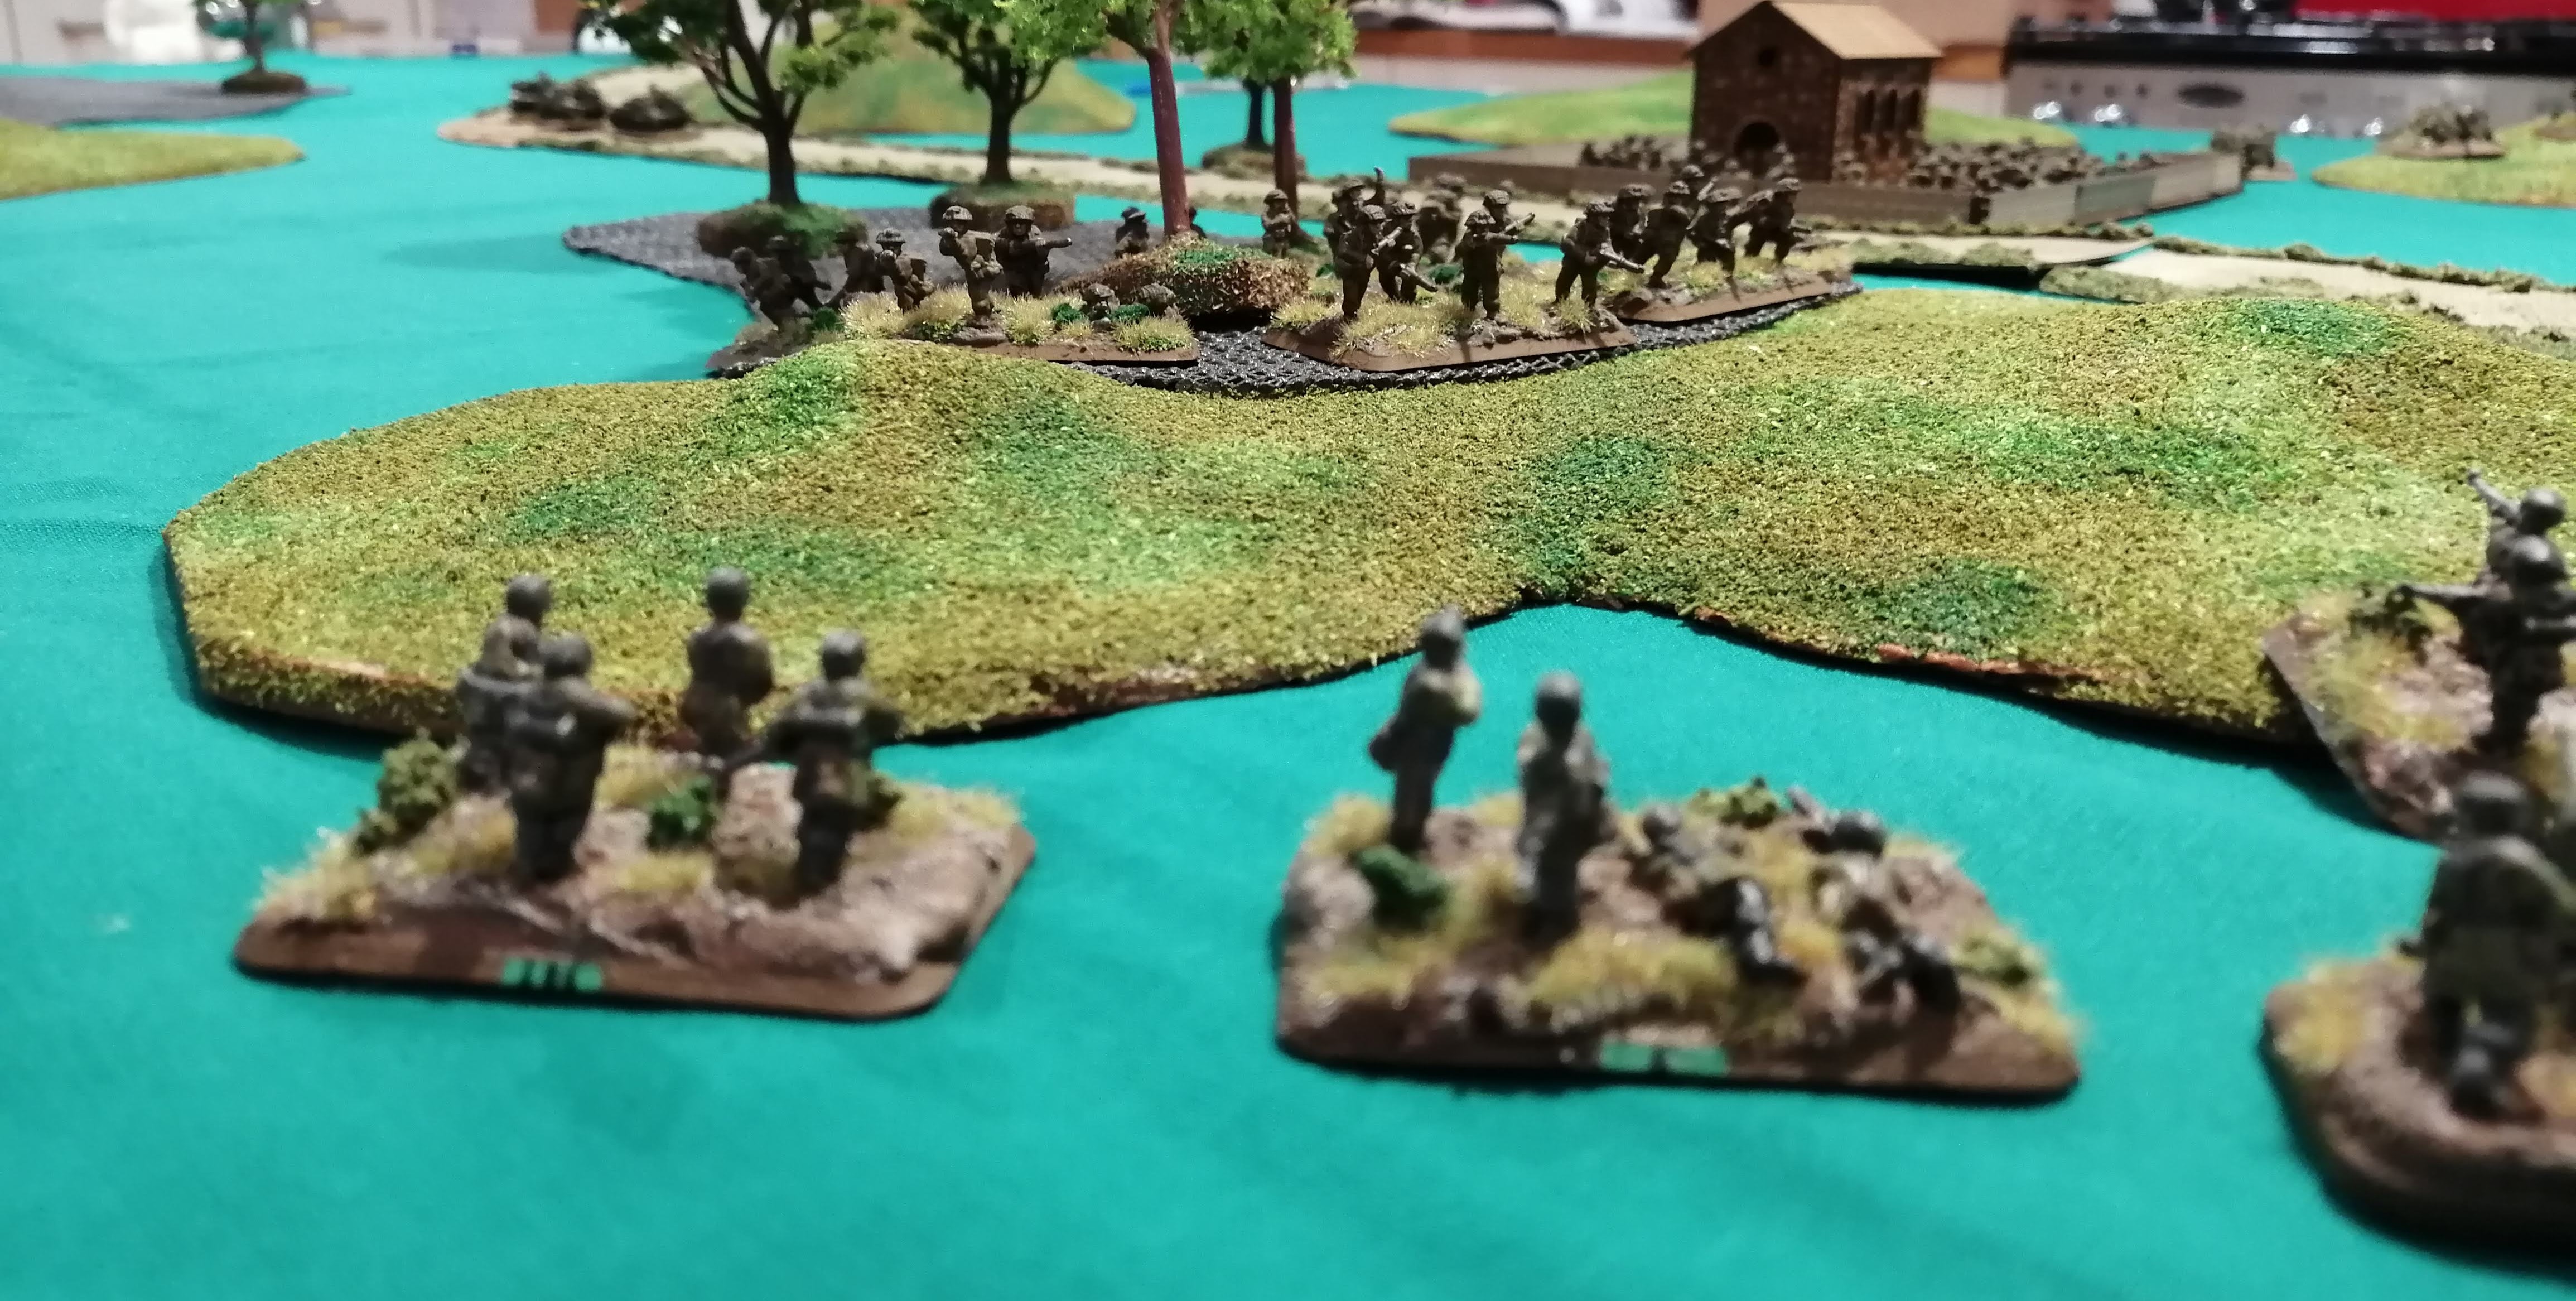
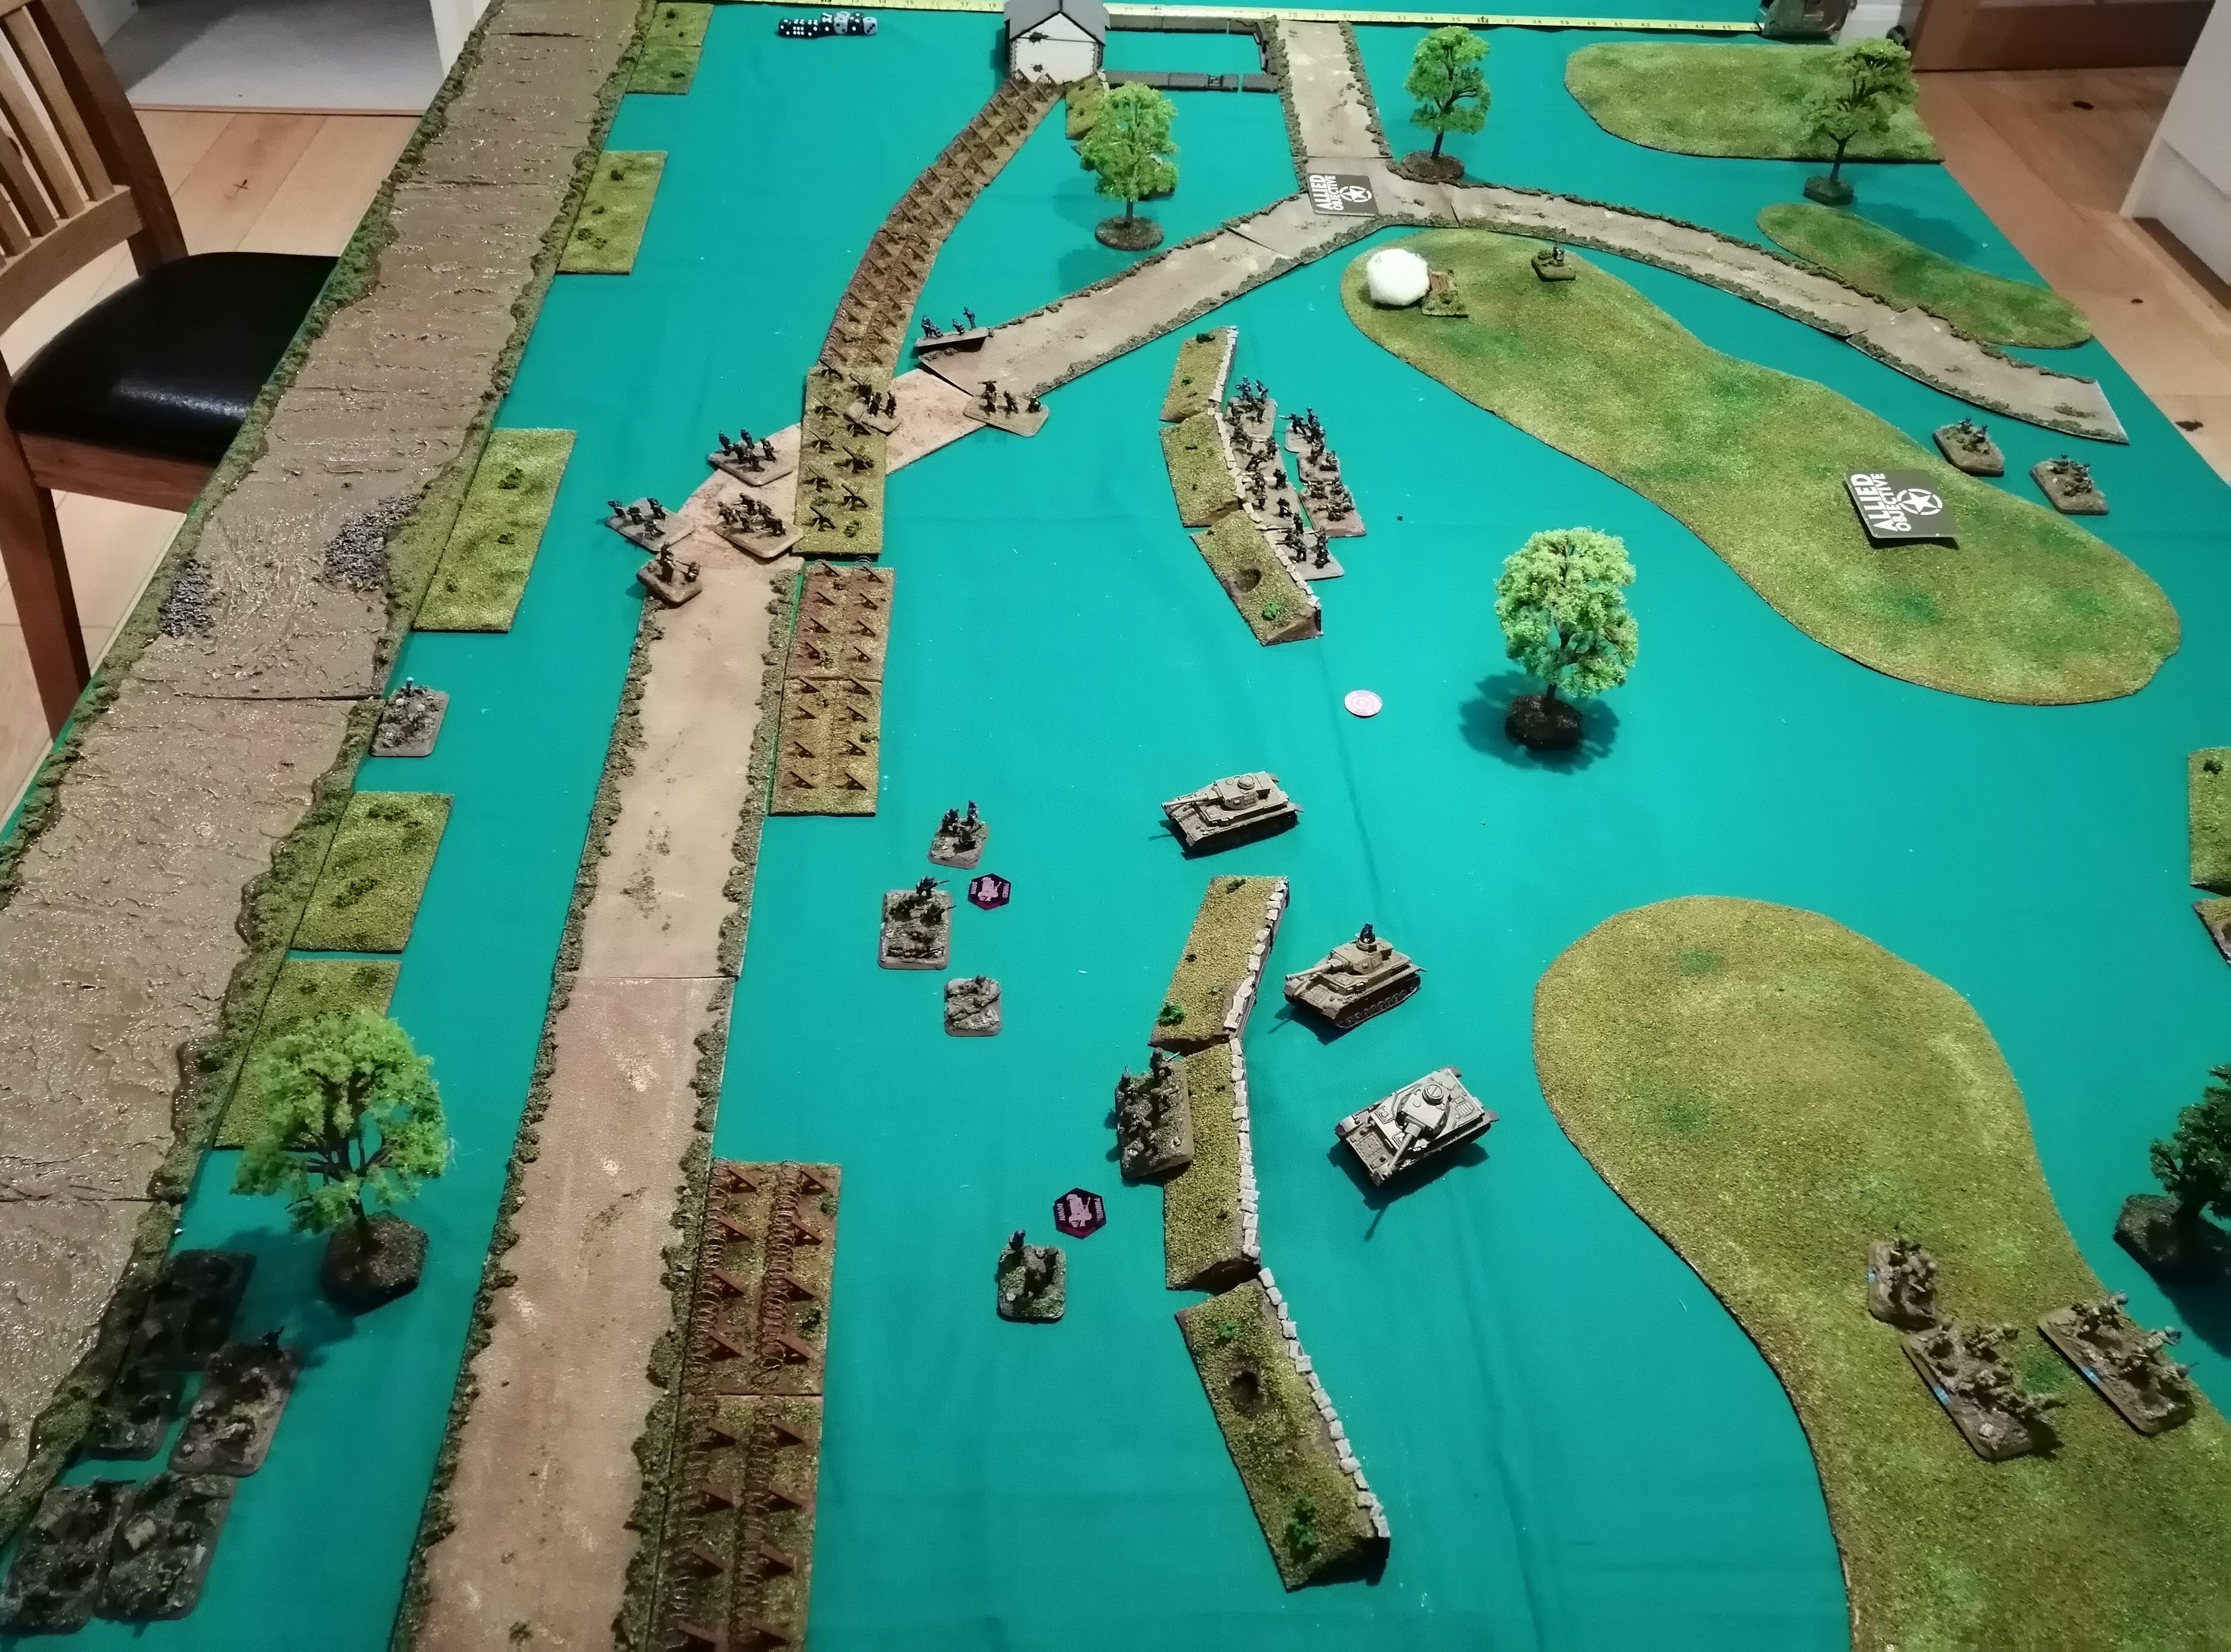
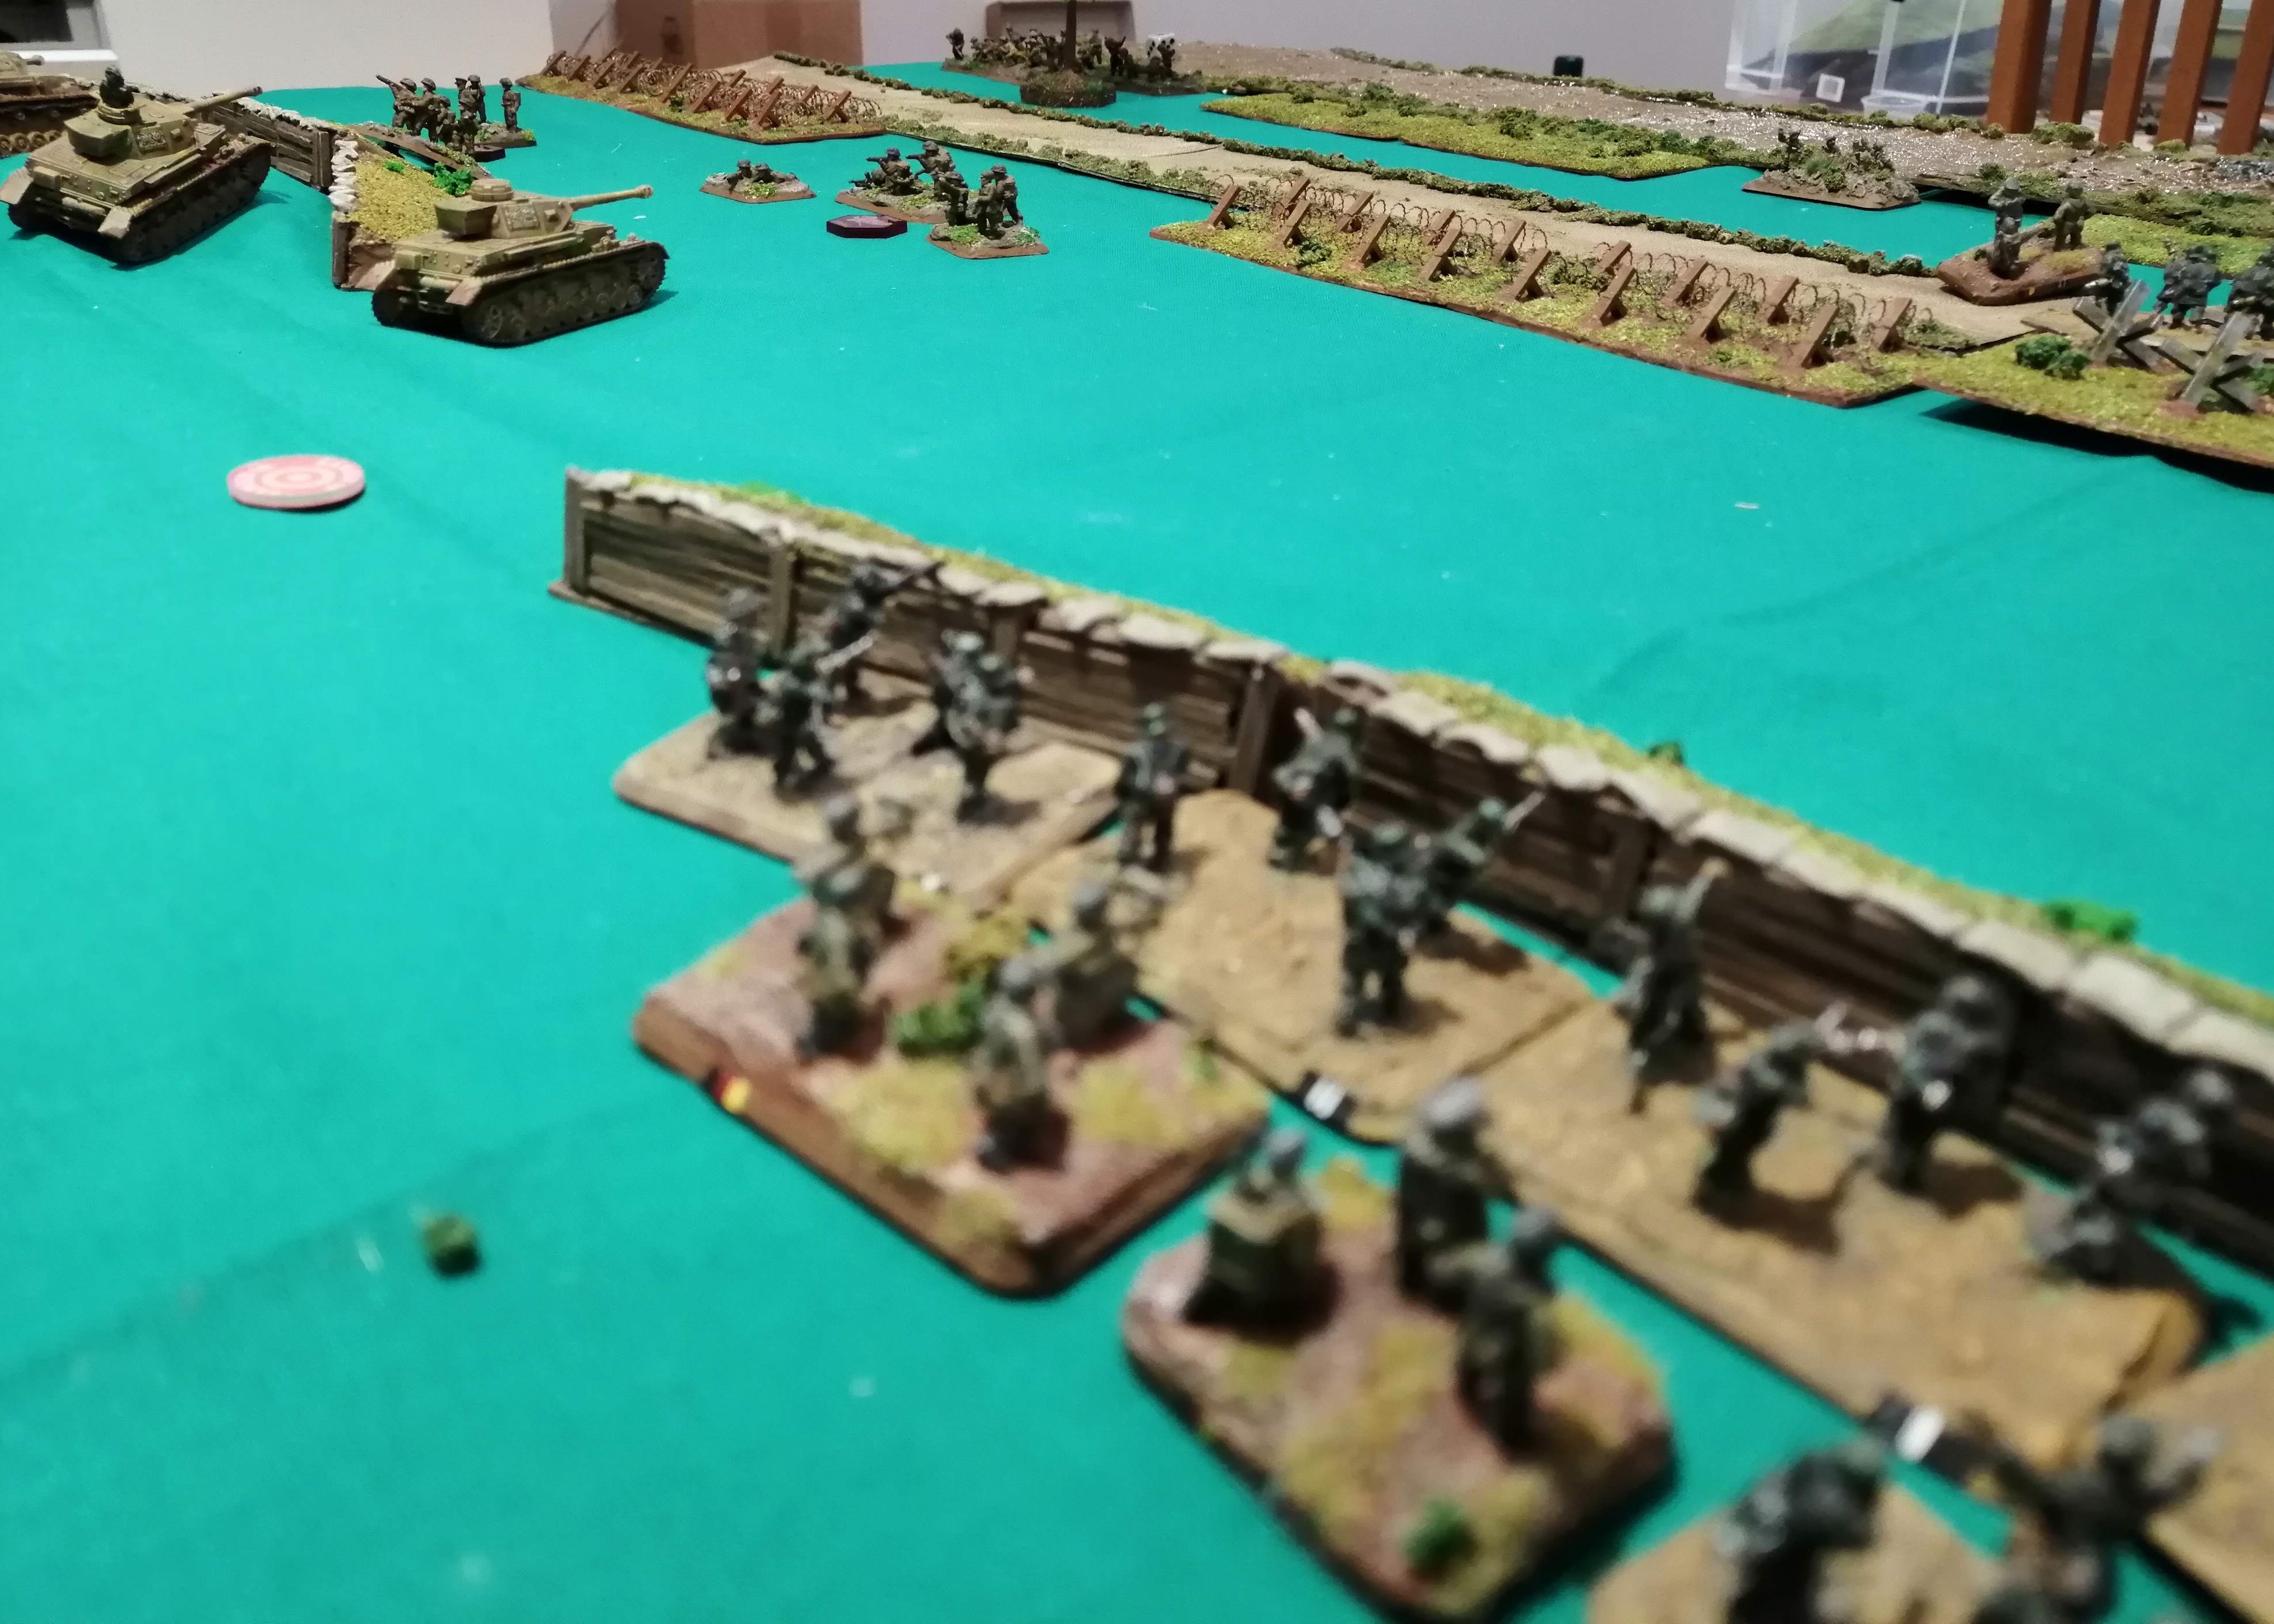
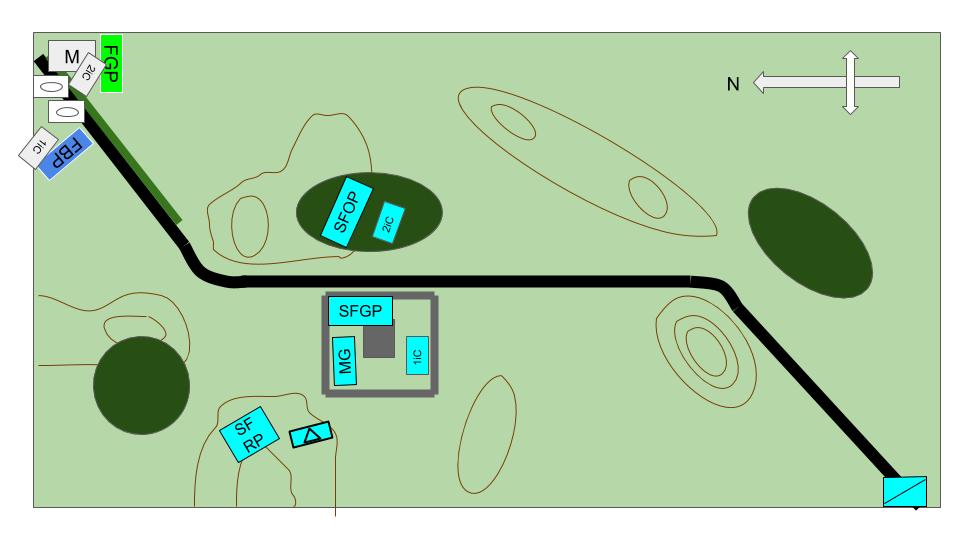 Initial Deployment
 The troops deployed and ready for battle
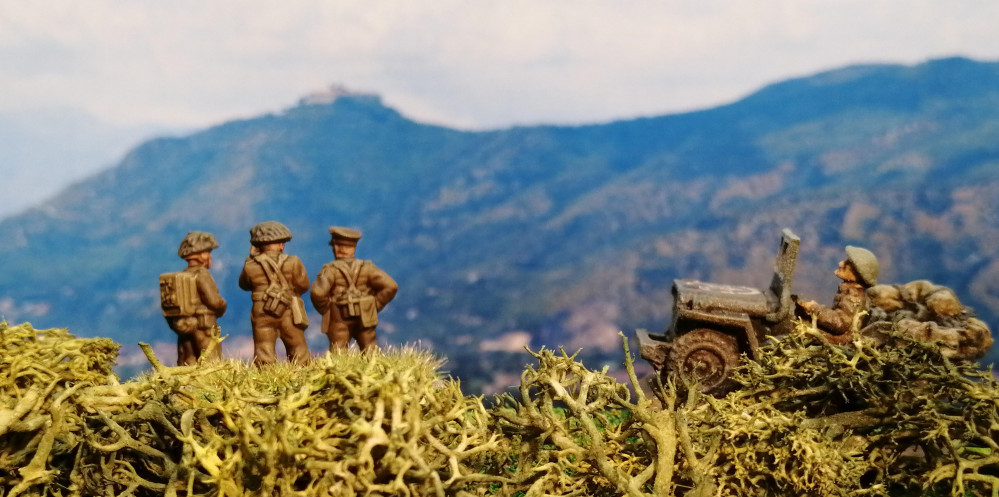
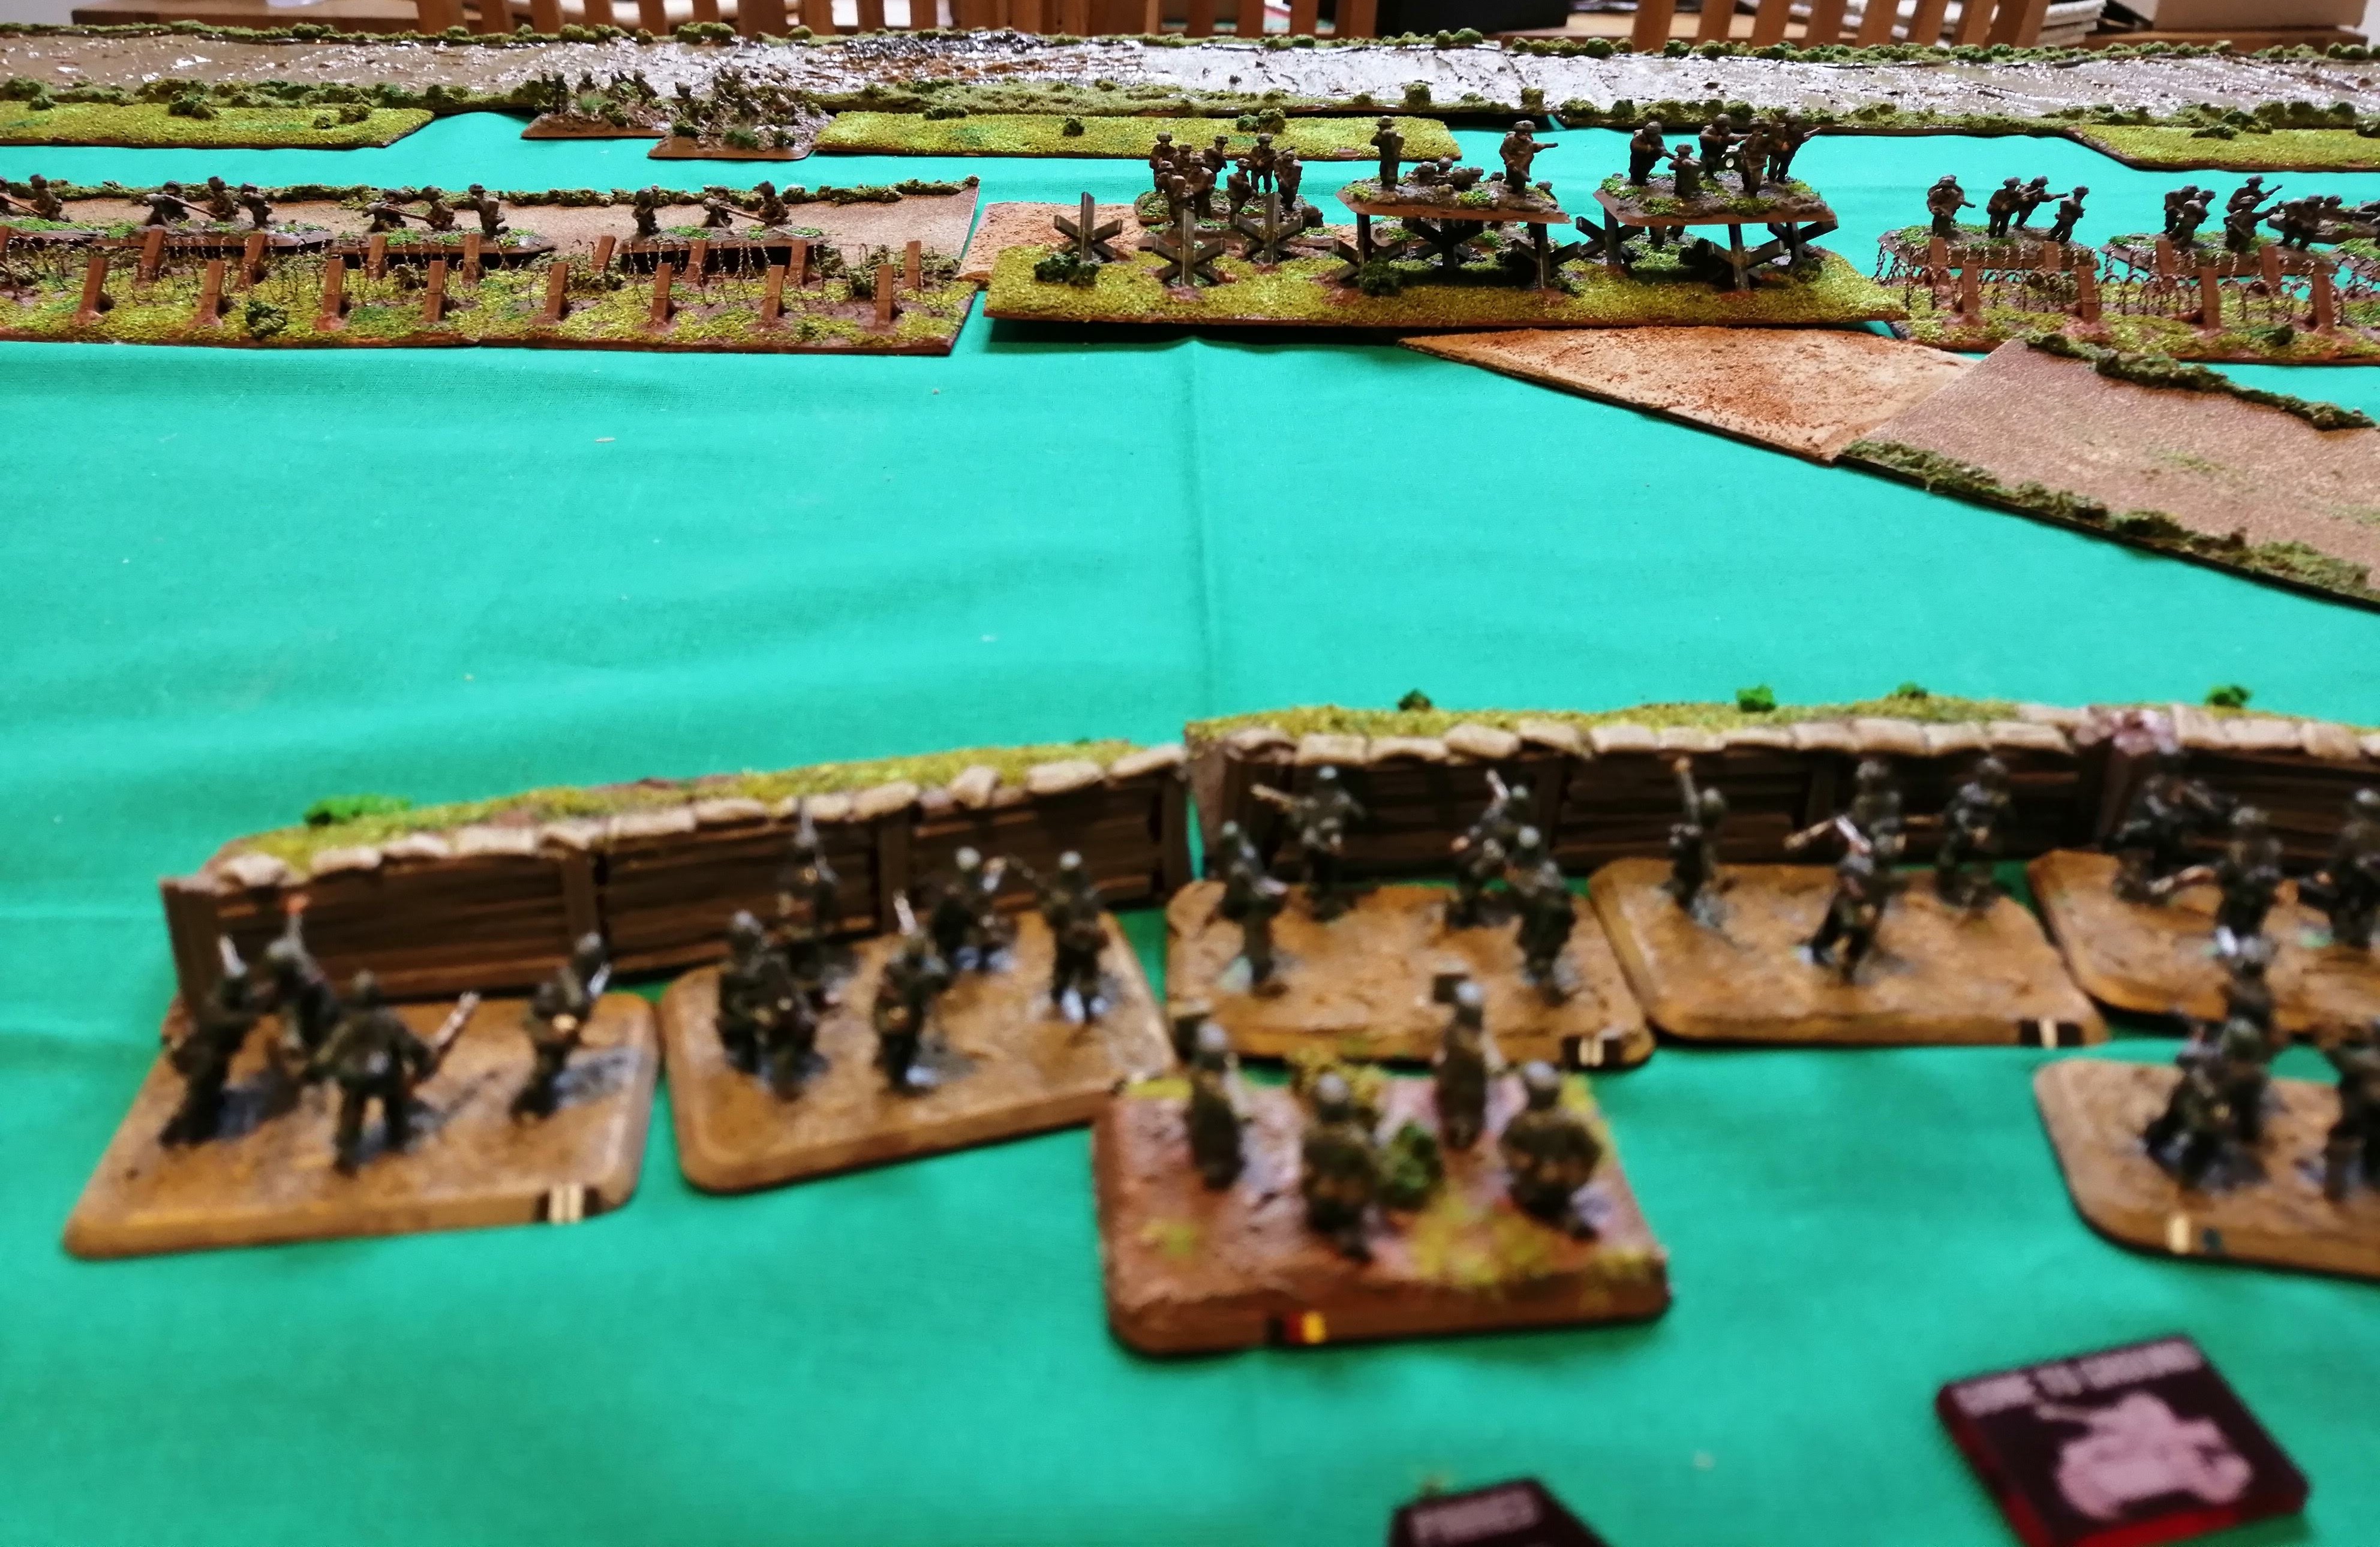
 The view from the German end of the table looking South
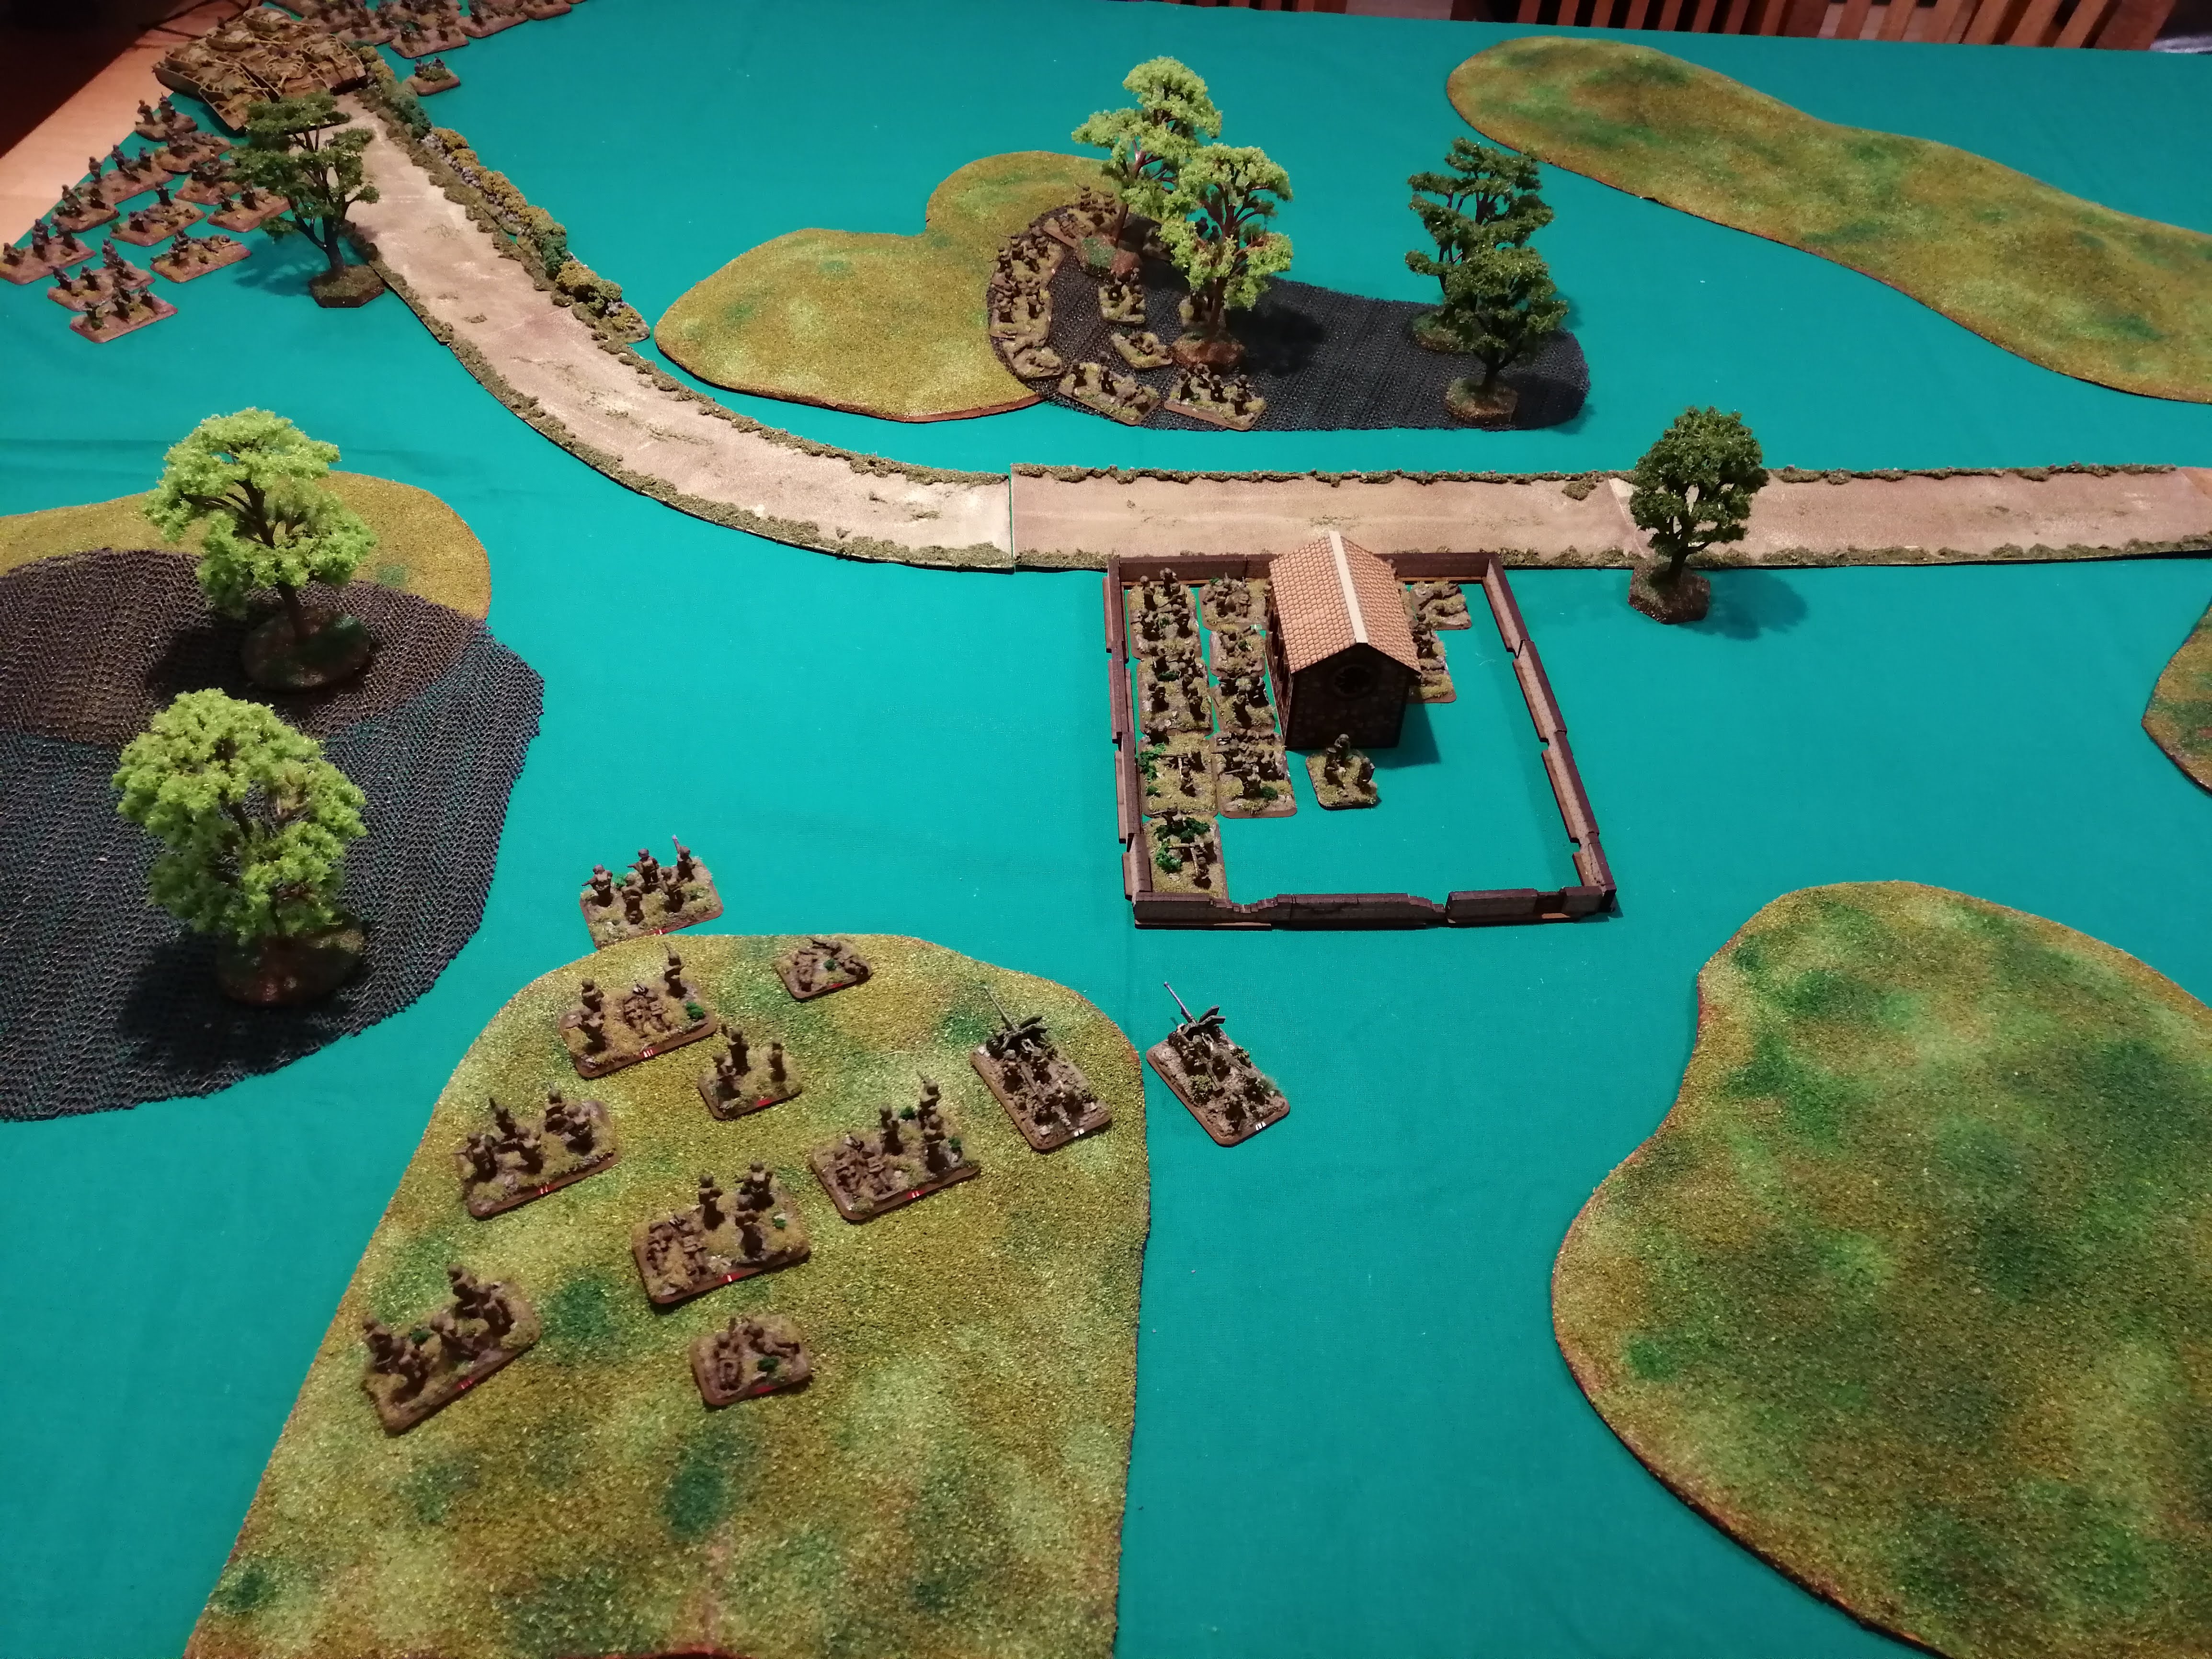 Close up of the tip of the salient
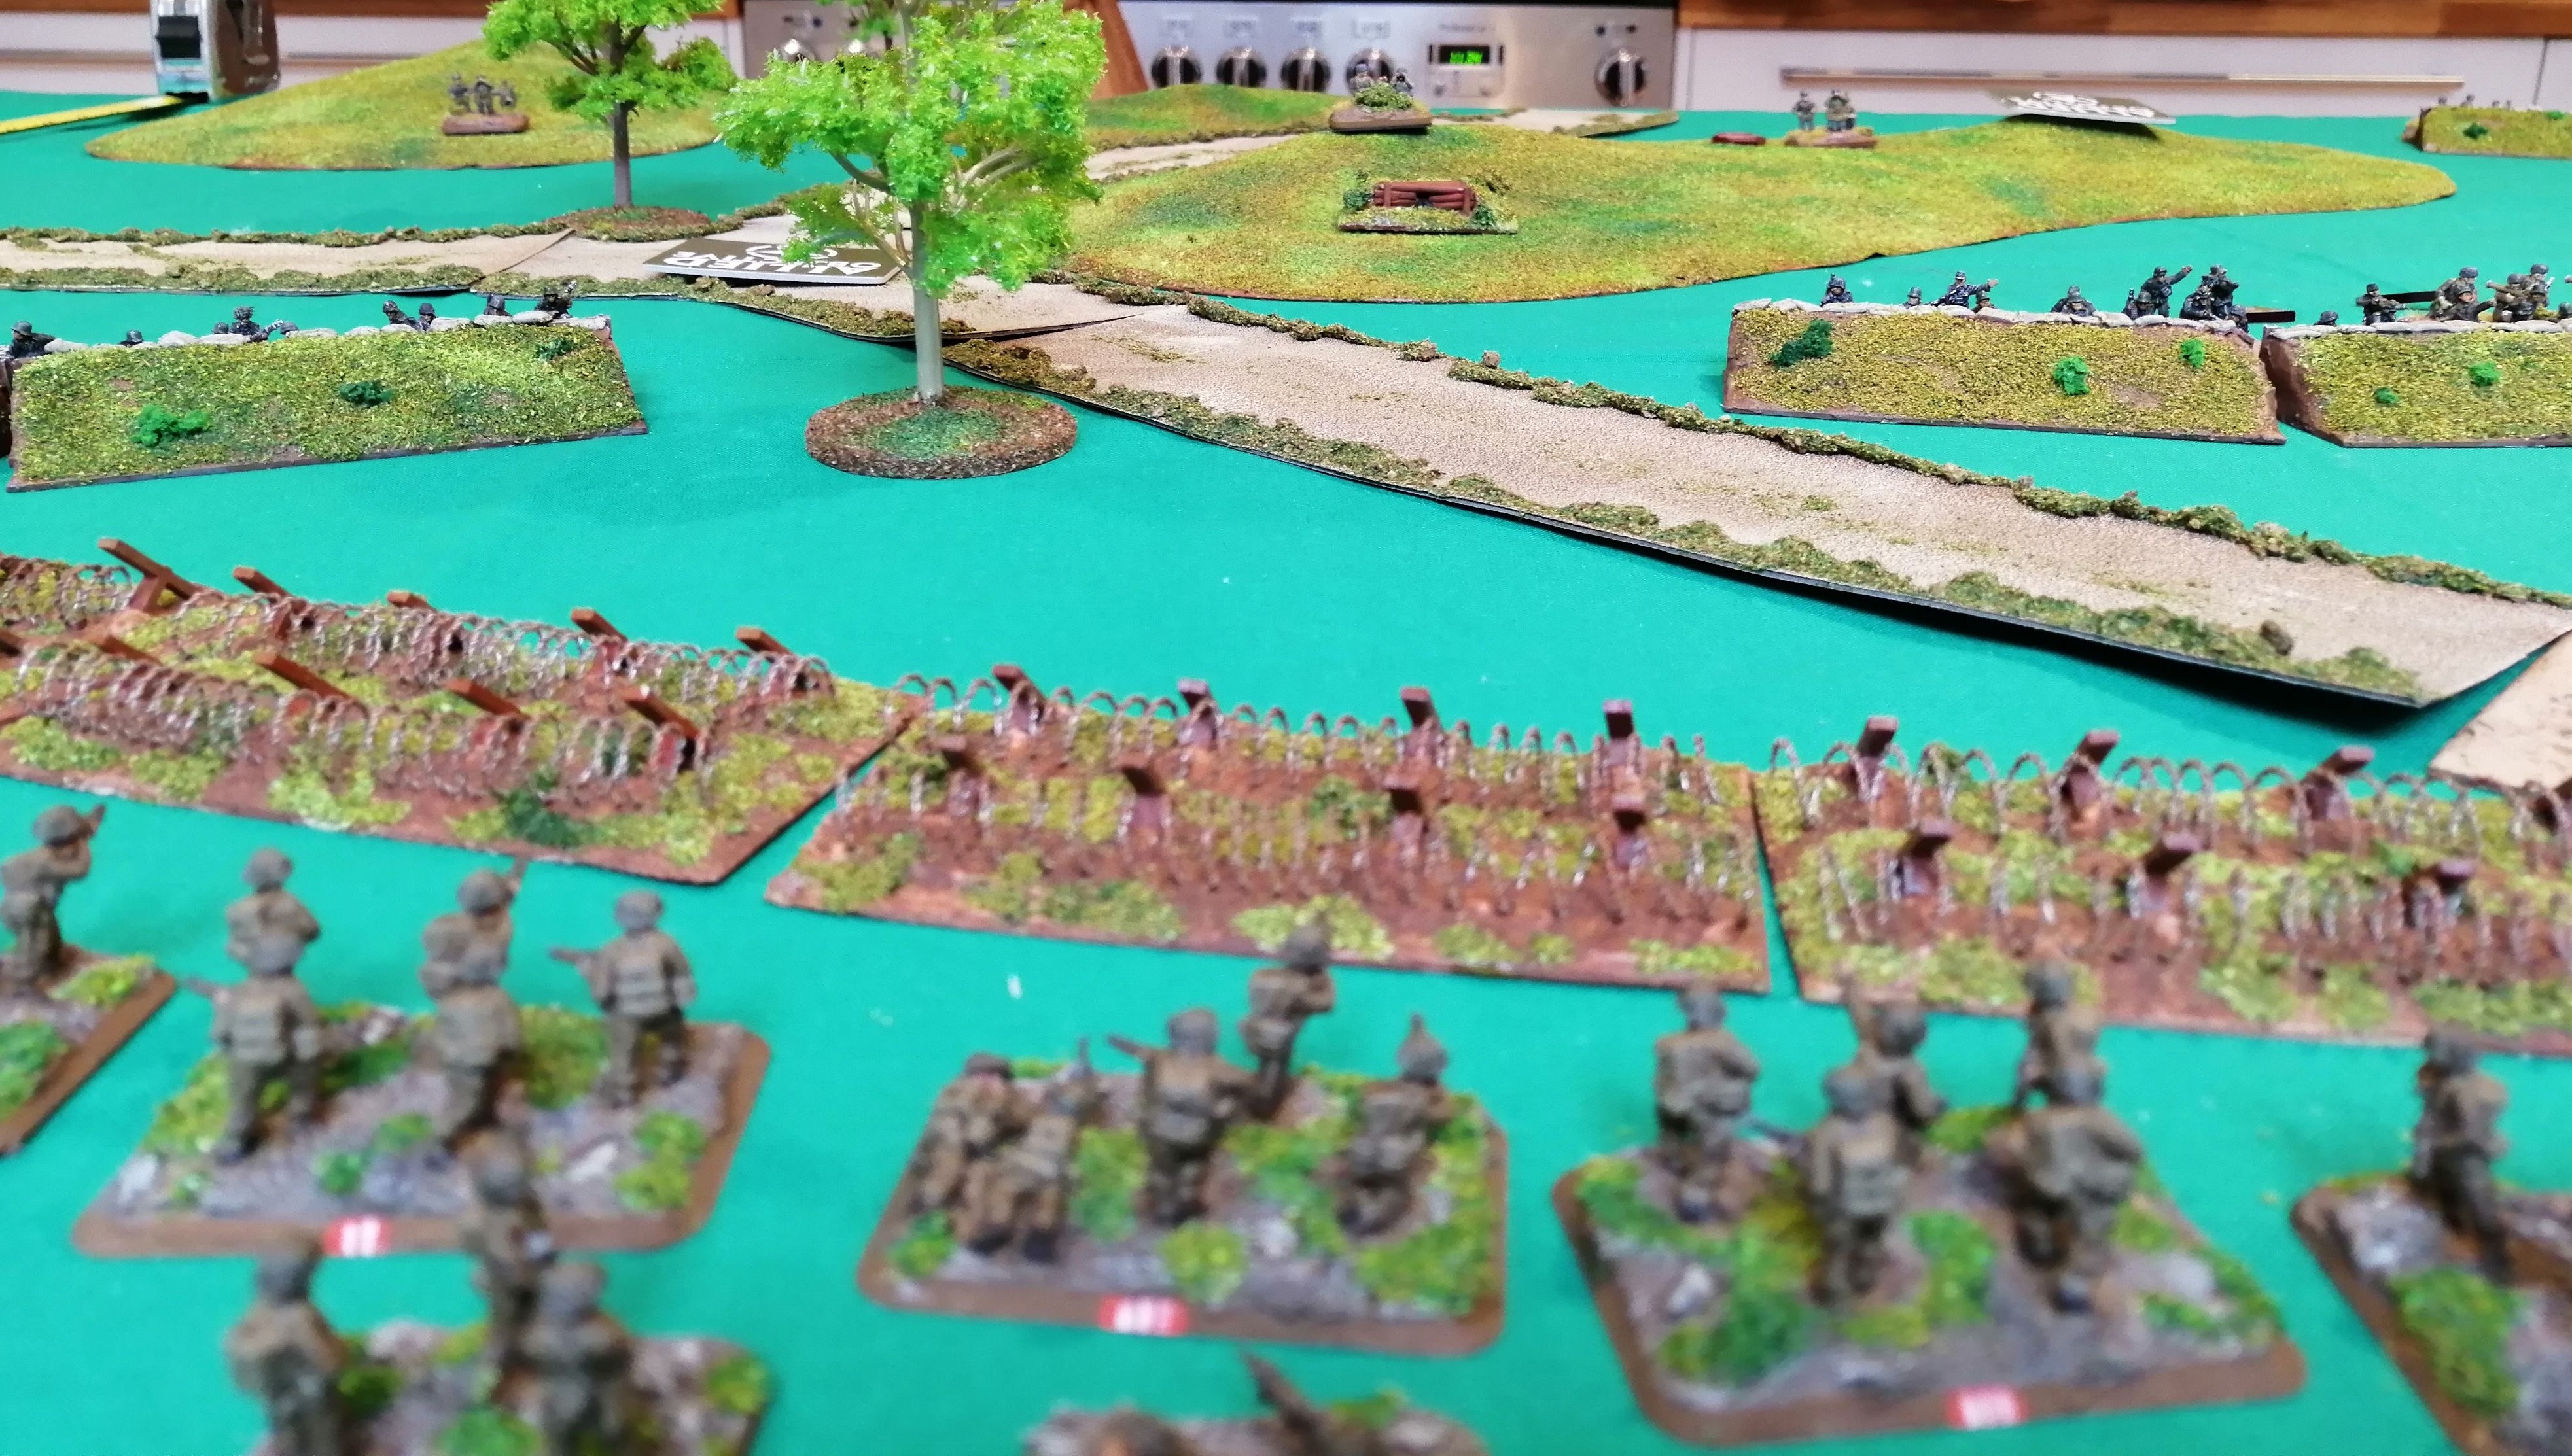
 The view the 6pdr anti tank teams have as the Panzer advance down the Via Anziate
Anzio Landings
On the 22nd January, the US 5th Army launched Operation Shingle, the beach landings at Anzio. The landings were devised by Churchill and, like the whole invasion of Italy, the Americans were very pessimistic around the entire plan. Clark, in command of 5th Army, viewed the operation as a distraction from Cassino and had been advised by others that it was a death trap, especially if a break through at Cassino could not be achieved. Clark cancelled the plan. He was however overruled by Churchill who impressed on Clark the need to open a new route to Rome and draw defenders away from Cassino. Clark relented and assigned the Anzio landings to Lt General Lucas’ VI Corps with orders to advanced quickly and threaten the rear of German XIV Panzer Corps.
 US 1st Armoured Division arriving shortly after the beach head was secured
Lucas had to contend with limited availability of landing craft and a short planning horizon. The Allies were insistent on nothing delaying Operation Overlord and could only offer the landing craft until 5th February before they were needed elsewhere. To further compound the problem, there was only enough capacity to land 2 tank divisions. Clark and Lucas also felt that to ensure success, at least two Corps would be required and that just using a single Corps would lead to failure. Confidence in the US Command was low, even before the operation started.
Surprisingly, the initial landings by VI Corps were largely unopposed and by midnight on 22nd, 36,000 men and over 3000 vehicles had been put ashore. Allied forces had even advanced 3km inland while US Rangers had taken the port at Anzio. Over the next few days, VI Corps continued to build up their forces and, expecting a German counter attack, dug in around their beach head to protect the gains. This was against the expectations of the rest of the Allied commanders who were expecting Lucas to advance rapidly however given the resources at his disposal, Lucas also had a responsibility to not over extend and to protect the beach landing sites. Whether a more offensive approach would have worked is debatable and could have been costly. It is likely that Lucas’ pessimism around the whole operation was a significant factor in his decision to not go on the offensive.
 The beach landings were relatively unopposed and Allied forces could advance from the beaches
Kesselring had drawn up plans to handle beach landings at most of the obvious locations and allocated some defenders to protect and delay landings at these sites. His main defence relied upon a mobile force that could deploy quickly once the landing location was known. Within two hours of being informed, Kesselring had mobilised his defending forces, sending 4th Fallschirmjager and the Hermann Goring Panzer Division to take up defensive positions around the beach head. He further requested additional reinforcements be sent from France and Yugoslavia to contain the Allies. By 25th January, three German Divisions had surrounded the Allied beach head and Von Macksensen’s 14th Army took overall command. Further divisions were on route to the Anzio area to add to the German presence. By 24th January, the 40,000 troops were in place around the Allied beach landings.
Troop build up continued over the next few days by both sides. By January 29th, the Allies had landed 69,000 men and over 200 tanks. The Germans had over 71,000 troops in place. On the North side of the landing zone were British 1st Division supported by 46th Royal Tank Regiment and 2nd Special Services Brigade. To the Northwest of 1st Division was a small US Ranger force made up of 4 Battalions from 6615th Rangers. The Southwestern force consisted of US 3rd Infantry Division and the US 504th Parachute Regiment.
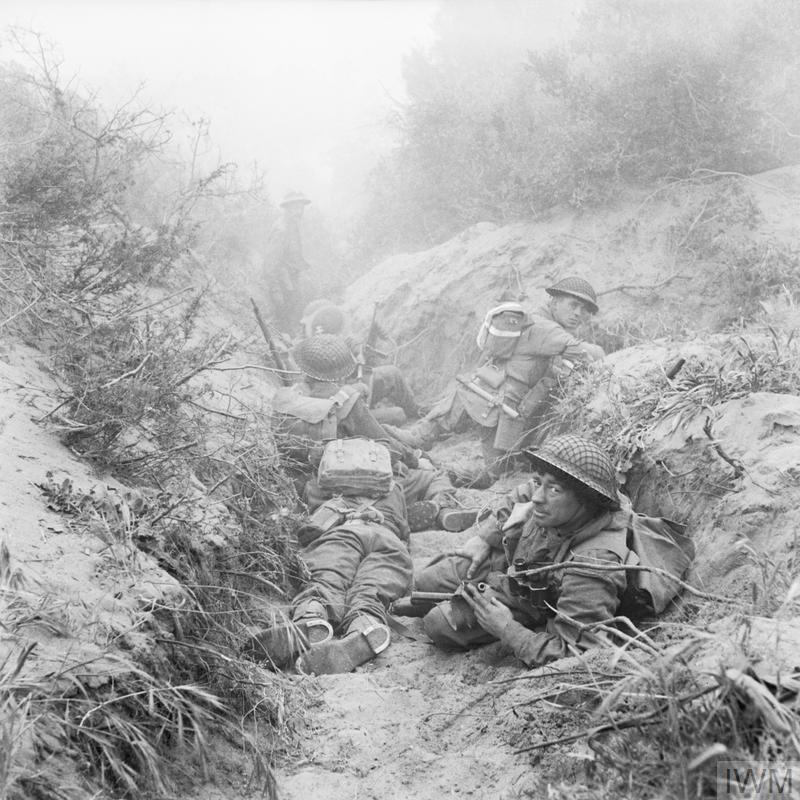 British Troops from 1st Division dug around Anzio
Lucas launched a two pronged attack on January 30th. US 3rd Division was to strike in land toward Cisterna and to take the Alban hills overlooking the landing beaches. Meanwhile, British 1st Division was to drive northwards up the Via Anziate and capture Campoleone. Initially, 3rd Division made good progress, pushing almost 5km inland but eventually ground to a halt short of their target. They failed to link up with 1st and 3rd Ranger Battalions who had launched a daring raid inland but had become cut off and were facing fierce opposition from the Herman Goring Division. Of the 767 men in the two Battalions, only 6 returned to US lines with the rest either captured or killed.
British 1st Division faced stiff opposition as they tried to push up the Via Anziate. They gradually gained ground but fell short of Campoleone and were left in a long, thin salient stretching up the road.
German 14th Army continued to build up its troops and by early February had reached an estimated 100,000 in 2 Corps. With the Allied attacks contained and stalled, Von Mackensen ordered some small scale counter offensives on the 3rd February, particularly around the salient created by the British 1st Division. These attacks went well and, realising that the Allies were in a difficult position, Von Mackensen ordered a full scale offensive at 11pm that night. By the early hours of 4th February, the fragile British front line had fallen into a disorganised, incoherent mess and started to collapse. Individual companies found themselves isolated and cut off, not sure in which direction to withdraw.
By mid morning on the 4th, the tip of the salient, now almost 3km long but less than 1km wide, was being squeezed on all sides. 3rd Brigade found themselves surrounded and cut off North of the collapsing salient and Lucas ordered the newly arrived 168th Brigade to try to stabilise the situation. 3rd Brigade held on for most of the day, taking heavy losses while 168th Brigade fought their way to their positions. At 5pm, 3rd Brigade was ordered to make a fighting withdrawal under the cover of artillery. At that moment, 168th Brigade, with support from 46th Royal Tank Regiment, broke through and assisted in the extraction of the remaining elements.
For the next couple of days, both sides utilised artillery and bombing runs to disrupt the enemy and soften up the targets. In the case of the Germans, this proceeded a renewed offensive launched late in the evening of 7th February. Several British Battalions were almost surrounded by the offensive and escaped only through giving ground. The German offensive slowly pushed the British back and by 10th February, the salient ceased to be.
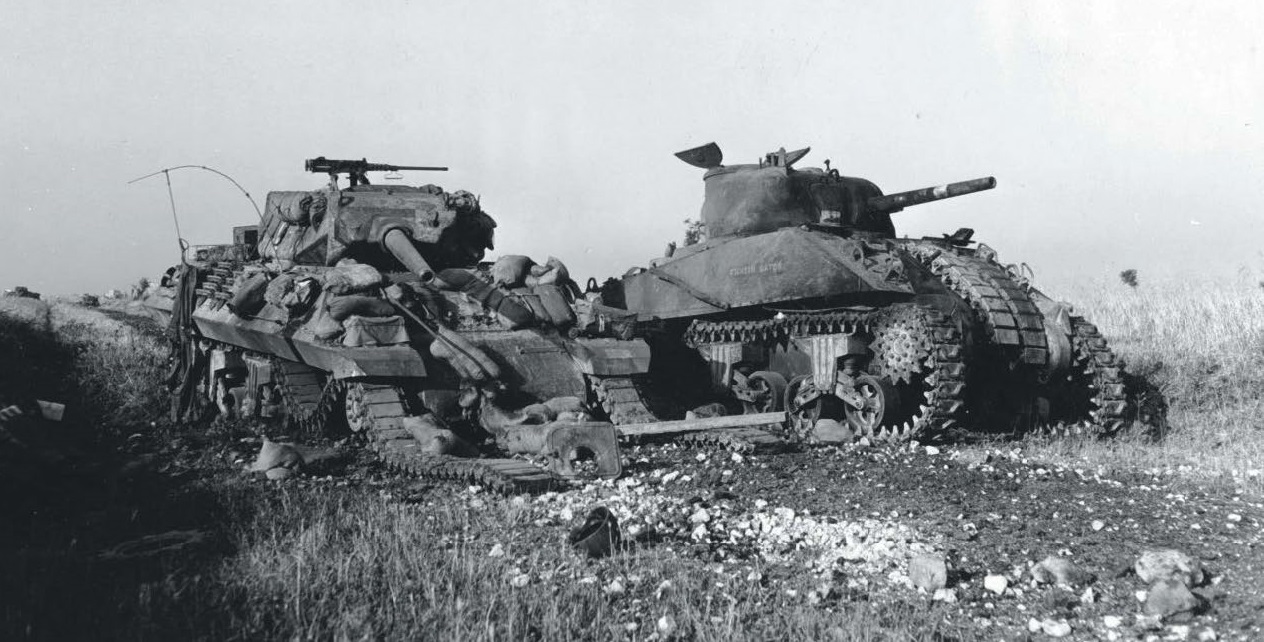 Knocked out M10 and Sherman following the German counter offensive
Monte Cassino - First Table Top Battle (Turns 7 and 8)
Project best read in reverse order
Turn 7
The last remaining team from AP B unpins and, with the 2iC there, is able to pass the morale check. RP E unpins however both RP G and RP F remain pinned. The last remaining team from RPD fails their morale check and are removed from the battle.
The Engineers roll another 6 bringing their bridge score to 7, just two away from potentially being able to bring in some much needed armour reinforcements.
RP E advances further past the old trench line of Green Platoon. AP B with the 2iC rush past HMG 2, deciding that this can be left for the advancing rifle platoons behind them. The 2iC sees the objectives and a largely unprotected mortar team further inland from the river!
RP E fires its bazooka at the Panzer IVs but misses. The pinned RP G fire their rifles at HMG 2 rolling 2 dice and getting 1 hit. The nest fails its save and RP G has to make a 6+ firepower check rolling a 6! But, as this is a nest, the FP needs to be retaken and a 6 is rolled again! So where the flame thrower failed, the pin point accurate rifle fire delivers! Clearly RP G has spent plenty of time on the range practicing.
The mortar team attempts to bombard the tanks in a desperate attempt to support the rifle teams. Despite ranging in first time, they fail to hit the tanks and cause any damage. Finally, the supporting tanks target the Panzer IVs but fail to hit.
The Germans continue to move Red Platoon up and they are rejoined by the German 2iC. The Panzer IVs make a blitz move and start firing on RP E hitting 6 times and killing another team.
Red Platoon are in range of the US mortar teams and open fire, killing 1 team. Black Platoon fail to cause RP G any problems.
The German mortars launch a repeat bombardment and are able to kill another team from RP F.
The Panzer IVs launch an assault against RP E. RP E get a bazooka shot off before the assault hits home and manage to hit and bail one of the Panzer IVs. It’s not enough and the tanks roll over RP E killing another two teams. RP E try to counter attack but, fearful of the tanks, decide to fall back instead while the tanks consolidate their gains.
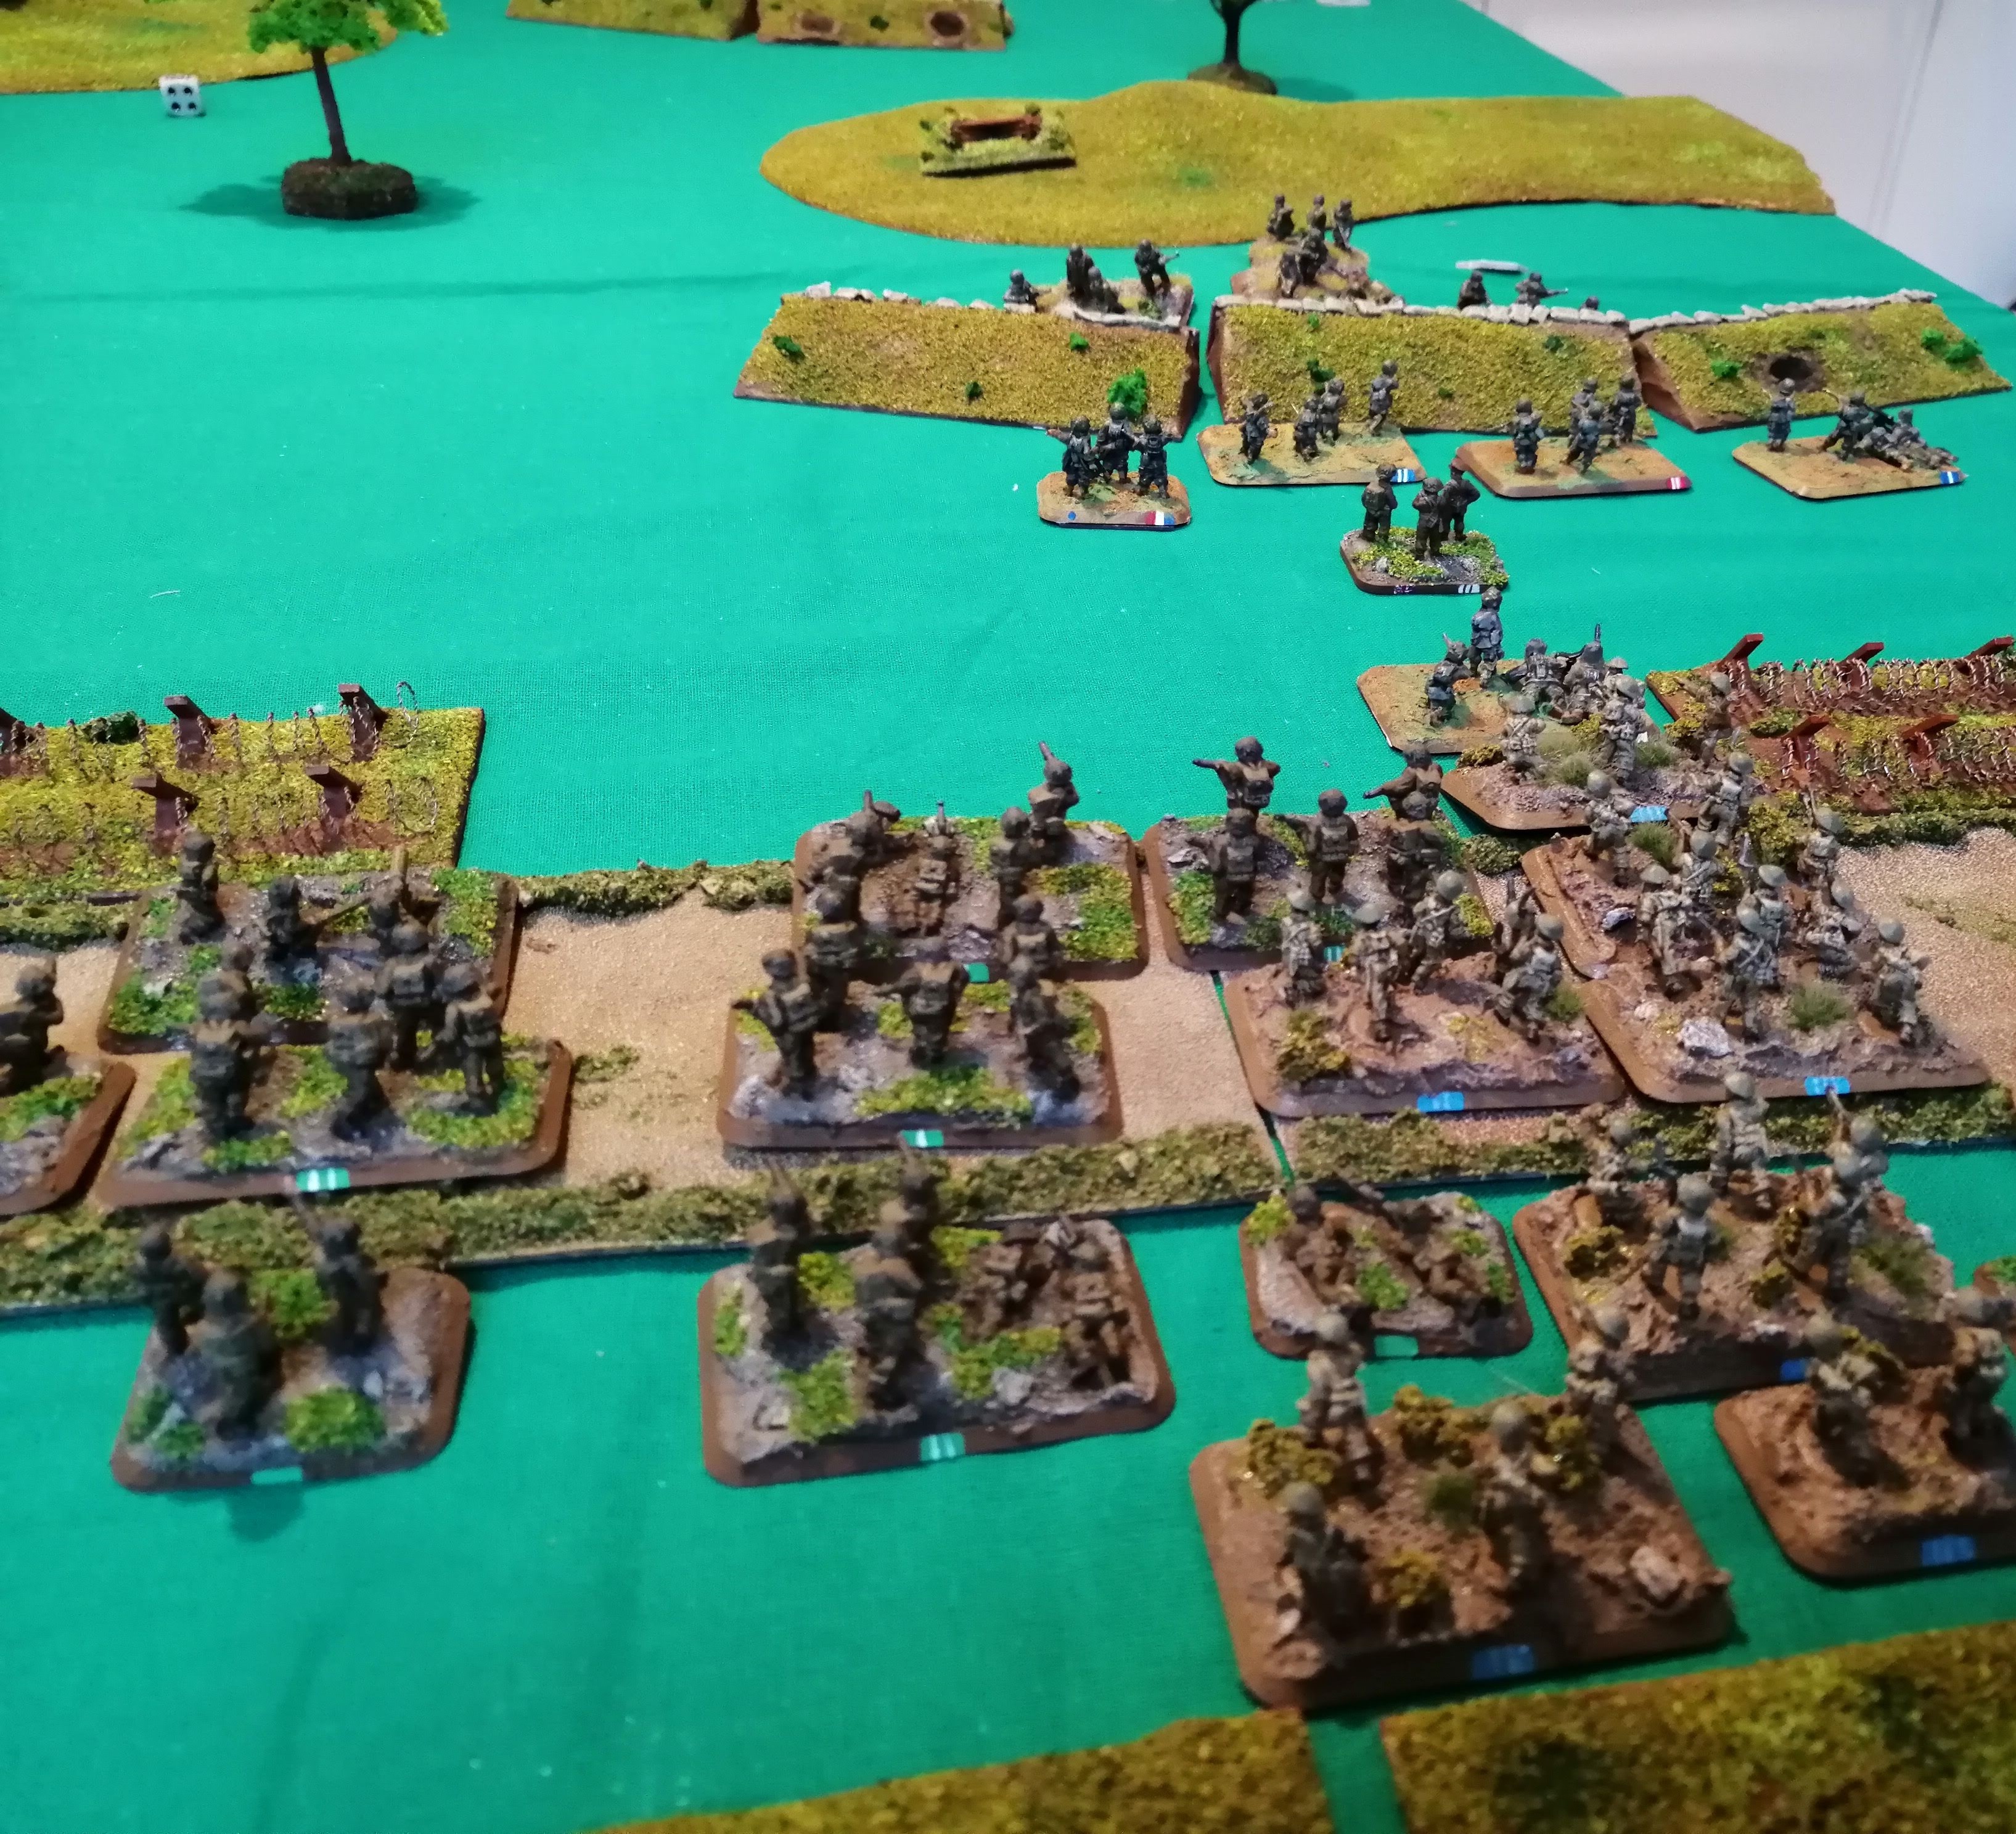
 End of Turn 7
 RPE advance on the MG Nest while APB and 2iC charge past, eyeing the mortars behind
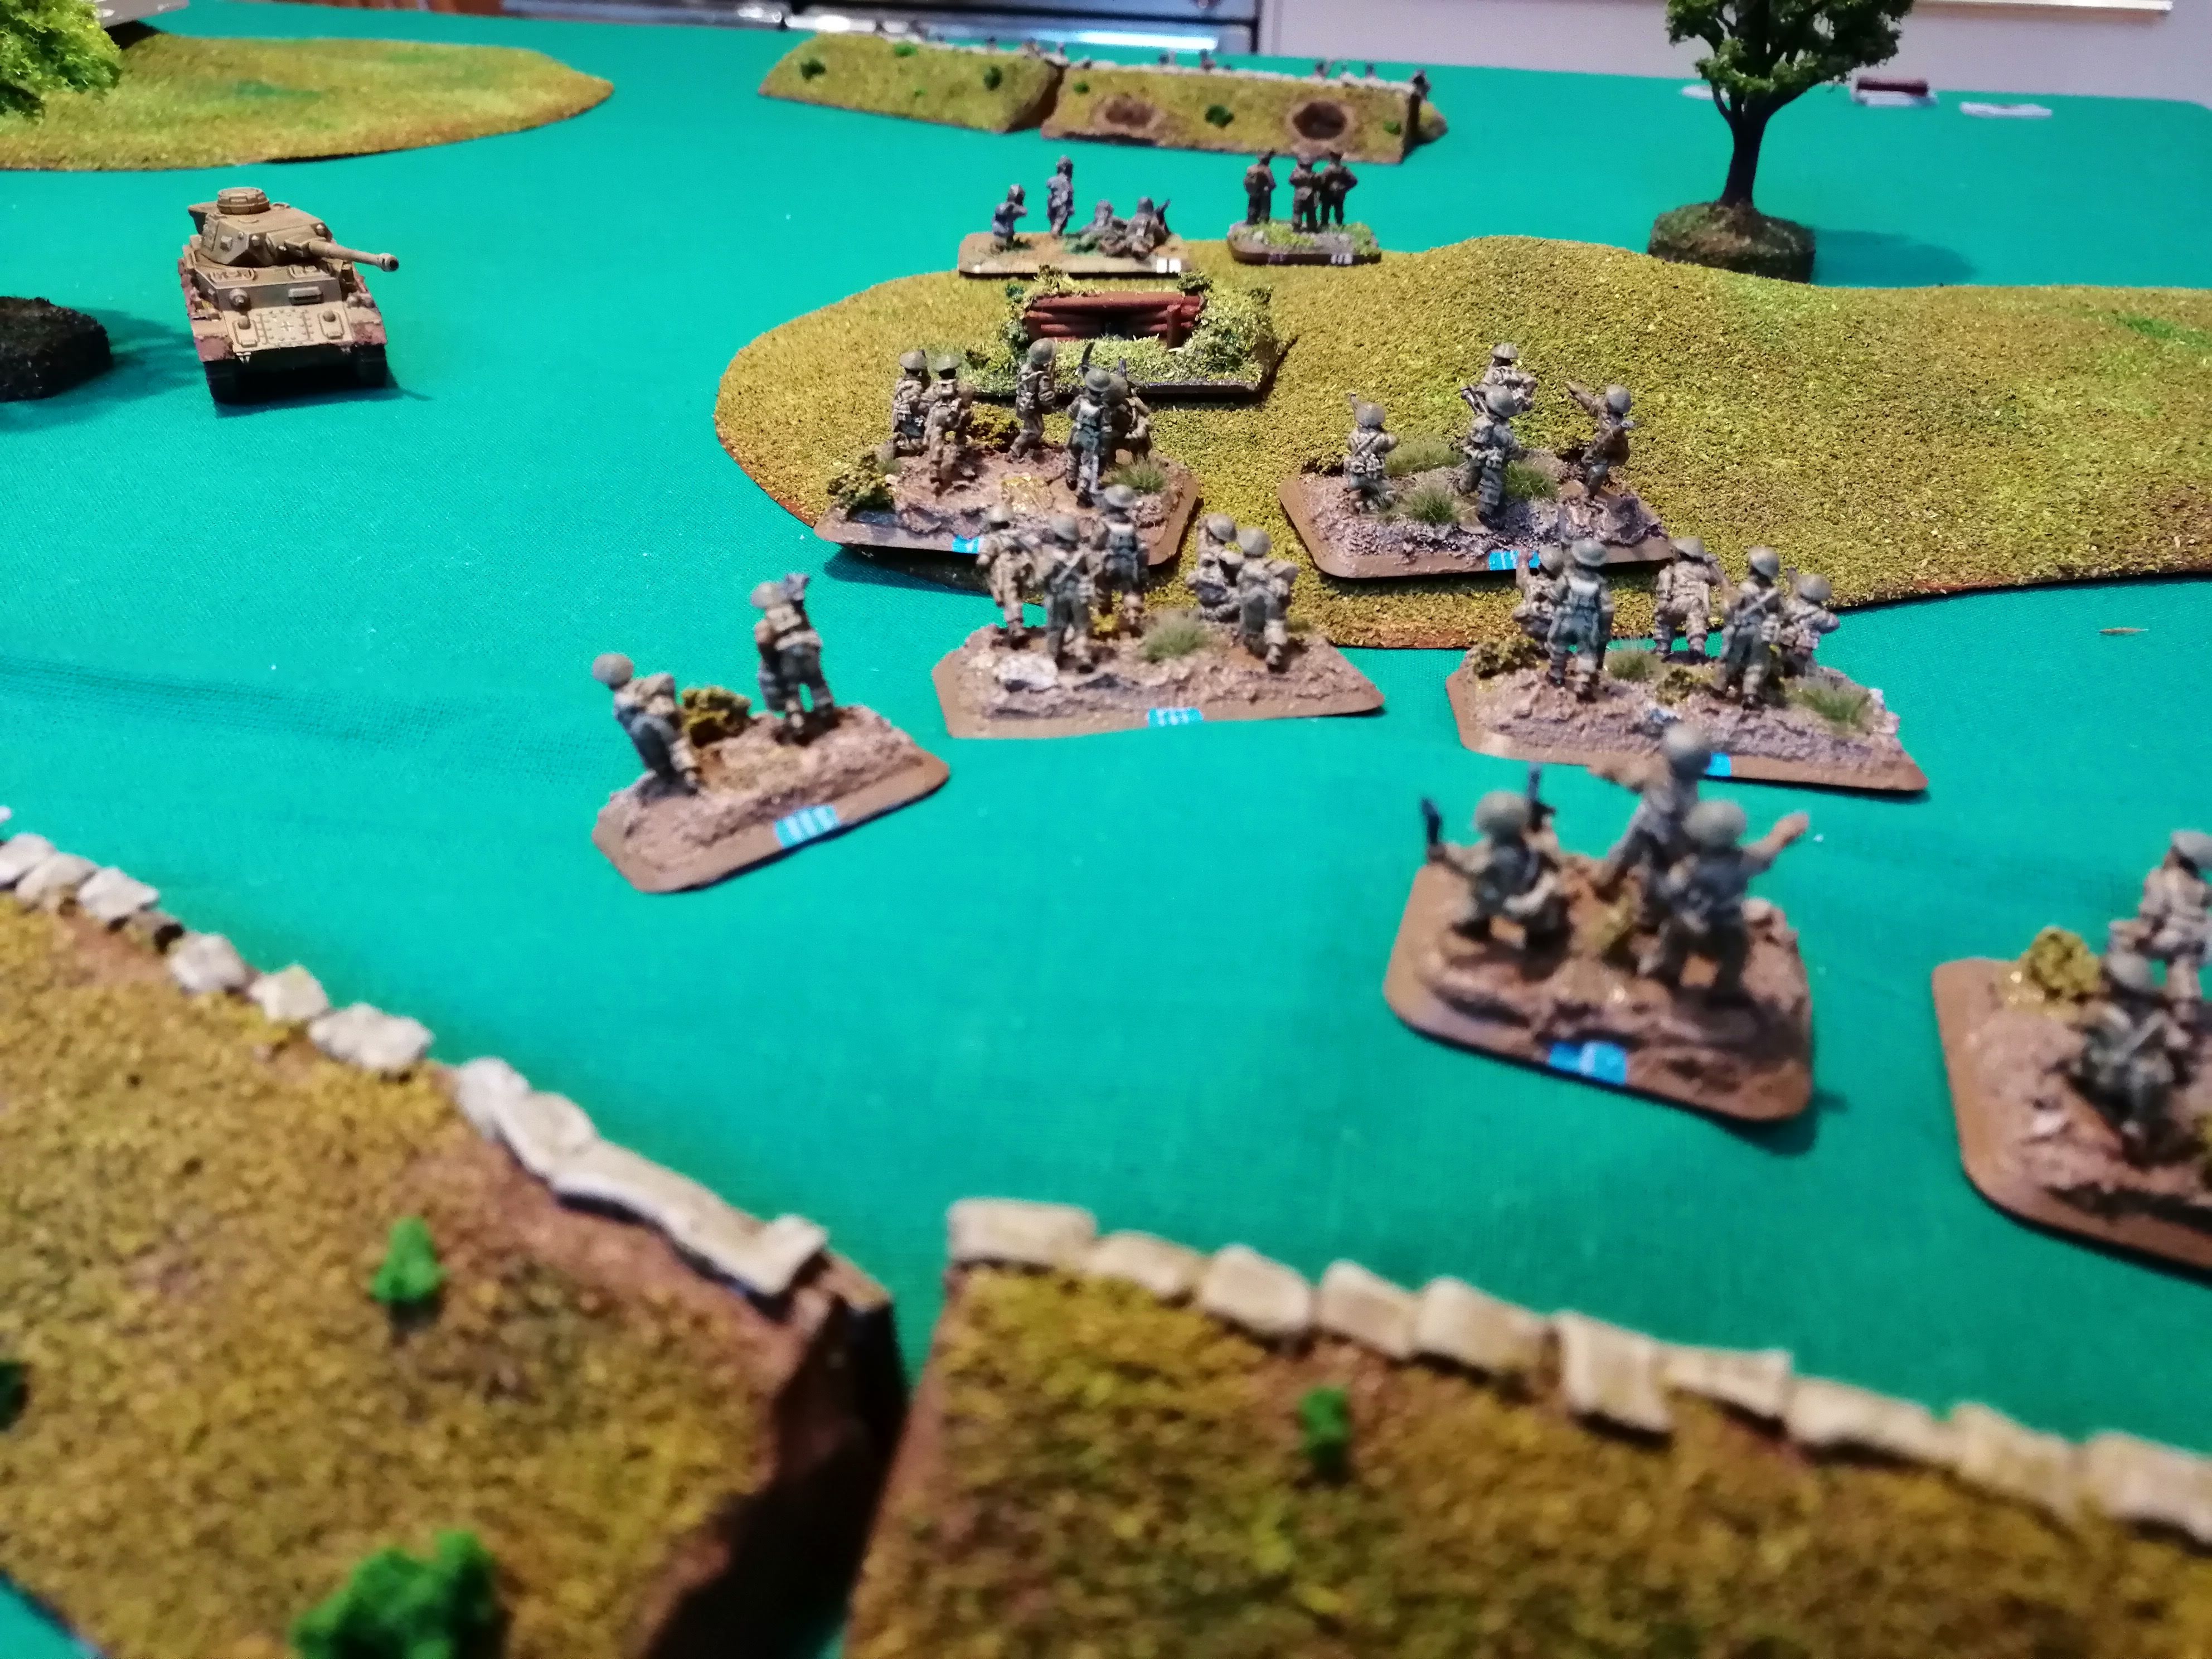

Turn 8
AP B passes their morale check and stays with the 2iC. Meanwhile, RP F unpins but RP G is not able to. The Engineers fail to add to their bridge this turn.
The 2iC accompanied by the last remaining team from AP B advance to within assault range of the German mortar teams. RP E also advances while RP F takes up position in Green Platoon’s trench.
AP B, 2iC and RP G all shoot at the German Mortar teams. They score 4 hits, not enough to pin them and fail to convert these hits into kills.
The tank support once again fails to hit anything and RP E’s bazooka hits a Panzer IV but fails to break the armour – had it, another bailed or destroyed tank would have left the tanks taking a morale check! Meanwhile, the US mortars repeat their bombardment against the tanks and cause a hit but can’t penetrate the armour.
RP G fire their rifles at Red Platoon, killing one team but Red Platoon is looking likely to close in behind the 36th and close of their retreat.
In defiance of the odds, the 2iC leads the last remaining team from AP B into assault against the German Mortars. The mortar teams fire with their rifles but fail to wound and the assault hits home. Between them, the 2iC and AP B kill two mortar teams. The rest of the mortar teams can’t stomach any more and fall back, leaving the 2iC and AP B to take their trench. Surely there will be commendations for the 2iC and AP B?? More importantly, that scores the US player another Victory Point!
RP F decide to launch an assault against the two operational Panzer IVs. The tanks look to be expecting this as their 8 shots of defensive fire cause 6 hits and kill two of the teams, including the bazooka team. This halts the assault before it even starts and pins RP F in place!
The bailed Panzer IV successfully remounts and the tanks continue their advance on the now almost defenceless 36th. Red Platoon also continues to advance along the road, looping behind the 36th Rifle Platoons. Red Platoon fires upon the US mortar teams and kills another. HMG 1 gets line of sight to RP G and kills another two teams.
Black platoon and one of the Panzer IVs fire on RP G and between them kill three teams. RP E has taken massive casualties this turn! The two remaining Panzer IVs fire at RP F and kill two teams.
At this point, with the score standing at 3-2 in favour of the Germans, the 36th concedes. Apart from the Engineer platoon and RPF, all of the remaining platoons require morale checks to remain on the table. RPF is down to just a few teams and there is no way of countering the German armour. It was a valiant effort and 2iC and AP B should be commended on their heroic actions but, as in the real battle, losses for the 36th became so great that they had to withdraw. Indeed, the losses were so great that the remaining Infantry Regiment of the 36th was not sent over the Garigliano but was sent up river to support the 34th Infantry Division. With the huge number of casualties taken, Congress investigated the US Army after the war concluded on their conduct during this assault.
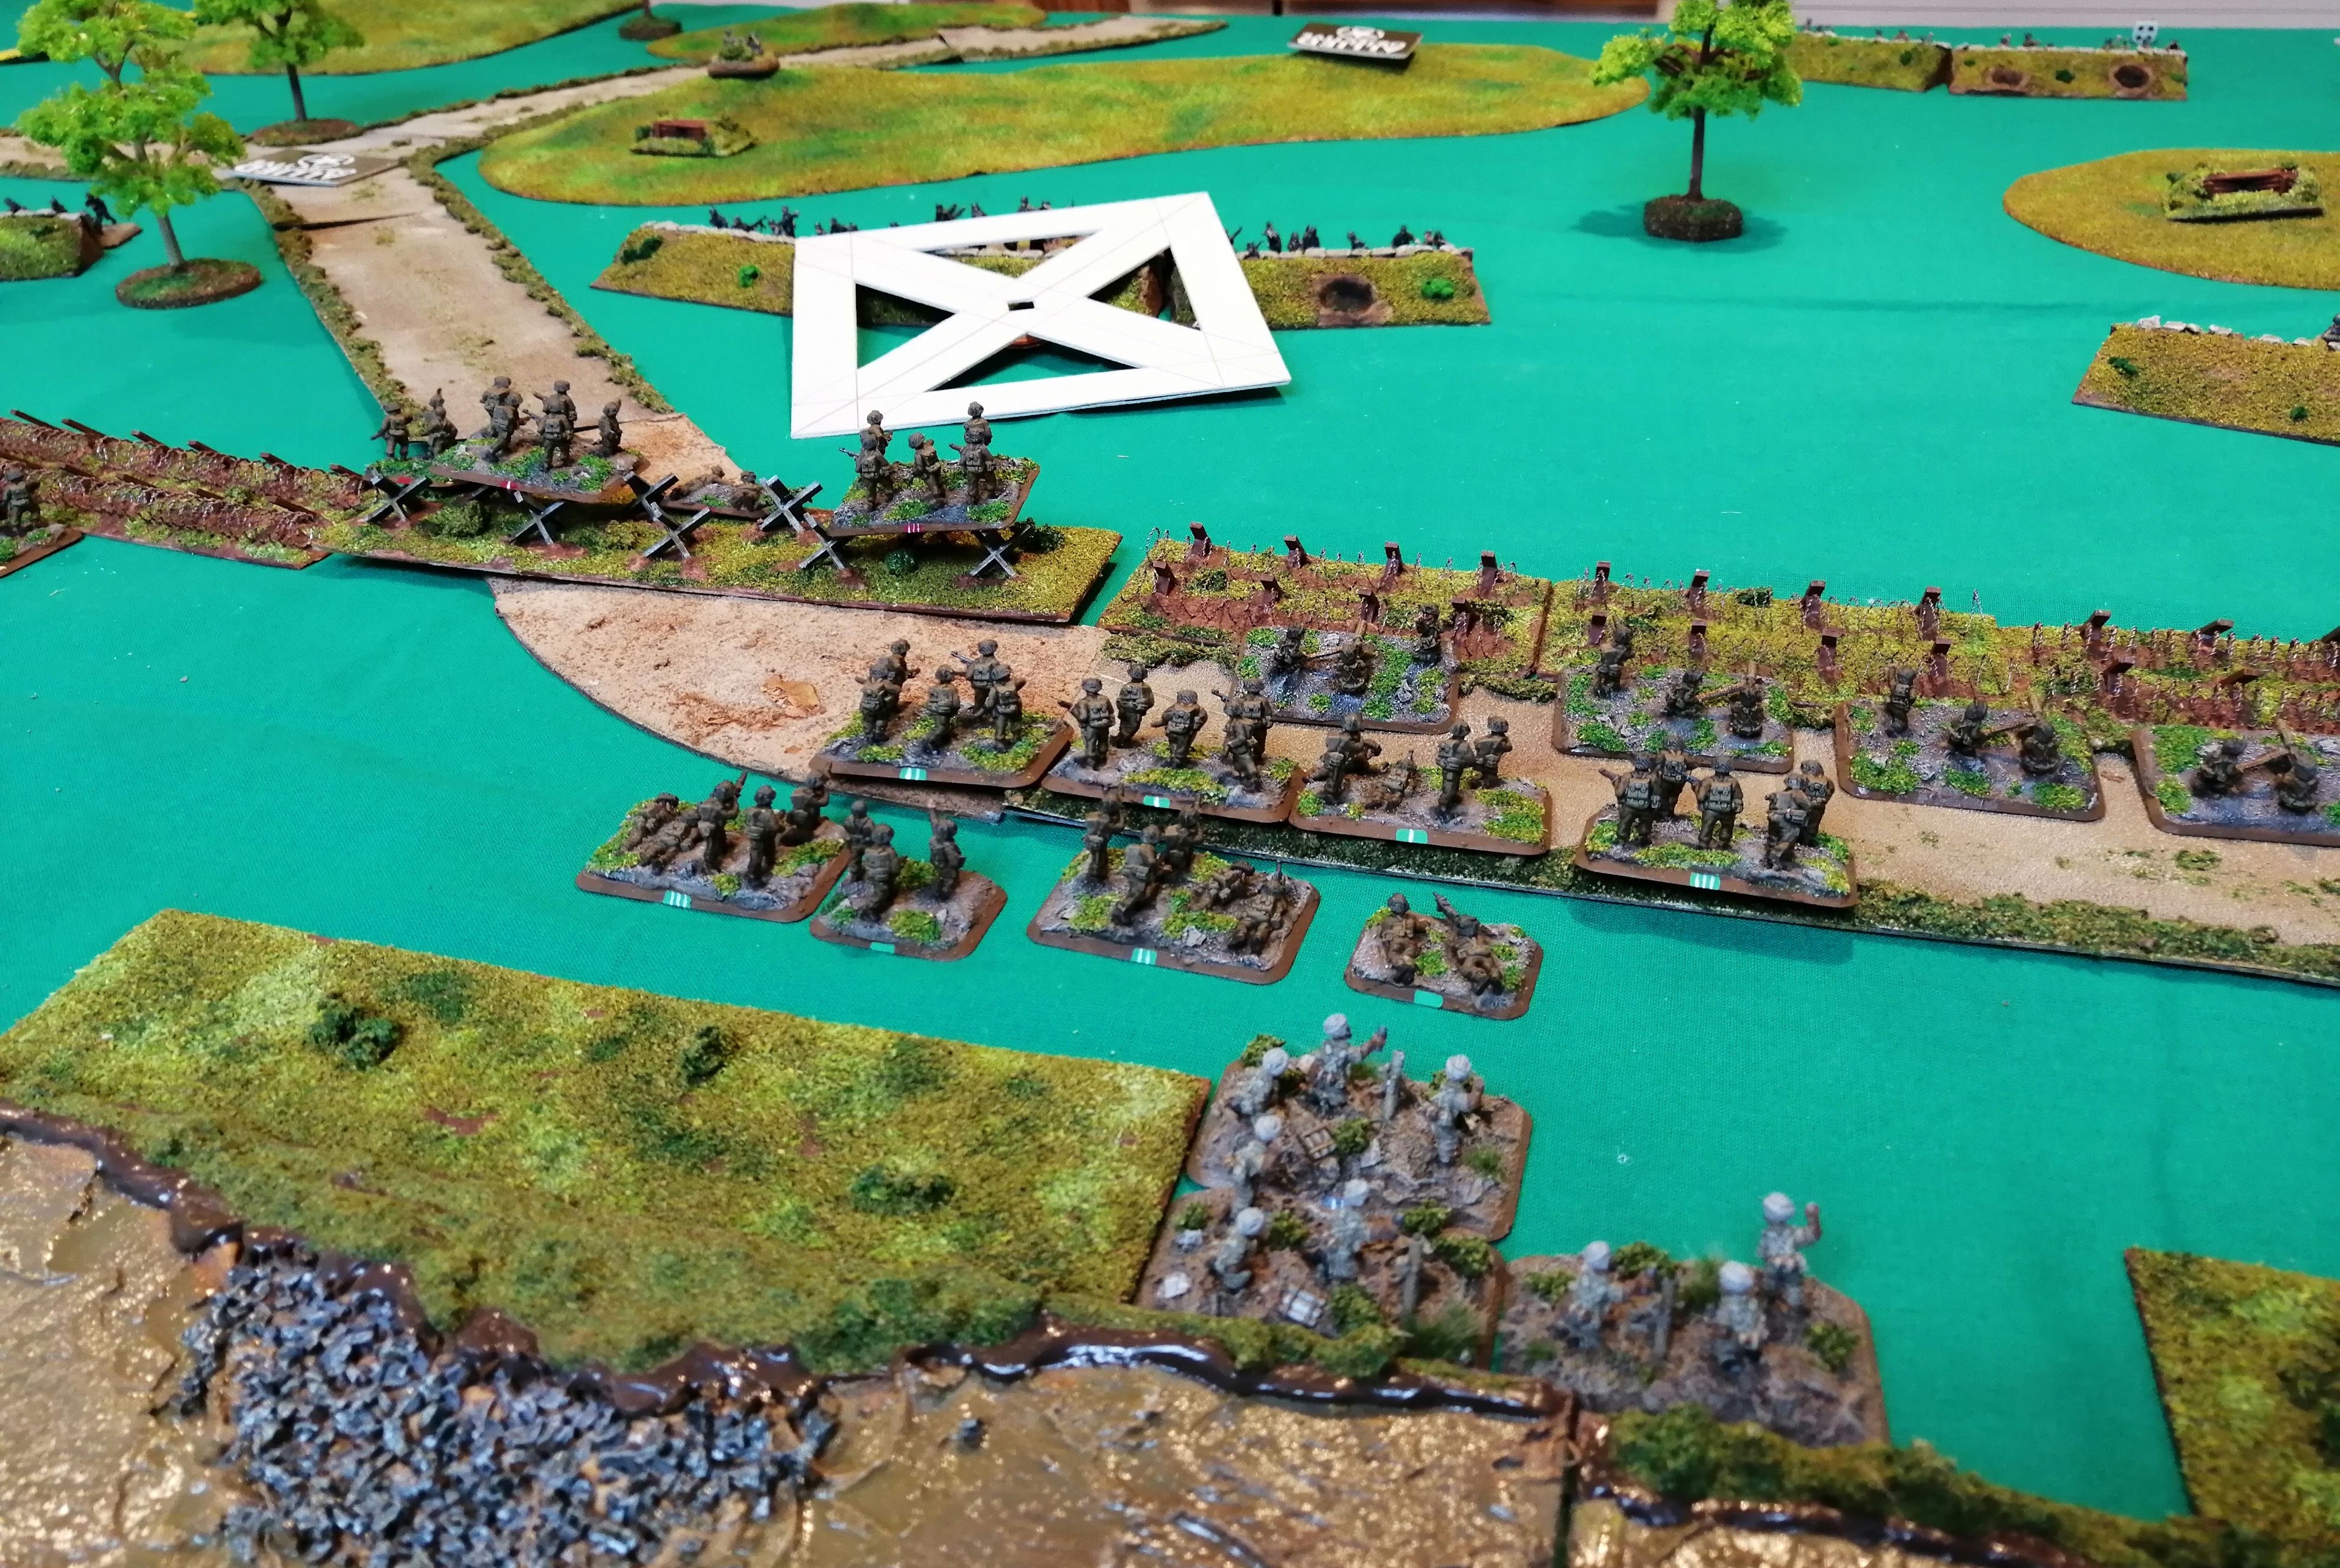
 Final state of play
 The assault on the mortar teams
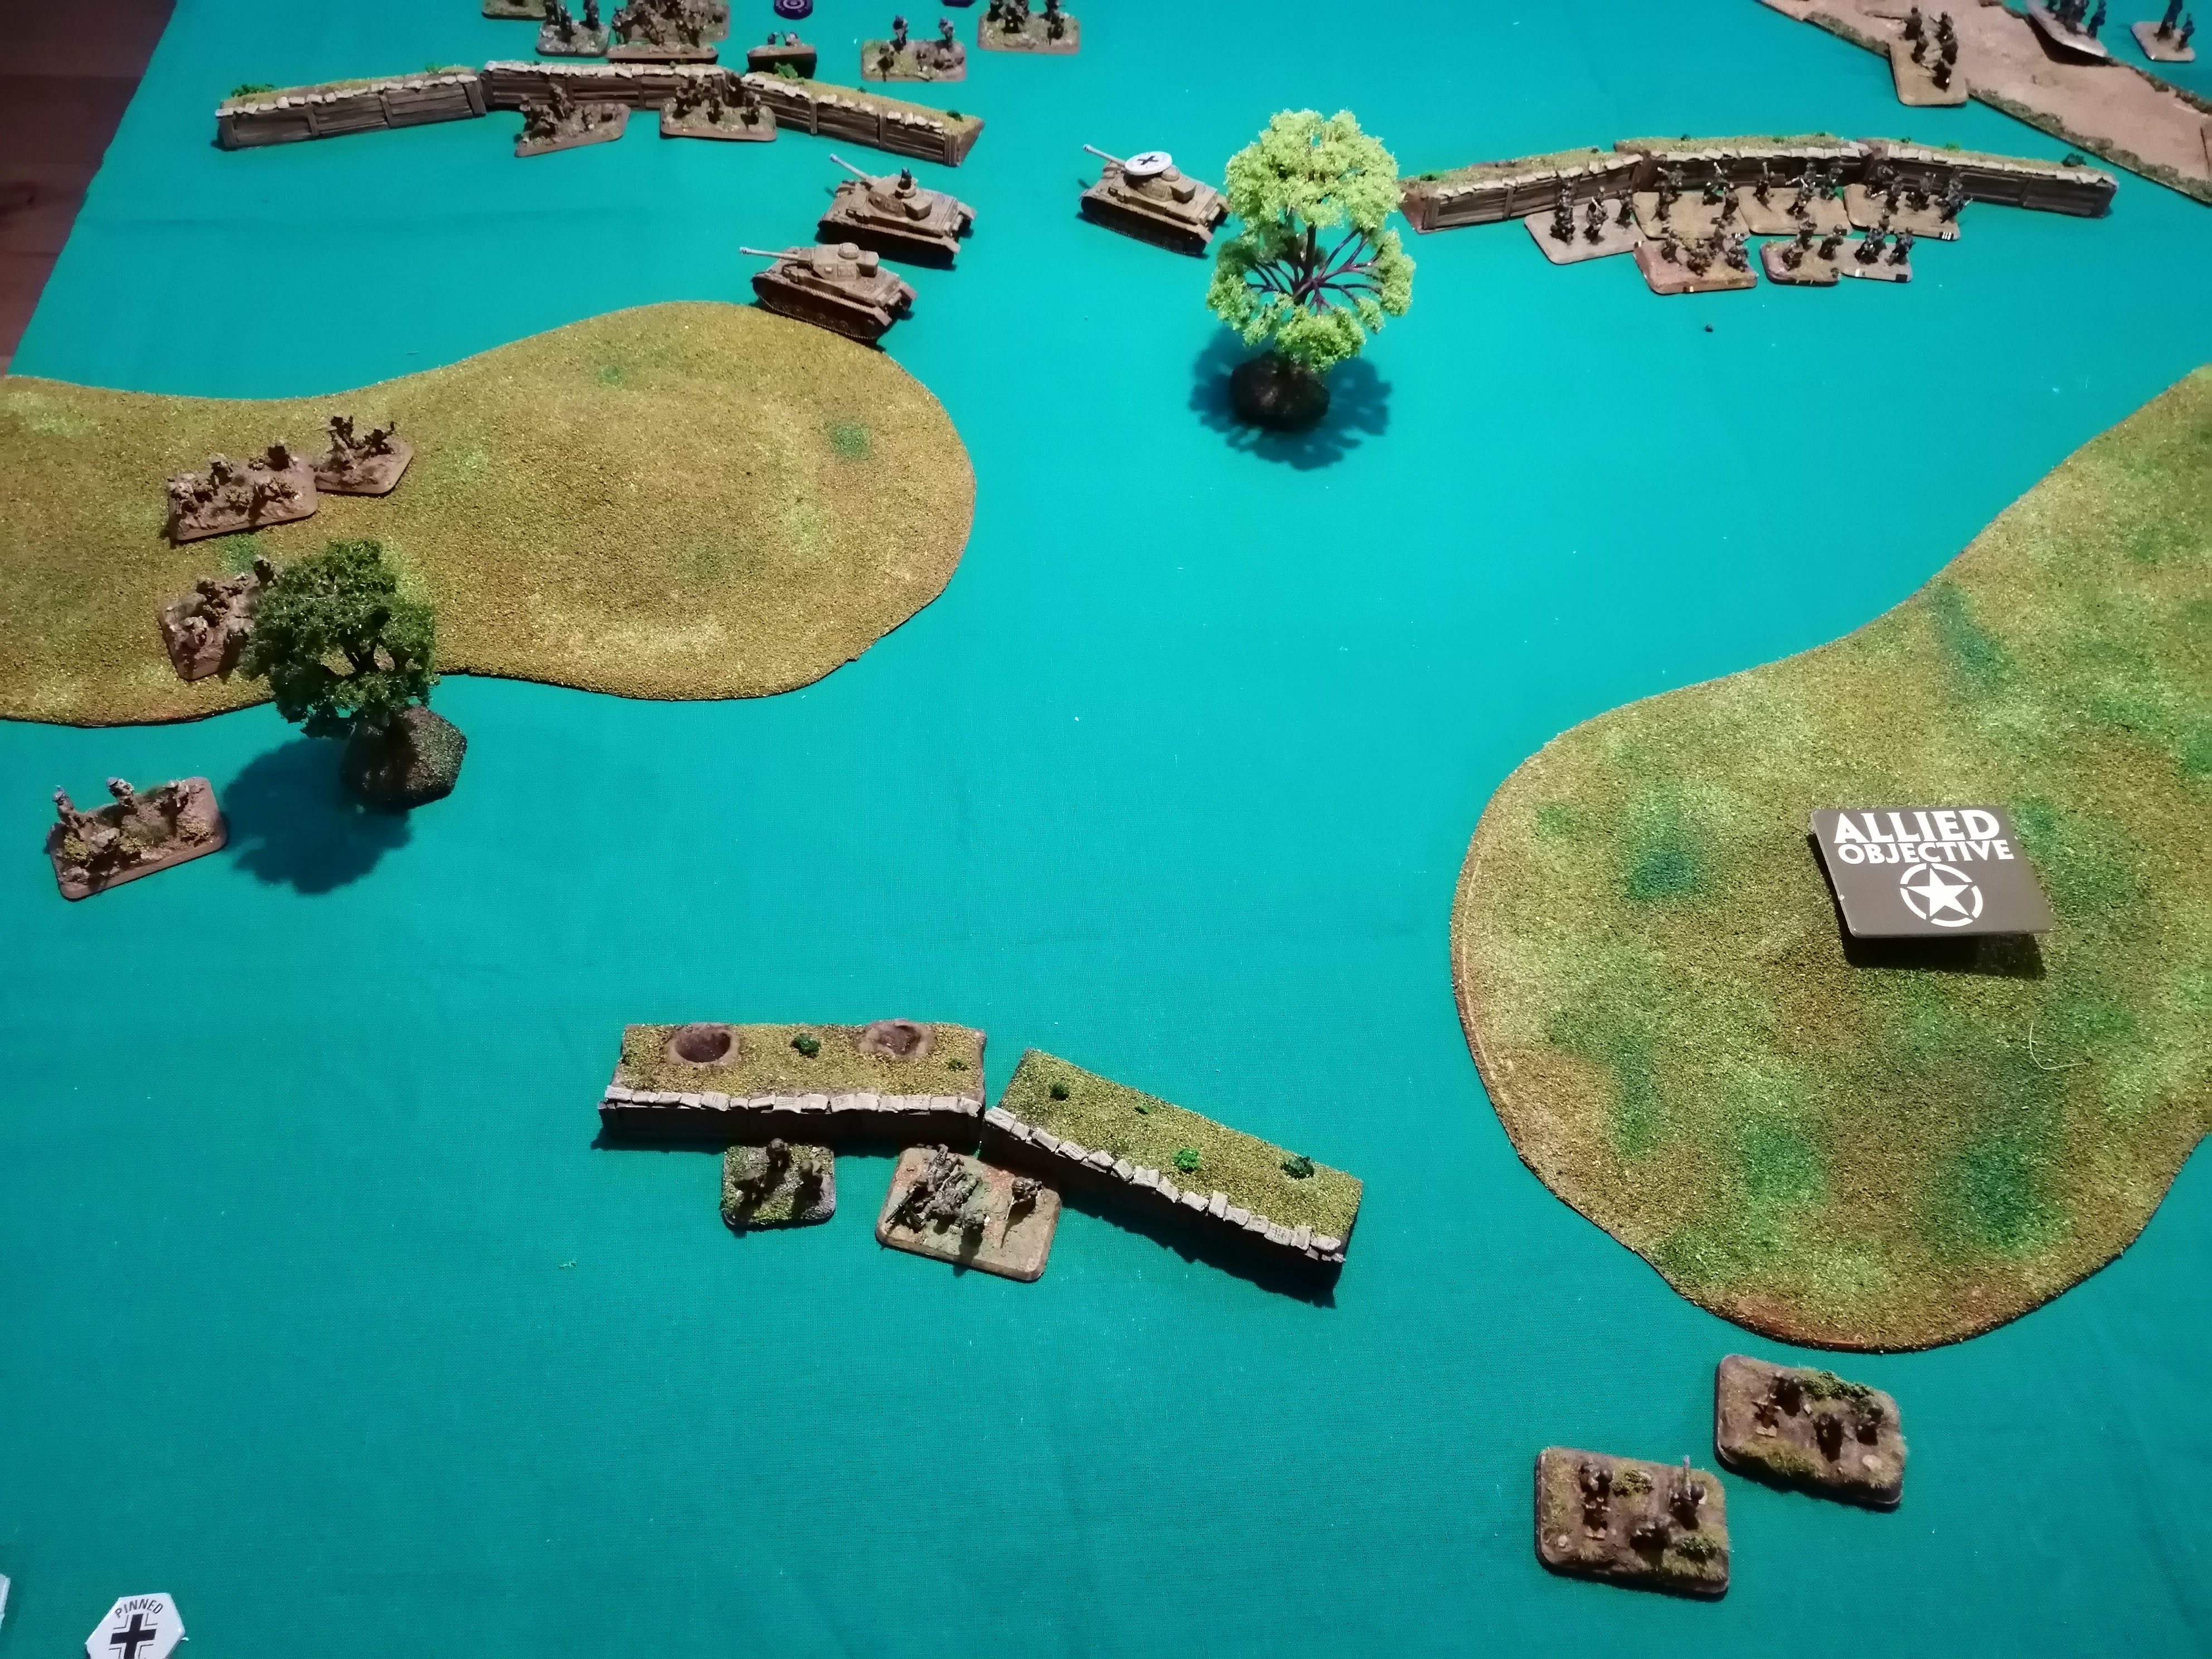
Monte Cassino - First Table Top Battle (Turns 5 and 6)
Once again, this project blog best read in reverse order.
Turn 5
RPD unpins and passes its morale check to remain in place! The MG teams also unpin and pass their morale check. On the 36th right, a rousing speech clearly lifts the troops as both AP B and AP F both leap up ready to continue the assault.
The last US rifle team deploys, RP G, and is fortunate to arrive toward the right flank as well, free from the minefield. There are now a lot of US forces on the right ready to go – can they push the advantage?
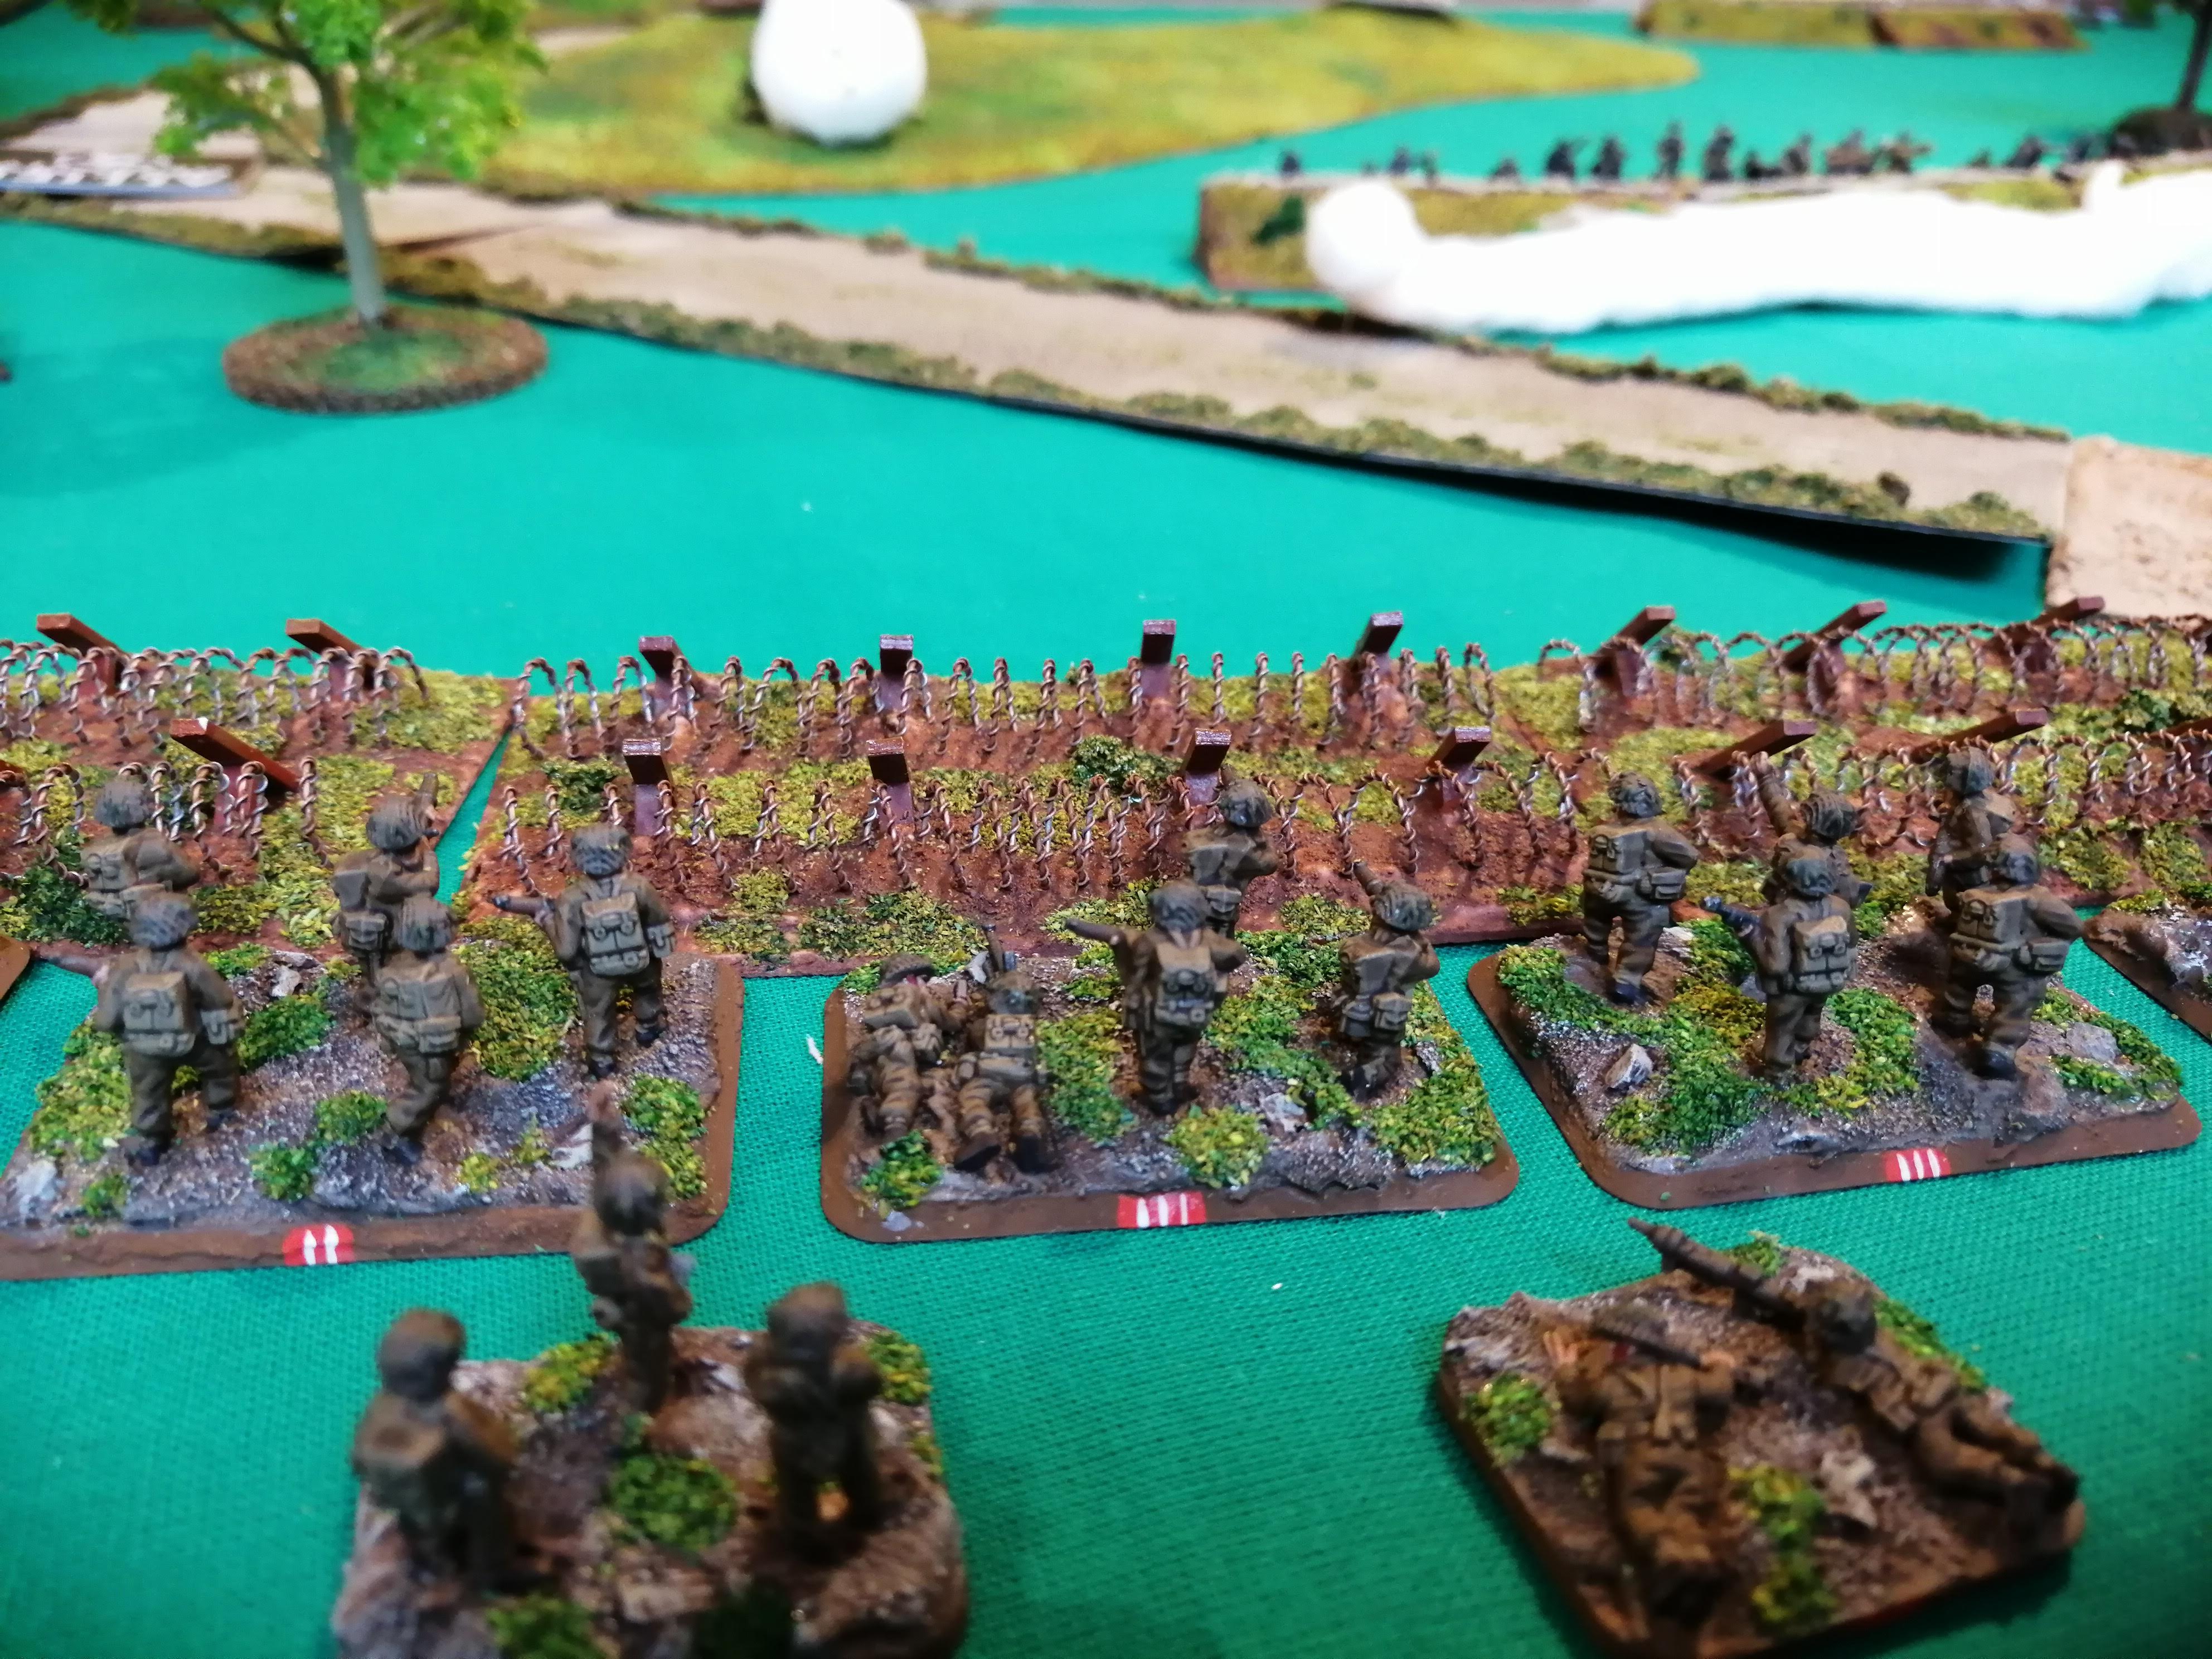
RP E tries to gap the barbed wire and is successful – this removes the obstacle from in front of them although they cannot move further this turn. RP F also try to gap the barbed wire but fail. However, the remainder of AP B who have not crossed the entanglements make good use of the gap created by RP E and rush round and through, advancing on Green Platoon, still pinned down in their trenches!
The newly arrived RP G waste no time advancing as well, heading through the newly formed gap in the barbed wire.
RP D, now finally unpinned, moves up to join the remnants of RP C left seeking shelter in the tank traps.
The Engineers make good progress on the bridge this turn, rolling 3 sixes to take the bridge score to 6! Just three more required to build the pontoon bridge and hopefully get some much needed armour support.
The two remaining MG teams continue to fire upon Green Platoon in their trenches and despite their reduced firepower, manage hit and kill one team. AP B, now within charge range fail to score any telling hits despite the flamers!
The tanks again smoke the HMG nests and attempt to take out HMG 2 with a direct shot. It proves unsuccessful however the mortar team repeat their bombardment against Black Platoon and manage to kill a team. The 36th are finally starting to deliver some payback!
AP B, now in charge range of Green Platoon in their trench, has a choice to either sit in the open or charge and take a lot of defensive fire from both Green Platoon and HMG 2. It’s a tough call but leaping up, waving his SMG, the 2iC urges APB forward into the assault! Green Platoon fire at the charging Americans but only manage two hits which are both saved. HMG 2 also opens fire but can only manage one hit which is again saved. With no lost teams and not enough hits to pin the valiant Americans, they hurl their grenades and leap into the trenches to engage the Germans up close. The assault is near flawless in its lethality and leaves just a solitary German team alive. The Germans counterattack but clearly dazed and bloodied from the assault, fail to cause any damage and the Americans finish off the job. With all resistance removed, AP B can occupy the trench and consolidate their gain. Suddenly, at the end of the 36th 5th turn, the heroics of AP B and 2iC have eliminated Green Platoon, gained their first Victory Point and started to expose the German left flank!
At the start of the German turn, Black platoon try to unpin but fail. Perhaps the events further up the trench line have them shaken?
Visibly concerned, and wanting to plug the open hole in the trench line, the Germans deploy their three Panzer IV tanks on the road at the back of the board. The tanks advance toward HMG 2 looking to provide some covering fire and head off the advancing 36th.
HMG 2 continues to fire at AP B, as do the newly arrived Panzer IV’s, but with the added protection of being in the trench line, the incoming fire is a lot less punishing and AP B takes no further losses.
The mortar team opts to change their bombardment point, trying to catch the massing US 36th behind AP B. They manage to range in on the second attempt and catch RP E, RP F and RP G all under the bombardment. The mortars fail to cause any wounds but do cause all three platoons to become pinned as they hit the dirt to avoid the flying shrapnel.
The previously reliable German shooting starts to falter and the remaining German platoons fail to cause any wounds despite a significant amount of fire power. However, HMG 1 is able to remove the last remaining team from RP C, removing them from the game completely to gain a second Victory Point and to take a 2-1 lead.
 We catch the Assault Platoon just as they jump into the trenches to take on Green Platoon
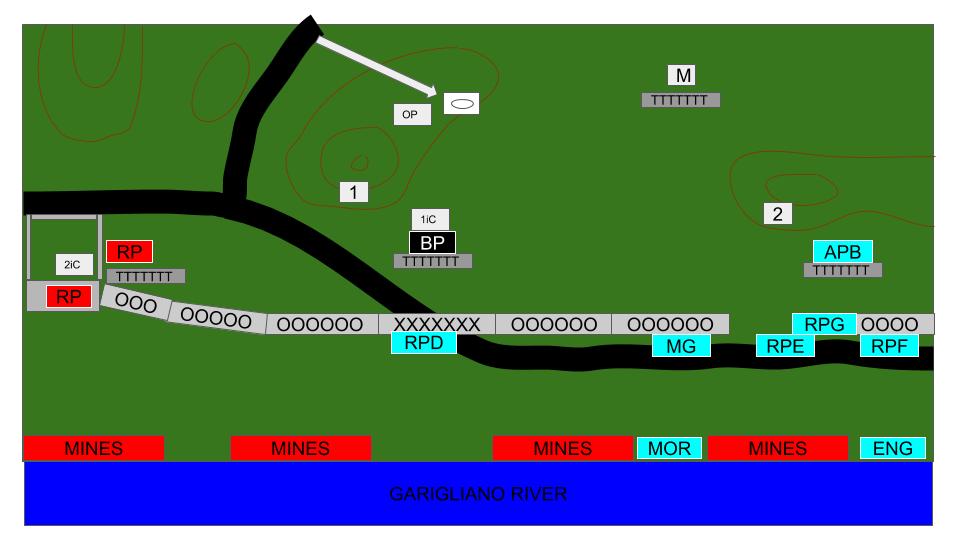 State of play at the end of the 5th Turn
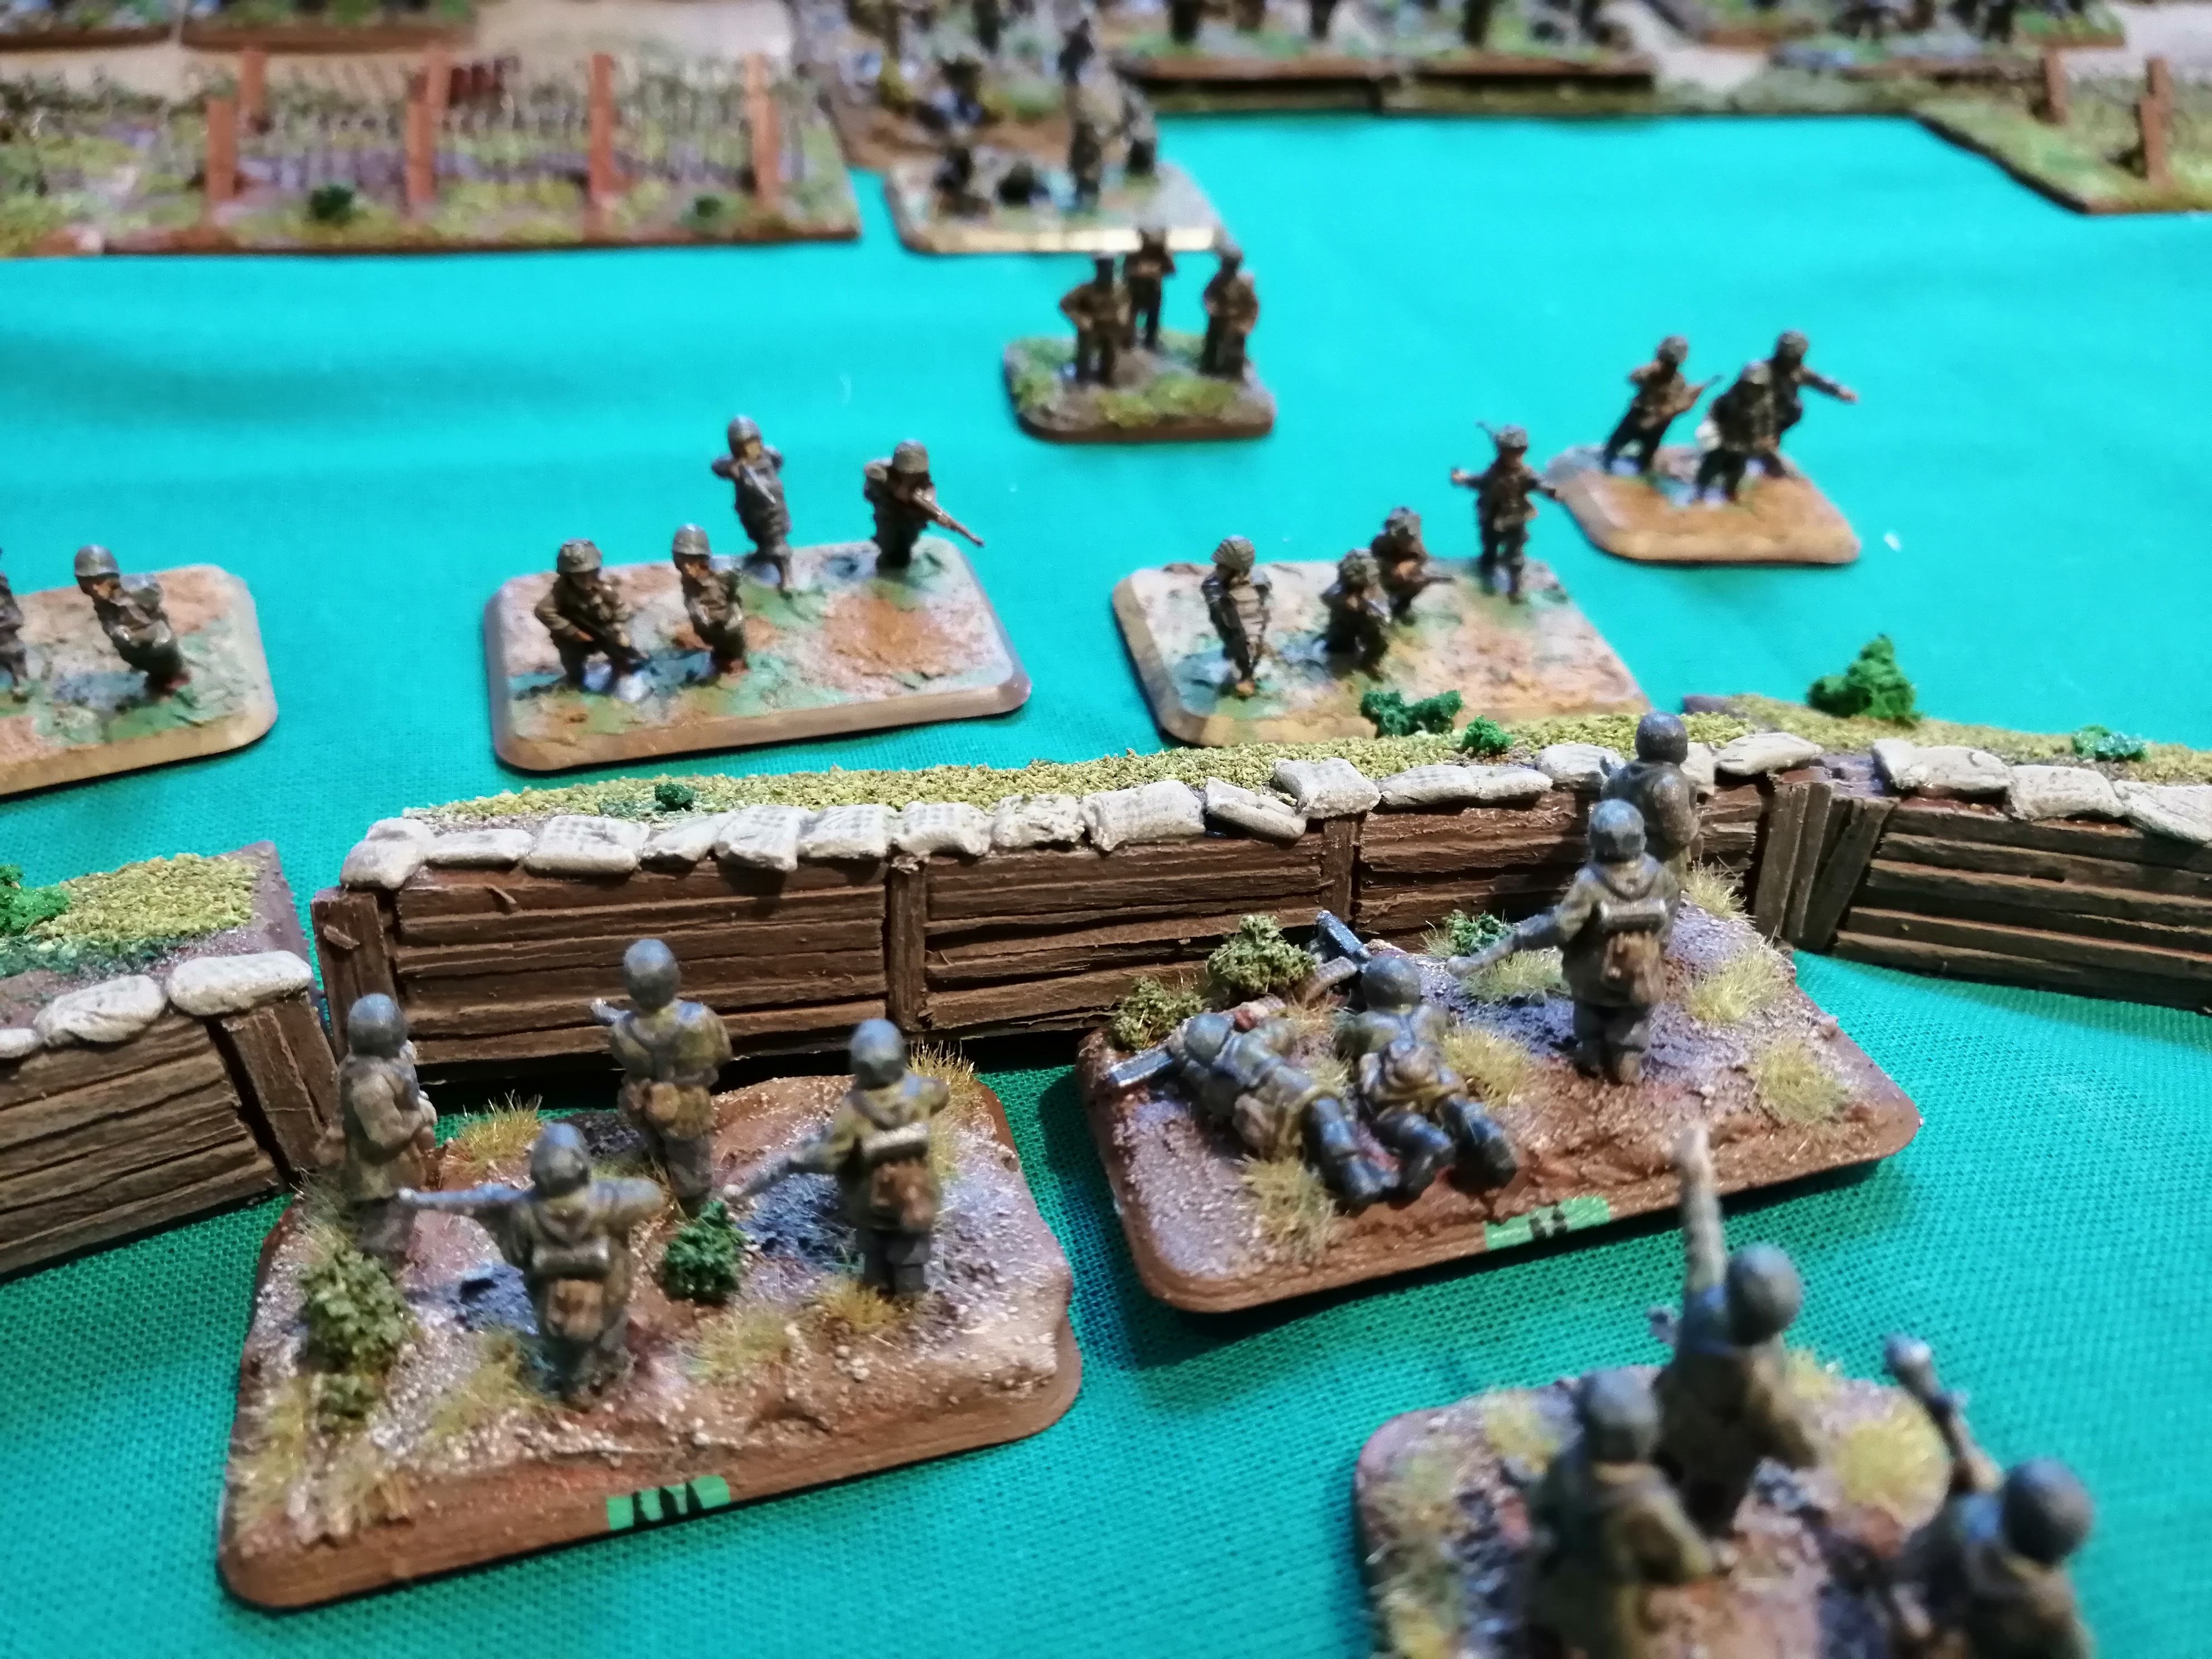


Turn 6
RP D, reduced to two teams, passes their morale check and stays in the fight. Further along the line, the two remaining MG teams fails their Morale and fall back, significantly reducing the firepower available to the 36th. Both RP E and RP G manage to unpin however RP F can’t lift themselves and remain pinned.
Both RP E and RP G continue to advance toward what was Green Platoon’s trench. 2iC recognises the threat that HMG 2 causes to the advancing rifle platoons behind, and with adrenaline surging through their veins, leave the safety of the trenches and advance on HMG 2, hoping that their remaining flame thrower will be enough to take it out.
Meanwhile, in the centre, the now decimated RP D moves further into the tank traps to try to gain some advantage from the cover available there.
The Engineer team continues with their attempt to build the Pontoon bridge but fail this turn to add to their bridge score.
The Rifle Platoons fail to make their shots count this turn, missing just about everything. The mortar team however is able to destroy another team from Black Platoon with a further repeat bombardment.
AP B, within charge range of HMG 2, uses their remaining flame thrower on the nest. This weapon is perfectly made for removing this type of resistance. With two shots and needing a 2 to hit, they roll snake eyes! AP B suddenly finds itself out in the open facing an HMG nest with three tanks heading toward them.
The US tanks smoke HMG 2 to try to protect AP B as best they can.
Once again, 2iC decides that attack is the best form of defence and he urges the men under his command to charge HMG 2. Despite the smoke, the nest causes 5 hits which is enough to pin AP B and cause the attack to fail. In addition, 2 teams from AP B are removed as casualties leaving AP B with just three teams, although the flame thrower team is still one of them.
With the action now on the German left flank, the 15th PG decide to relocate Red platoon to support the now unpinned Black platoon in the centre. In doing so, they hope to sweep up between the barbed wire and the trench line and catch the 36th the side. The 15th PG 2iC also transfers from the Red Platoon trench to the Black platoon trench to reinforce the defences there. Further back, the Panzer IV’s continue to advance and draw within MG range of AP B.
HMG 2 continues firing at AP B and it looks as if AP B’s luck has run out as they lose another two teams including their command team and the flame thrower. It’s just 2iC and a solitary rifle team left!
In the centre, Black Platoon kills another team from RP D while the rest of the German infantry shooting is largely ineffective.
The tanks choose to ignore what’s left of AP B and concentrate their MG fire on RP E who are advancing up behind AP B. The tanks cause 5 hits, pinning RP E but can only kill one team.
The mortar team attempts to target RP G and RP E, ranging in first time. One team from RP G is killed and the rest of RP G is pinned.
 End of Turn 6
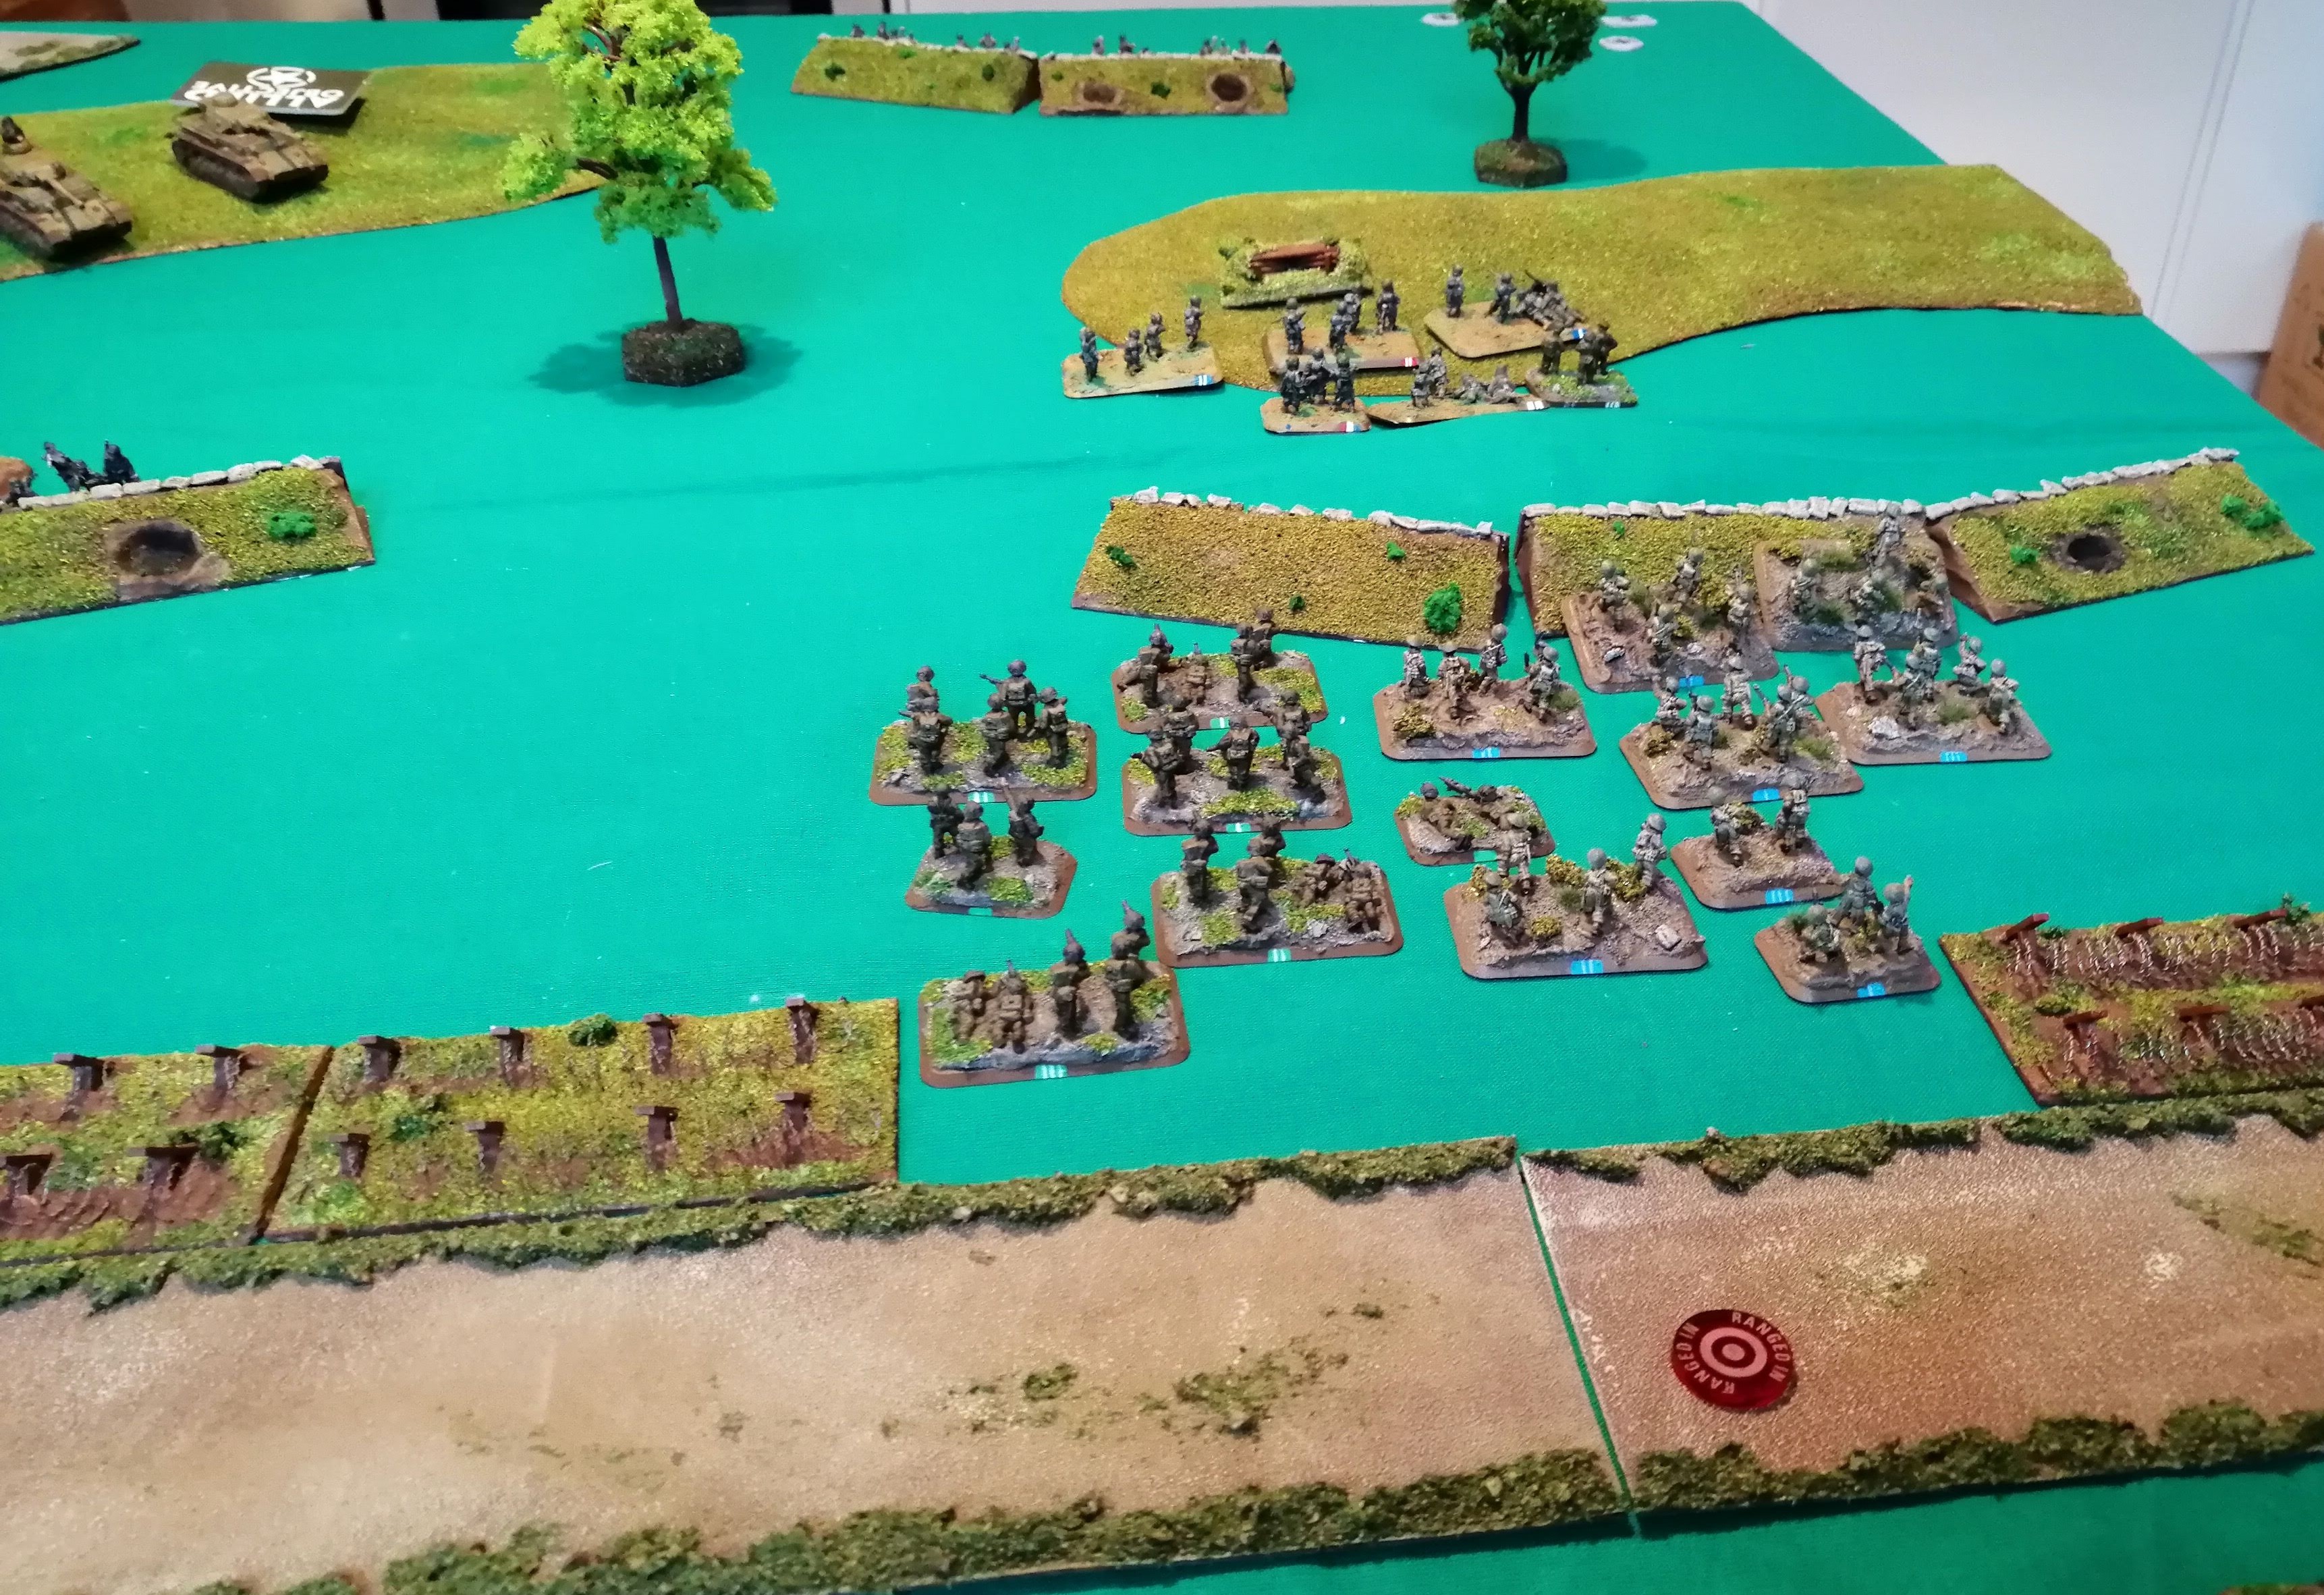 The Assault Platoon right in front of the HMG Nest
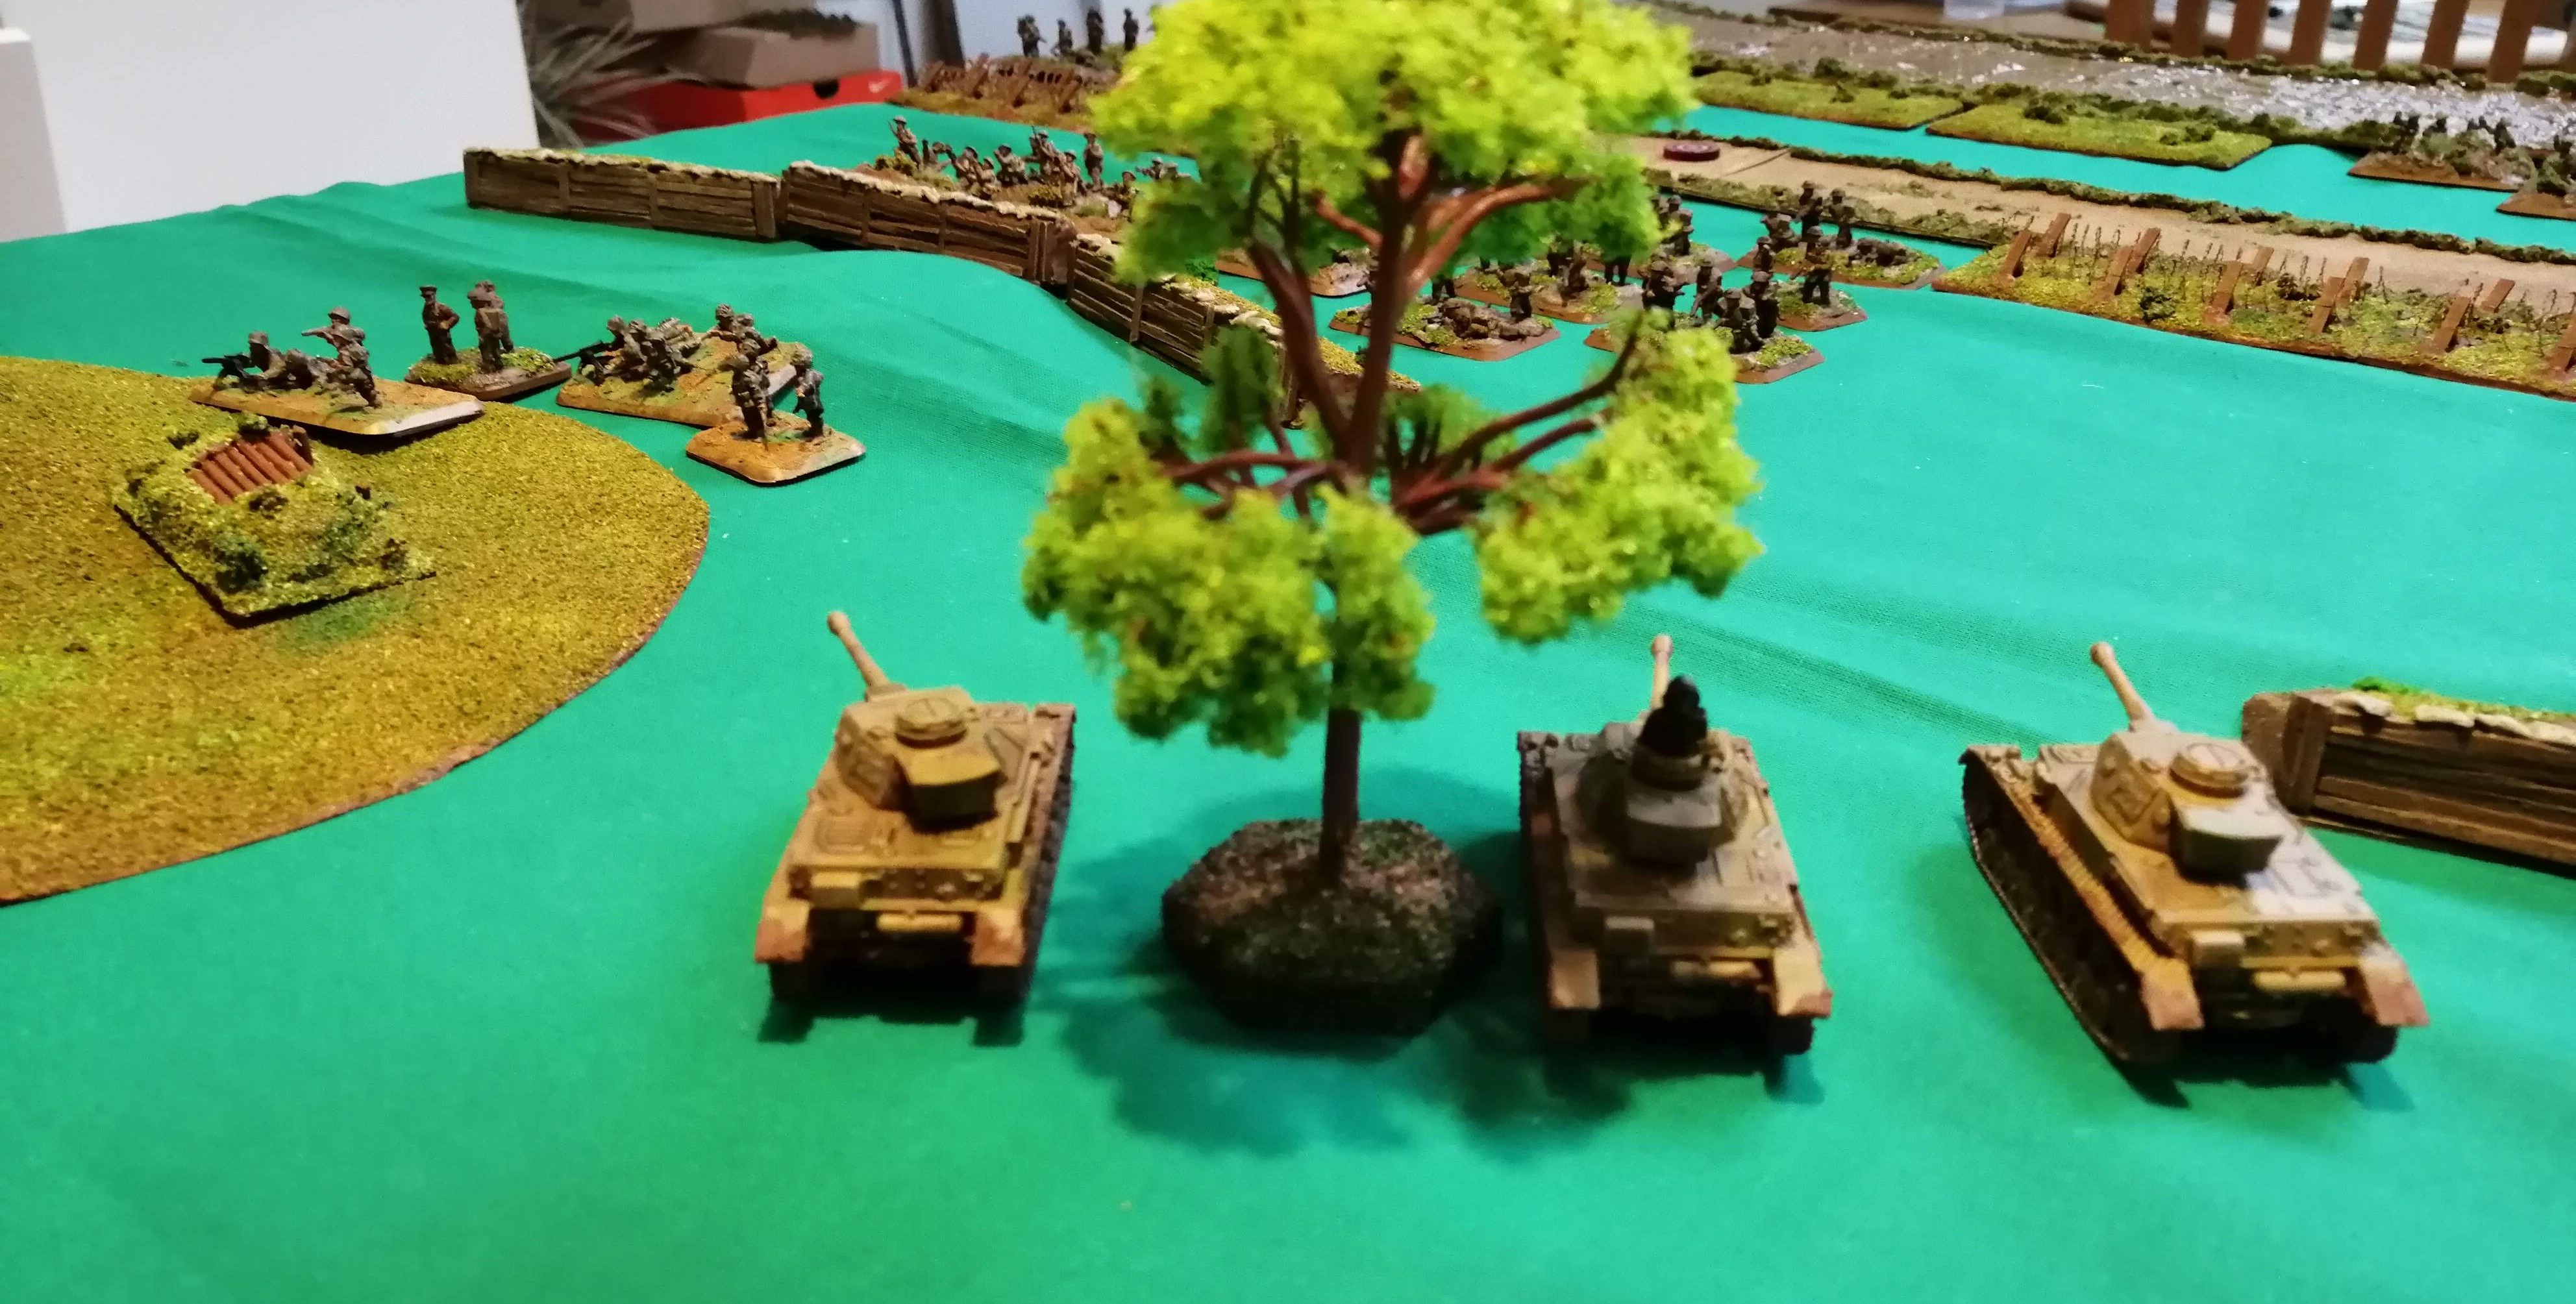 Panzer IVs threatening the US Infantry

Monte Cassino -First Table Top Battle (Turns 3 and 4)
 RPD hard up against the barbed wire
Project best read in reverse order!
Top of the Third turn
Turn three sees desperately needed reinforcements arrive for the 36th. Assault Platoon B (AP B), accompanied by the 2nd in Command (2iC) rolls for their deployment and deploys alongside the Engineer team on the US right. Rifle Platoon E (RP E) also arrives and their deployment roll is a 6, giving the US the choice on where to deploy, opting for the area clear of mines, just to the right of centre.
During the starting phase, what’s left of AP A fails their morale check and they are removed from the battlefield. RP C unpins but RP D and the Engineers remain pinned down by the incoming fire.
The newly arrived platoons waste no time in getting forward. AP B advances past the pinned Engineers up to the barbed wire, bravely putting themselves between the MG’s of Green Platoon and the Engineers. RP E advance along the road up behind MG teams, looking to add their fire power to the advancing AP B.
RP C, now unpinned, inch forward and are able to move the bazooka team within range of Black Platoon in their trenches, with the hope that the improved firepower might be able to punch through.
The Engineer team, still pinned and therefore rolling only 2 dice can’t add to the bridge score, which remains at 3.
With the movement complete, the 36th look to deliver some payback to the defenders. Both AP B and the MG teams open up on Green Platoon. A lot of hits are scored but the bullet proof cover saves the defenders from losses but Green Platoon end up pinned.
RP C and RP D both fire on Black Platoon but fail to score any hits. The bazooka team of RP C need a 6 to hit and gets it! Black Platoon fail their saving throw but are saved by their bullet proof cover, ending up being showered with mud, splintered wood and debris taking just minor wounds.
The mortar team launch a repeat bombardment but having used their smoke bombardment, use explosive shells instead. The repeat location is not ideal for this, being placed for smoke in the previous turn but guarantees hitting and still catches five of Black Platoon. It fails to cause wounds but does pin Black Platoon down.
Finally, the tank shots manage to smoke both of the HMG nests again.
At the end of the 36th 3rd turn, as in the real battle, their progress has been kept contained by the defenders and their losses are high. It looks as if history will repeat itself on the tabletop.
Middle of the Third Turn
The 15th PG roll to unpin their units and succeed with the Mortar team and Black platoon however Green Platoon fails and remains pinned. There is no point in moving out of the entrenched areas and so 15th PG moves straight to the shooting phase.
Green Platoon splits its fire upon the AP B and the MG Teams. They score 4 hits against AP B but all are saved and not enough to pin the unit. The MG teams fail a save and lose one team and are reduced to three. HMG 2 attempts to pour fire into AP B but misses all of its shots!
Black Platoon splits its fire against the MG teams and RP C. The MG teams survive but end up pinned by the weight of incoming fire power. The fire from Black platoon into RP C is joined by HMG 1 and together they kill a team and pin the remainder of the platoon.
Red platoon fires on RP D killing a further two teams.
The mortar team, now unpinned, can begin to rain shells down upon the beleaguered 36th. The spotter on the hill calls in a bombardment against AP B and manages to range in and land a number of hits against the platoon, killing one team. AP B, who had been grimly advancing against the incoming MG fire, hit the deck when the shells land and are pinned.
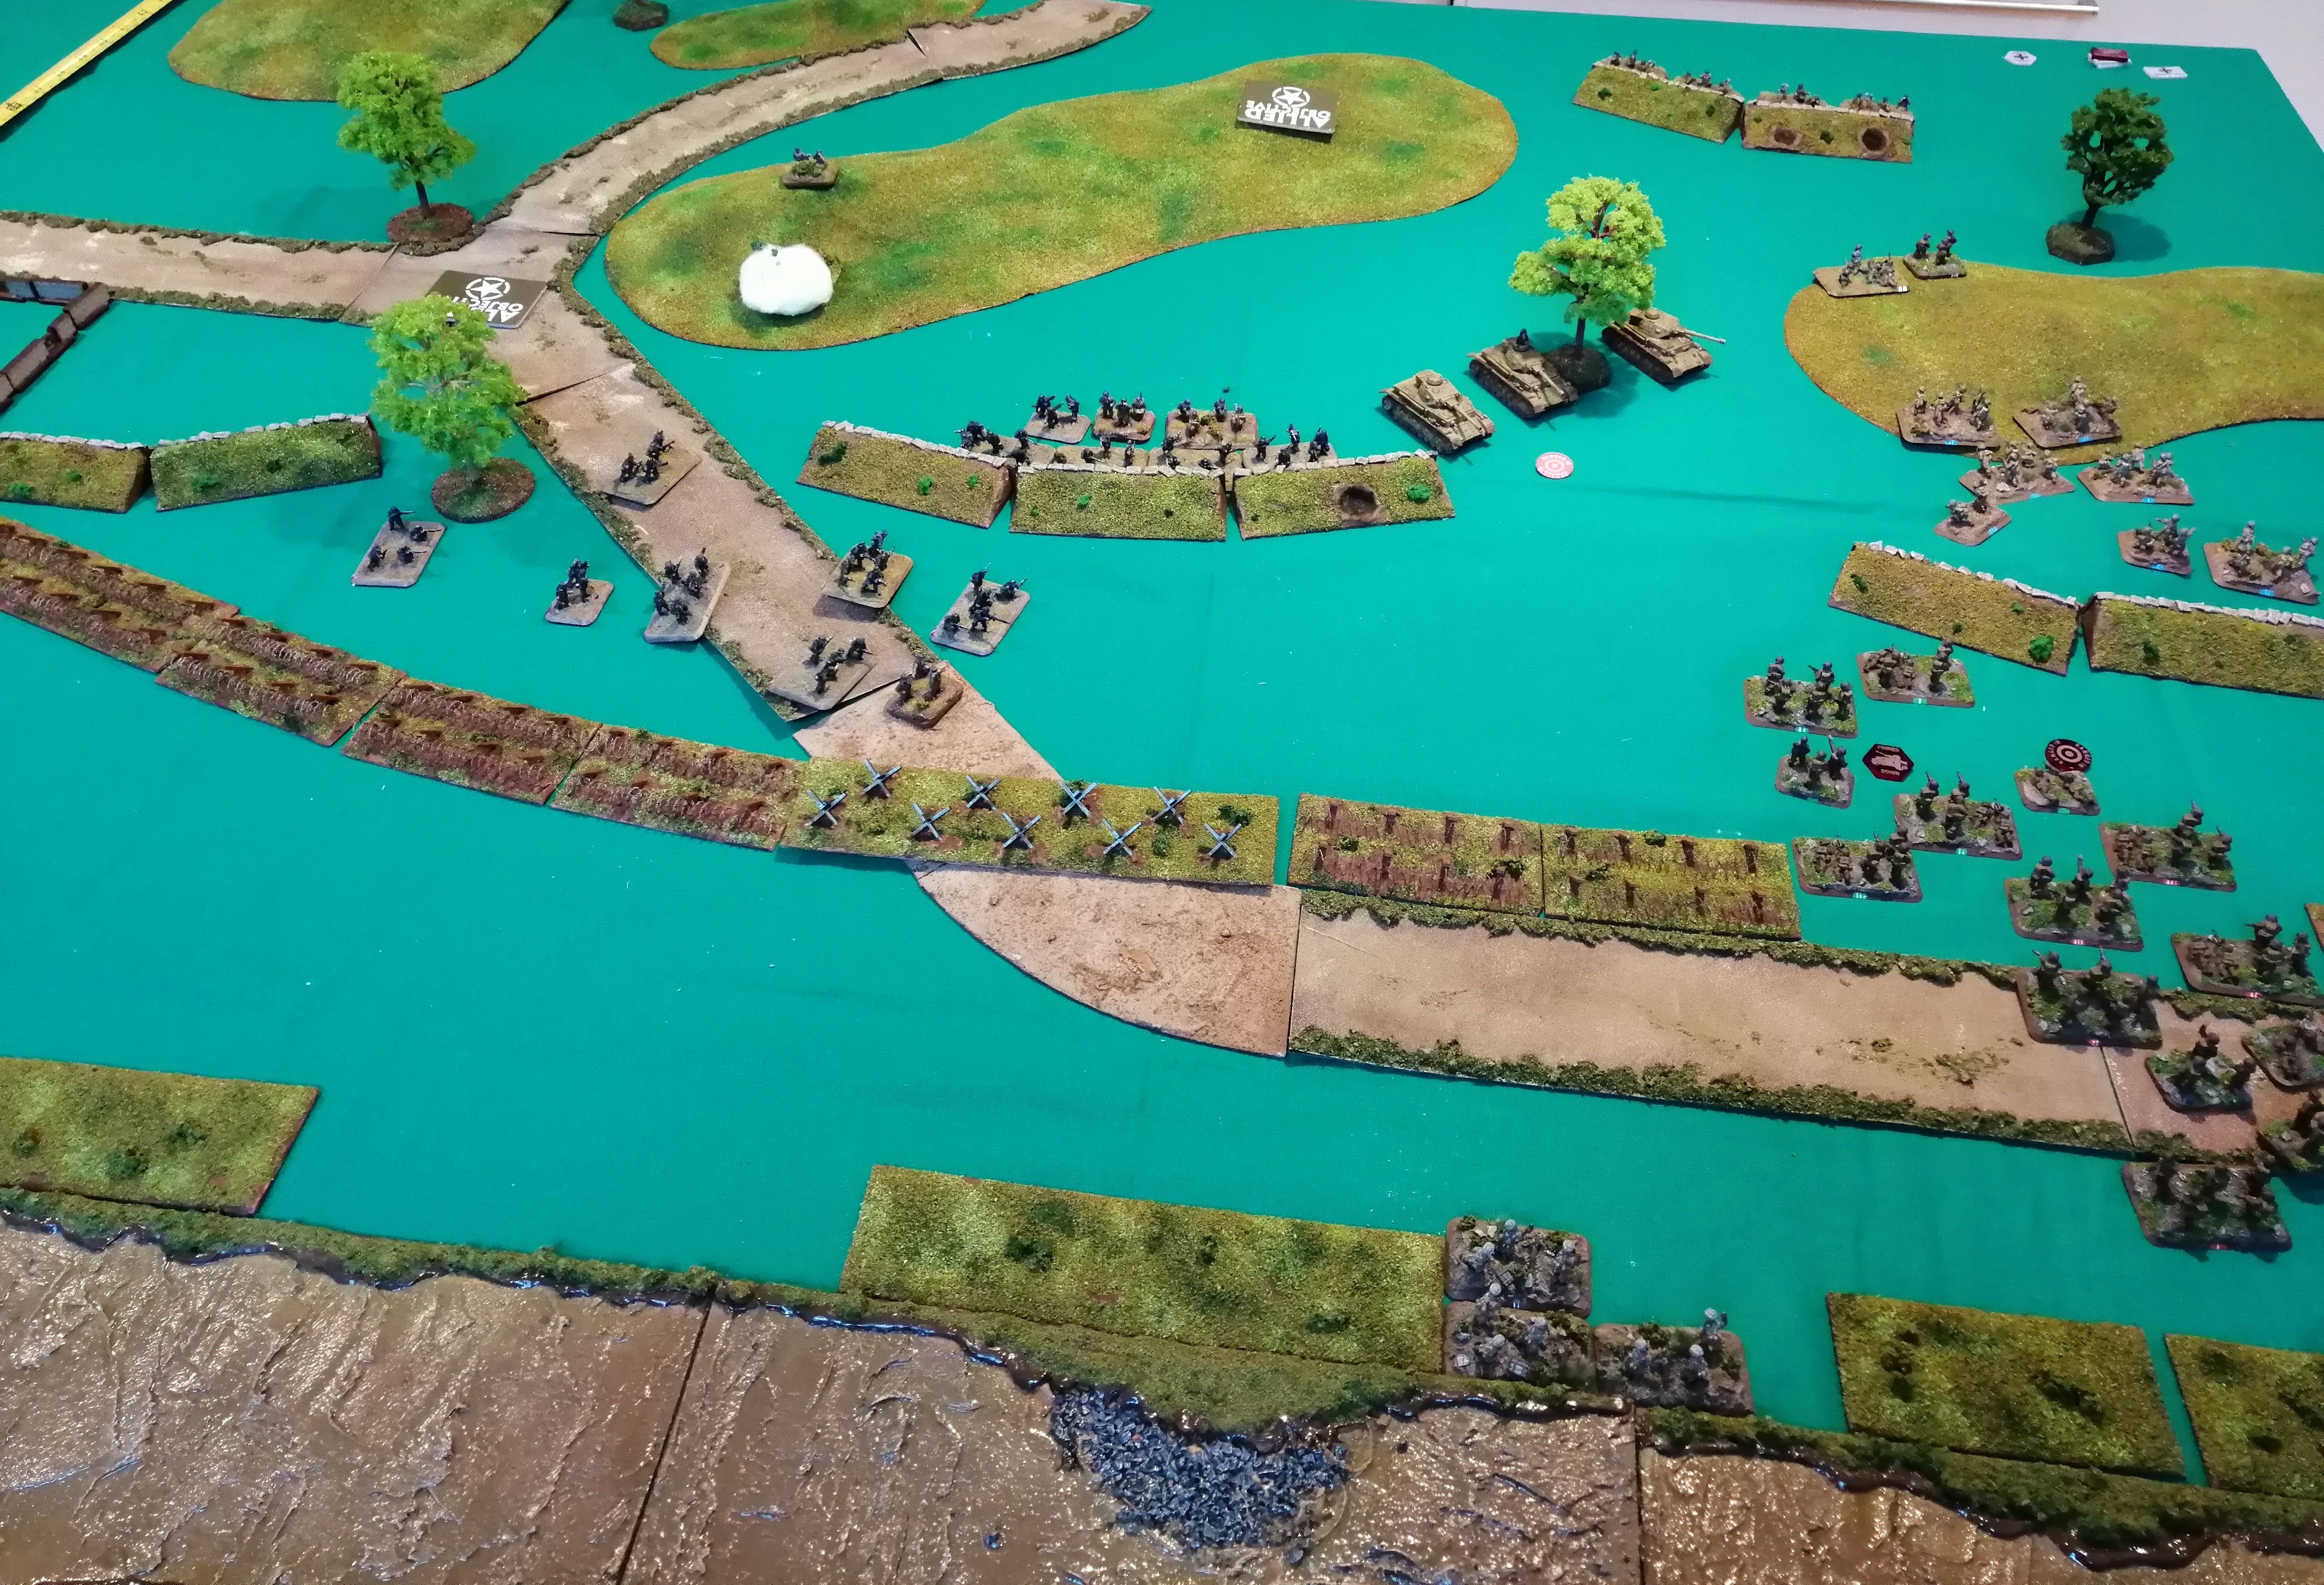
 State of play at the end of Turn 3
 The Battlefield
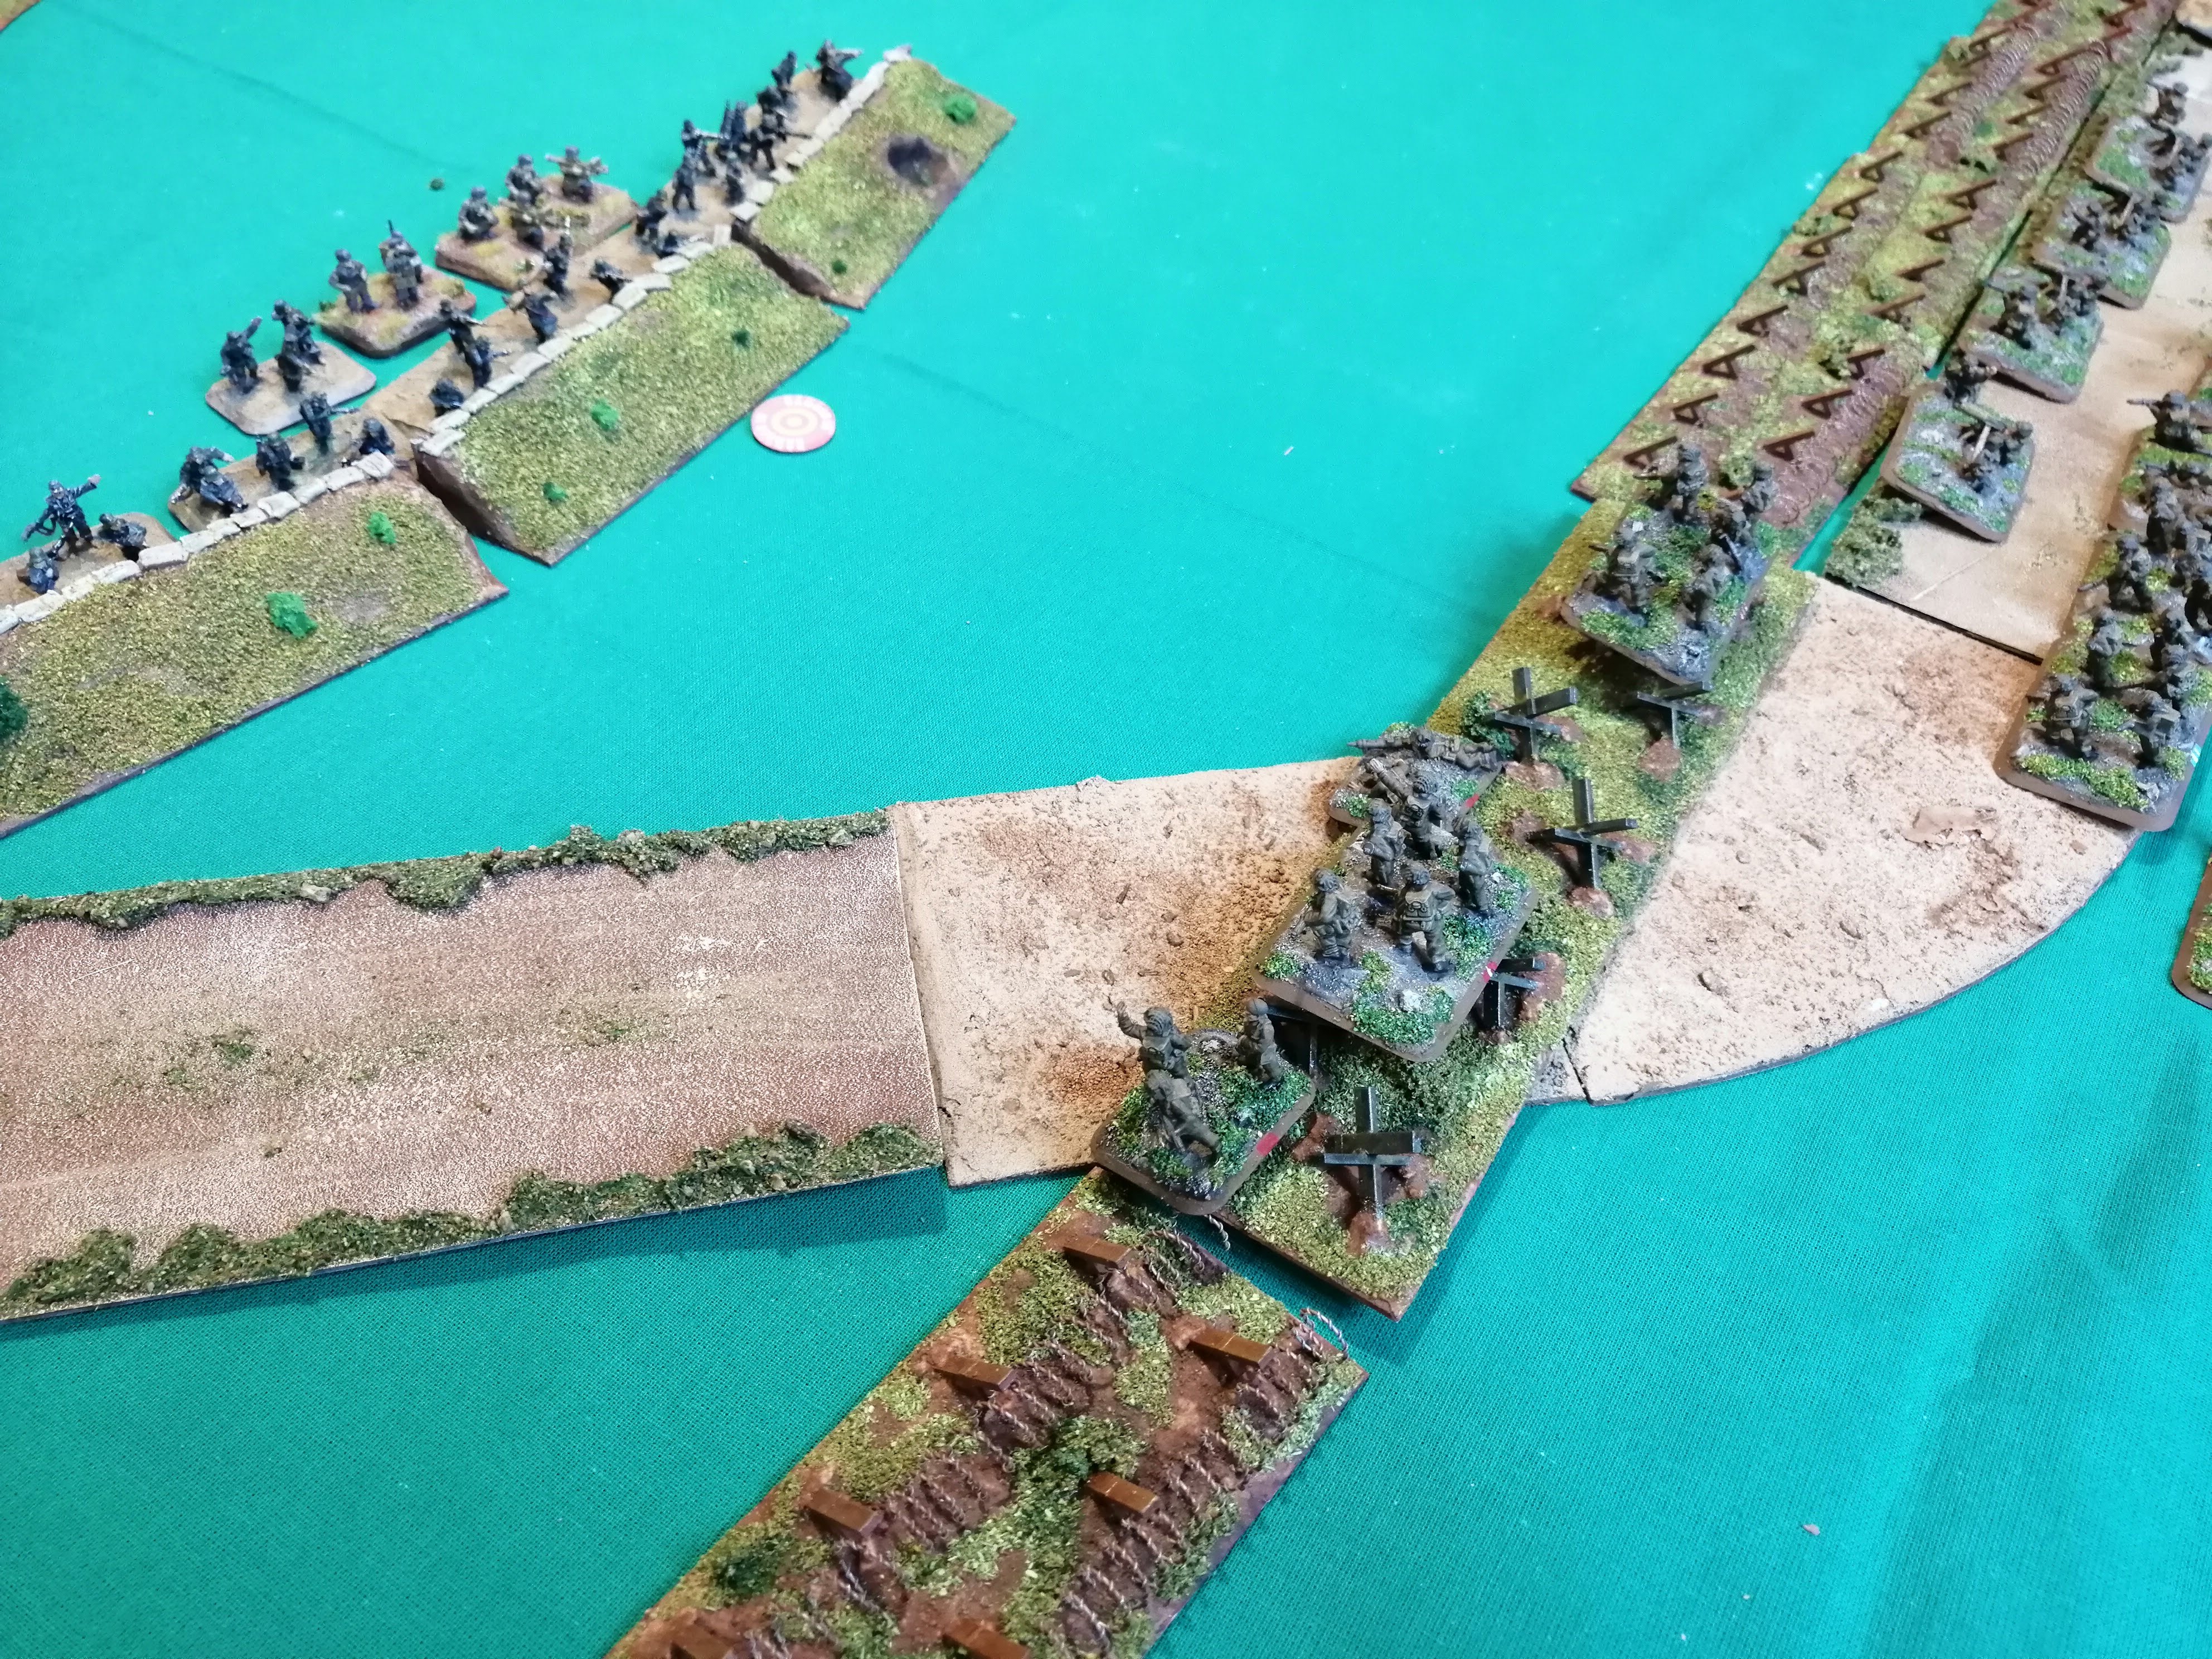
Turn 4
With nearly the entire 36th pinned down, it is imperative that the US command can get their troops up and advancing again to have any hope of salvaging the assault. Fortune favours the 36th and AP B, RP C and the Engineers are all able to get up and get moving. RP D and the MG teams however remain pinned.
RP F is allowed to deploy and arrives with the Company 1st in Command (1iC). Their deployment roll sees them fortuitously arrive alongside the Engineers, which will allow the 36th to really concentrate their assault up the right flank.
AP B attempts to cross the barbed wire entanglement and three teams manage it, including a flamer team but the rest of the platoon stop on the wrong side of the barbed wire. RP F is able to advance up behind AP B.
RP E moves up to the barbed wire between the MG teams and AP B and prepare to cross the following turn. Meanwhile, the engineers are not able to advance the pontoon bridge further this turn.
The tanks shoot first in the shooting phase and are able to smoke both HMG nests again. This will definitely provide some much needed cover for the advancing infantry platoons.
RP F, supporting AP B, are able to shoot just the once for fear of hitting AP B in front, Clearly the team taking the shot contains the platoon sharpshooter as they kill a Green Platoon team despite needing a 5 to hit, a 2 or less to not save and 6+ fire power check!
AP B are able to shoot and are in range with the flamer! The rifles miss however the flamer team is able to carry out its grisly task and destroys another team from Green Platoon. All of a sudden, Green Platoon has lost a third of its strength!
The rest of the 36th shooting was ineffective although Green Platoon was pinned down by the MG teams and Black Platoon is again pinned by the mortar team.
Black Platoon is able to unpin however Green Platoon, perhaps because they know a fiery death awaits the other side of their trench, keep their heads down and remain pinned. The rest of the 15th PG remain in place although the HQ are looking nervously toward their left flank and the gathering 36th troops – should they redeploy their right flank or remain in their trenches….?
Red Platoon kills another team from RP D. HMG 1 and Black Platoon fire upon RP C failing to wound but pinning them in place. Black also fire upon the MG teams and destroy another team reducing the MG teams to half strength.
Attention shifts to AP B in front of Green Platoon’s trench. Green Platoon, despite being pinned, can still mange 8 shots but only hit three times with all of these being saved! HMG 2 also opens up on AP B having more luck and killing another team. The mortar team repeats the bombardment and despite not causing a wound, does manage to pin AP B in place. The mortar team also catches RP F, pinning them as well.
At the end of turn 4, the 36th find themselves almost destroyed in the middle, with RP C down to 3 teams and RP D down to just a single team. AP B has lost two teams but still has both flamer teams in place and are still being led by the company 2iC. They also have support on their right from RP E, RP F and the now half strength MG Teams. Is this weight of numbers going to be enough?
 Reinforcements land on the North banks of the Garigliano
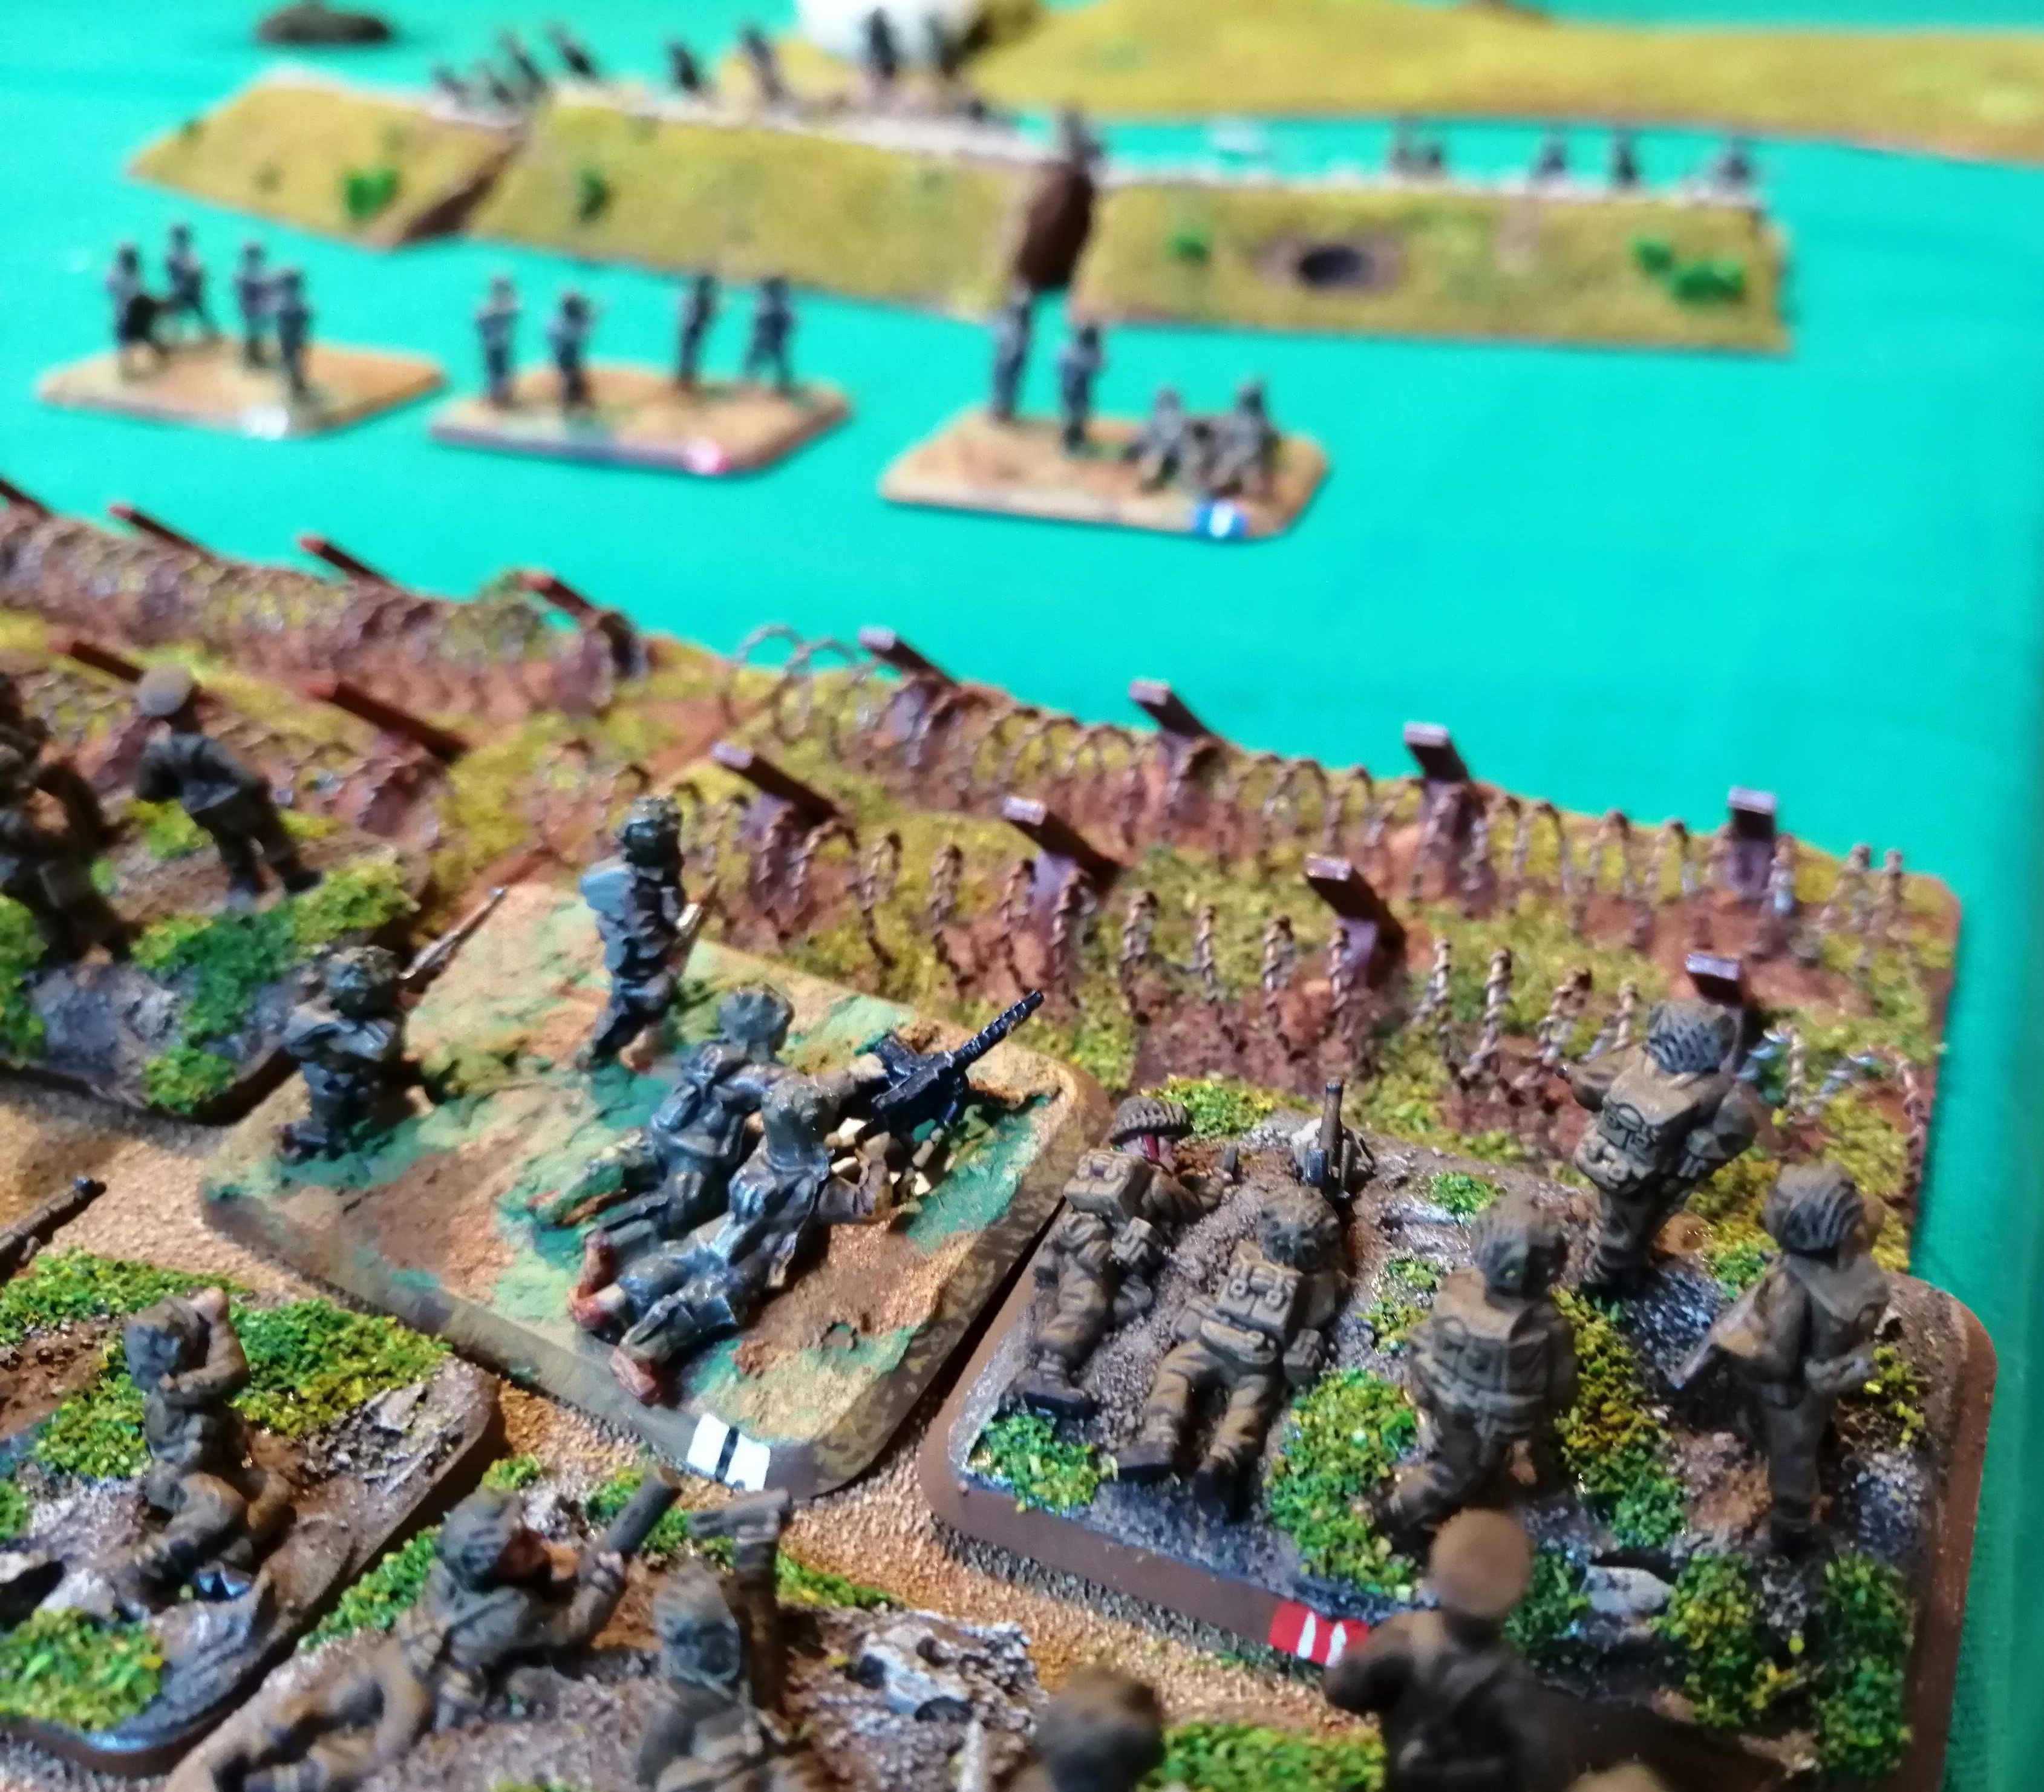 Some of APB get caught at the barbed wire while three teams make it through
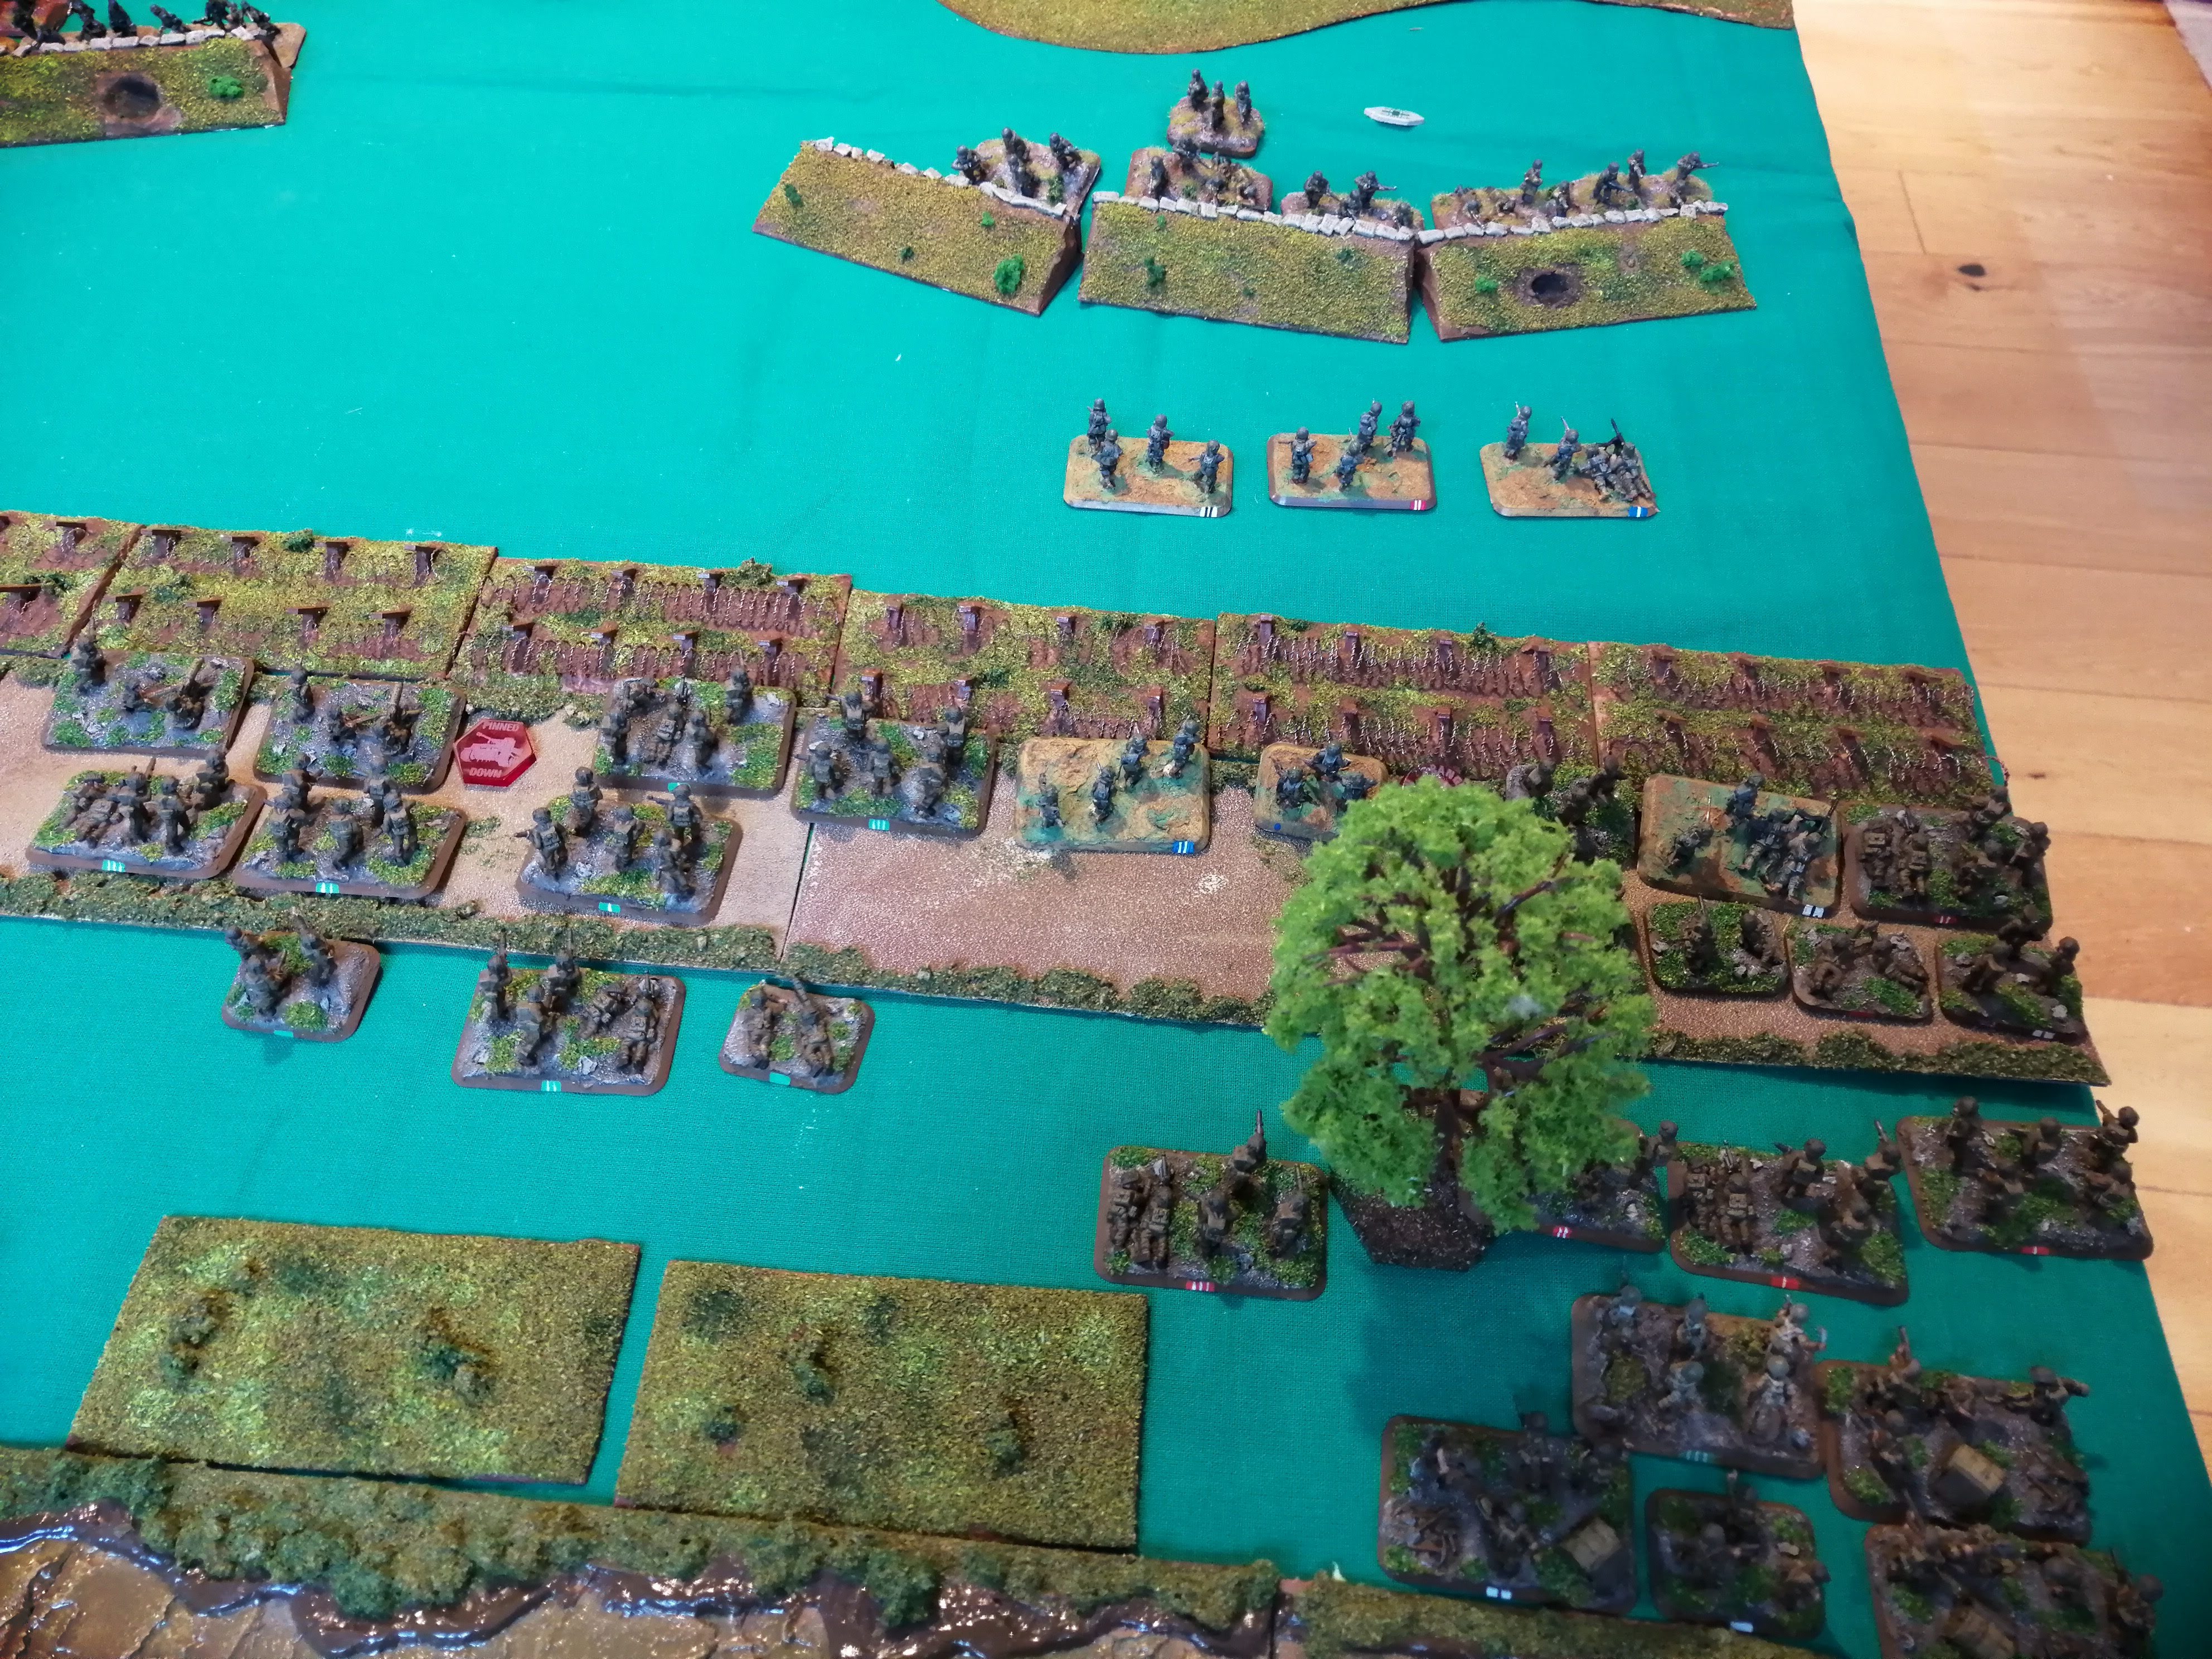


 End of Turn 4
Monte Cassino - First Table Top Battle (Turns 1 and 2)
 36th Infantry Division deployed
Just a reminder that this project is best read in reverse order!
I’d also like to point out that there has been a ‘mix up’ in the supplies and the US 36th (Texas) Infantry Division has received uniforms, weapons etc meant for British X Corps. This explains why all of the models that are US troops look suspiciously like British but, if you listen carefully, you can definitely hear the Texan drawl coming from the soldiers.
Turn 1
As the Attacker, the 36th Infantry go first. Faced with a large amount of German fire power, the 36th knows they need to advance quickly as being left out in the open without cover is certain death.
RP C starts to advance toward the tank traps covering the road, seeing an opportunity to pass quickly through this gap but immediately loses a team to the minefield. The rest of the platoon do make it and gain some bullet proof cover.
AP A looks to get forward quickly to make use of their flame throwers and looks to advance on the barn. Unfortunately, two teams are lost to mines so the platoon is already reduced to 4 teams plus the command team.
RP D are able to advance straight up the board, looking to provide support to either the RP C or AP A, depending on how each platoon fares against the defenders. Meanwhile, the mortars decide to stay put while the 4 MG teams advance up to the barbed wire, intending to dig in there and provide covering fire.
The engineers, who fortuitously landed on the far right of the US flank and out of reach of a lot of the German guns go to work on starting the pontoon bridge. With six functioning teams, they were able to roll a dice per team and got two sixes, so off to a good start toward completing the bridge and being able to bring in some much needed armour.
During the shooting phase, the US failed to cause any wounds against the dug in and gone to ground defenders however the supporting tanks were able to fire smoke at HMG nest 2.
The German defenders start the game pinned due to the artillery and mortar barrage sent in before the assault, so before any return fire can be attempted, the defenders need to test to unpin. The 15th PG are rated as Confident Veteran and so need a 4+ to do this. All platoons are successful except for the mortar platoon, HMG 2 and black platoon.
There’s no need for any movement from the Germans who begin to open up on the 36th. Red platoon splits its fire between AP A and RP C. RP C survives intact but perhaps fearful of the flame throwers coming their way, Red platoon is more successful against AP A and kills 2 teams and pins the remainder of the platoon under a withering hail of fire. To add to AP A’s woes, one of the destroyed teams were carrying a flame thrower, significantly reducing their effectiveness.
The pinned black platoon’s shooting against RP C is ineffective however Green platoon fares better against the engineers, killing one team and pinning the rest of the platoon.
The HMG nests open up with HMG nest 1 cutting down 2 teams from RP C and pinning the rest of the platoon. The pinned and smoked HMG nest 2 however is less effective against the engineers and fails to hit anything.
At the end of the first turn, the 36th are already taking heavy losses. AP A is already down to just 2 teams and their cmd and is pinned down in the open. RP C is at half strength and pinned down although at least has the benefit of being in bullet proof cover. The engineers have lost a team and are also pinned.
 Battlefield at the end of Turn 1
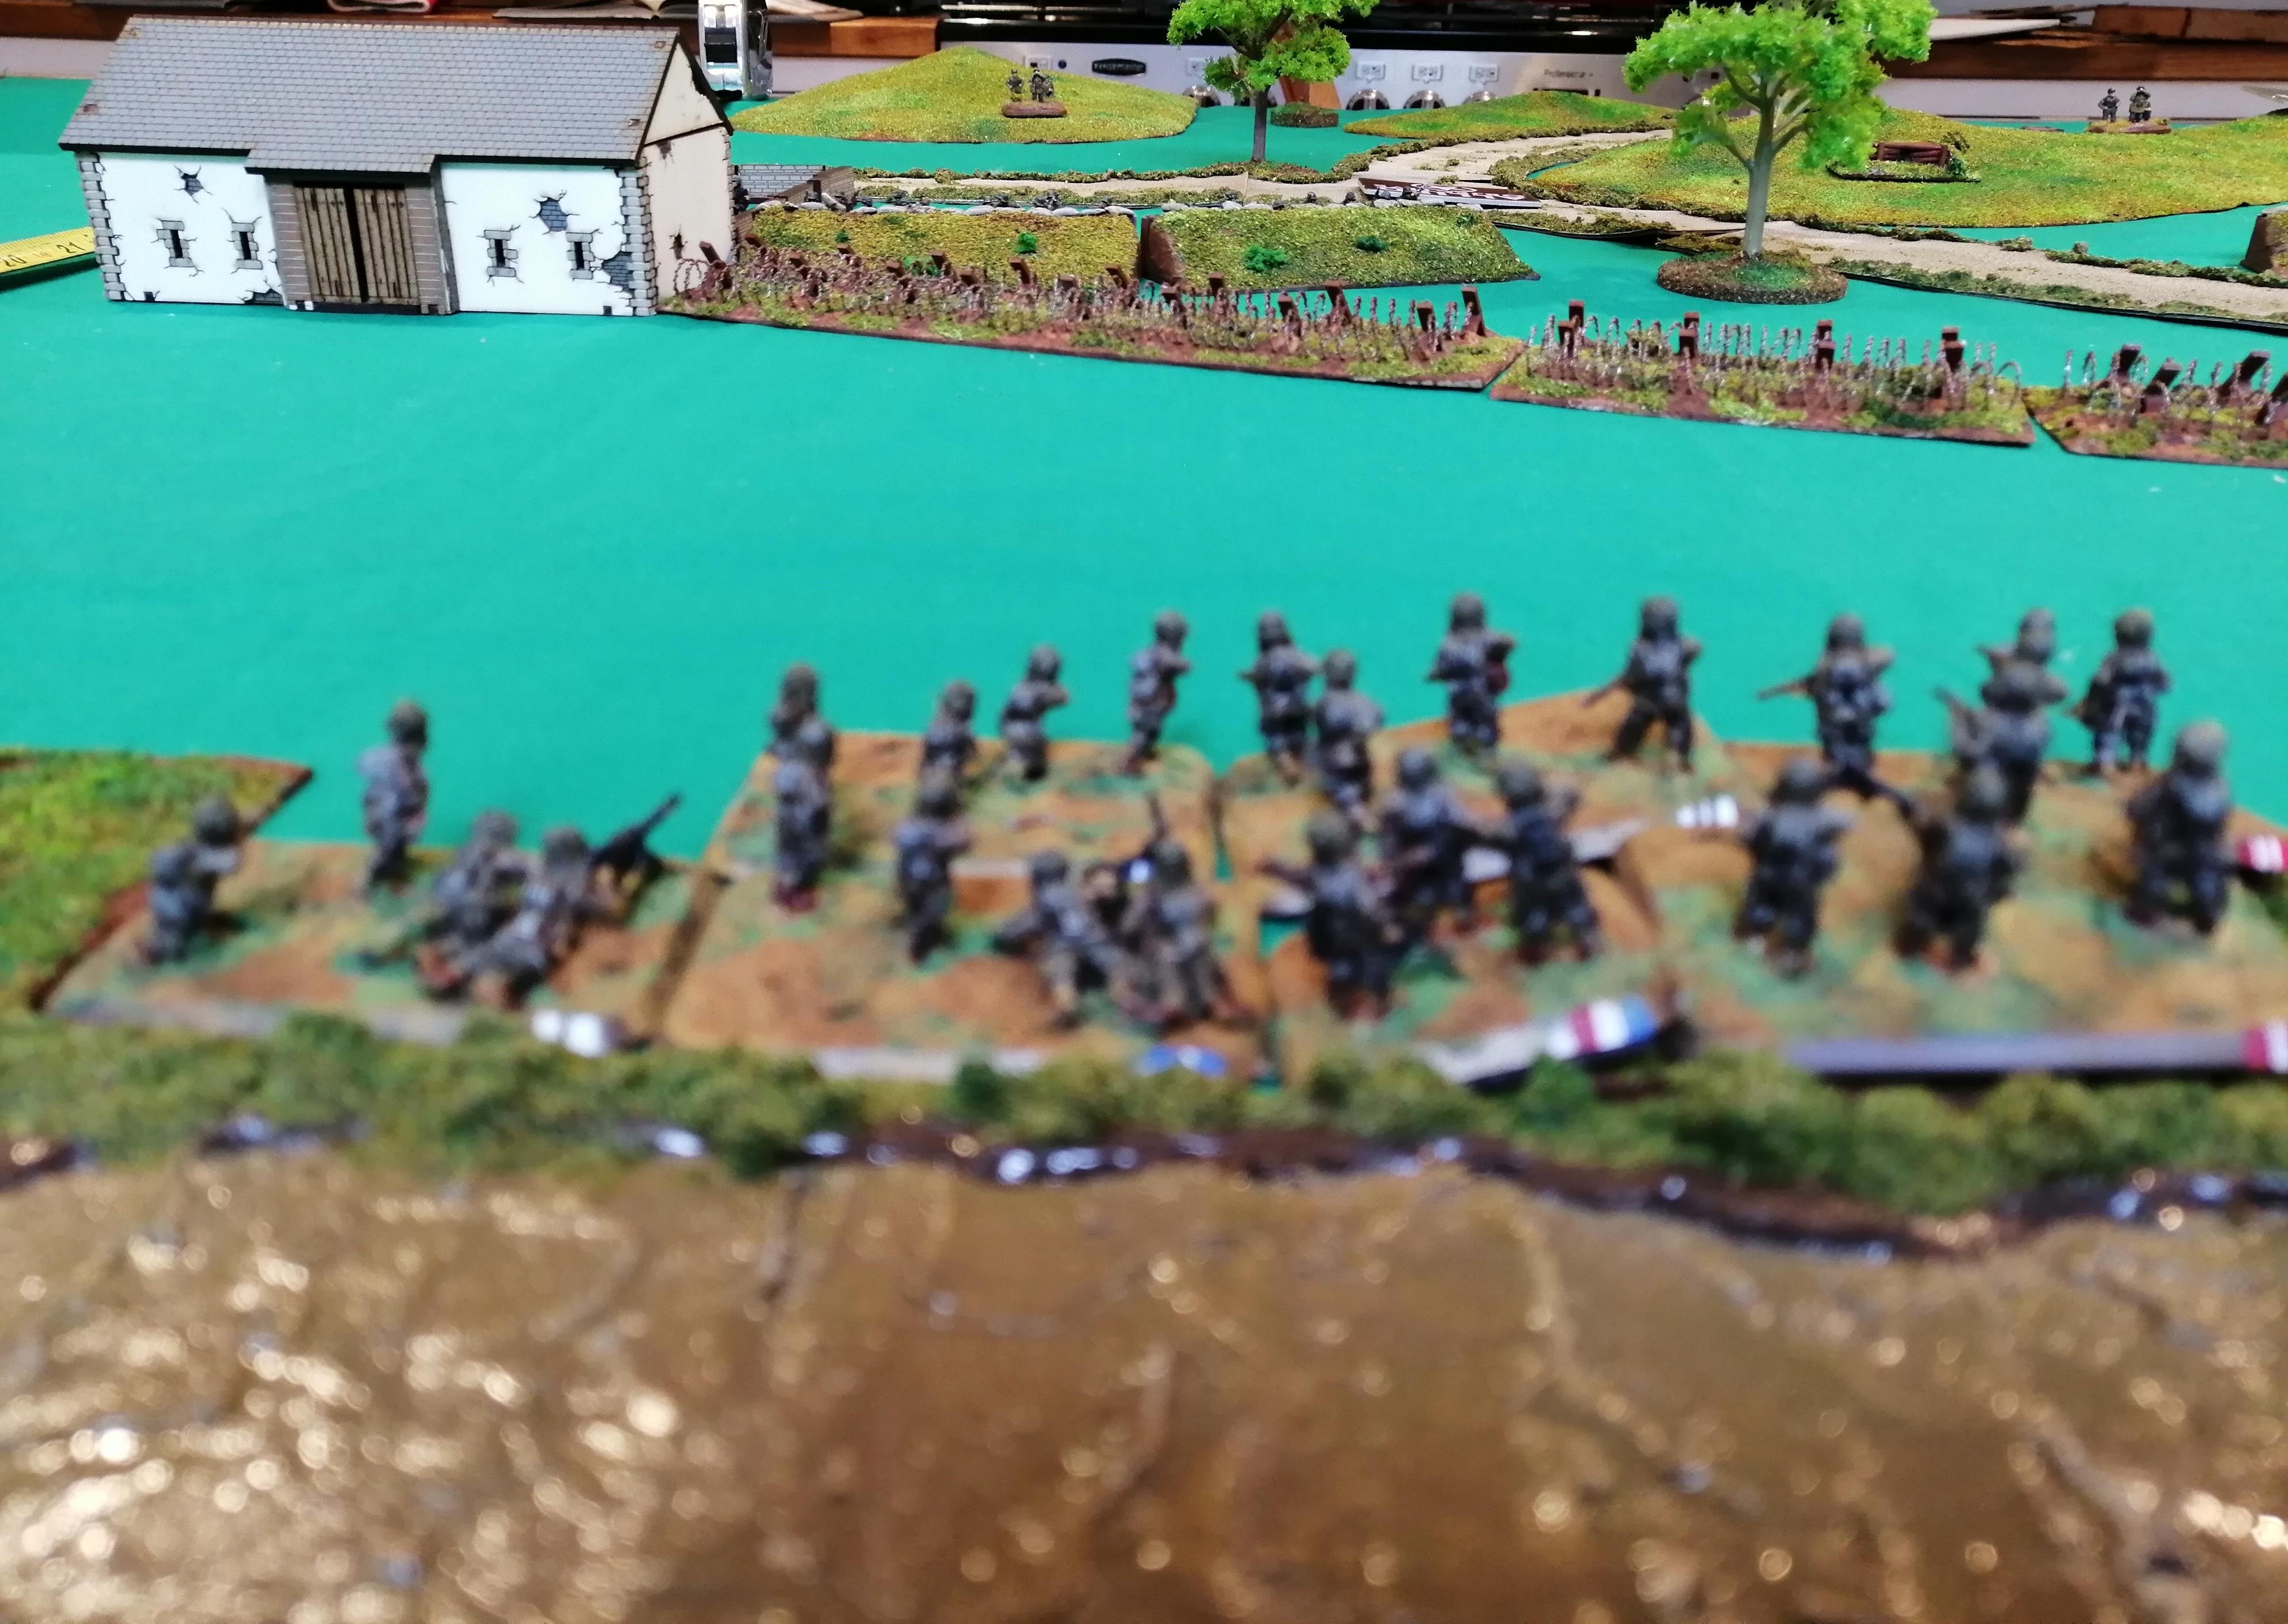 Assault Platoon A looks at the barbed wire the defending Germans dug in behind
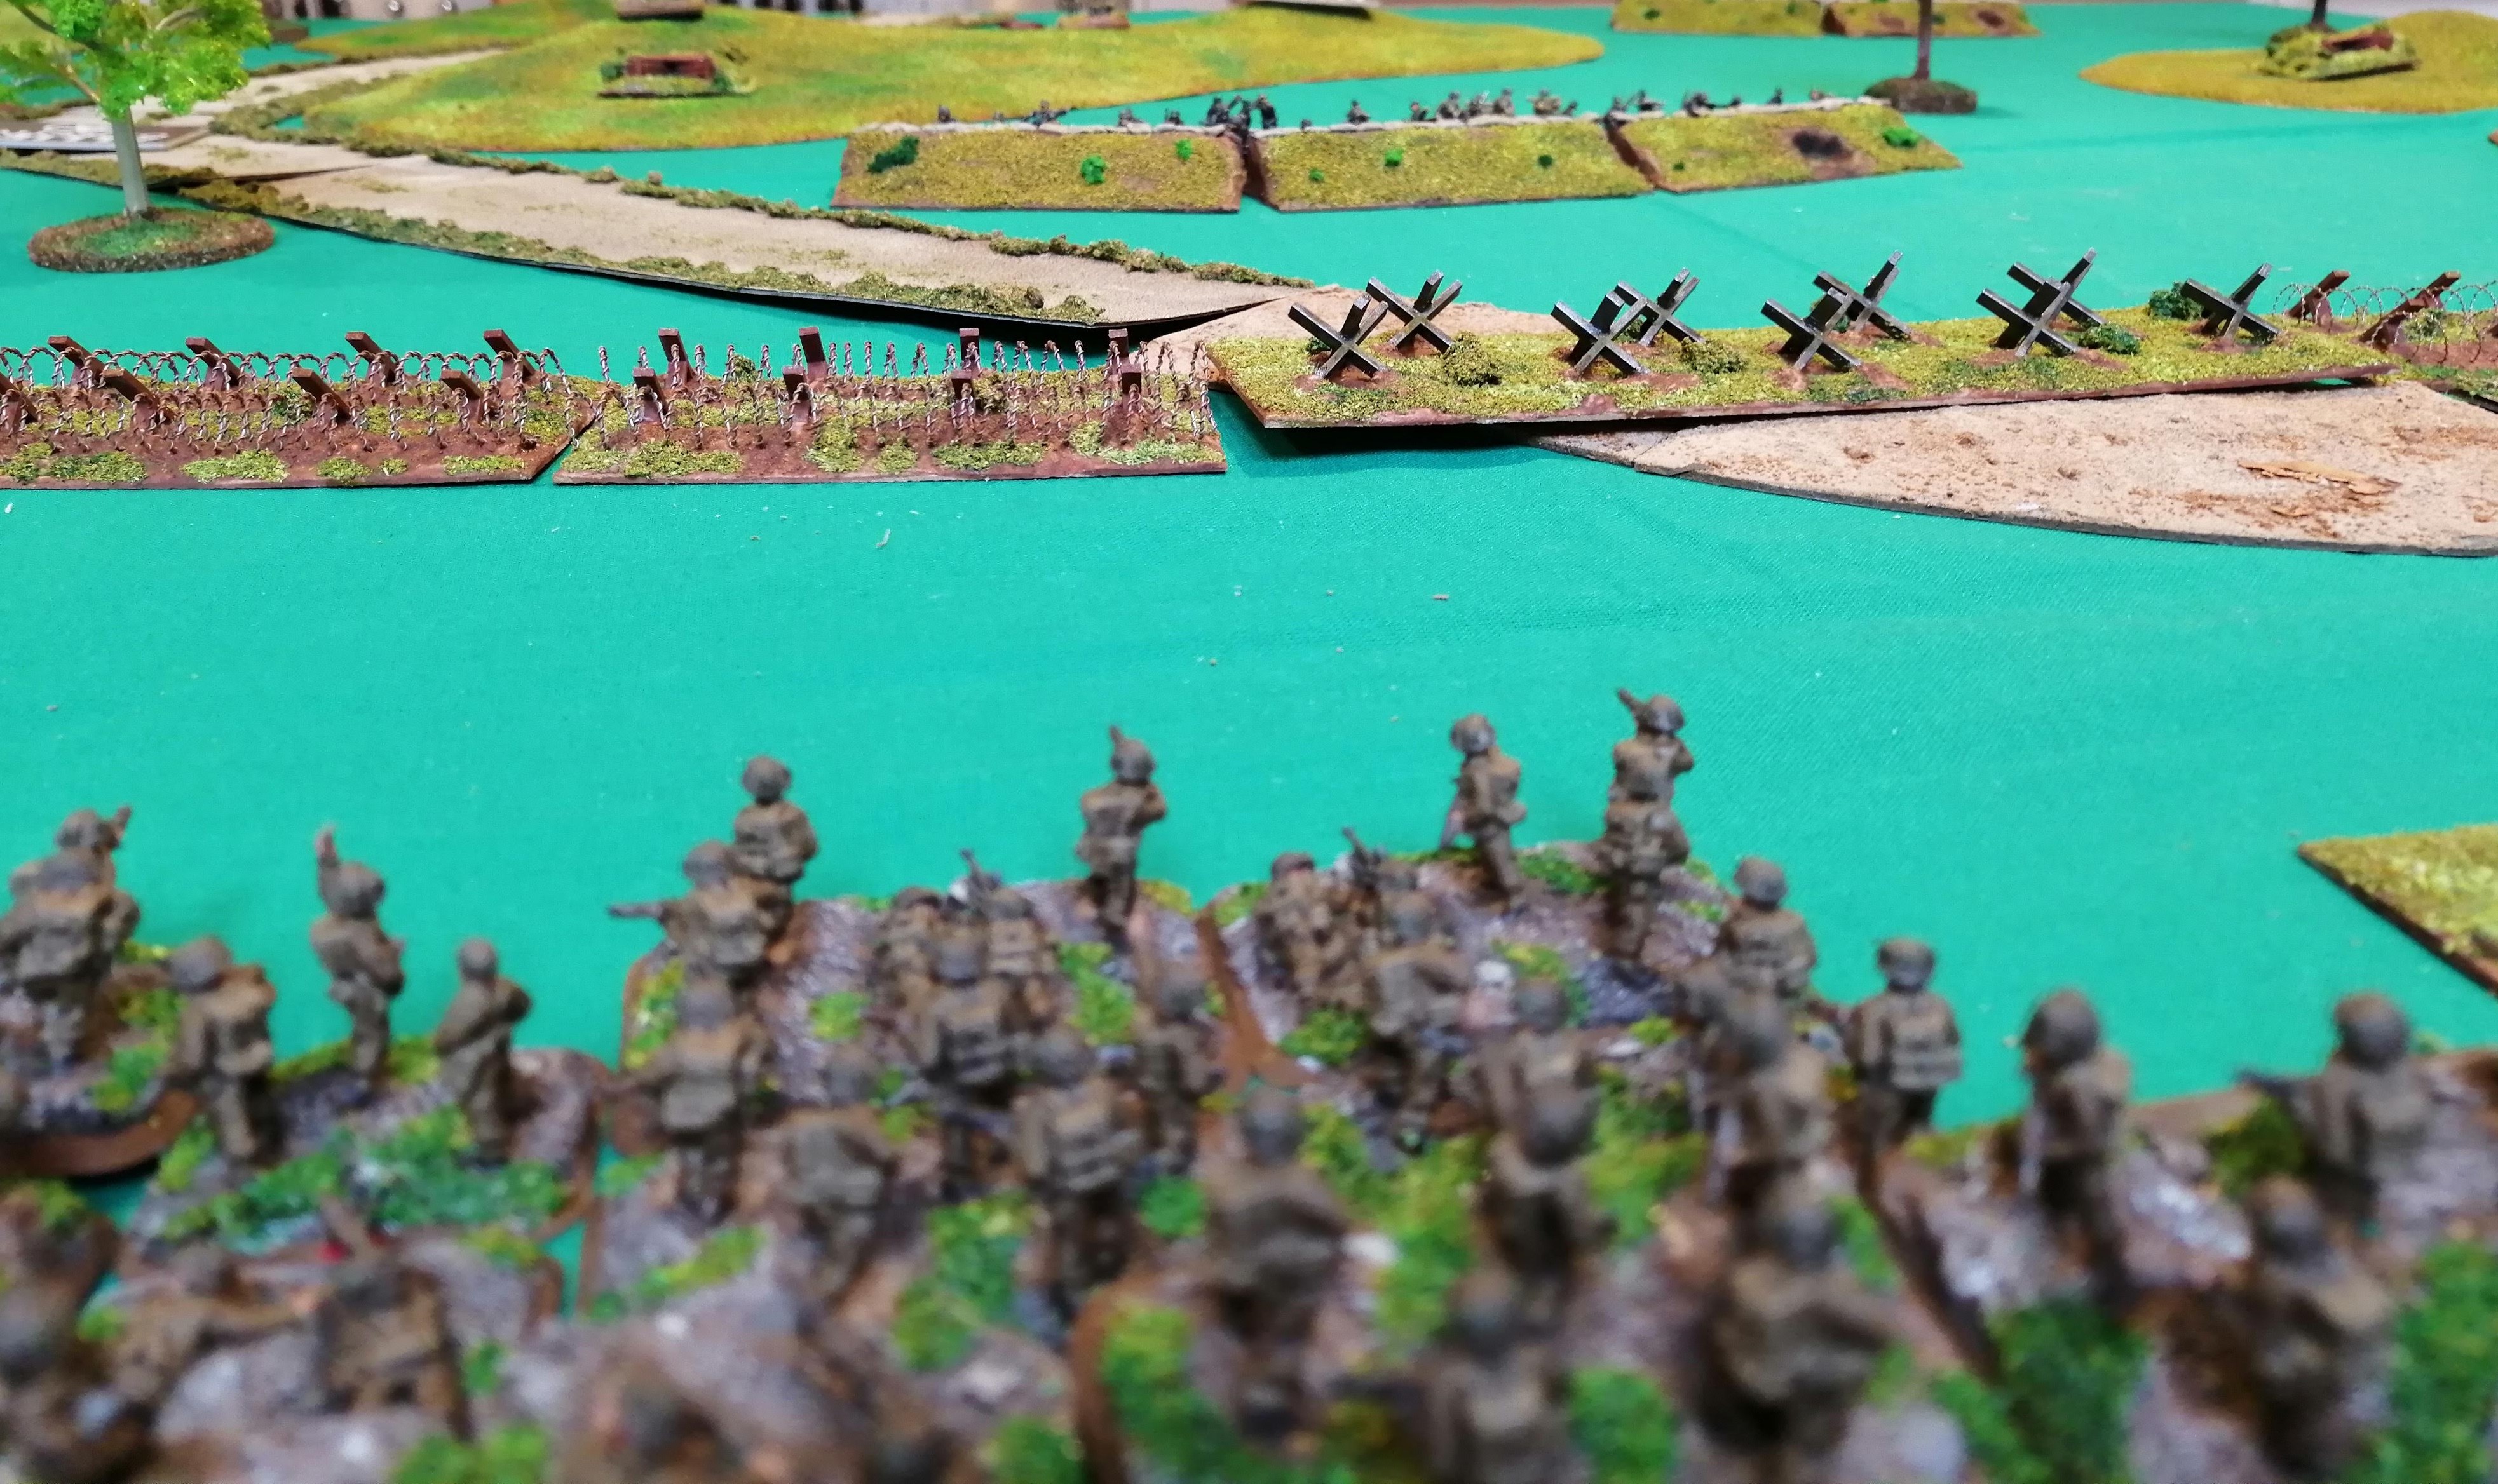
 The Position from German Green Platoon over on the East flank
Turn 2
The bad luck continues for the 36th as all of the pinned units fail to unpin and get moving. This leaves AP A horribly exposed in the open, albeit concealed as the unit can’t move this turn. RP D, who survived the first turn unscathed, advance as far as the barbed wire but are unable to cross this turn and so must halt.
The Engineers attempt to continue with the pontoon bridge but with 5 teams who are pinned, can only roll 2 dice but still manage to roll one more 6 taking their bridge score to three! Heroic stuff while under fire.
The 36th then return fire. RP D manage a few hits but the bullet proof cover stops any casualties. The tanks manage to land smoke on both HMG nests which might prove critical in the following German shooting phase given the exposed nature that some of the 36th platoons find themselves in.
RP C’s shooting is wholly ineffective however the MG teams pour a deluge of fire into the Green platoon killing one team and causing enough hits to pin the platoon down.
The US mortar teams, having remained stationery, are able to launch a bombardment. Recognising the situation, they land a smoke screen in front of black platoon, providing some cover for the advancing Rifle Platoons.
The 15th PG start their 2nd turn by unpinning all their platoons except the mortar team, who remain pinned and unable to fire this turn. The German 2iC moves up to join Red Platoon and 1iC moves up to join Black platoon to reinforce the defences and provide additional morale if needed.
Green platoon continues to pour fire into the engineers and manages to kill another team reducing the engineers to 4 teams and their command. Green platoon also takes some shots at the MG teams but fails to cause any damage.
In the centre of the line, Black platoon splits their fire against the MG teams, RP C and RP D. The MG teams escape harm however RP C loses another team from the withering hail of bullets, as does RP D.
From the barn, Red platoon splits its fire between AP A and RP D, hoping to finish AP A. The hail of fire cuts down 2 teams from AP A, leaving just the cmd team while RP D also suffers the loss of two teams and gets pinned by the incoming fire. Things are now looking dire on the US left flank.
Thanks to the smoke, the two HMG nests are ineffective this turn failing to cause any casualties.
 Situation at the end of Turn 2
 The Smoked central trench line
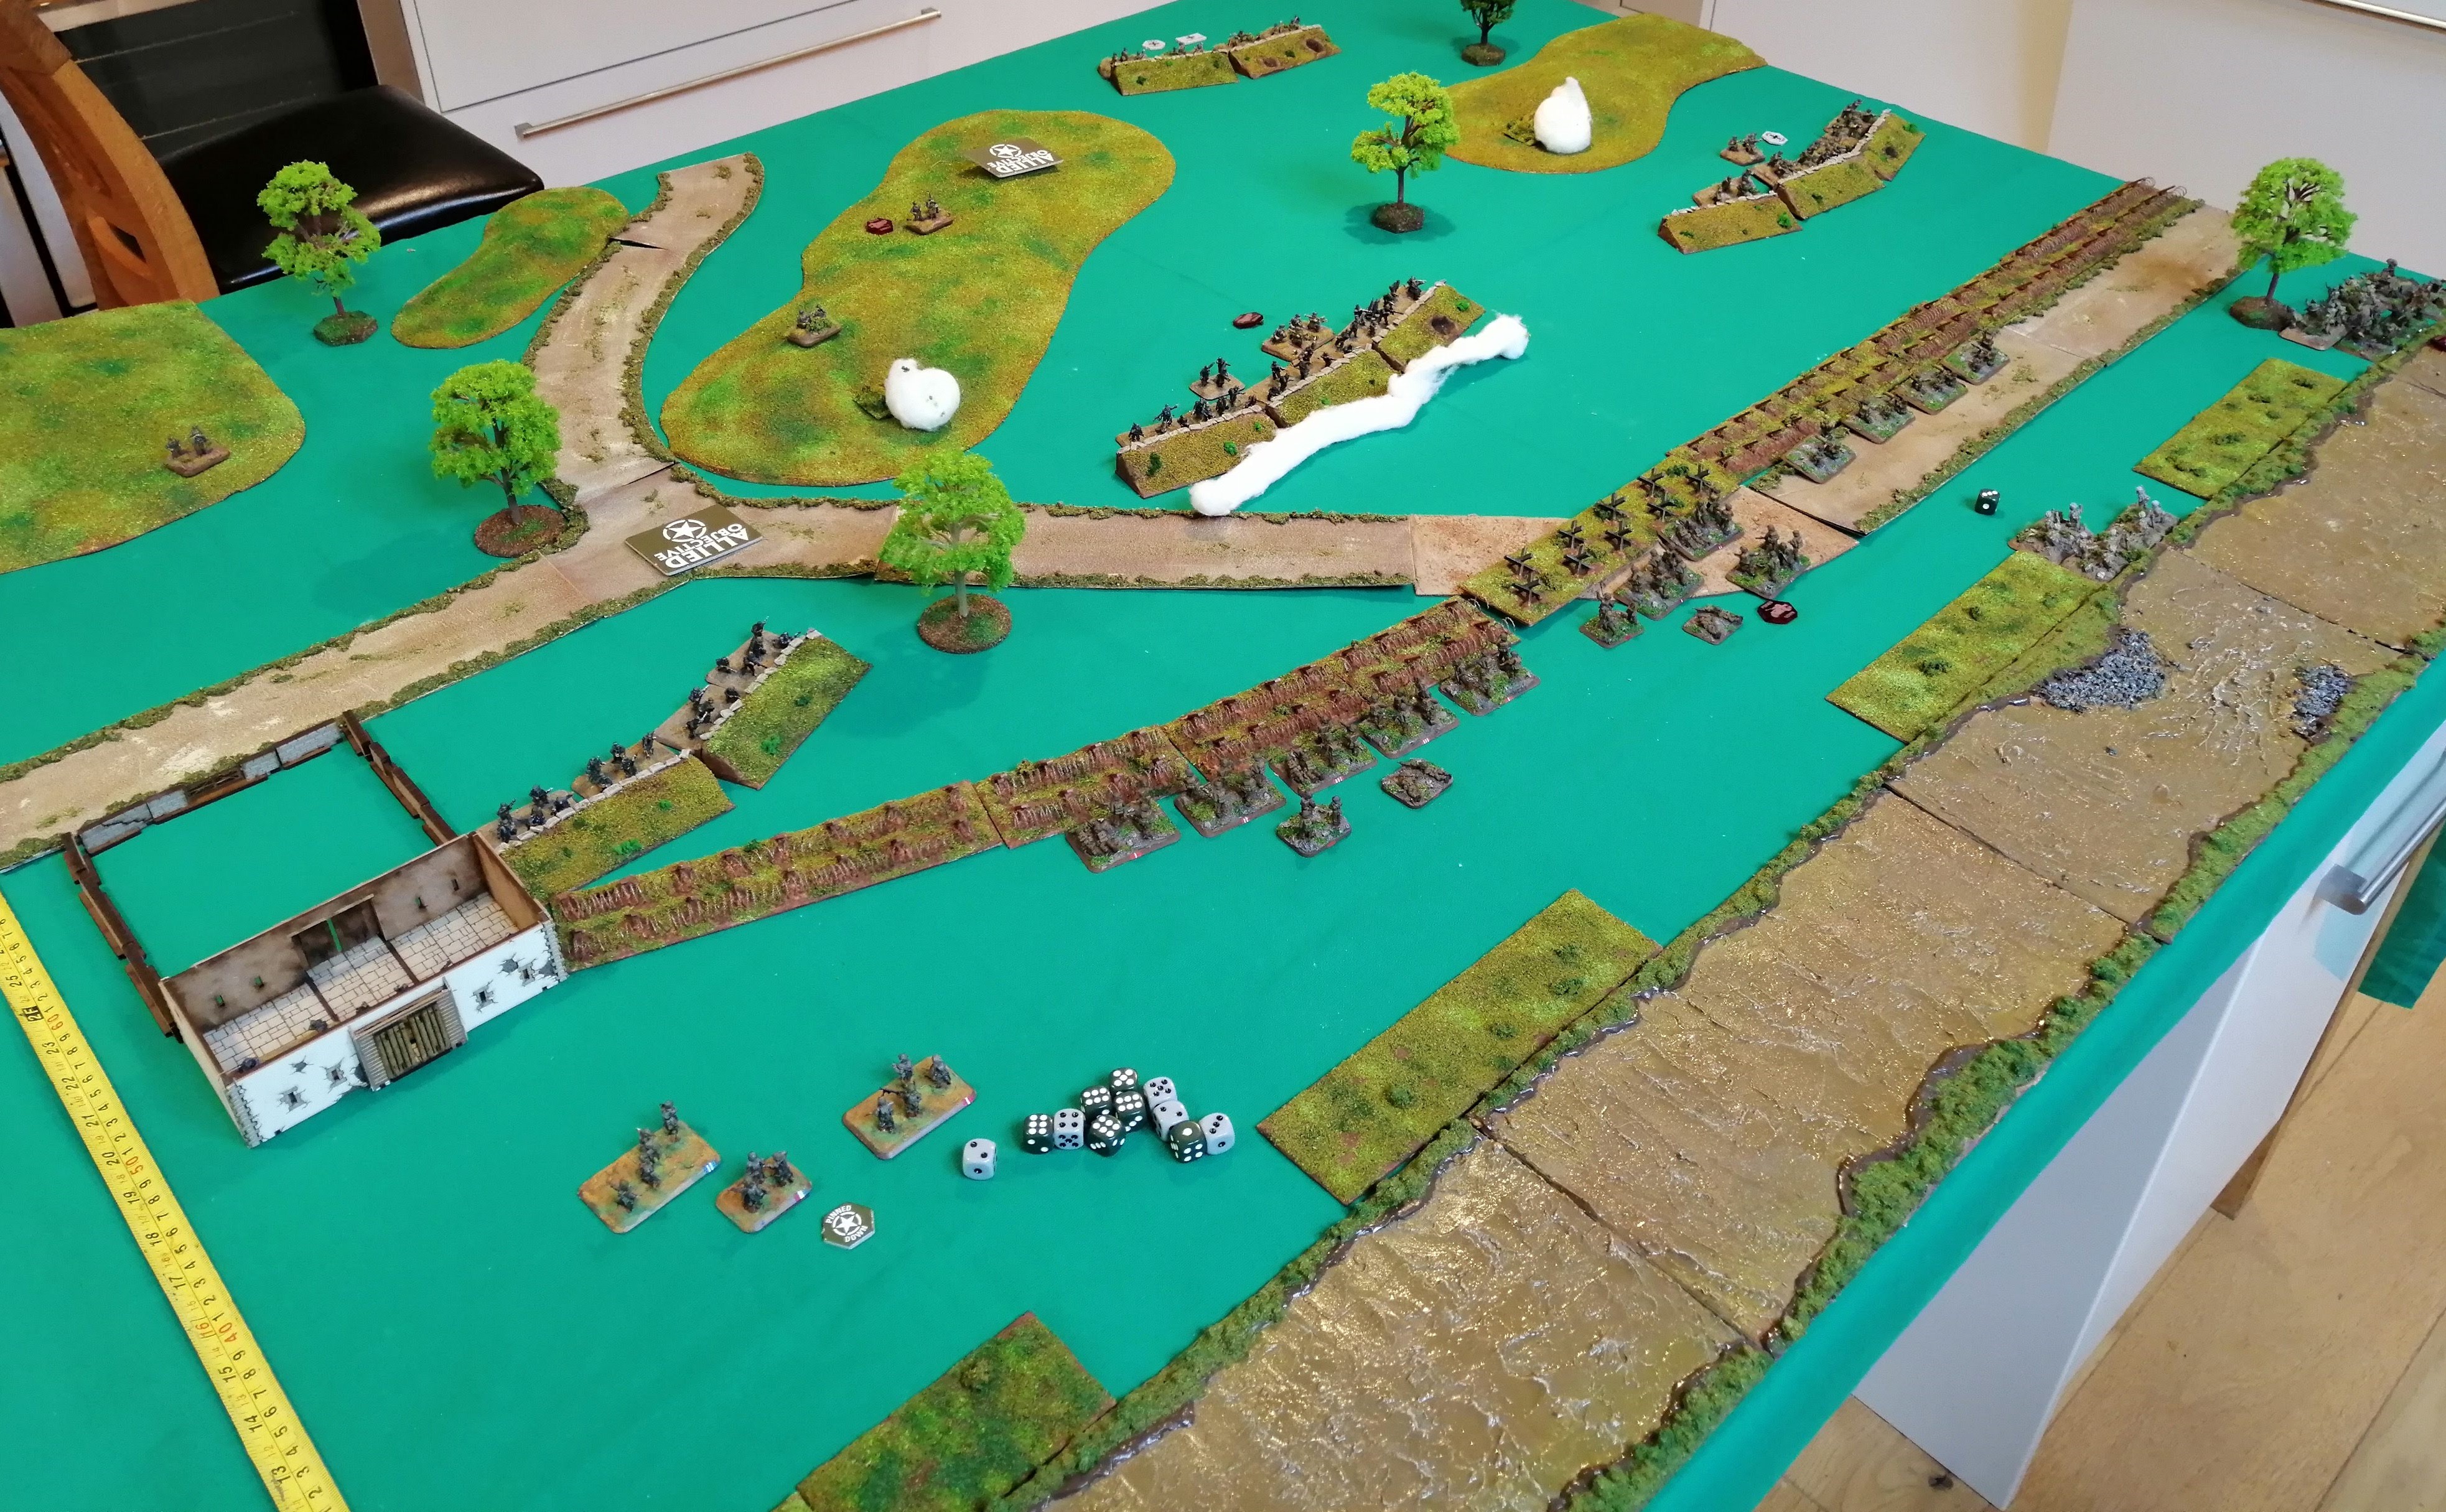

Monte Cassino - First Table Top Battle
It’s time to stop the history lessons and start gaming some of the battles. For our first battle, we will look at the US 36th (Texas) Infantry Division’s ill fated crossing of the Garigliano. The assault started on the 20th January 1944 and lasted several days before the 36th was withdrawn due to the high casualty rate. The 36th had seen a lot of action since arriving in Italy having been heavily involved in the Salerno beach landings as well as the costly assault on San Pietro Infine less than six weeks earlier.
Let’s look at the forces which were drawn from Fortress Italy and Road to Rome supplement books from Battlefront. We’ll be using the Flames of War 4th Edition rules for the battle
15th PanzerGrenadiers
HQ including Panzerschreck team
3 Platoons of PanzerGrenadiers
(Platoon command and 6 teams)
12cm Mortar Team
(4 teams/mortars plus spotter)
2 HMG Nests
3 Panzer IV (held in reserve)
In addition to the above, all infantry teams are within trenches/fortifications. Tank traps block the road while barbed wire entanglements are positioned in land from the banks of the river.
Minefields have been placed along parts of the river edge.
US 36th Infantry Division
HQ (SMG teams)
2 Assault Platoons (1 held in reserve)
(Cmd team, 4 rifle teams, 2 flame thrower teams)
5 Rifle Platoons (3 held in reserve)
(Cmd team, 6 rifle teams and a bazooka team)
Support Weapons Platoon
(4 60mm mortar teams, 4 MG teams)
Pioneer/Engineer Platoon
(Cmd team and 6 teams of engineers)
In addition to the above, Sherman tanks on the other side of the river are providing some fire support. In game terms, this is represented by a total of 3 shots from a Sherman each round, firing at long range. If the Engineer Platoon completes the pontoon bridge during the game, the Shermans can join the battle.
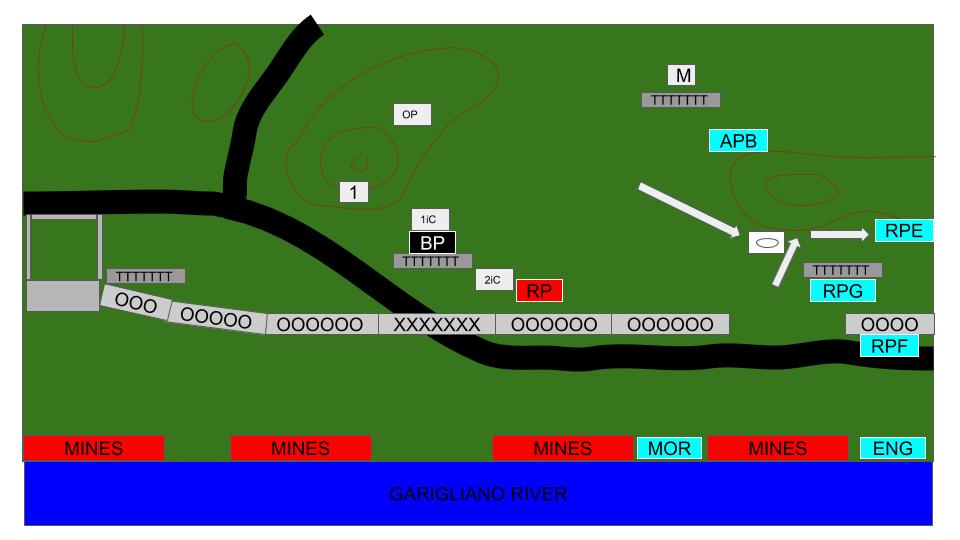
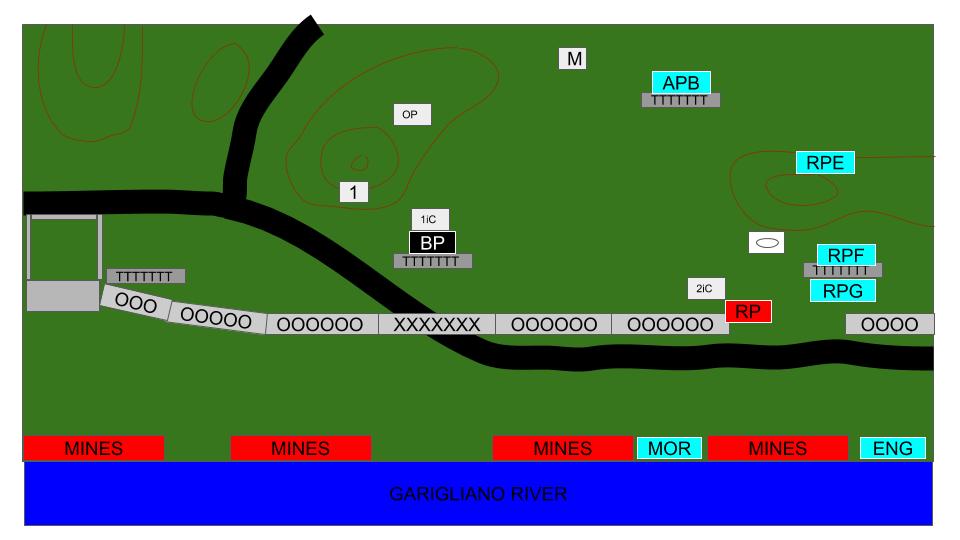
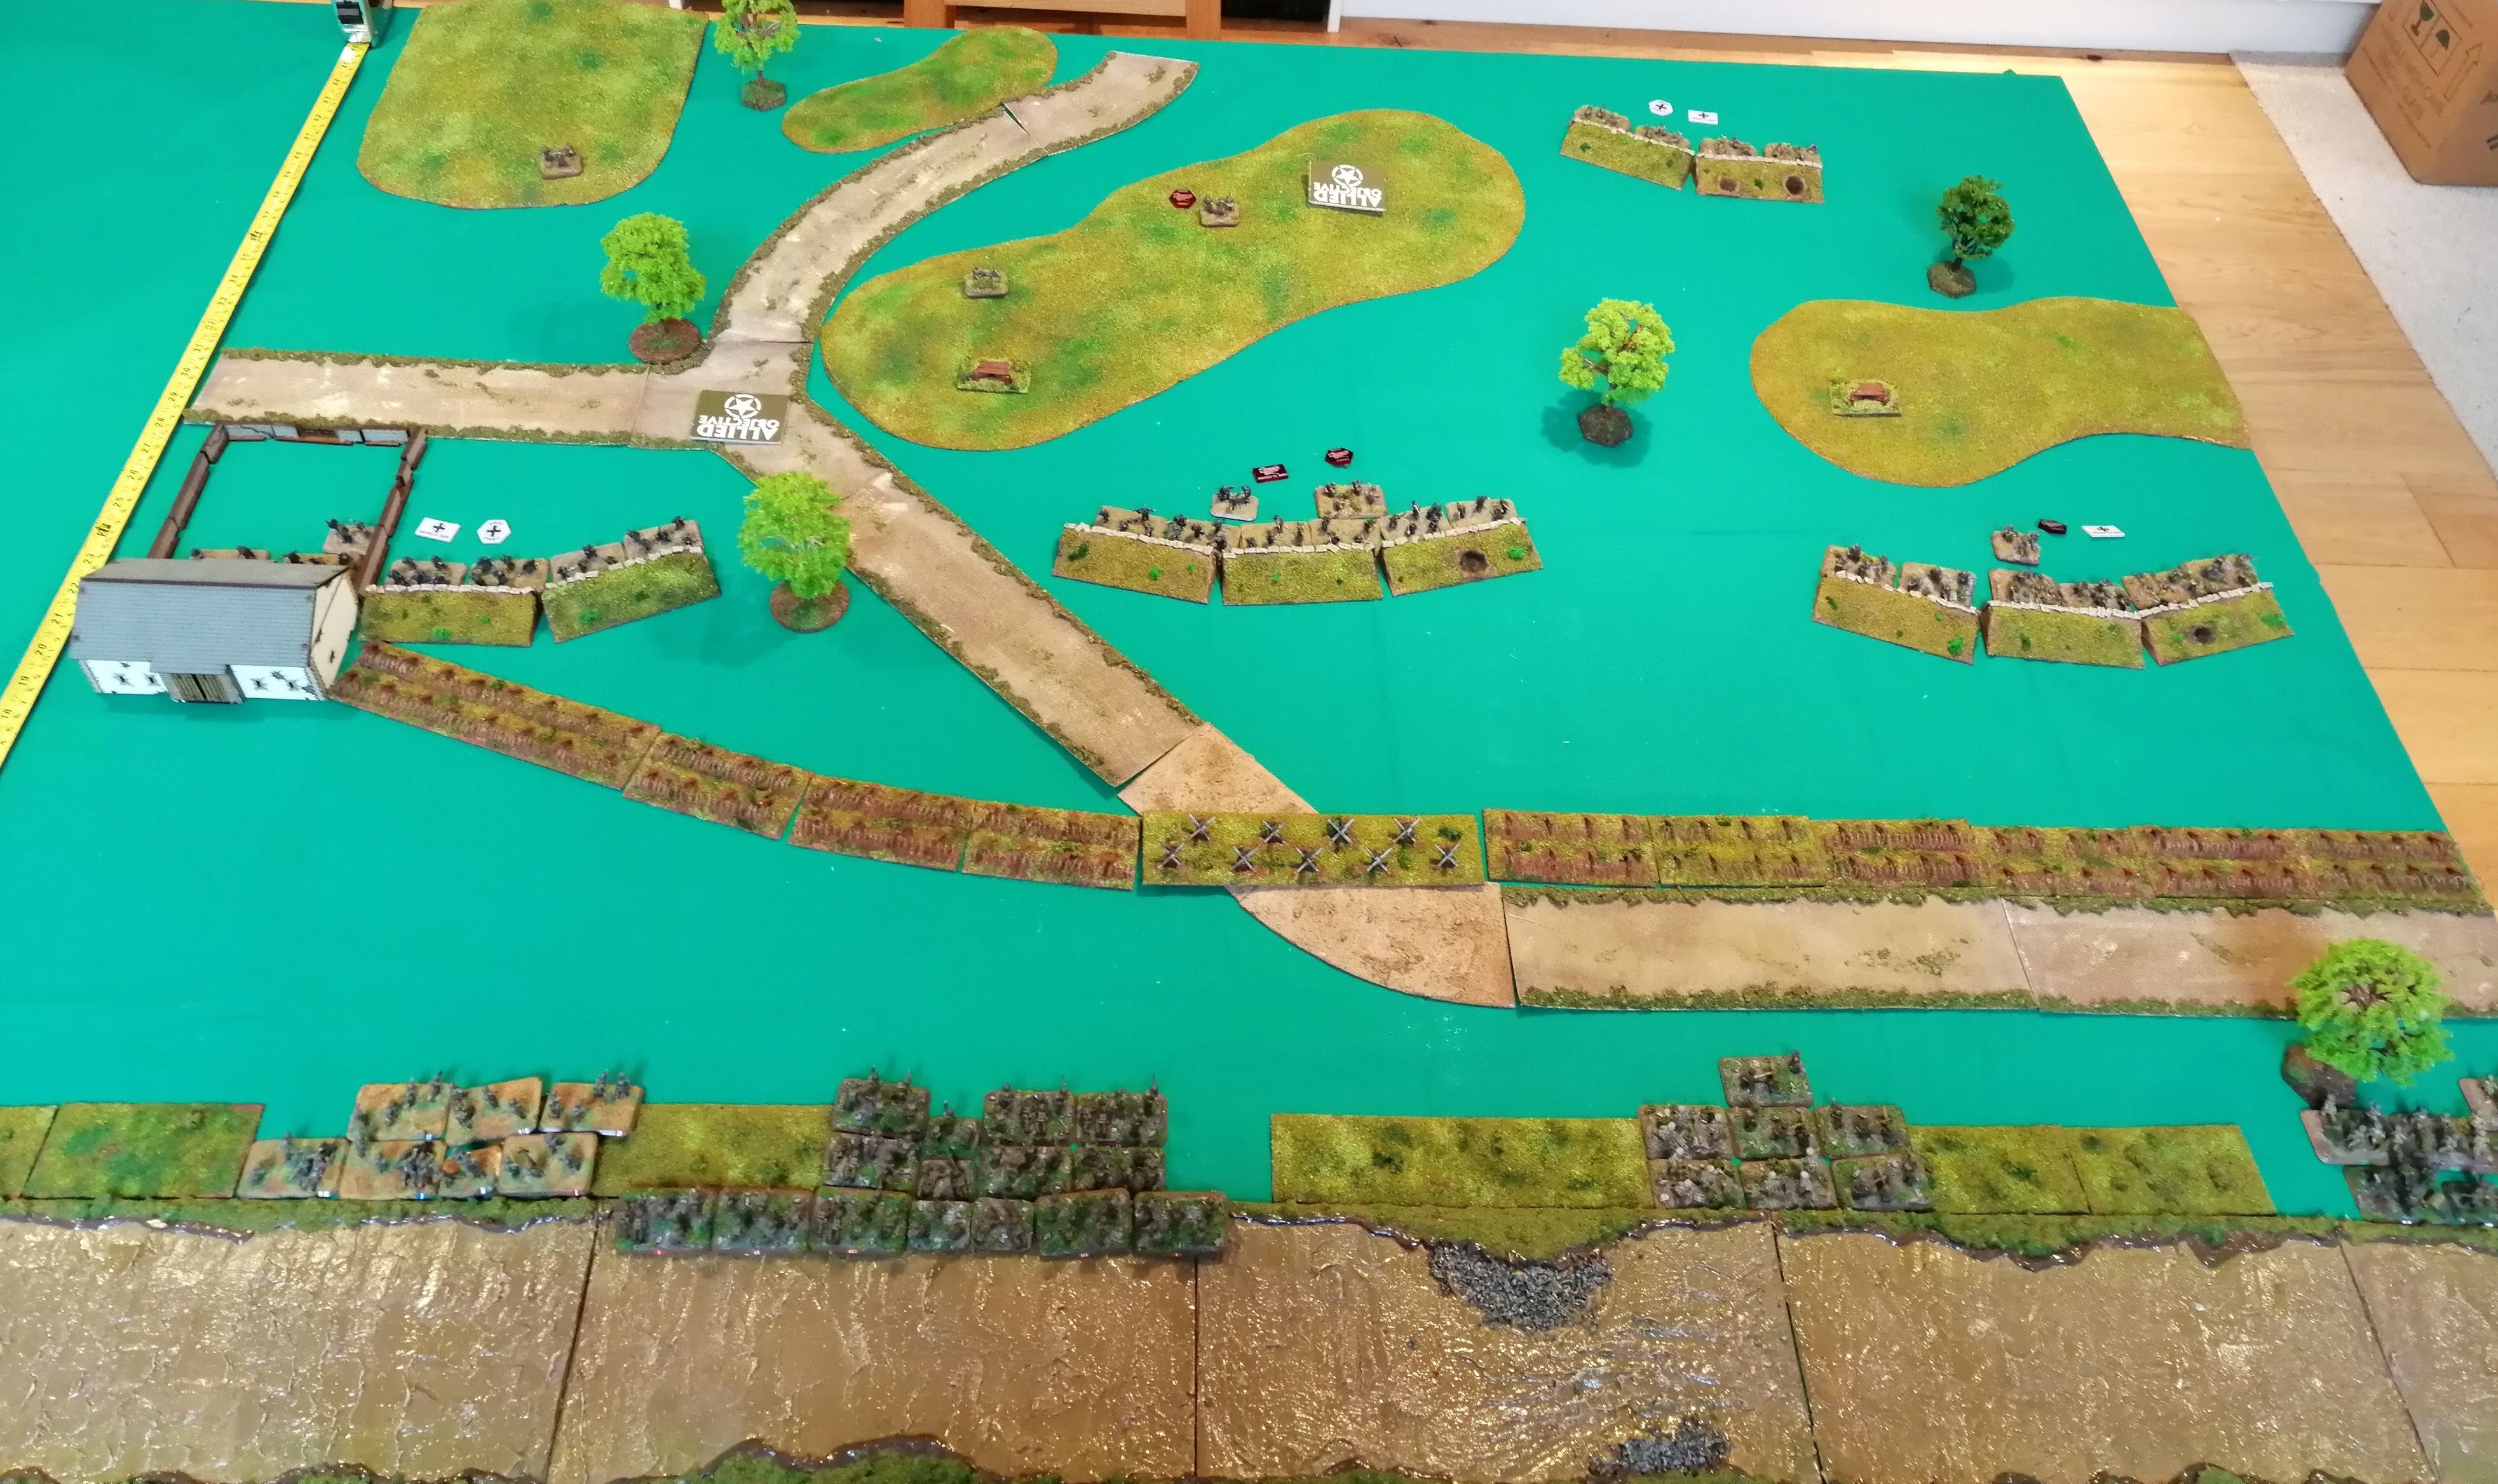
The Battlefield
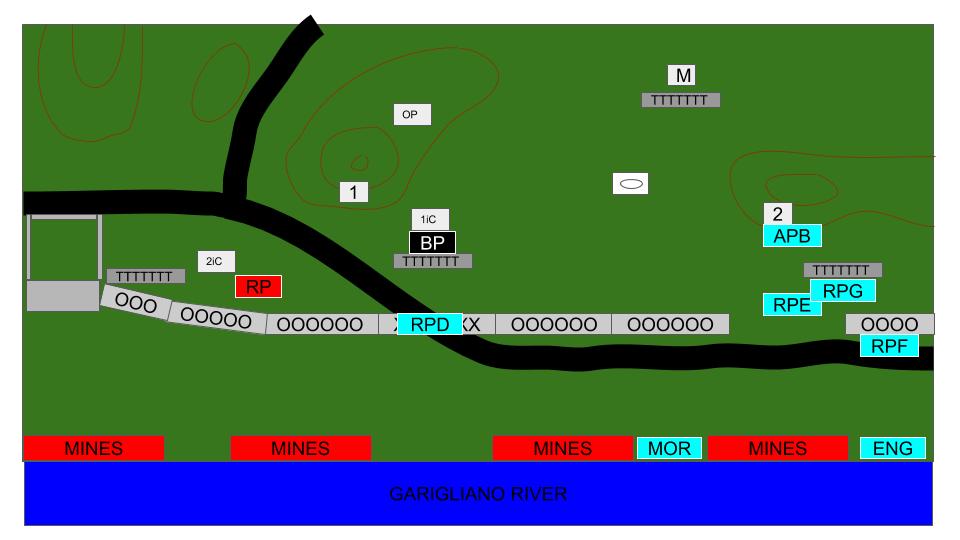
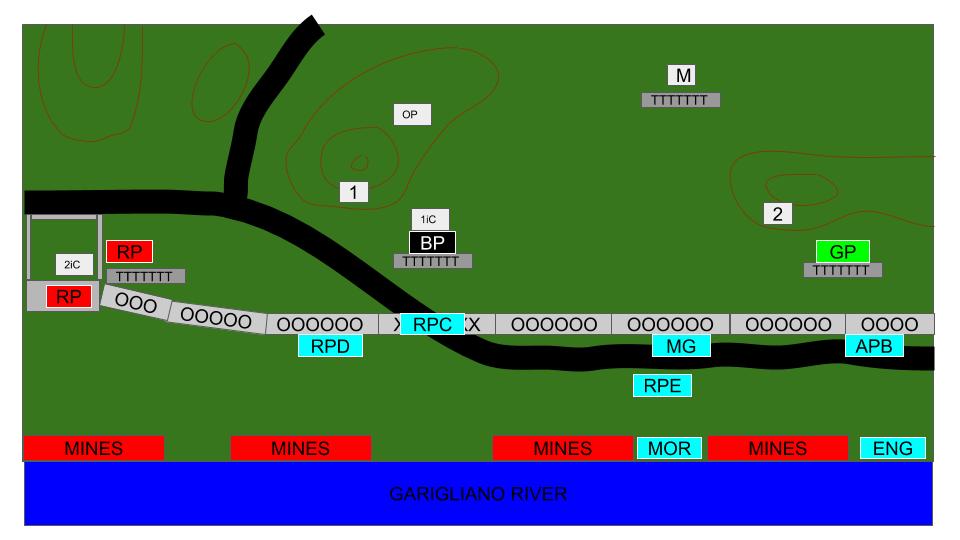
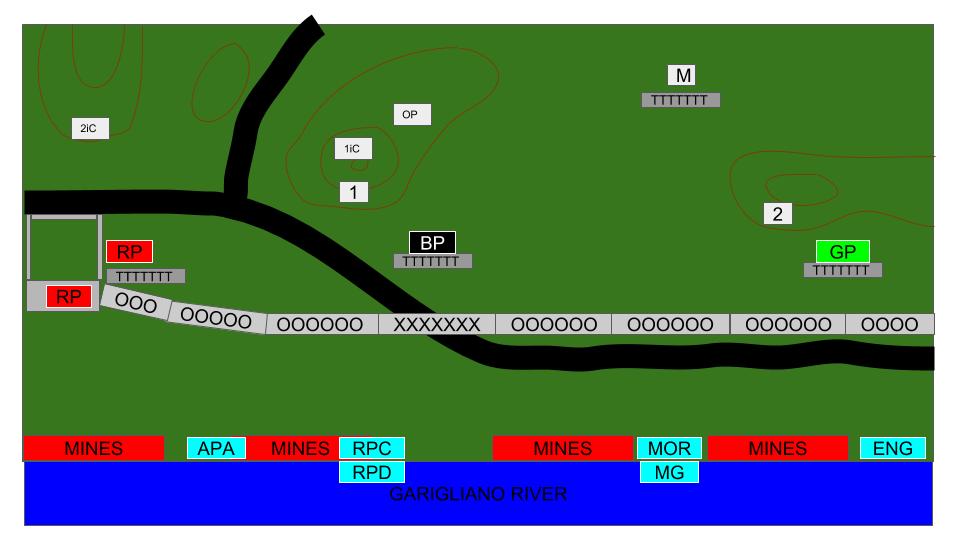
I’ve created some pictures of the battlefield to supplement the photos. In the images, North is at the top. The River Garigliano runs along the bottom with the black line being the dirt road.
On the left (West) the grey box is a barn with stone walls behind. The brown lines are hills while the red boxes are minefields.
Grey boxes marked OOO are barbed wire and those marked TTT and tank traps.
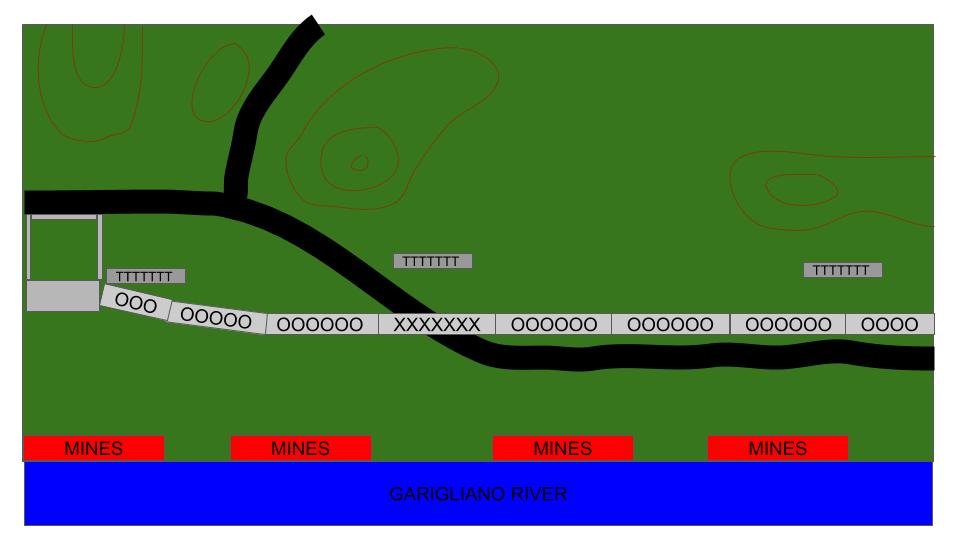 The Battlefield
 Germans Deployed
Game Rules:
To try to recreate the battlefield more accurately, we will introduce the following rules and victory conditions.
German
The 15th PanzerGrenadiers have had time to dig in and prepare their defences. All infantry platoons start the game within trenches offering concealment and bullet proof cover all around.
The defenders have been able to mine the river banks and can place 4 8”by2” minefields anywhere along the river bank.
The 3 Panzer IV tanks must be placed into reserve. They can only enter the battlefield if it is Turn 4 or later AND at least one of the trenches have been overrun by US forces. The tanks must enter the battlefield using the road on the German side of the battlefield. This represents the limited number of tanks available and to only be committed to plug gaps in the line.
The German forces have been subject to a significant artillery and mortar bombardment prior to the battle commencing. All German forces start the game pinned down.
Victory Conditions: 1 VP is awarded for each US Platoon destroyed or withdrawn from the battlefield
US
The 36th Infantry Division are trying to create a bridge head. To assist in this, they need to build pontoon bridges to allow the supporting armour to cross the river. The Engineer platoon is tasked with building the bridge and at the start of each movement phase may elect to commit any number of teams to the task. For each team committed, a dice is rolled with any result of a 6 adding one to the bridge score. Once the score reaches 9, a bridge is in place.
Engineer teams that move or are not within 2” of the river cannot assist in building a pontoon bridge. Teams building a pontoon bridge cannot shoot. If the platoon is pinned, half the number of dice to be rolled, rounding down.
Due to the fast flowing river water and the difficulty in crossing while under fire, US deployment is randomly determined by rolling dice. The table edge is 5’ in length and a first dice is rolled to determine which foot, measured from the US left flank, the platoon arrives, with a roll of 6 allowing the US player to choose exactly where the platoon can arrive. If the result is 1-5, randomly determine which inch of the foot the cmd team should be placed. The rest of the platoon must be placed in base contact evenly around the cmd team no more than two teams deep, spreading out along the bank as necessary.
The 36th receives 3 shots per round from the supporting Sherman tanks on the far side of the river. This is always at long range but there is no limit to how far these guns can fire. It is assumed that the Sherman tanks are dug in and stationery.
Reserves. The US will receive their reserves in the following turns or under the following conditions:
Turn 3: Assault Platoon B with 2nd in Command (AP B & 2iC), Rifle Platoon D (RP D)
Turn 4: Rifle Platoon E with 1st in Command (RP D & 1iC)
Turn 5: Rifle Platoon F
If the Engineers get a total score of 9 on their pontoon bridge score, they can roll for armour reserves. A roll of 6 at the start of any turn results in a Sherman Platoon deploying on the river banks where the bridge is constructed.
Victory Conditions: The US player receives 2VP for completing the Pontoon Bridge, 1VP for each German Trench occupied or overrun. 1VP every turn they hold one of two objectives.
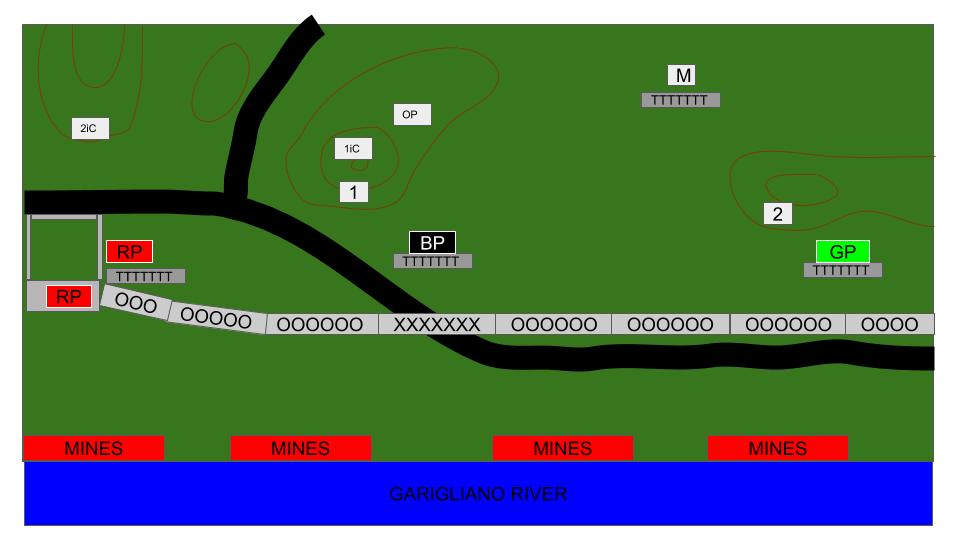
German Deployment
The Mortars deploy at the back of the board behind a trench line.
Red Platoon deploys into the barn and trench line beside.
Black Platoon deploys in the middle
Green Platoon deploys on the German left flank behind a trench line
The two HMG nests are positioned slightly further back on the hills between the three PG platoons. The ranges of the HMG are enough to still reach the barbed wire while providing a good degree of overlapping fields of fire
The spotter deploys on the hill while the 1iC and 2iC HQ teams deploy behind Red and Black Platoons
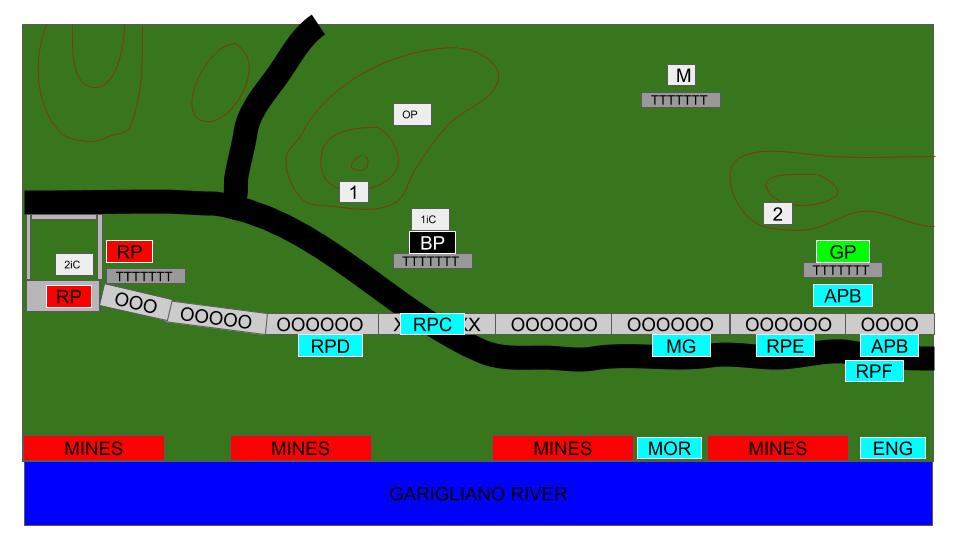
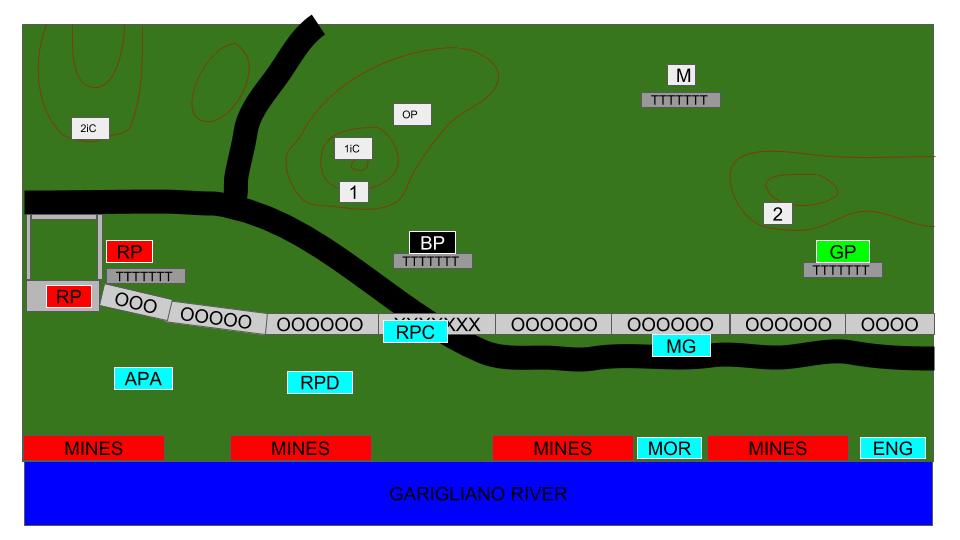
Key to the image: RP is Red Platoon, BP is Black Platoon and GP Green Platoon. white boxes 1 and 2 are the HMG nests. Box M is the mortar platoon. OP is the observer post for the mortars.
 German Deployment
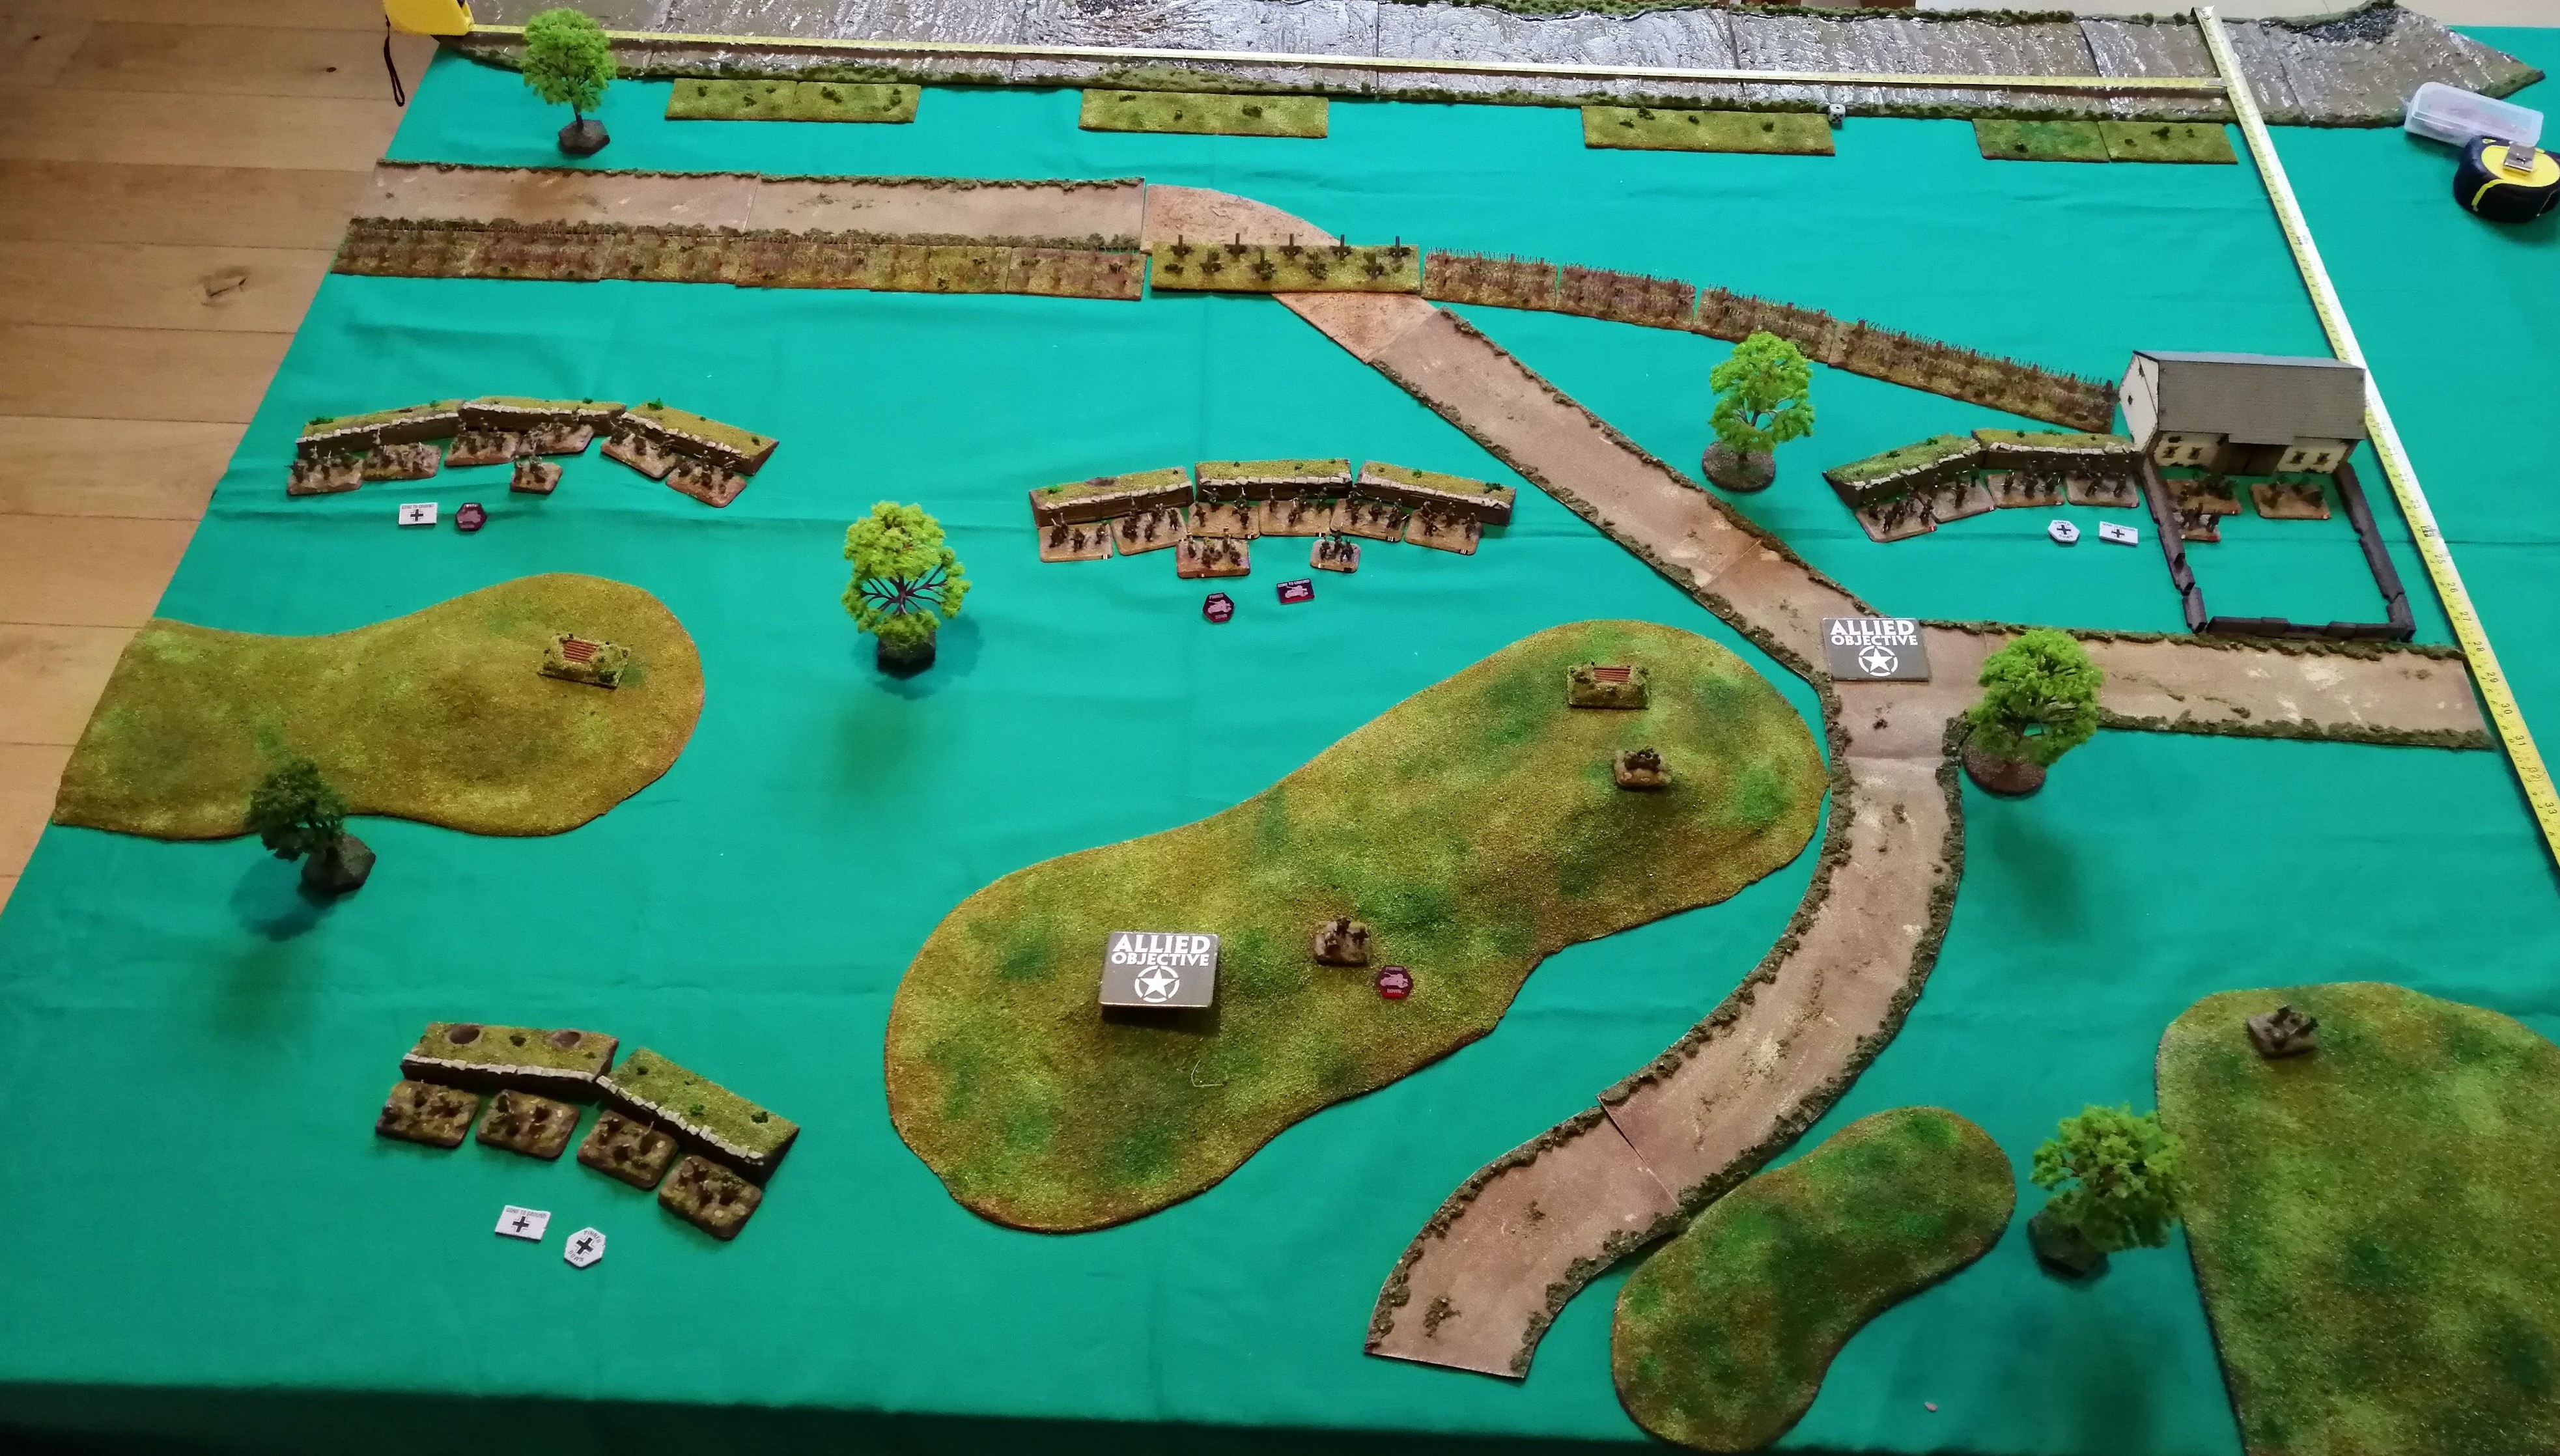 Germans deployed and waiting for the US 36th to launch their assault
US Deployment
The US have a random deployment along the banks of the river and this results in the following
Assault Platoon A (AP A) deploys 13” in from the US left flank and partially into a minefield
Rifle Platoon C (RP C) deploys 17” in from US left flank, partially into a minefield
Rifle Platoon D (RP D) deploys exactly in the same location as RP C and so will start behind RP C in the river
Engineers start 49” from US right flank
Weapons team roll a 6 and choose to position half way along the bank between two minefields.
 US Deployment

![Games Workshop Kick Off Grot Week For Warhammer 40,000 [Updated]](https://images.beastsofwar.com/2026/04/grot-new-40k-news-cover-600-338.jpg)