





Persei-Aries War – Oriskany v. Rasmus




Recommendations: 1421
About the Project
After racking up 127 entries, 3500+ recommendations, and 600+ comments, the original Darkstar project thread was getting a little unwieldy. So I'm starting a new one, featuring a new campaign for interested players in the OTT community and beyond. So far we have five players, but there's always room for more!
Ever wonder if you had what it took to command fleet of starships in tactical combat? Darkstar offers that challenge to the hard-core wargamer, with a "Newtonian Physics" movement system, rules for astrophysical objects and phenomena, gravity, and of course dizzying amounts of 26th-century firepower. There are no aliens, no "hyperspace," no planets that look suspiciously like movie studio back lots. Just the old empires of Earth doing what they do best, colonization and kicking the hell out of anyone who gets in their way (i.e., each other).
In addition to starship tactical combat, Darkstar includes rules for carriers and aerospace craft, atmospheric operations, orbital and surface installations, boarding actions, assault landings, and a complete campaign system.
The system is free to download for members of the OTT community, and of course we play almost every weekend with a on-line version with starship commanders around the world! So if you ever want in, you know where to find us!
Related Genre: Science Fiction
This Project is Active
Battle of Kayashenko Four
FROM: UNITED NATIONS REGIONAL COLONIAL CENTER
02:10 SOL GMT, 08 MAY 2521
BREAKAUTH: 181072.18J
CLEARANCE: SECRET (NATIONAL)
**UNITED NATIONS COMMUNIQUE**
Reports have now been confirmed of another major naval action in the Third Hercules War. In response to their recent setback in the UN-Mandated “Redemption” colonies (99 Hercules system), the United States Navy has sent a high-speed task force into orbit of the Russian-owned “Kayashenko” gas giant, scene of a bloody American defeat suffered at the lands of the Arab League last month.
Sources close to American naval command and colonial administration at Port Halsey in the Vega Colonies (Alpha Lyra) suggest that the plan was originally to send a somewhat smaller force much further. Specifically this would have been Task Force Oriskany under Captain Matthew A. Spencer, a small hunter-killer group of destroyers, a light carrier, and a torpedo corvette with greatly enhanced Darkstar drives. The original target was the Arab League base of operations at Khaizan’s Haven (14 Hercules), a full sixty light-years from Port Halsey. While Task Force Oriskany could cover this distance in about two weeks, any other naval units proposed to support the strike would take upwards of two months to cover the same strike range.
Alternatively, US Naval Command wanted to make this a much larger operation, determined to mount a definitive response in the wake of the Battle of Kayashenko 17 and the loss of the destroyer USS Vincennes. Commodore Virginia Saunders was placed in command, flying her flag aboard her newly-arrived Gettysburg class heavy cruiser, USS Shiloh.
With such a heavy warship in the task force, any question of striking distant targets like 14 Hercules was out. Instead, the Americans chose to hit the Arab League at the Kayashenko gas giant (pressure from their Russian allies at Krasnaya Nadhezda may also have influenced the American decision). Orders were simple, return to the Kayashenko gas giant in 99 Hercules, engage any Arab League warships lingering among the planet’s 63 moons, and defeat them.
Clearly this new mission profile was drawn up as much for political reasons as military objectives. The Americans wanted to win a battle against the league at Kayashenko, symbolically balancing the scales after the loss of the Vincennes (lost with 110 souls including Commander Yvonne Alliston). They also needed to secure Kayashenko for their Russian allies before they started looking to cut a separate peace. Lastly, the primary reason the Americans joined this war in the first place was to win shipping and colonization rights along the Hercules Rim, and the UN-mandated “open system” of Hercules 99 seemed a natural place to plant the flag.
As fate would have it, however, this American response at Kayashenko would have tremendous military impact as well, since the Arab League was also building up a heavy naval presence, hidden among the Kayashenko moons. Clearly they hoped to build on their earlier success, shoving heavy naval units into the 99 Hercules system while the Americans and Russians remained off-balance. Starships of the League tend to have much faster Darkstar drives than similar warships in other navies, giving them a great advantage in operational flexibility and making such a forward deployment that much easier.
So when the USS Shiloh, flanked and screened by Task Force Oriskany, made its appearance at Kayashenko, it found not the small cruiser-carrier battlegroup that had been here last month … but a far more powerful task force of heavy cruisers, light cruisers, and destroyers. This engagement, in orbit of the larger “Galilean” moon of Saint Yegor (Kayashenko 4) will pit 1.1 million tons of warships into a pitched battle, fought between two full battle fleets of “outside powers” both hoping to stake a claim in 99 Hercules and the Hercules Rim in general.
Game Terms: Solitaire game to test two NEW ship designs, the Arab League Damascus class heavy cruiser, and the long-awaited American Gettysburg class heavy cruiser. Also, I sometimes feel a little bad putting the FULL order of battle of Task Force Oriskany (heavily upgraded, very experienced) up against newer battlegroups and task forces of other players. Lastly, I wanted a chance to dust off my old Arab League commanders, who haven’t seen action since the Aegean Path War (played in 2014).
508 points per side
ASSAULT victory rules
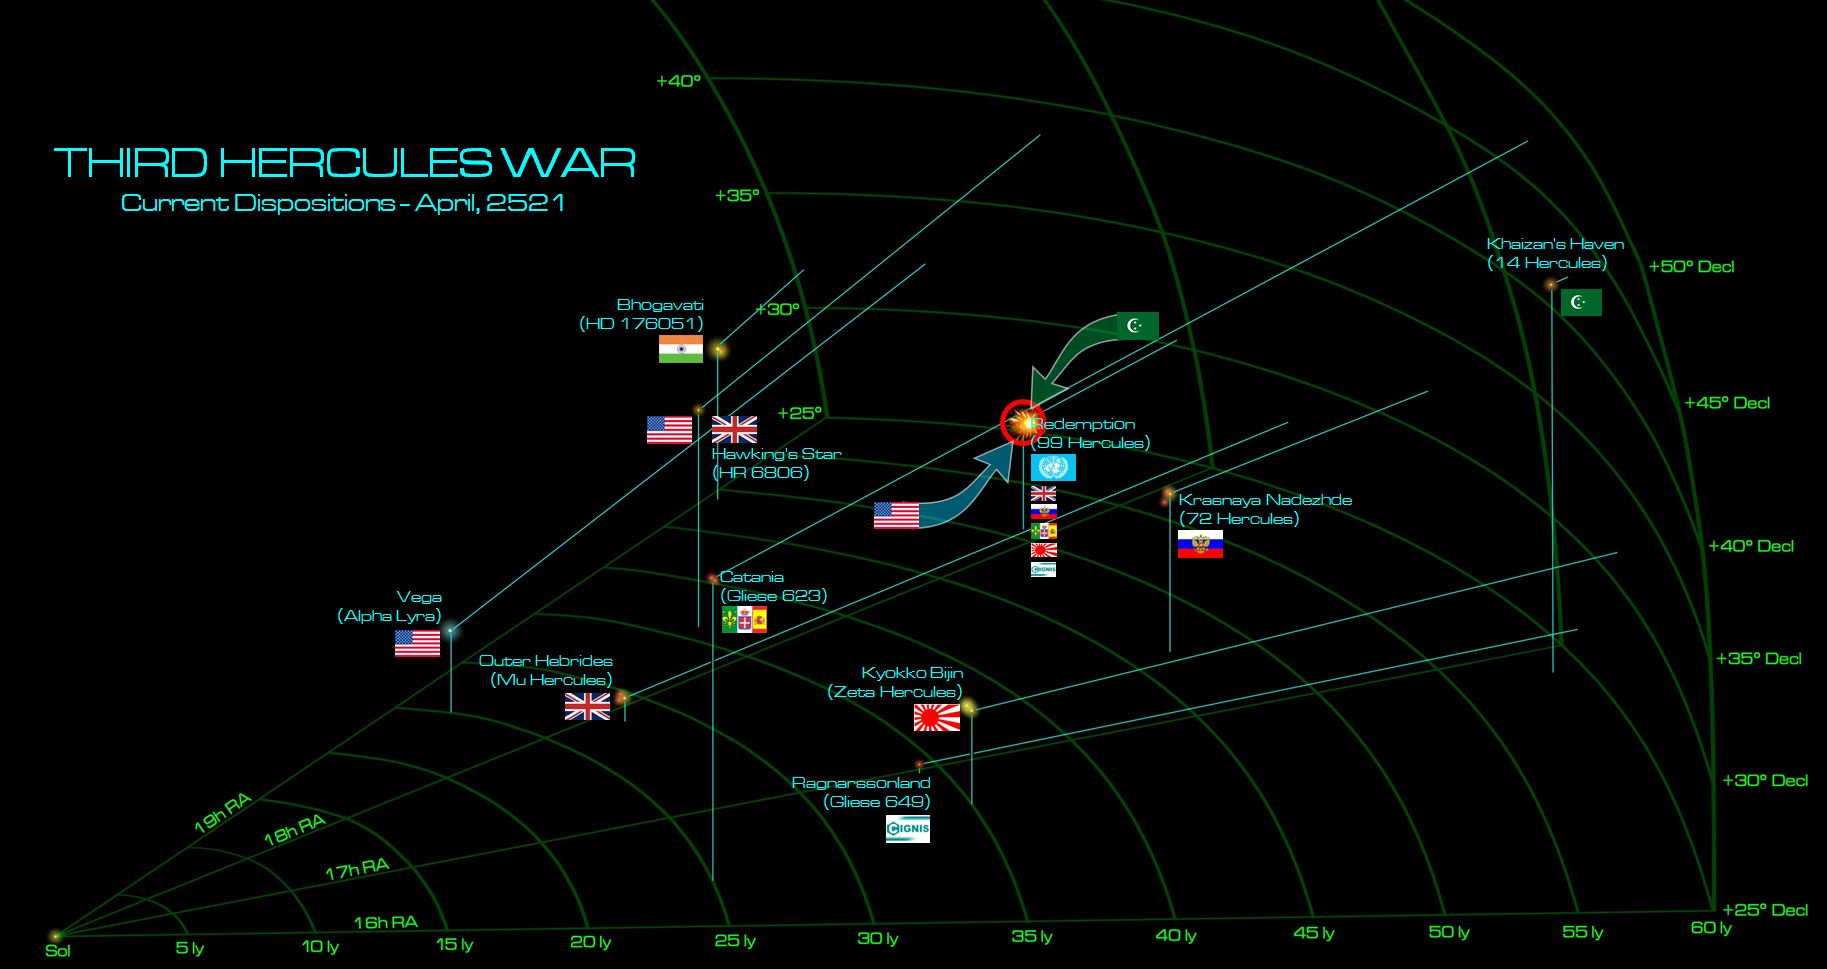 Here is the current disposition of the Third Hercules War. While the strategic American focus remains on securing British colonies at Hawking’s Star, the massive and bloody DRAW fought there with Russian, British, and Japanese naval units means it will take some time for the Americans to realign their forces and allies to make another push at knocking the UK out of the war. Meanwhile, media reaction to the loss of USS Vincennes and increasing complaints from the Russian allies to help deal with the Arab League along the coreward shoulder of the Hercules Rim has compelled the Americans to mount a forceful strike at any Arab League ships lurking among the moons of the Kayashenko super gas giant.
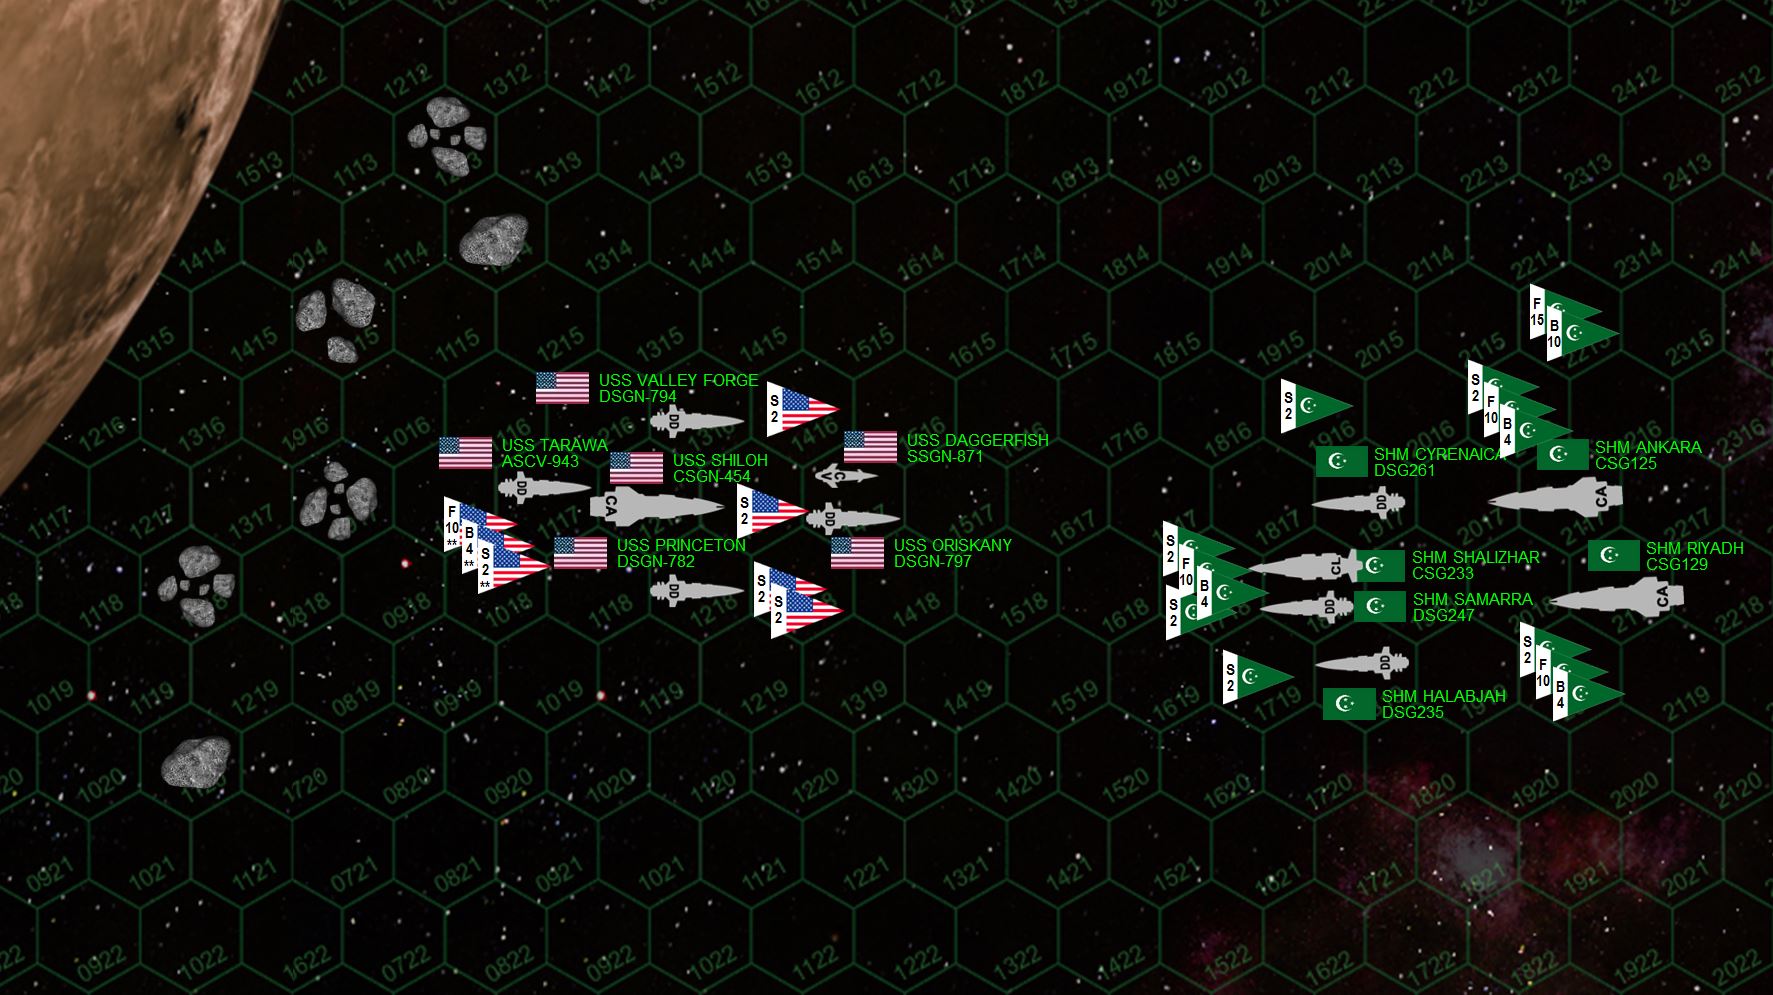 Today’s matchup. Yeah, this is gonna be a brutal one, with 12 ships, well over 100 aerospace craft, over 1 million tons in shipping, and 1016 game points on the table. This game would take experienced Darkstar players AT LEAST 6+ hours to complete, and represents the upper limit of what can usually be accomplished with Darkstar.
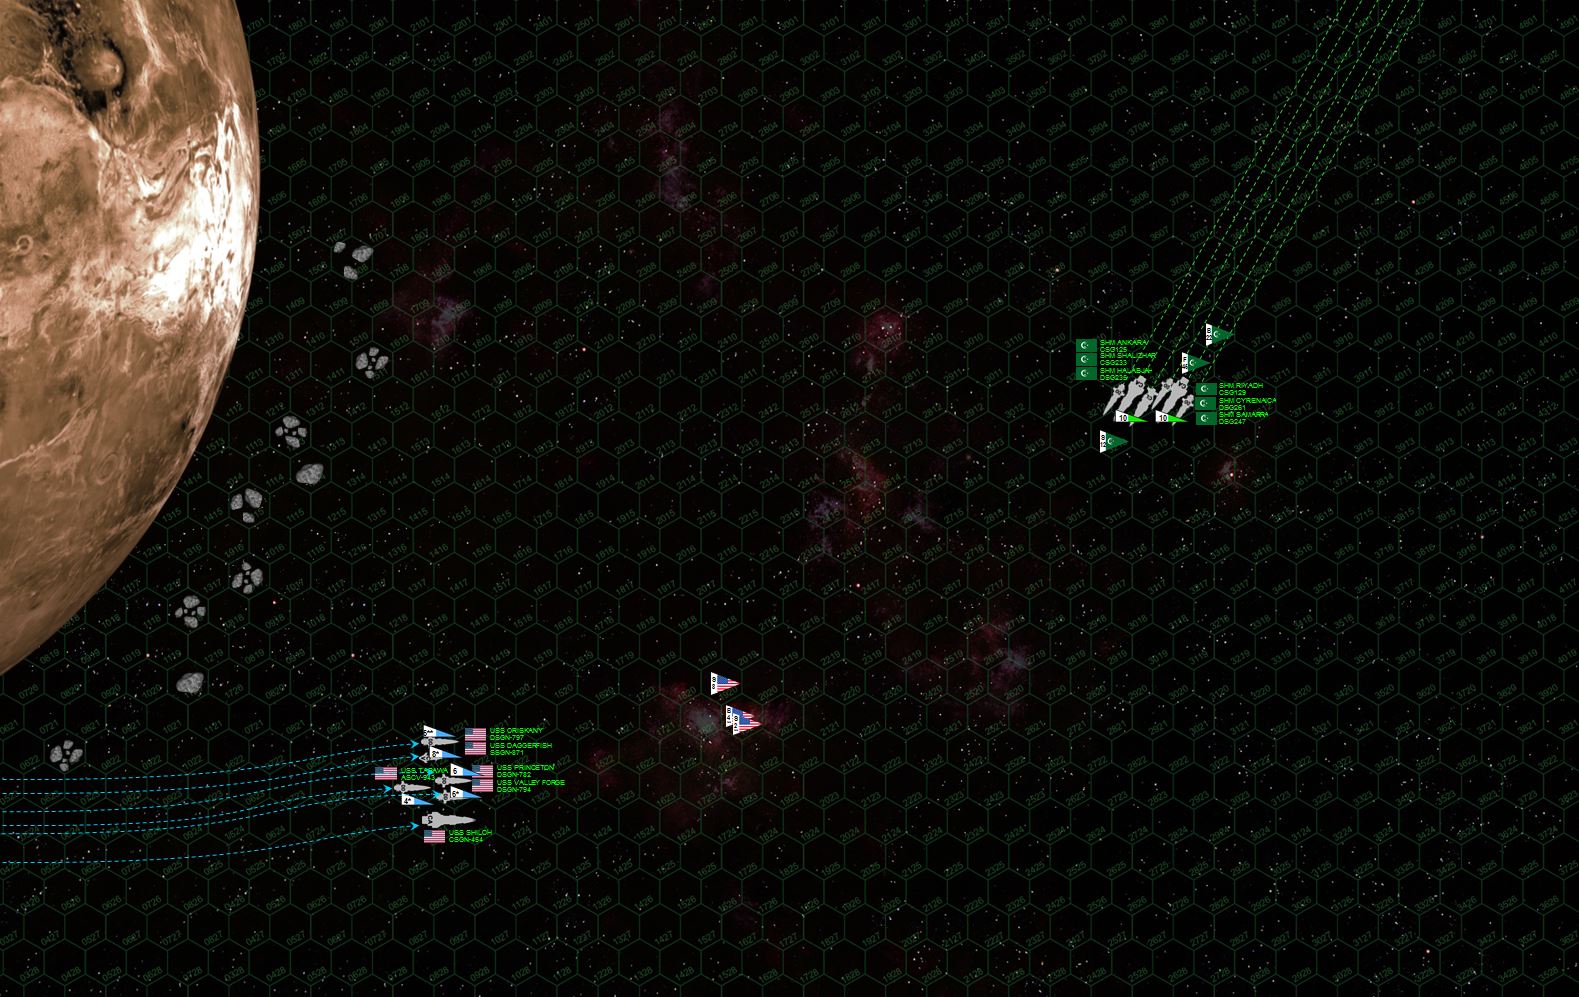 Both sides enter at over 35 kps, decelerating to attack speed as sharply as these immense heavy cruisers will allow. The Arab League is able to launch all their fighters and bombers (carried aboard larger-than-average “hybrid” cruisers) while the USMC strike carrier USS Tarawa gets all her bombers launched, fighters standing by right behind. In all, there are almost 80 League fighters, bombers, scouts. Both sides open fire at just under 4000 km range. The USS Oriskany takes “ranging fire” hits from heavy cruiser Ankara and the destroyers Cyrenaica and Samarra. American fire all misses. Torpedoes away!
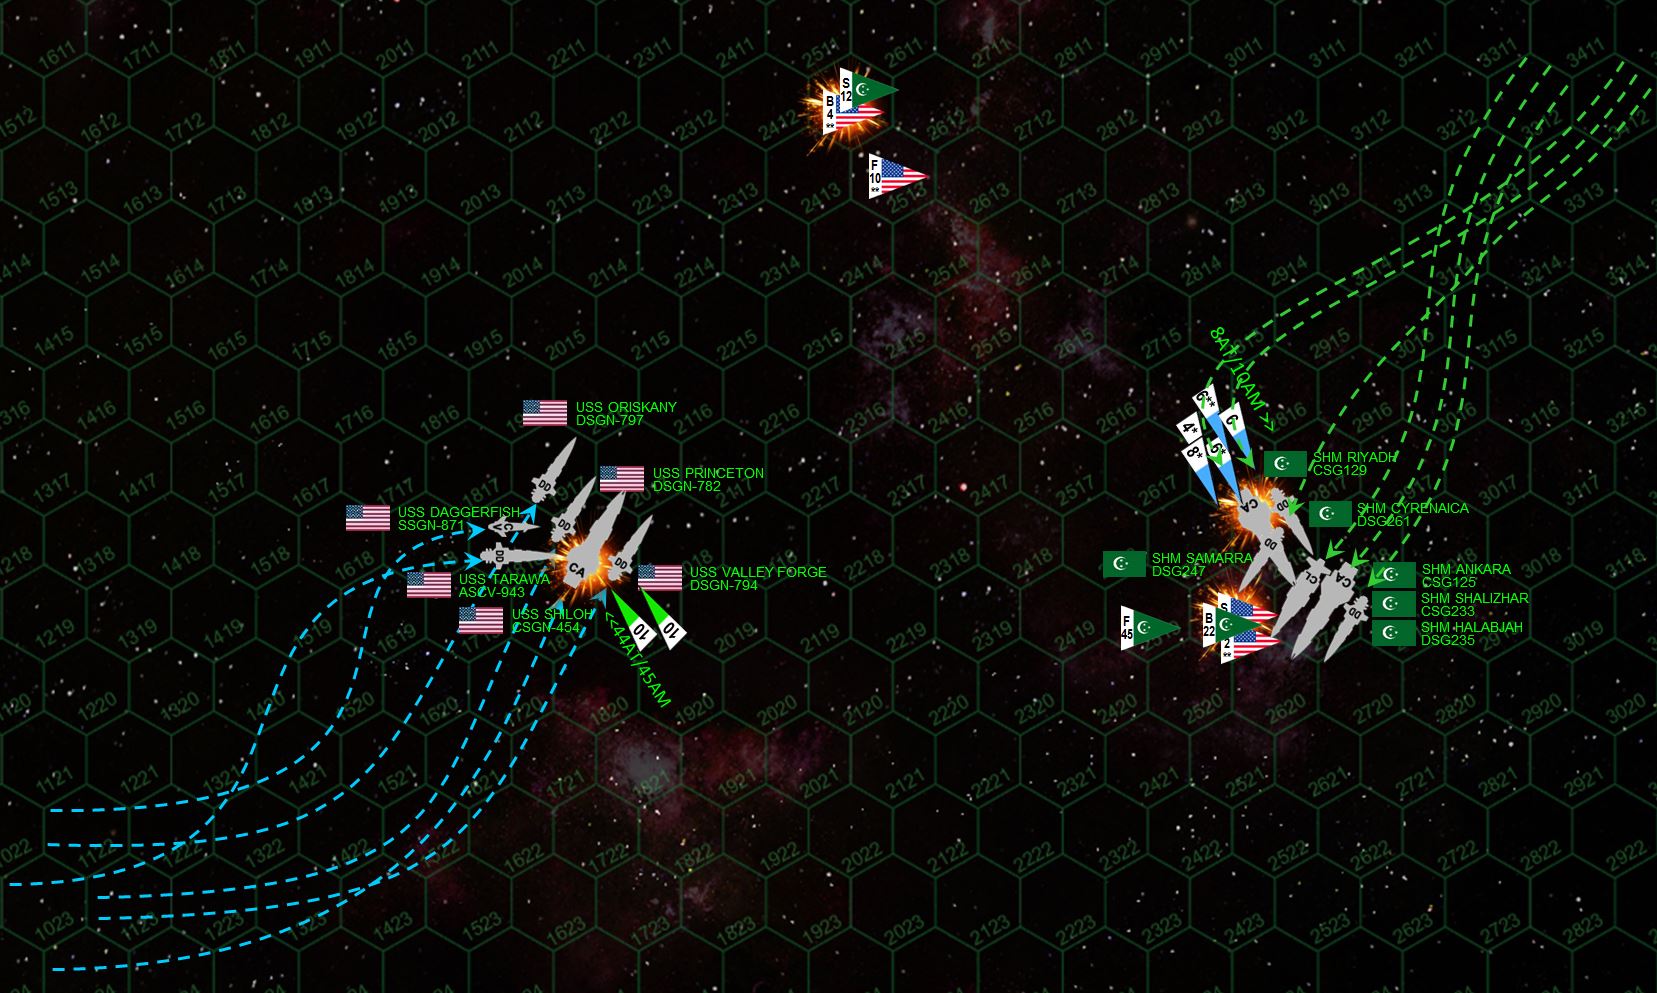 As both sides rapidly close the range, and velocities drop beneath 20 kps, the heavy cruisers feint, shift, sidestep, and finally make hard last minute turns, each trying to get the better angle for broadsides on the other. The Americans largely win this contest, with virtually their whole fleet poised to broadside the starboard quarter of the heavy cruiser SHM Riyadh. The League deploys in a wedge, presenting broadsides in both possible directions with each element covering the fantail of the other. The aerospace strikes go in. Scouts engage bombers, the Americans lose two, the League loses three. Four Mark 48 gravitic torpedoes from the Princeton slam home into the Riyadh’s stern, together with one aerospace missile and four aerospace torpedoes from the Marines of VMF/A-319 “Tigershark” Squadron. The Riyadh is still in, but her aft shields just collapsed. The Americans do much better with their mass driver defences against the huge League aerospace strike, four aerospace missiles and six "Ahrasyfa" (Storm) torpedoes hit the starboard quarter of USS Shiloh. Some of these cavitate inside the starboard reactor room. She still has power, but starboard quarter shields (and mass drivers and sensors) just went down. The League broadside is next, all focused on the Shiloh, and it is brutal (note the League CANNOT put both their aerospace strike and gunnery against the same facing of the Shiloh, the distances were just too great). The Shiloh’s forward magazines are hit, three sensor suites, both port and starboard hangars are gone, starboard bow maneuvering thrusters, starboard bow shields, officer and enlisted quarters, and the bridge is damaged. But still she maintains power, and stays in the fight. The American broadside returns, and with more accurate guns, and careful sequencing of the hits (i.e., the heavy rail guns of the Shiloh landing AFTER all the energy based weapons of her secondary batteries and broadsides of her escorts) hit the starboard quarter of SHM Riyadh. This damage, combined with the damage inflicted by USS Princeton's torpedoes and the Marine "Tigershark" aerospace wing, is enough to force the Riyadh's captain to eject his reactors. The heavy cruiser is crippled. Off the bat, the Americans seem to have gained a critical edge in this battle.
 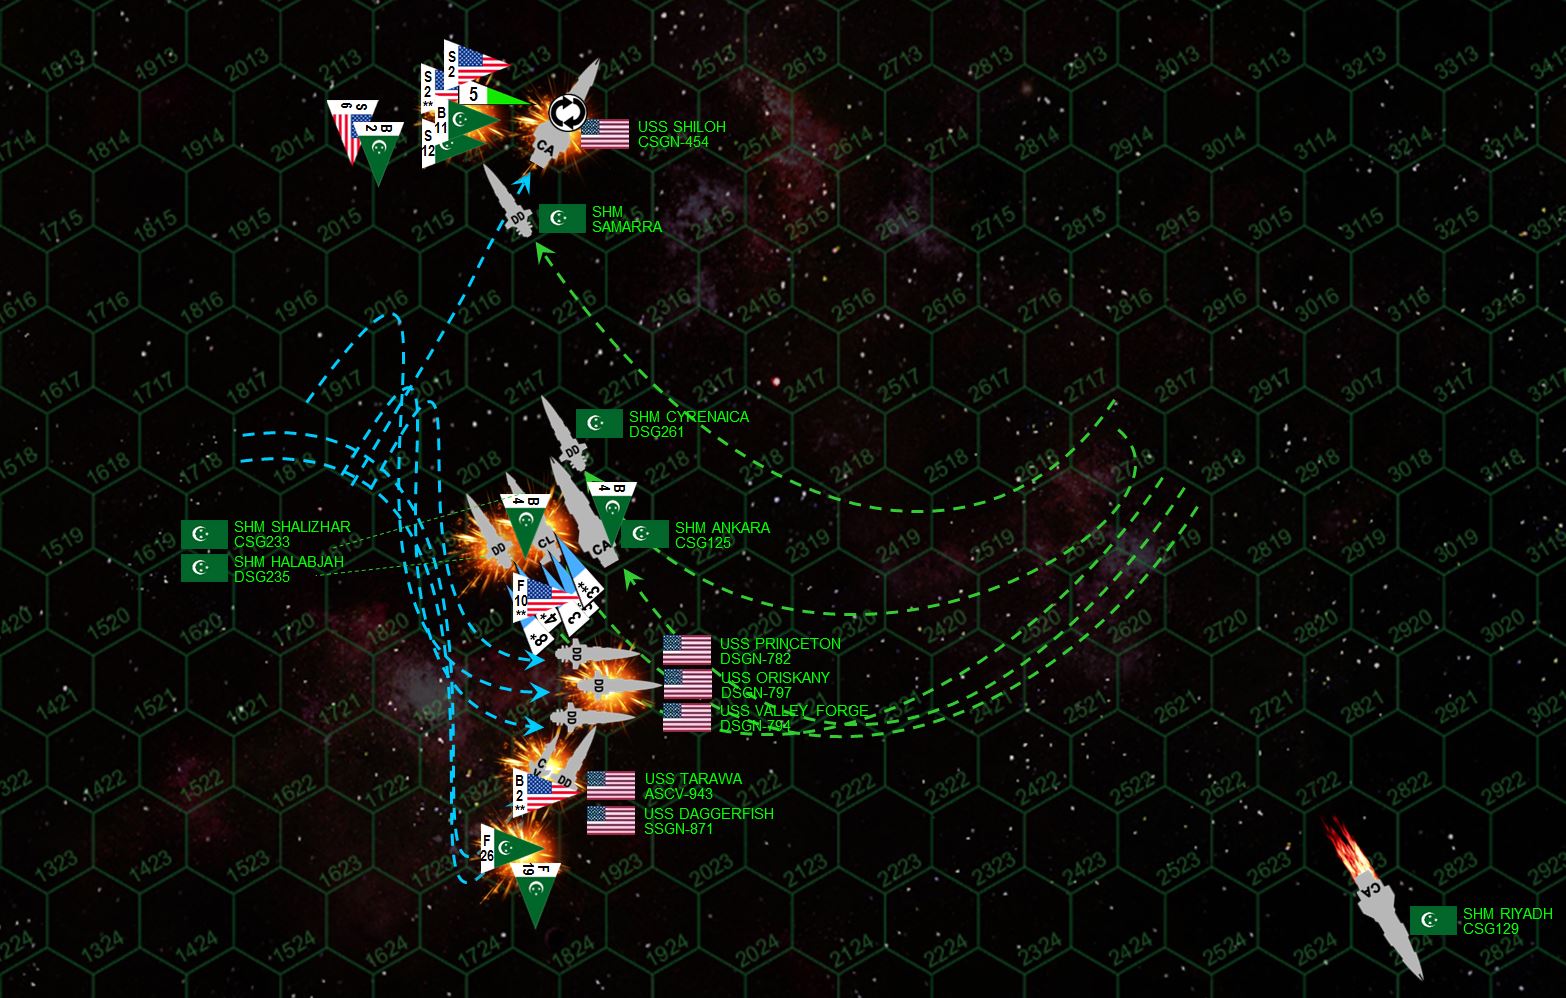 That American edge doesn’t last long. Although not quite crippled, the USS Shiloh has lost two shields and is basically unmaneuverable. She can only roll over on her back to protect her starboard side. Commodore Virginia Saunders orders Spencer to detach Task Force Oriskany, already ordering her crew into lifeboats and escape pods. The destroyer Samarra rushes up to broadside Shiloh's stern. The Shiloh's mass drivers (two turrets down) manage to take down most of the Ankara's torpedoes, but the last one hits the unshielded starboard bow, JUST missing the bridge. The Samarra takes a hammering on her attack run, but maintains power (losing sensors, maneuvering thrusters, shields ...) and puts a masterful broadside right into the stern of the massive Shiloh. At the same time, unloaded League “Demkikham” (Vengeance) bombers and scouts mount a desperate strafing run against the Shiloh’s unshielded starboard bow, praying to knock out the bridge. The Ankara’s torpedoes drew all the Shiloh’s mass driver fire, and the Samarra’s mass drivers shoot down most of the US scouts that try to stop the League’s bombers. Six American scouts are lost, compared to only two League bombers. It’s this bomber strafing run that finally cripples the big American cruiser, putting just enough autocannon fire into the bridge superstructure to force an evacuation and explosive decompression, knocking USS Shiloh at last out of the battle. Meanwhile, the Oriskany, Princeton, and Valley Forge jackknife behind the Shalizhar and Halabjah, supported by F/S-44 “Star Corsair” fighters of the Tigershark Marines. Both the light hybrid cruiser Shalizhar and the destroyer Halabjah are crippled by the point-blank broadsides and Marine strafing attacks, but aft batteries of the Ankara, the Shalizhar, Halabjah, and Cyrenaica blow both port and starboard reactors clean out of the Oriskany’s hull, smacking the “Lady O” clean out of the battle. The light carrier Tarawa and torpedo corvette Daggerish line up a third frontal torpedo spread, only to find 45 more Arab League fighters rushing behind them on a murderous massed strafing run! NINETEEN League fighters are shot down, but the 26 that survive use autocannons to explode the Daggerfish's starboard engines and reactors, leaving the torpedo corvette spinning helpless and crippled through space. Has the tide turned? The Americans have lost three ships here, including their only heavy cruiser and the Oriskany herself ...
 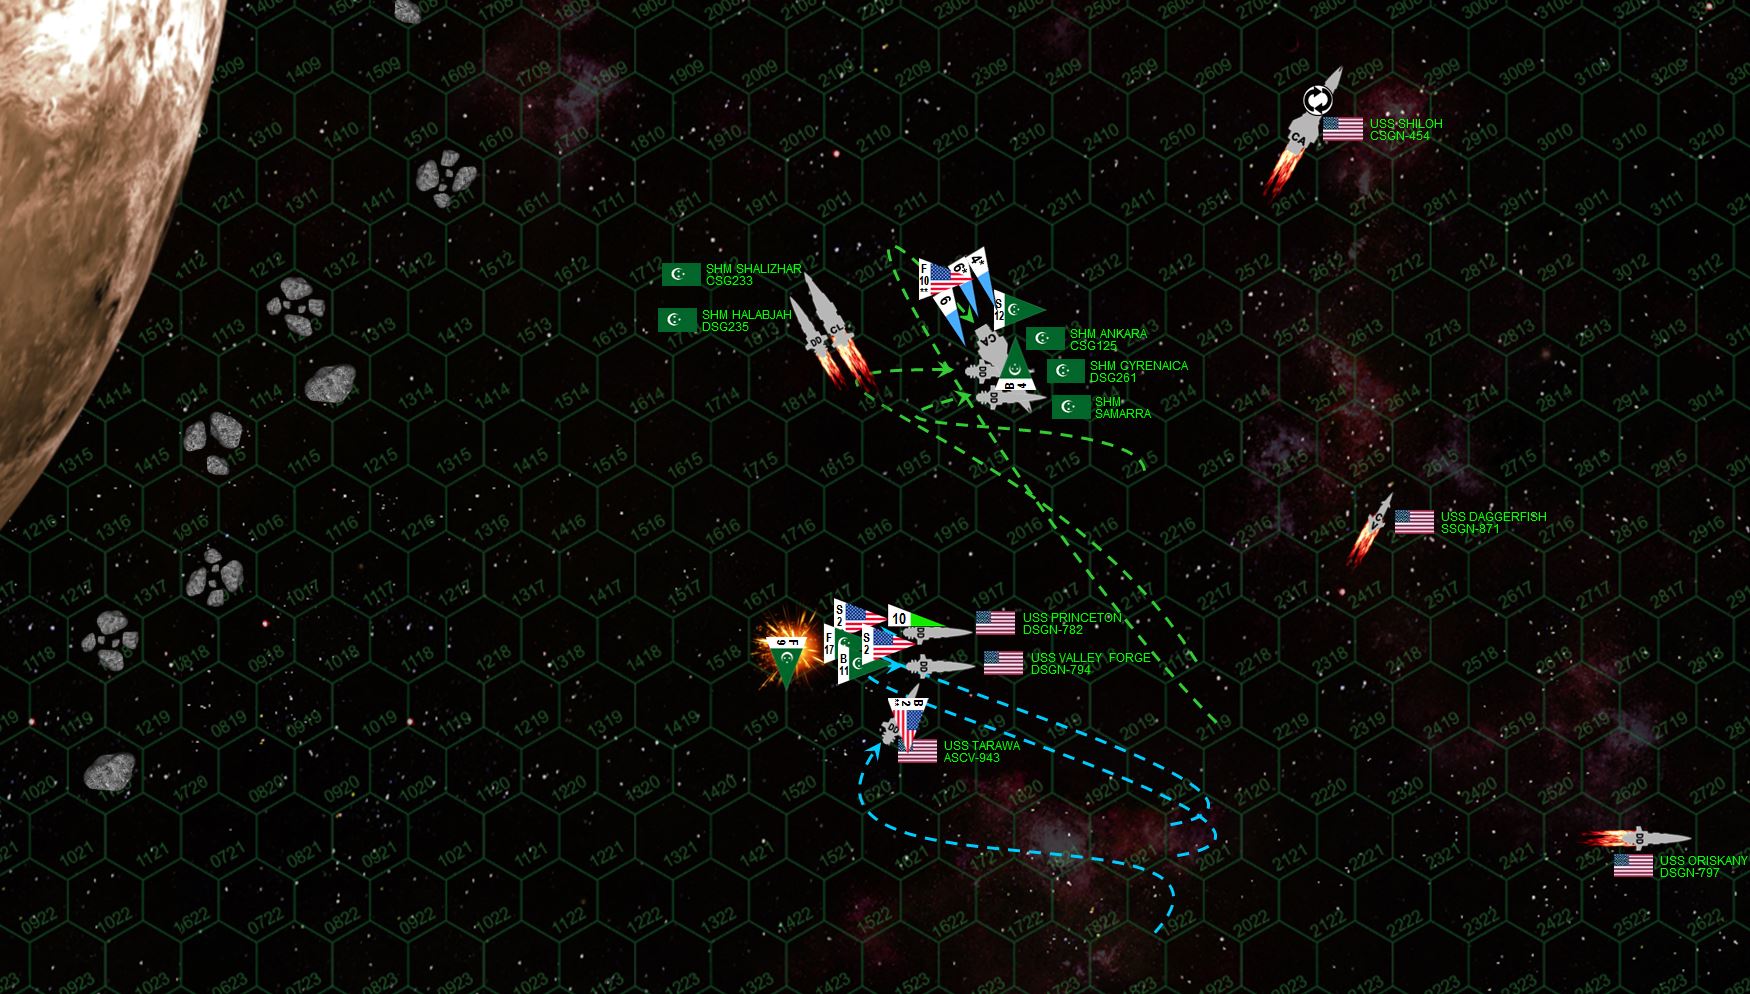 With the ships that are left, the League realizes they will never outmaneuver the faster, more agile (and admittedly smaller) American ships. Nor do they need to, they now clearly have the advantage of weight and aerospace numbers in this battle, they just have to “defend their lead” until the Americans mount an ill-advised attack or concede defeat. The Anakara and her two remaining destroyers "hedgehog" in such a way where the Americans will find it almost impossible to get fighters or torpedoes into Ankara’s stern WITH a destroyer broadside from the Princeton and Valley Forge on the same quarter. Refusing to give up, Captain Jack Morrison takes command aboard USS Princeton and commits his Marine fighters and more Mk 48 torpedoes in a series of "hooking" attacks around the Ankara's stern, while engaging in trailing broadsides against the League destroyers ... all while staying OUT of the broadside of the Ankara. League fighters continue to assail the sterns of the American ships, shot down in dizzying numbers but pressing home their attack along with torpedoes from the Ankara. The Valley Forge takes the worst of it, hammered by the Ankara and her destroyers, while the destroyer Cyrenaica takes hits in her starboard reactors from the pin-point accurate Valley Forge and Princeton. Meanwhile, the Marines press their strafing attacks on the Ankara. The Marines take no losses for now, since the League mass drivers are busy fending off American torpedoes. However ... the Americans are RUNNING OUT of those torpedoes.
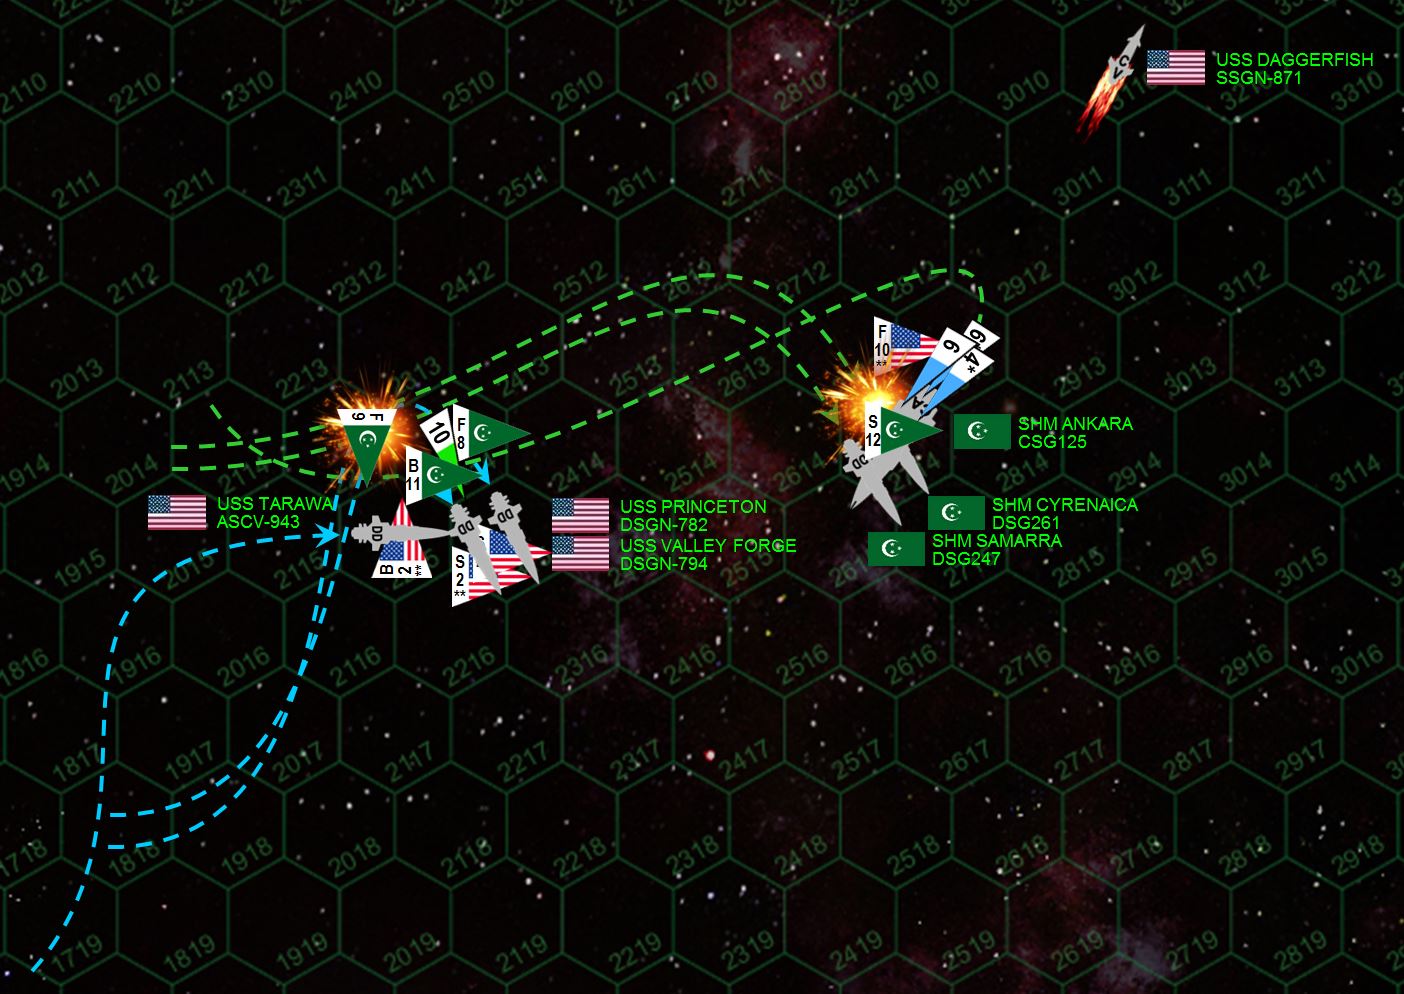 A second torpedo-fighter strike again fails to take out the Ankara! The Americans are SO close to turning the tide here! But now they’re desperately short on torpedoes and the Valley Forge takes a savage series of hits from the forward guns of the Ankara and the destroyers Samarra and Cyrenaica. Only barely does she maintain power, but she’s lost her forward magazines and ALL torpedo tubes, slashing the handful of available Mark 48s (already pitifully few) in half. Bombers make gunnery attacks on the Valley Forge, but still she stands tall (rolling a 00 on her percentile breakoff check). Meanwhile, a ray of hope shines for the Americans when their successive broadsides finally manage to power down the destroyer Cyrenaica.
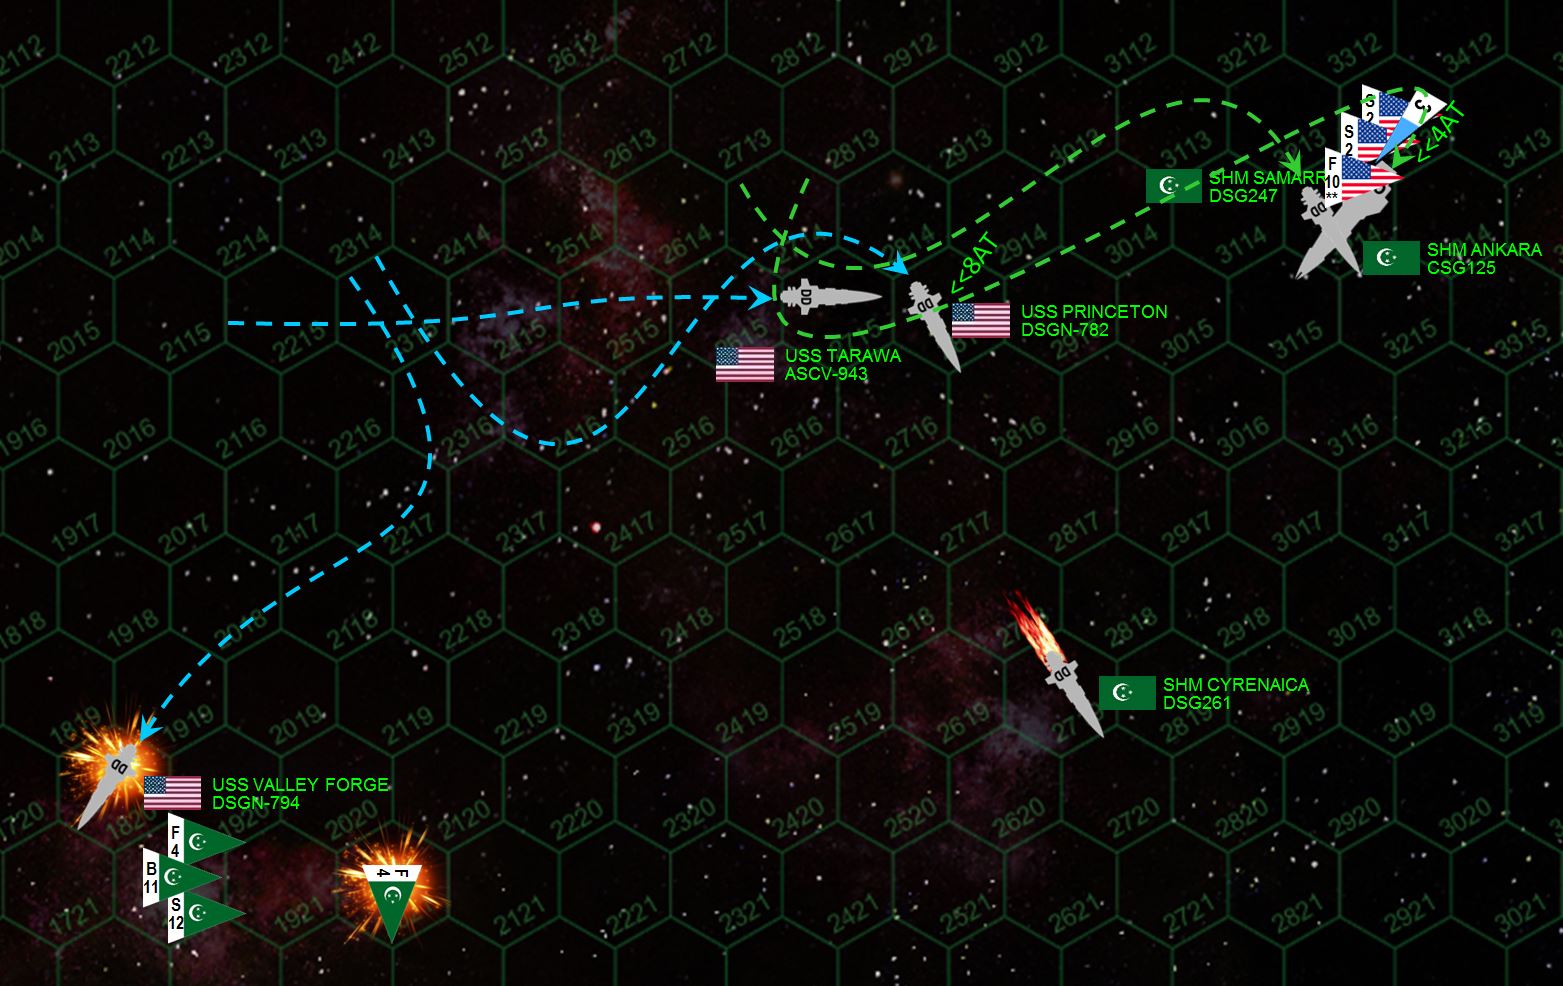 The Valley Forge breaks to starboard, hoping to open the range and remain on the table as an operational warship. But she is swarmed by surviving League fighters and bombers, and her port bow is totally unshielded. Thus, USS Valley Forge is finally crippled. The Marines hit the Ankara a THIRD third time, still taking no losses, covered by the very last American Mk 48s and the last two Marine bombers that have been re-launched from the USS Tarawa. But STILL the Tigersharks just can’t quite do enough! In game terms, the Ankara now has a 5+ to cripple, but the Americans roll a FOUR! Meanwhile, with the Valley Forge down, the Princeton takes her turn as the punching bag of the Ankara's forward batteries and the broadside of the SHM Samarra (the longest-serving ship in this League battlegroup). Instantly the Princeton starts taking damage, including a torpedo wave from the four bombers the Ankara managed to launch last turn. Only because of the Tarawa's mass drivers does the Princeton somehow survive.
 Turn 7: With no torpedoes or missiles coming in against the Ankara, the heavy cruiser's mass drivers are FINALLY free to engage the Marine fighters as they mount a FOURTH heroic strafing attack. Fortunately, double-elite Marines are hard to hit, especially for the destroyer Samarra which has lost some of her sensors and mass drivers. Still, the Marines can only dodge so much, and five Corsairs are destroyed going in. The five survivors press the attack, three of which hit, two of which hit critical components. The Ankara FINALLY loses power in her port engines and reactors, the ship going dark (after no less than four aerospace strafing and torpedo attacks). The Princeton has kept her supporting fire position, executing a roll to present her starboard bow instead of port bow (which has been badly damaged). Again the Princeton is hammered, but she and the Tarawa don't flinch (and admittedly neither does the Samarra) as this battle finally draws toward a close.
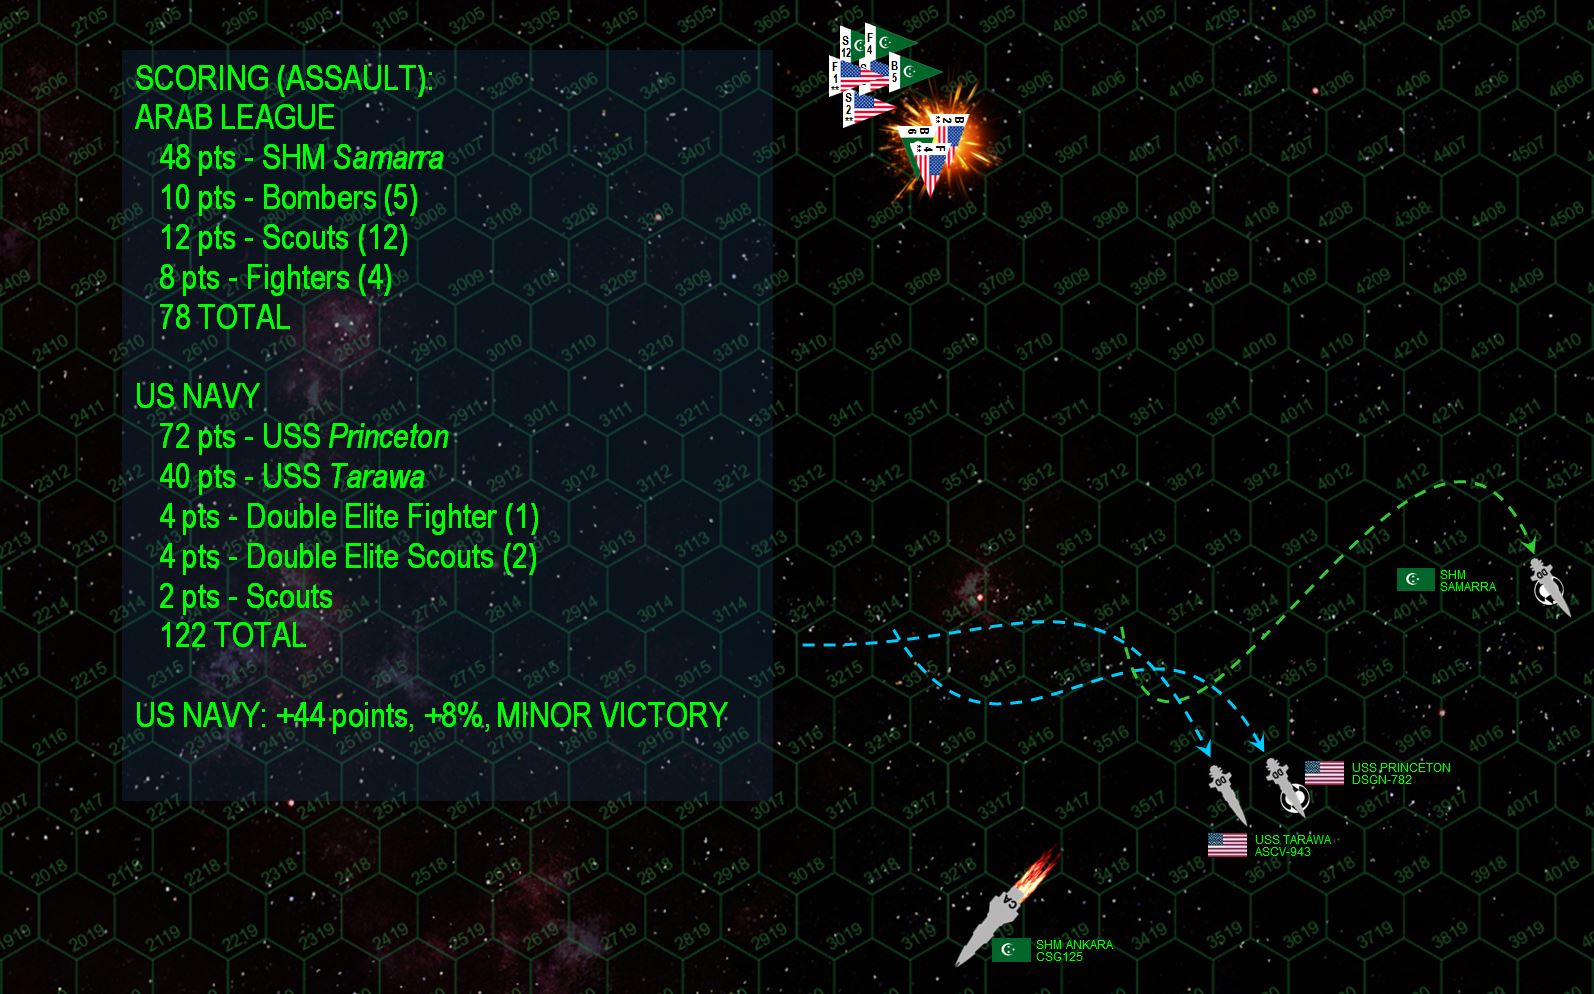 Turn 8: The Battle of Kayashenko 4 finally staggers to an exhausted, smoking, charred conclusion. Neither the Samarra or the Princeton have the guns, torpedoes, sensors, or maneuvering thrusters to cripple the other. The Tarawa cannot help, her torpedoes long exhausted. The surviving League fighters engage and shoot down the last two bombers of VMF/A-319, although their bombers are in turn mauled by the last American fighters and scouts. In the end, the crippling of the Ankara means this battle will TECHNICALLY shake out as a minor American victory, but only by the most slender of margins. Remember that in Darkstar, you must win by at least 5 percent or the game is considered a draw. The Americans have won by 8 percent, and only at the very end with near-suicidal fighter tactics and the very last of their torpedoes.
 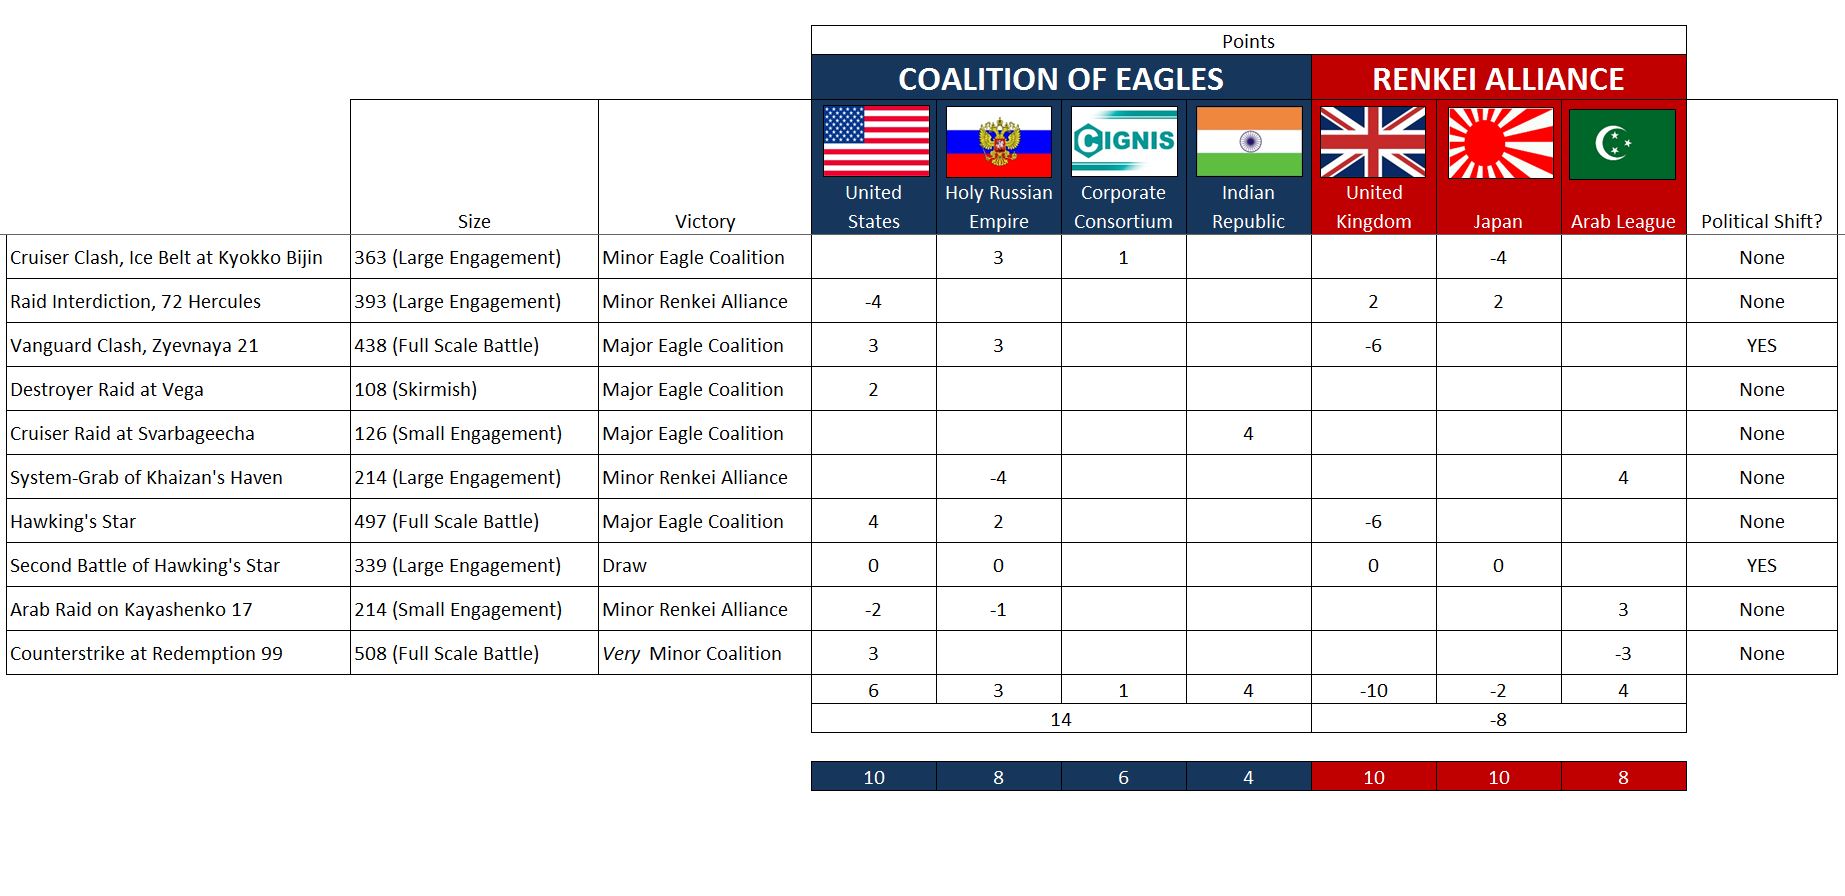 Given the razor-thin margin of ... ahem ... “victory” here, I’m giving the Americans only half score for a minor victory in a 500+ point battle (normally this campaign award is 6 points, not 3. I feel the playtesting of the Damascus class and Gettysburg class both went well, I hope it’s clear that the League didn’t “take it easy” on my commanders (again, I actually have commanders on both sides of this battle), and the Arab League is no longer on the precipice of leaving the war (actually good news for @muakhah, our Arab League player, who was in danger of “winning his way out of the war” if the Arab League accepted victory terms and signed a separate peace).
Galaxy Class (TNG) and Miranda-Soyuz Class (Star Trek II, IV)
Been building a few more ships for Star Trek’s conversion into Darkstar – expanding a little into the films and the TNG-era ships.
First up with have the Miranda-Soyuz class. This is the ship made most famous in Star Trek II: The Wrath of Khan as the unfortunate USS Reliant, which Khan took over and used to fight Enterprise.
Now this class is all over the place in both Alpha and Beta canon, and is seen as late as the TNG episodes which take place 80 years after the Star Trek films I-VI (these poor things were still fighting the Borg Cube at the Battle of Wolf 359 in 2366, 95 years after the first ships of the class were commissioned).
So I picked a few sites that had stats for them in FASA’s Star Trek Starship Tactical Combat Simulator game, looked at some of the earlier marks in the mid 2270s (roughly, the time of Wrath of Khan) and sort of “aimed for the middle” of what several sources were quoting.
I also rolled out the famous Galaxy class, of course the class we see in The Next Generation, embodied with Jon-Luc Picard’s USS Enterprise NCC-1701-D.
Of course, new weapons and systems tables have to be worked out for these Next Generation era ships. Calculations of power requirements, weight, and crew complement – which are usually based on damage, game effect, and other capabilities – go way off the scale if I used the same formulas and gradients as with TOS-era ships. Basically, if a 10-point TOS phaser in 2270 costs “X” in power, mass, and crew, then a 100-point TNG phaser was costing “X times 10” – meaning that TNG ships were actually coming out critically UNDERPOWERED.
Obviously, technology advances in 100 years, and systems become much more efficient. What a TOS-era ship can do with 10 points a power, a TNG ship can do with 5 or even less. Also, TNG ships generate 5-10 times more power to start with. End result, these ships are freakin’ powerful … and thus in Darkstar … they’re freakin’ expensive.
 First up, we have the USS Saratoga, Miranda-Soyuz Class (Mark II), commanded by Captain Margaret Sinclair-Alexander, as seen at the beginning of Star Trek IV: The Voyage Home. Yes, this is the ship thatis first disabled by the "Whale Probe" and yes, in beta canon and the novelization she IS rescued and recovered. She's roughly the same as the infamous USS Reliant we see Khan command in Star Trek II. Same Class XI designation as the Enterprise refit, but with a little less power (again, drawing from several sources here).
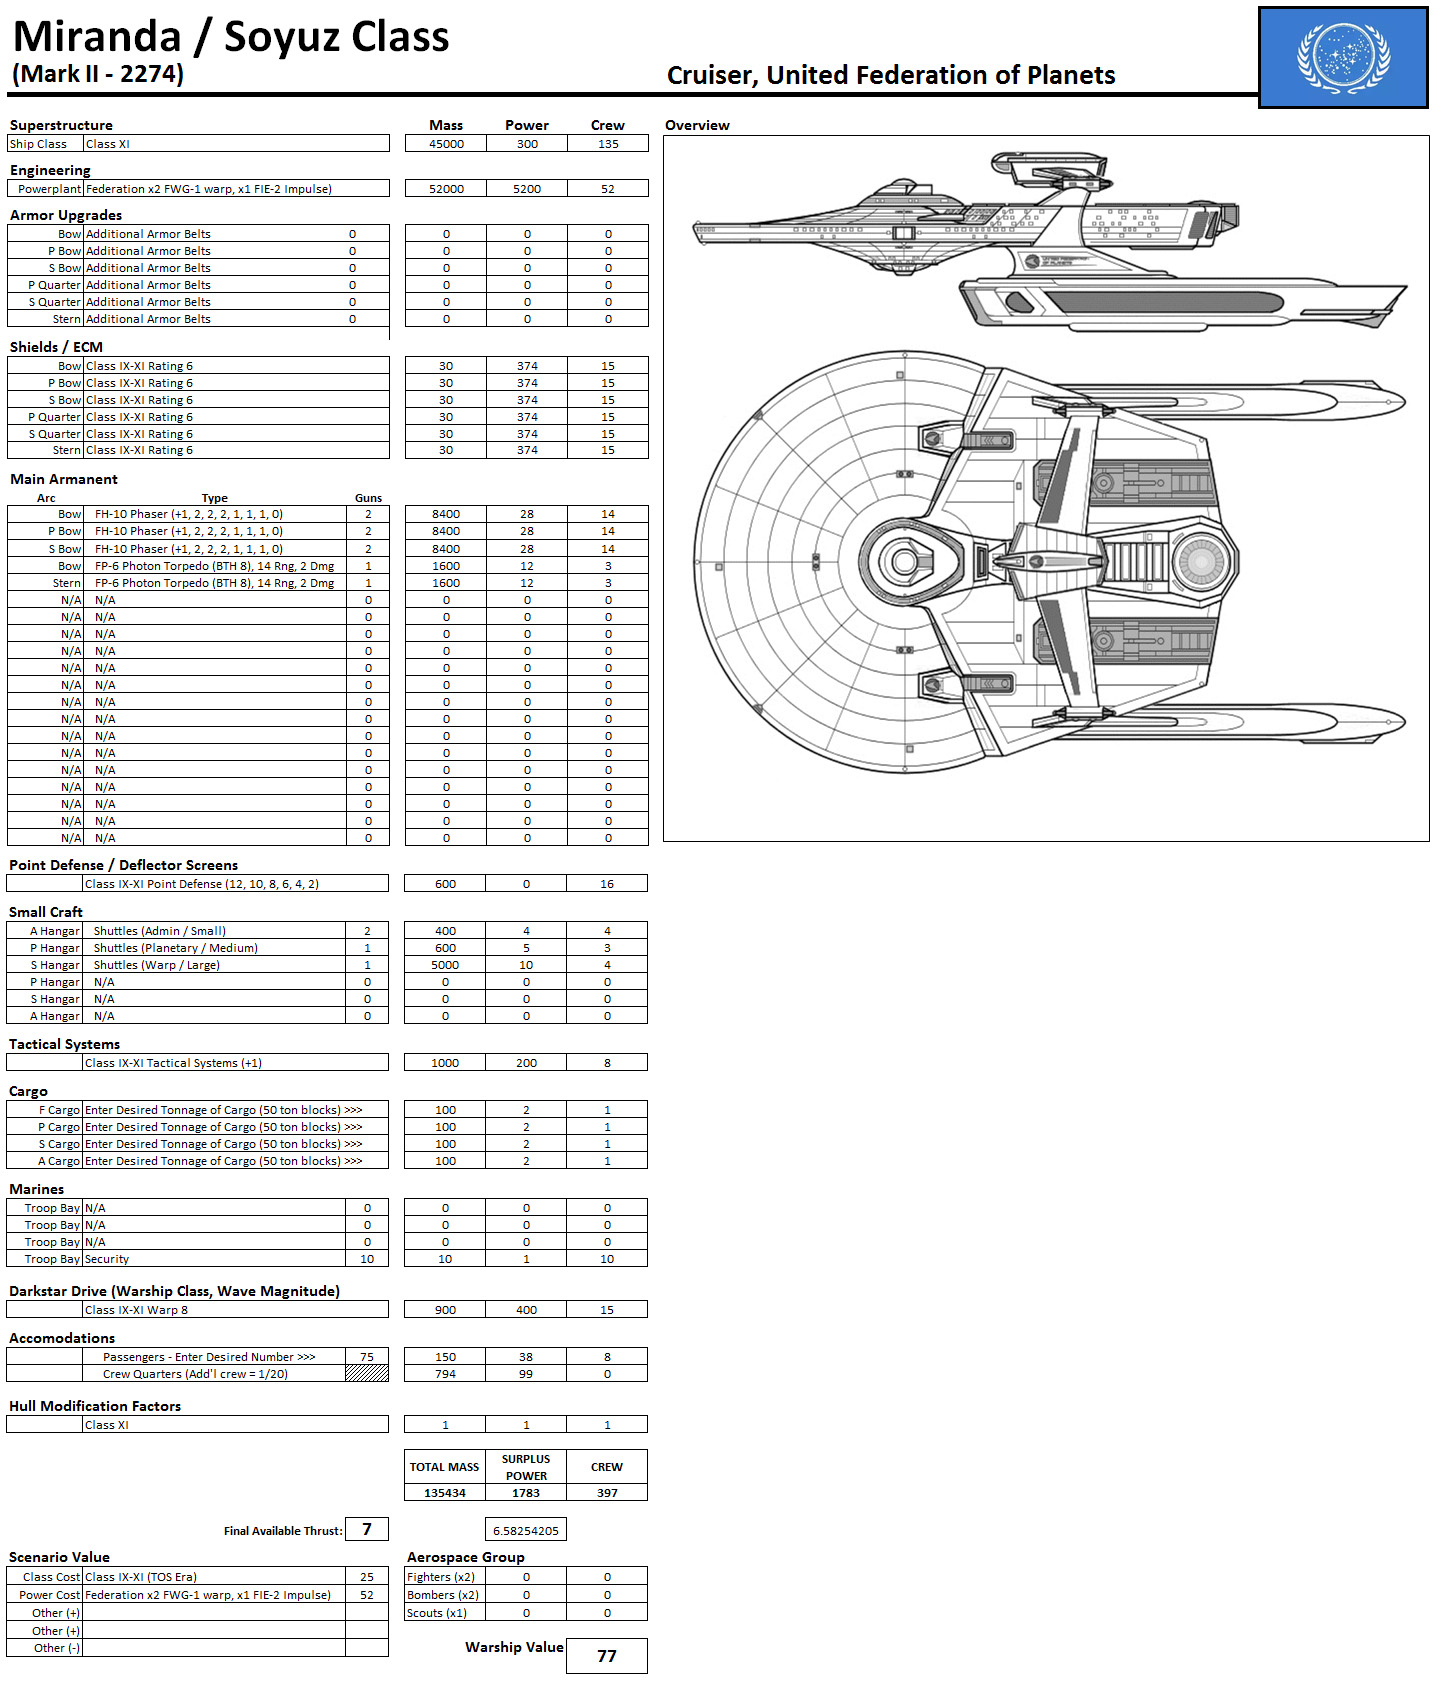 The design tables for my Miranda-Soyuz (Mark II) class cruiser. The Miranda-Soyuz would be continually upgraded through the next 80 years or so, this thing is the "Bird of Prey" of the Federation, for all the right and wrong reasons, upgraded and re-used in movies and TV shows until they literally couldn't agree on the name of the class. Slightly less powerful than her famous Enterprise 1701 (refit) opponent, with the tables producing a mass of 130,000+ tons and a crew of 390 or so ... pretty close to what we see claimed in FASA.
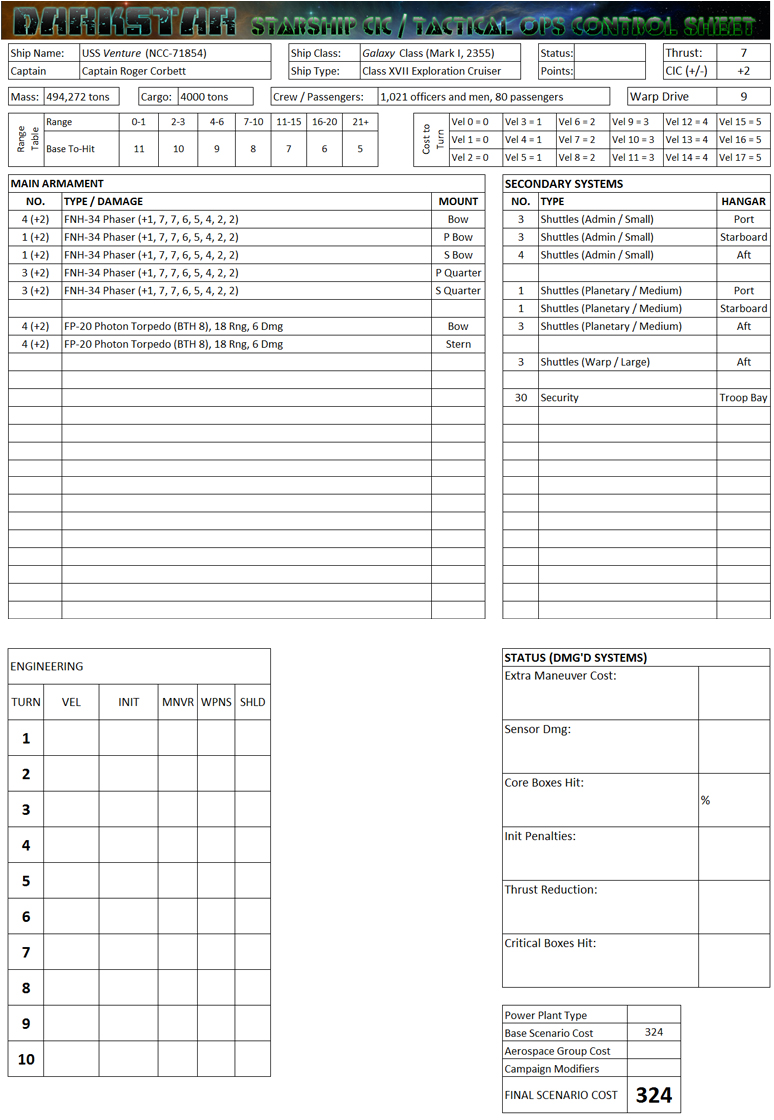 The Warship Record Sheet (WRS) for the Galaxy Class starship, as seen in Star Trek The Next Generation. Yes, she's considered a "battleship" in Darkstar - sources list her as weight well over 400,000 tons and she's a Class XVII ship). She moves like a frigate, though, with an incredible thrust of 7 (for a battleship!!!) She's also got a very high warp engine, and of course very powerful weapons. However, she's vulnerable. Like all Star Trek ships, she has very thin armor, usually a single torpedo against an unshielded target goes right through the hull (many examples of this on screen). Like all Star Trek ships, she's vulnerable because of how her warp nacelles are laid out. However, she is much more flexible, more accurate (better sensors) and FAR faster than anything in her class in Darkstar. And of course she has the price tag to match. This is the USS Venture, as seen in Star Trek: DS9, commanded by Captain Roger Corbett, friend of Benjamin Sisko.
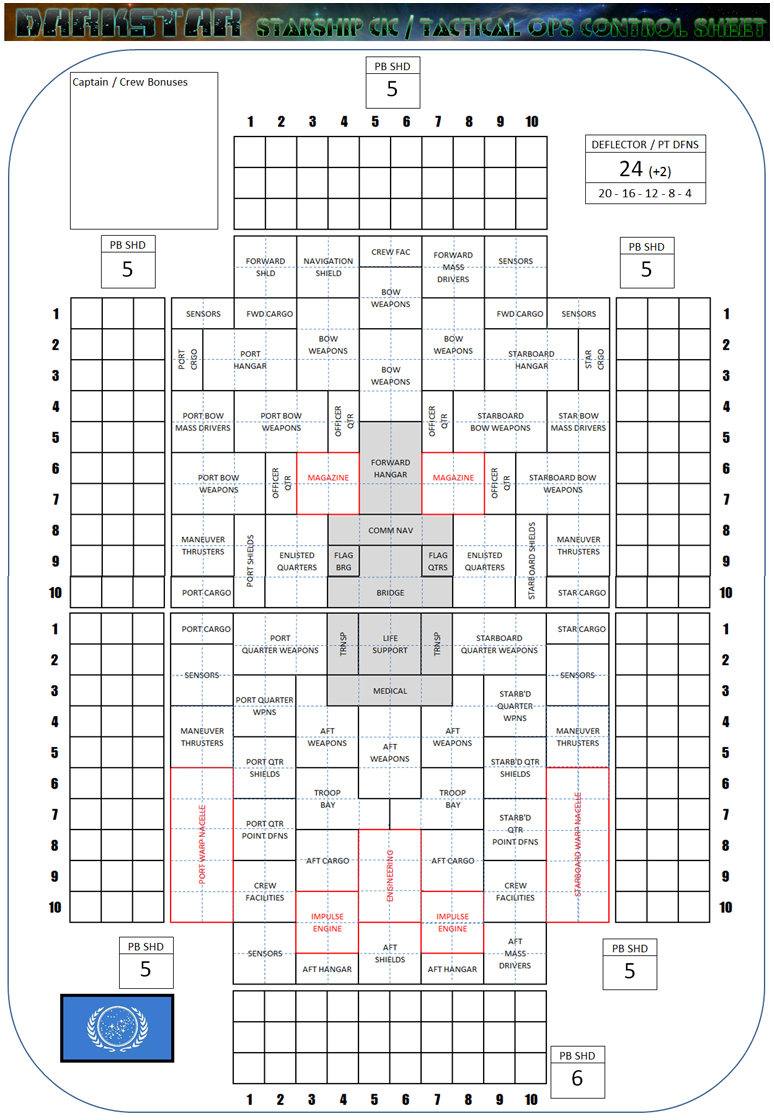 Page 2 of the Galaxy Class' WRS. Note the low shielding (well, low for a Star Trek ship). Again, the Galaxy class were pretty, comfortable, and packed with science labs ... but solid warships they were not. USS Yamato blew up in TNG. USS Odyssey was destroyed by the Jem'Hadar in minutes in DS9. USS Enterprise was eventually taken out by a 100-year old ship 1/20 her size once her shields were compromised. Subsequent Starfleet designs like the Defiant, Akira, and Sovereign classes were much leaner, tougher, and meaner as Star Trek history moved into a much more combative period against the Klingons, the Dominion, the Borg, the Udeen (species 8472), and others.
 Bloody Raid at Kayashenko 17
FROM: UNITED NATIONS REGIONAL COLONIAL CENTER
19:55 SOL GMT, 15 APRIL 2521
BREAKAUTH: 181072.18J
CLEARANCE: SECRET (NATIONAL)
**UNITED NATIONS COMMUNIQUE**
Even as major naval engagements continue to unfold along the spinward shoulder of the Hercules Rim (specifically at the embattled Hawking’s Star colonies in the HR6806 system), simultaneous engagements are reported along the Hercules Rim’s coreward shoulder as well. Although perhaps smaller in scope, these skirmishes are perhaps even more ferocious in intensity – proof that while the Americans, Japanese, Russians, and British throw the bulk of their firepower into the Hawking’s Star maelstrom, other powers are taking the opportunity to strike at the “back door” of the Hercules Rim warzone.
Recently, the “Black Dragon” rebels of the self-proclaimed Khitan-Tunguska Free State sought to take advantage of American and Indian preoccupation in the Hercules Rim. Accordingly, the Black Dragons launched a number of long-range raids out of the remote Khaizan’s Haven colony (14 Hercules system), striking at American outposts at the Port Halsey at Vega (Alpha Lyra system) and the Indian Bhogavati colonies (HD176051 system). Both of these raids came to ruinous failure, one at the hands of Battlegroup Shalya of the Indian Republic, the other thanks to the American destroyer USS Oriskany.
Forced not only to make an ignominious exit from the war, the Black Dragons had to vacate the 14 Hercules system entirely under threat of American or Indian reprisal. Due to the vast distance from Port Halsey or Bhogavati, however, the Americans and Indians were not the first power to reach 14 Hercules … it was their allies, the Holy Russian Empire, with a cruiser sortie from their colonies at Krasnaya Nadhezda (72 Hercules).
However, even the Russians found they were not the first to lay a new claim on Khaizan’s Haven. A new player had joined the war, the Arab League, their Al Fihri battlegroup dealing the Russians a sharp defeat and chasing them out of the 14 Hercules system. Running up their flag at the Khaizan’s Haven colony and formally joining the “Renkei Alliance” with the British and Japanese, the Arab League’s successes were a welcome respite from the recent setbacks suffered by the Alliance.
Not content to rest on their laurels, the Arab League has struck again at the Russians, determined to help the Renkei Alliance win the Third Hercules War and, in the bargain, win a stable and recognized mandate for their new 14 Hercules colony.
Wary of overconfidence, the Arab League’s strike does not come directly at the major Russian colony and naval base at 72 Hercules. Rather, it strikes at a smaller outpost in the United Nations “open system” of Redemption (99 Hercules), specifically at the 17th moon of the massive Russian-owned “Kayashenko” gas supergiant.
The Holy Russian Navy naturally has a presence here, but they aren’t alone. With them are a pair of US Navy destroyers, USS Valley Forge and Vincennes, part of a battlegroup originally tasked with showing an American presence in Khaizan’s Haven, now tasked with lending weight to American claims for a share of the UN mandate in Redemption / 99 Hercules.
Americans and Russians: Jim (Oriskany)
Arab League: @muakhah
214 points: RAID
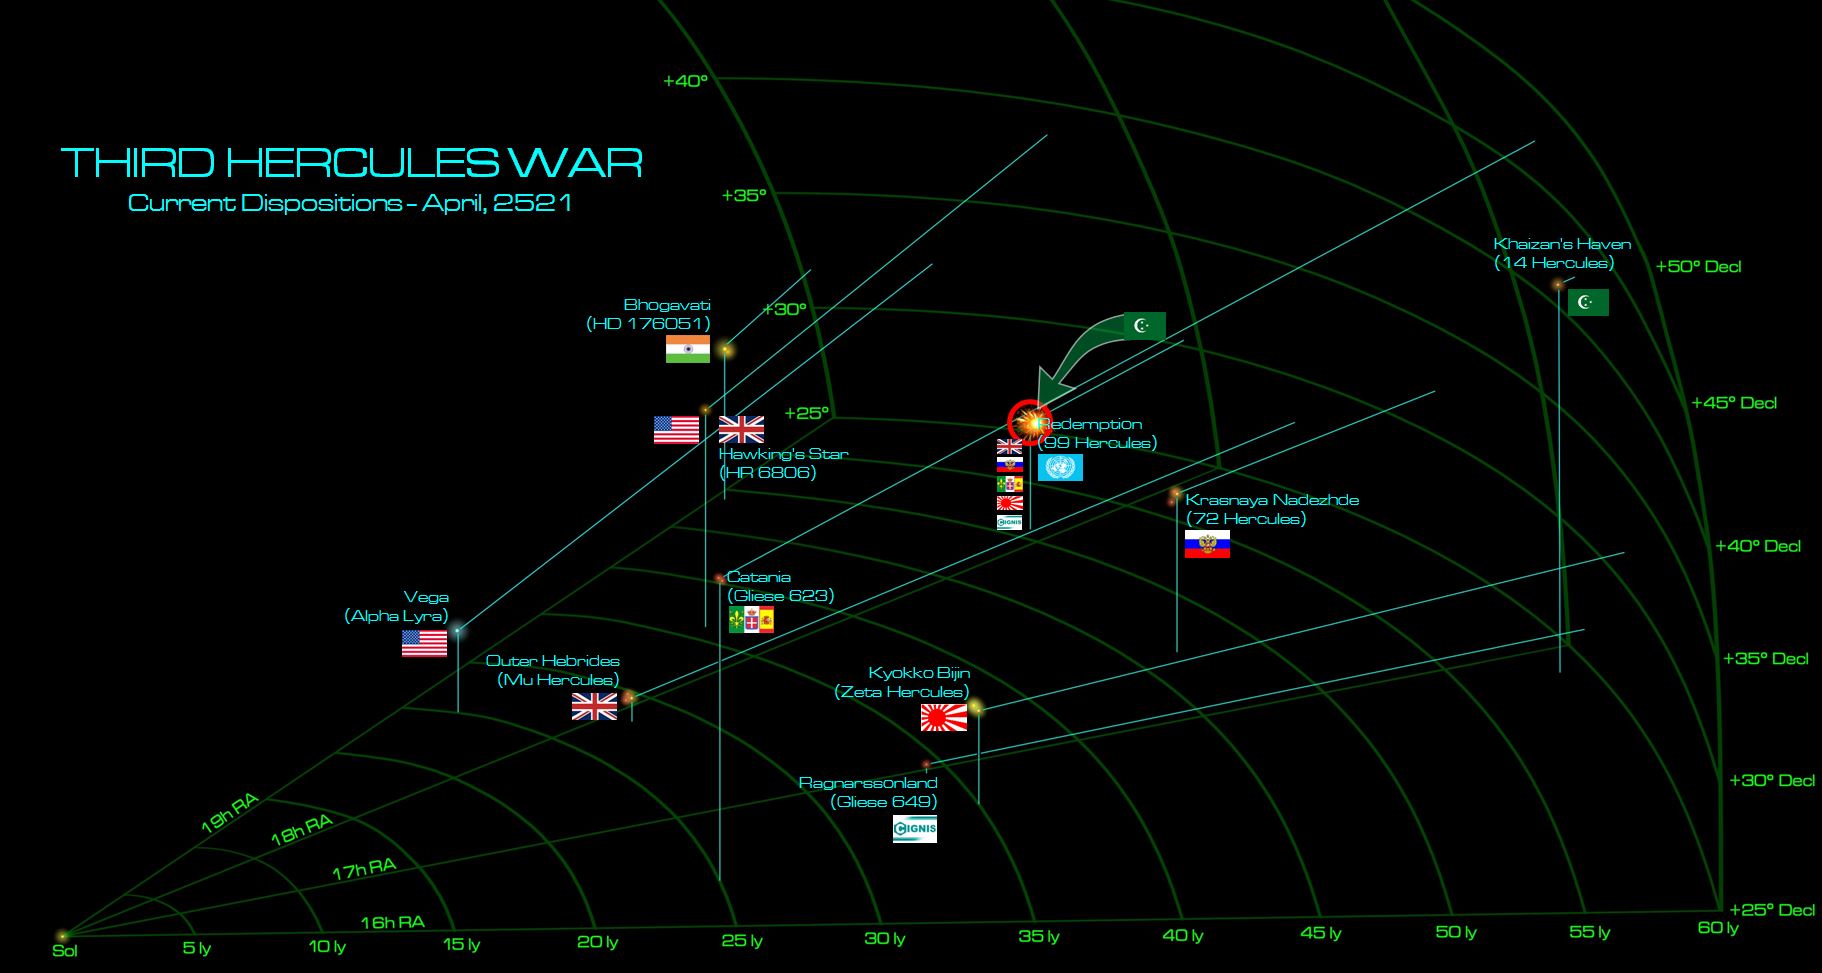 Here we see the current state of the Third Hercules War. While the spinward shoulder of the Hercules Rim continues to see battles focused on Hawking’s Star, the Arab League has launched a strike at Imperial Russian holdings in the UN Mandate of the Redemption (99 Hercules) system. While the Americans have no claim in 99 Hercules yet (part of the reason they’re fighting this war), they’re here to help their Russian allies, and perhaps convince the UN to lease them holdings in 99 Hercules in the process.
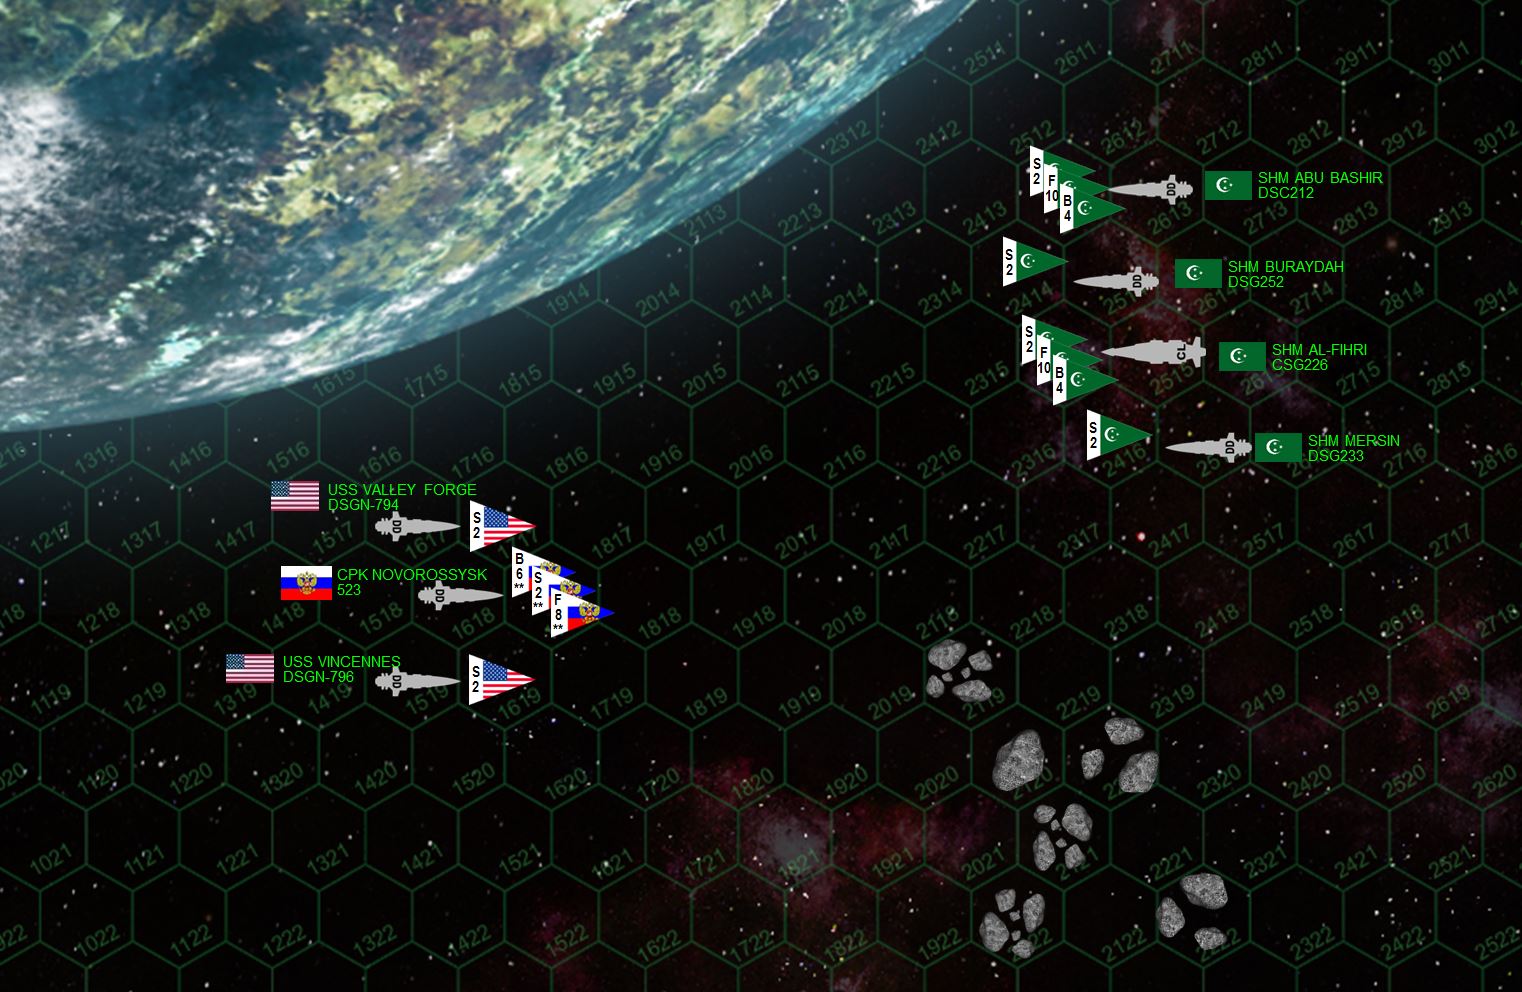 Here is the match up. As we saw at the Second Battle of Hawking’s Star, the Americans and Russians are fielding heavily-upgraded, elite units against a relatively new ... but much larger ... enemy battlegroup. The Americans have the nigh-legendary destroyer USS Valley Forge, detached from Task Force Oriskany, and her sistership USS Vincennes from Task Force Liberty. The light strike carrier CPK Novorossysk mounts a small but very elite aerospace strike group, one of the best in the Holy Russian Navy. On the other side we have the Arab League flag ship SHM Al Fihri, a curious hybrid design, part light cruiser, part light fleet carrier. Two Basra class destroyers (Mersin and the new Buraydah) escort her, along with the Khalifa class light carrier SHM Abu Bashir. Altogether the Arab League outguns the Russo-American battlegroup about 2:1 in both warships and aerospace, but crew experience, technology, and speed could easily tip the balance here.
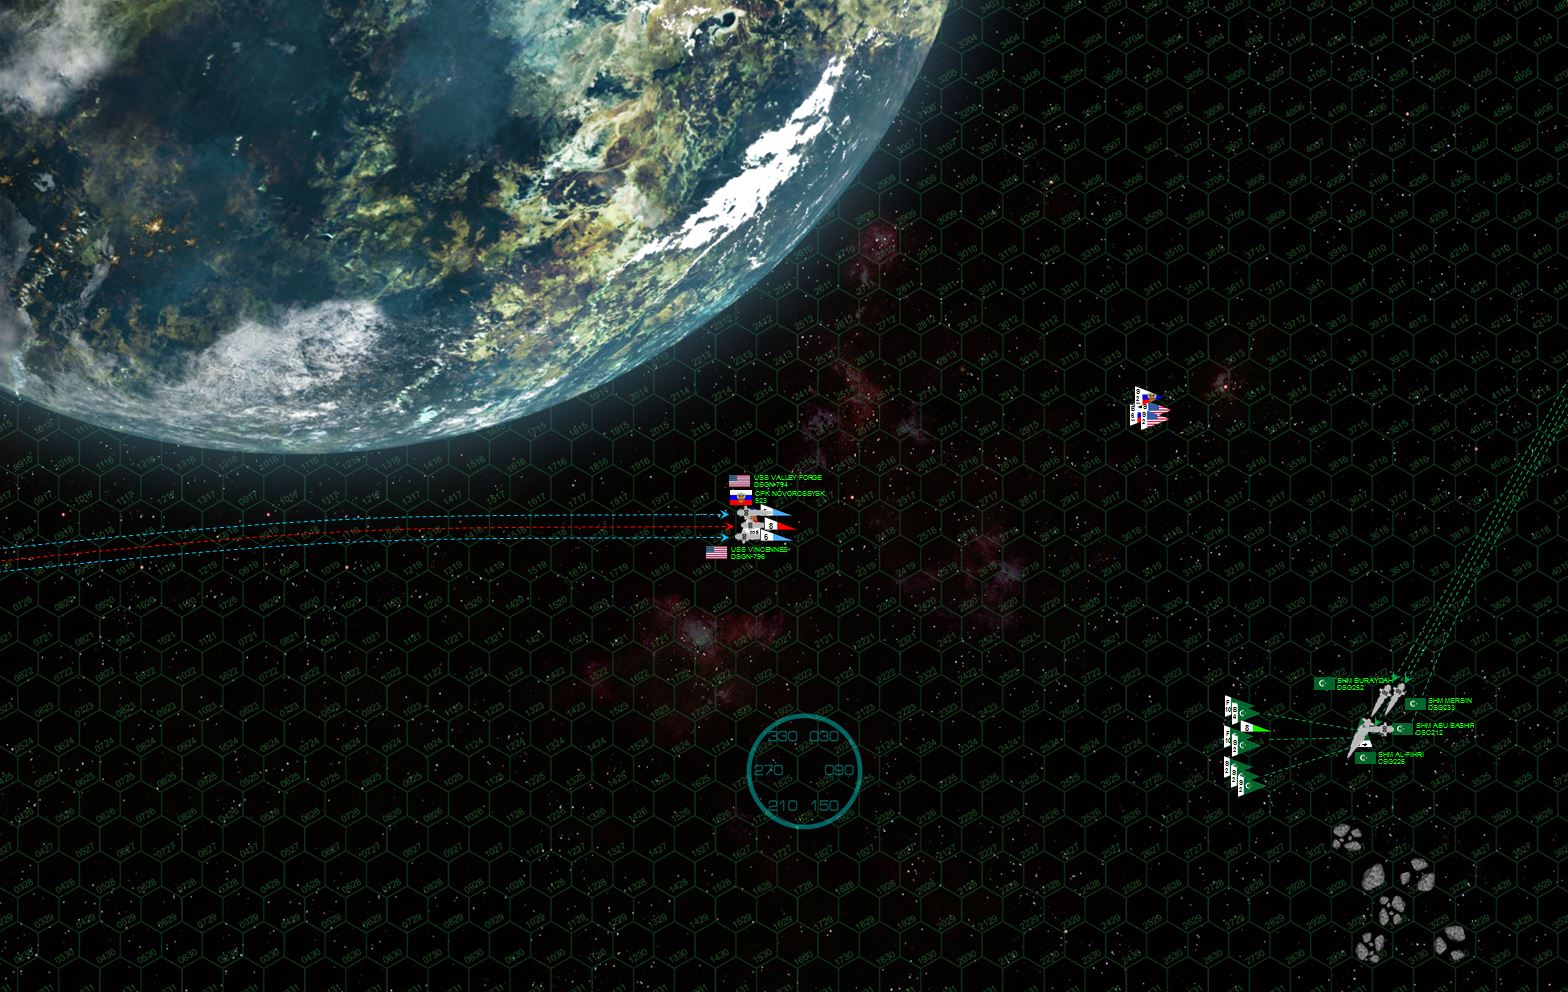 The Americans and Russians set a very fast intercept approach, straight at the enemy, their vector refracted only by the gravity of the Kayashenko 17 moon. The League cuts to port and presents a starboard broadside, launching fighters from their two carriers and ranging out the defenders with long-ranged laser and EPC fire.
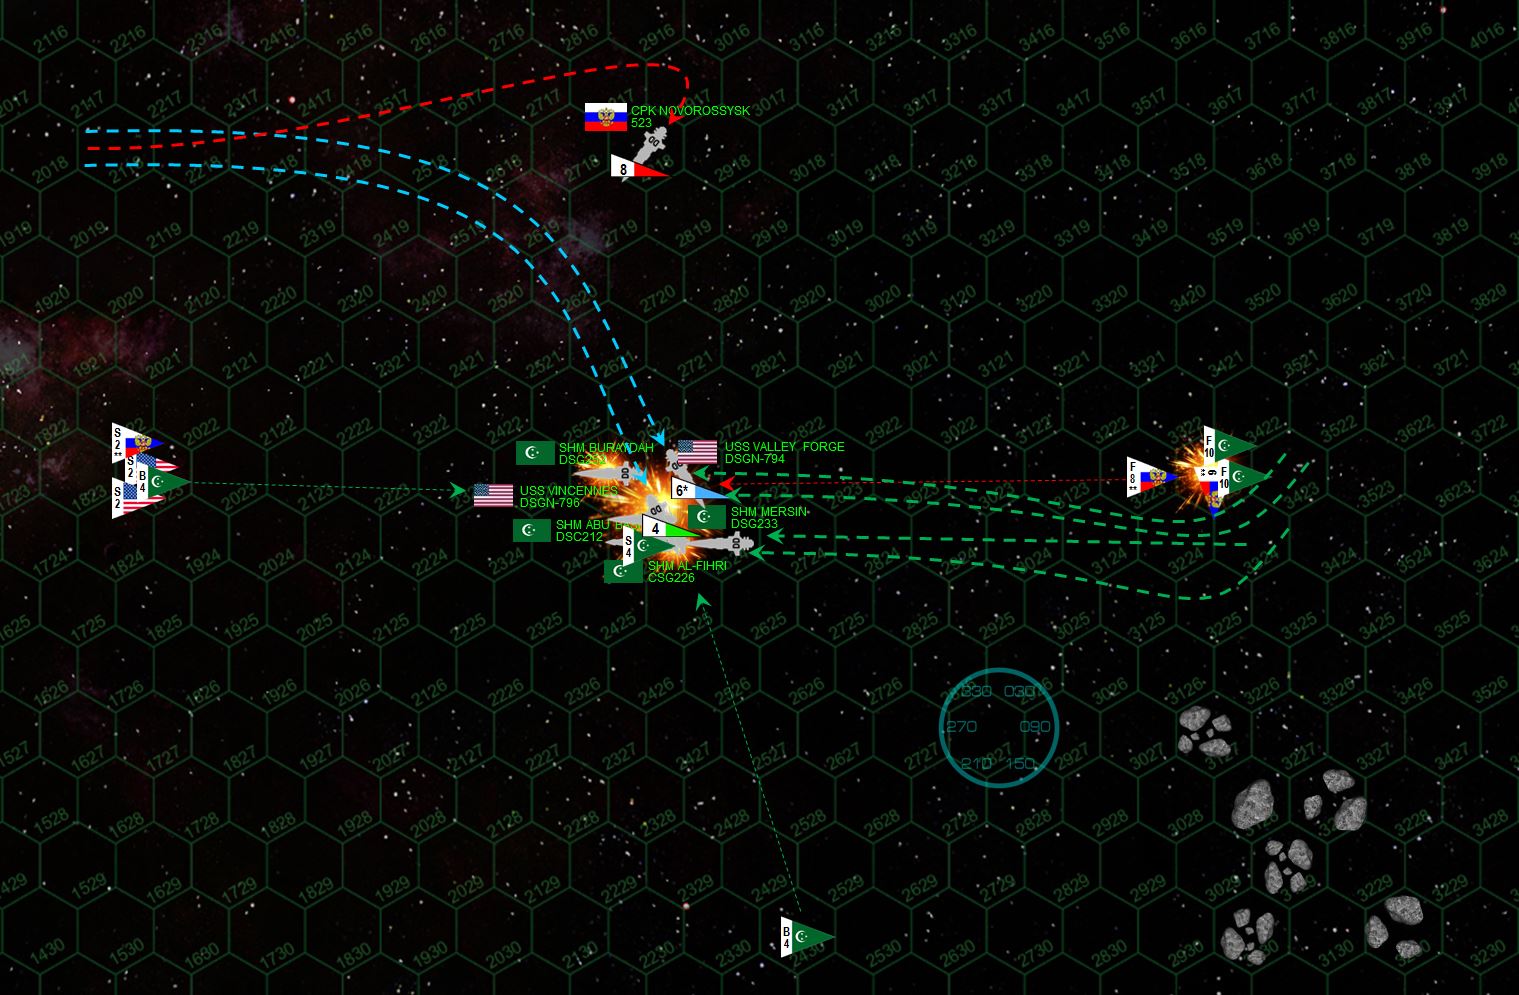 Things get very nasty ... very fast. As the SHM Al Fihri and Abu Bashir cut toward their enemy, the USS Vincennes re-accelerates, making a high-speed turn to starboard to cut directly across the Al Fihri’s fantail at point-blank range. The aggressive destroyer Buraydah darts forward to cut across Vincennes’ stern. Valley Forge sweeps down to cut across Buraydah’s stern. Mersin rushes forward to put a broadside across Valley Forge’s bow. By now the Al Fihri, Abu Bashir, and Novorossysk have completed their aerospace launches, with the Russian Tupolev Tu-97 “Zvesburya” (Star Storm) bombers and Mikoyan-Guyevich MiG-103 “Tunguska” fighters releasing a hail of torpedoes and missiles at the stern of the Al Firhi, along with a swarm of American Mark 48 gravitic torpedoes launched from the Vincennes and Valley Forge. Arab “Mylekinir” (Fire Angel) fighters scream into the Russian bombers, and elite or not, all the Russian bombers are shot down even as they release their ordinance. Arab “Demkikham” (Vengeance) bombers fire off a two-pronged hail of torpedoes at the Vincennes. It’s an incredible release of violence released into a volume of space just a few dozen kilometers across.
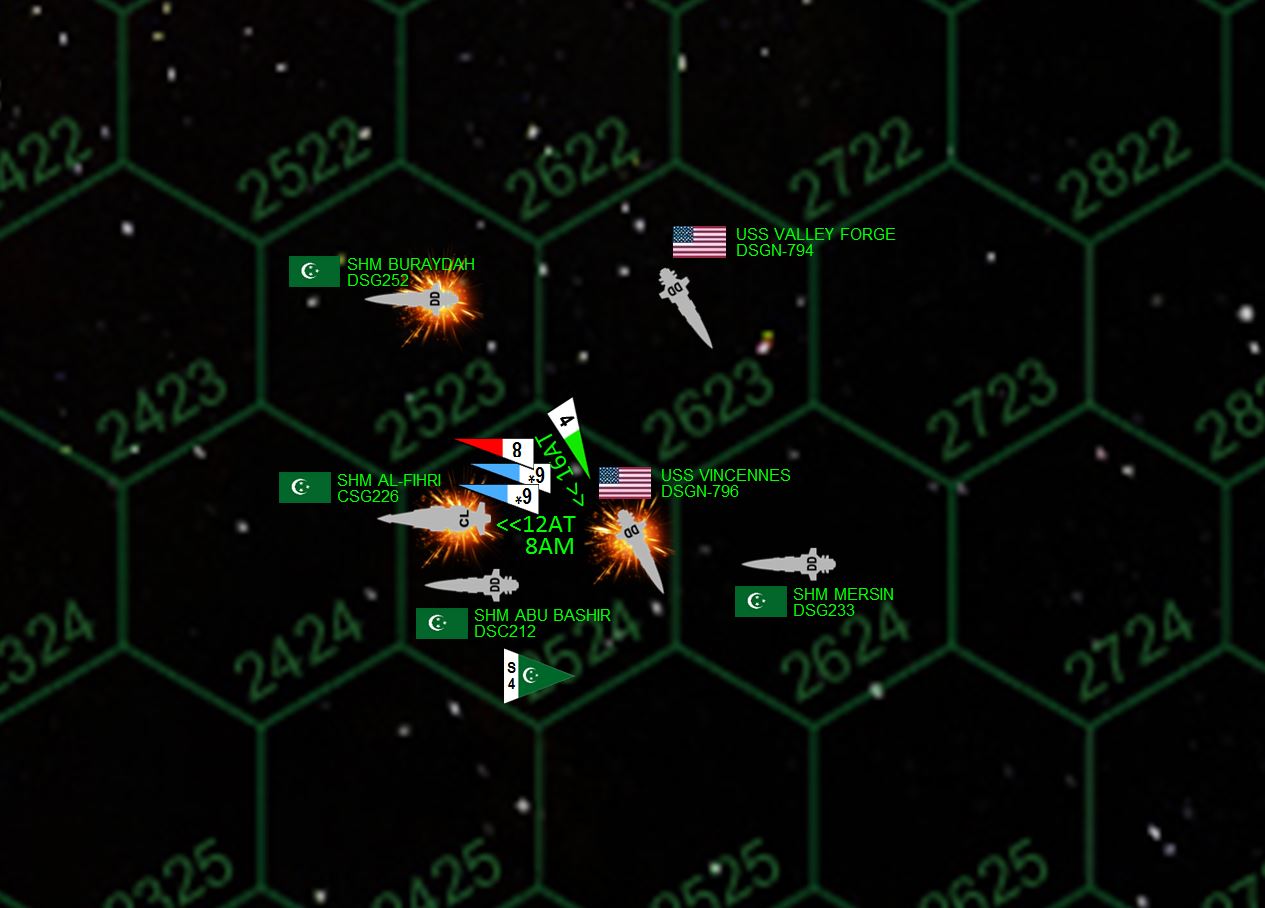 Here’s a zoom-in of what’s happening. The Al Fihri reels under the impact of torpedoes and missiles, even as her aft batteries of 8MgKv lasers and EPCs slash into the Vincennes’ starboard bow. An instant later the Vincennes’ broadside of 5GW rail guns and 6MgKv lasers slash open the already-wrecked stern of the Al Fihri, backloading two engines and blowing her port reactor clean out of the hull. The Al Fihri loses power, crippled. An instant later the Vincennes is struck by the hail of Arab torpedoes and missiles, and likewise loses power ... even as the Buraydah fires a point-blank broadside into her stern as well. The Vincennes’ reactors instantly go critical, but the engineering crew fails to eject the reactors in time. The ship actually DETONATES, killing at least half her 249 crew, including her skipper, Commander Yvonne Alliston. The blast wave smashes into the Abu Bashir, the Valley Forge (which is almost crippled as a result), the already-crippled Al Fihri (almost setting off a SECOND explosion), the Mersin, and the Buraydah the set off the explosion in the first place. Four Arab League scouts are also lost in the blast. The Valley Forge fires a broadside that cripples the Buraydah, even as she is hammered by the Buraydah’s aft guns, the blast from the Vincennes, and the broadside of the Mersin. In short, two ships are crippled here, one destroyed outright, and EVERYONE damaged with the sole exception of the carrier Novorossysk, which has wisely kept a more sensible distance from this collision.
 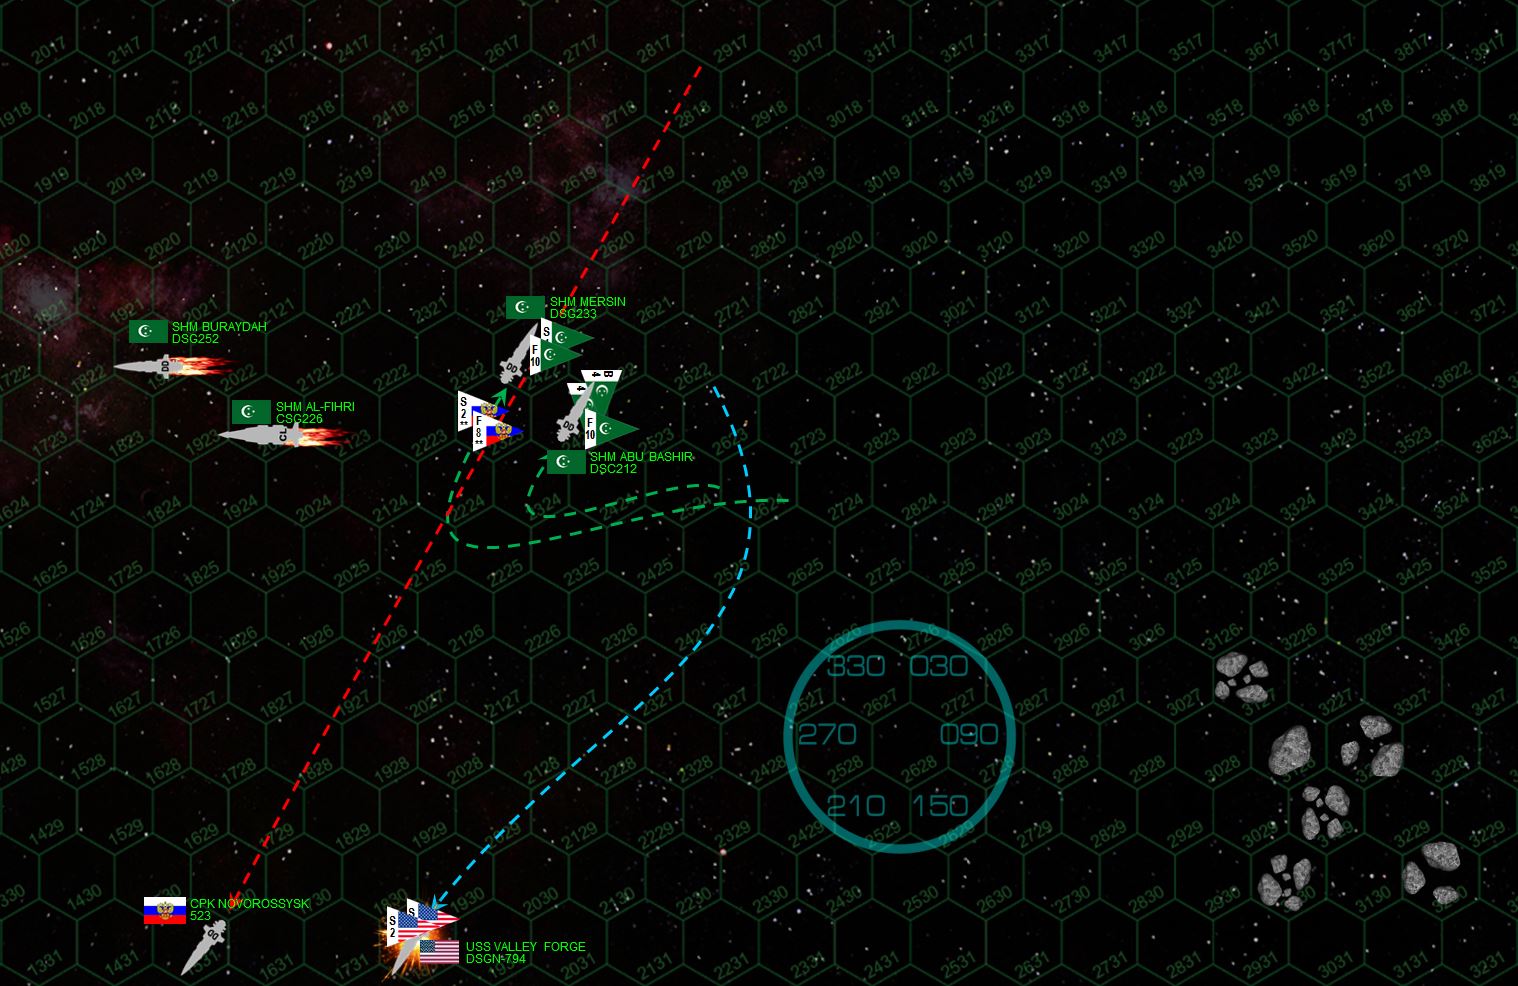 With her nose and port bow smashed open, Commander Garrison Heathe of the Valley Forge is forces to break off the engagement. He makes best steam away from Kayashenko 17, the Novorossysk racing after her to provide mass driver cover from a potential missile strike of Arab fighters (and also not to be left behind). But the Arab commander, Captain Rashid al-Maghrebi, is playing it safe. He pulls his fighters back to defend his two remaining ships from torpedoes fired by the Valley Forge and Novorossysk. The gambit pays off, the last Russo-American torpedo strike is defeated, the Russian strafing attack doing some damage to Mersin’s starboard engines, but fortune smiles on the Mersin and she does not lose power.
  This raid at Kayashenko 17 has been small, sharp, fast, and incredibly brutal. The loss of USS Vincennes comes as a startling blow to the Americans, the worst single loss of life suffered by the US Navy (110 officers and men) since the opening days of the Xi Scorpio War. The Arab League destroyer SHM Buraydah will also be lost, her skipper forced to evacuate and scuttle the ship (detonating her reactors) before she is captured by Russian assault marines four hours later.
 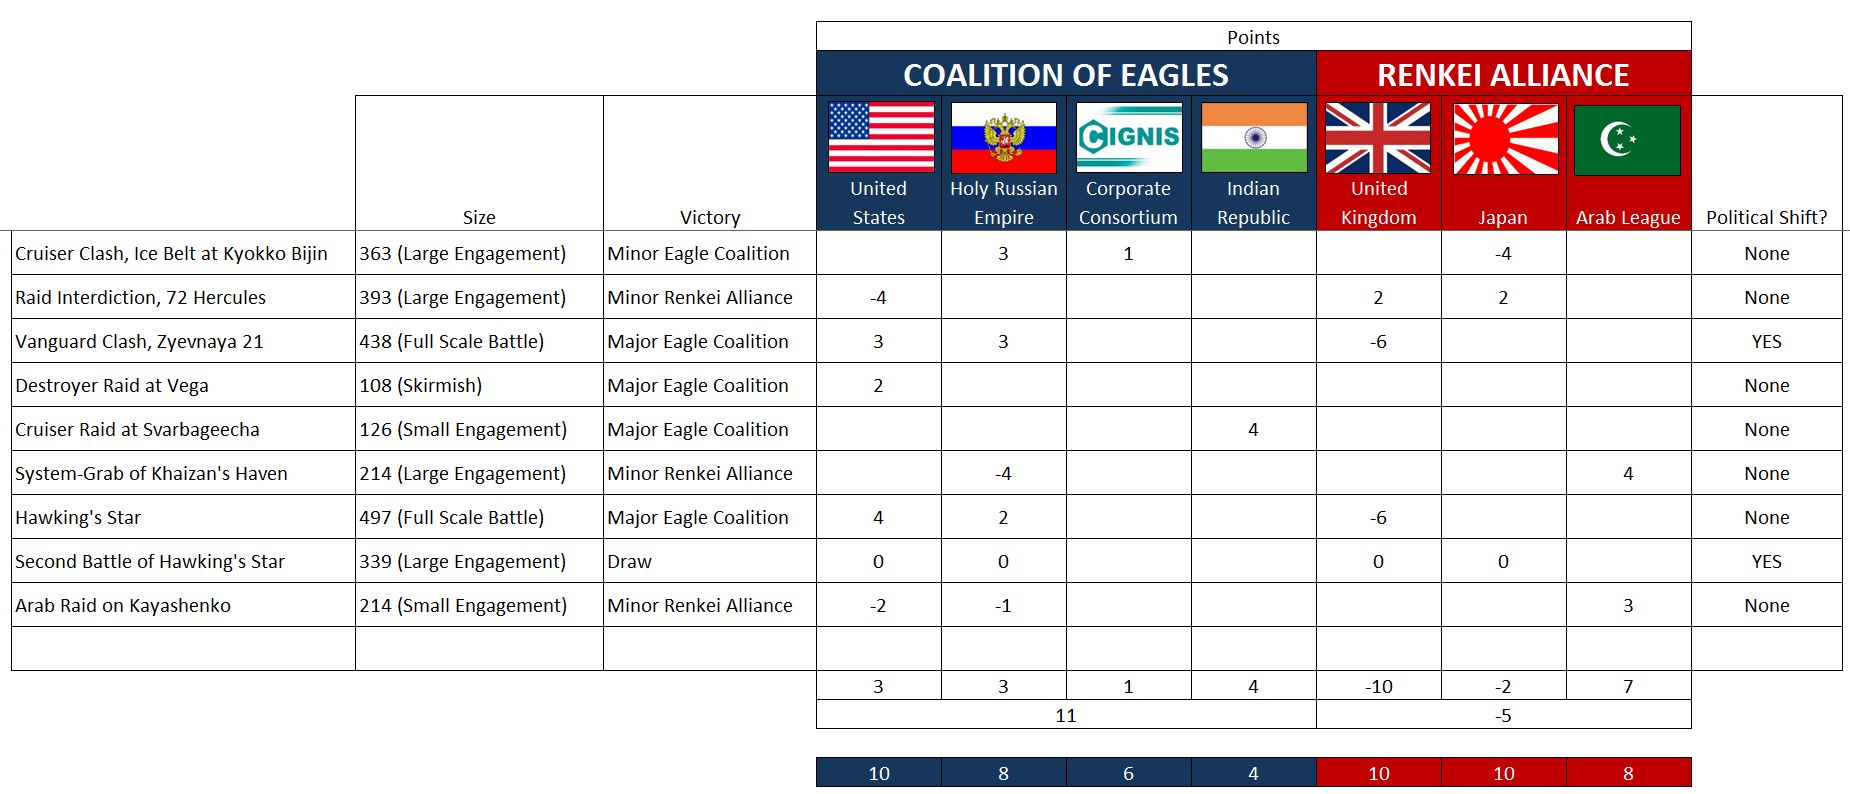 An updated campaign chart, tracking the “victory level” of the factions involved in the war. This 3-point victory actually puts the Arab League AHEAD of their initial campaign requirements for victory (different factions have different victory / defeat thresholds depending on their government’s commitment to the Third Hercules War). So technically, this should be it for the Arab League. They’ve won, and their commanders receive “cease-fire” orders from the League’s regional governor. The Americans and Russians have been forced to recognize their claim on the Khaizan’s Haven system, meaning the Arab League would accept peace and end their participation in the war. However, @muakhah wants to keep playing these captains ... :D ... and player fun trumps spreadsheets. So the Arab League’s “commitment threshold” is increased by 3 points, meaning their government TURNS DOWN the terms offered by the Russians and Americans. To balance the campaign chart, the Coalition of Eagles must also gain three commitment threshold points (putting both alliances at a total of 28 points). I assign the three new points Russians (1) and especially the Corporate Consortium (2), based on the proximity of their holdings at Krasnaya Nadhezda and Ragnarssonland (72 Hercules and Gliese 649, respectively), reflecting their hardening stance toward Arab League aggression and refusal to come to peace terms.
 SECOND BATTLE OF HAWKING'S STAR
FROM: UNITED NATIONS REGIONAL COLONIAL CENTER
13:10 SOL GMT, 06 APRIL 2521
BREAKAUTH: 181072.18J
CLEARANCE: SECRET (NATIONAL)
**UNITED NATIONS COMMUNIQUE**
Reports continue to come in from the spinward shoulder of the Hercules Rim, where another major battle has taken place in the Hawking’s Star (HR6806) planetary system. These British colonies have been the epicenter of intense naval action for over a month, ever since a spectacularly successful raid by a combined carrier-cruiser task force of the United States and the Holy Russian Empire all but shattered the Royal Navy in the system.
Commanded by Captain Zachary Irons aboard the Endeavor class light fleet carrier USS Liberty, this “raid” might’ve taken the Hawking’s Star system outright and ended the Third Hercules War in a single bloody afternoon. However, this strike had been planned and executed as a raid only, and neither the US or Russian navies had the planetary assault ships in position to capitalize on the success. In short, the degree of Task Force Liberty’s success in the First Battle of Hawking’s Star was as much a shock to the American and Russian commanders as it had been to the unfortunate British.
As it was, the closest US Marine assault ship was 13 light-years away at Alpha Lyra (Vega), while the closest Russian base capable of supporting any such “take and hold” invasion was well over twice that distance.
[Game Terms: When setting up a Darkstar game, players agree to assess victory points as either a RAID or an ASSAULT. A MAJOR VICTORY (+40% VP margin) in a game of sufficient size (at least 300+ points = “Large Engagement”) determines ownership of the star system. In our last game, Damon and I agreed to a 497-point RAID, which I was then fortunate enough to win by well over a 40% margin. Had this been an ASSAULT, the campaign rules would have given my Americans and Russians possession of the Hawking’s Star colonies. But since the game had been conducted as a RAID, with different victory point priorities driving different game strategies for myself and Damon as players, it wouldn’t be fair to have the Americans and Russians retroactively TAKE the system, despite the victory margin.]
However, once the extent of Task Force Liberty’s success became clear, US Naval Command at Alpha Lyra were quick to act. Immediate orders were dispatched to the Saipan-class planetary assault ships USS Belleau Wood and Iwo Jima, carrying 2nd and 3rd Battalions / 5th Marine Regiment. At a ninth-magnitude Darkstar Wave, they reached the Hawking’s Star system in 22 days. In that time, the USS Liberty had been pulled back to Vega, while the light carrier USS Tarawa was sent in her place along with the newly repaired San Antonio class light cruiser USS Spokane (Captain David Cheatham). Their Russian allies were also able to get a Kutusov class light carrier (CPK Gavrilov) to Hawking’s Star, determined to participate in what was hoped would be a war-winning victory.
Russo-American optimism was not unfounded. Things hadn’t gone well for the Royal Navy in the Third Hercules War, already there were calls for a change of government in the House of Commons or at the very least, an immediate end to British involvement in the war. Now, with the Belleau Wood and Iwo Jima carrying 2000 Marines, grav tanks, APCs, orbital assault boats, and “Avenger” ground attack bombers in the protoplanetary belt of Hawking’s Star, and a combined Russo-Amerian cruiser-carrier force again poised to strike to the heart of the system, it seemed as if British fortunes in the Hercules Rim were about to come to an abrupt end.
However, the British had also used the previous three weeks to maximum effect. While the heavy cruiser HMS Agamemnon and light cruiser Retribution would still be under repair at the nearby Outer Hebrides (Mu Hercules) system, the light fleet carrier HMS Vindictive and destroyer HMS Sheffield would be ready to re-sortie again into the core orbital zones of Hawking’s Star. More good news arrived in early April when the advanced Japanese heavy cruiser IJN Kama and strike frigate IJN Urakaze arrived from the Kyokko Bijin (Zeta Hercules) system. Together, this Anglo-Japanese force just might be able to stop the Russo-American task group determined to end the war (at least for the British) once and for all.
The question came to a head on 6 April, 2521 … when the two forces collided at Eastman’s Manor, outermost terrestrial planet in the Hawking’s Star core orbital zones.
Americans and Russians: Jim (Oriskany)
British: Damon
Japanese: Rasmus
339 points: ASSAULT
 Here we see the current state of the Third Hercules War. Despite intermittent victories and draws, a series of Royal Navy defeats, first in the Krasnaya Nadhezda (72 Hercules) system, and later in their own Hawking’s Star colonies, have seriously compromised British interests in this region. Simply put, the CANNOT lose here, or their government will sue for peace on American, Russian, and Indian Republic terms.
 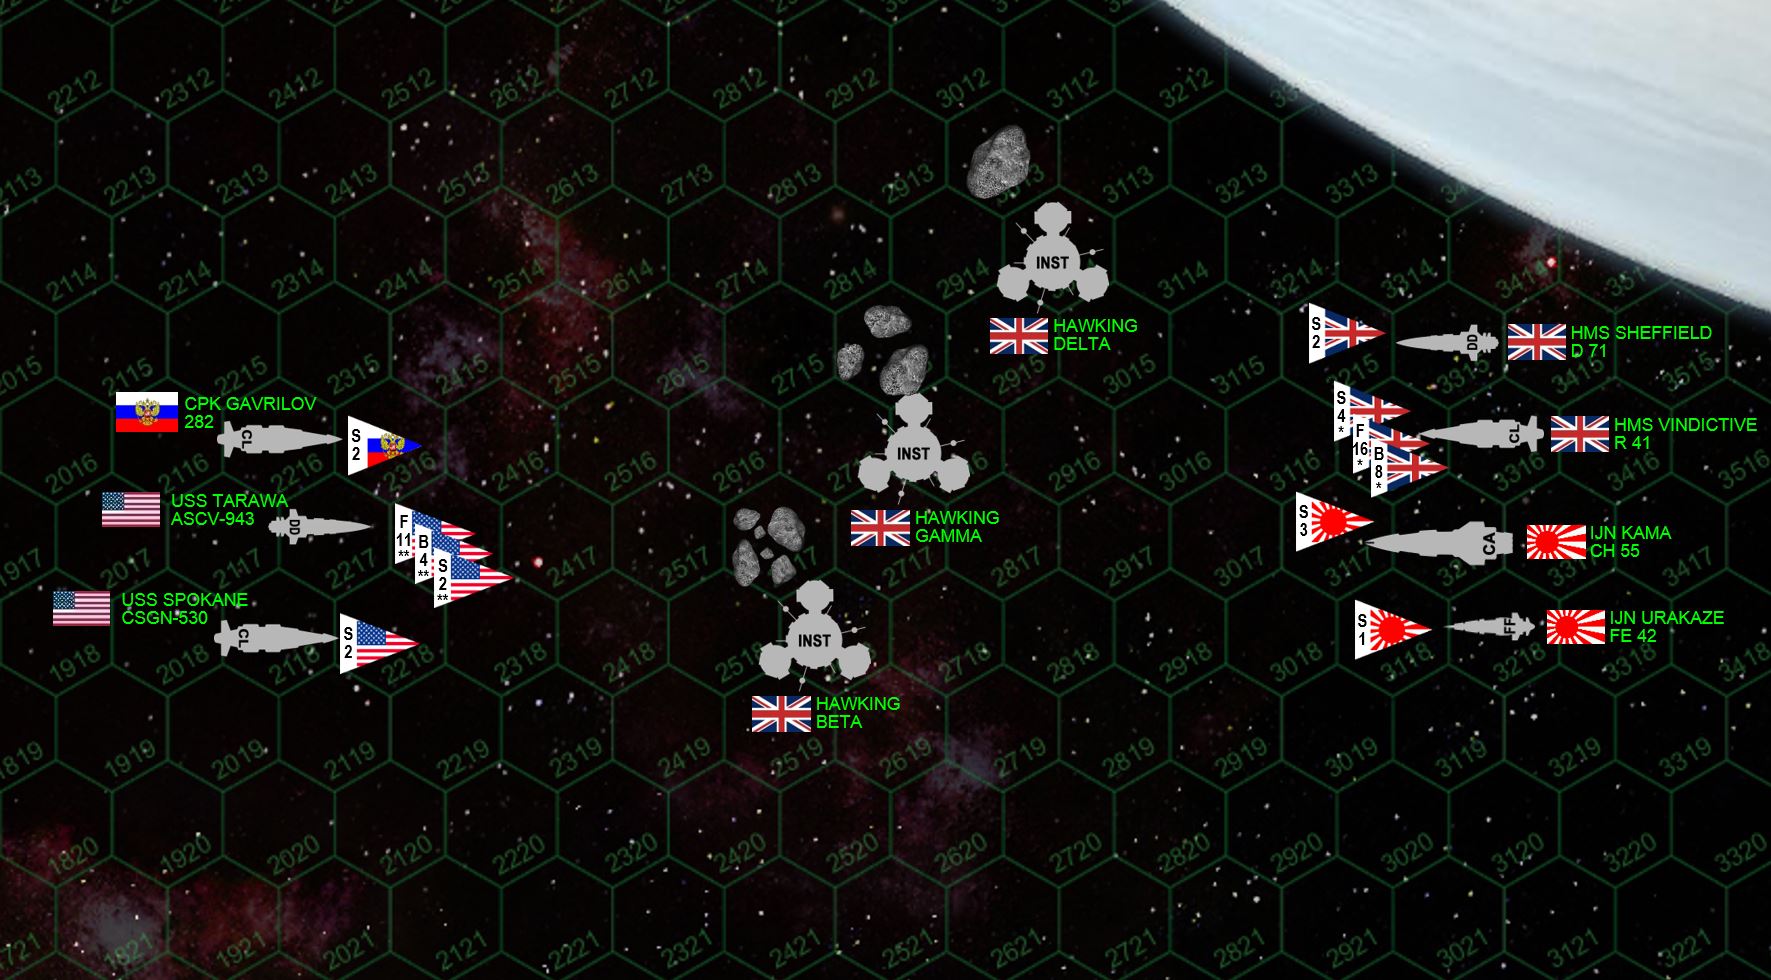 Here is the matchup for today’s game. The Hawking Beta, Gamma, and Delta stations are more or less there for “table dressing,” they have no effect outside of stacking limits in their hexes. However, the asteroids beside them (remains of a small moon that has been gradually broken up for mining) pose a significant navigational hazard. Either way, these stations are unarmed, cannot be attacked, and are not objectives. They’re just the kind of thing one sees in the HEART of a heavily colonized and industrialized system. In other words, no more skirmishing out in the Kuiper Belts, Oort Clouds, or outer gas giant moon systems. This in the heart of Hawking’s Star. This game is an assault, we’re playing for keeps. The Americans seen to be outmatched, outnumbered 4-3 in warships, 2-1 in aerospace, and with no heavy cruiser. However, the USS Salt Lake is the largest ship from Task Force Liberty, while the USMC aerospace strike carrier USS Tarawa is detached from none other than Task Force Oriskany itself. These ships are BEYOND upgraded.
 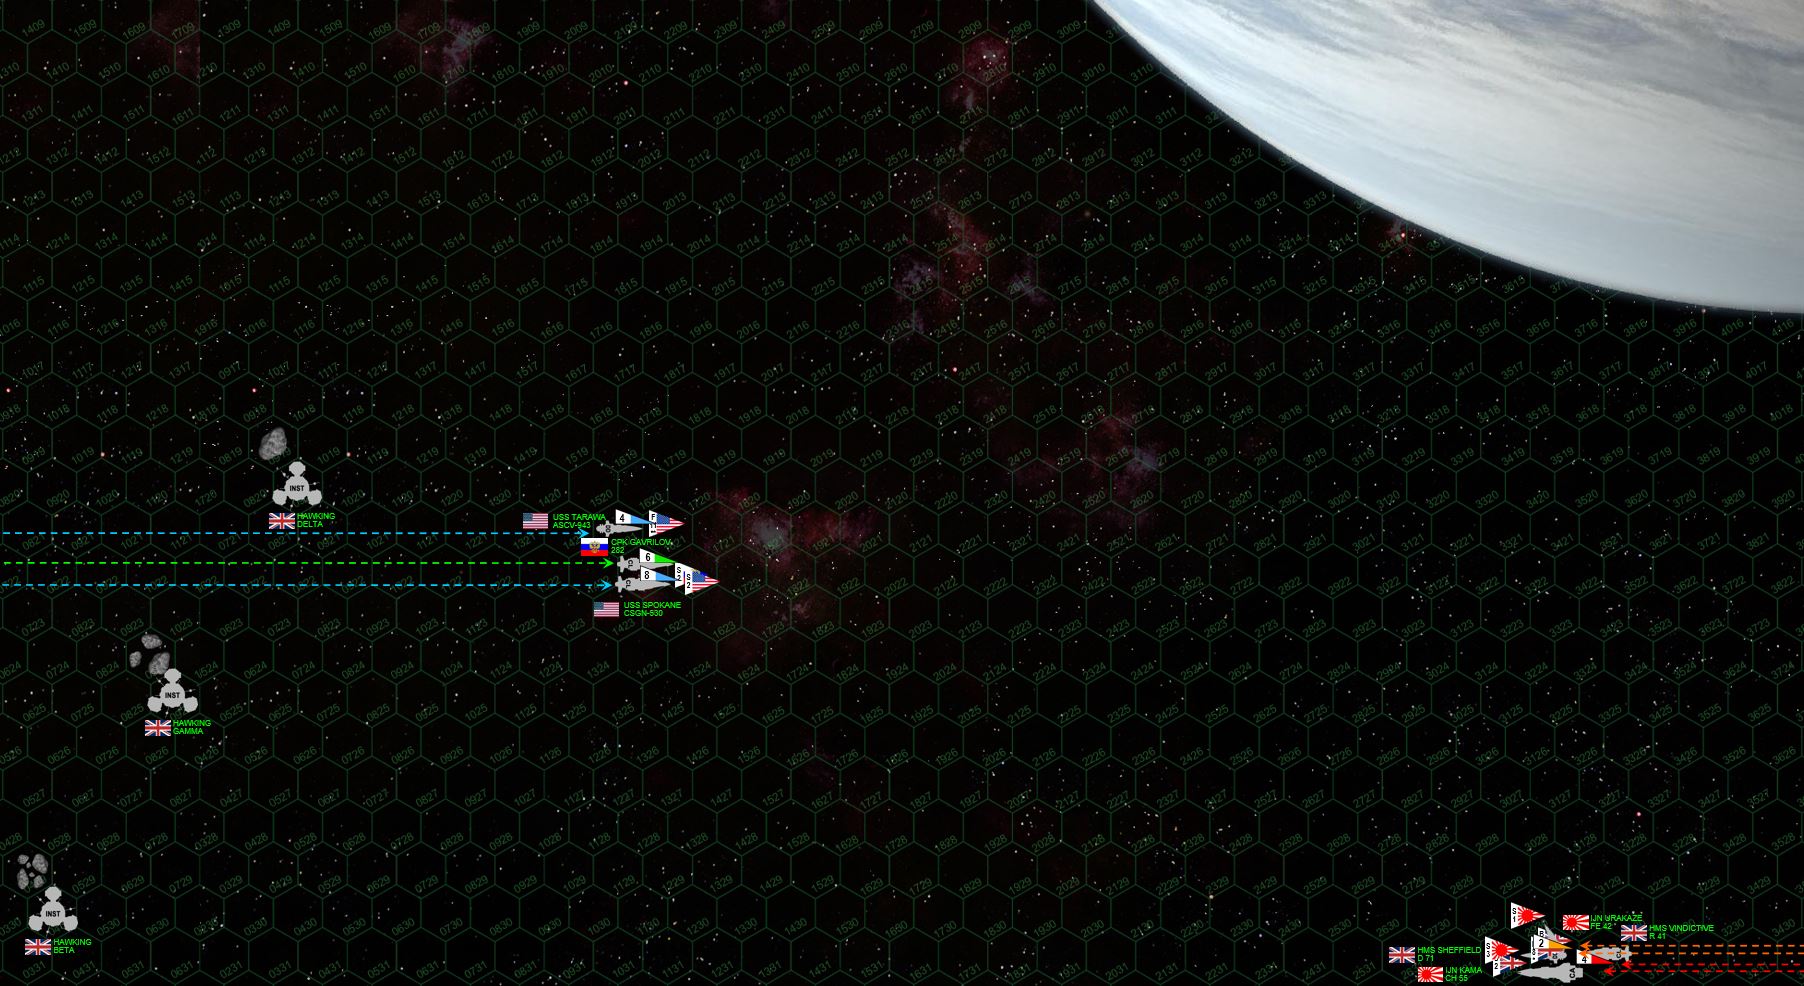 The actual map setup and initial approaches. The planet of Eastman’s Manor (roughly Mars-sized) looms at upper right. The Americans and Russians enter at a VERY high speed of 45 kilometers per second (hex = 180 kilometers, a turn is 1 minute), decelerating at full reverse thrusters, while the British and Japanese set a much more wary course at lower right, speeds at 18 and 15 KPS. Any ship that ends its movement within 10 hexes of the planet is subject to gravity.
 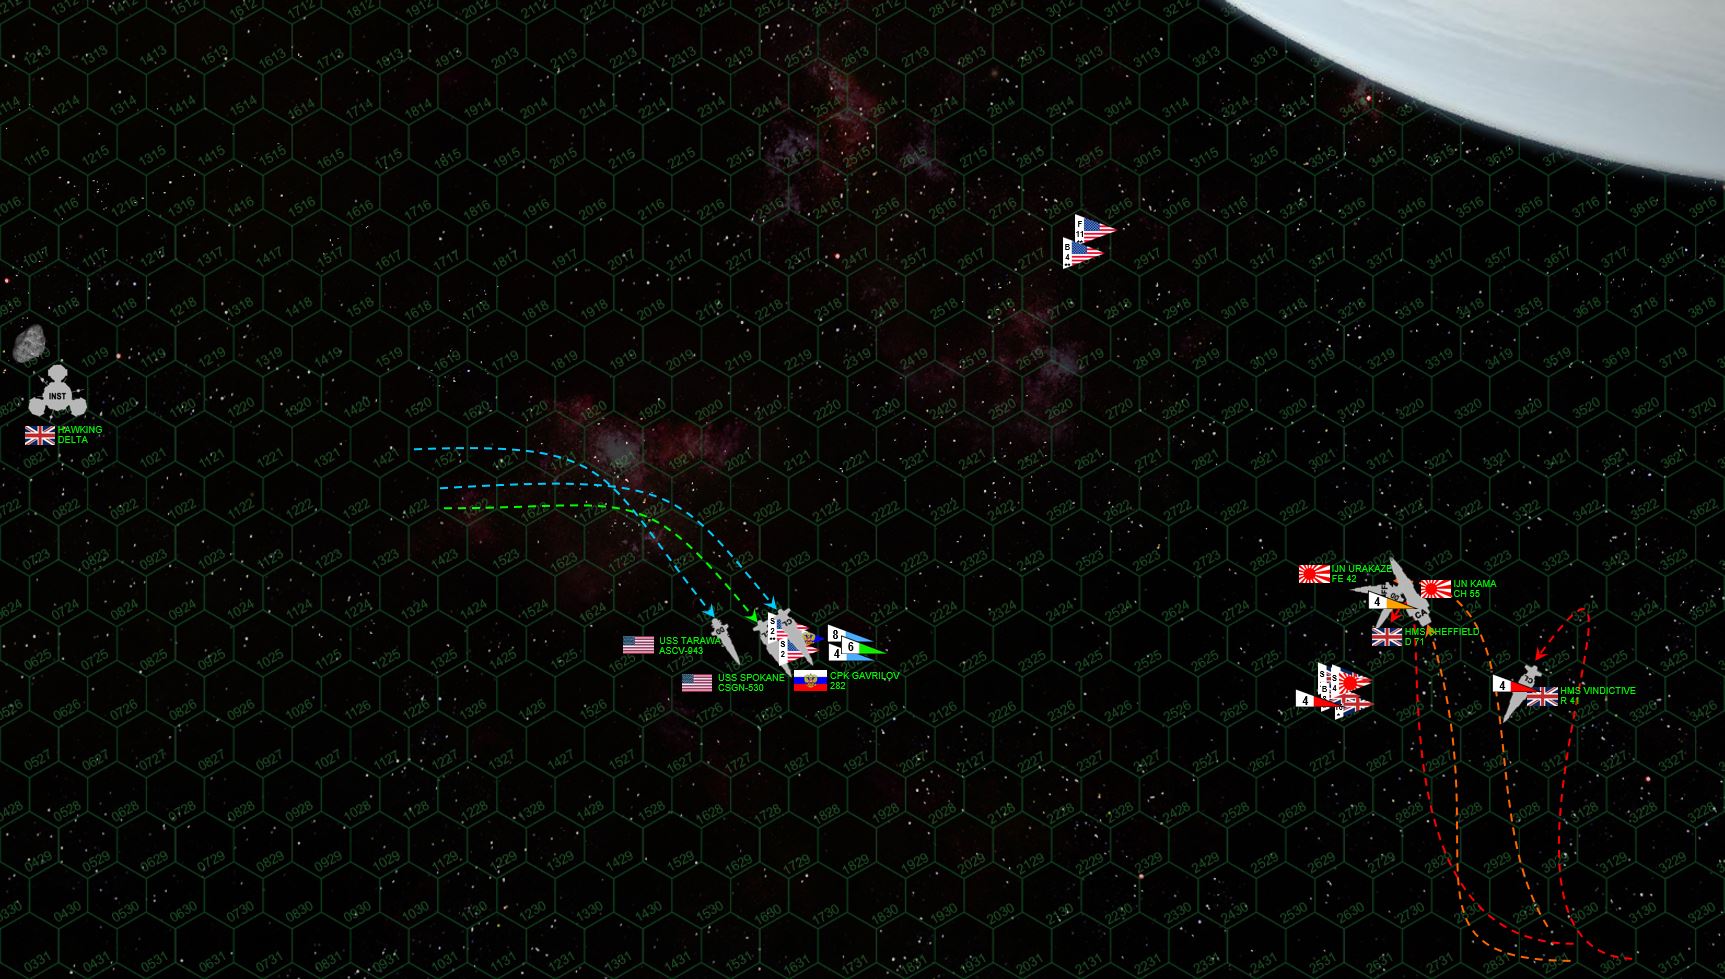 The British and Japanese cut hard to starboard, using the planet’s gravity for a little extra speed, setting up broadsides against the approaching invaders. The Americans and Russians (having largely won initiative) are happy to oblige, launching the rest of Tarawa’s Marine strike wing while setting up a broadside of their own, carefully ranged to make the best advantage of Spokane’s edge in gunnery accuracy. The Sheffield’s optronic gunnery systems and crews are just as sharp, however, while the Kama’s guns are also by far the biggest on the table. Range here is just under 2,000 kilometers, and damage on the Sheffield and Gavrilov are heavy. Meanwhile, HMS Vindictive completes the launch of her Starfire fighters and Nebula Typhoon bombers, the aerospace group staying close to the protective cover of the task force’s point-defense guns. The American Marines are being a little more aggressive, sweeping toward Eastman’s Manor and setting up for an imminent strike, combining with a large spread of Mark 48 and P-500 “Plamya” gravitic torpedoes launched from the American and Russian capital ships.
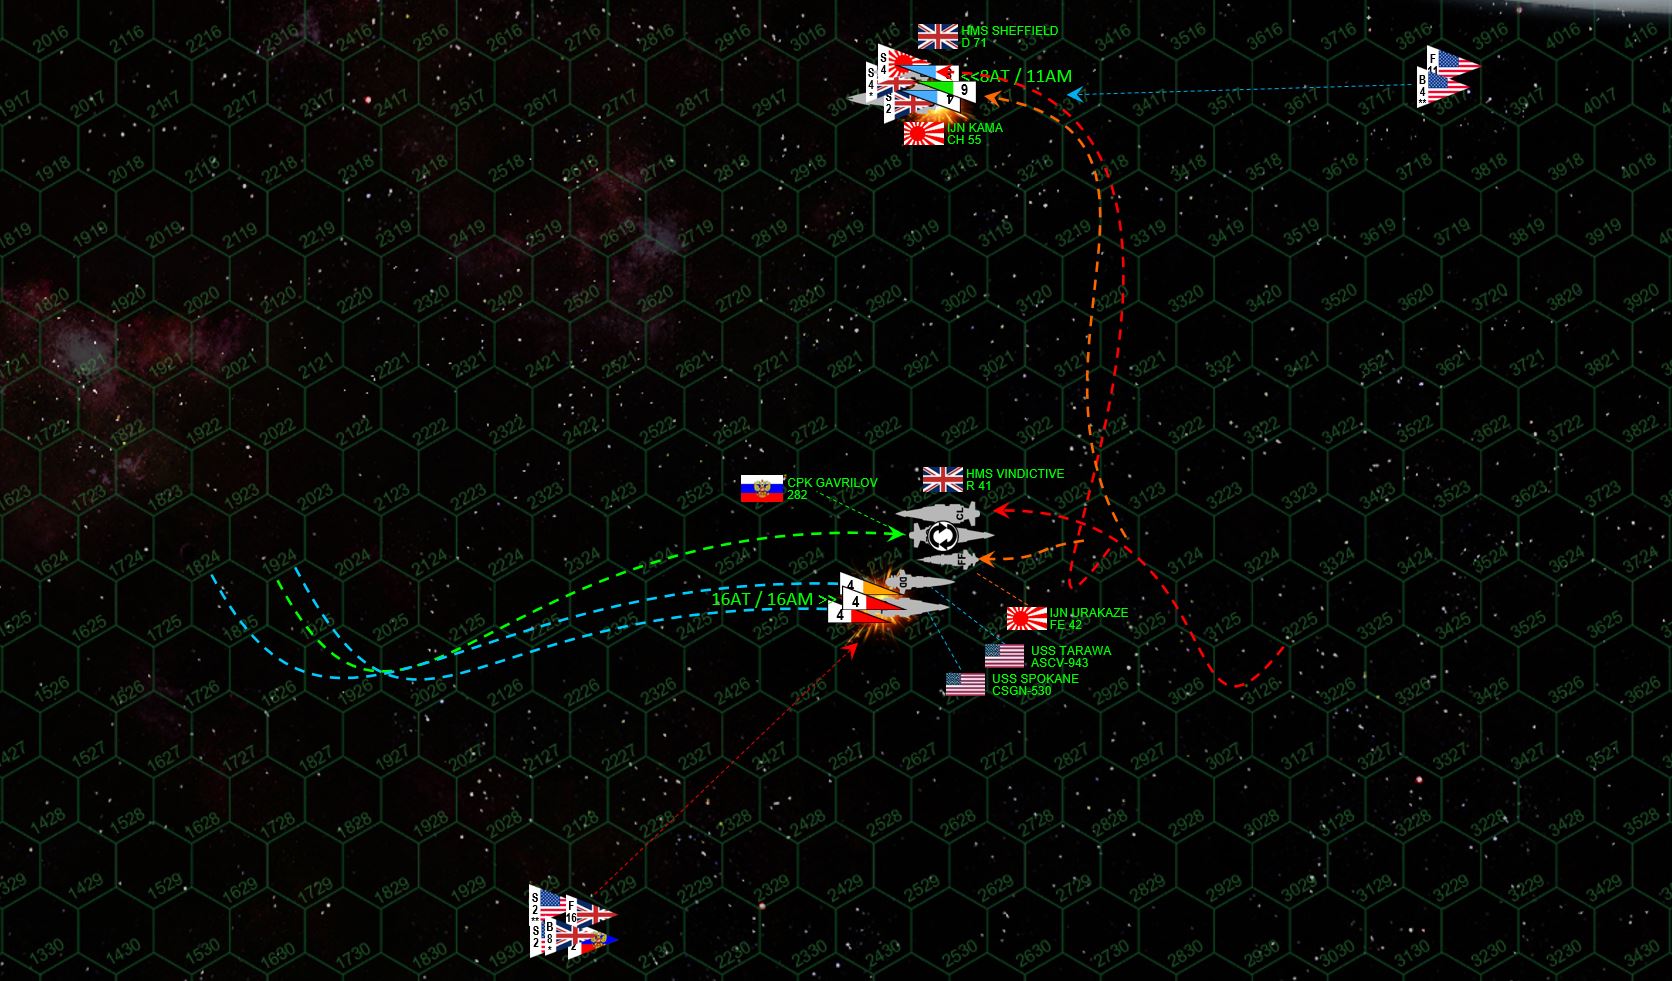 Turn 3, and the British and Russians make what I initially thought was something of a mistake here. As the Gavrilov lunges toward the Japanese (rolling on her back to protect her wounded port bow, the strike frigate Urakaze rushes right toward her as well, actually entering the same hex alongside the Russian light cruiser’s port side. That’s pretty much going to be it for the Urakaze, but if Rasmus can trade a frigate for a light cruiser, that’s not a bad move at all. However, the heavy cruiser Kama and destroyer Sheffield again turn hard to starboard, diving toward the planet, while the carrier Vindictive runs close abeam to the Urakaze. In effect, the Anglo-Japanese are divided in half, usually a VERY bad move when an American aerospace-torpedo strike is coming in. The Kama gets the worst of it, the Marines of VMF/A-319 “Tigershark” Squadron unleashing a hail of Harpoon torpedoes and Hellfire missiles, along with the Mk 48s and P-500s from the warships. But mass driver defense aboard the Kama and especially the valiant little Sheffield is ferocious, and while the Kama loses almost all the armor off her stern, her reactors and engines are almost undamaged by what SHOULD have been a killing strike. If Damon and Rasmus “made a mistake,” they got away with it. Meanwhile, the British strike against the American flagship USS Spokane, while textbook executed (concentrated on a single target, optimum range, no bombers lost to mass drivers, etc.) ... just doesn’t get the dice it needs. Even the missiles and torpedoes that DO hit the Spokane all hit in the “wrong” places, and while the American cruiser loses all her stern armor, no internal damage is inflicted at all. On both sides, the results of these heavy aerospace-torpedo attacks are bitterly disappointing. Guns open fire as well, with both the Gavrilov and Urakaze lost in a blinding, point-blank exchange. But Gavrilov is three times the size of the Urakaze, and at least for the moment, the British and Japanese are winning the day.
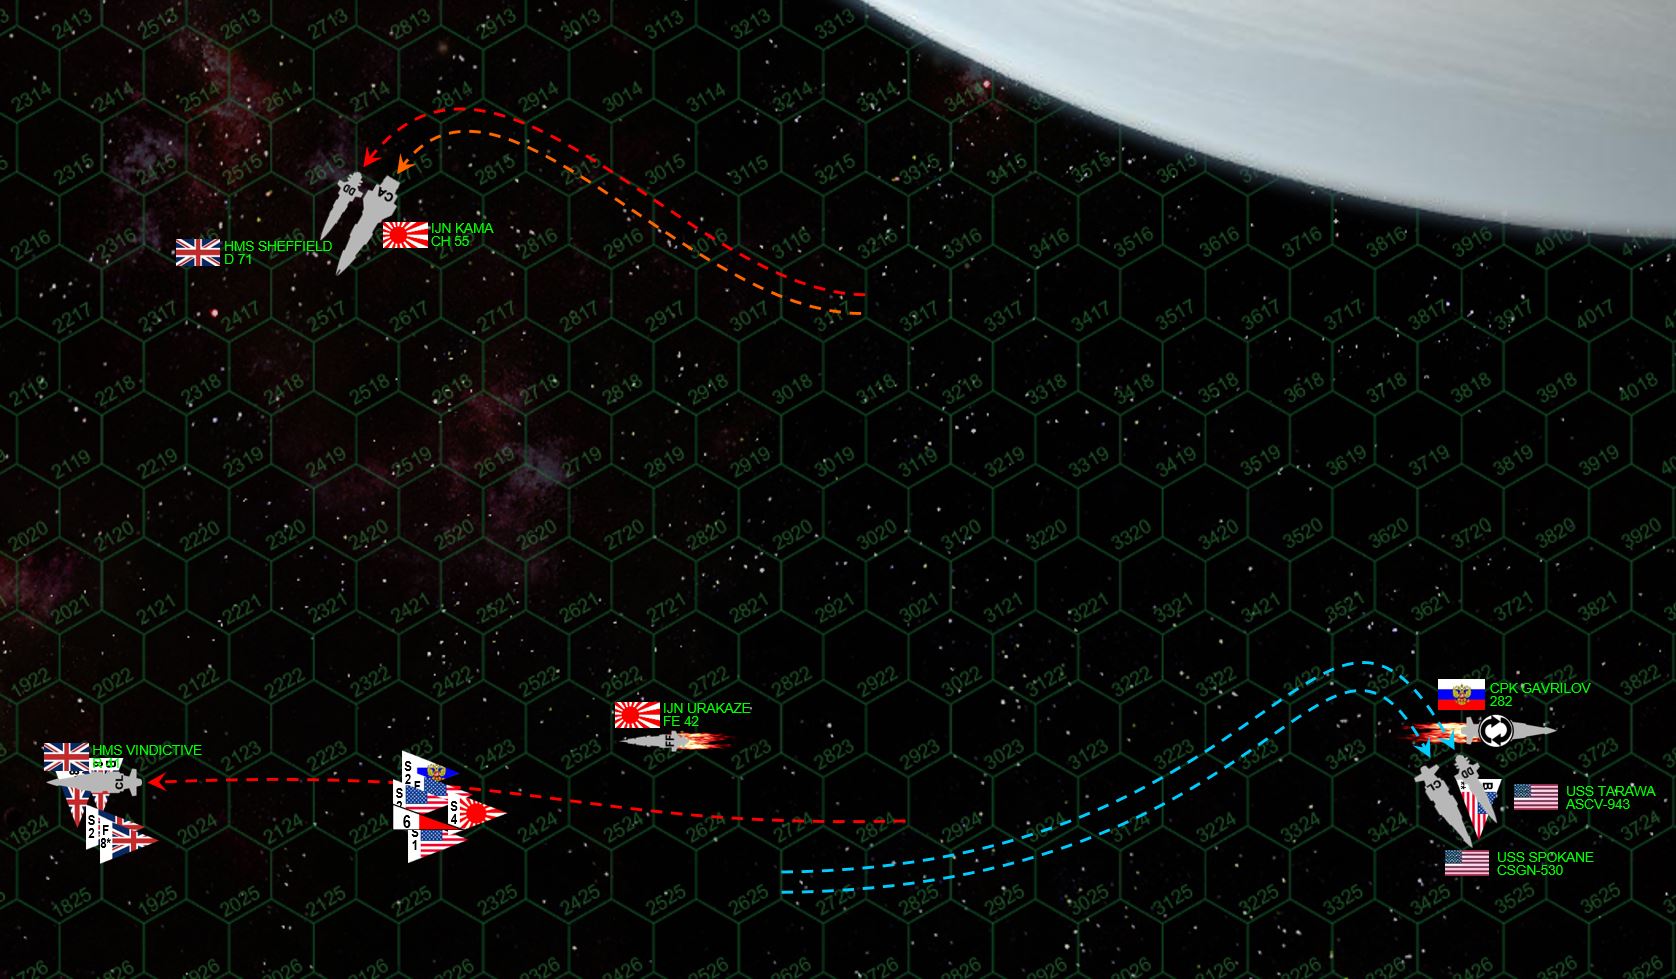 While the Urakaze and Gavrilov both spin out of control, burning and dead in space, the remaining ships of both sides streak past each other, engines on all ships pulling hard against Eastman’s Manor’s gravity as they begin to turn back toward each other. The Spokane actually side-slips to port slightly, then turning starboard to line up a long-range broadside on the stern of the carrier HMS Vindictive, which has slowed slightly to recover her bombers and some of her fighters, clearly to rearm for a second strike. Four Marine Grumman FS/A-81 “Avenger” torpedo bombers also land in the bays of the USS Tarawa. The Kama and the Sheffield have also set up long-range broadsides on the Tarawa, hoping to cripple the light carrier WHILE she’s rearming bombers. The enhanced gravitic shielding and electronic warfare suites of the Tarawa, however, along with the 3000+ kilometer range, spare the little Marine carrier the worst of enemy fire.
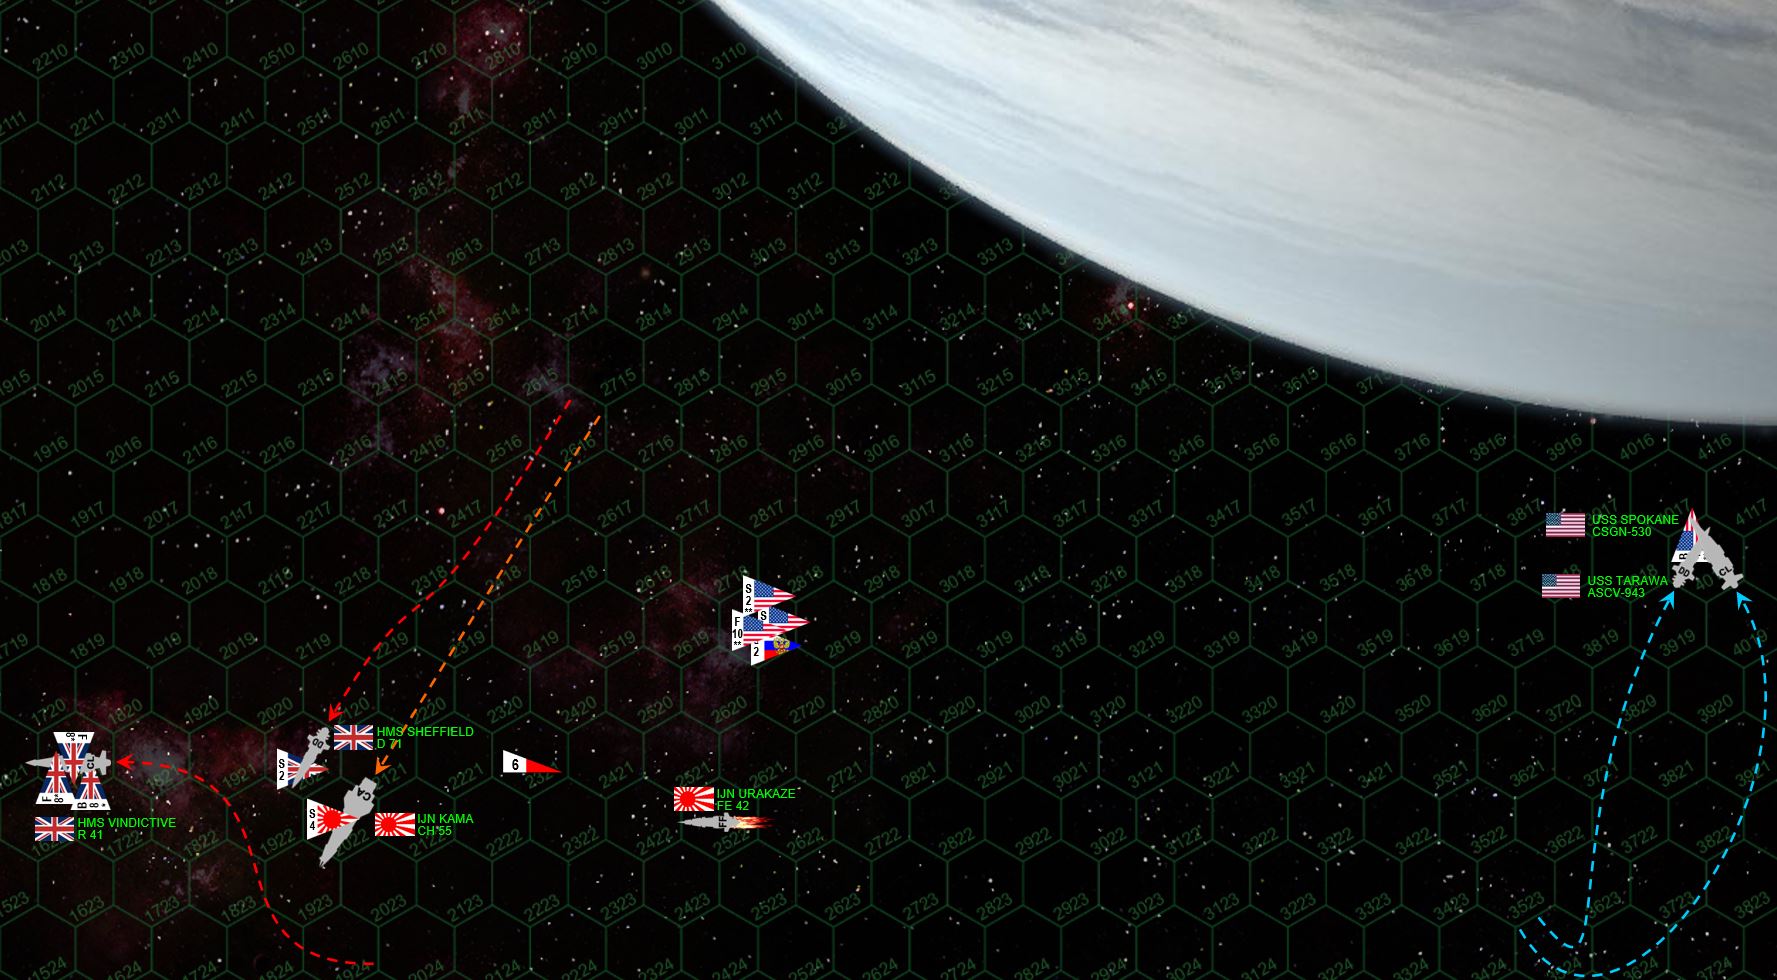 Recovery and rearming continue at a feverish pace aboard the Tarawa and the Vindictive, with Damon landing 8 more fighters even as 8 previous fighters and the initial 8 bombers complete rearmament in the Vindictive’s bays. Carriers of given classes are limited not only by how many aerospace craft they can carry, but how many they can launch and recover in a given turn. Especially with larger carriers, this can sometimes lead to tough “Nagumo-esque” decisions about when to recover, when to launch, and what ordinance packages to carry on a re-armed aerospace strike. The Sheffield takes more hits, some of which carve deep into the ship’s interior, causing heavy crew casualties and decompressions ... compelling her skipper to break off from the engagement. The Americans have plenty of their own problems, however. Seemingly minor hits on maneuvering thrusters aboard both USS Spokane and Tarawa mean they have a very hard time turning, rolling, and decelerating as they wish, especially while trying to screen badly-damaged sections of their hulls from further Japanese EPCs AND turning against planetary gravity. Captain Cheatham is forced to turn TOWARD the planet at a hair-raising distance, just praying he doesn’t take another hard hit and loses power until he can complete his turn ...
 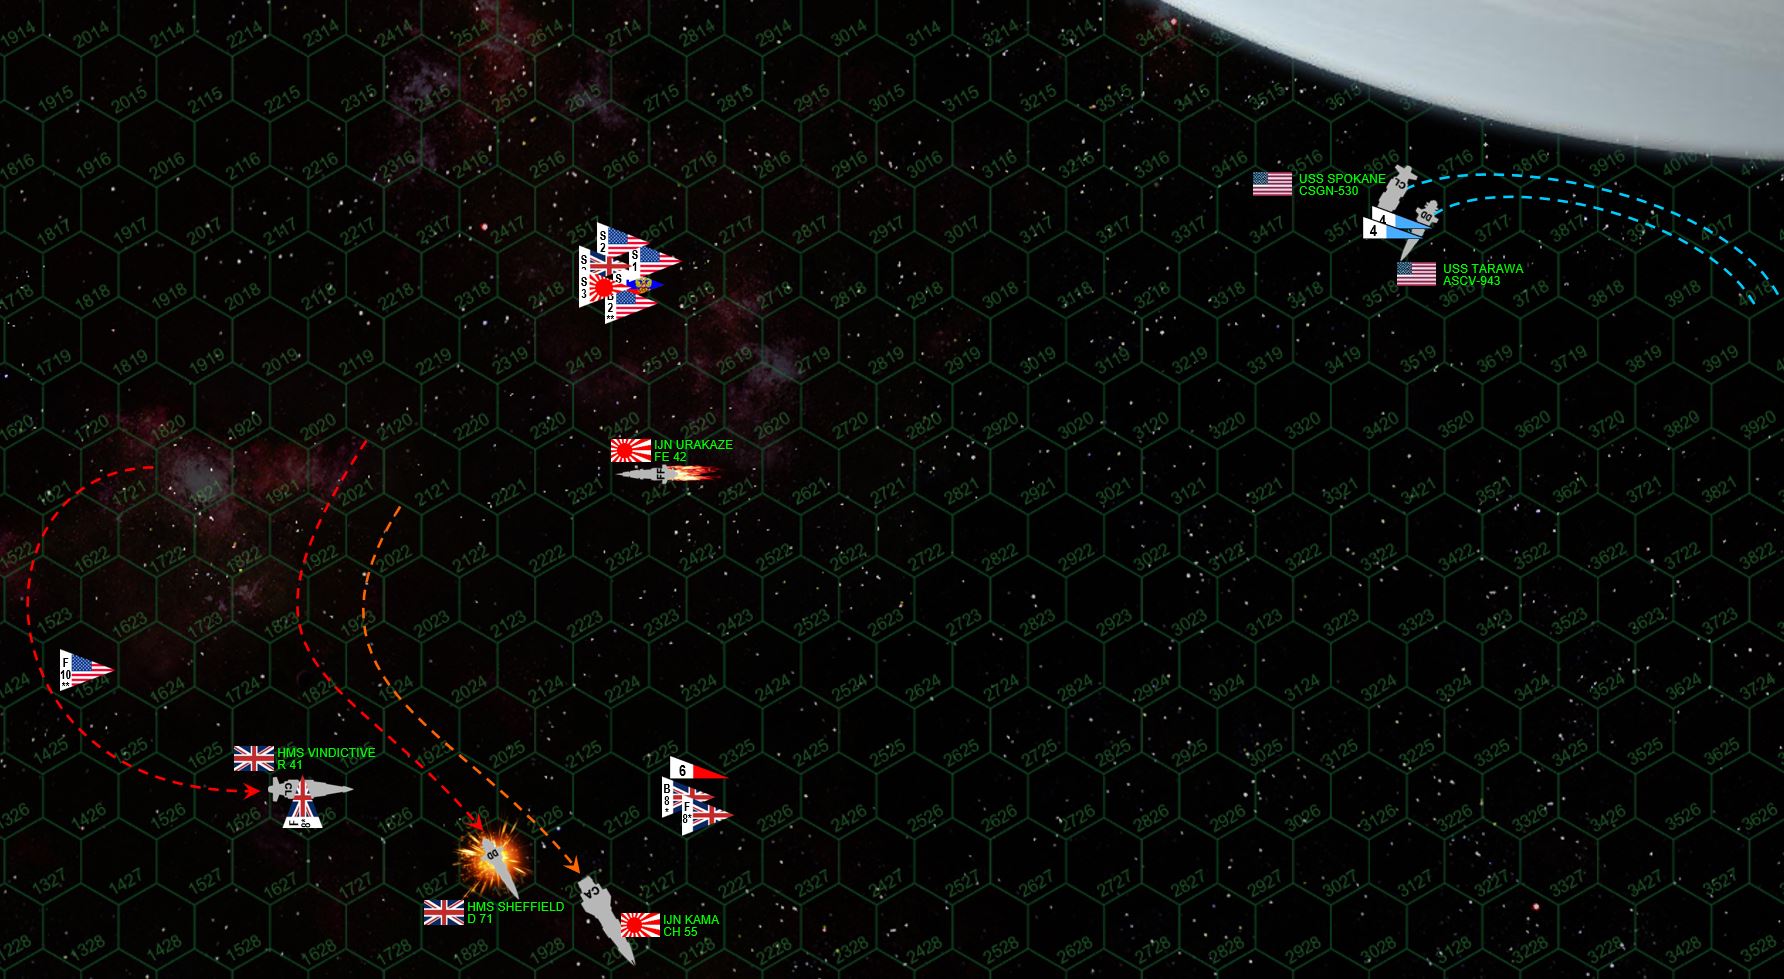 The Americans get away with it, completing their turn (their hulls perhaps glowing a little red) and pulling back out of Eastman’s Manor’s gravity. Presenting bows to the enemy, they can thus launch full frontal spread of torpedoes (what torpedoes they have left, that is, USS Spokane has actually lost her portside array). More immediately, the forward EPCs and 8 MgKv lasers of the Spokane still through the wounded side of HMS Sheffield, and at last the valiant little destroyer loses power. Burning and out of control, she careens out of the battle area. The Kama replies with her own broadside of vengeance, massive 18-teravolt EPCs burning away the Tarawa’s fo’c’sle and crippling forward shields. This is going to have a critical effect in the time to come. Meanwhile, the Marines get perhaps a little too aggressive, their F/S-44 Star Corsair fighters trying a strafing run against the stern of the Vindictive while their four Avenger bombers are swarmed by British and Japanese scouts which manage to shoot down two of them BEFORE they can launch more Harpoon aerospace torpedoes against the Vindictive.
 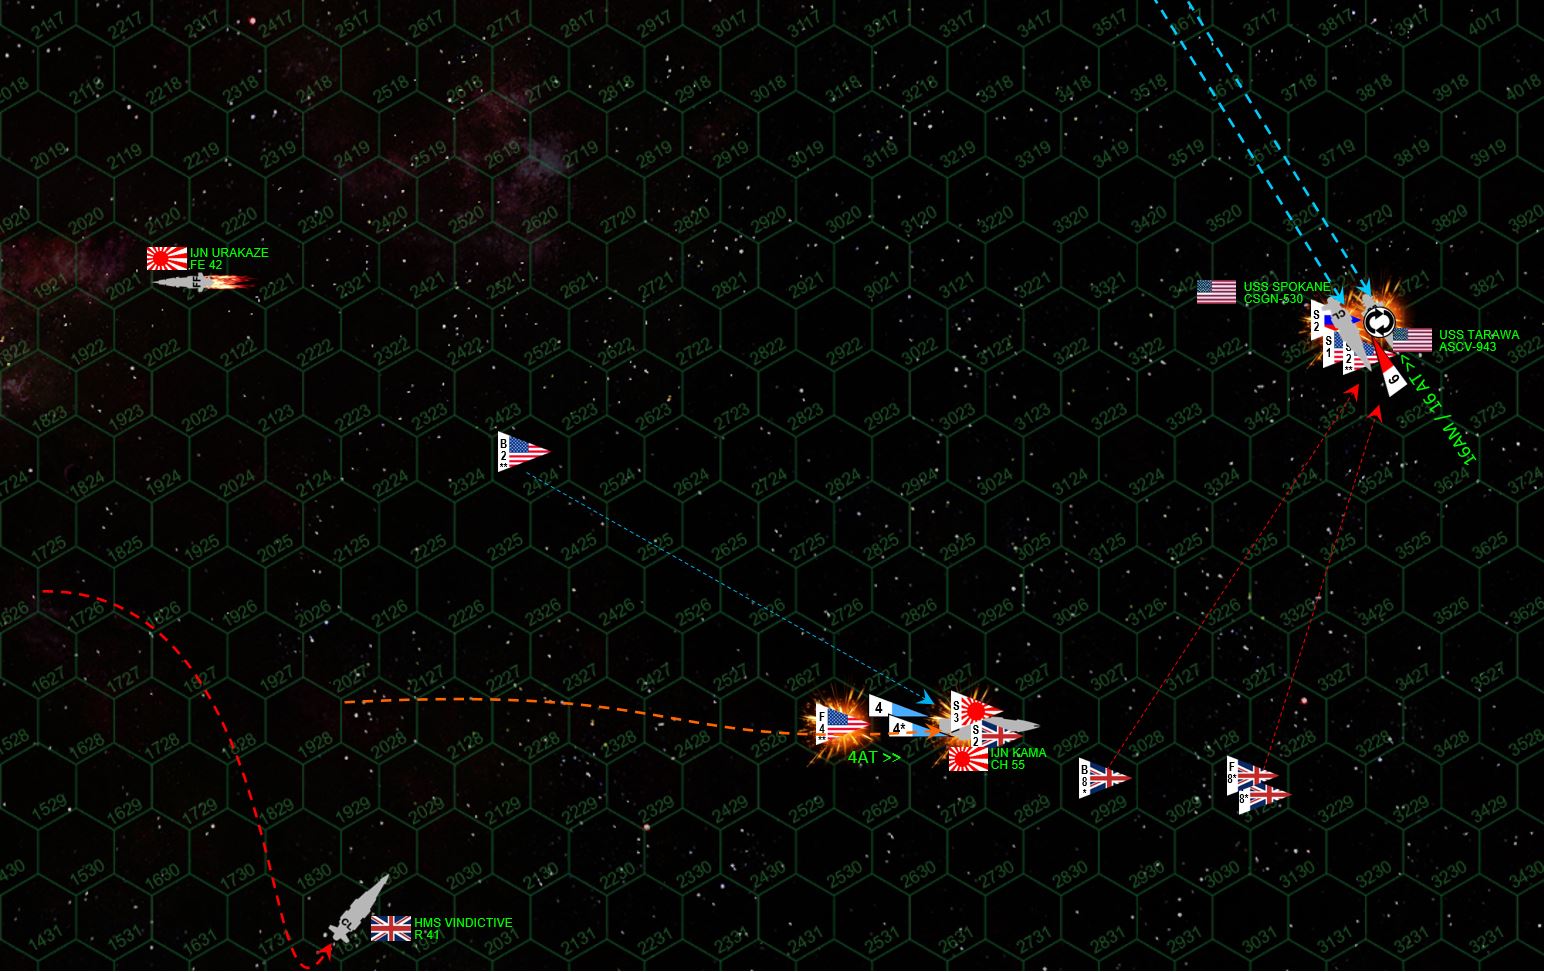 The Second Battle of Hawking’s Star takes a final horrific turn on Turn 7, where American torpedoes, bombers, and fighters on a gunnery strafing run rush the stern of the gigantic Japanese heavy cruiser IJN Kama. The Kama decides to mass her point-defense against the Marine fighters rather than the incoming torpedoes, hoping her shields will project her. It’s a fateful decision, especially for the Corsair pilots of VMF/A-319, which lose 60% of their strength in a hurricane of Japanese anti-aerospace fire. That means the torpedoes and missiles have a clear path, however, and the accuracy of these weapons (guided by elite Marine pilots, upgraded CiC of the USS Spokane, and enhanced electronic warfare aboard USS Tarawa) mean that the stern of the Kama is positively torn apart in the fusillade. Recall that Kama’s stern armor was largely shorn away in the previous aerospace strike, and the mighty heavy cruiser doesn’t survive a second encounter. Successive Mk 48s and Marine torpedoes explode INSIDE Kama’s engineering section, and the captain has to eject reactors to keep the ship from exploding altogether. Just that fast, the Americans have gone from losing this battle to being the clear victors. But the Japanese are not alone in their agony. Without shields over her bow, the USS Tarawa is targeted by the expert torpedo and missile strike of the Supermarine Starfire fighters and Nebula Star Typhoon bombers of HMS Vindictive, having relaunched her aerospace group and carefully protected them until they could get within range for a united second strike. The Tarawa soon takes missiles through the bridge, crippling the Marine carrier and sending it spiraling out of control from the battle zone. The rest of the strike goes for the Spokane, and together with the last volley from Kama’s forward guns, hits the forward magazine of the Spokane. The ship isn’t crippled, but that internal explosion causes enough decompression where Captain Cheatham is forced to break off the engagement.
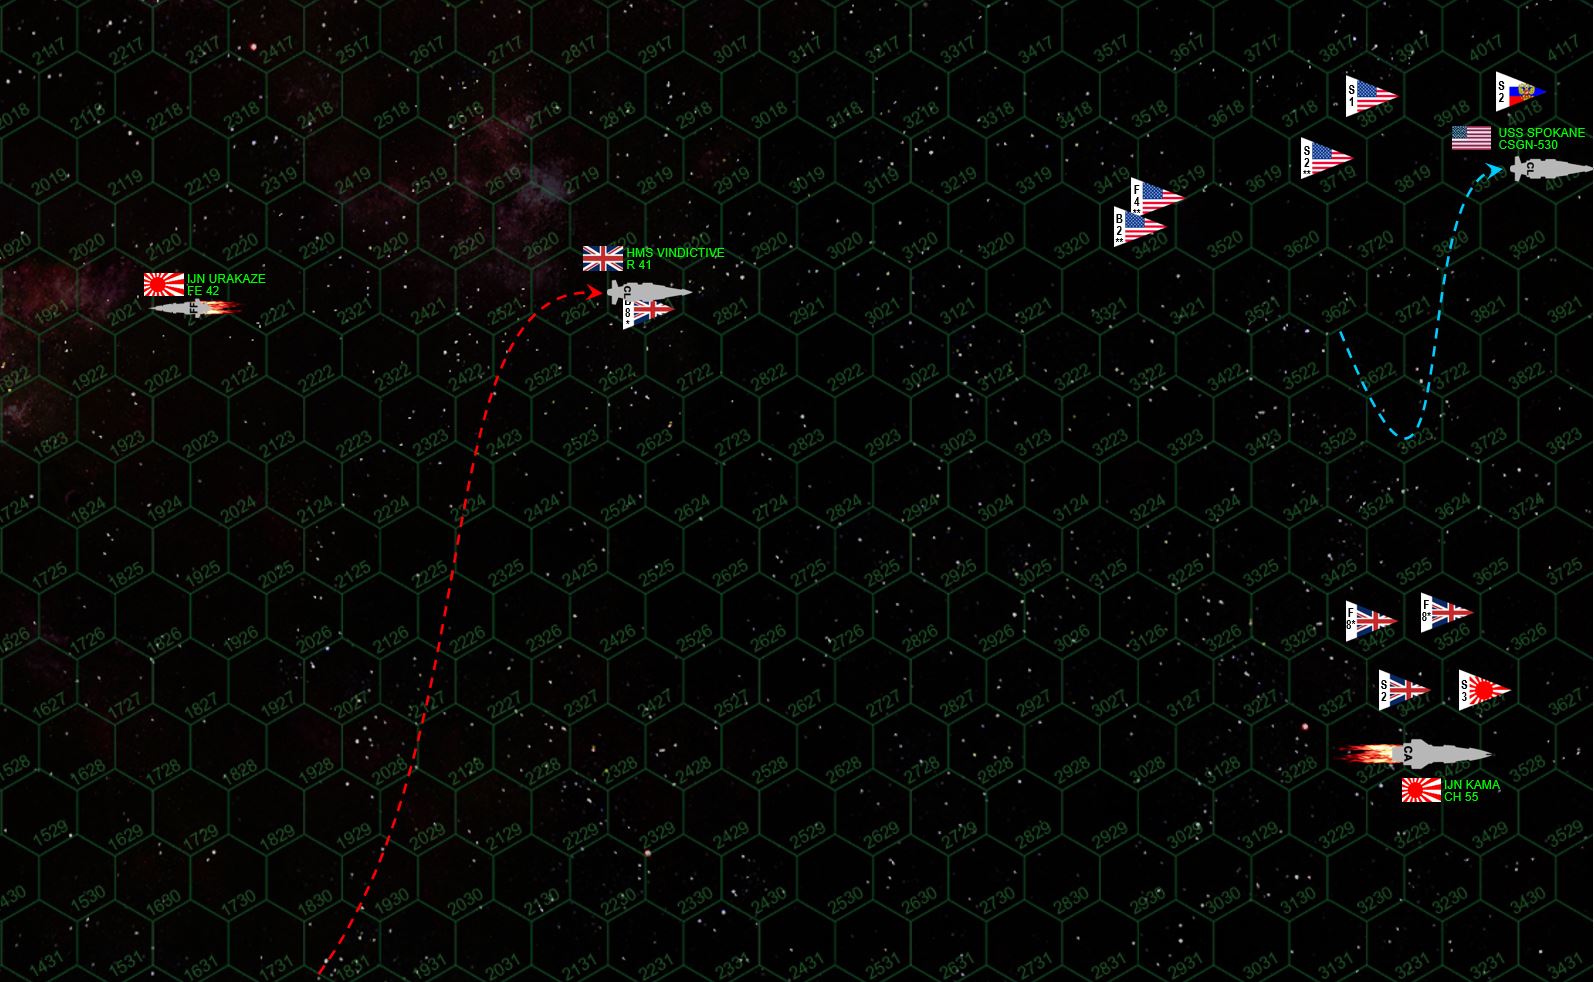 Turn 8, and we see the USS Spokane turn away from the last enemy ship, HMS Vindictive. Obeying the rules for breaking off, the Spokane is just able to remain on the table until the end of Turn 8 (the end of any ASSAULT game, Darkstar Rule 5.2.1., p. 92), meaning she counts as half victory points as a technically “operational” ship (Darkstar Rule 5.2.1.A.). As an ASSAULT game, this battle’s outcome is assessed based on what forces both sides have left on the table (again, Spokane only counts for half because she is being forced off the board). Carefully counting everything up, we come up with a shocking result. Counting every last scout plane, the Americans have 111 points on the table. The British and Japanese have ... 112. Rasmus and Damon have a +1 point victory margin, but the game goes down as a draw (Darkstar Rule 5.2.1.C.i). You have to win by at least 5% of the game’s beginning point value. Otherwise, High Command has determined this engagement “too close to call.”
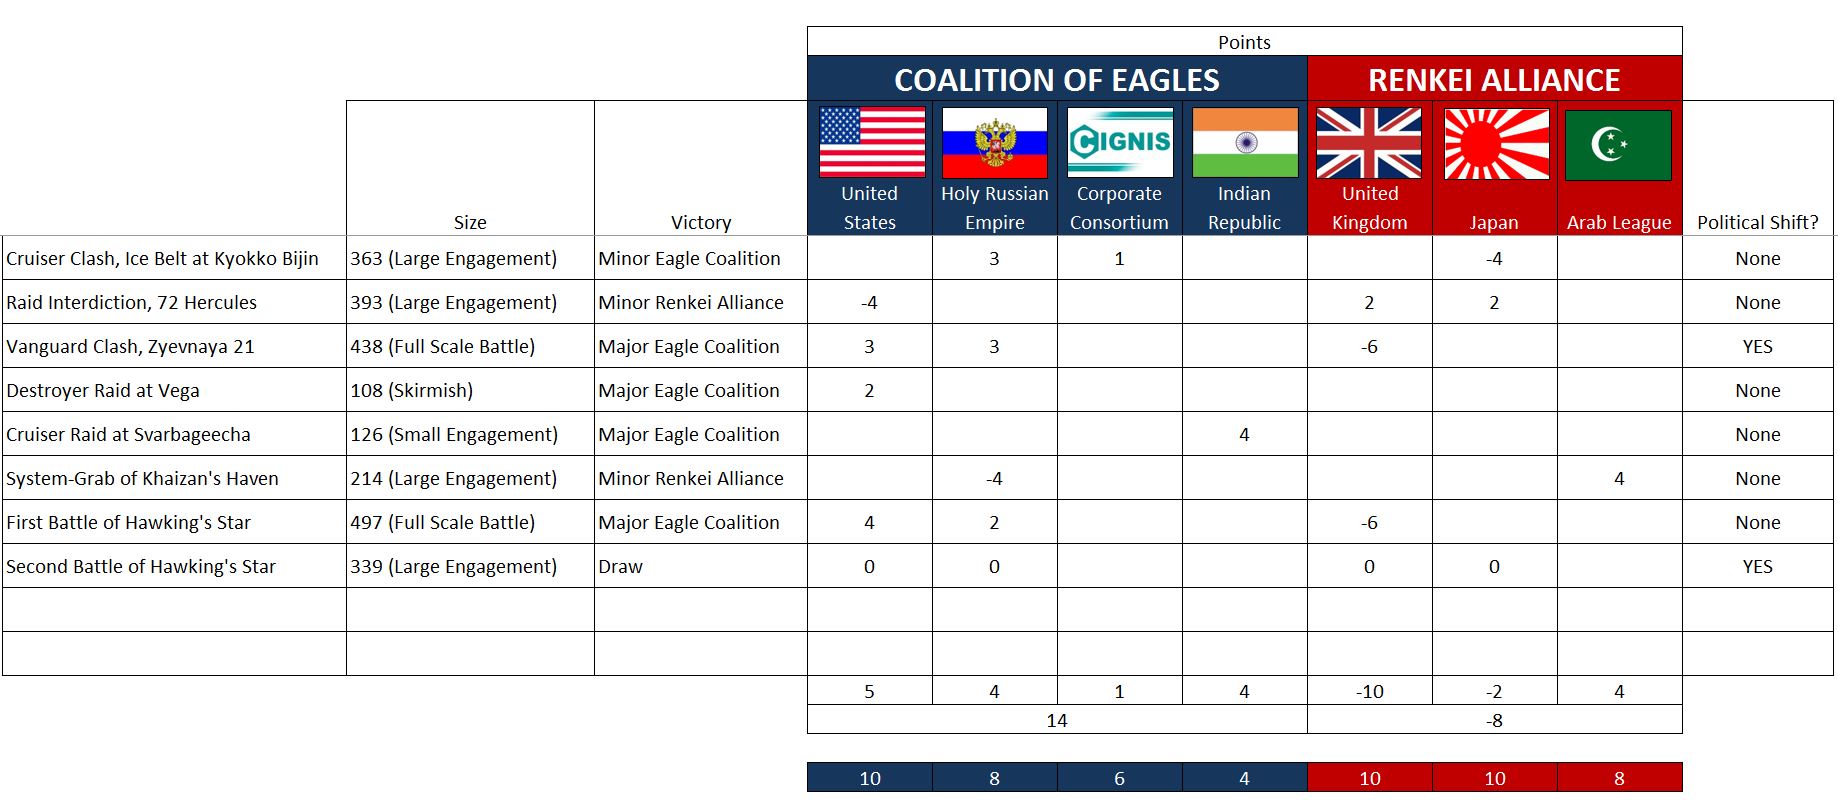 So what does this mean? Well, the Second Battle of Hawking’s Star has gone down as a charred, smoking, blood-soaked draw. The two American planetary assault ships in the system’s outer debris belts are NOT called in (the British and Japanese have held on ... the core orbital zones of the system are NOT secured) ... but they’re not sent home to Alpha Lyra, either. The threat remains in place. The fate of Hawking’s Star, and the British in the Hercules Rim, and the Third Hercules War overall, remains in a razor-thin balance. In the chart above, we see where the results of this battle are all chalked up as “zero,” meaning the British still hover on the precipice of defeat. They have a -10 campaign score balanced against a “political commitment threshold” of 10 ... one more defeat point and they exceed that threshold ... their government sues for peace. The Americans and Russians, both at +3, are still technically “winning” this war, but the results of Second Hawking’s Star are nevertheless far from what they wanted. I’m sure we’ll keep this campaign going and see how it turns out. Stay tuned!
 The "Real" Bird of Prey
Development continues for crossover warships and rules between Darkstar and Star Trek. I’ve now designed system rules and “available components” for cloaking devices, because it’s time to bring in the third great faction in Star Trek, the Romulans.
This is the classic Romulan Bird of Prey from the original series. Not the hijacked lore-screw-up “Klingon” Bird of Prey (technically there was no such thing before bungled script re-writes in Star Trek III).
I was surprised by how small the ship is in the FASA records. Only a class VI, barely a “large destroyer” in Star Trek (counts as a frigate in Darkstar). Then again, it has a cloaking device, and the powerful Romulan plasma torpedo we see in the episode: Balance of Terror (Season 3, TOS).
Rules for the Romulan plasma torpedo were easy. FASA had perfectly designed tables for these weapons, cost-balanced and meticulously play-tested, and of course Darkstar players are no strangers to plasmsa weapons.
The cloaking devices were a little tougher. We know they’re very small (Kirk practically carries one in his arms in the TOS episode: The Enterprise Incident. Crew is not an issue, so POWER has to be the real “cost” of the system.
I originally took a short cut, simply “demanding” that a ship equipped with cloaking carry shields one class bracket higher (i.e., a Class V-VI destroyer with level 6 shielding would have to carry Class VII-VIII “Frigate” shielding).
But this was cheap, manual, and would prove problematic when I wanted to build the very largest Romulan ships, like the D’deridex class warbirds seen in TNG (i.e., they are already the “highest” class bracket, there IS no higher class bracket for them to pay for their cloaking).
So I finally bit the bullet and built two more weapons categories for the two weapons tables (TOS, TNG). Now a ship that wants to carry cloak simply buys this as another “weapon.”
Power is the killer. Cloaking devises in the lore are described as drawing tremendous energy from the quantum singularity power plants that drive most Romulan warships.
So like I said, this is the classic V-8 Bird of Prey, commanded by “Mark Leonard” in Balance of Terror. It’s smaller than the Enterprise, but can cloak and is overgunned for its size. It’s not faster (which balances against how we see it in the episode, it could never simply run away from the Enterprise, and jives with the general concept that this ship was analogous to a large submarine (the episode drawn from the classic movie: The Enemy Below).
The usual cloaking rules apply. The ship is NOT placed on the table. The owning player must track his hex number and facing per turn. While the cloak is up, no weapons fire is allowed (the experiment in Star Trek VI: The Undiscovered Country seems to have never been repeated – it’s also lore-breaking and game-breaking).
So in game terms is breaks down to a simple modification to the usual power allocation rules. You can spend thrust and operate shielding while cloaked. Weapons will not fire while cloaked. A player must decloak during power allocation phase before he can use weapons. And of course, all weapons fire in Darkstar is simultaneous.
This still makes cloaked vessels (and Romulans in general) very dangerous. They can literally sneak up behind you and blast away at full broadside, slowing to a crawl so they can double-allocate to weapons when their cloaks drop (no thrust points). So the turn sequence would allow for:
- Turn 1:
- Vector toward an enemy
- Slow down.
- Turn 2:
- No power to Thrust or Cloak
- Decloak
- Fire all weapons twice
- Take fire in return (you shields are still up)
- Turn 3
- Power away next turn.
We’ll see how it works probably next week. This weekend is getting v ery busy with “conventional” Darkstar and Sitrep / HK Ops.
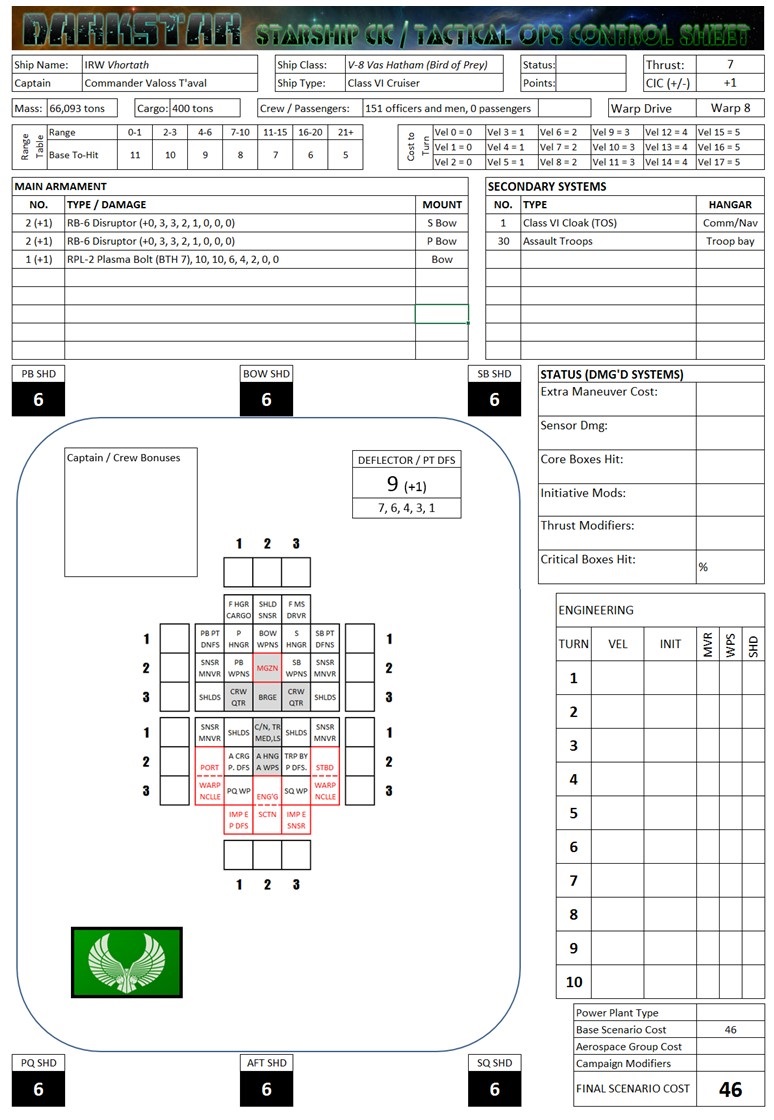 The Warship Record Sheet of the V-8 Class Cruiser. She's a savage little beast, a "Darkstar Frigate" with 2800 power, a nasty weapons suite (for a Star Trek vessel this size) and the ability to cloak. She's a little slow, however, and again ... only a "frigate." I gave her a +1 Tactical Systems bonus (costing her plenty in weight and power) to supplement her rather inaccurate weapons (drawn from FASA data). Those Romulan plasma torpedoes will be nasty - as those familiar with "Balace of Terror" will tell you.
 This one took a little while, only because I had to finally come to grips with how to design cloaking devices and track the power draws off the Excel sheets that actually build the ships for the game.
Star Trek has been ported into Darkstar
Over the last three days I’ve been working to pull the universe of Star Trek into the Darkstar tactical starship combat system.
The “data basis” for this effort was the FASA Star Trek Starship Tactical Simulator game of the 1980s. Although not officially “canon,” the writing, warships, and history presented in under this FASA license is still kept alive on many fan websites and has clearly influenced Star Trek development through the Enterprise series, Prelude to Axanar film, countless novels, the Star Trek Online game, Discovery series, and other parts of the Star Trek verse.
As a FASA game (the same company that developed classics like Battletech, Renegade Legions, Shadowrun, etc), STSTCS was beautiful, detailed, balanced, customizable, and encouraged players to design and modify their own starships. Through a meticulously-calculated, cross-referenced, and balanced point system, anything players would design in this system would automatically be “tournament legal” and playable in any STSTCS game.
This old game was also one of many inspirations for Darkstar back in 2012. So converting starships from STSTCS into Darkstar so warships from these two universes could interact in a formal Darkstar wargame has naturally been a long-time item on the Oriskany wish list.
Finally, it’s been done. Finding huge spreadsheets on these FASA fan sites, and applying some hard “Darkstar design-style” crunching, I’ve created a conversion system that will support a wide range of Star Trek factions, eras, and designs into Darkstar.
So far I have weapons and systems tables for Federation, Klingon, Romulan, Cardassian, and Gorn. Future expansions might include the Dominion and Orion pirates.
The tables will cover anything from the TOS era through the Dominion War. So from the Four Years War before the original series through the end of DS9 / Voyager will be able to be constructed and “reliably” portrayed in Darkstar.
A few things will be left “off the table” for the moment. At present I cannot recreate Romulan War / Archer era warships (22nd Century), nor many things from Star Trek Online (2409 – 25th Century).
I will not be handling transporters. They are a “broken” plot device, and would rarely be able to be used on a Darkstar table anyway when warships have shields up.
I will not be handling Saucer Separation capabilities. The vast majority of ships in the Star Trek universe cannot do this anyway.
I will not be handling uber-races like the Borg or Udeen (Species 8742).
Things I will be bringing in will be Romulan cloaking devices, DS-9/VOY-era quantum torpedoes, etc (yes, they’ll be very expensive). There will also be a rudimentary power allocation system that will allow players to prioritize propulsion, weapons, and shields during a battle (a ubiquitous staple of Star Trek stories and combat).
So far I have about 10 warships designed in the new system, from the Class II Pulsar class warp shuttles to the Marklin class destroyers made famous by Garth or Izar during the Four Years War, the classic Enterprise 1701 and Enterprise 1701-A refit, the Excelsior class “battlecruiser”, and the Galaxy-class flagships of the 24th Century Federation.
I have also prepared D-7 battlecruisers (M-class “K’tinga” variant – “Bringer of Destruction”) of the Klingon Empire.
The images below show a small sample of what is prepared so far.
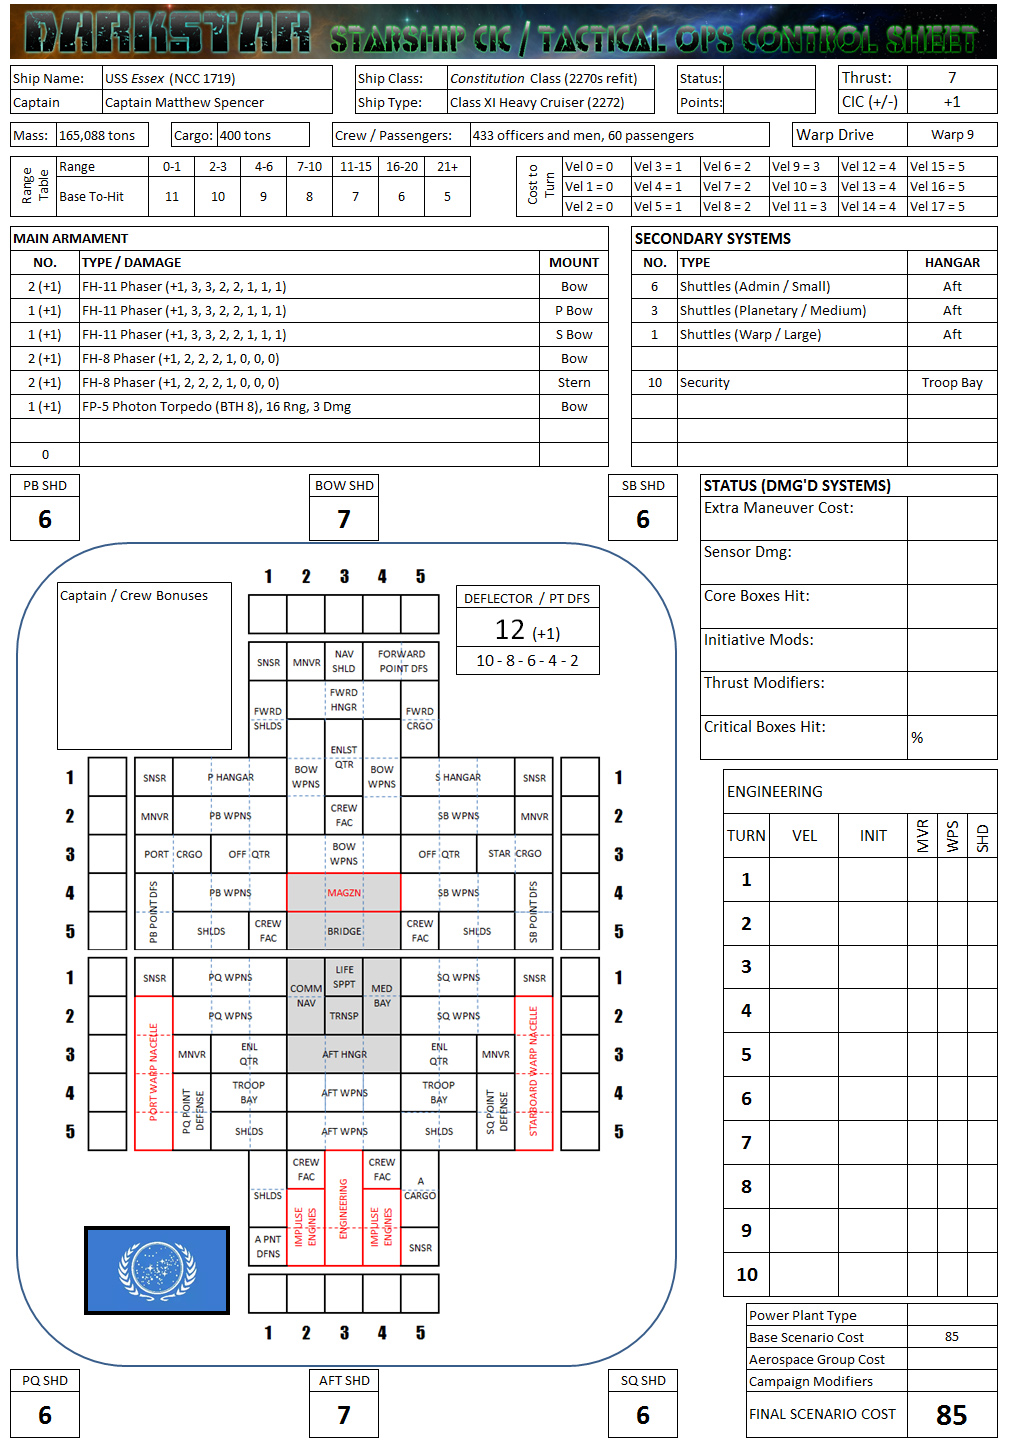 Warship Record Sheet for the USS Essex (NCC-1719). This is sistership of the USS Enterprise after her refit we see in Star Trek the Motion Picture - Star Trek III: The Search for Spock (also, NCC-1701A from Star Trek IV-VI). It is one of the older Class XI Constitution class (Mark IV series) cruisers confirmed in FASA sources to undergo the "Enterprise Class" refit of the early 2270s. Note also the warship component layout has been redesigned to more closely resemble the layout of Star Trek ships. Again, those war nacelles make Star Trek ships far more fragile than Darkstar ships ... IF the Darkstar ship can shoot through the Star Trek ship's much better shielding).
 Warship Record Sheet for a D-7 class battlecruiser, specifically the "M" series "K't'inga" (Bringer of Destruction). The captain is Kang, one of my favorite Klingon characters from "Day of the Dove" episode, Season 3 of the original series. In general, Star Trek ships are proving under-gunned and VERY thinly-armored compared to Darkstar ships (several examples from the movies and TV shows support this), but much more heavily shielded, much faster, and much more flexible in terms of their power allocation special abilities. I have added the ability to include additional armor in Star Trek ships. Note this K't'inga class carries an extra belt of armor over her engineering section and impulse engines (stern section).
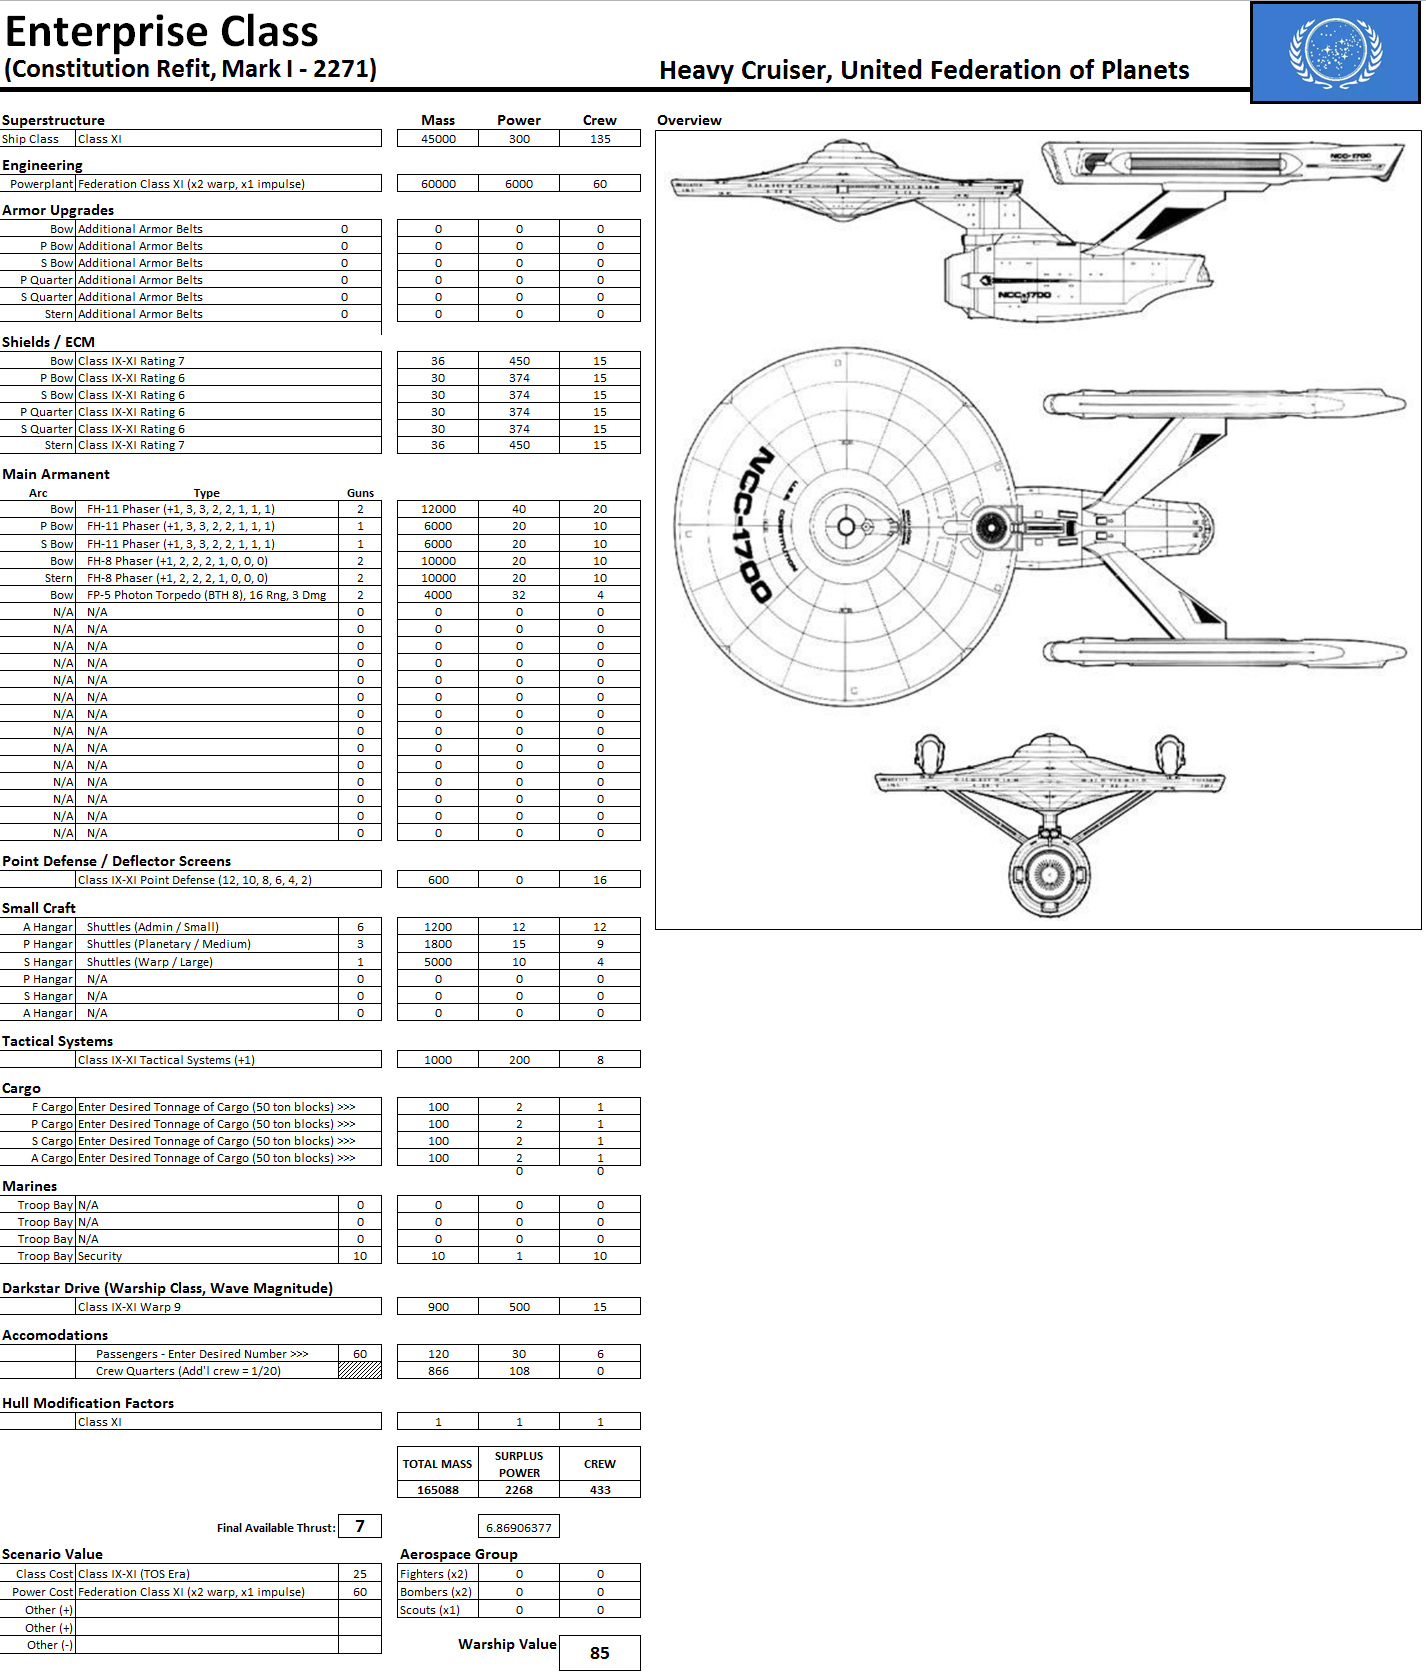 The design tables for the Enterprise refit Constitution class. The base categorization structure is drawn directly from the FASA source material, the universal Class I - Class XX hierarchy. Within that structure, however, there is TREMENDOUS latitude regarding the available power. Therefore, the point value calculation system is much less bracketed for Star Trek ships than native Darkstar ships, with cost being a simple function of a base for class plus 1 point per 100 units of available power in the design process.
  The design tables for the Klingon K't'inga class. Systems like Shielding, impulse propulsion, and warp drive are far more efficient in the Star Trek 'verse (thus lower power draws reflected here). This allows a typical Star Trek ship to carry much better shielding and move much faster than a comparable-sized Darkstar analog. However, the Darkstar ship usually has much more powerful weapons, and thicker hull plating. The point of this project is to allow Star Trek ships to fight Darkstar ships ... or Star Trek ships to fight each other in the Darkstar system.
Massive 500-Point Battle, Star System Almost Lost, Faction Hangs by a Thread
FROM: UNITED NATIONS REGIONAL COLONIAL CENTER
21:45 SOL GMT, 14 MARCH 2521
BREAKAUTH: 181072.18J
CLEARANCE: SECRET (NATIONAL)
**UNITED NATIONS COMMUNIQUE**
A major shift seems to be in the making in the ongoing Third Hercules War. Reports continue to come in from the far-flung systems of the Hercules Rim, and the full impact of recent events presently remains unclear. However, observers agree that the United States had undertaken a significant shift in strategy, and made a much more aggressive move in the conflict.
Until recently, the “Coalition of Eagles” (United States, Holy Russian Empire, and supporting factions) have pursued a “siege” approach to the Third Hercules War. With Russian colonies along the coreward shoulder of the Hercules Rim at Kransaya Nadhezda (“Red Hope” at 72 Hercules), and American and Indian Republic colonies along the spinward edge at Vega and Bhogavati (Alpha Lyra and HD 176051), the idea was to squeeze the British and Japanese in their more central colonies until their governments ceded at the peace table.
When the American and Indian Navies more or less smashed the “Black Dragons” (Khitan-Tunguska Free State) out of the war and forced them to abandon their colonies at Khaizan’s Haven (14 Hercules), the moment seemed perfect to expand on this strategy. Seizing this abandoned system would all but surround the British and Japanese with American, Indian, and Russian holdings. However, the Holy Russian Empire suffered a sharp defeat at 14 Hercules when the Arab League abruptly entered the war and signed an alliance with the Renkei Alliance (United Kingdom, Japan).
Acknowledging at last that this “siege strategy” will not work, the Americans have now embarked on a much more direct approach. The newly-arrived “Task Force Liberty” carrier-cruiser group, under the command of Captains Zachary Irons and David Cheatham, is sent directly into the British colonies at Hawking’s Star (HR 6806). To support this effort, a Russian Slava-class heavy cruiser, CPK Rotislav, attacks from the other direction, vectoring in from Krasnaya Nadhezda. The attack takes quite a while to put together (some of these ships have to cover upwards of 18 light-years), and doesn’t actually commence until the middle of March, 2521. Even at this late date, the strike is in fact somewhat rushed. Originally planned as an assault (supported by two Saipan-class USMC planetary assault ships), the time scales were projected out into the beginning of May, by which time any chance at surprise would sure be lost. Instead this operation is to be conducted as a strike, directly it the heart of the Hawking’s Star colony.
As the Americans and Russians converge on the HR6806 system and emerge from their 10th magnitude Darkstar waves (easily detectable well in advance, especially with ships this large), the British mobilize a powerful defense force. The entirety of Cruiser Squadron “A” (Agamemnon) is mobilized against the threat. Of particular note will be the elite aerospace strike group of the large Valiant-class light fleet carrier HMS Vindictive pitted against the elite (some would say nigh-legendary) aerospace squadrons of the Endeavor-class USS Liberty, including Fighter Squadron VSF-221 (“The Dead Rabbits”) and Attack Squadron VSA-193 (“The Eight Ball Express”).
US/Russians: @Oriskany
UK: @Damon
497-point raid
Carrier-Cruiser Raid into Heart of Enemy Star System – Hawking’s Star (HR6806) – March 14, 2521
 Here is the current state of the Hercules Rim warzone. With their hopes dashed for an allied foothold at 14 Hercules (Khaizan’s Haven which could’ve been a possible staging point “behind” the British and Japanese), the Americans resolve to kick down the front door with a direct strike into HR6806 (Hawking’s Star).
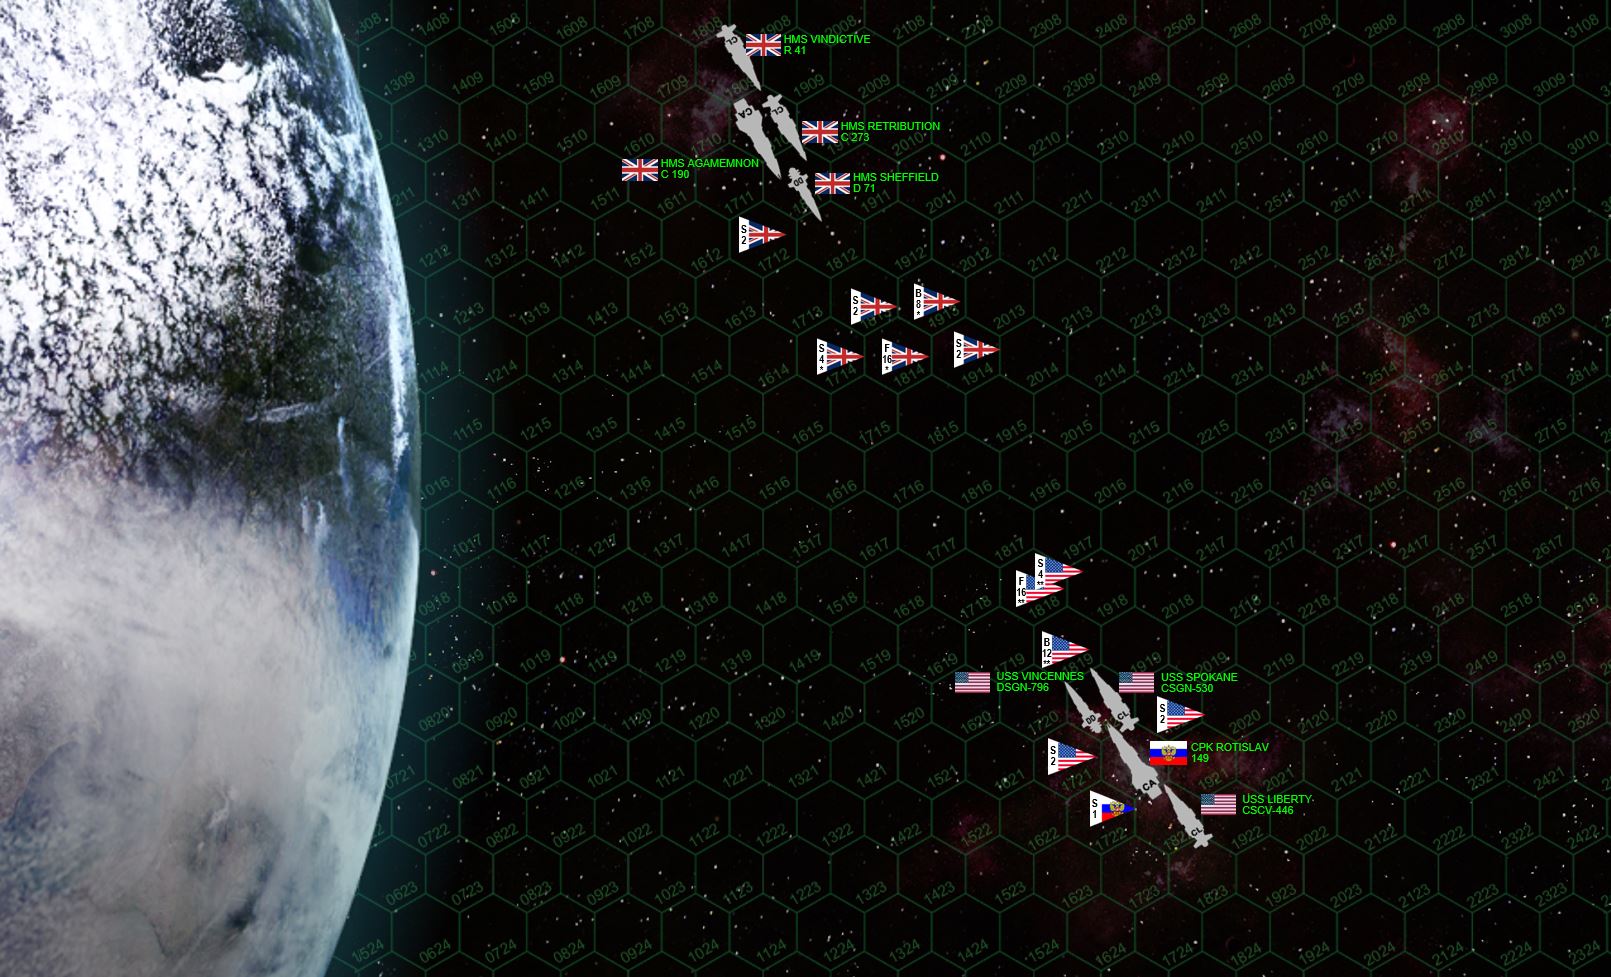 Here is the matchup. Note that most of these aerospace groups are either elite (one “*”) or double-elite (two “*”). The cruisers will be trading heavy gunfire to be sure, but there will also be a very nasty dogfight as over 70 fighters, bombers, and scouts mix it up or launch devastating aerospace strikes on the capital ships. Speaking of the warships, Cruiser Squadron “A” has become a truly formidable force. Over almost a year of play Damon has worked this task force up to nearly 500 points including all his upgrades, in fact he can’t upgrade any more or he’ll be over 500 points, beyond the command limit of Lord Edward Cavendish. He’ll have to pick up a few promotions and command ratings before he’s allowed to command a 500+ point FLEET instead of a 251-500 point Task Force. In summary, he needs a spot in the Admiralty, at least a Commodore’s star on his shoulder.
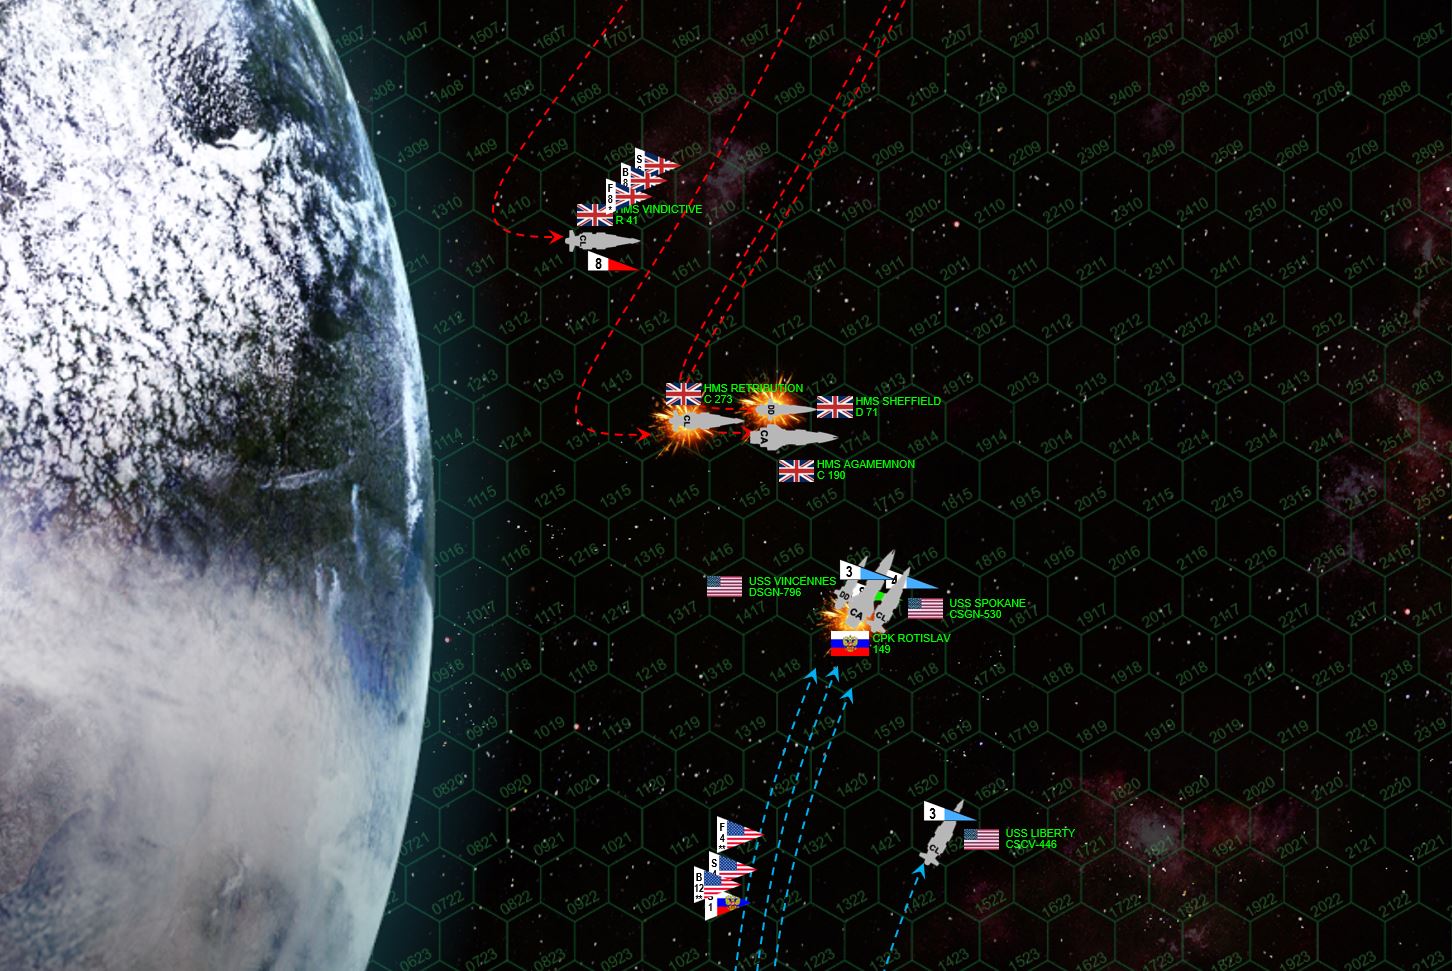 The battle begins. The Americans and Russians set a very fast approach speed, closing the distance very quickly against the British. Once the Agamemnon loses initiative, the heavy Rotislav lines up a perfect broadside against her. Note that the Rotislav will have a broadside on the Agamemnon but the Agamemnon will only have forward guns in return. Sleek, hyper-advanced, and heavily-upgraded (not to mention extremely expensive) American USS Spokane (San Antonio class light cruiser) streaks in as well, along with the destroyer USS Vincennes (Valcour class, same as USS Oriskany only not nearly as well-upgraded). Once the HMS Sheffield and HMS Retribution pull in alongside and astern of Agamemnon, the American and Russian guns switch to them. Clearly they want an early lead in this battle, so decide to clip a few of the smaller ships first. Even as the British and American carriers hang back and begin launching their elite fighter groups, the Russian and especially American buns positively maul the Sheffield, burning through her forward magazine and bridge ... while the light cruiser Retribution is all but blown in half. British fire mauls the Rotislav ... but this is possibly a mistake. While certainly the biggest ship on the table (heavy cruiser, 168,000 tons), she’s but no means the most dangerous (she’s worth only 101 points, the much lighter USS Spokane is 163). The USS Spokane, Liberty, and even Vincennes are probably the bigger threat, and thus get his first deadly round of fire “free.” It cost the British the HMS Sheffield and Retribution, while the CPK Rotislav’s port bow is gutted, forward magazine hit, and bridge damaged ... but remains operational at least for now.
 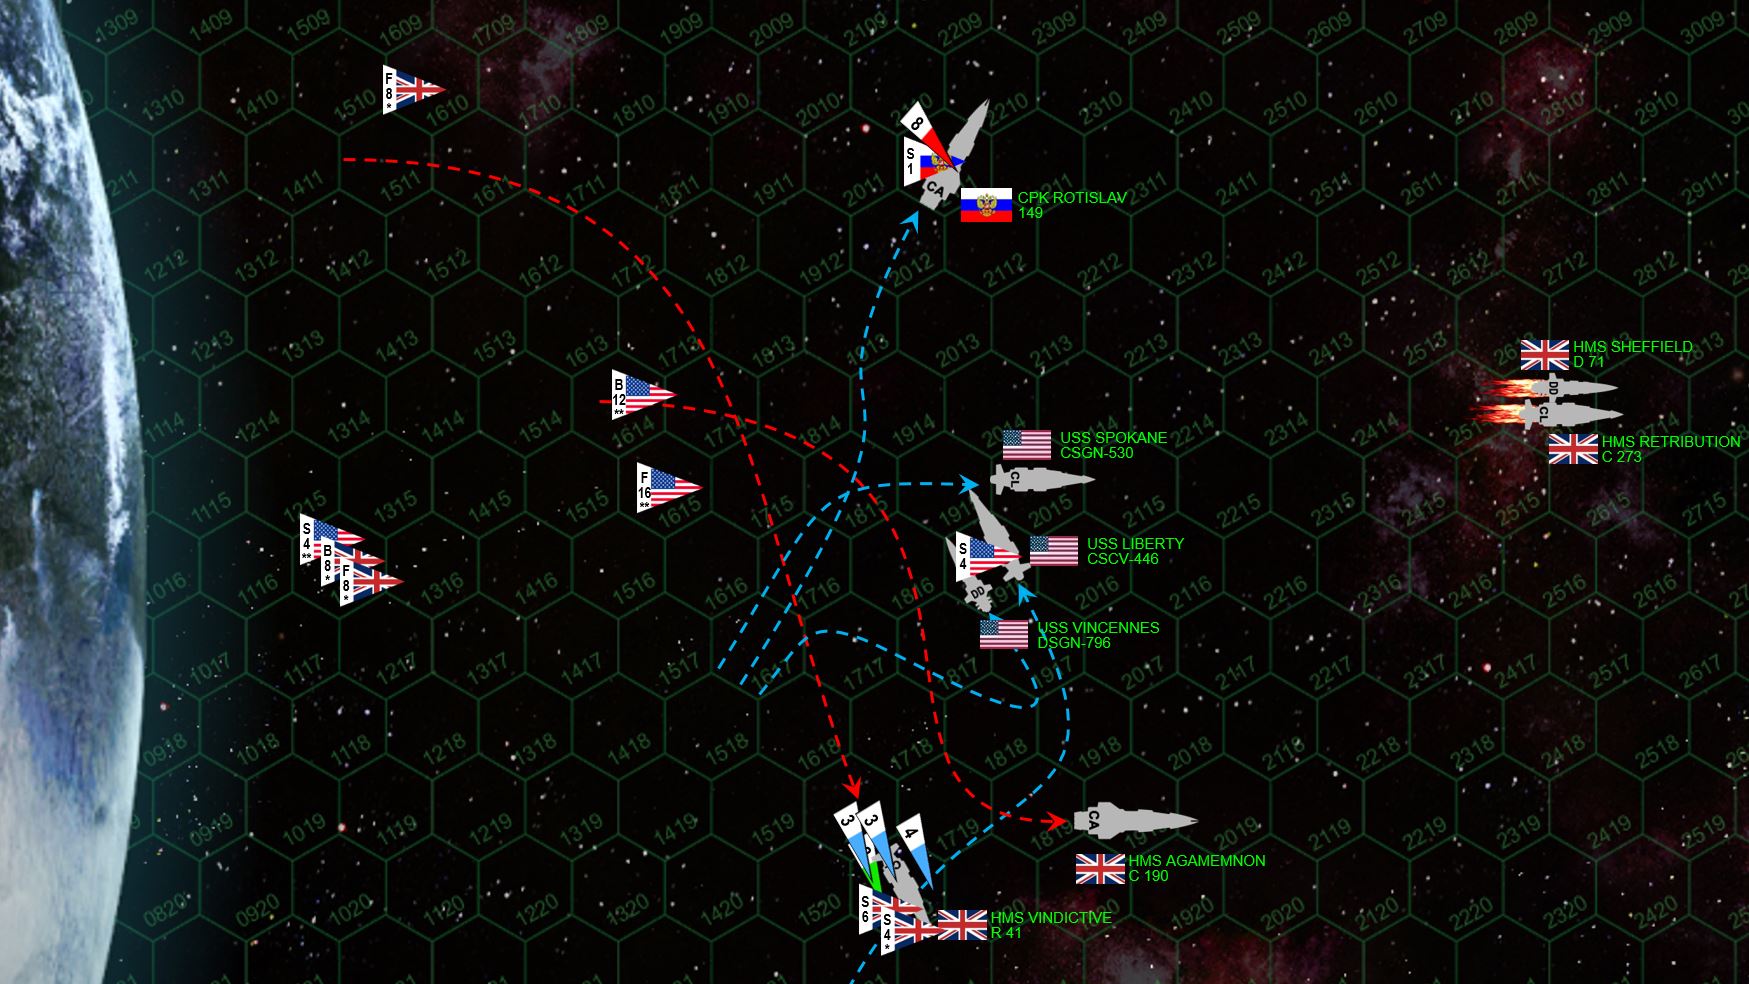 Still moving very fast (neither the British or the Americans are wasting any time on this one), the two fleets race past each other, many ships standing on their retros and gravity rudders, screaming to slow down and turn as best they can. One exception is the Rotislav, which is already breaking for the far edge of the table. Even heavily damaged, if she can remain operational she’ll remain a potent threat this deep in an enemy star system (RAID victory rules in this game). Surviving British and American ships also struggle to remain close together ... because by now both HMS Vindictive and USS Liberty have completed their aerospace launches, and both sides are ready to unleash a withering barrage of aerospace missiles and torpedoes. The bombers of USN Attack Squadron VSA-193 (“The Eight Ball Express”) put a hail of ASM-56 Harpoon torpedoes into the stern of the Agamemnon, while the fighters of USN VSF-221 (“The Dead Rabbits”) do the same with their ASM-92 Hellfires. Many are shot down, along with Mark 48 torpedoes from the USS Liberty, Vincennes, and Spokane. But enough hits are scored in this massive strike that the Agamemnon is crippled. This explains the strategy the Americans turn the previous turn, knocking down a few smaller British ships, even though they were smaller, greatly weakened the overall British mass driver point defense strength in anticipation of this combined aerospace – torpedo strike.
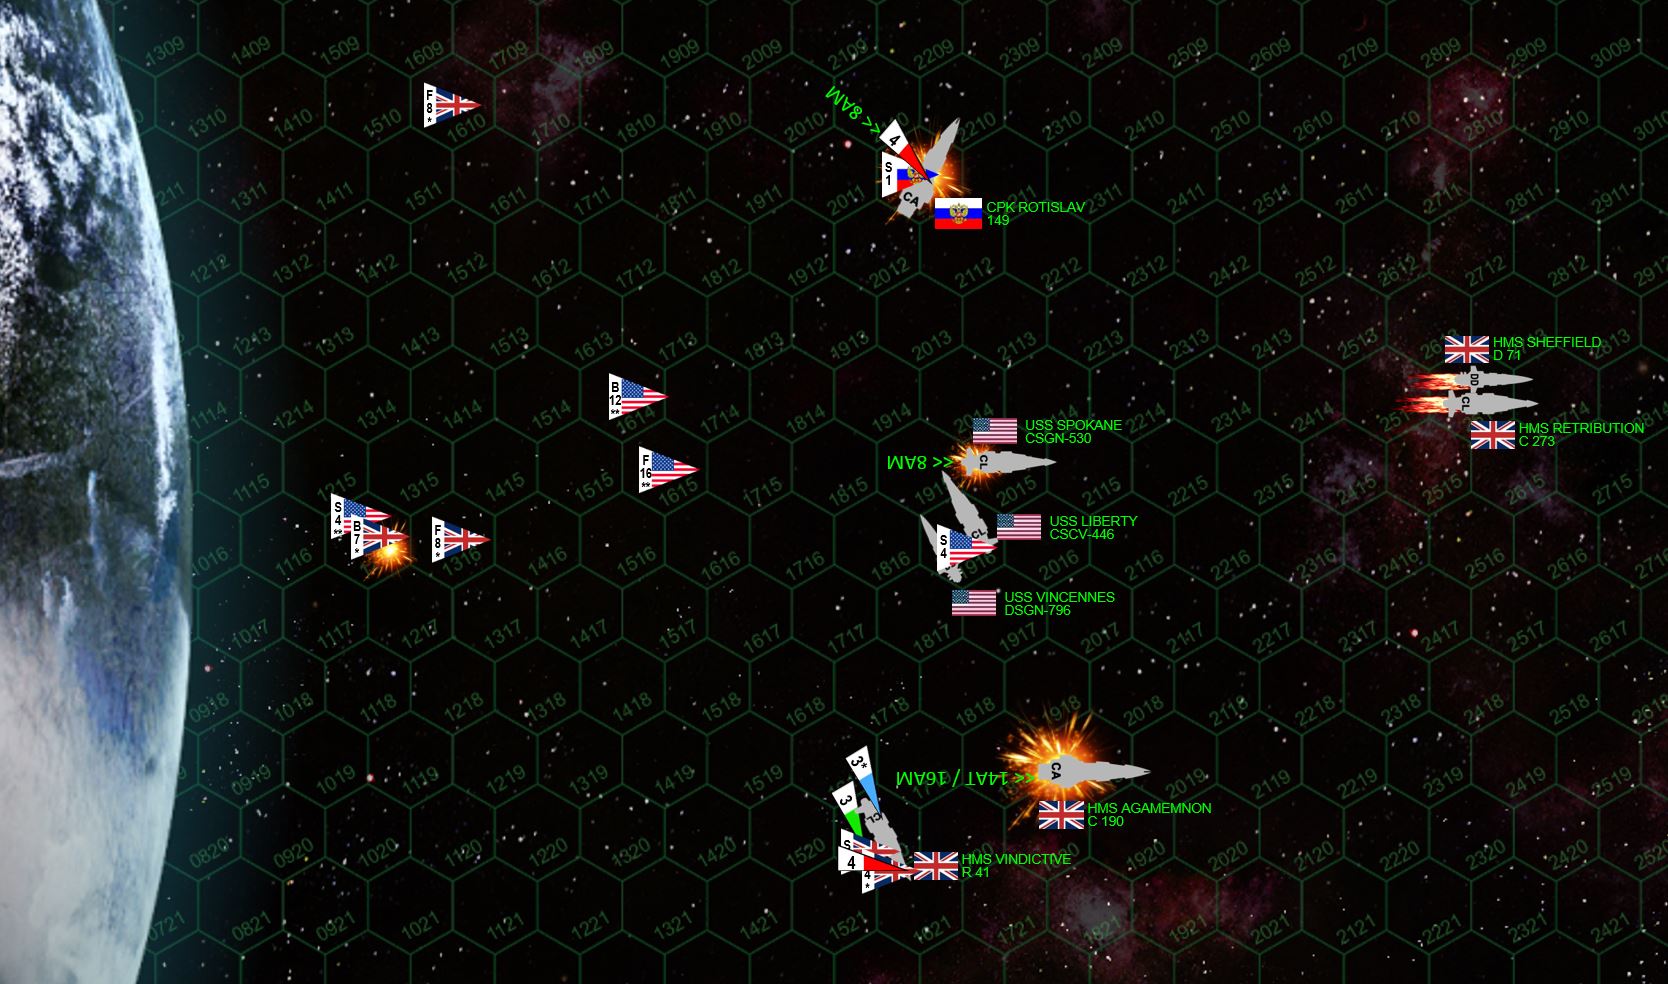 The British meanwhile, also have a significant aerospace wave of their own. Three factors, however, prove decisive. One, the Americans have lost no ships. Although the Rotislav is too far away to help with point defense, the Liberty has electronic warfare upgrades and together with the Spokane and the Vincennes is able to put up a much better defense. Two, the British force doesn’t have quite the same number of capital ship gravitic torpedoes, allowing the Americans to focus against the British fighter/bomber strike. Three, the British divide their strike between the USS Spokane and the CPK Rotislav. While this is almost always a bad move, in this case it might’ve paid off because the Rotislav has completely lost its port bow shields. One missile or torpedo in the bridge would knock out the ship and net the British 100 points. Almost all the missiles hit, but hit LOCATION is just plain bad luck for the British. Almost all the missiles just hit too far forward, they blow a virtual tunnel through the Rotislav’s fo’c’sle and two missiles literally pass THROUGH the gaming hole and never explode. Unbelievably, the Rotislav escapes under her own power, denying the British victory points. Meanwhile, the weakened missile strike against the Spokane is largely fended off. The one bright spot for the British is the gunnery against the stern of the USS Vincennes, enough to cripple her and leave her burning and adrift in space.
 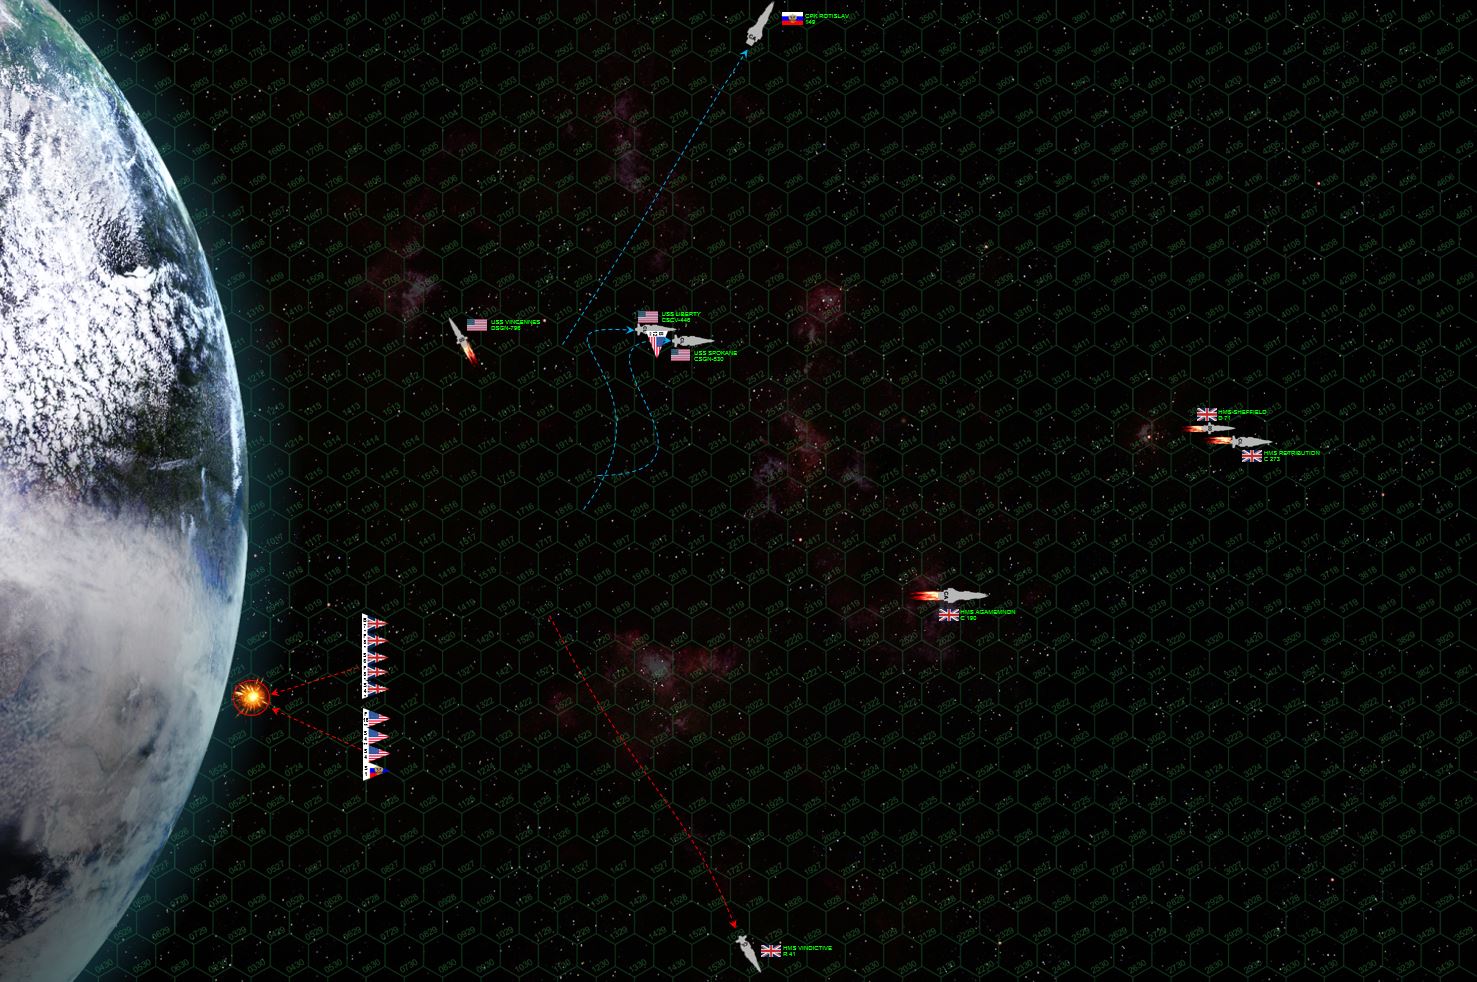 Now alone, the British carrier HMS Vindictive beats a hasty break-off, denying the Americans at least victory points for crippling, destroying or even capturing her. The fighters and bombers engage with the Americans near the planet in a huge dogfight, helping cover Vindictive’s withdrawal. The move costs the British all their bombers, but American fighters suffer heavily (engaged against British bombers while British Starfires engaged the American Corsair fighters). Meanwhile, the American Avenger bombers have all landed back aboard USS Liberty, re-arming for a second strike that will never be necessary.
 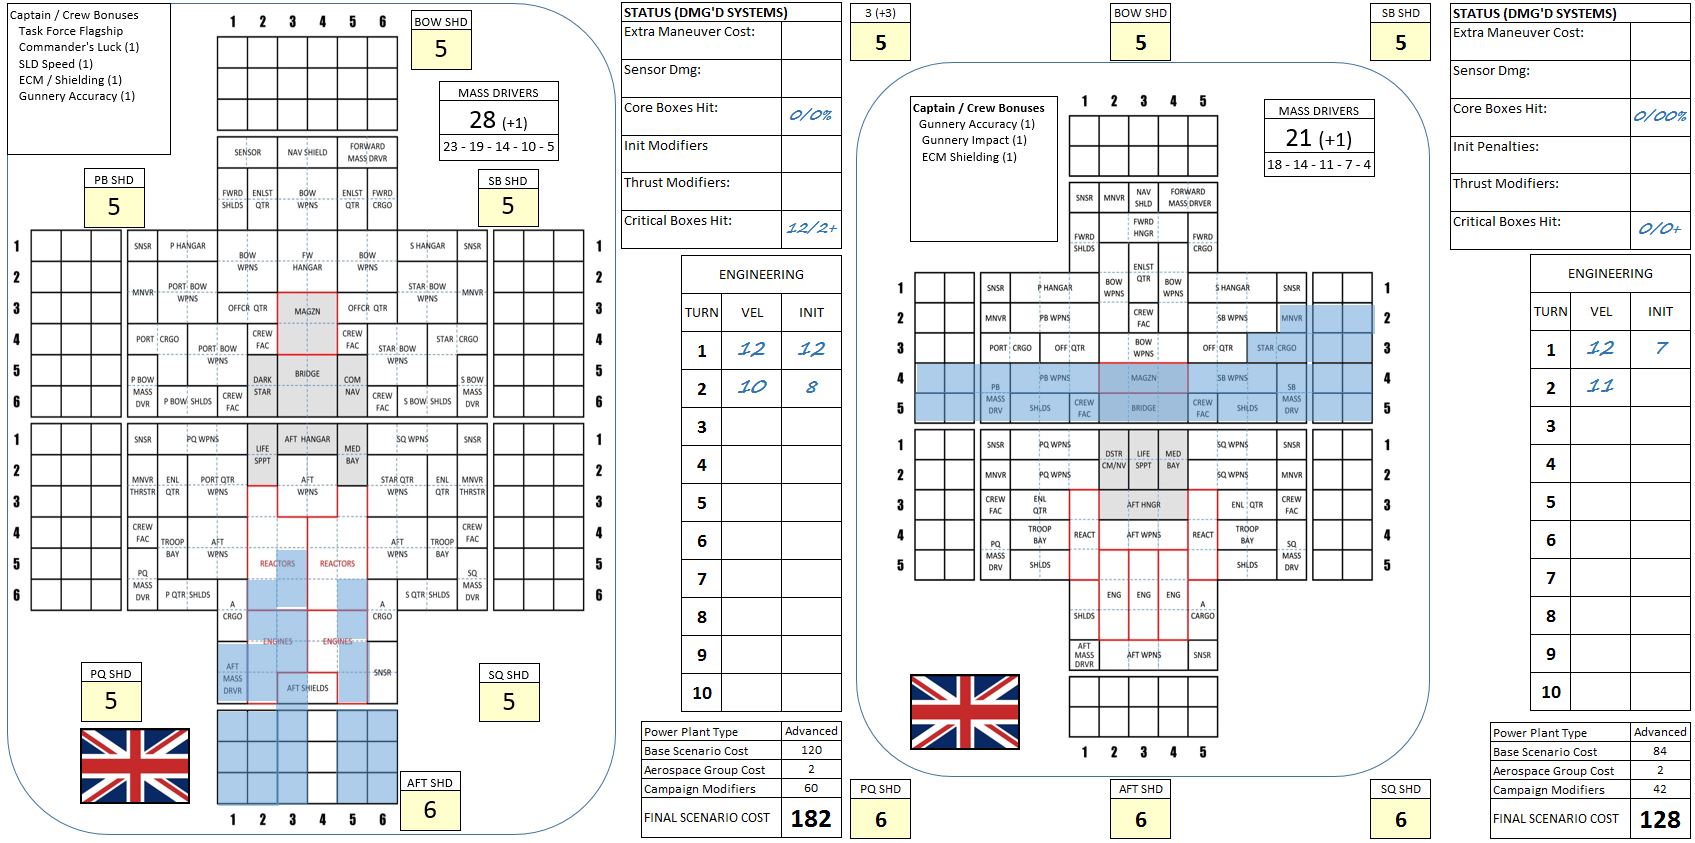 This battle was mercifully short, never formally lasting into Turn 04. The Americans have won by +321 out of a 497 point battle, a 65% margin that clearly indicates a DECISIVE victory. Honestly, I have a lot of experience with the particular ships and these particular upgrades, I feel Damon might have misidentified the Rotislav as the greater threat vs. USS Spokane (again, 101 points vs. 163 points), and the British were just dogged by plan bad luck (by all rights the Rotislav should have been crippled TWICE – as it was she wasn’t even driven off).I would say the divided aerospace strike was a “mistake” – except it wasn’t, it was an honest gamble that should have worked ... it just didn’t due to spectacularly bad hit LOCATIONS on the Rotislav. By contrast, here are the Warship Record Sheets for HMS Agamemnon and HMS Retribution. Not all the American guns hit, but those that did, hit right where they should have. The cripple results on these British warships are almost COMICALLY surgical. This is just Lady Luck, nothing more.
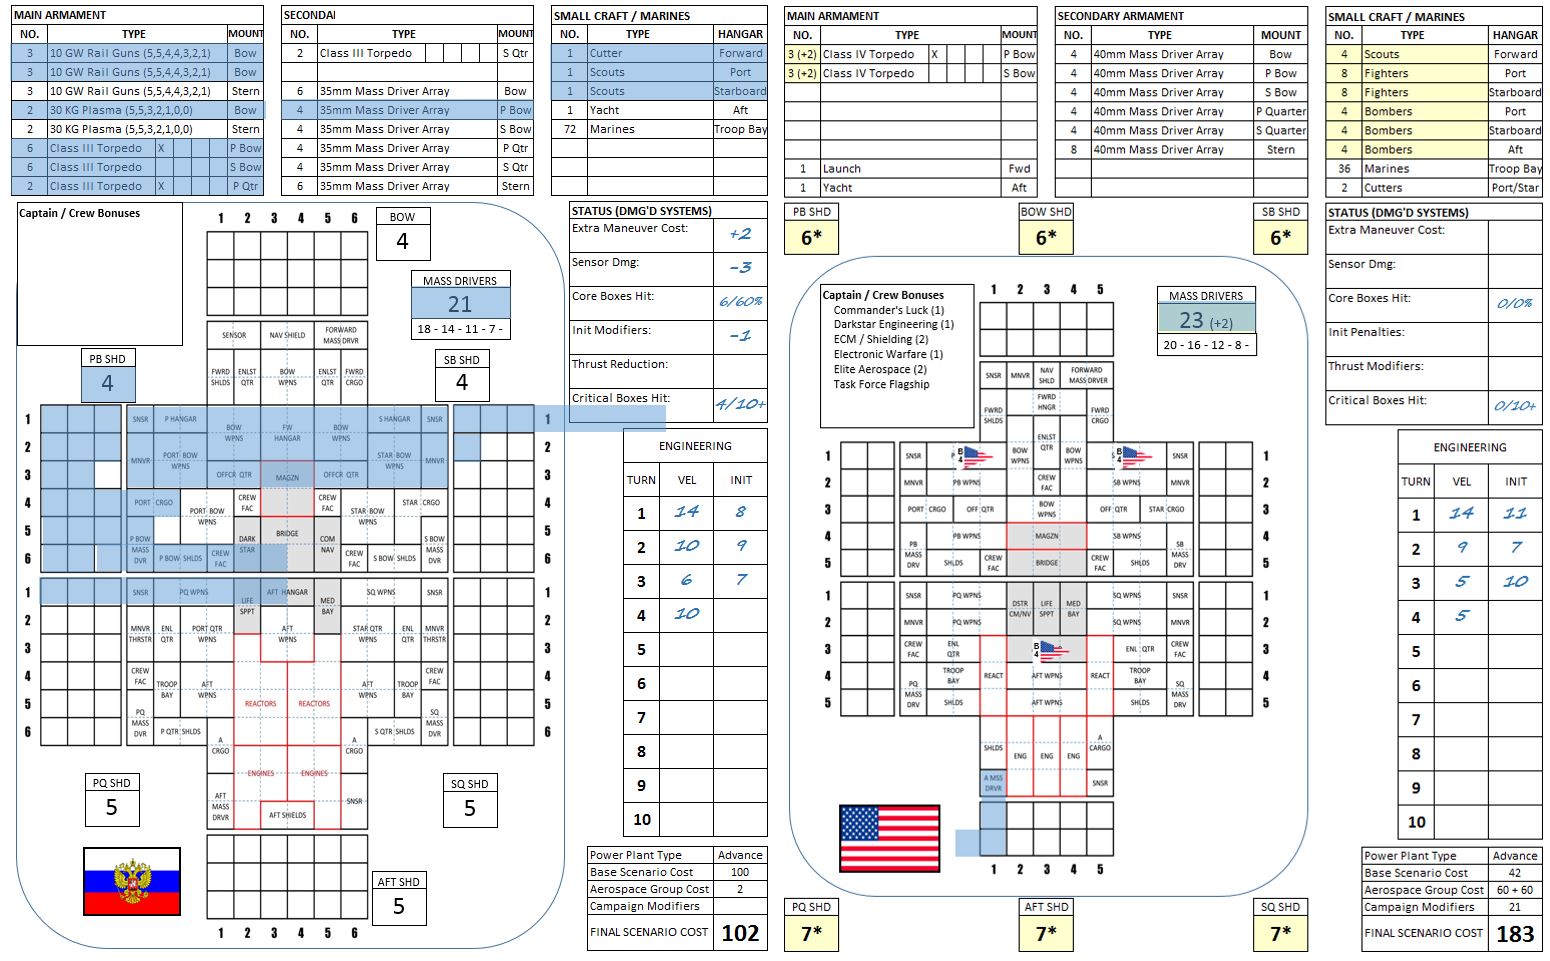 Here are the WRS for the hapless CPK Rotislav and USS Liberty. You can see the amount of punishment the British put into this Russian heavy cruiser, but like a stubborn Russian mule she just wouldn’t go down. The Liberty, meanwhile, is practically unscathed ... we can see the bombers where they were landed in her bays, rearming for a potential second strike.
So what does this shattering result mean? Well, a major defeat in a 400+ point battle means +/-6 campaign points for the factions involved. The Americans win +4, the Russians +2, and the British lose -6. The British campaign tracker now has them at -10, the absolute limit of their government’s commitment to this war. Suffice it to say that debate rages in the Parliament over whether to sue for peace, and the Prime Minister has been subjected to a Vote of No Confidence, which for the moment he has survived … barely.
Along the Hercules Rim, and specifically at Hawking’s Star … while a MAJOR victory of this scale normally gives the star system to the winner outright, please remember that this game was played as RAID, not an ASSAULT. In campaign rules, the attacker has to declare they’re launching an assault – where victory points are calculated differently and thus tabletop strategy is decidedly different – THEN win a battle of sufficient size (although it doesn’t necessarily have to be a MAJOR victory). This represents operational and logistic planning and support for an actual colonial invasion, like the two Saipan class planetary assault ships mentioned previously (these are basically Endeavor class light fleet carriers, outfitted to carry assault boats, troops, and grav tanks instead of fighters and bombers). So while the Royal Navy has been decisively crippled at Hawking’s Star, the Americans just don’t have the Marines, engineers, and logistic support to mount an immediate invasion, at least not closer than 12 light-years.
So we’re settling on a compromise. The Americans now have a FOOTHOLD in the Hawking Star (HR6806 system), not at the terrestrial planet itself, but among the moons of the outer gas giants. In narrative terms, we could have the Marine assault ship USS Tarawa (part of Task Force Oriskany, upgraded with 12-mag Darkstar Waves) get to HR6806 in less than five days, and put a company or two down on these perimeter outposts. But a destroyer-sized carrier / assault ship like the Tarawa could never boot enough boots on the ground to take Hawking’s Star colony itself, at least not all in one go.
That said, the Americans are dominating in the Third Hercules War, and the British are clinging to survival by the slenderest of threads. After victories in the Psi Serpentis War, the Second Hercules War, and most recently in Duchess Annabel’s War, are they finally about to lose one? One more decent American or Russian victory in the Hawking’s Star colonies will lose the system for the Crown, and force the British to sue for peace.
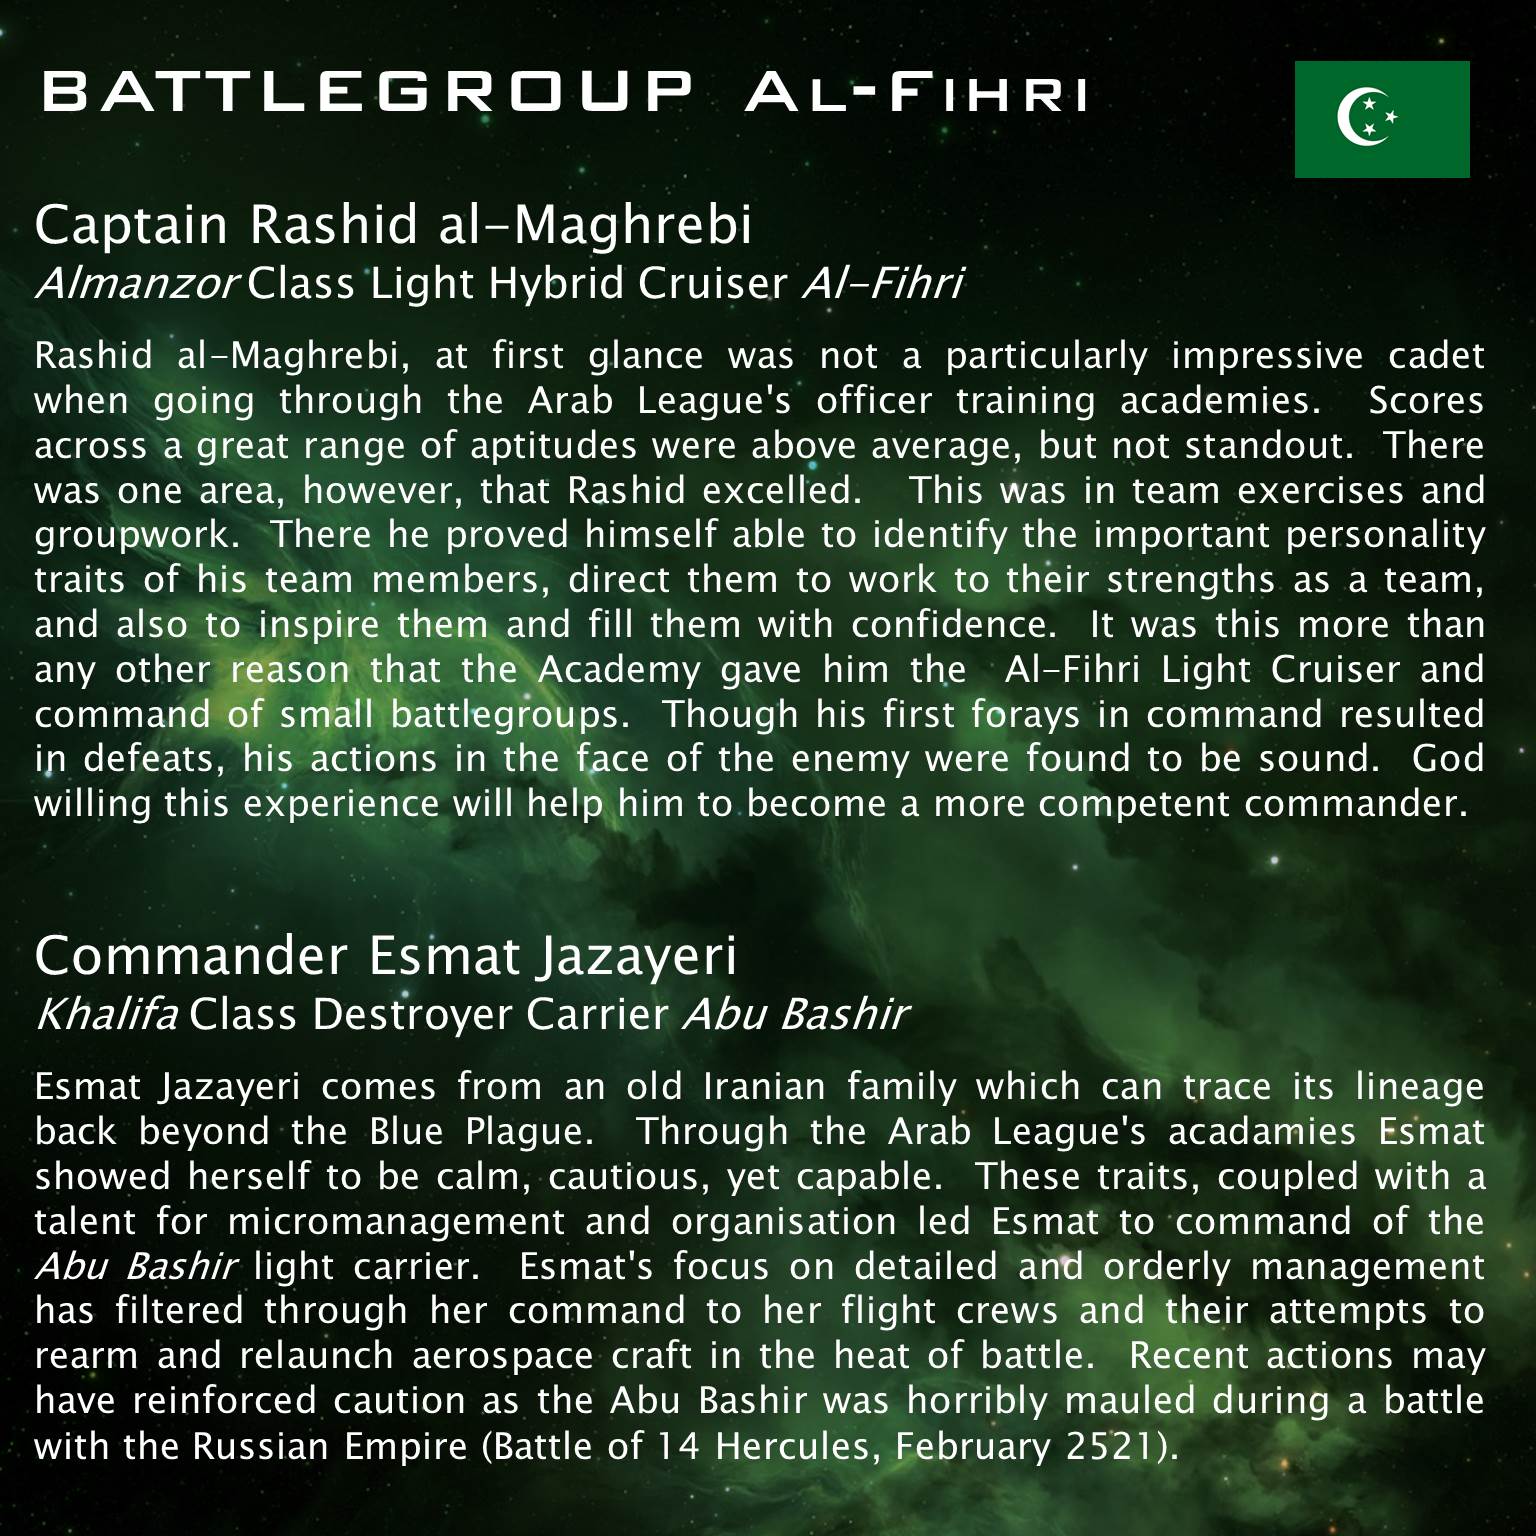
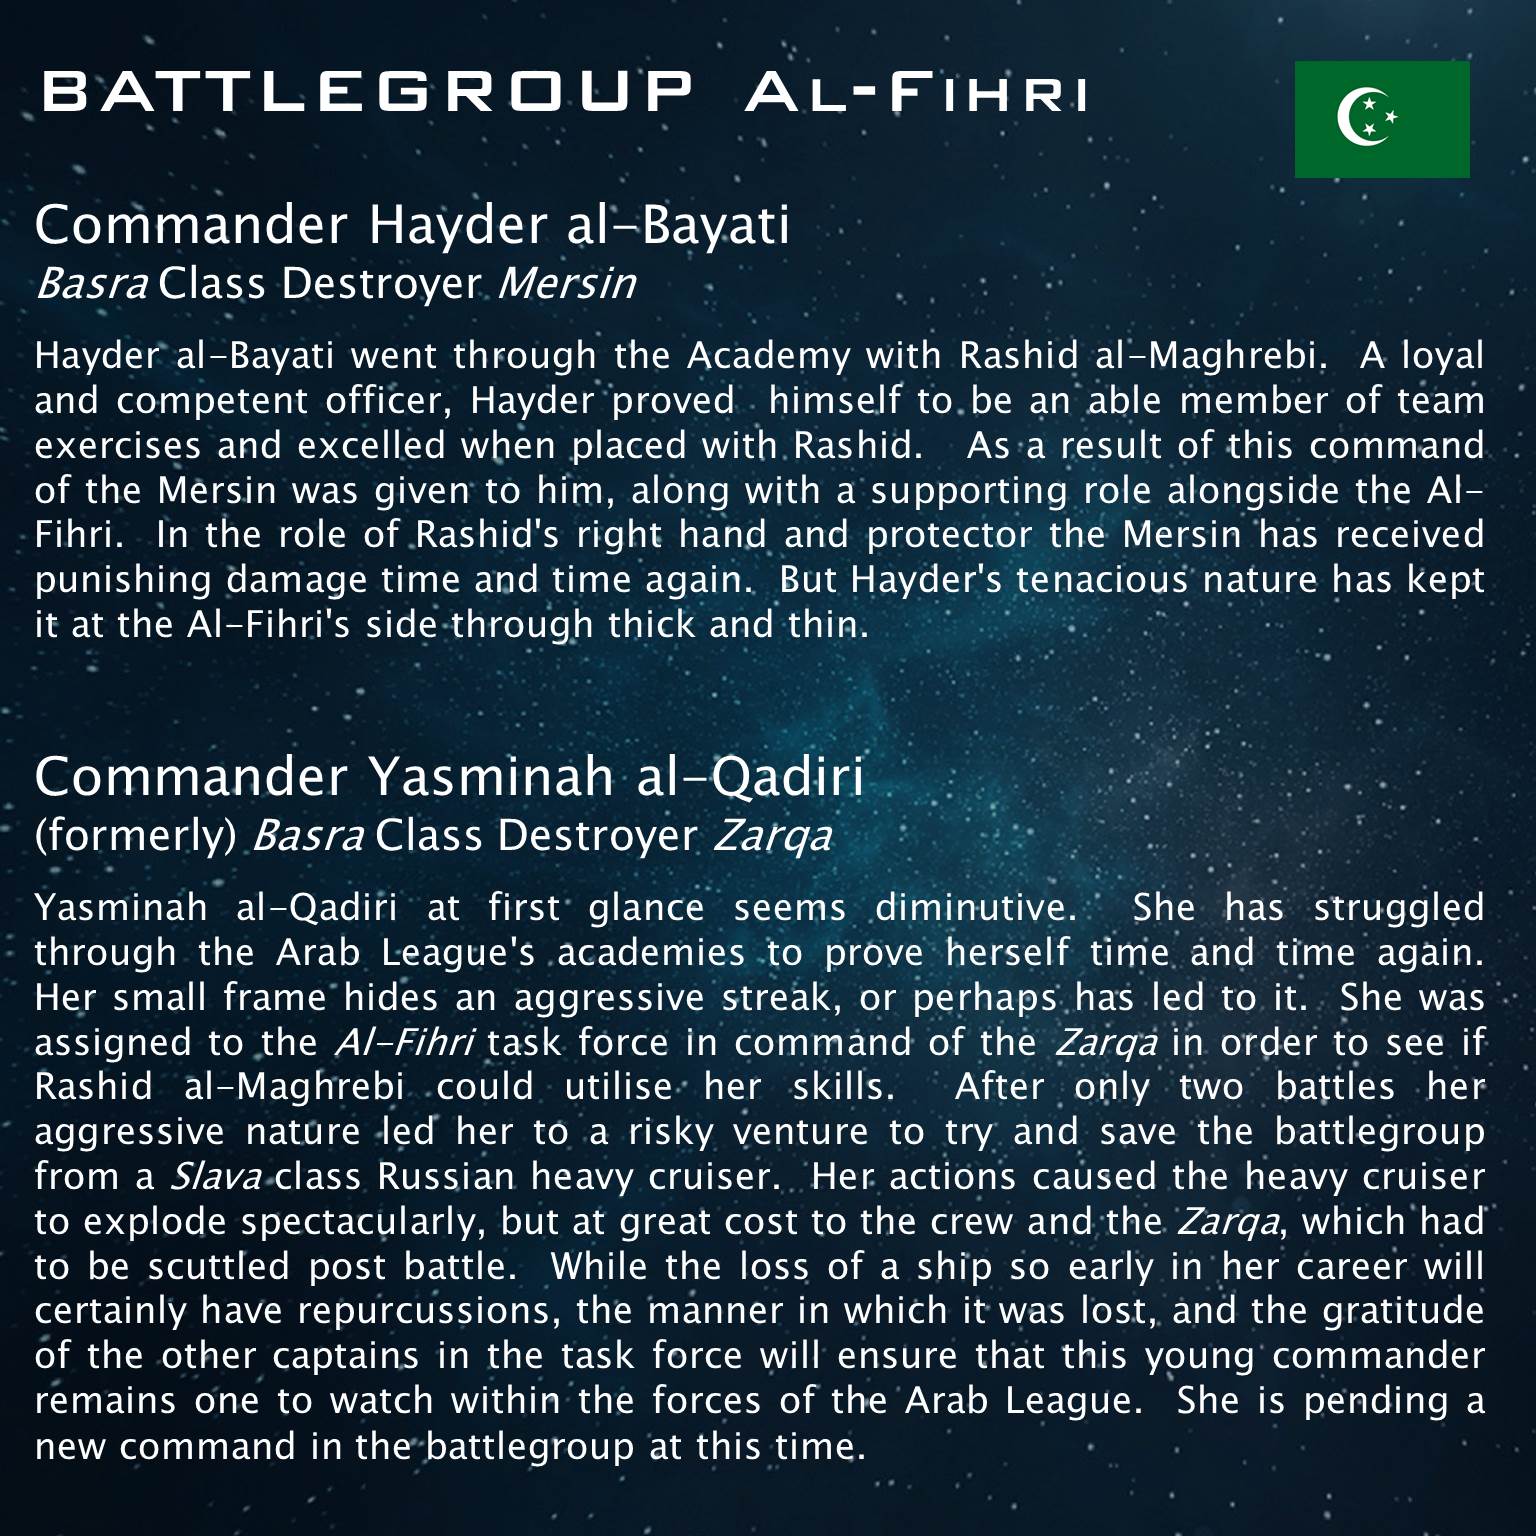
Battlegroup Al-Fihri
Our friend @muakhah has written up backgrounds for the commanders of his Arab League battlegroup, a set of commanders that have definitely been through the “school of hard knocks” when it comes to Darkstar, but has come through with flying colors on their first big victory at the Battle of Khaizan’s Haven (14 Hercules) – February 2521.
I put the slides together, but the writing is his. 😀