


Husaria – Building a Polish army for the 1620s


Recommendations: 2003
About the Project
This project describes my efforts to build a 1620s Polish and Lithuanian Commonwealth army, including the famous Polish ‘Winged’ Hussars. I will cover the historical research, choosing the miniatures, build and painting the miniatures, and finally hopefully playing with the army. (N.B. Since starting this project I have added a couple of further projects to the system. One contains opponents for the Poles, the Swedish army. I had been adding entries about these here but it was a perhaps bit confusing. See here for the Swedish project: https://www.ontabletop.com/project/1798825/ . I also started a project for the set up a of demo game planned for Salute 50, using the Poles and Swedes, here: https://www.ontabletop.com/project/1798842/ .)
Related Game: Pike & Shotte
Related Company: Warlord Games
Related Genre: Historical
This Project is Active
Casualties of War
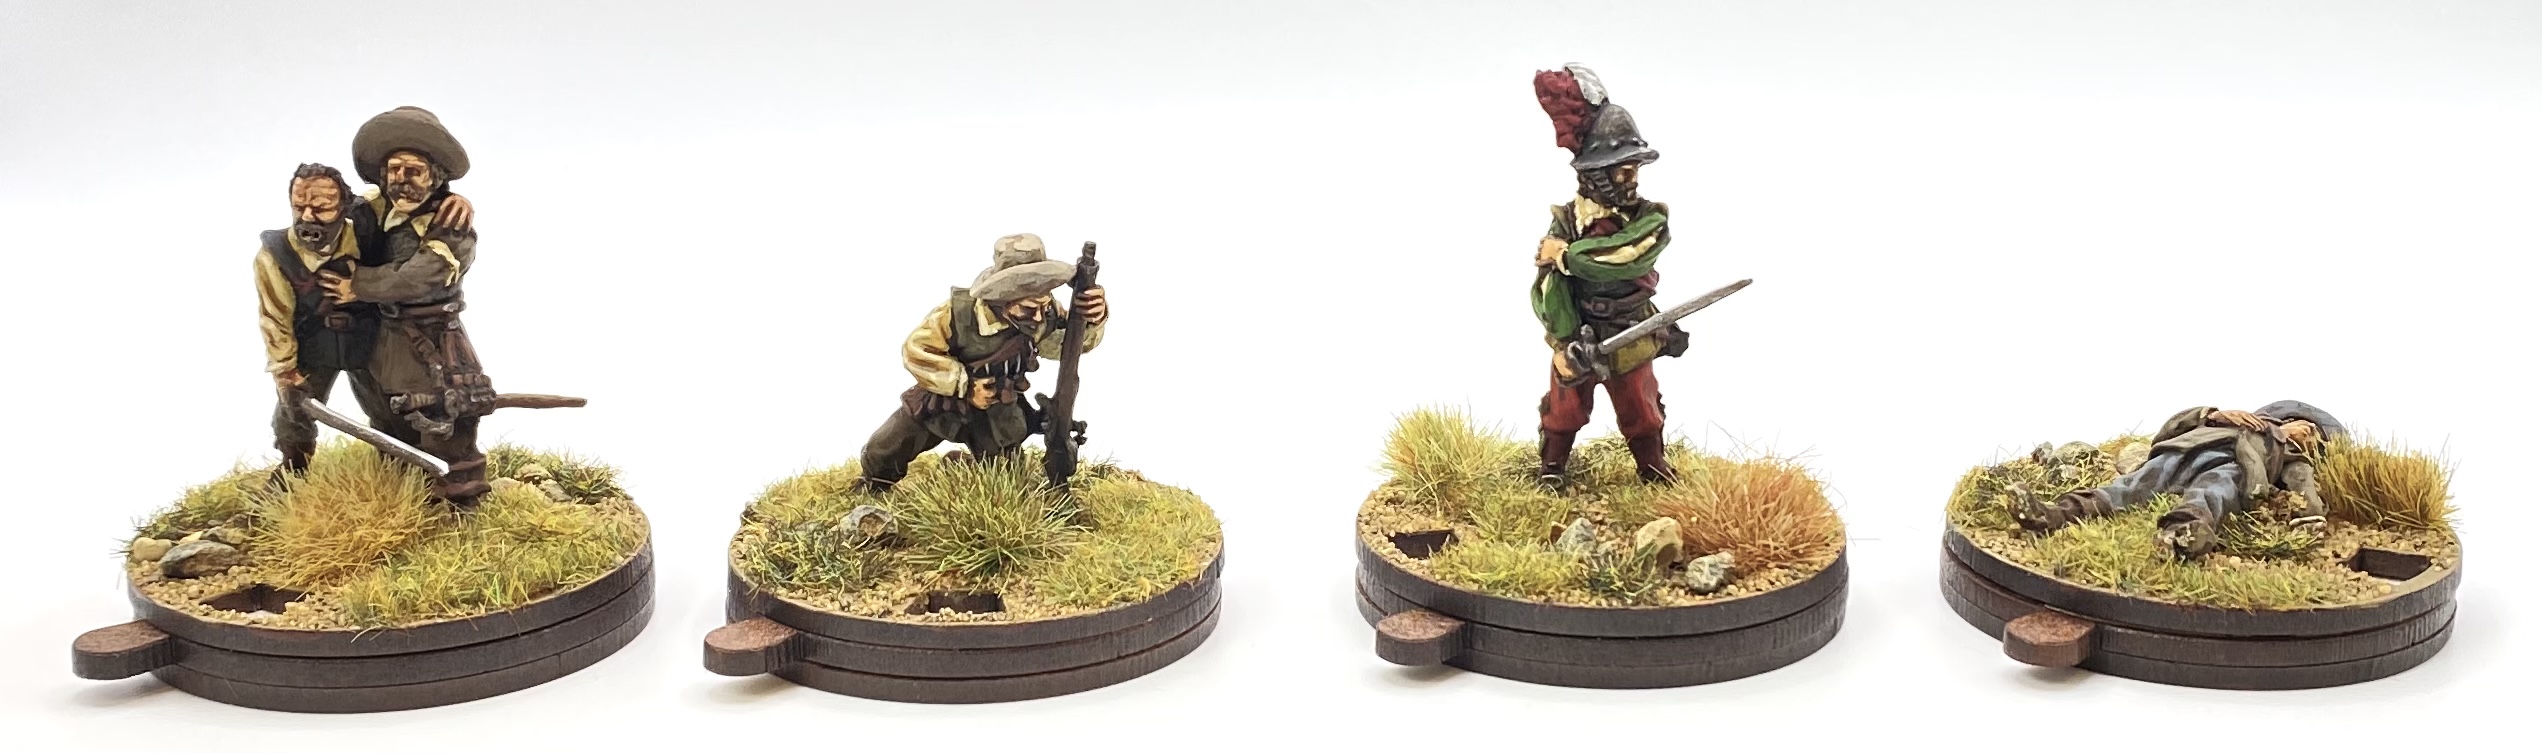 Casualty figures from the 1898 Miniatures Tercio range - 28mm
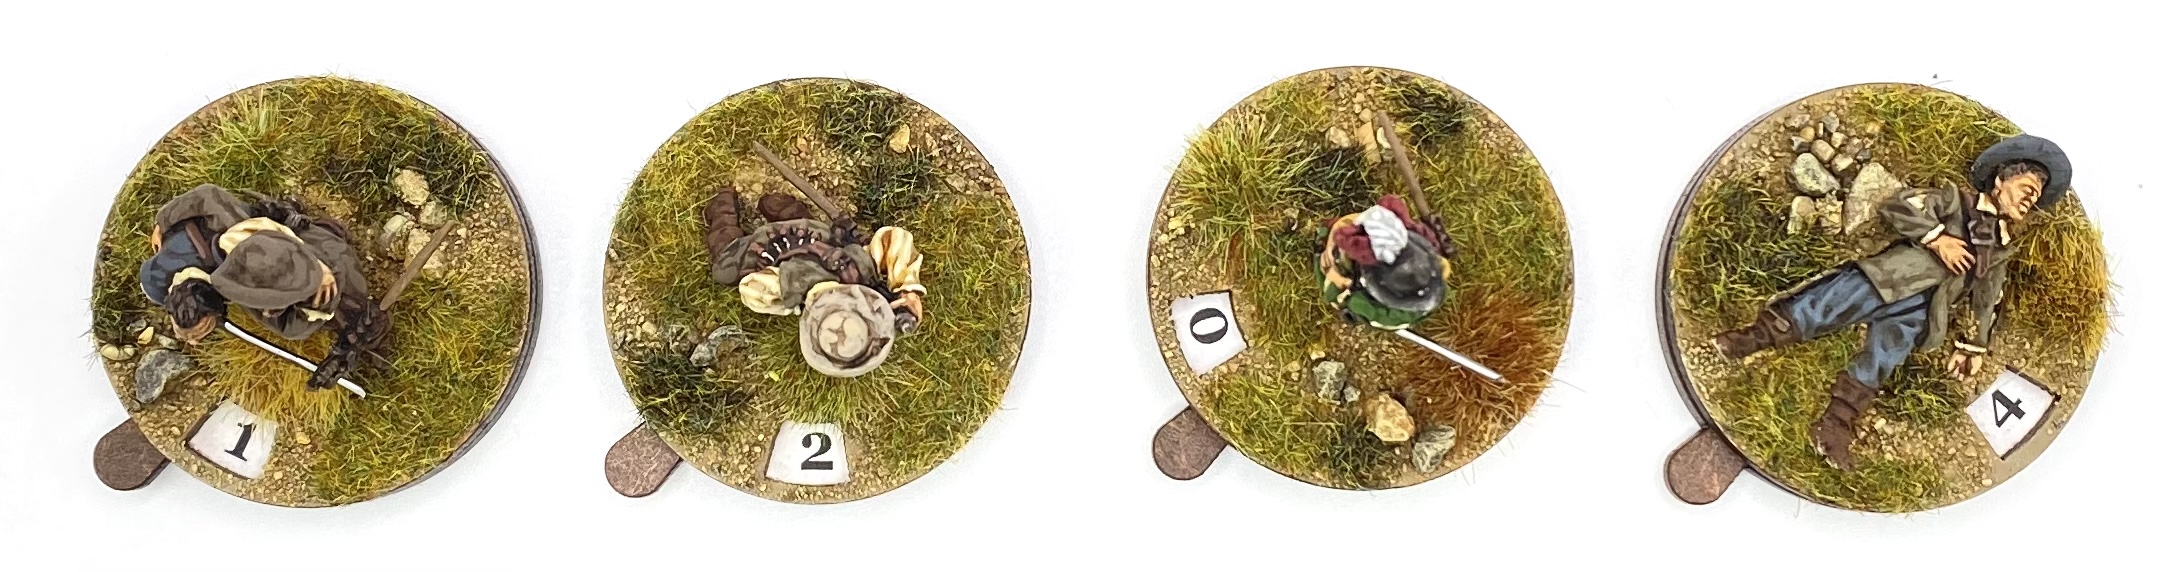
One piece of record keeping that is required for Pike and Shotte games is to keep a note of a unit’s loss of stamina points. You can do this with a small dice, but I find that these either get knocked over as figures are moved about, or that the dice get picked up by accident and used for other rolls! I am therefore a fan of using these counter bases from Warbases (link). I have used here the 40mm “Style 2” option. These are ideal to fit a 28mm figure which I think improves the look of a bare counter.
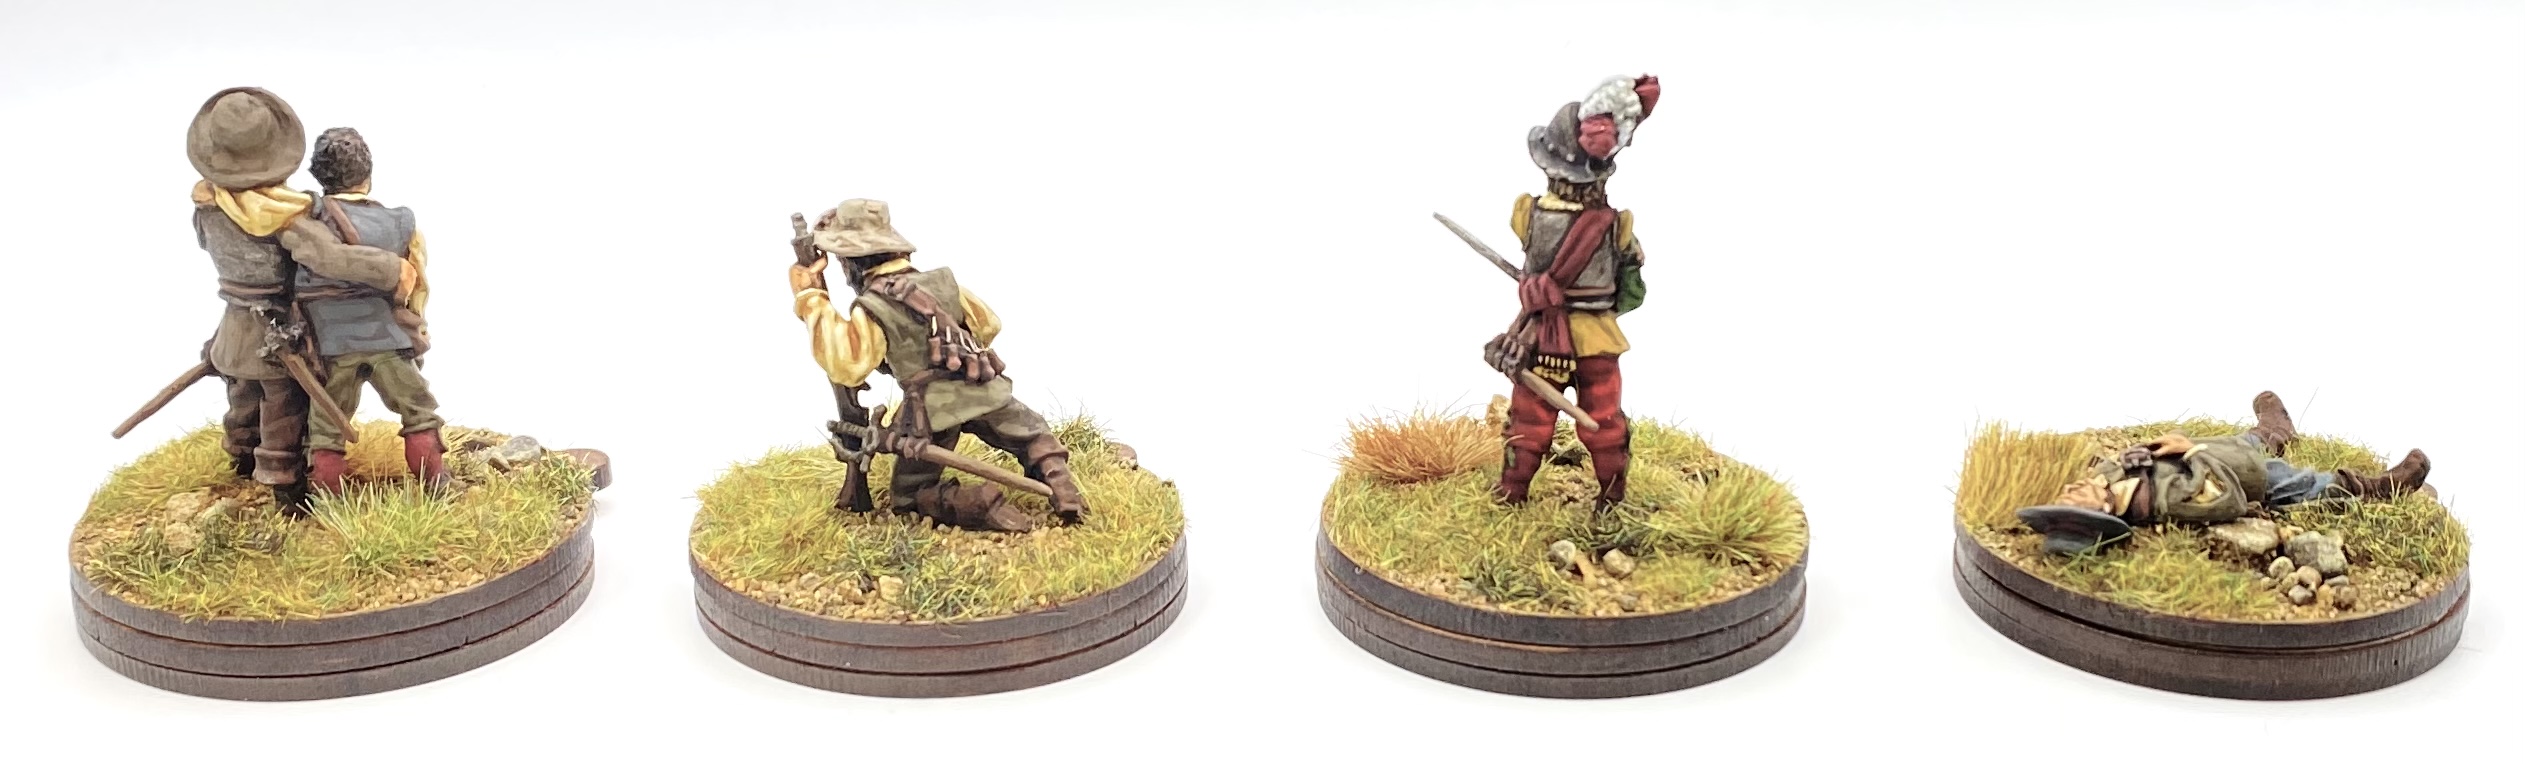
I was therefore delighted to see that 1898 included a ‘Dead and Wounded’ pack in their Tercio range (link). Having recently painted up a few units of shot from this range these casualty figures were ideal to use with them on the tabletop. In line with the rest of the range, the casualties are single piece, 28mm castings, some of which require the addition of a scabbard to the figure.
 Rear view of the casualty bases.
There are six figures provided in the 1898 Dead and Wounded pack, although two of them are provided as a single piece casting. I really like the poses of the figures as there are two or three that provide a nice change from the standard dead figure lying flat on the ground. I really like the wounded solider being helped by his comrade, and the wounded officer preparing to defined himself.
 Top down view showing the numbers.
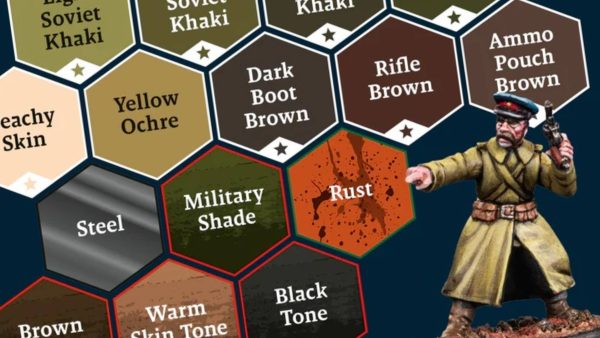
The figures were nice to paint up, and have enough detail to take washes. 1898 have a useful painting guide for the Tercio range on their site (link) that, as well as showing the overall technique, also has a handy table of the Vallejo colours that provide the ideal muted colour palette to represent the typical 17th century solider on campaign.
I hope you have found this project entry useful, and you feel inspired to create some of your own casualty markers.
Until next time!

Those Bloody Miniatures!
This entry takes a look at minis from a new figure producer, Bloody Miniatures.
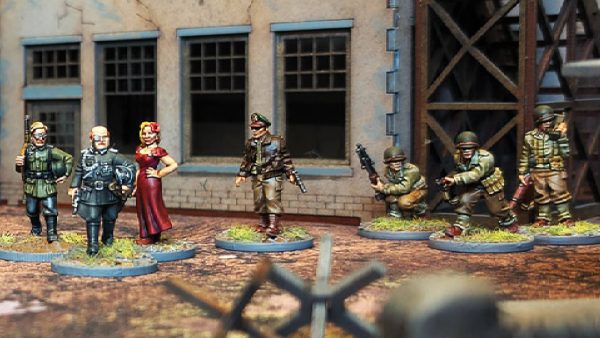
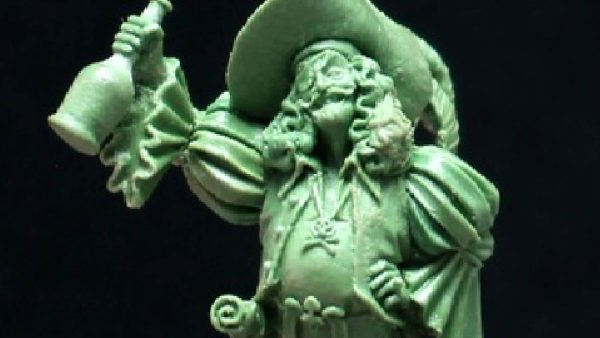
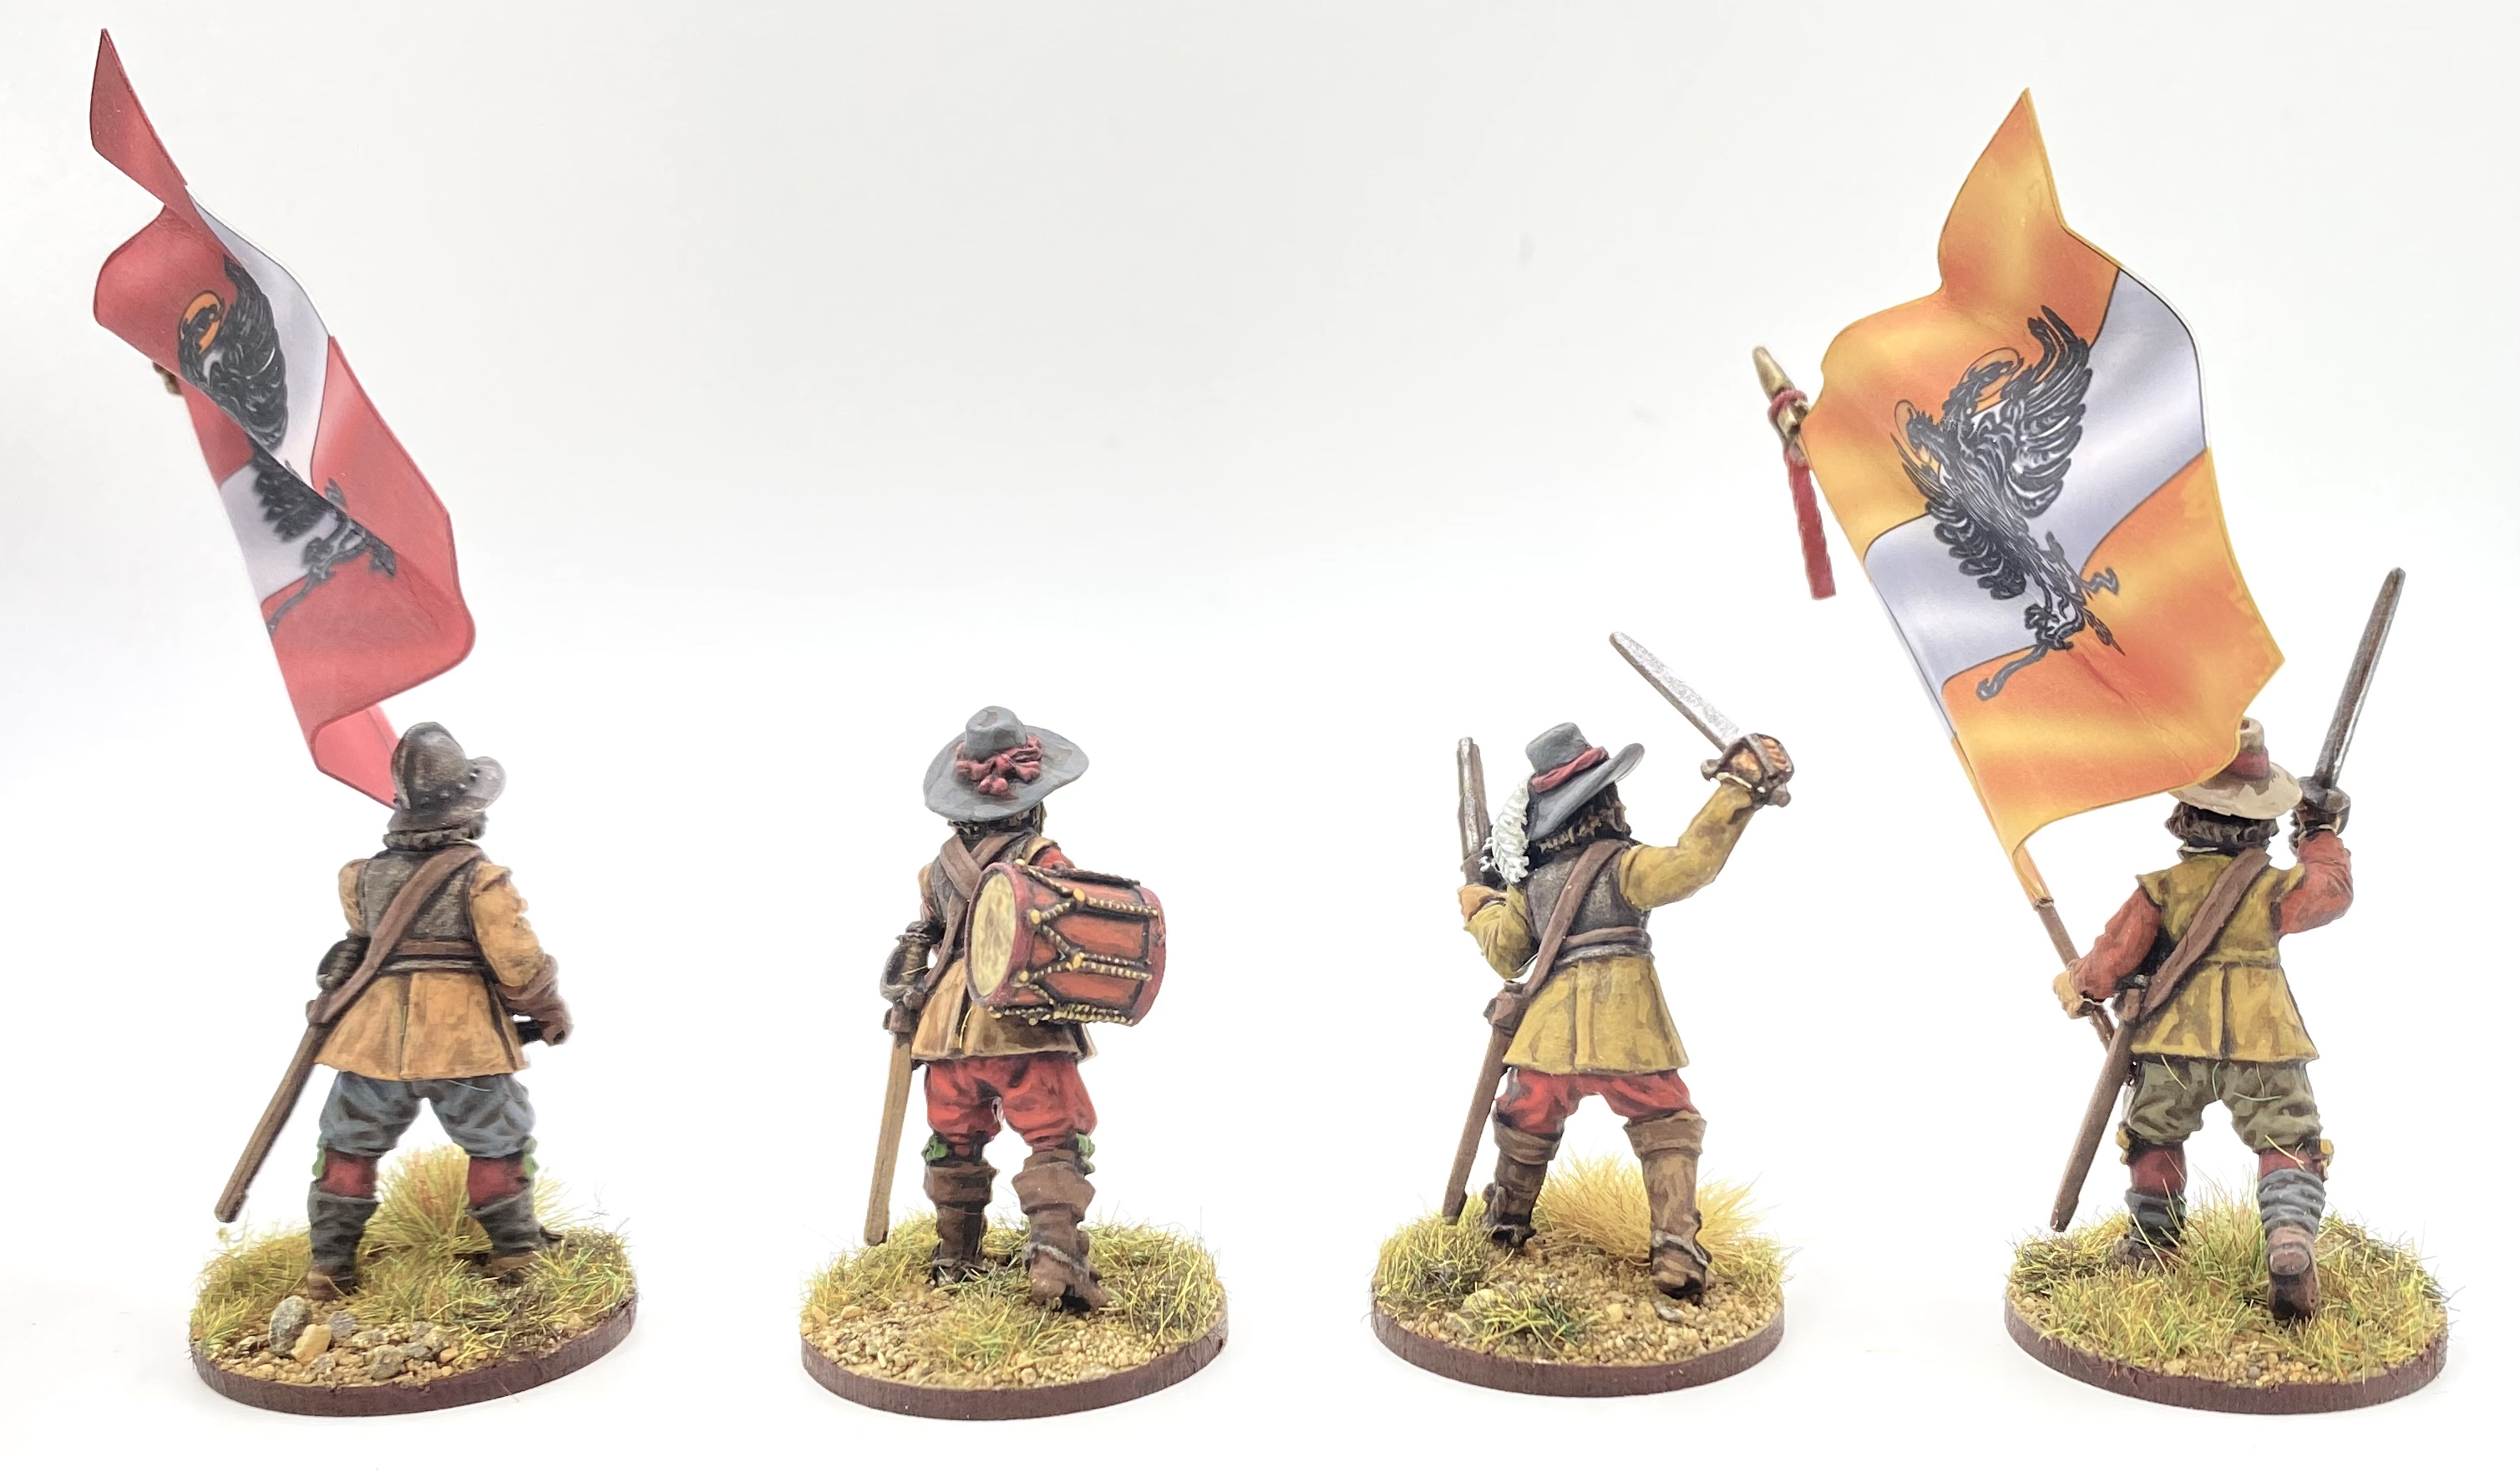
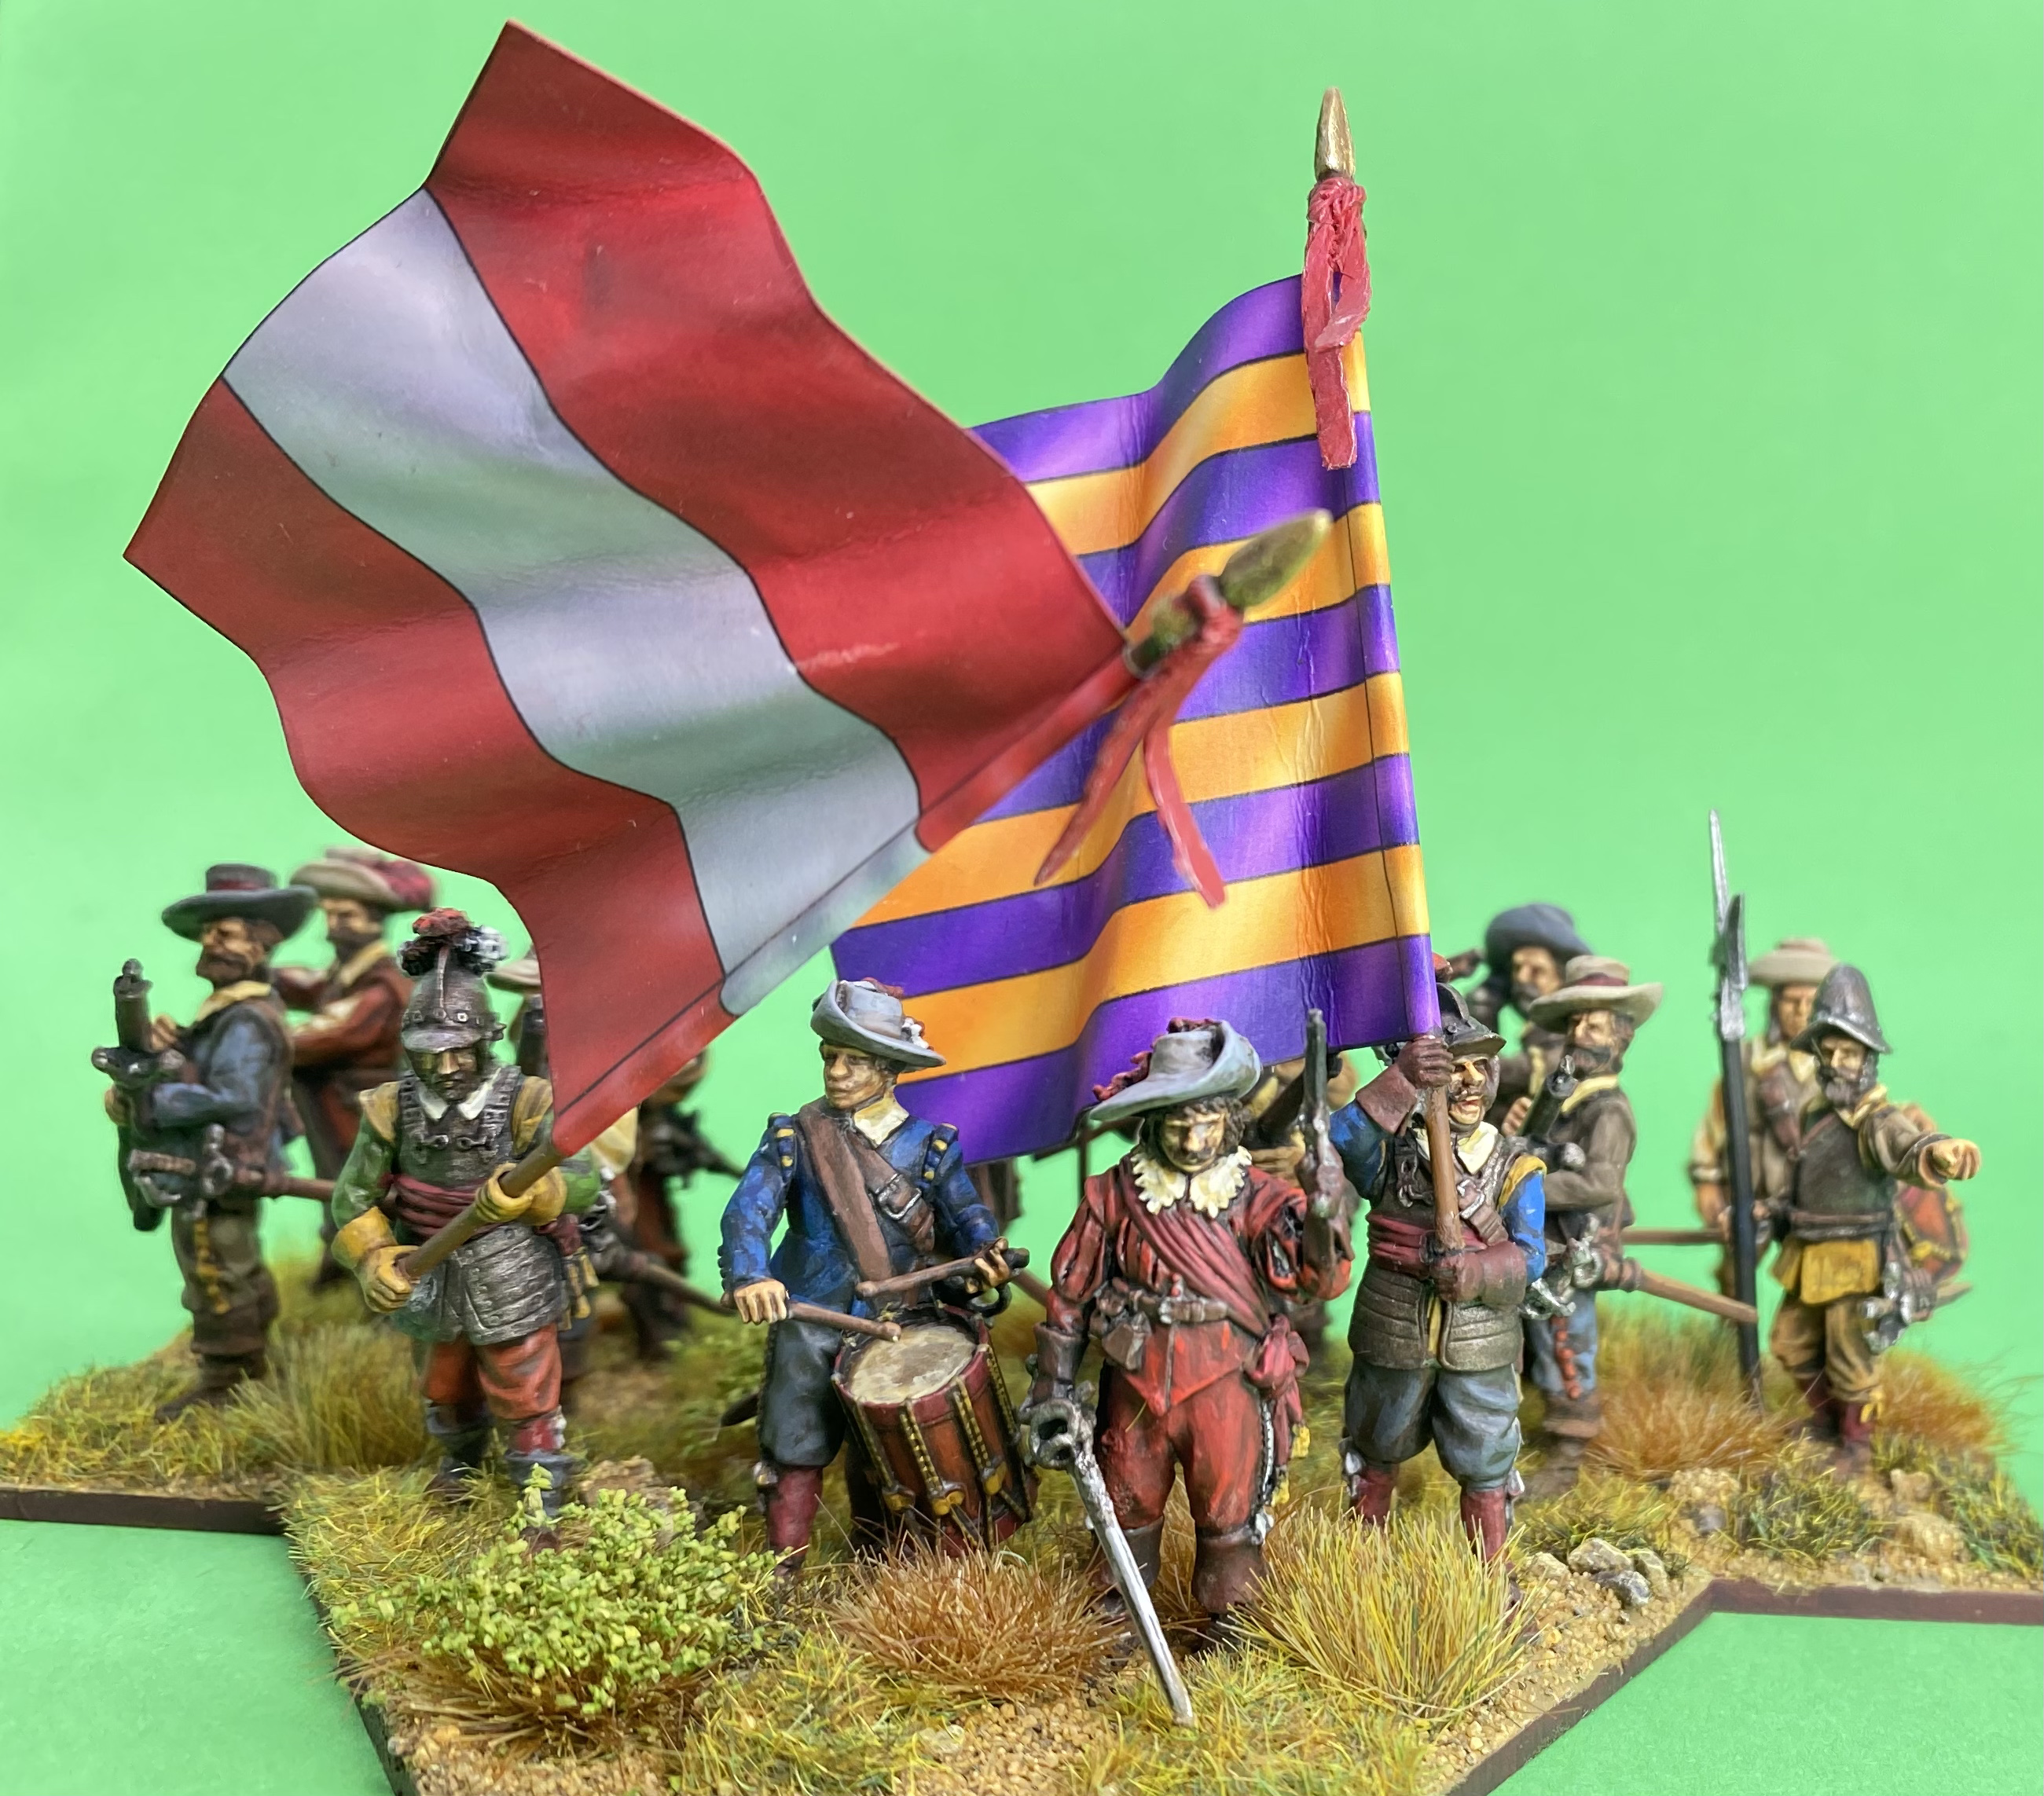
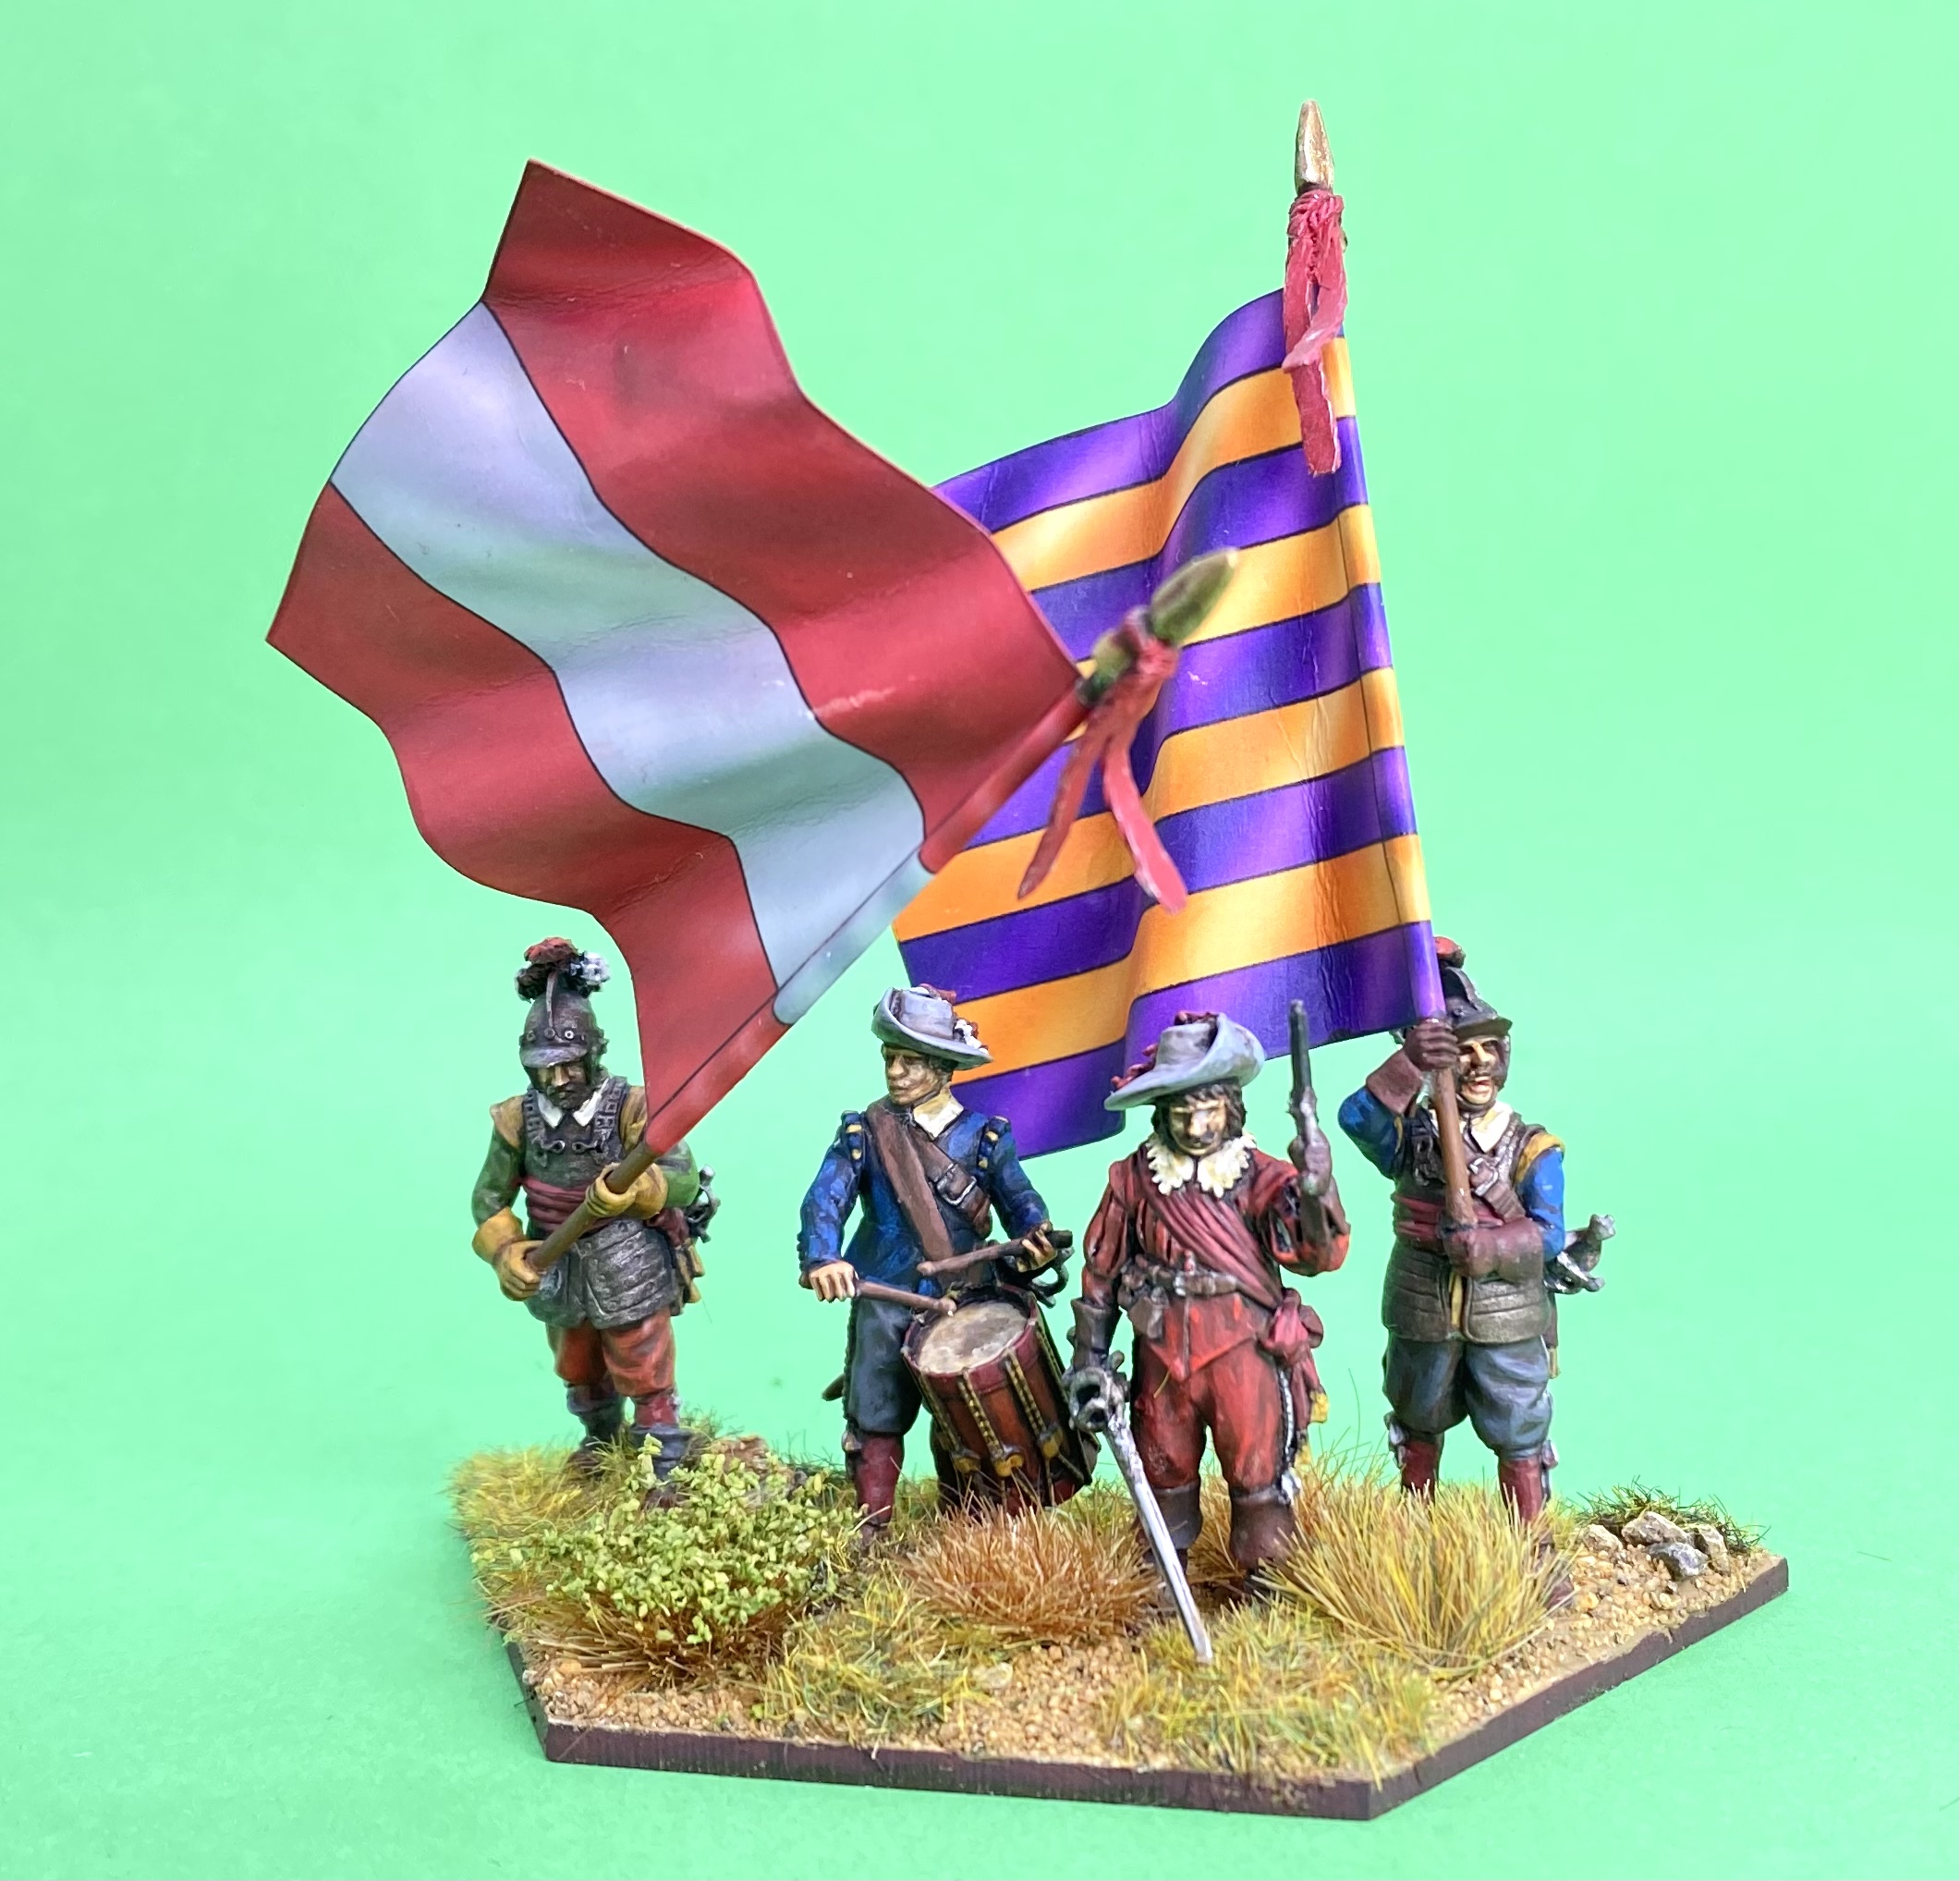
 A first command group created using the new range from Bloody Miniatures - 28mm
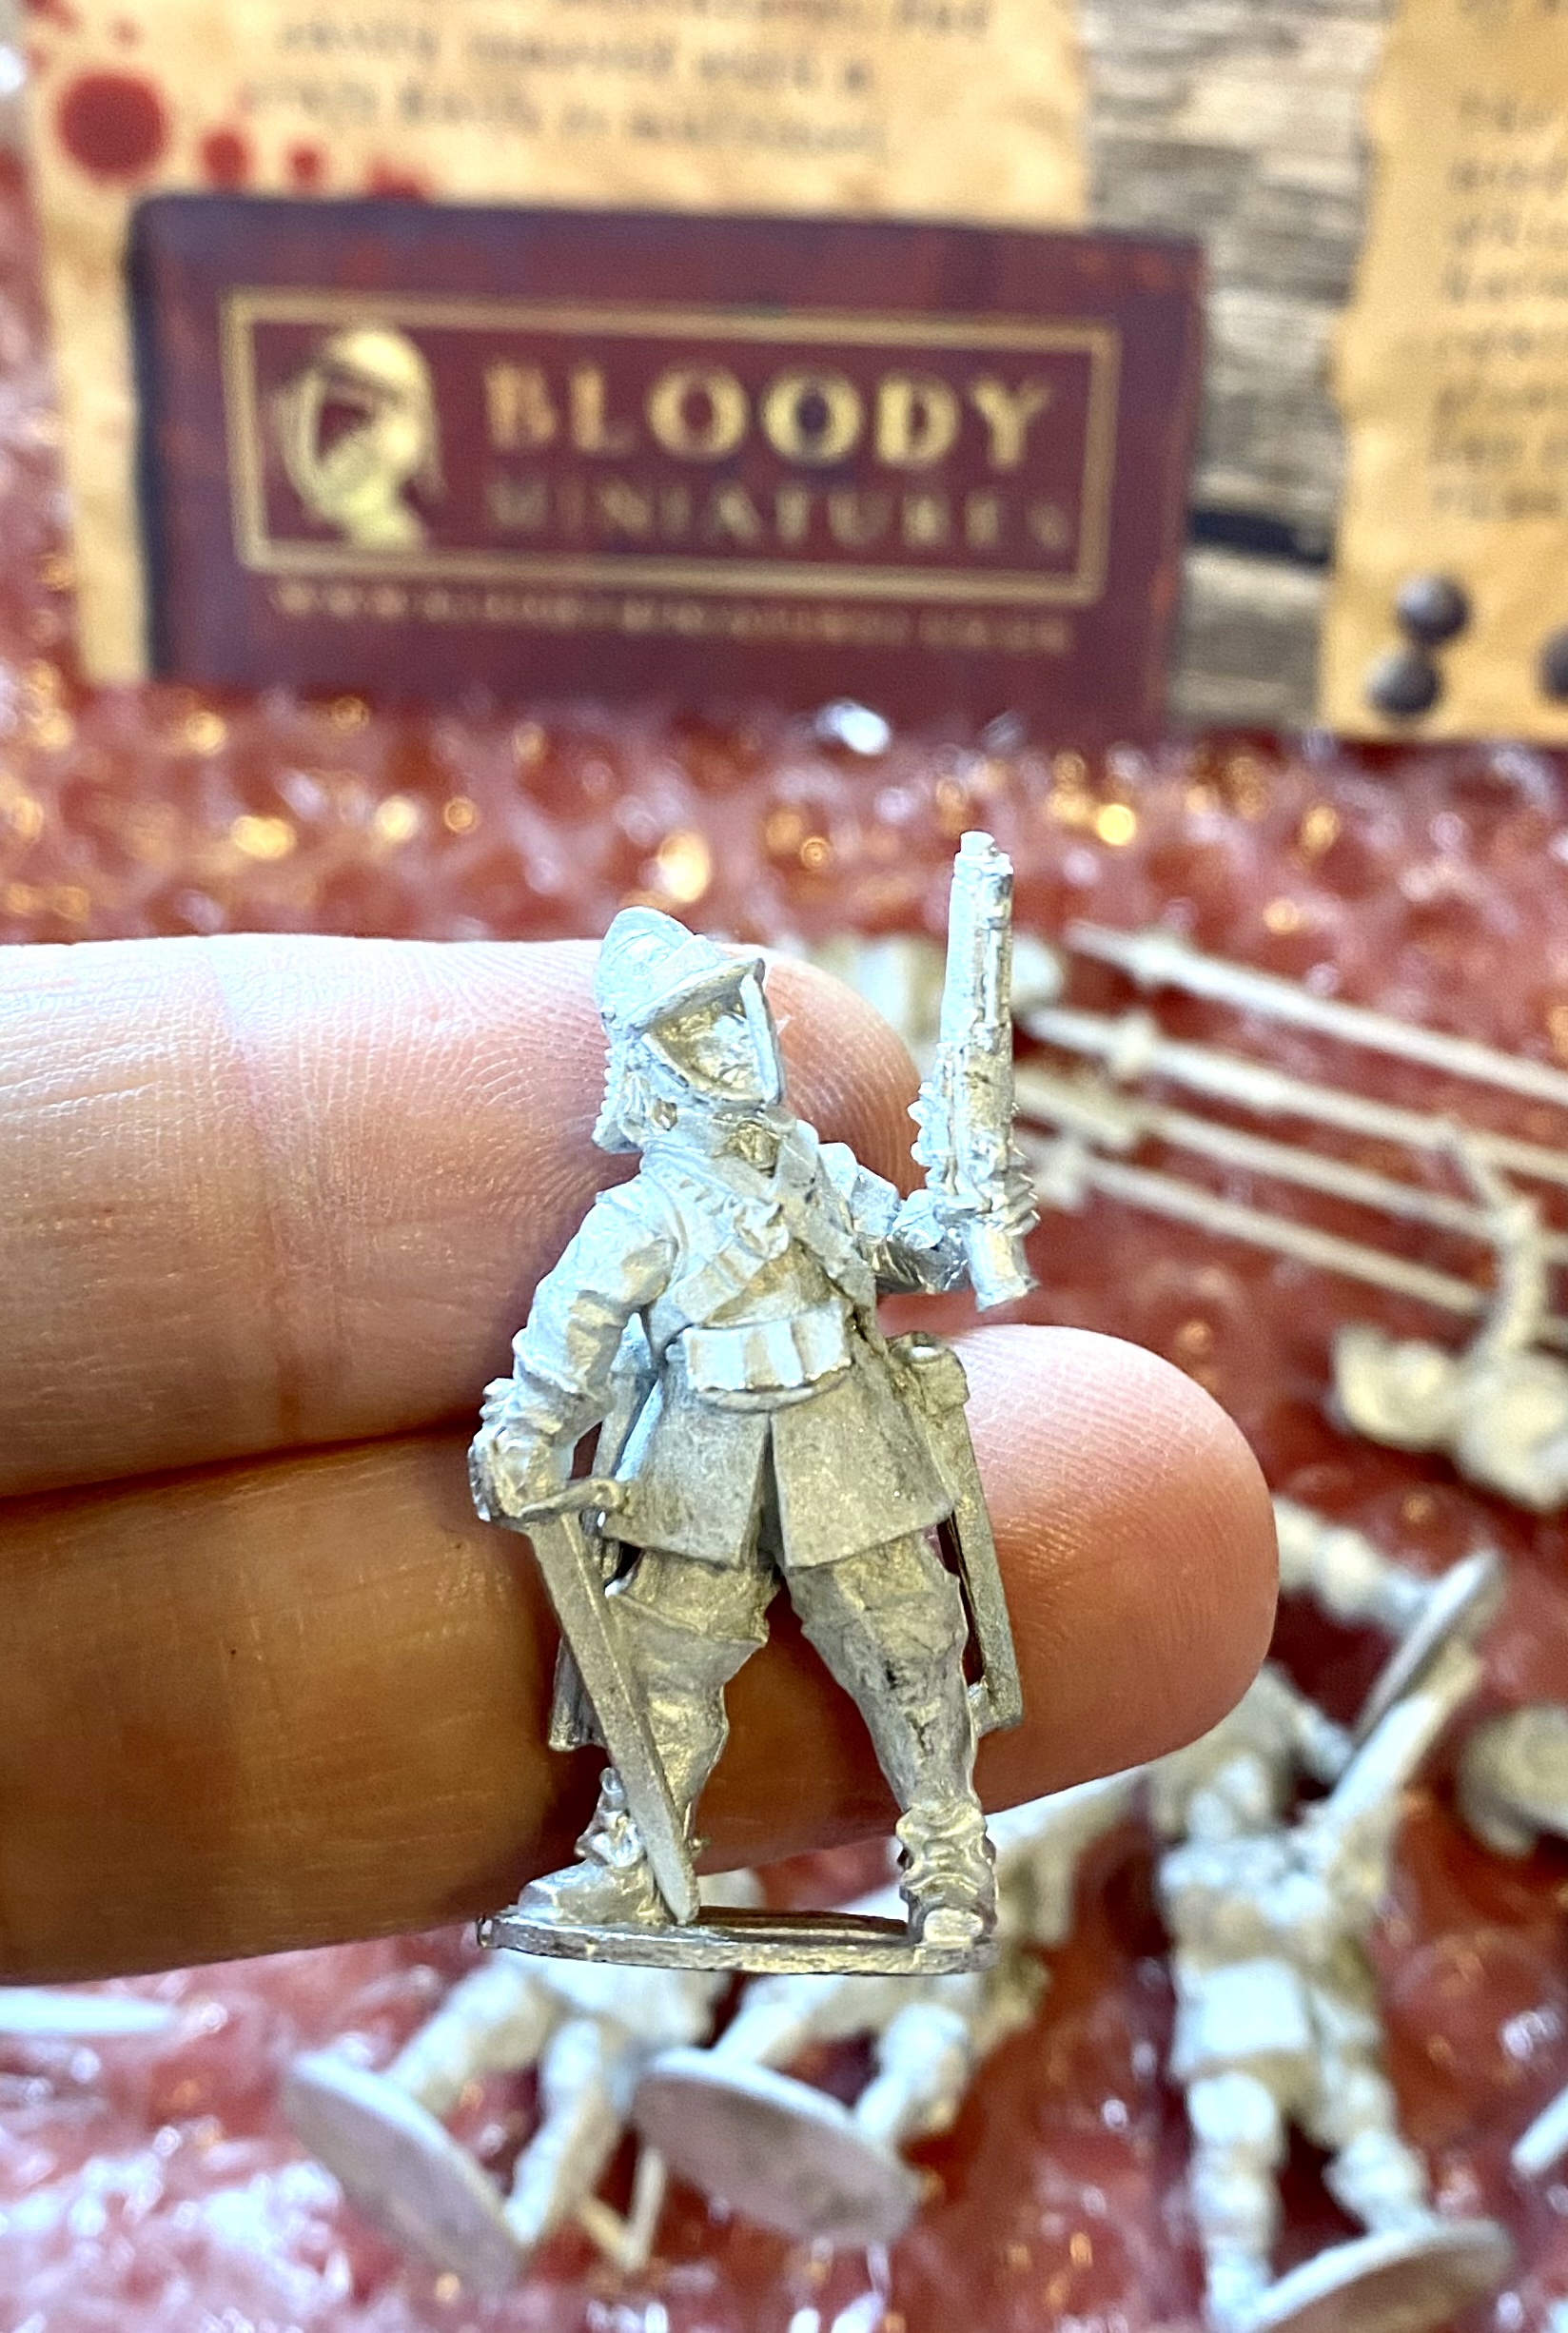
Bloody Miniatures (link) is a new figure producer that has just released (March 2021) their first range of miniatures. These are aimed at the War of the Three Kingdoms (English Civil War) and the Thirty Years Wars. The initial release contains four packs, each of four different figures and is focused on equipment and poses especially suitable for forlorn hopes, storming parties and other smaller ‘actions’. The figures have been sculpted by Nick Collier, who Bicorne and Renegade fans may remember was the designer for those early ranges. In common with Bircorne etc. these are on the larger side of 28mm figures, and are supplied in one piece metal castings (the figures armed with pole arms have separate weapons).
I was lucky to spot the announcement of the Bloody Miniatures range on Facebook on the release day. I was so impressed with the pictures that I immediately ordered all four packs. The figures arrived in a couple of days and were very nicely boxed. I especially liked the red tissue paper used in packing which goes well with the company name!

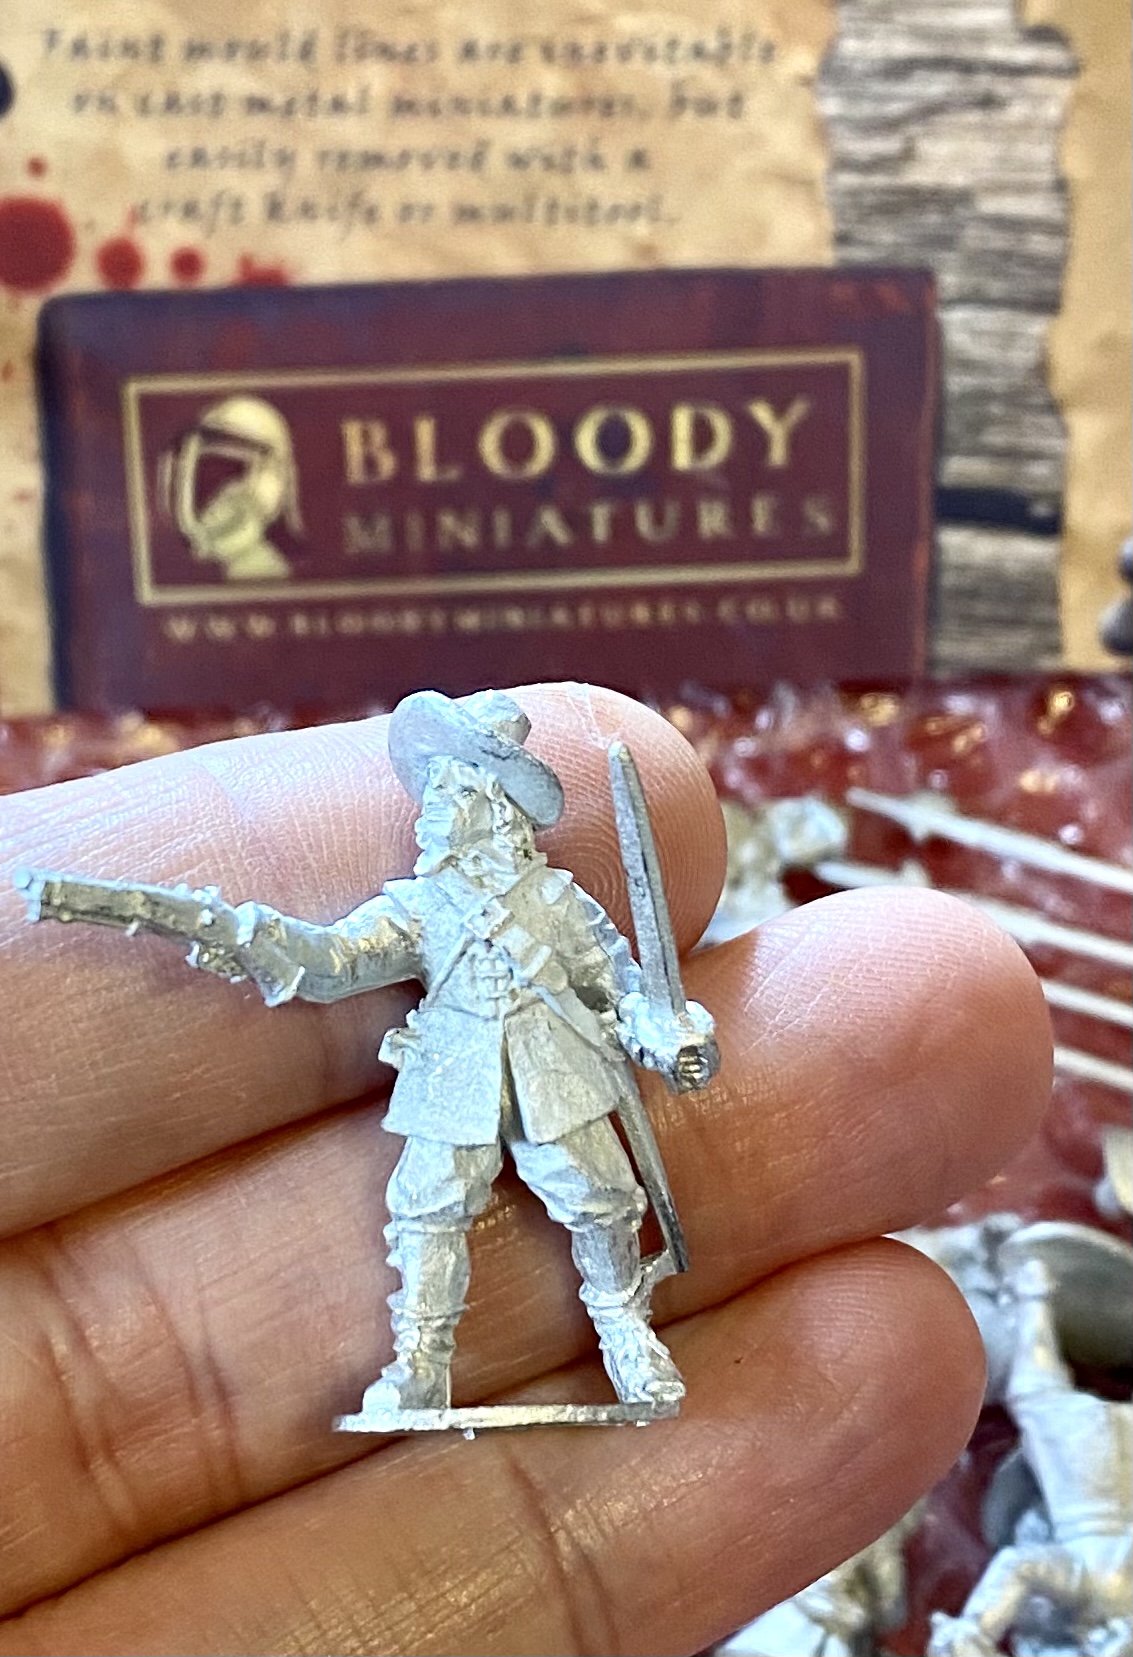
The figures are really nice sculpts, with lots of crisp details. This initial release are great representations of dismounted cavalry and infantry equipped for close quarters fighting. This makes them ideal for smaller skirmish games, or as specialist assault units in larger games. I have chosen to make some slight conversions to the first four on to my painting table as a command group.
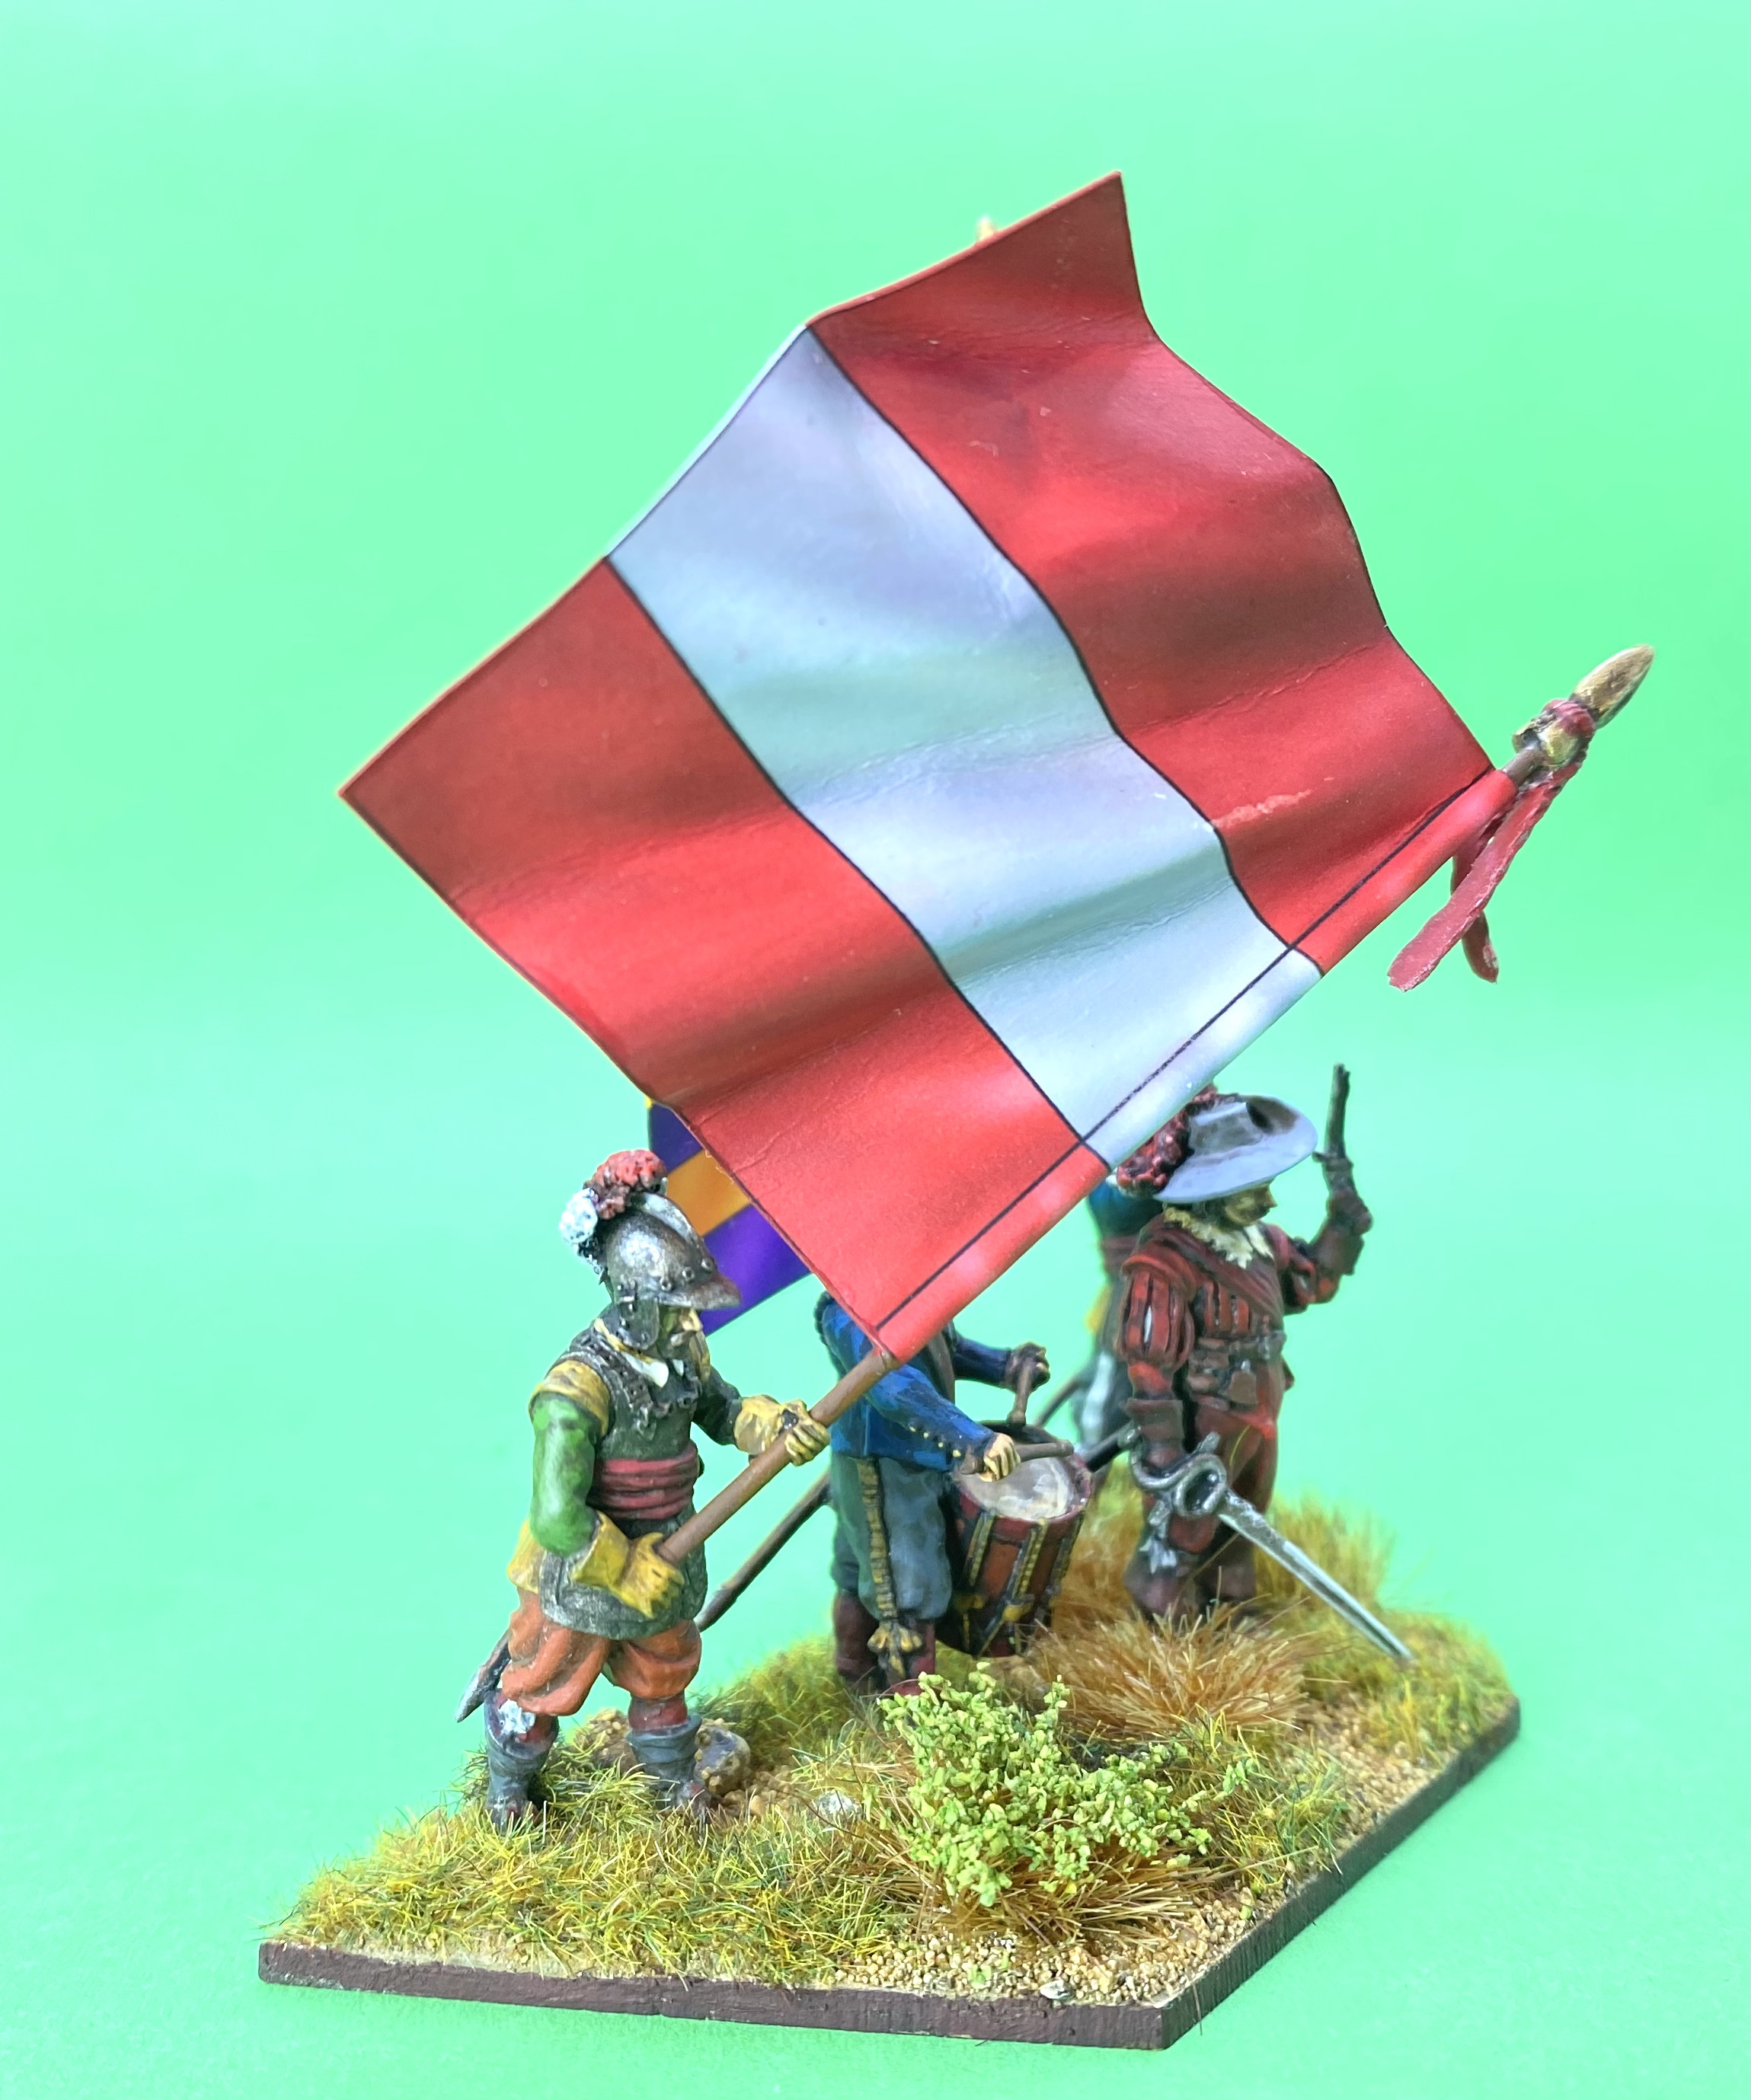
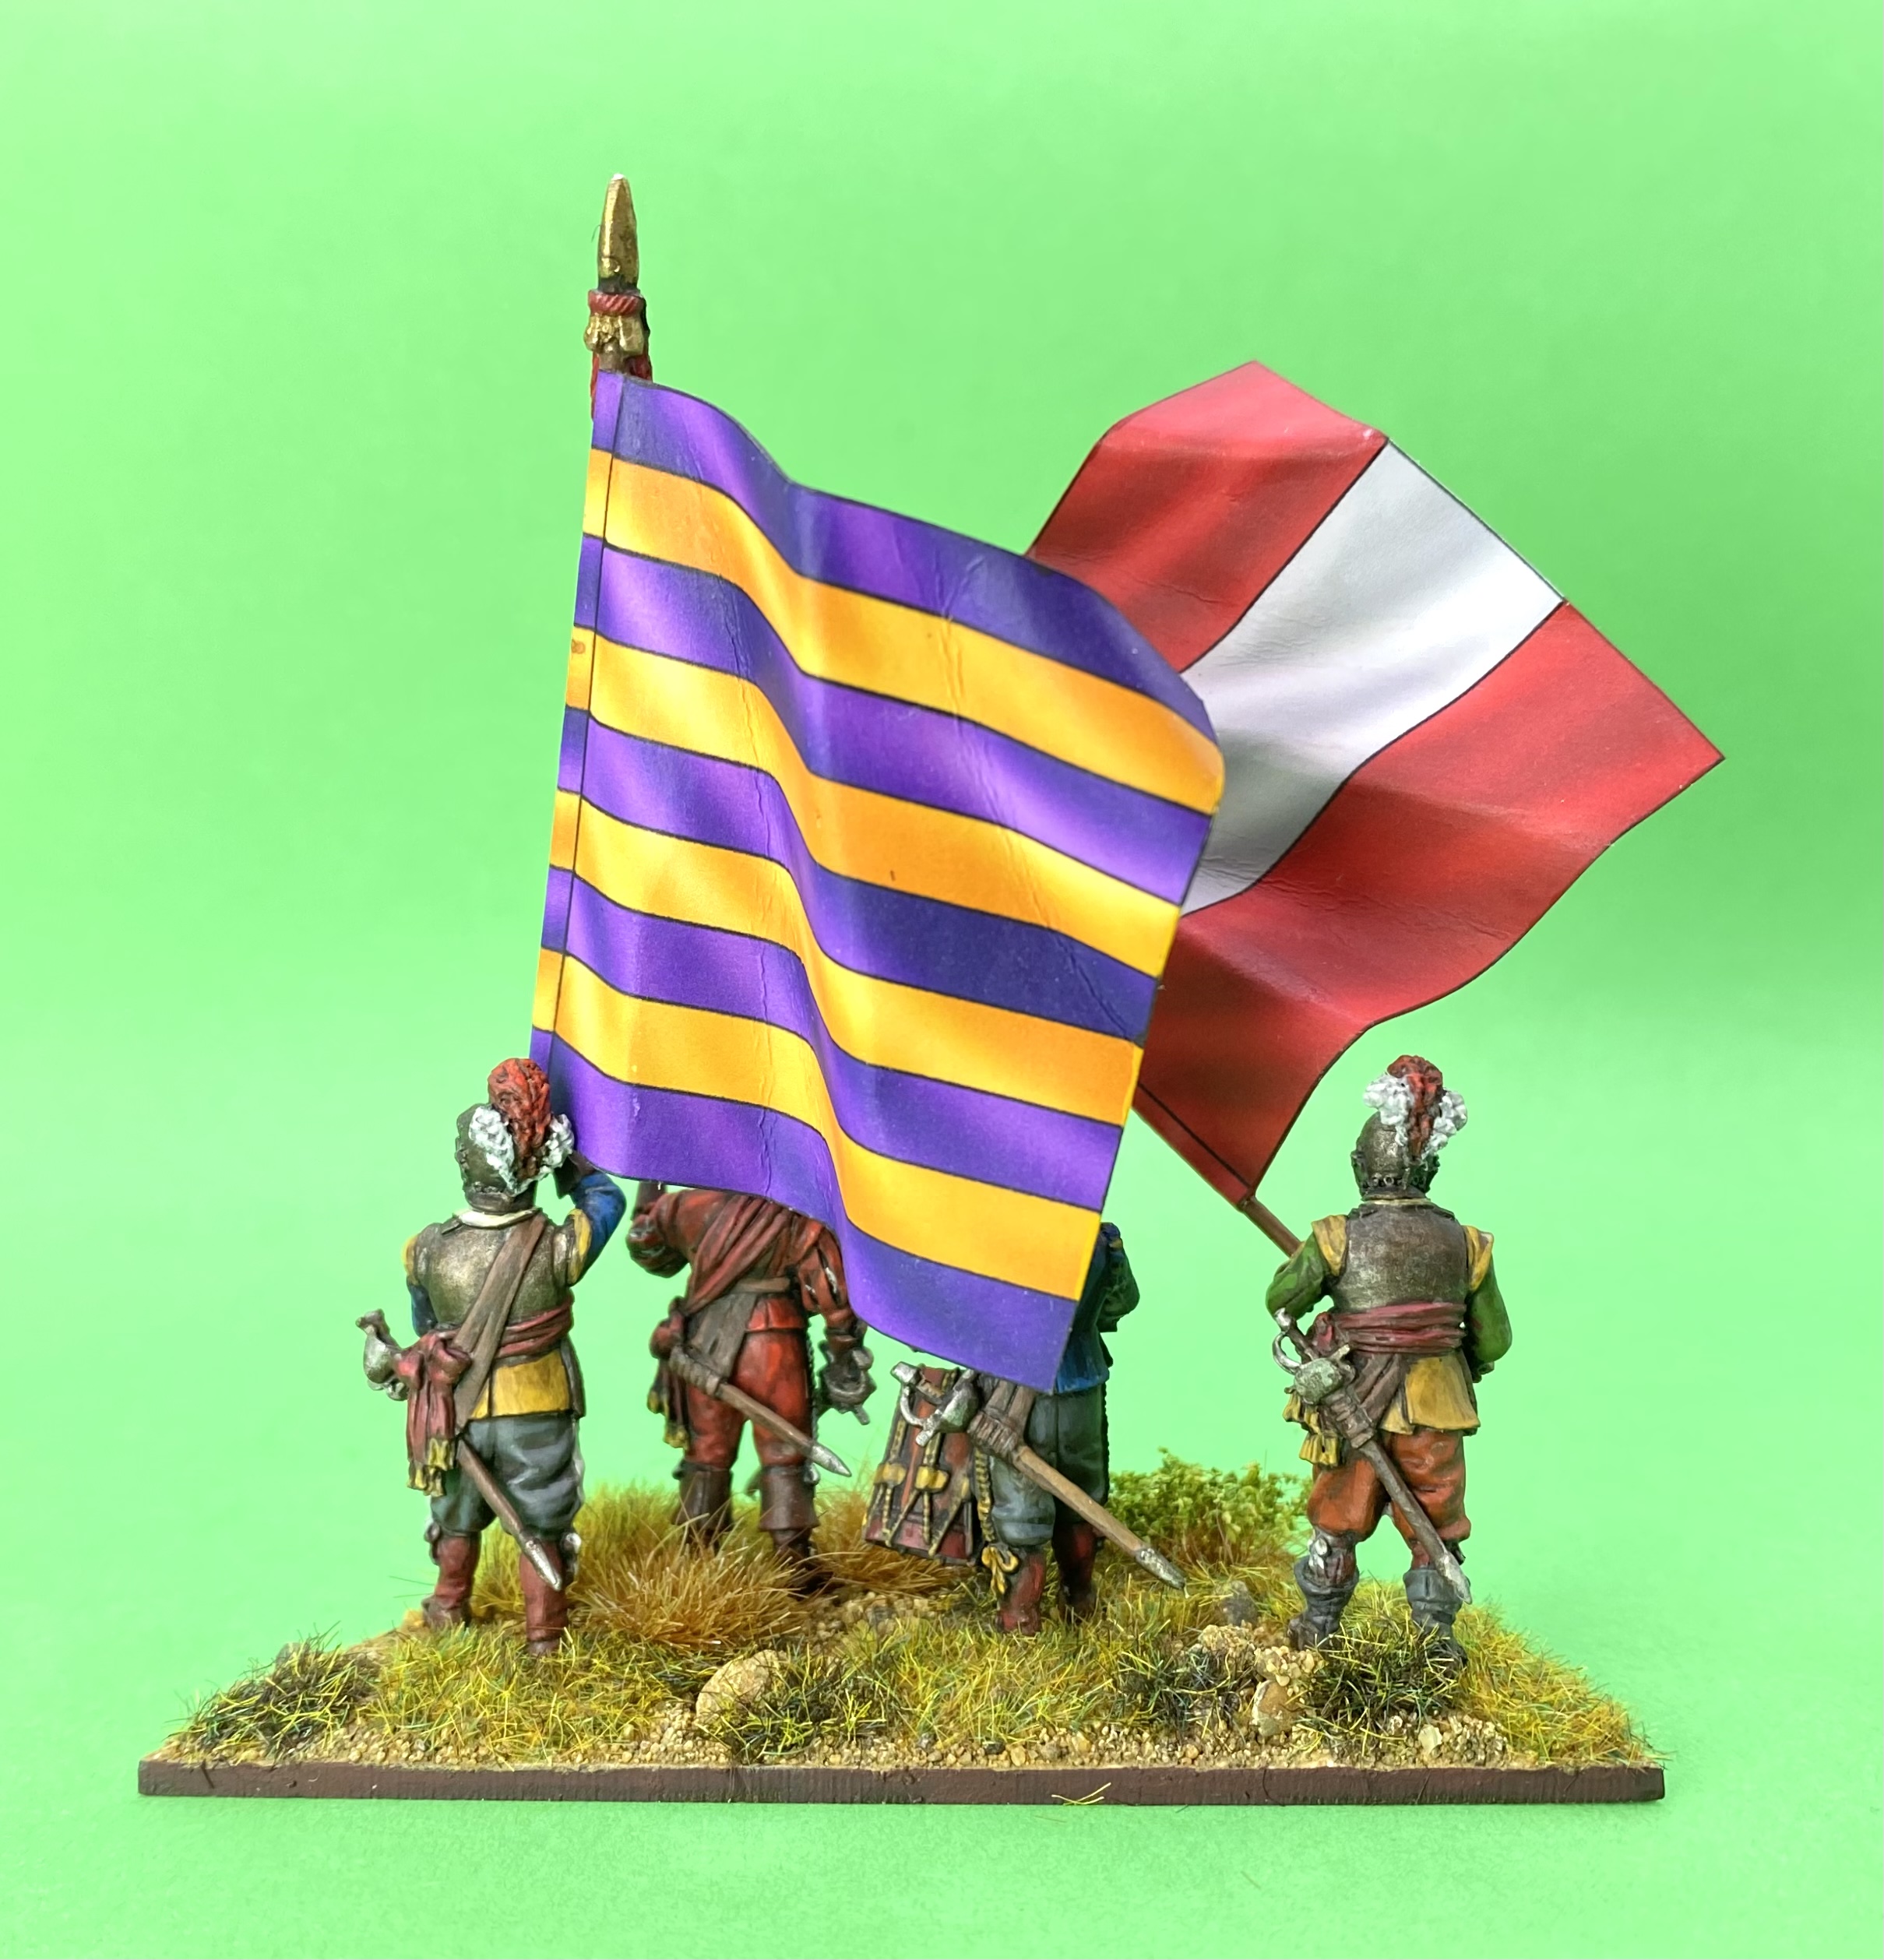
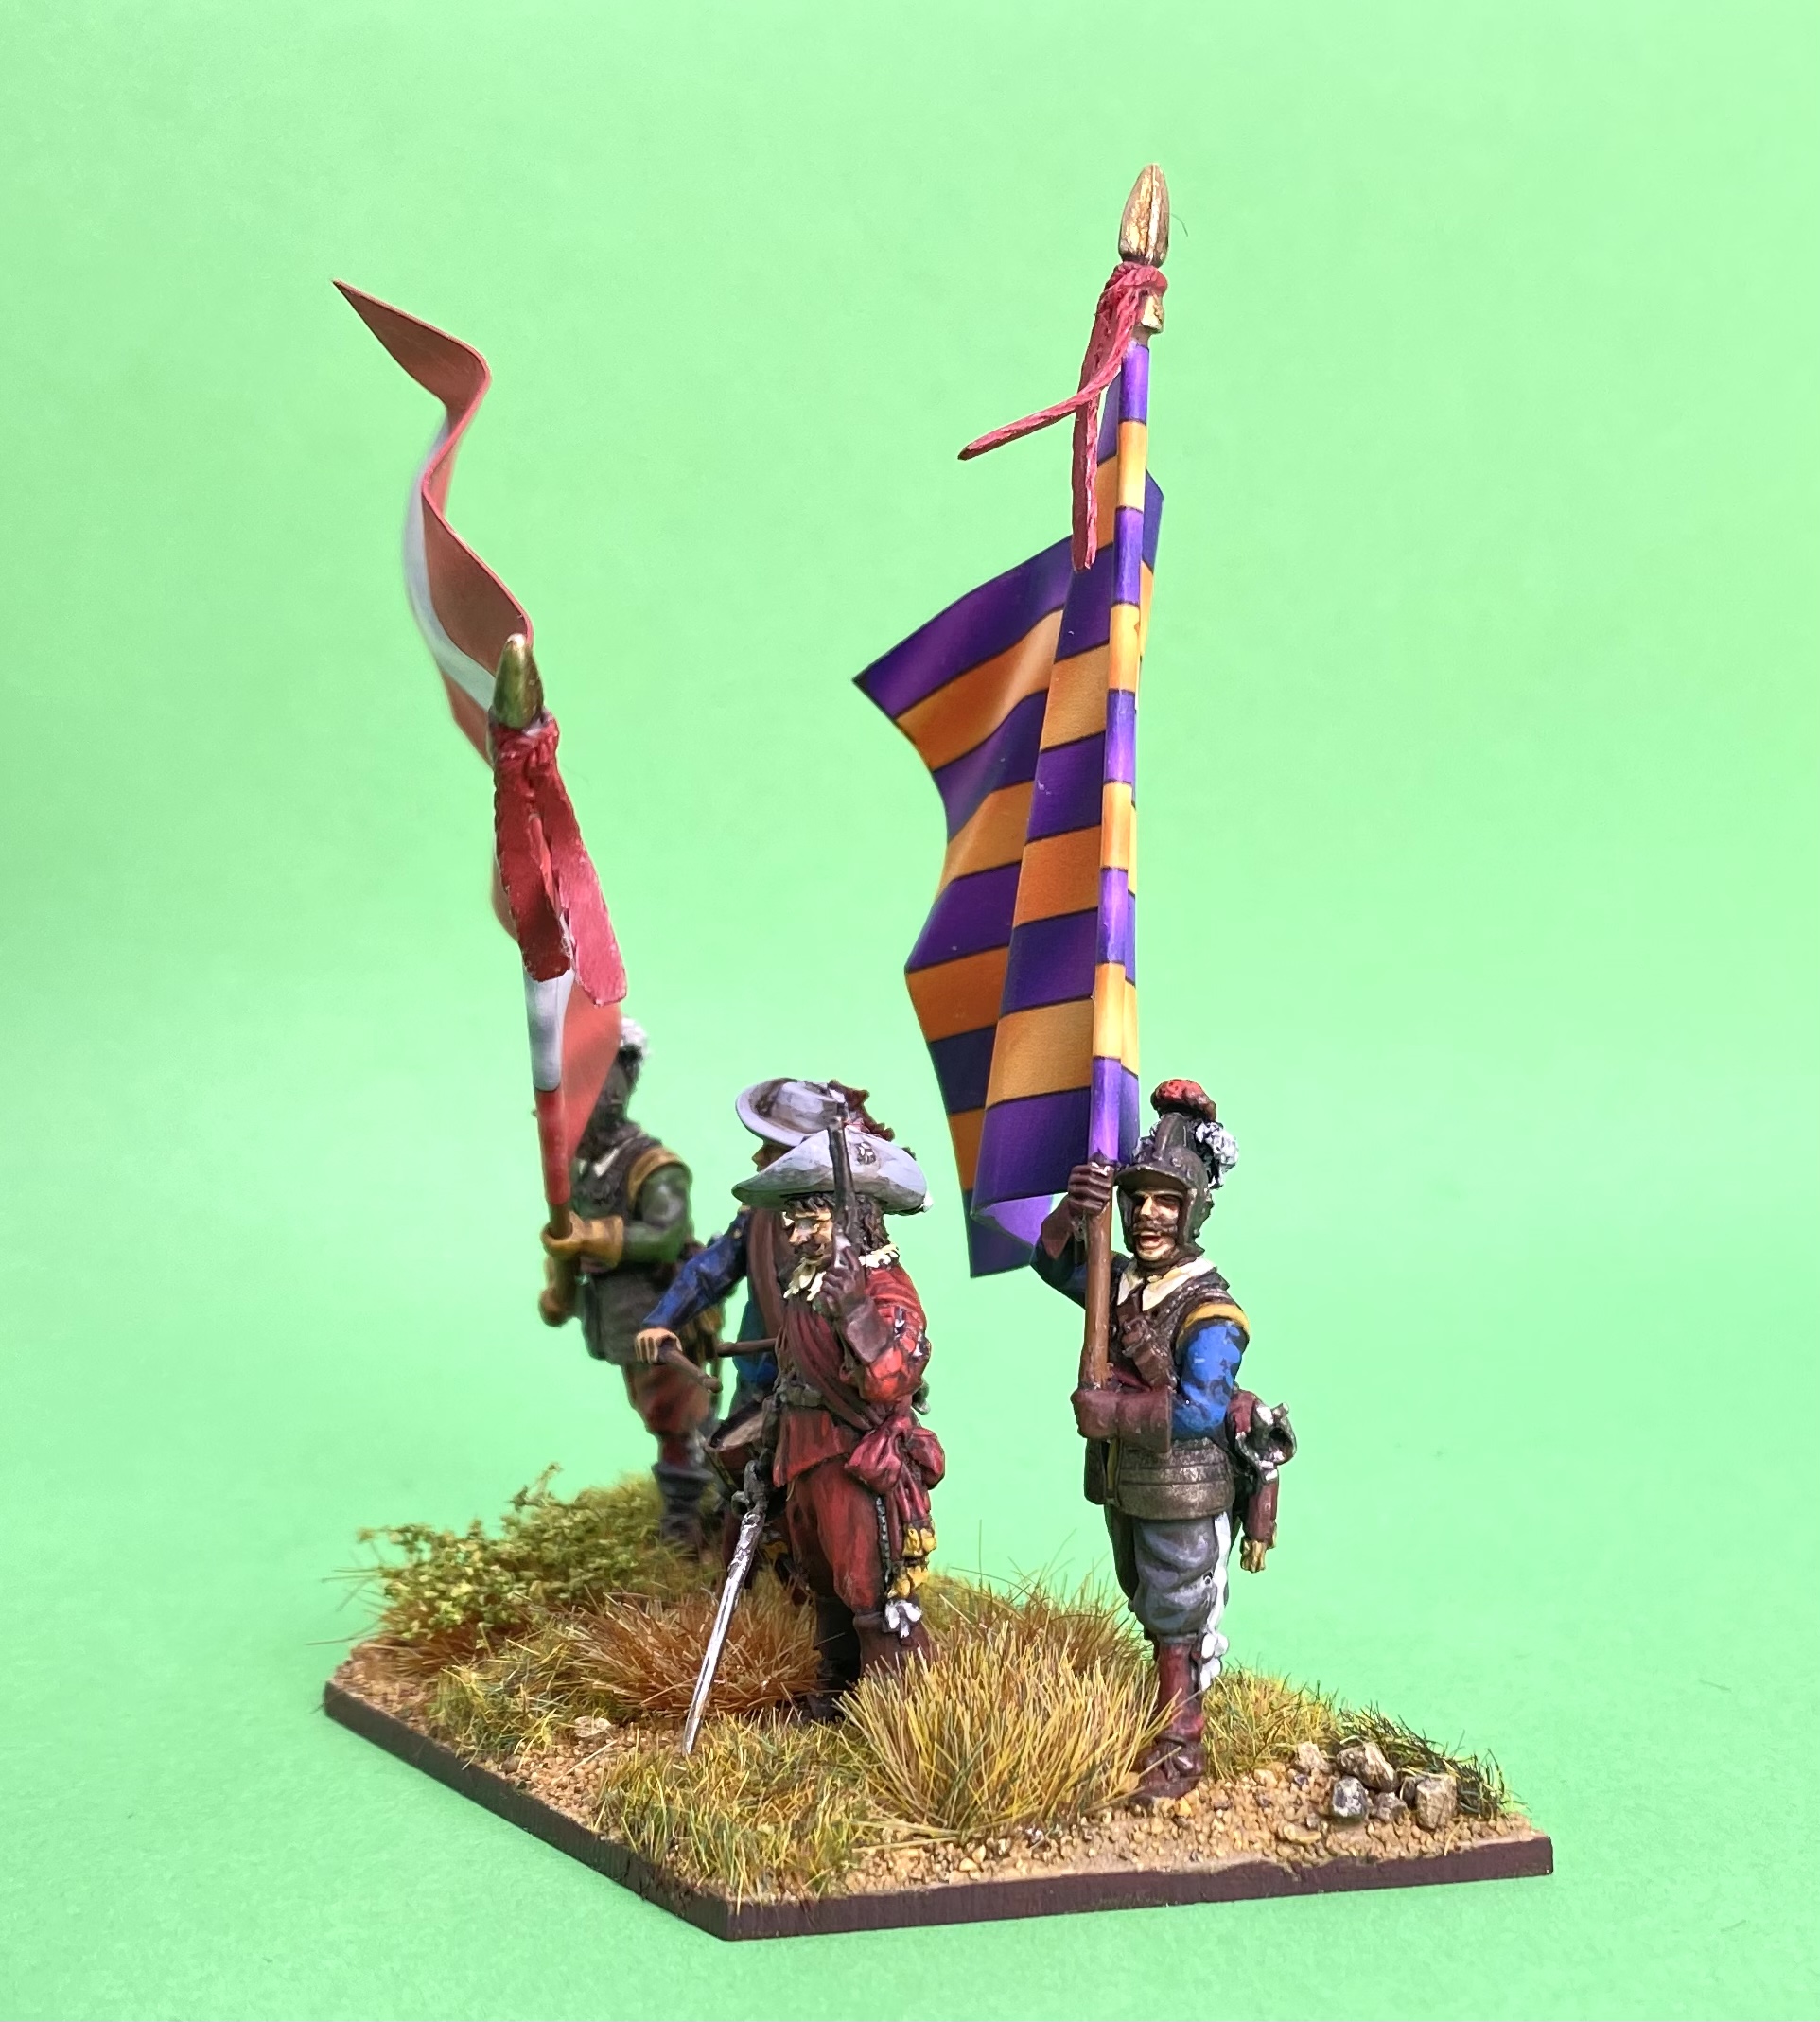
 The first four figures from Bloody Miniatures on my painting table
The ensign with the red colour (above) is supplied with a polearm, so I have simply swapped this for a flag. I added a drum from my bits box to the carbine armed figure to represent a musician who has slung his instrument and is getting ready to get stuck in. I didn’t change the sword and pistol armed figure. The ensign with the yellow colour has had his, previously empty, left hand drilled out to accept a flag staff, and I also added a hat, also from my spares box, as he was bare headed and I wanted a more formal look. (Flags from Adolfo Ramos, link.)
I based these figures on individual, round bases, as I intend to use them in either skirmish games or as lose formation troops in games of Pike and Shotte. I normally use UK two pence pieces (2p) as bases for this type of figure as there are the perfect size, the weight helps balance metal figures and they are magnetic for helping with storage. Due to ‘the event’ I no longer seem to have a supply of 2ps. Over the last 12 months I have used up my own stock, as well as raiding the children’s piggy banks etc. I have therefore fallen back on Warbases round, 2mm deep, MDF bases with a 5mm hole (link, and then go to custom items to order the holes link). Warbases do these in exact 2p diameter size, which is great, and with the addition of a 5mm diameter, 2mm deep rare earth magnet, the bases are also magnetised for storage.
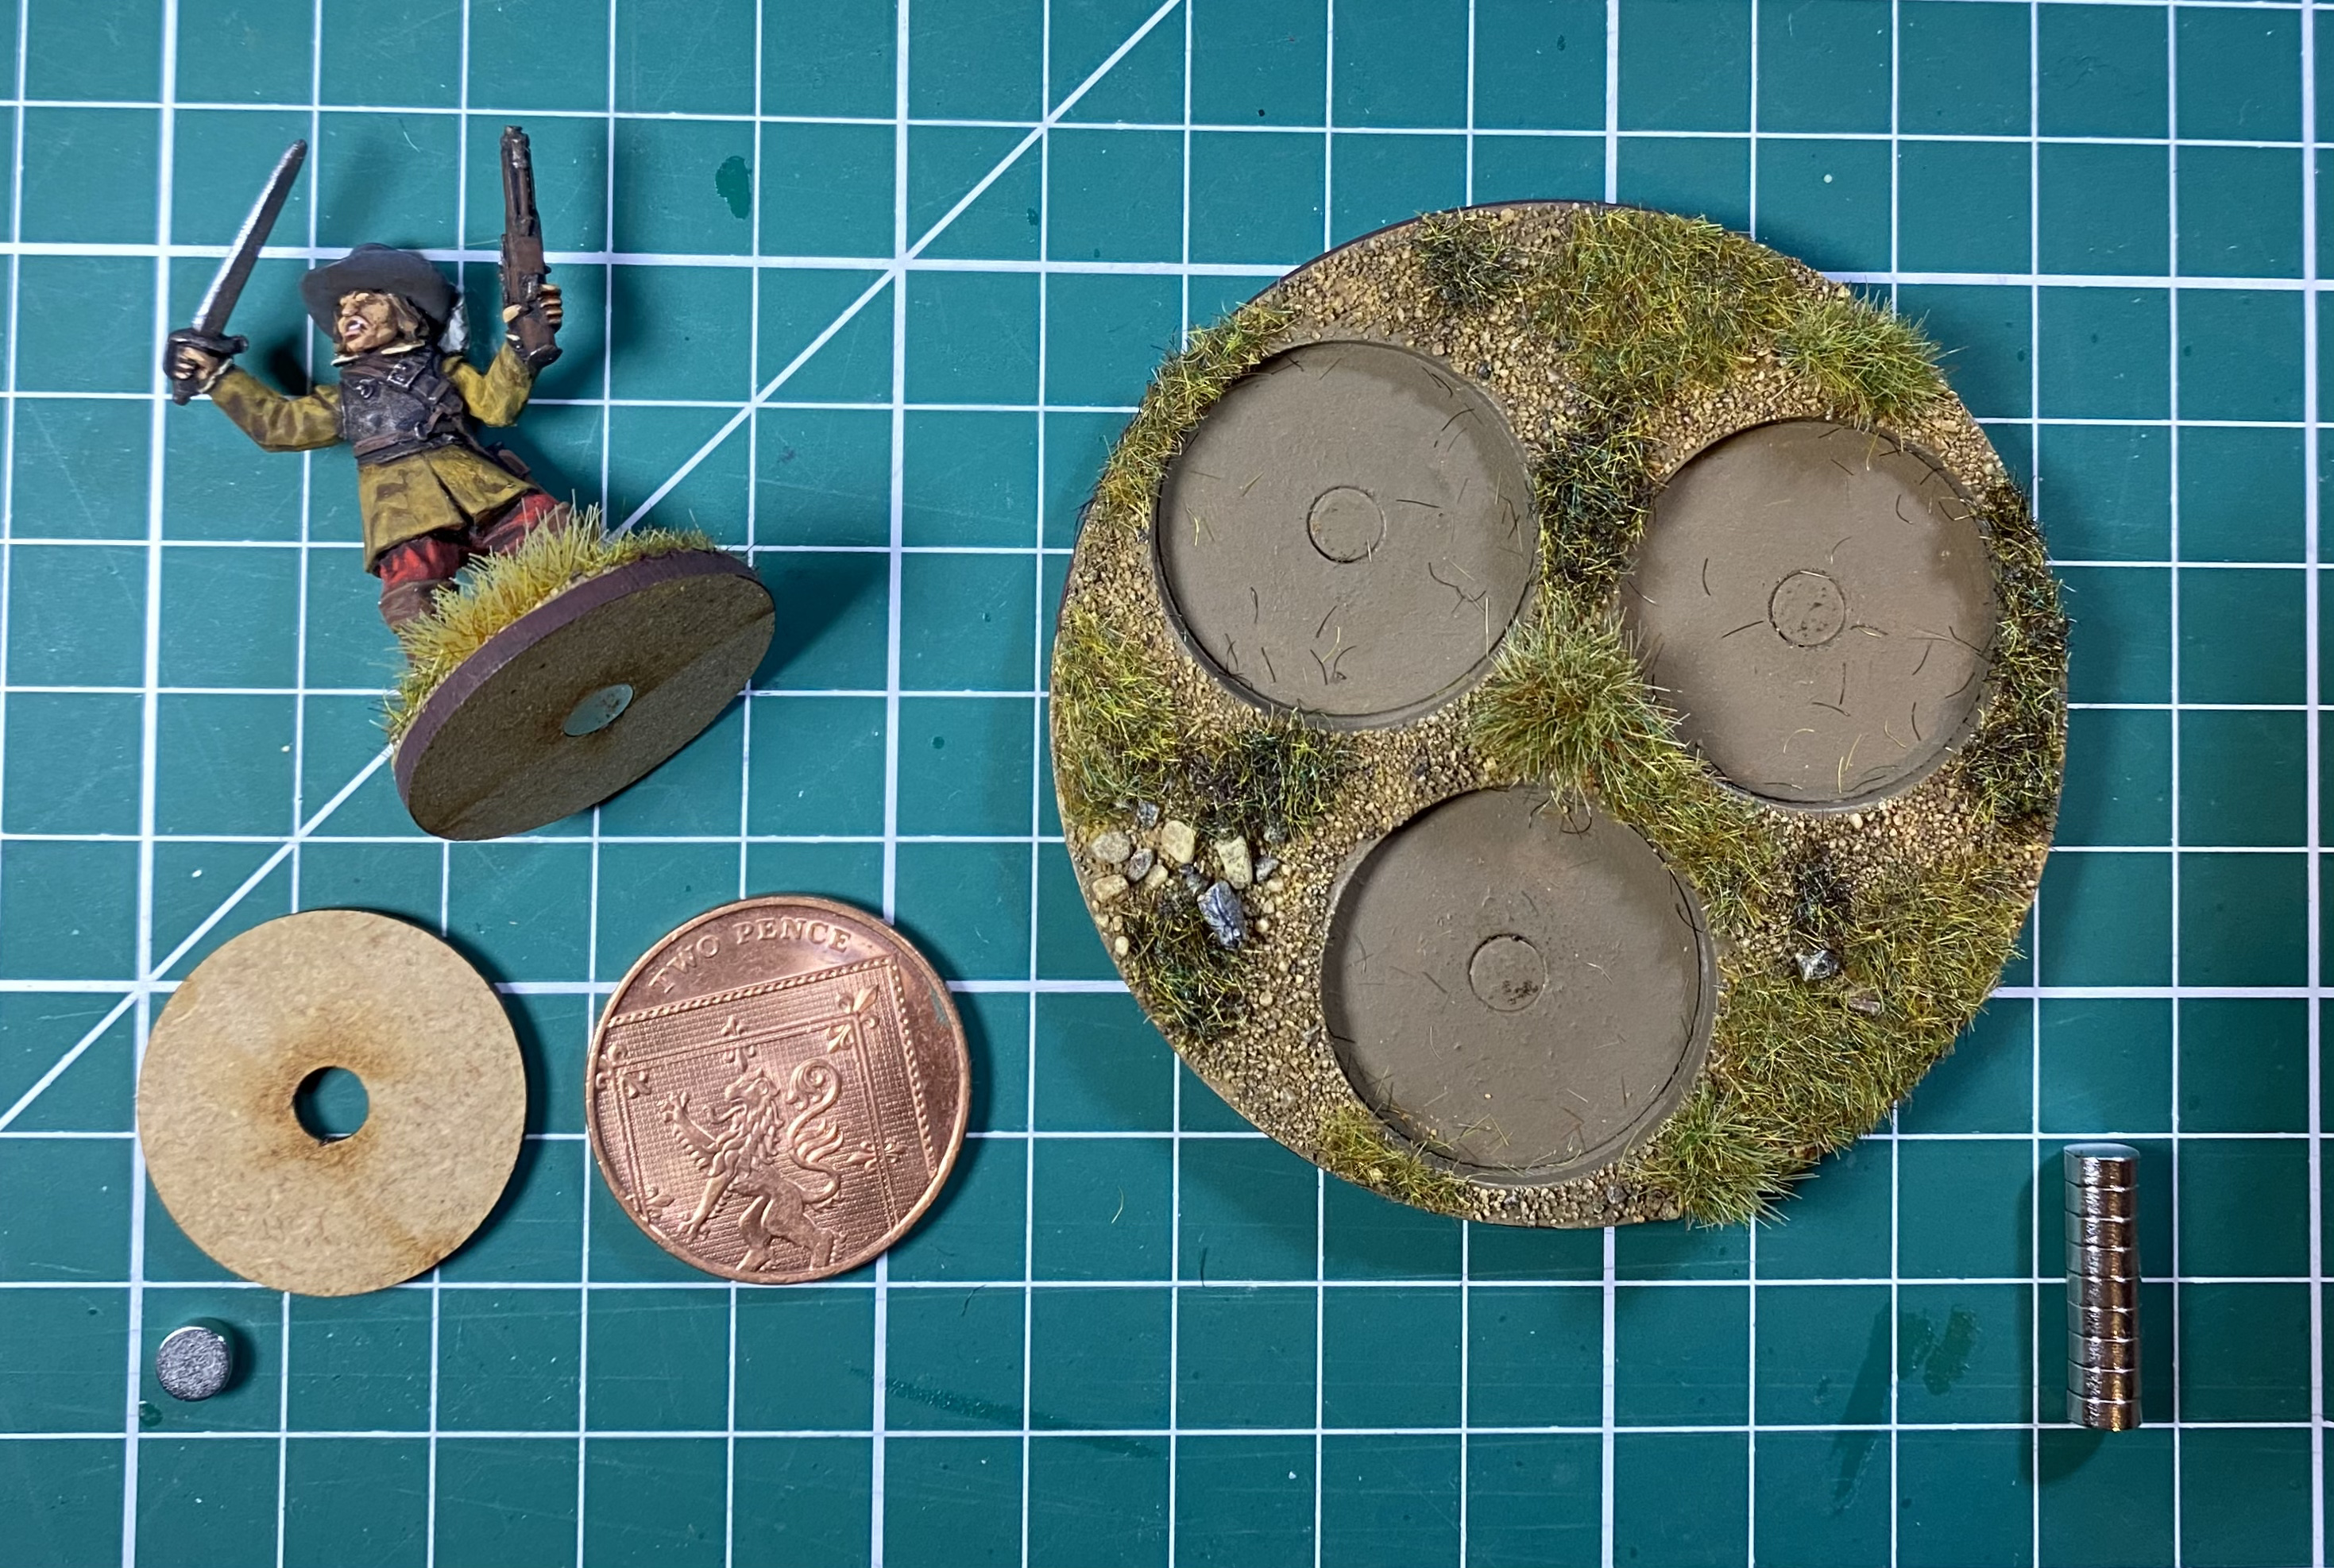 A custom 2p movement tray from Warbases to take 2p bases
You can see from above that I’ve also taken this a step further. Warbases made me some custom 2p movement trays, also with holes for 5mm magnets. These are 70mm in diameter with space for three bases. These are a great way to add some flexibility to your collection; you can use figures individually when necessary, and also multi base for convenience. Two tips. You can get different size magnets but I have found 5mm the best to allow for the weight of a 28mm metal mini. Secondly, when using magnets in the tray, and on the figure base, then polarity becomes important. When gluing the magnets in you’ll need to check that the polarity matches with the rest of your collection. I keep one of my completed and magnetised bases handy to use when deciding which way round the magnets need to be placed in new bases.
In conclusion, this is a fantastic start from Bloody Miniatures. The figures are a joy to paint; very characterful, and with clear details. There are a few figures wearing triple bar lobster pots that I will probably restrict to representing troops in the British Isles, but the rest of the figures would be at home in any conflict in the first half of the 17th century. I understand that the first release was so successful that the initial stock sold out in a couple of days! There has since been a re-supply and I would heartily recommend these figures to anyone using 28mm figures in this period. A new release is planned for later this year, and I am really looking forward to it – I’m sure it will be something out of the ordinary, and very desirable!
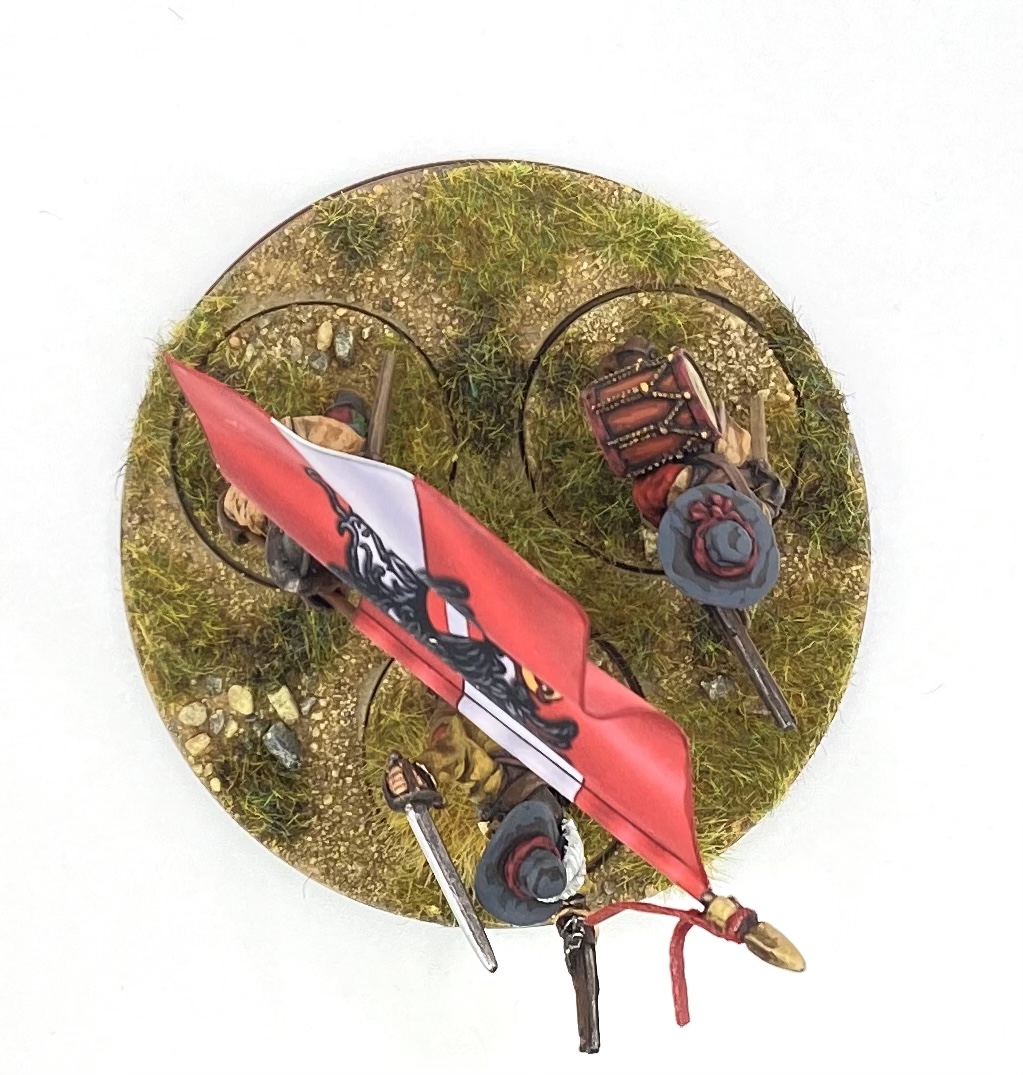 The movement tray with figures added.
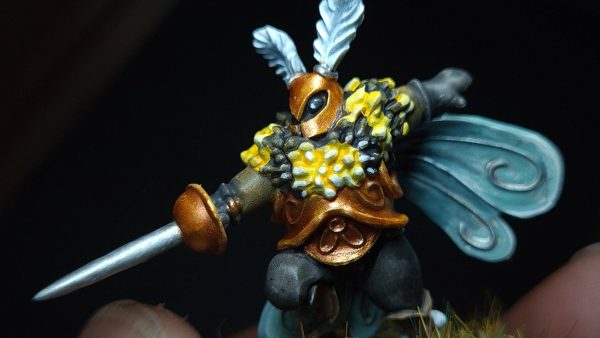
Flogging a dead horse (Avanpost part 2)
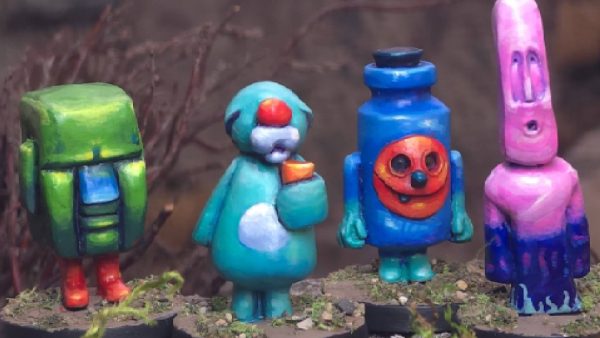
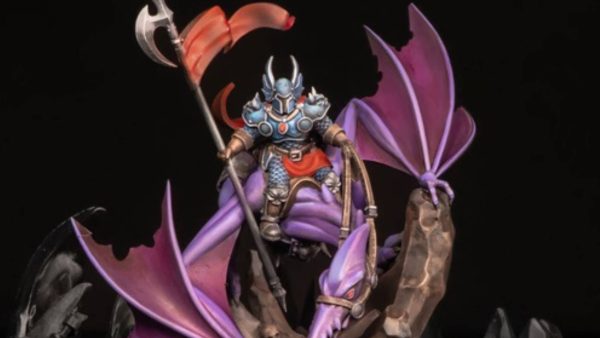
Following on from my last update, I have completed some more of the Avanpost miniatures.
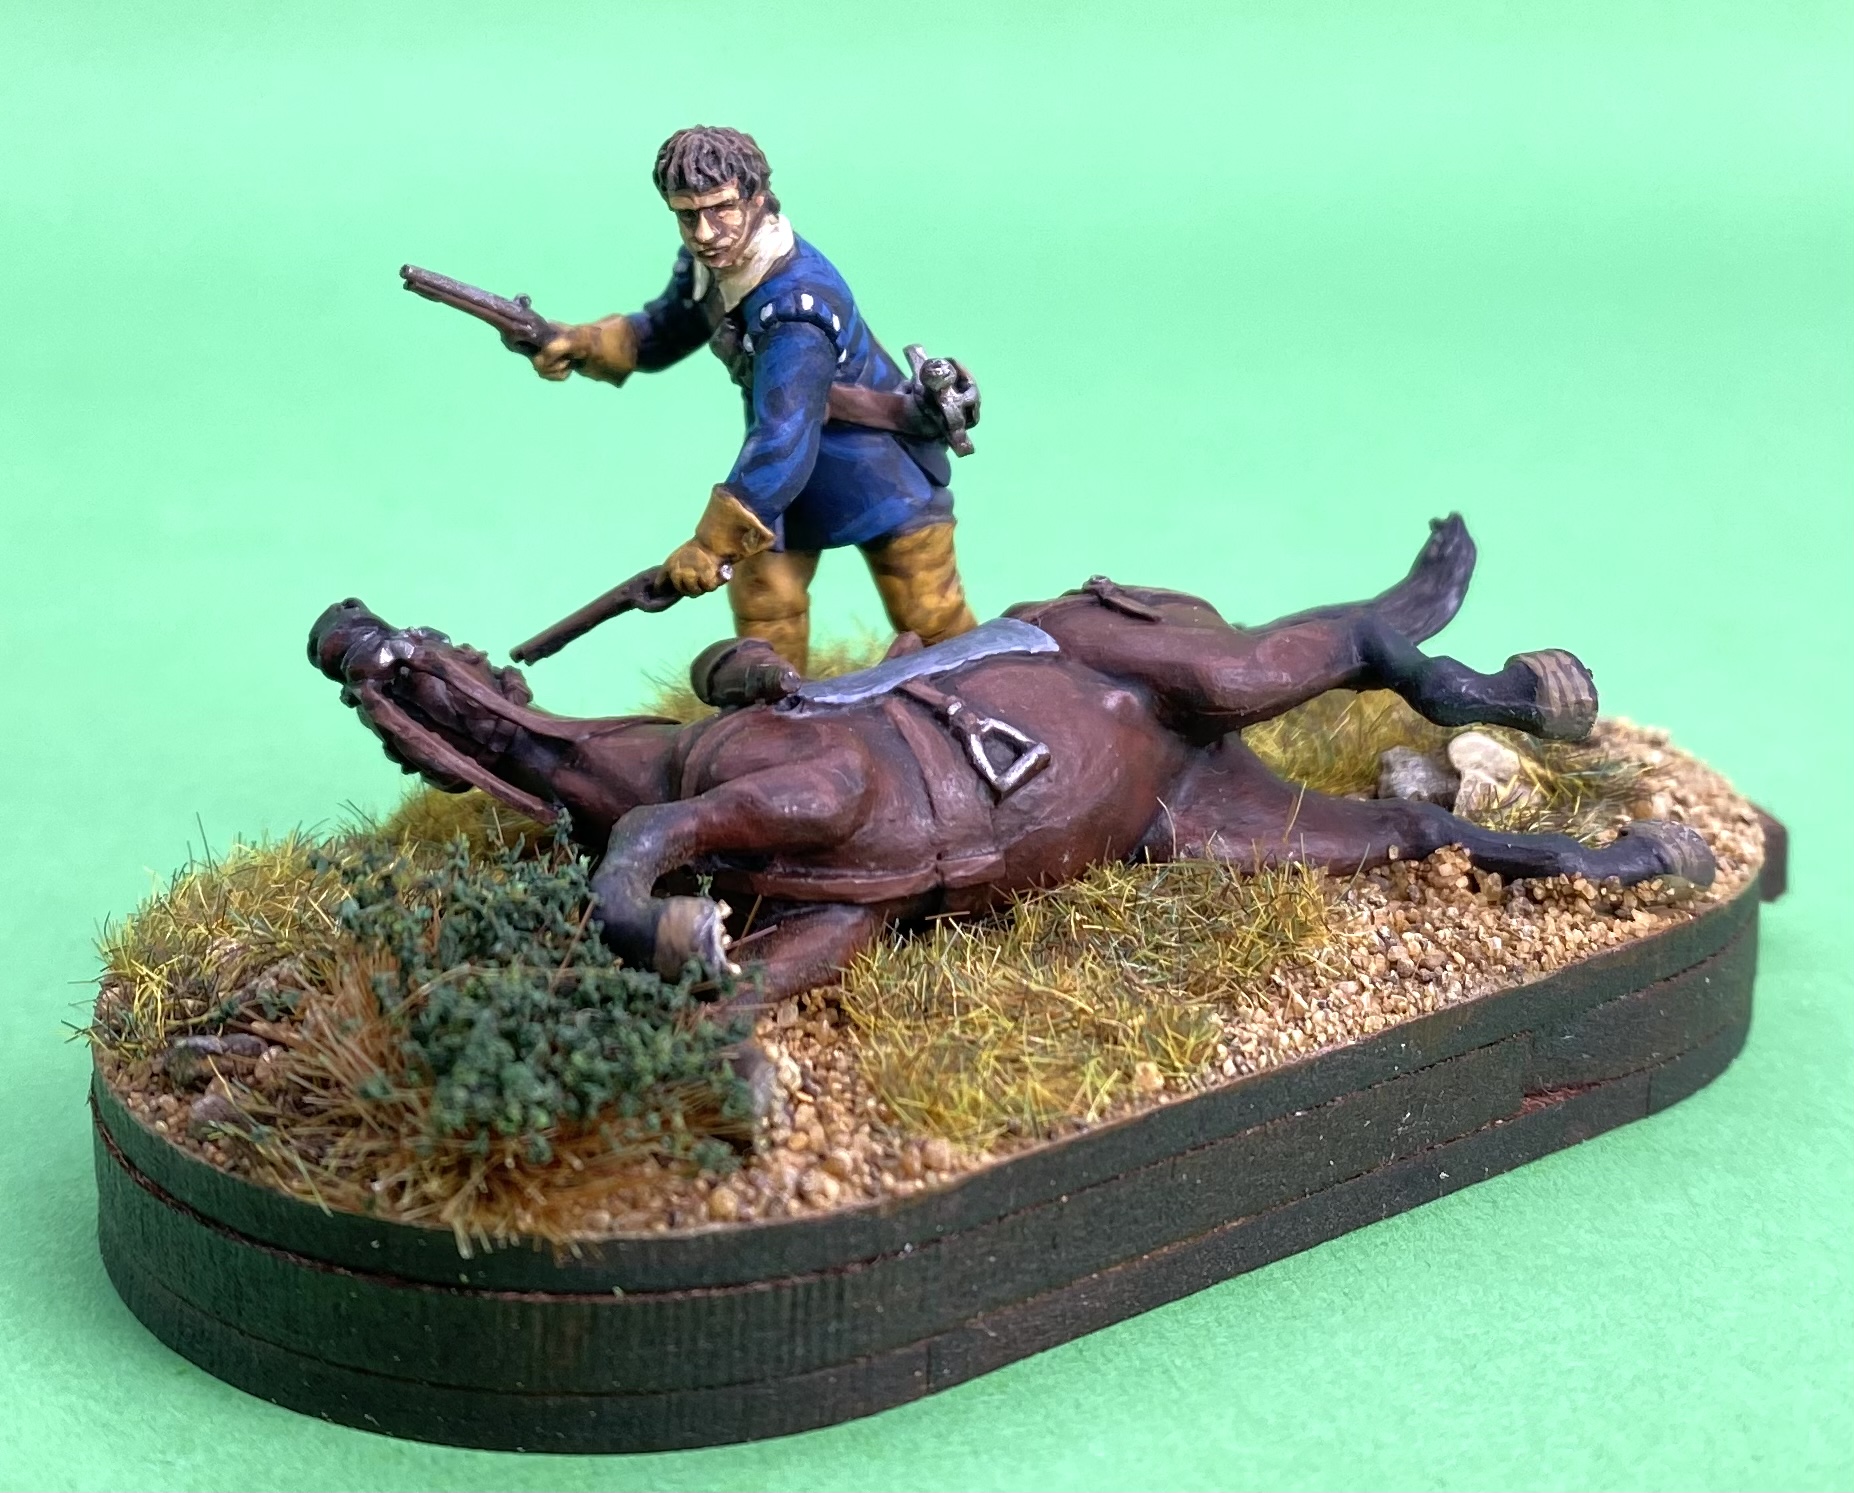
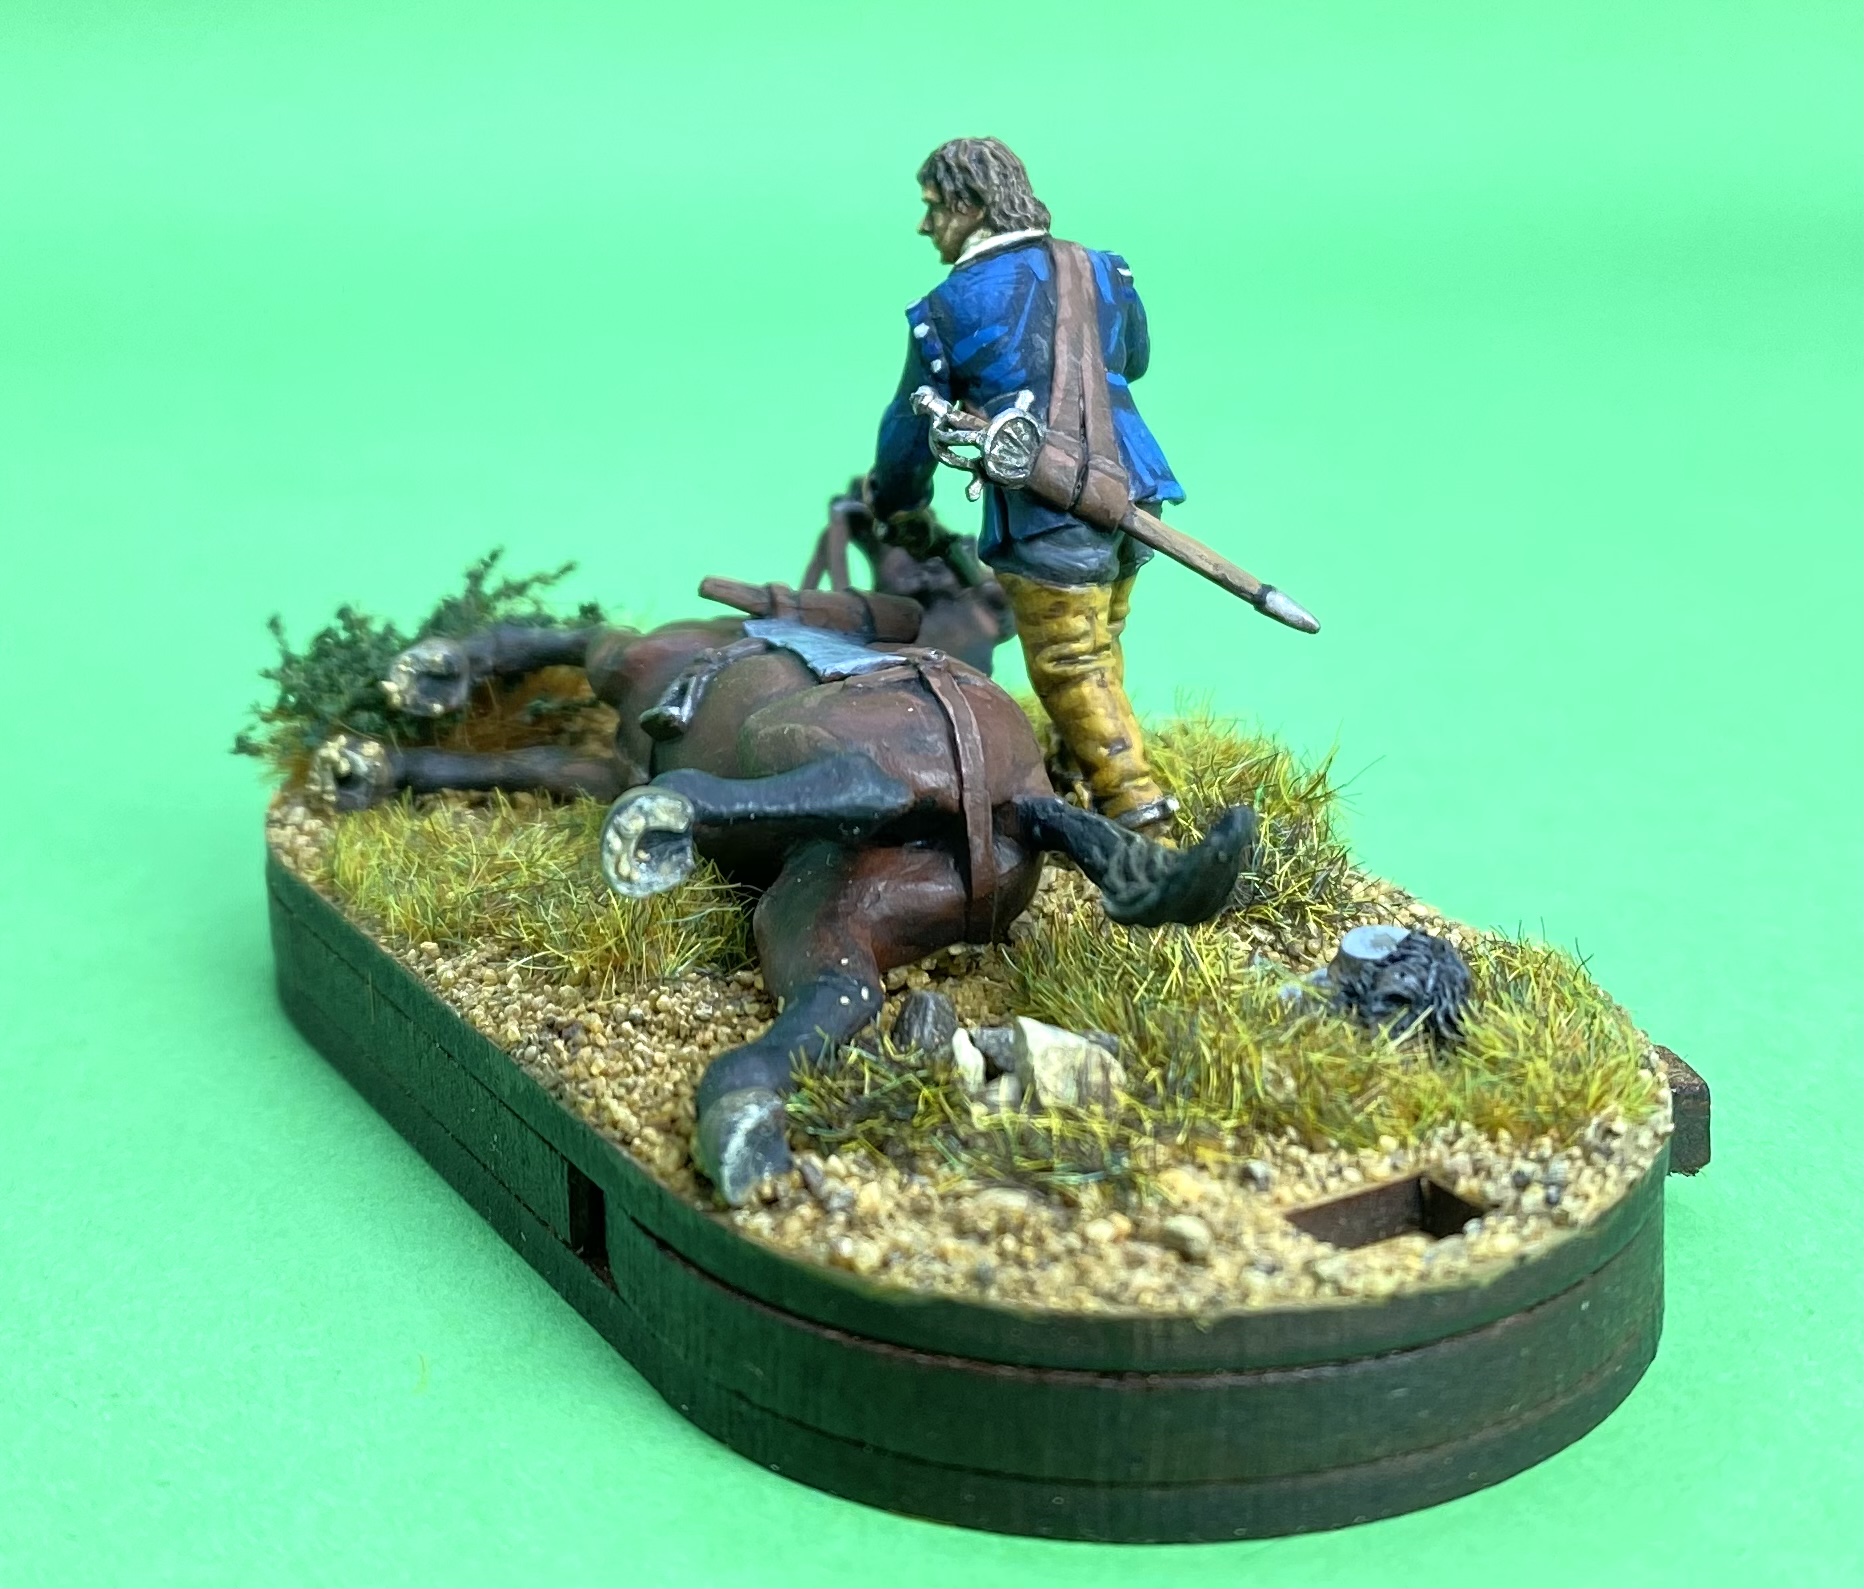
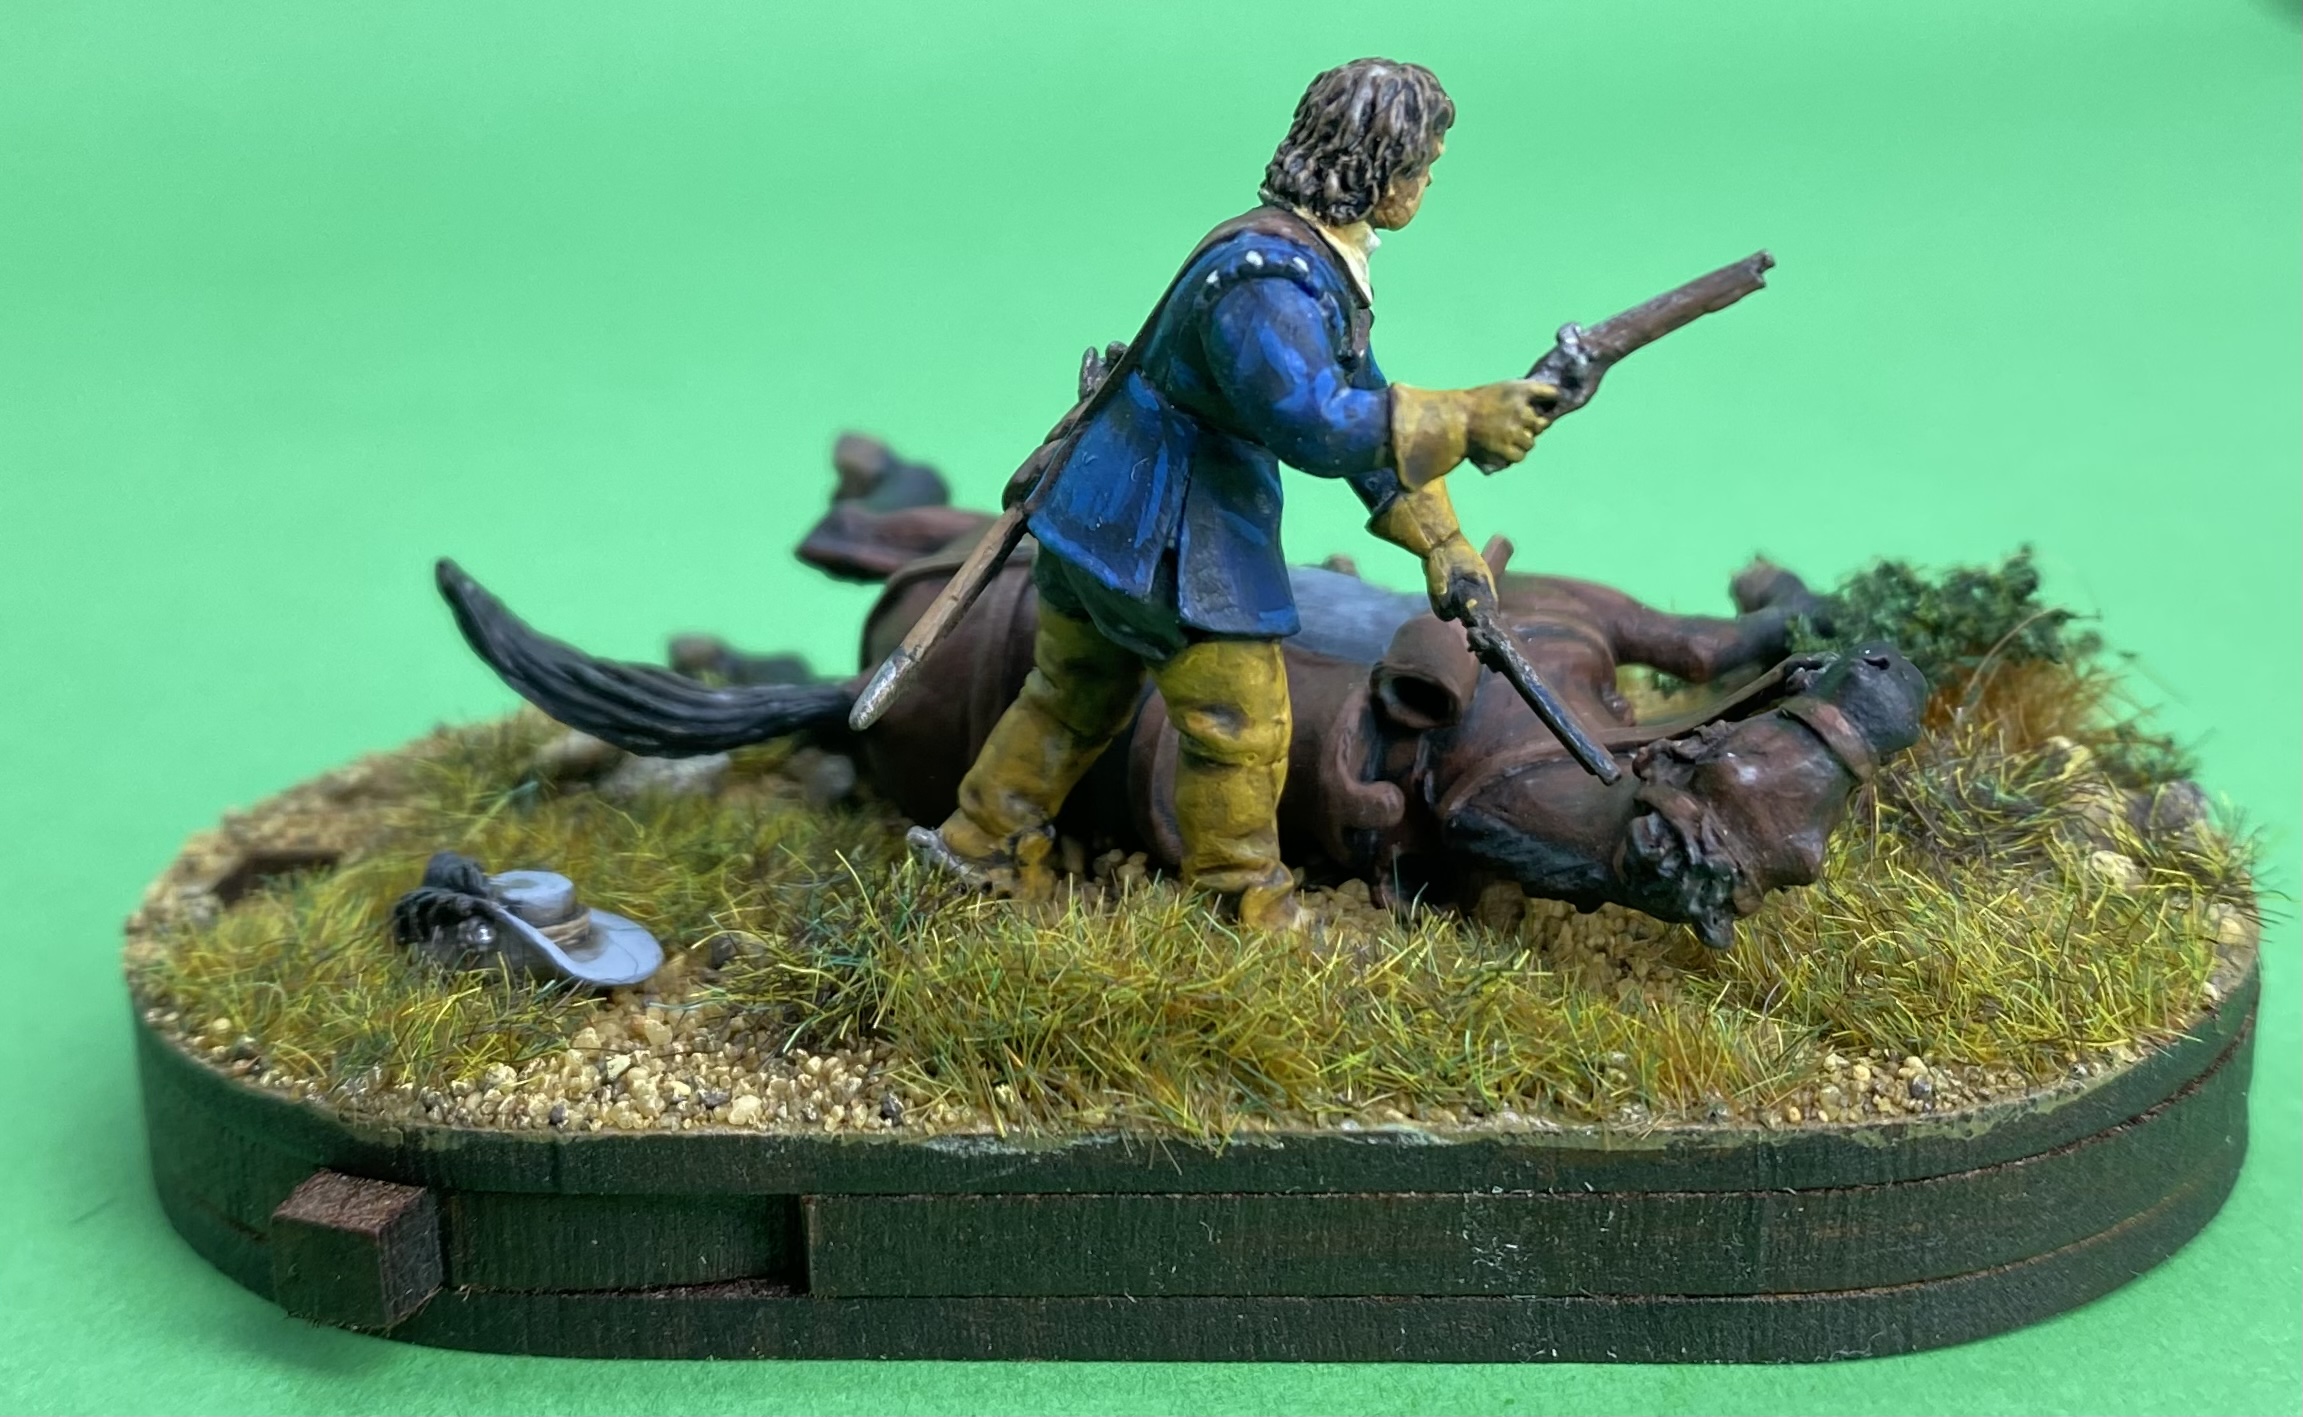
Above is the completed mini diorama for the stamina counter base. I realise this is perhaps a rather morbid scene, but it’s a good reminder of how horses suffered in this period of warfare. I’m glad that Avanpost chose to include this in their collection so we don’t forget this point.
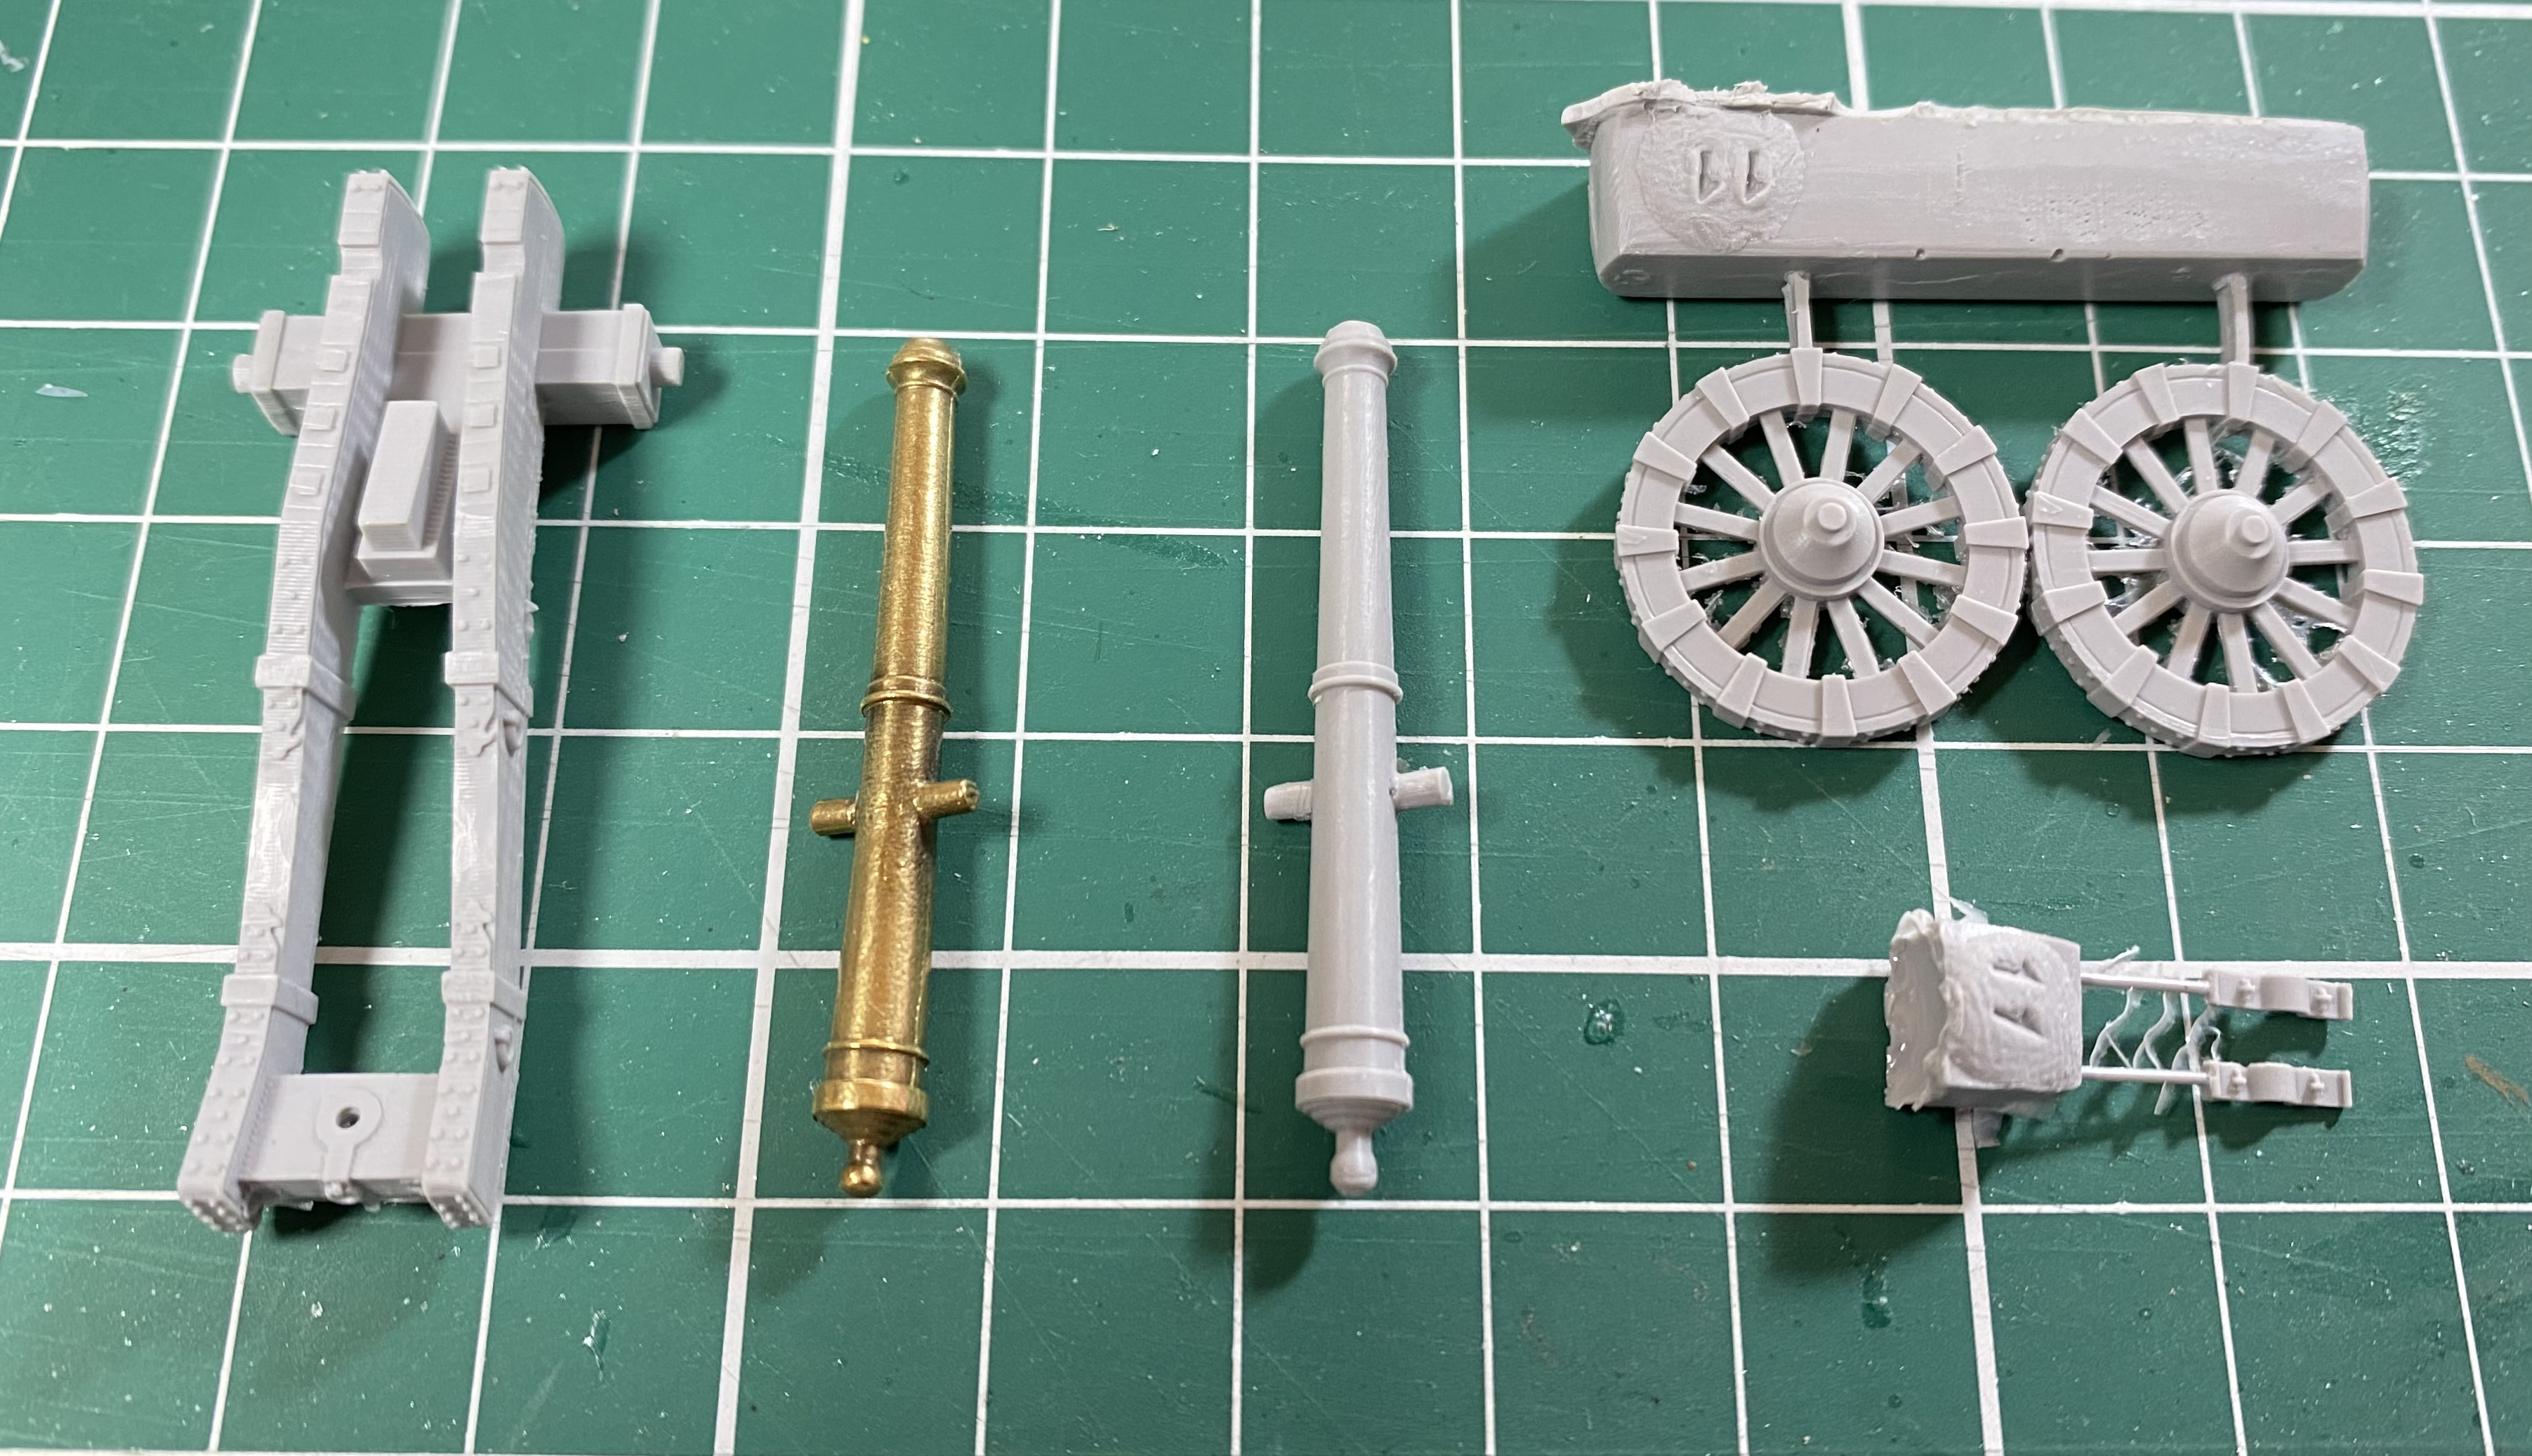
I have also purchased an artillery piece from Avanpost. The gun carriage is in resin and you can choose to have the gun barrel in either resin, or beautifully turned brass! These brass gun barrels are little works of art. I will probably paint over this, but it does provide the option of just weathering the bare metal for you finished model.
I have just two cautions that you should consider with the Avanpost figures. Firstly is that the resin is reasonably delicate and so when there are small parts that stick out on the resin figures I have found them prone to breaking when not carefully handled. For example, the scabbards are very fine items, and a couple of times, when I have carelessly picked up a resin figure, I have broken their scabbards. These are fairly easy to repair, but if you expect to be rough with your figures you should beware of this.
The second item is, I suppose, both a plus and a minus. Wargames figures from other manufacturers have traditionally been sculpted with parts of the figure slightly exaggerated; for example heads, hands and weapons. This has been partly to do with what we think looks good, and partly to do with traditional sculpting and casting methods. The Avanpost figures, on the other hand, seem to be very accurately sculpted from a scale model point of view, and this is apart of their appeal. This scale accuracy includes their equipment and this means that when you compare an Avanpost figure to say, a Perry or Warlord figure, the Avanpost figures’ muskets appear to be much finer and smaller than those on other manufacturers’ figures. Variety in figure height is ok by me (real people are different heights) but differences in equipment scale can be incongruous. For example, I would be nervous of fielding Avanpost musketeers with musketeers from other manufacturers in the same unit because of the different musket sizes. I know that actual 17th century muskets did vary in size, but there is only so much difference my eye will accept. I would suggest you get a sample of two to compare with other figures to check for yourself.
In summary, Avanpost offer a range of beautifully sculpted miniatures, some of which are unique to this period. If you are interesting in playing games in the first half of the 17th century then I’m sure there is a space in your forces for some of these miniatures! The range is still expanding with the recent release (in resin) of sword and buckler armed infantry.
The final pictures show the command base with an also newly completed 1898 unit of musketeers.

Until next time!
Avanpost Miniatures - a mini review (part 1)
This entry covers my experience with the Thirty Years Wars (TYW) figures from Avanpost Historical Miniatures.
I first became aware of this company a couple of years ago from posts on the Lead Adventure Forum, and I was instantly blown away by the quality of their figures. They are superbly detailed and lifelike. I immediately ordered a few figures to see what they were like in the hand, and I wasn’t disappointed.
Avanpost are a Russian manufacturer and don’t have a traditional website/shop. They use a Facebook group to advertise their ranges (link). You can also buy them through Mezzer’s Miniatures (link), a UK distributor. They have two main 28mm ranges; Napoleonic (French & Russian) and Thirty Years War (TYW). They also produce a range of really lovely 75mm models for collectors and painters. Their full ranges are available in cast resin, and most of the 28mm ranges are also available in metal. They are on the small side of 28mm and fit perfectly with Perry Miniatures ECW range. I have mixed them in happily with TAG and Warlord as well. However they might seem a bit incongruous in the same unit with Bicorne or Renegade which are at the bigger end of 28mm.
Most of the figures require some assembly, such as adding arms and sword scabbards. I assume they are designed like this to make the casting process easier. The figures I received have needed little cleanup and fitted together very easily, whether metal or resin, with small dabs of super-glue.
I have only purchased figures from their TYW range so far. Unusually nowadays, the figures are sold individually which is a real boon when you are trying to find that extra drummer figure, or officer, for example. They cover pike and musket armed troops in a wide variety of classic poses. They also cover artillery (guns and crew), dragoons, harquebusiers, and cuirassiers, with command figures for all types. The TYW range is pitched at the first half of the 17th century and would work equally well for the Wars of the Three Kingdoms (ECW).
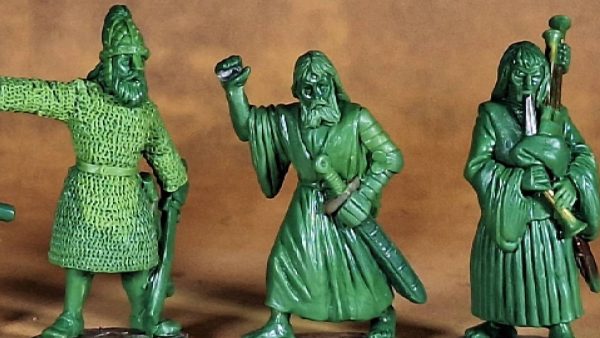
 Avanpost figures straight form the packet - resin on the left and metal on the right.
Here are a couple of figures as they arrived from Mezzer’s Minis. On the left is a resin wounded horse and dismounted cavalryman (an unusual and perhaps unique to Avanpost set!), and on the right a metal sergeant with halberd. The separate pieces were easy to snip from the sprues, and to tidy up with craft knife and file before assembling with superglue.
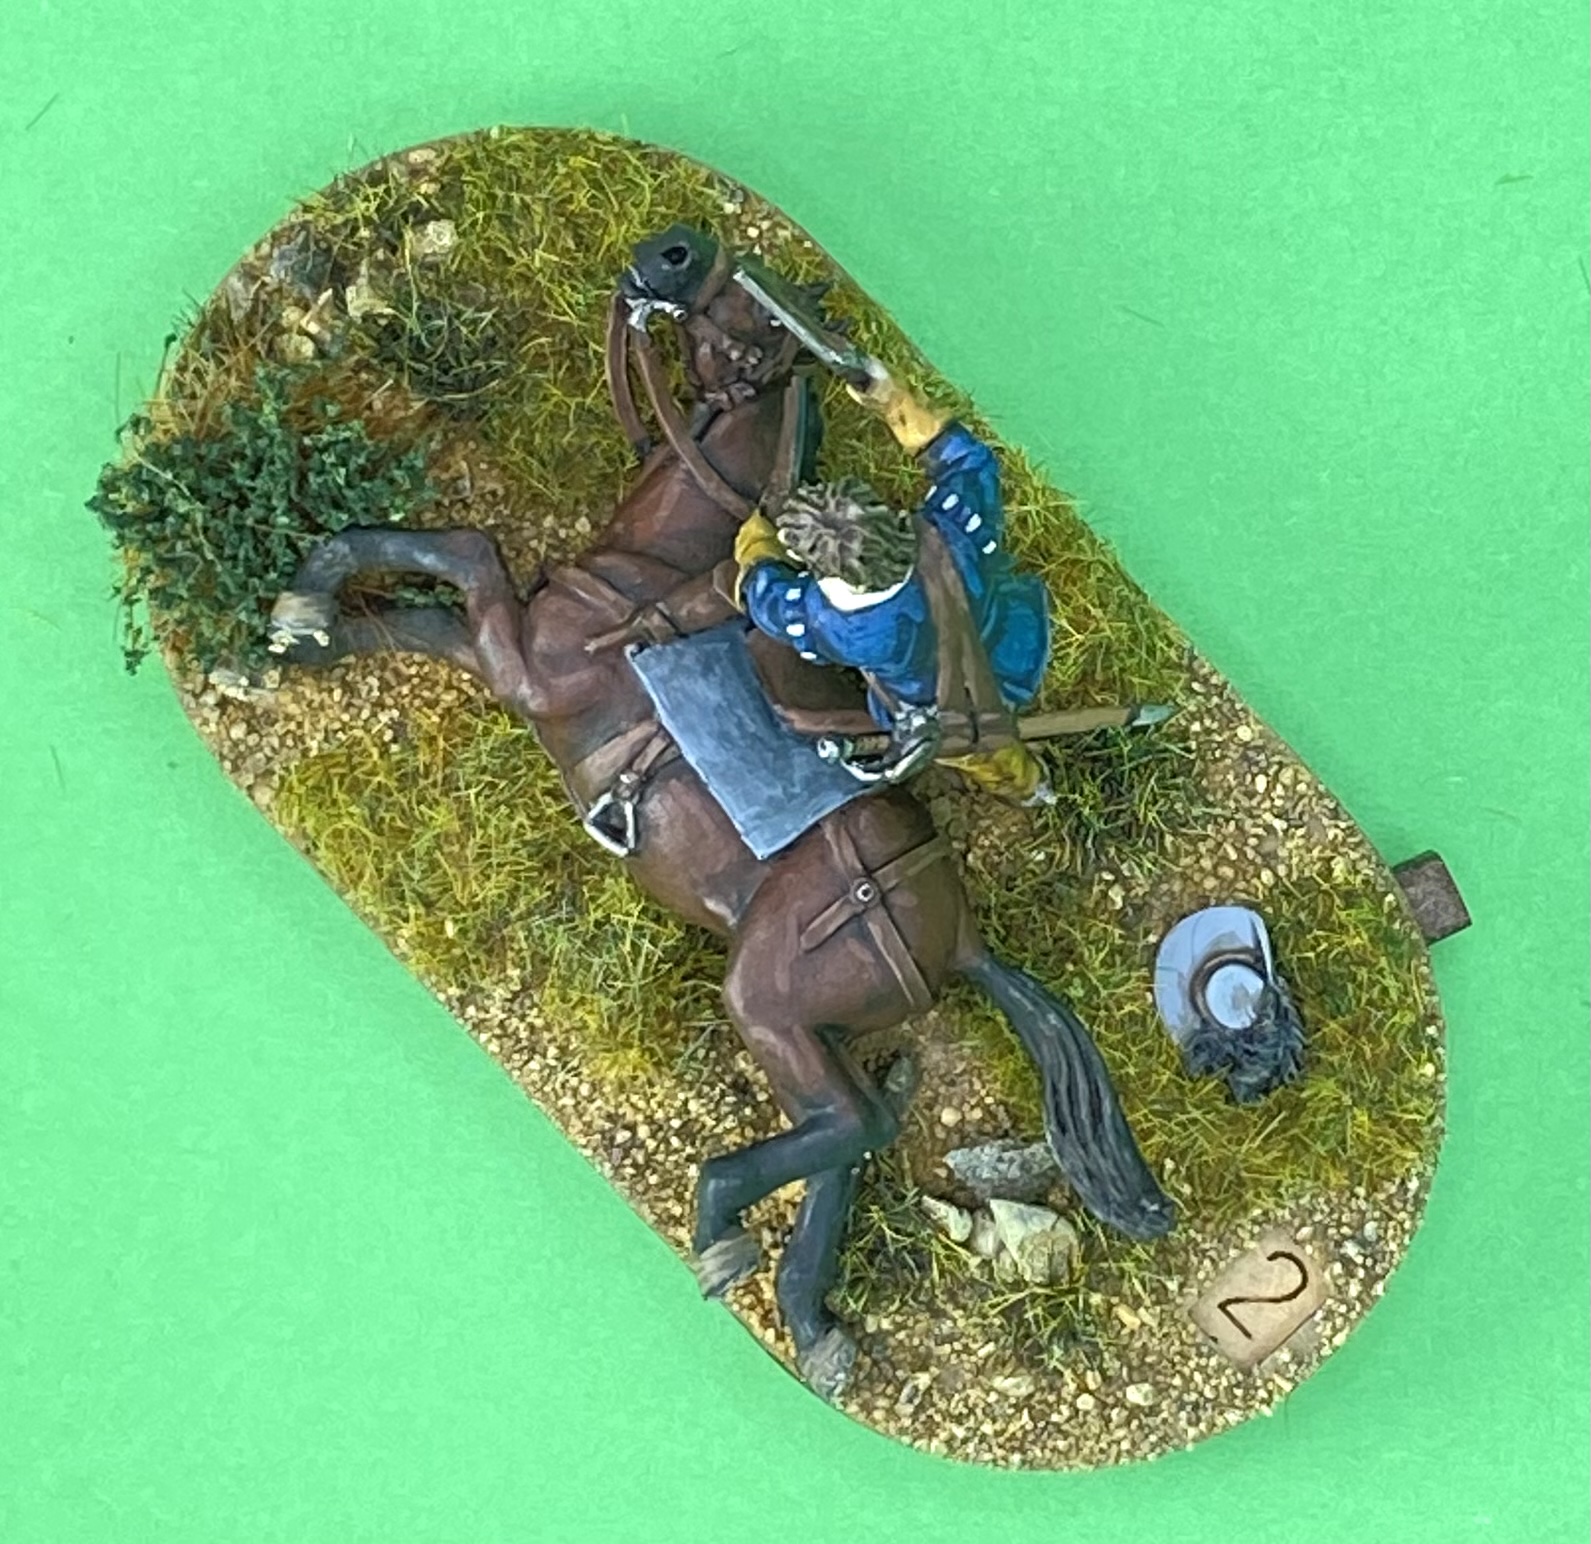
 Avanpost wounded horse on a Charlie Foxtrot - dial / counter base
Here is the wounded horse after construction. This is on a Charlie Foxtrot ‘dial counter’ base and will be used. as stamina / wound counter in Pike & Shotte games.
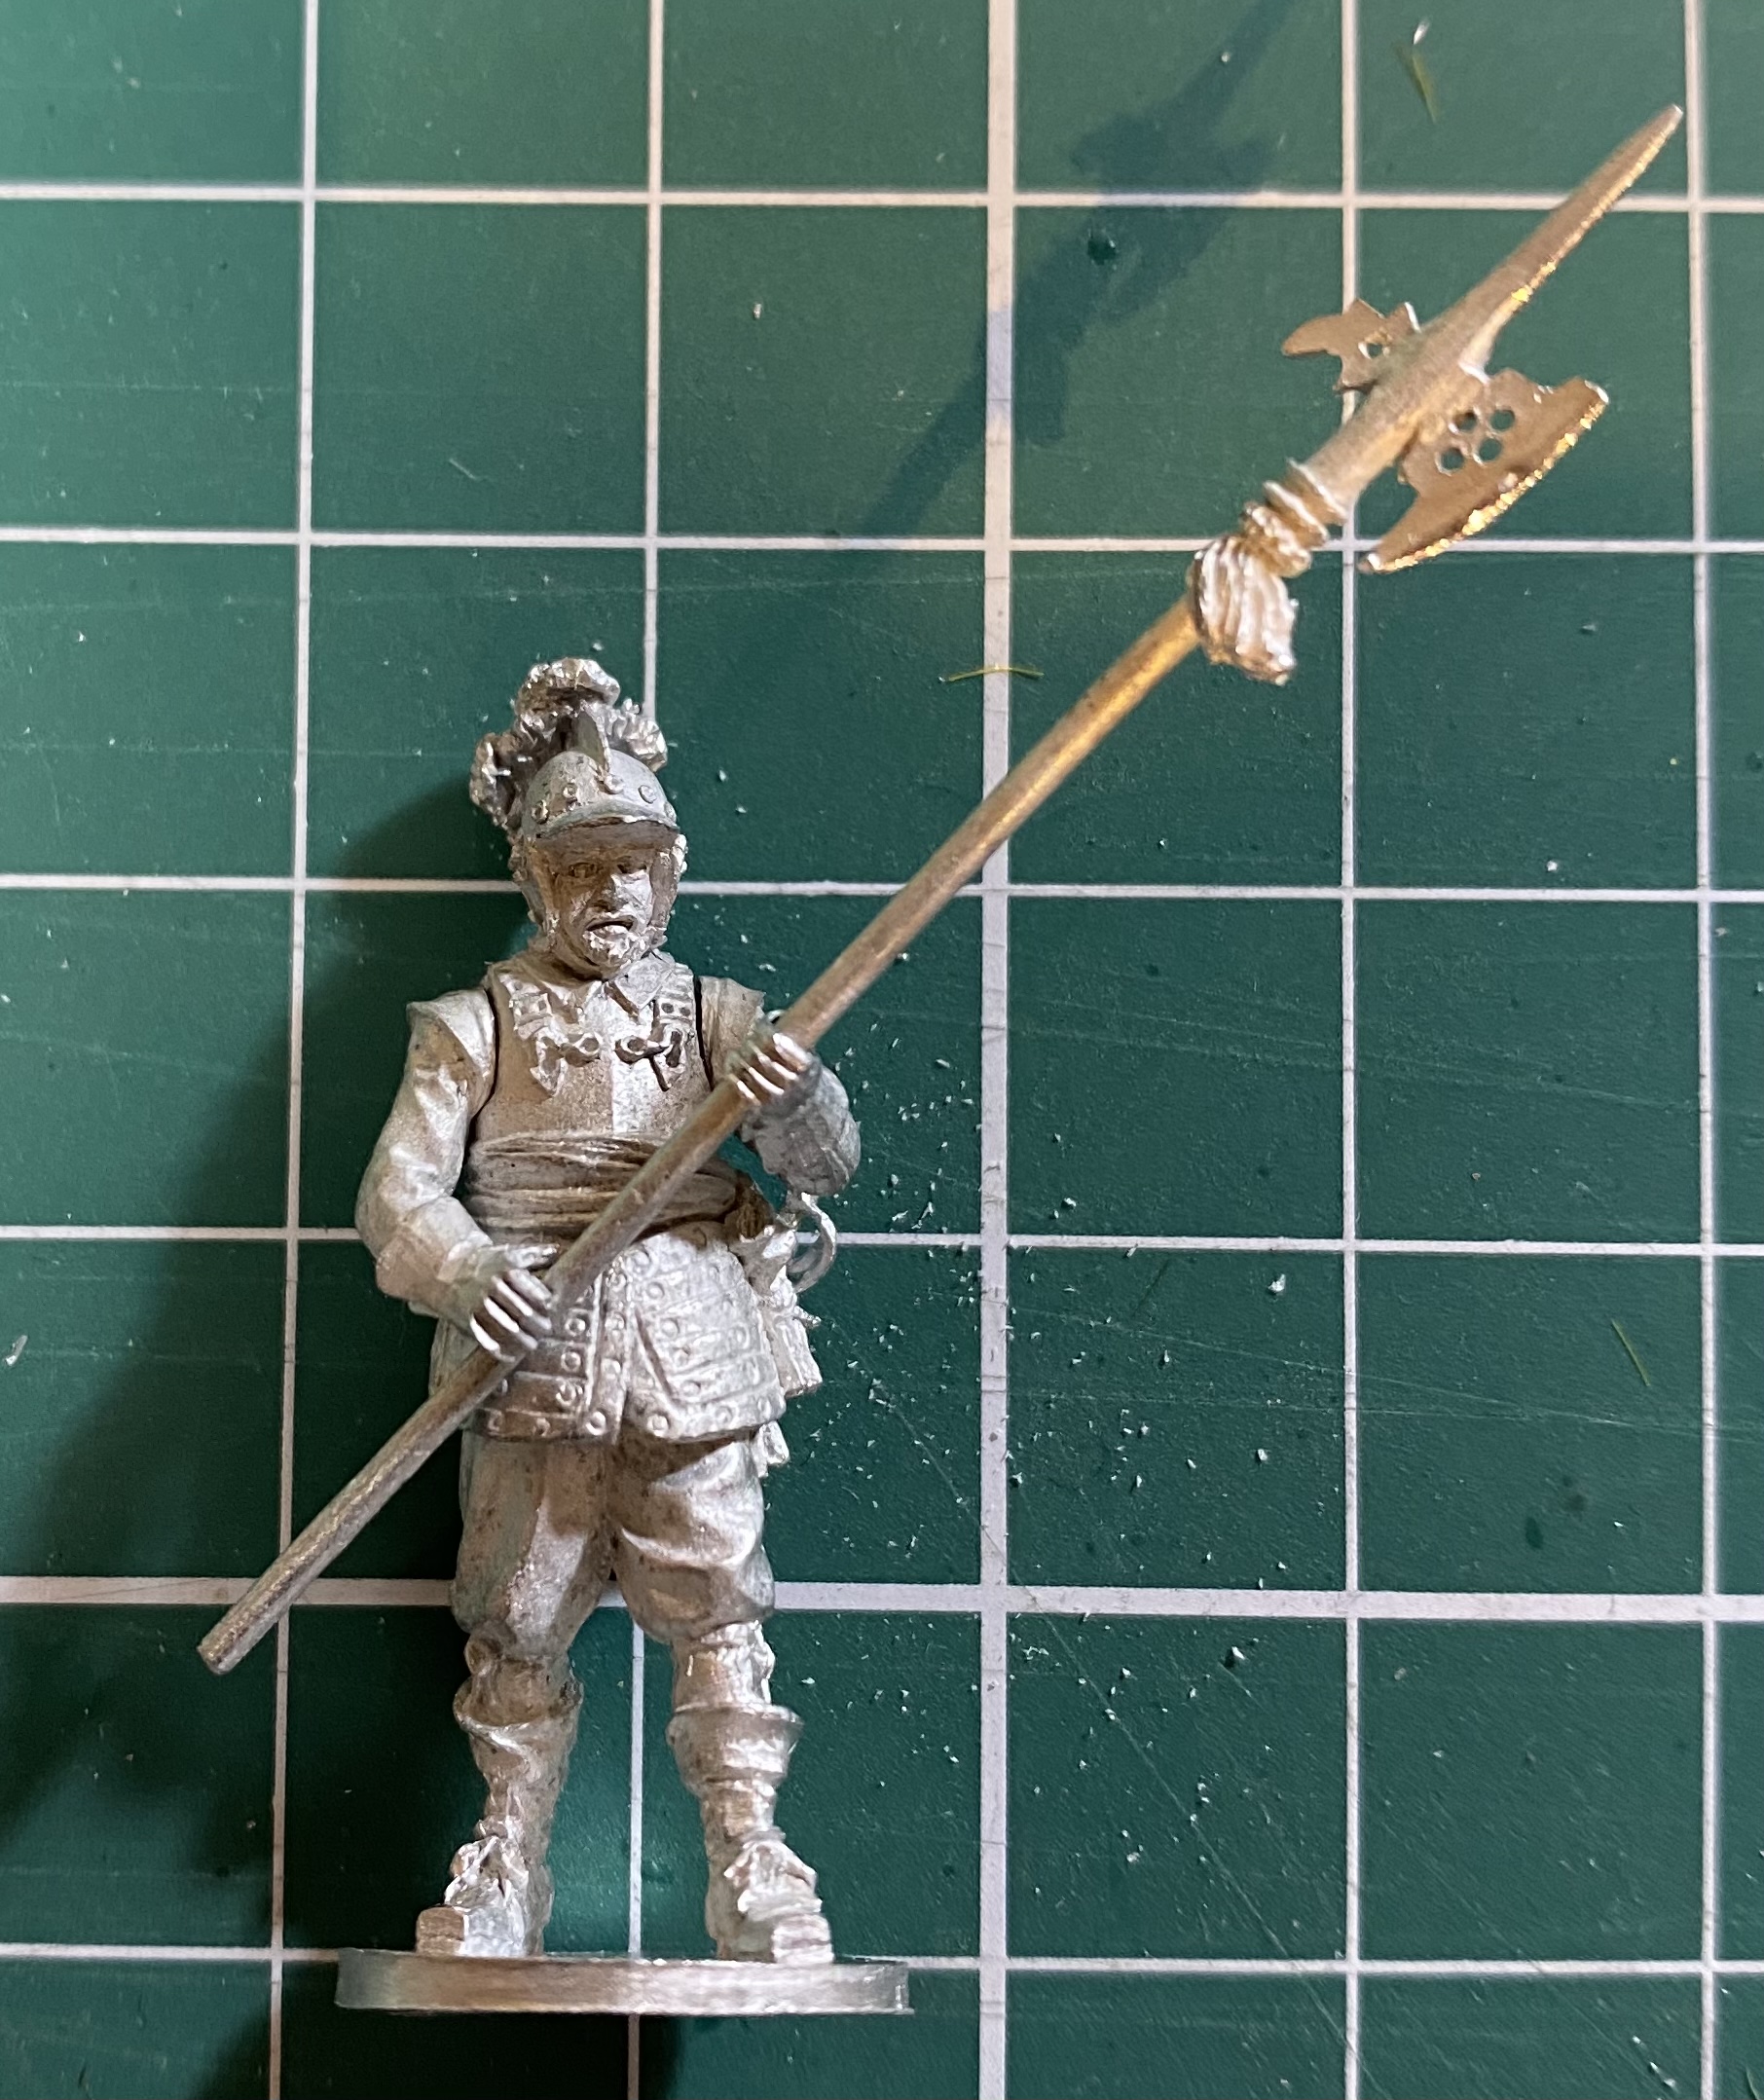 Avanpost sergeant in metal
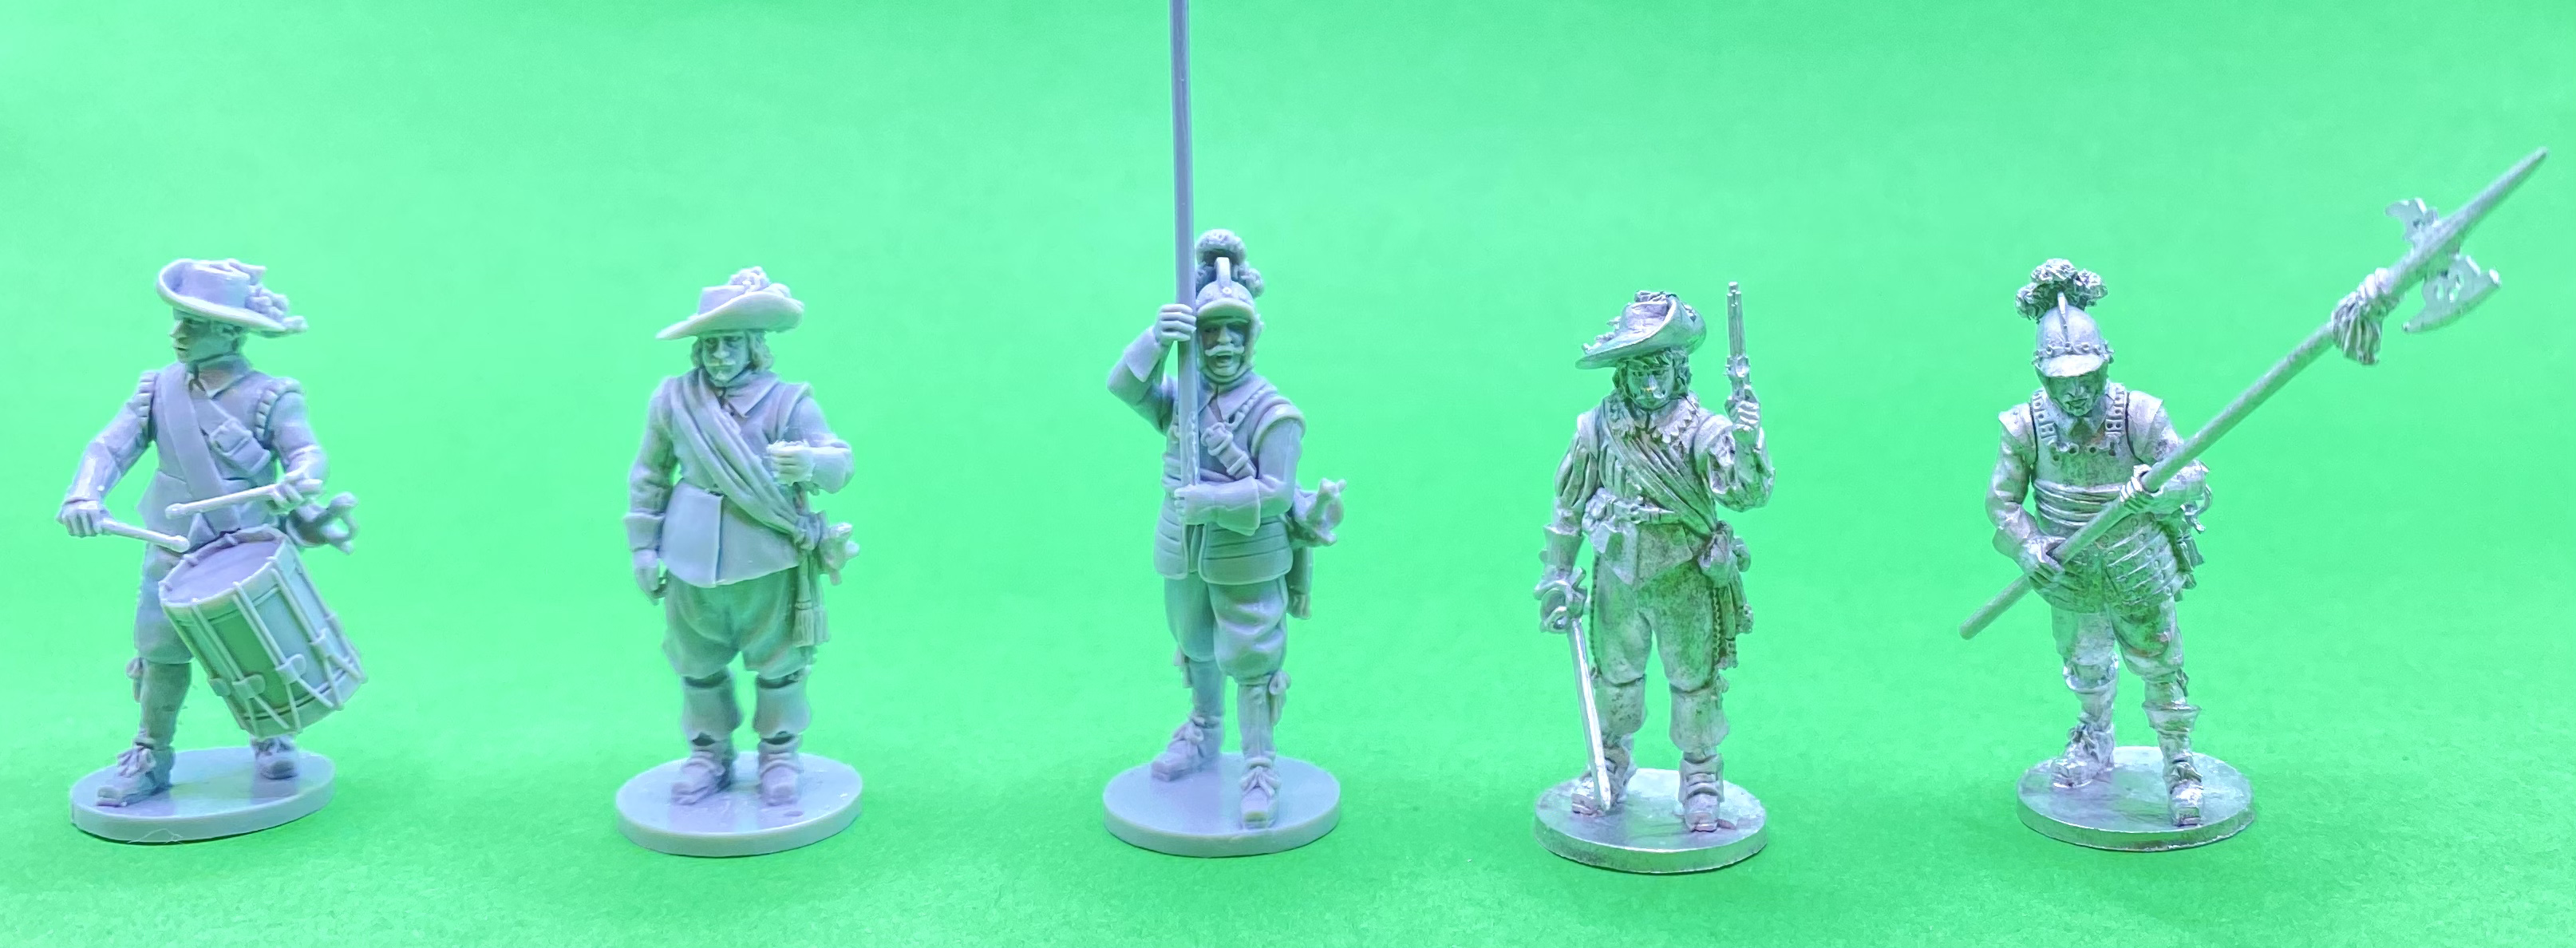
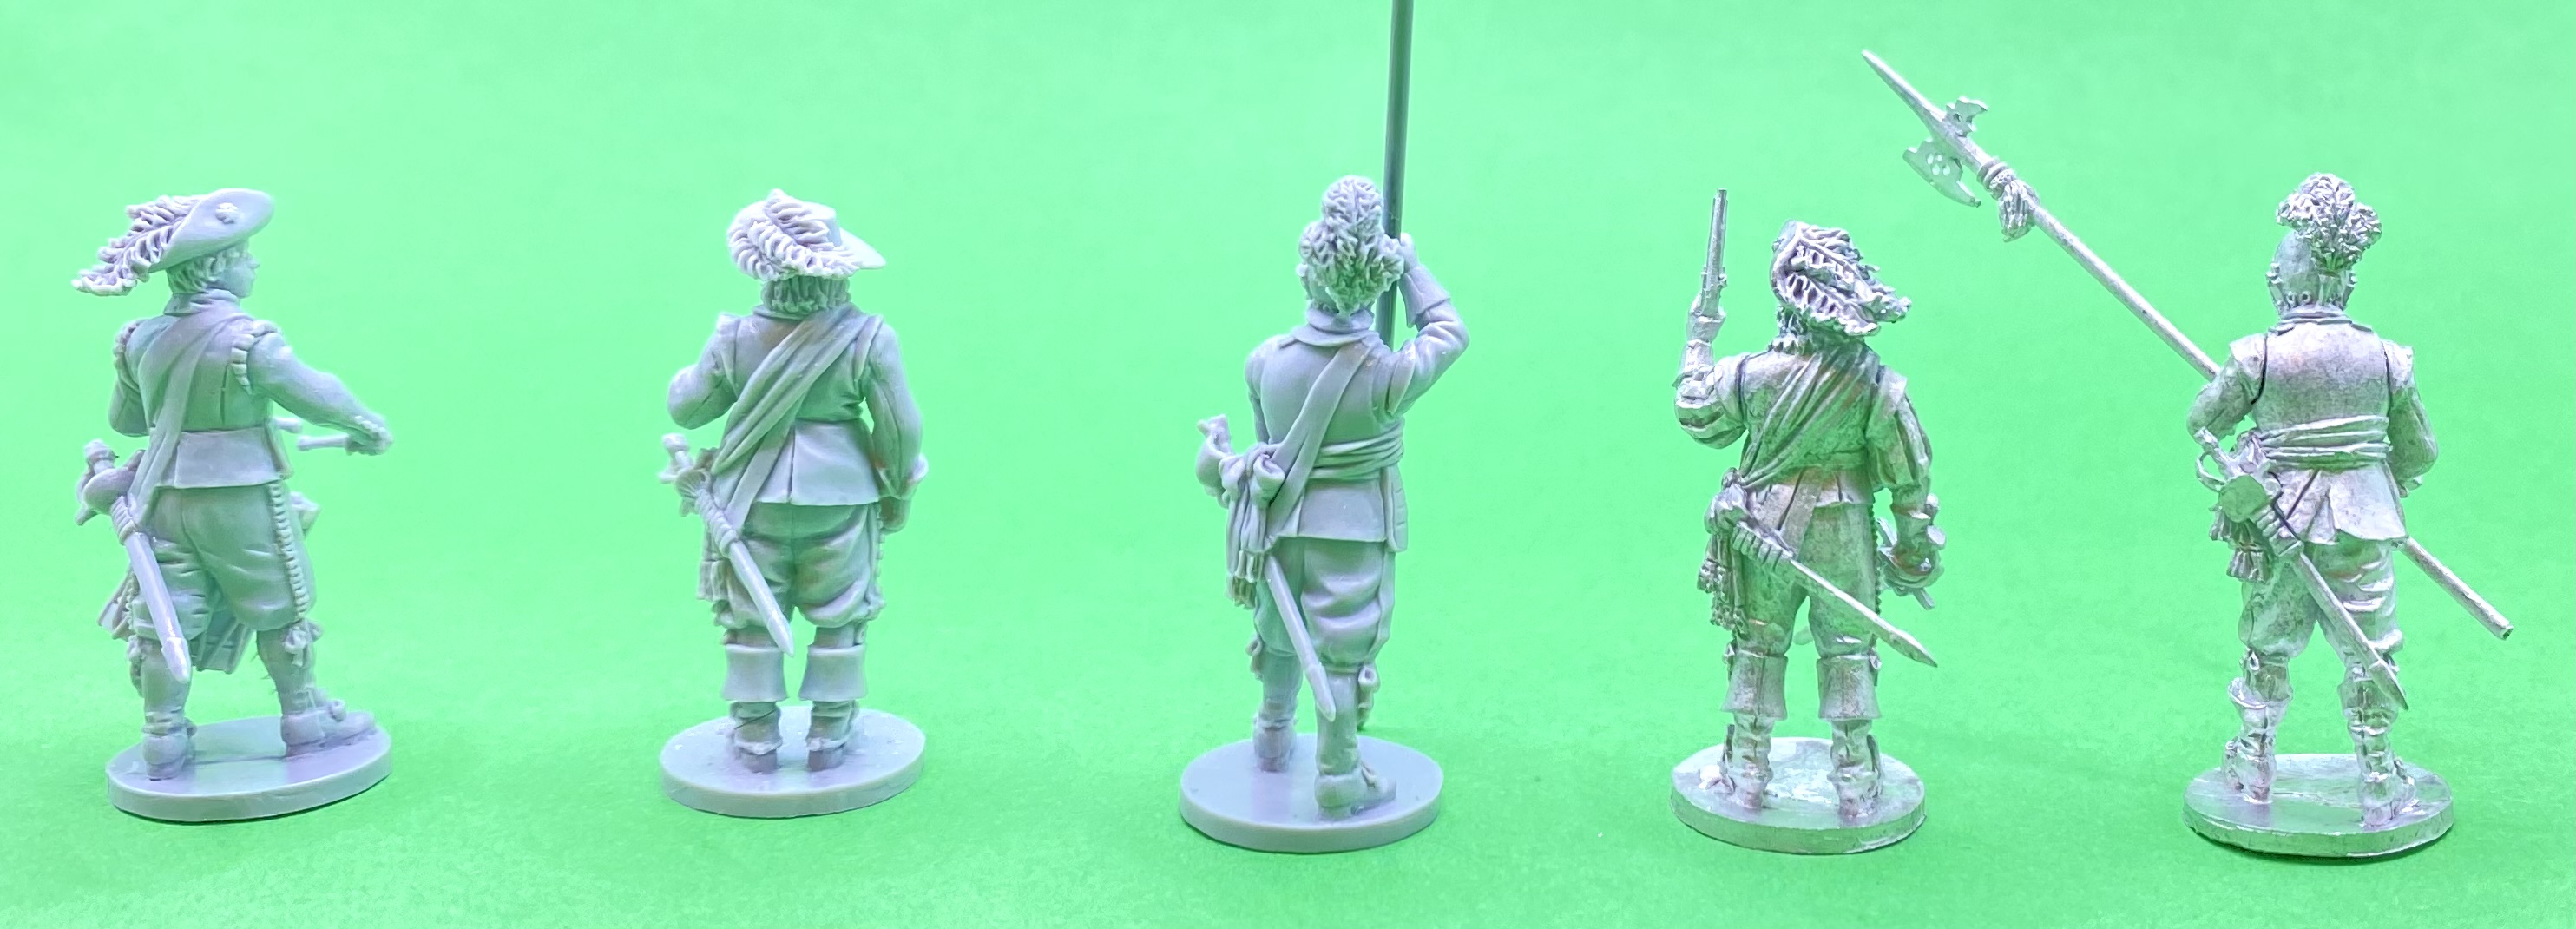
Here are a group of resin and metal foot figures after construction. Hopefully the picture shows the fabulous level of detail in these figures, both resin and metal.
Here is a completed command base using figures from the previous picture. The figures were a joy to paint. (One caution would be that the figures, both metal and resin, could do with a quick wash in warm soapy water before priming. )
The flags are from another supplier new to me, Adolfo Ramos (link), who is based in Spain. These are really nice flags, and there is a lot of flexibility available when ordering to choose the size of flag you want, and also to have them mounted with cords etc. I chose this ‘full service’ option for these two and was very pleased with the result.
In the next post I’ll finish off my review.
Until next time!
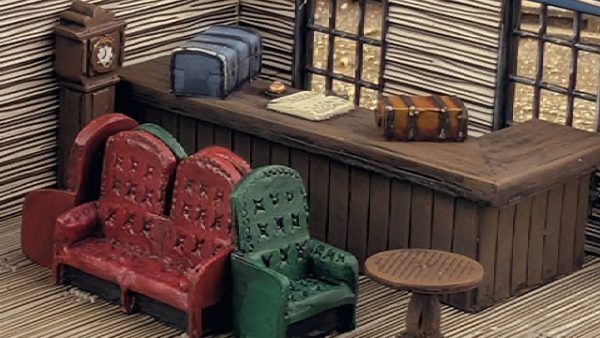
Commanding Bases
In this project entry I’m going to cover basing the command groups for the infantry in my army.
Background
Up to now my foot units have typically had one base within the unit that includes the ensigns or standard bearers. In a period with either no uniforms, or what uniforms there were being vaguely understood now, it is often the unit’s flags that gives the strongest indication of what the unit is trying to represent. Also, I think flags look really good and so try to have two of them in most units. Along with the two standard bearers I typically include an officer and musician (most often a drummer) on the base. The officer’s sash can also suggest a particular historical force (although not as often as we’d hope). Therefore you can see that by changing this single command base you can swap the unit for use in a different army.
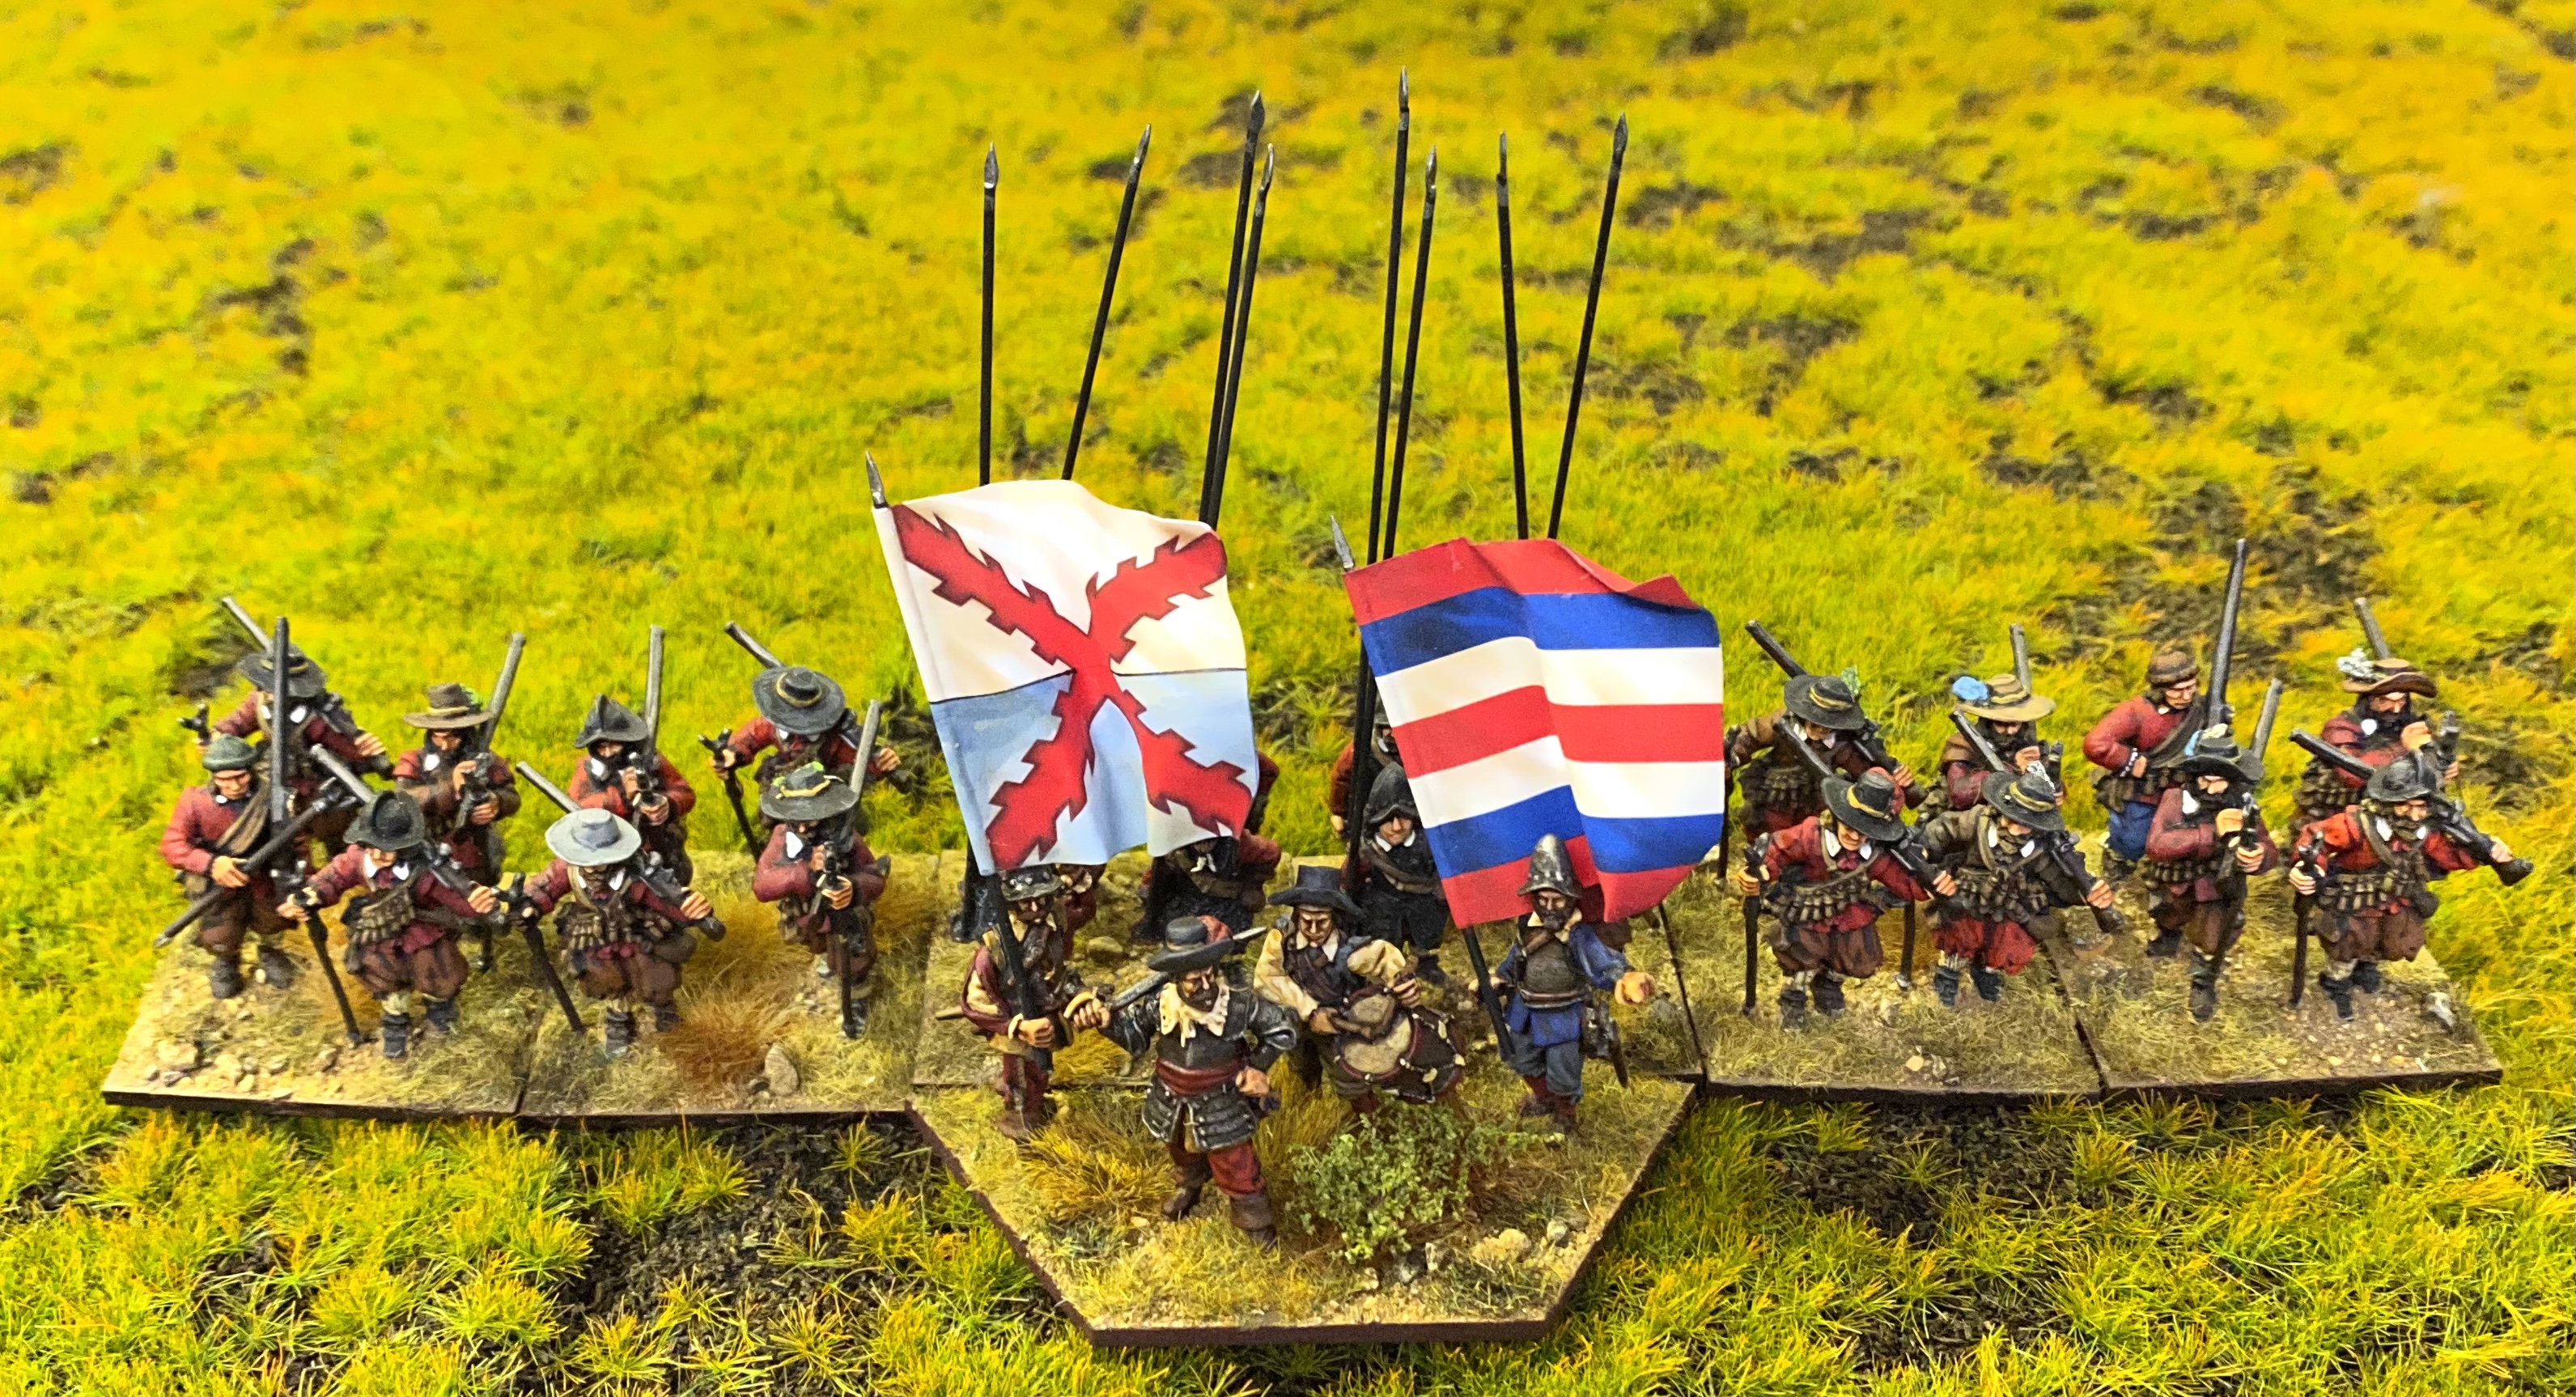
 A regular Pike and Shot unit. Note the command base in the middle.
My basing system for foot figures is to use four 28mm figures on a 40mm square base. This system, with my approach to command bases, means that three bases makes a nice central pike block; two bases of pikemen either side of a central command base. The full regiment or battalion therefore looks like this.
New Requirements
More recently I have been looking at representing formations that don’t fit this approach, such as the Swedish brigade formation that Gustav Adolph used for his Swedish infantry. I’ve also been looking to experiment with other rule systems, some of which use the whole unit frontage as a measure in the game, that means this 360mm (9 bases each of 40mm width) wide formation isn’t very convenient. If I was able to have the command base outside the regular rank and file bases then it would make it easier to change units about.
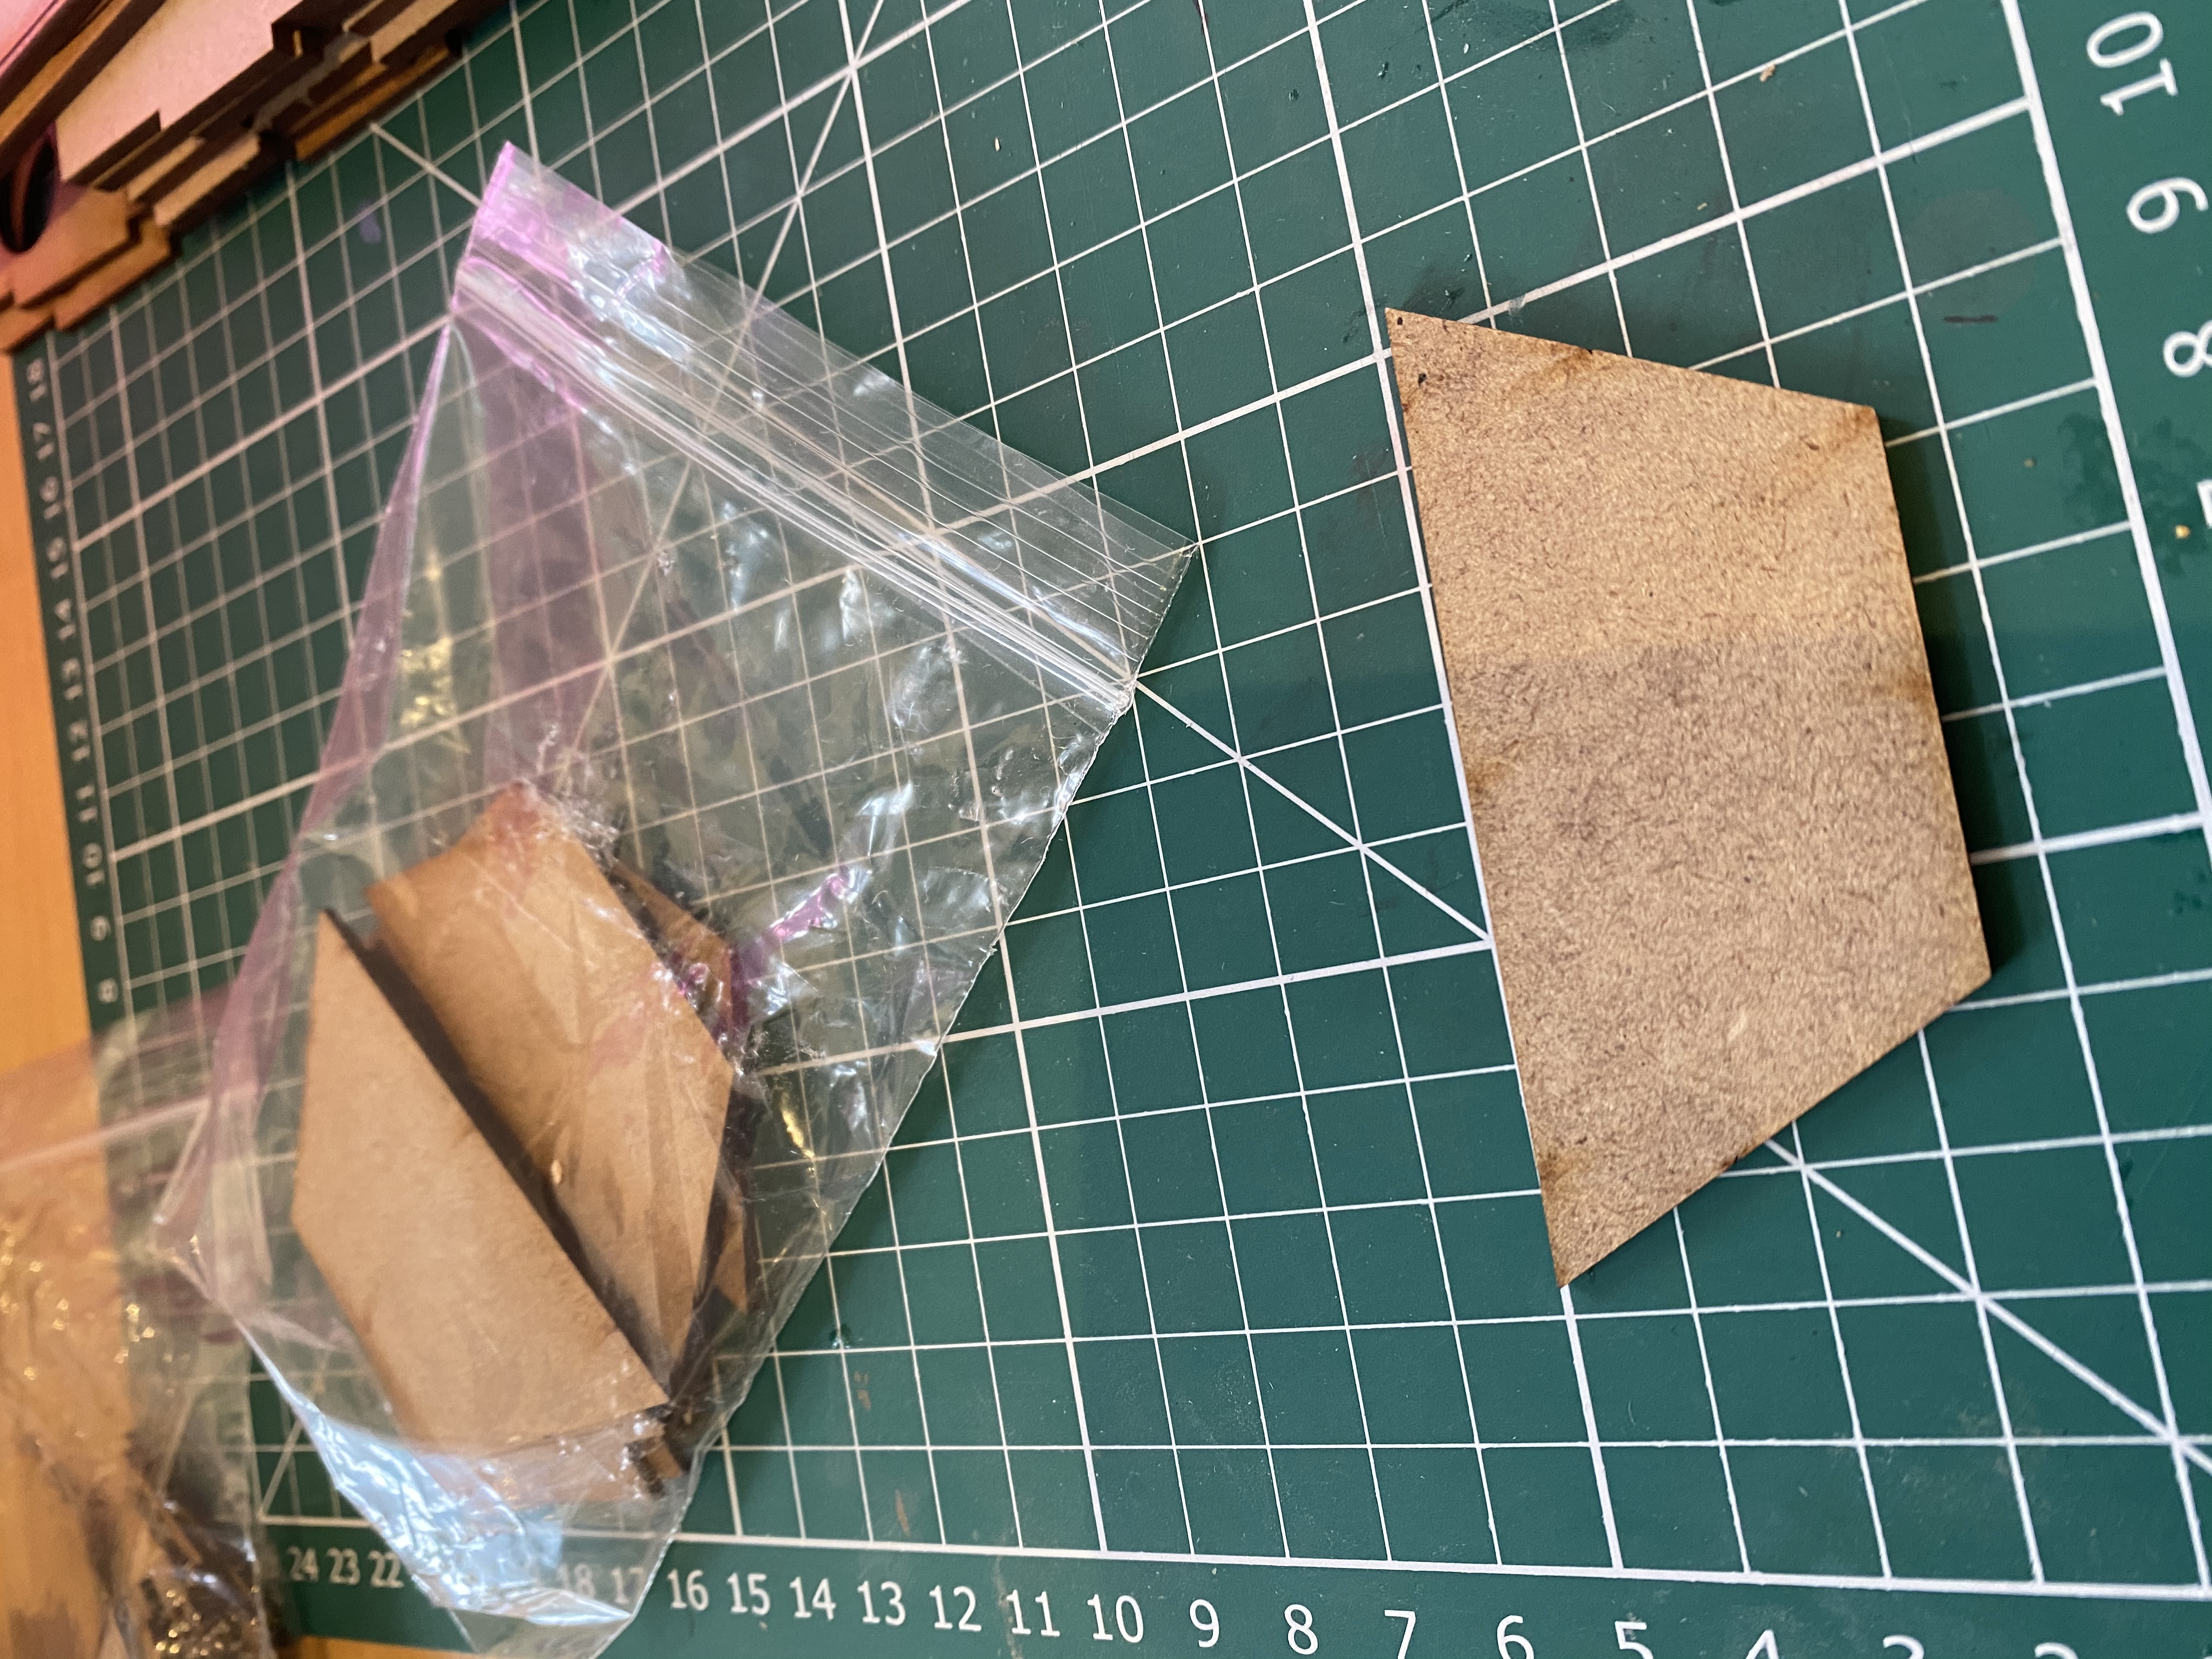 Half-hex, 2mm thick, MDF from Warbases.
A solution to this was suggested when I looked at some of Barry Hilton’s units on the League of Augsburg site (link). Barry sometimes uses a base that sits in front of the rank and file bases. I have seen he has used half hex shaped bases in some cases, and I think this looks quite neat. So, a brief email exchange with the ever helpful Warbases resulted in me receiving some half-hex 2mm thick MDF bases. These are 80mm point to point.
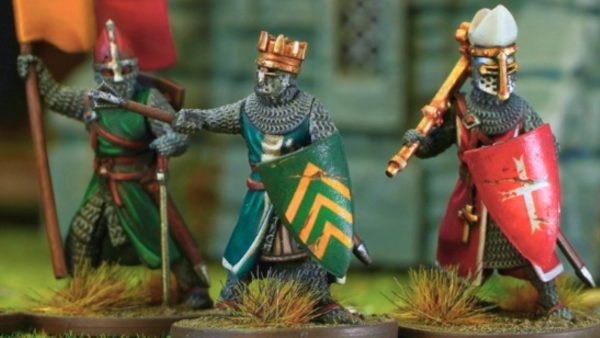
Here is my first new style command base. These figures are from 1898 Miniatures ‘Tercio’ range. The flags are slightly modified from Flags of War.
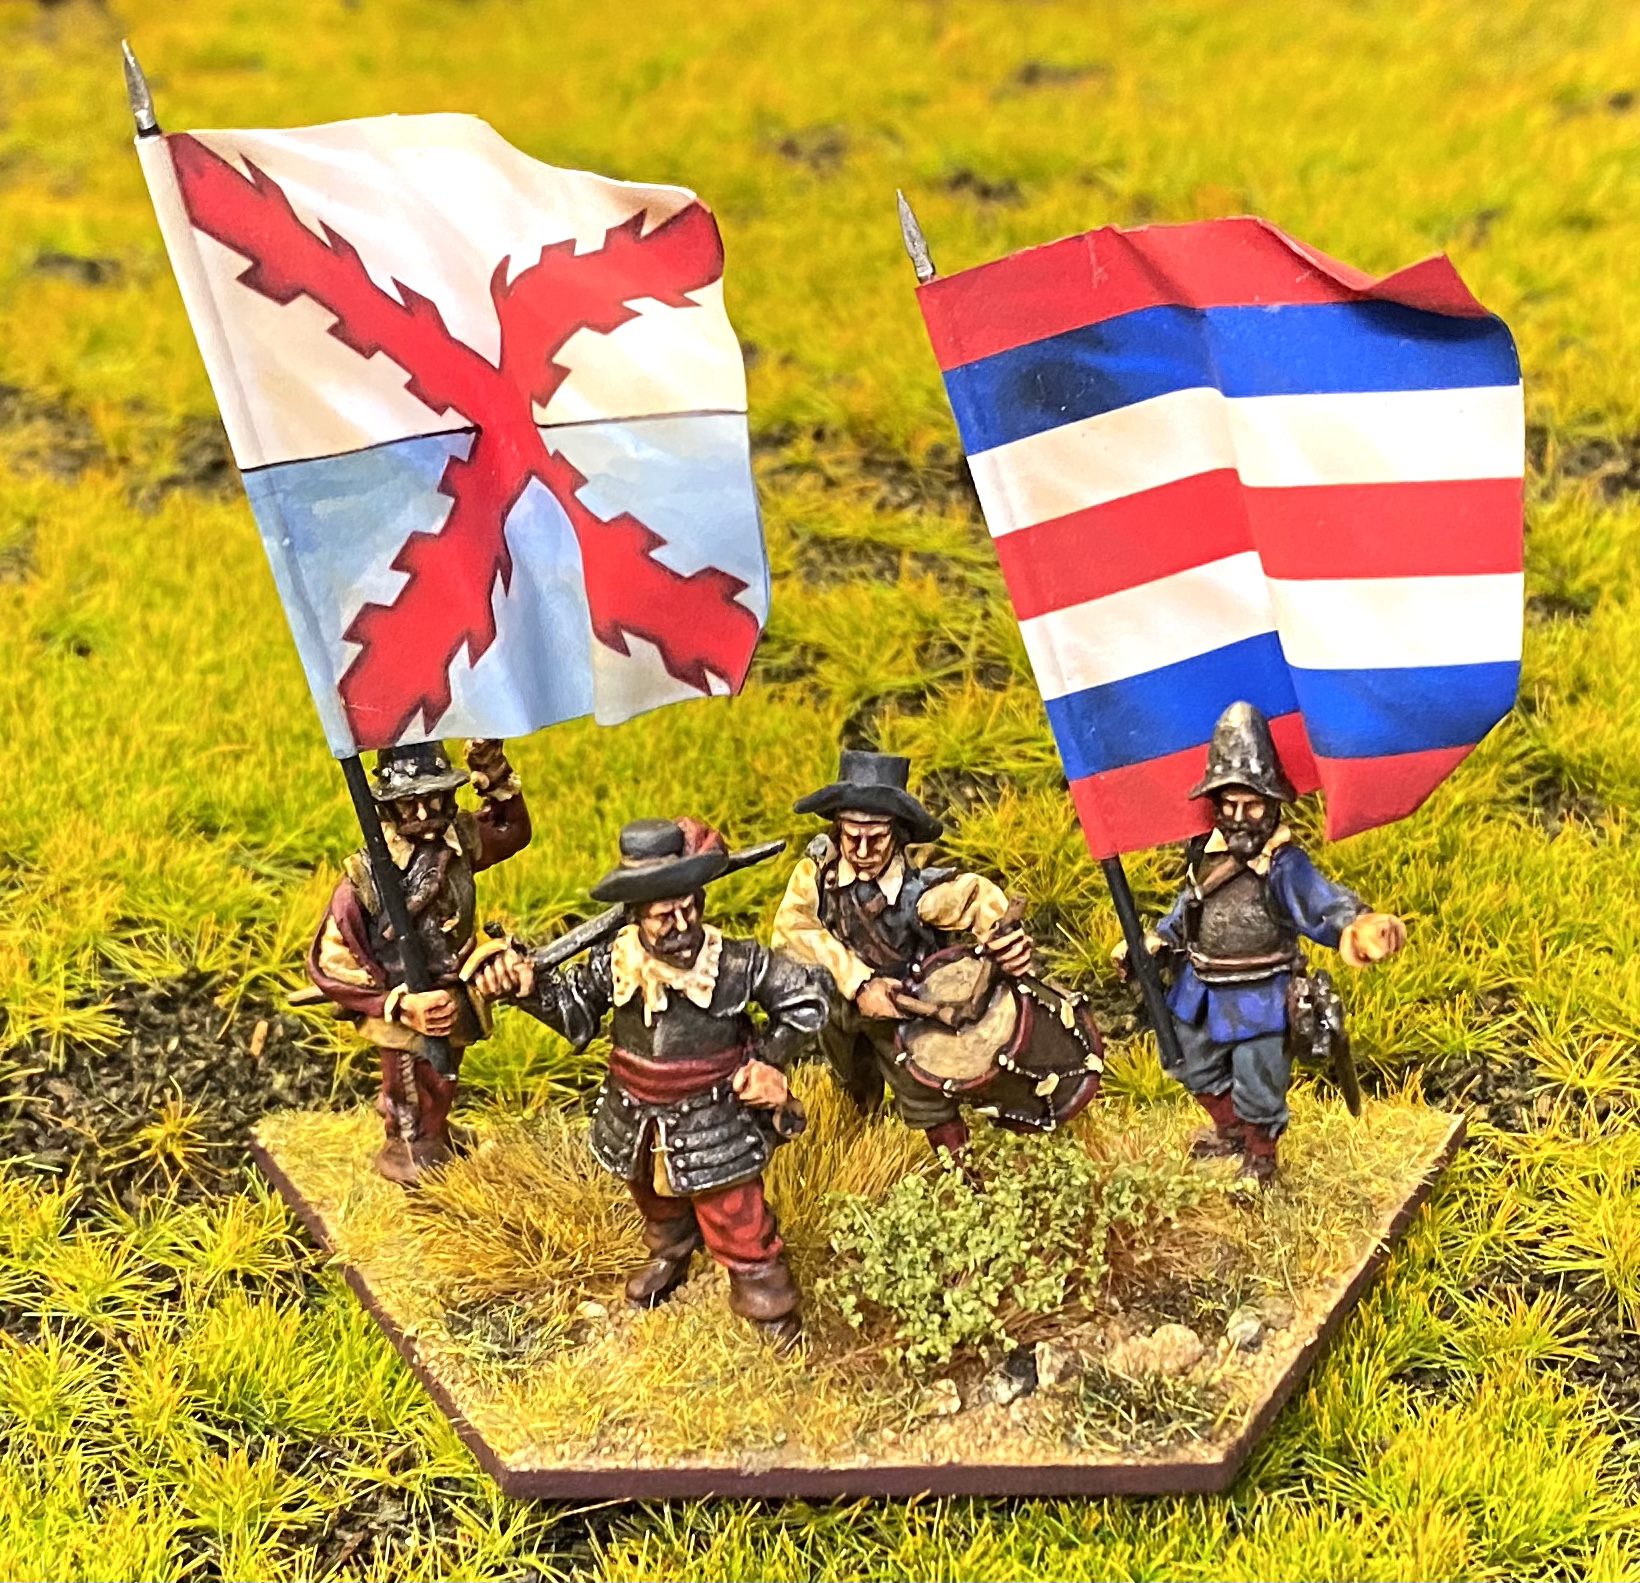 Command base - 28mm from 1898 Miniatures, ‘Tercio’ range.
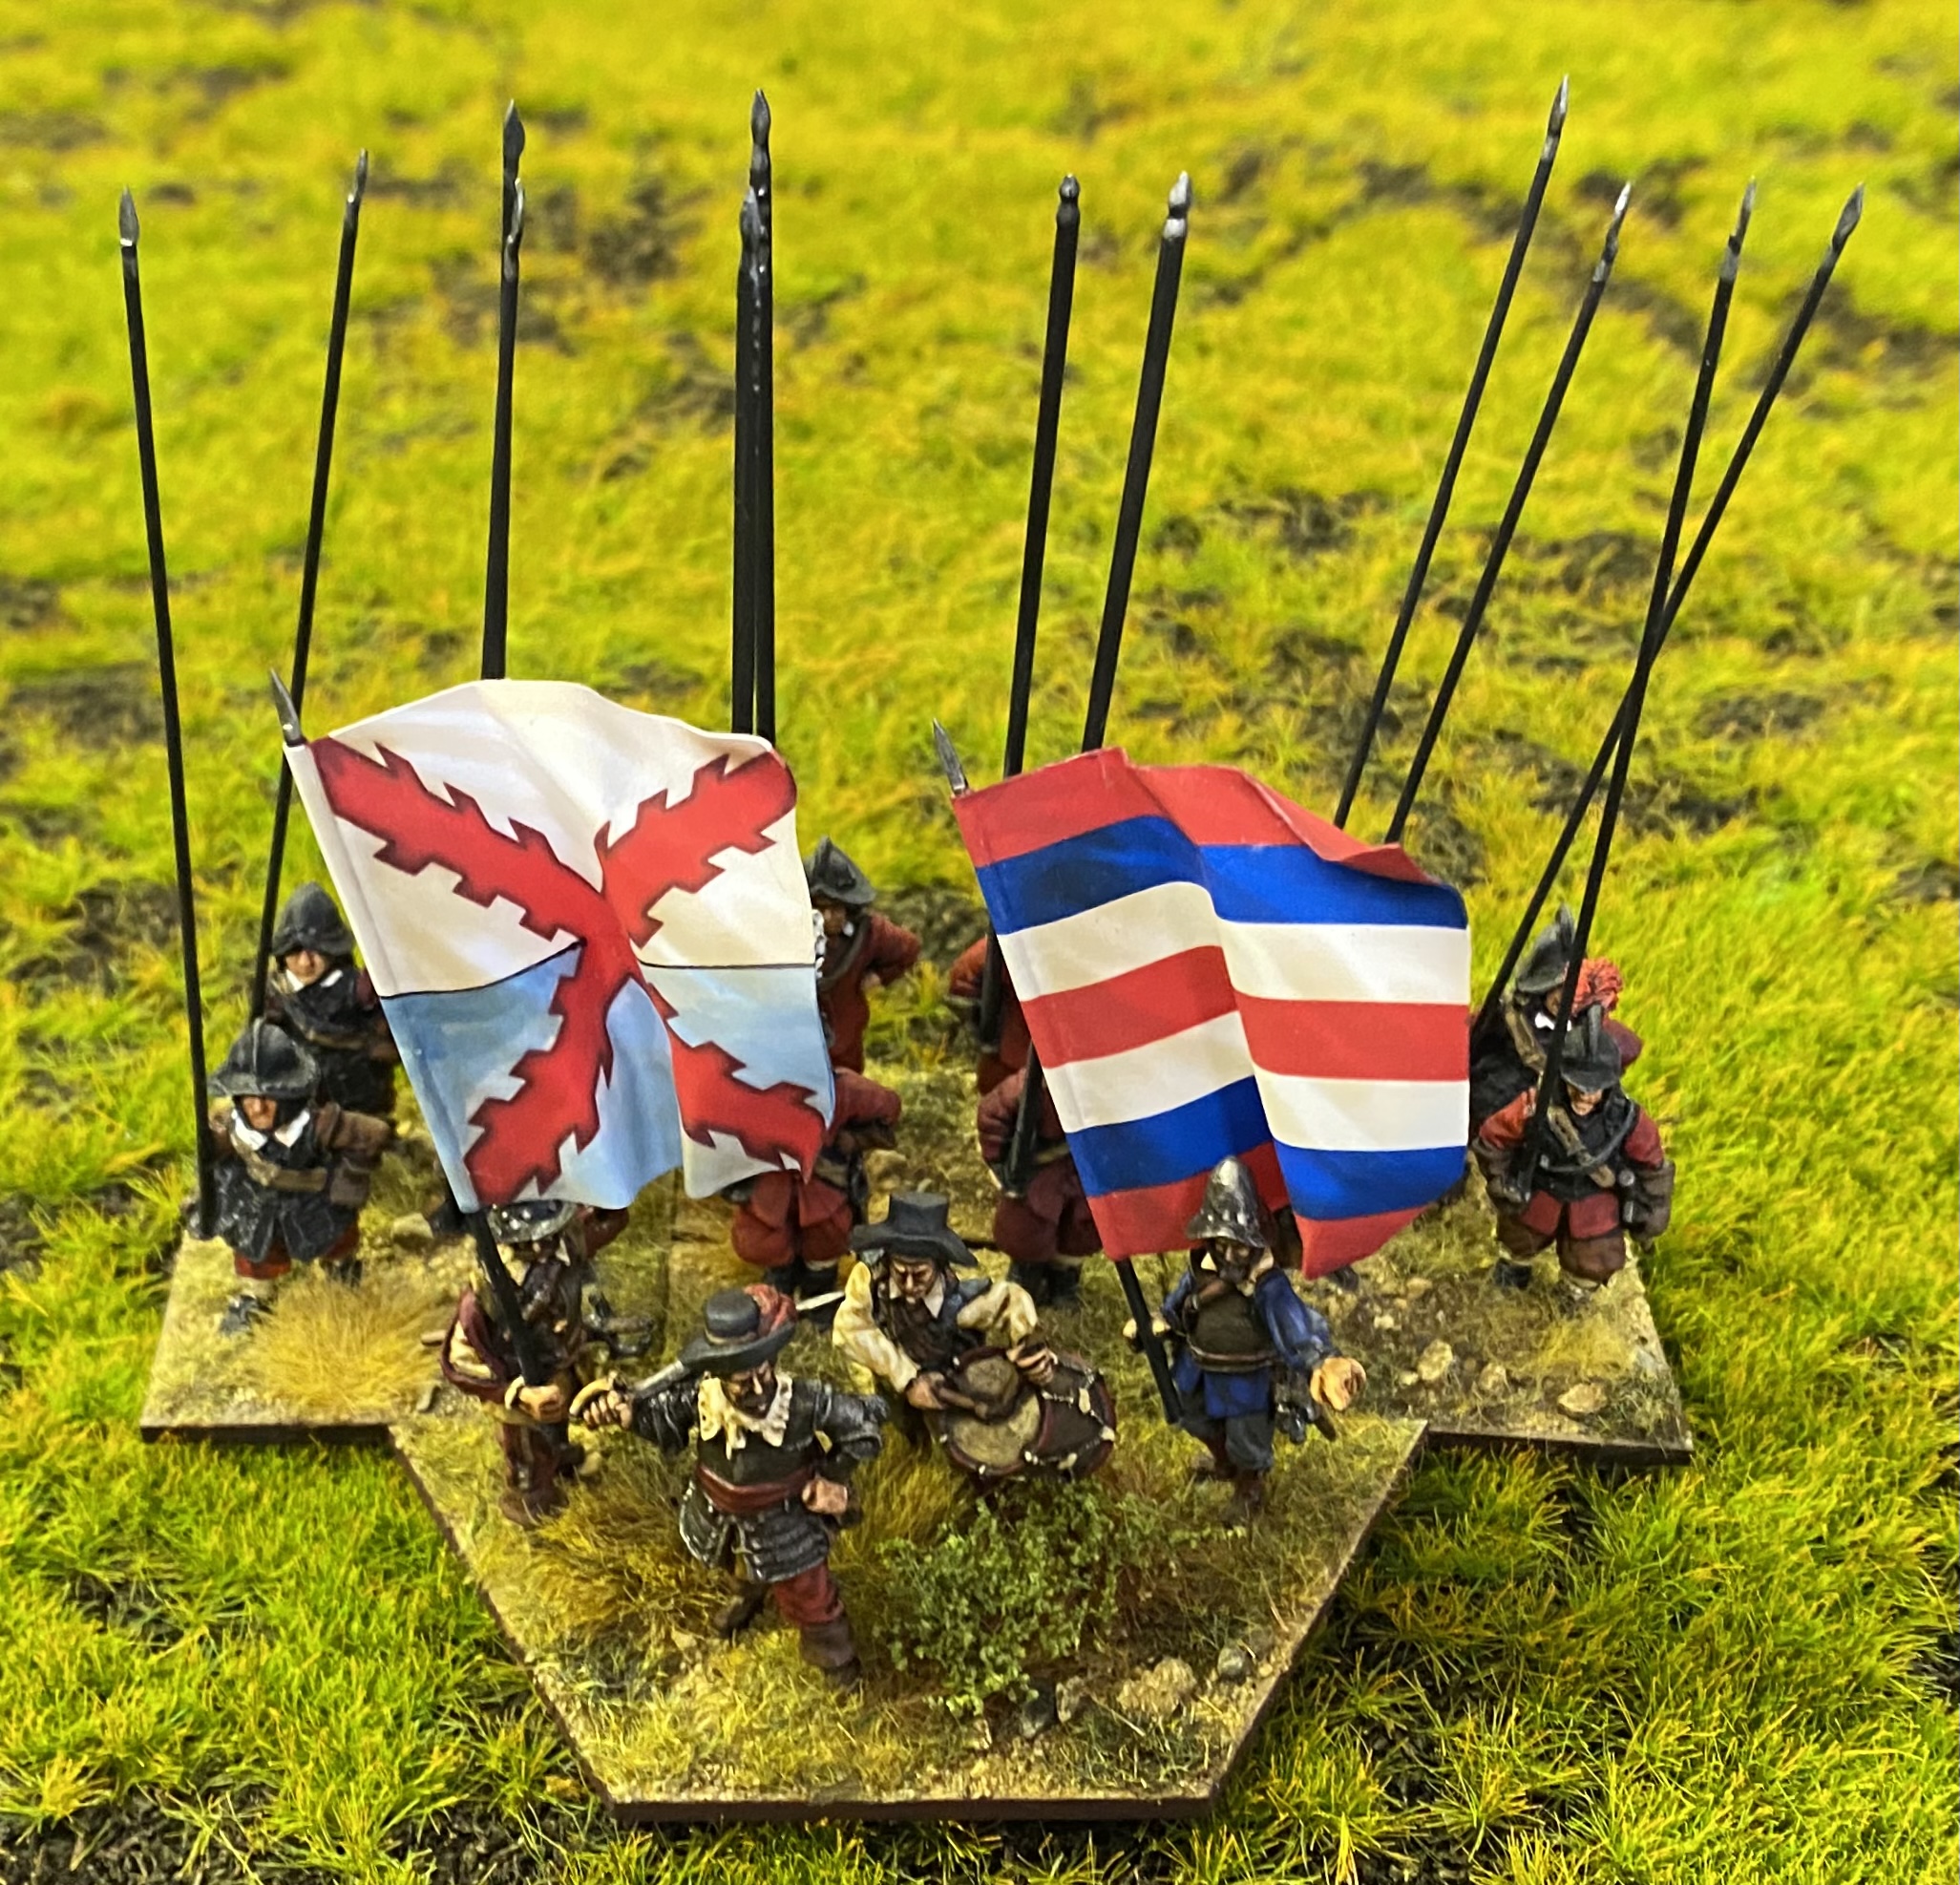

This base can be placed at the front of a unit. The idea is that it doesn’t count as part of the actual unit for the purposes of the game – it is just there for show.
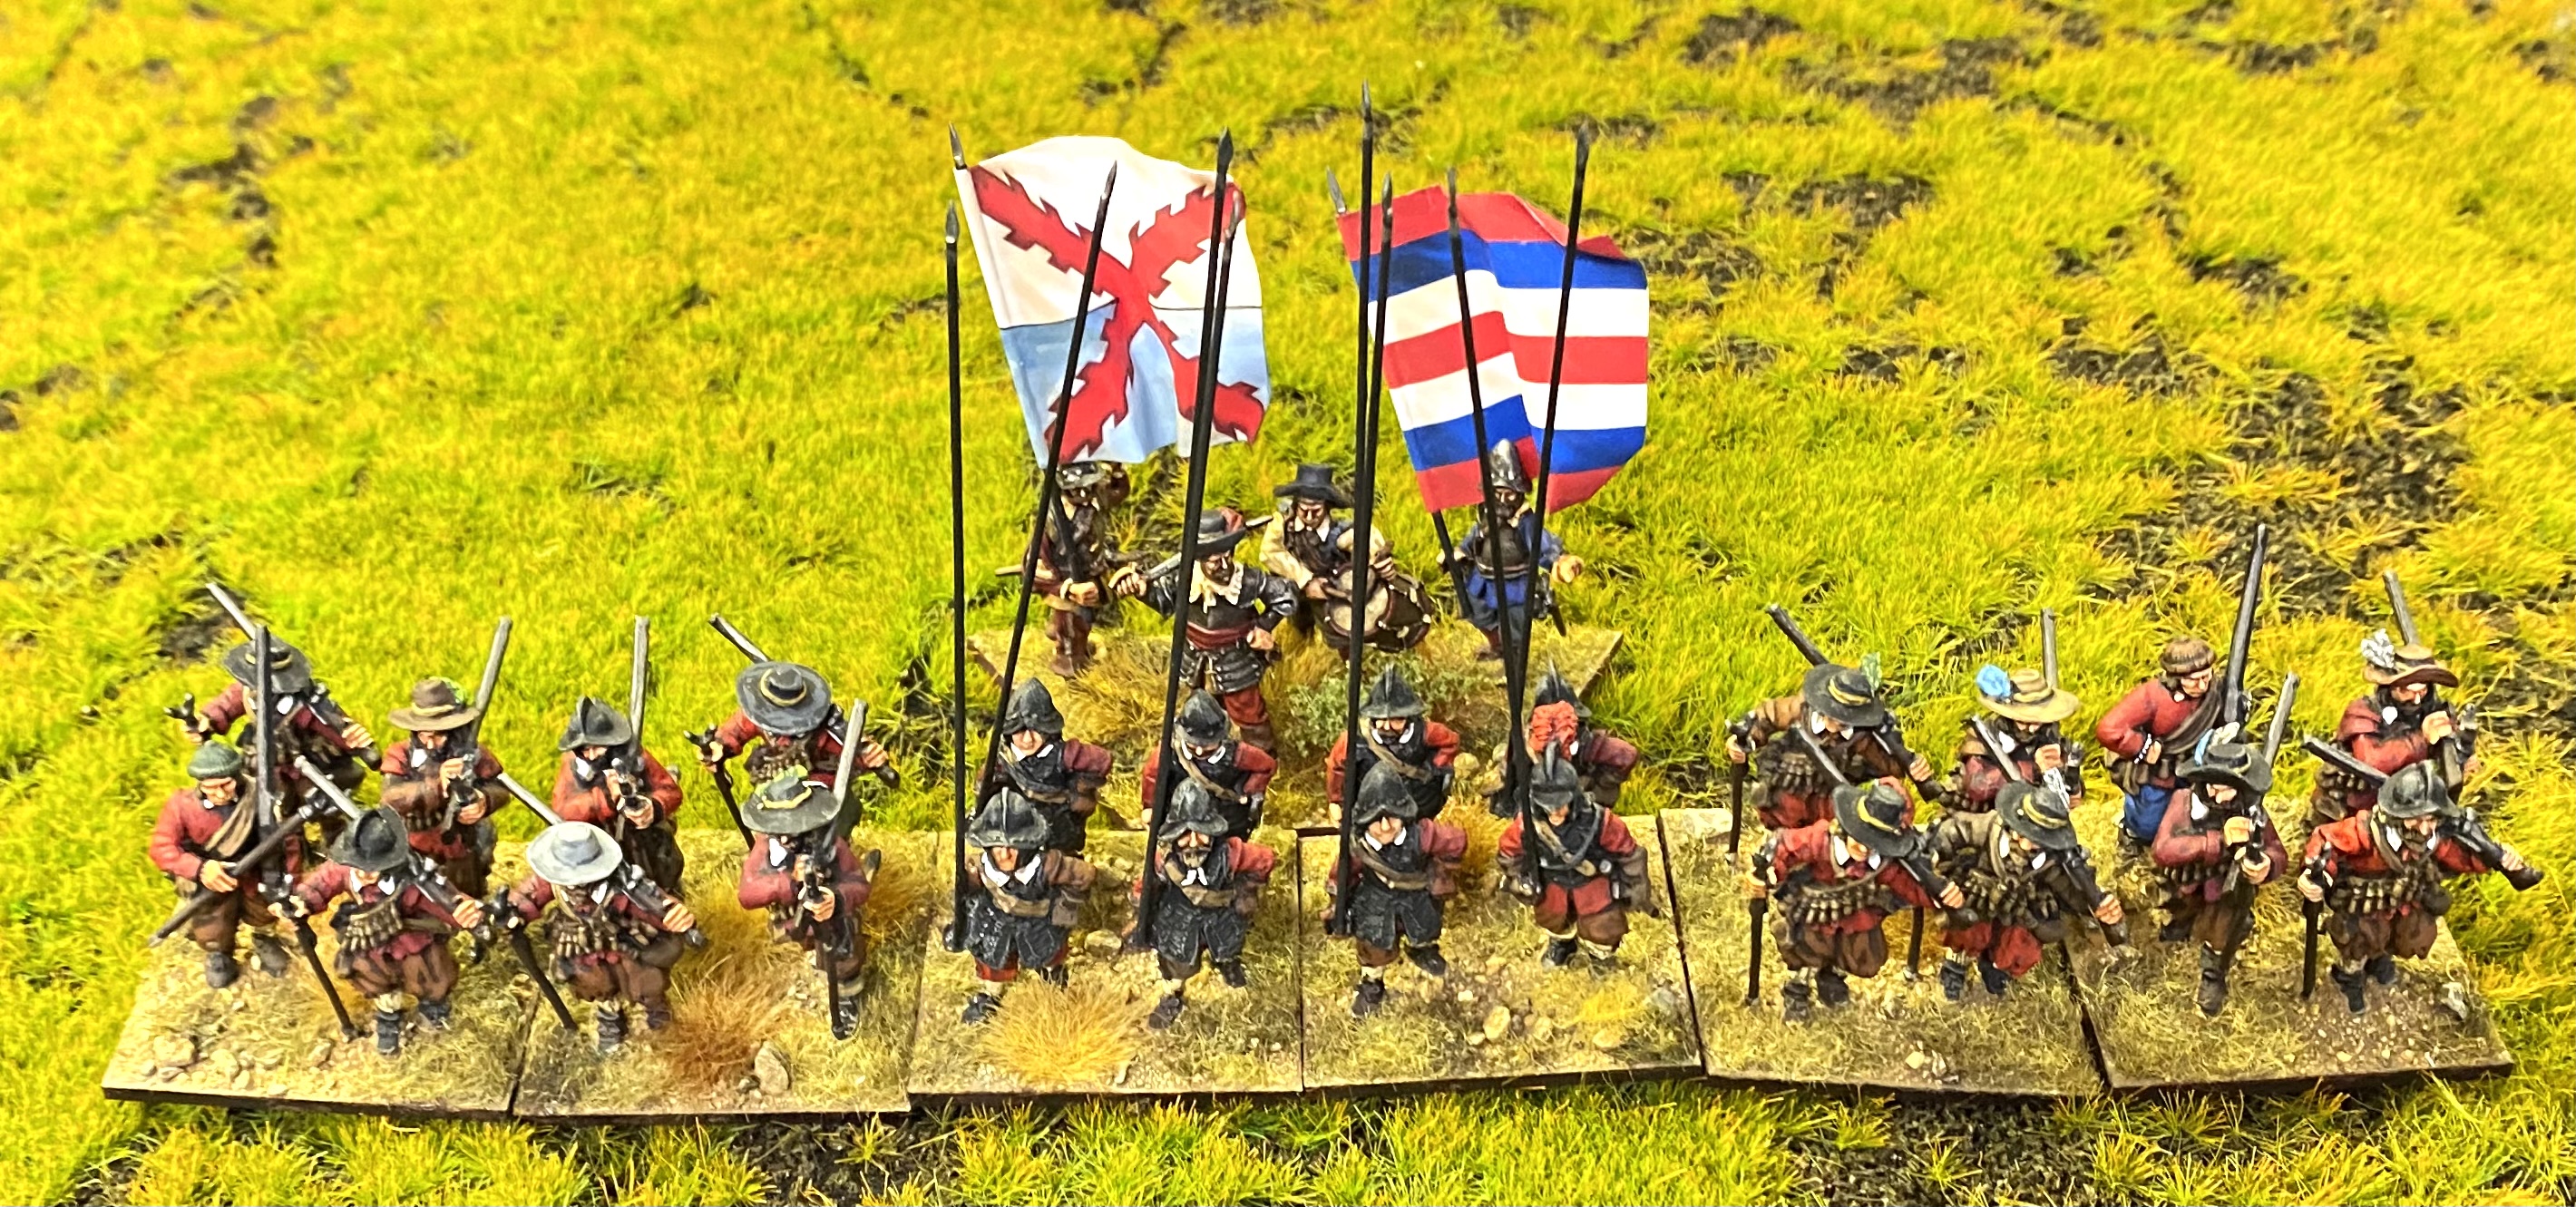
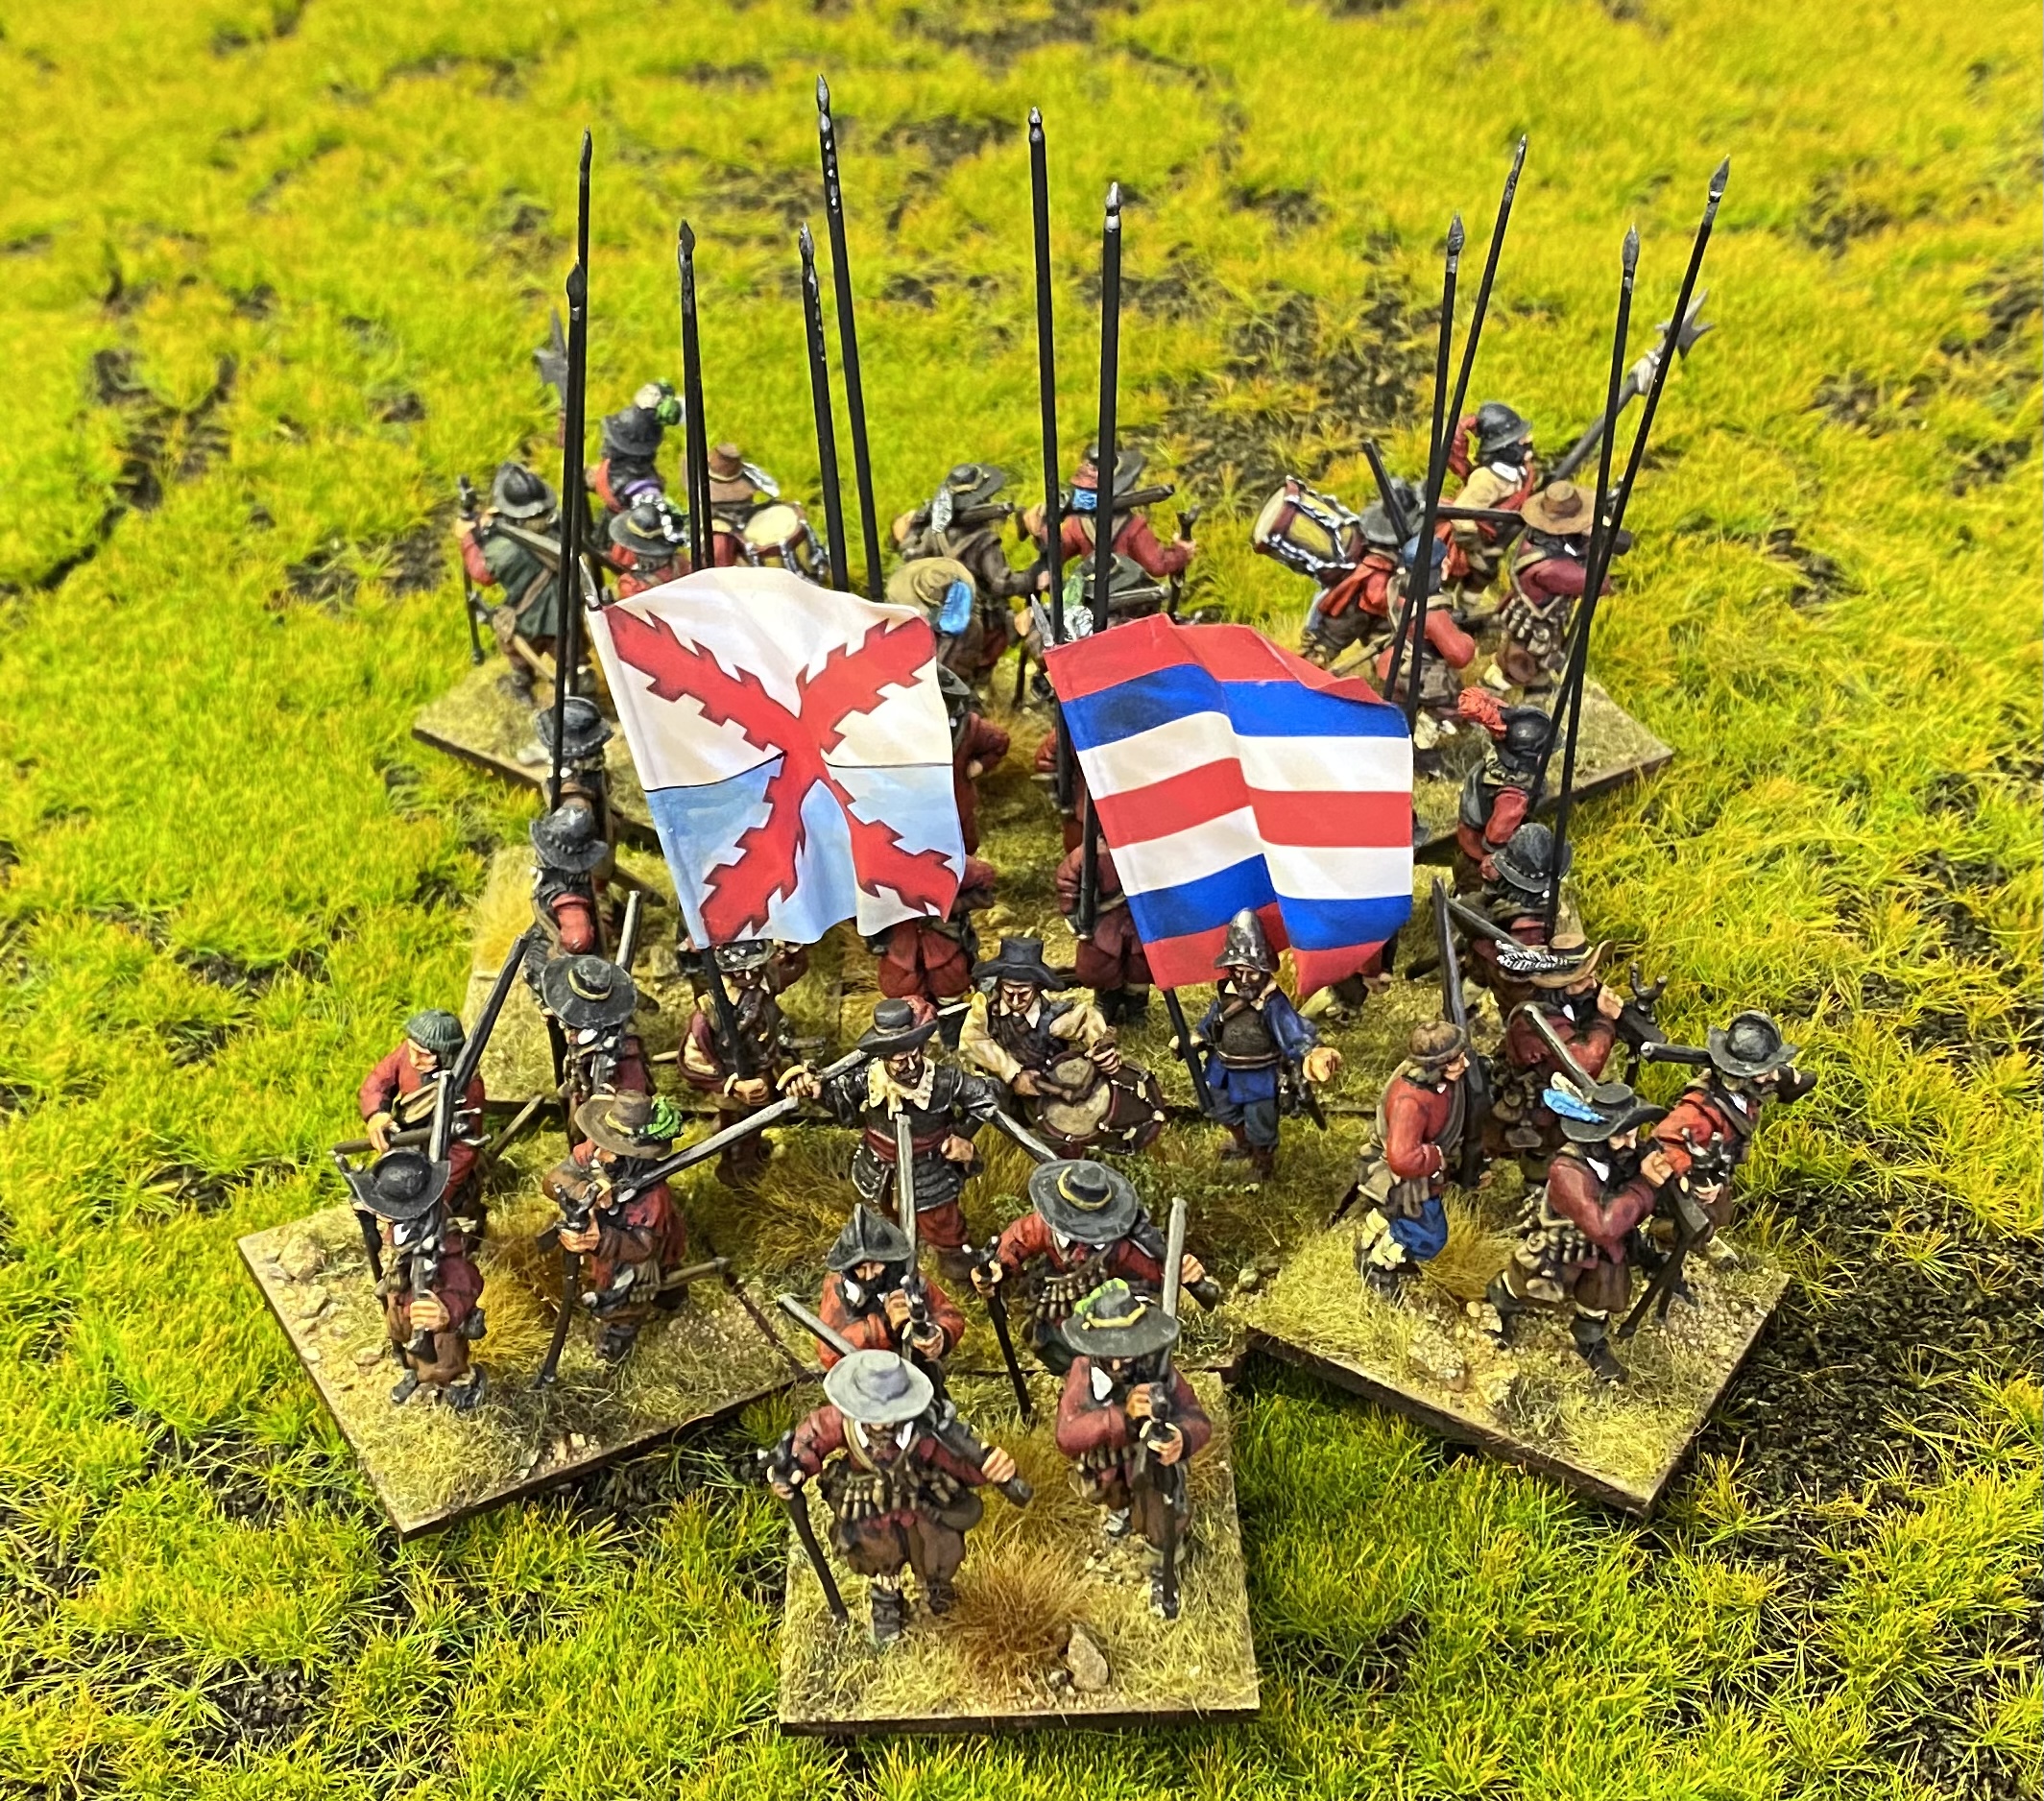
The pictures show some different formations demonstrating how the new command base will fit in. I think it provides a flexible way having different formations and still have the command base ‘look right’. It can even be placed behind units to allow for the unit to be in combat.
I am pleased that this experiment seems to have worked out. I will build my command bases like this going forward. I want to try it in some games (when we can do those again!) and if it still seems like a good idea then I will consider going back and rebasing some of my old units.
Until next time!
Painting the Foreign Infantry
The metal figures were fairly straightforward to prep. One slight pain was having to glue on the troops sidearms, a sword hung on the left hip from a baldric or belt. These look really nice on the figure, but I’m a bit worried about robustness in the long term as the swords are very thin and stick out in a realistic, but easy to bend way. If you expect to be heavy handed with your figure then you should consider leaving the swords off.
I gave the figures my normal, black spray primer undercoat. I then painted up a test figure to try out how I wanted to paint the figures. I combined a couple of approaches to try and speed up my normal snail’s pace painting speed.
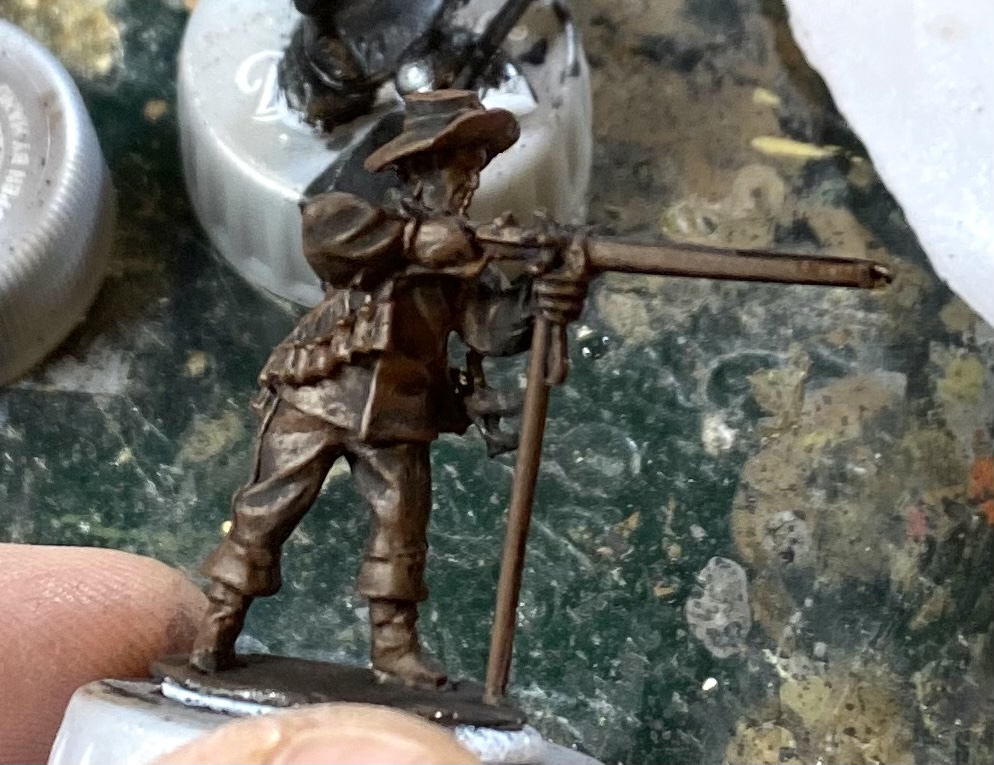 Undercoated figure with a heavy dry brush of Flat Brown.
After the primer was cured I gave the figures a very heavy dry brush in Vallejo Flat Brown (70.984). This helps show up the details on a matt black figure, and, as so much of a 17th century soldier ends up brown, this can provide a base coat for things like shoes, belts, bandolier, scabbard, musket, etc.
 BAse coats slapped on, waiting for the ‘magic’ to happen.
I painted up a base coat across the other, non-brown items, not being too precious about neatness as minor errors would be corrected by the next stage. Next I gave the figure a generous wash of GW’s Agrax Earthshade (the ‘magic part’). This provides a shade and also neatens up the figure overall. When this wash was dry I highlighted the original base coats again.

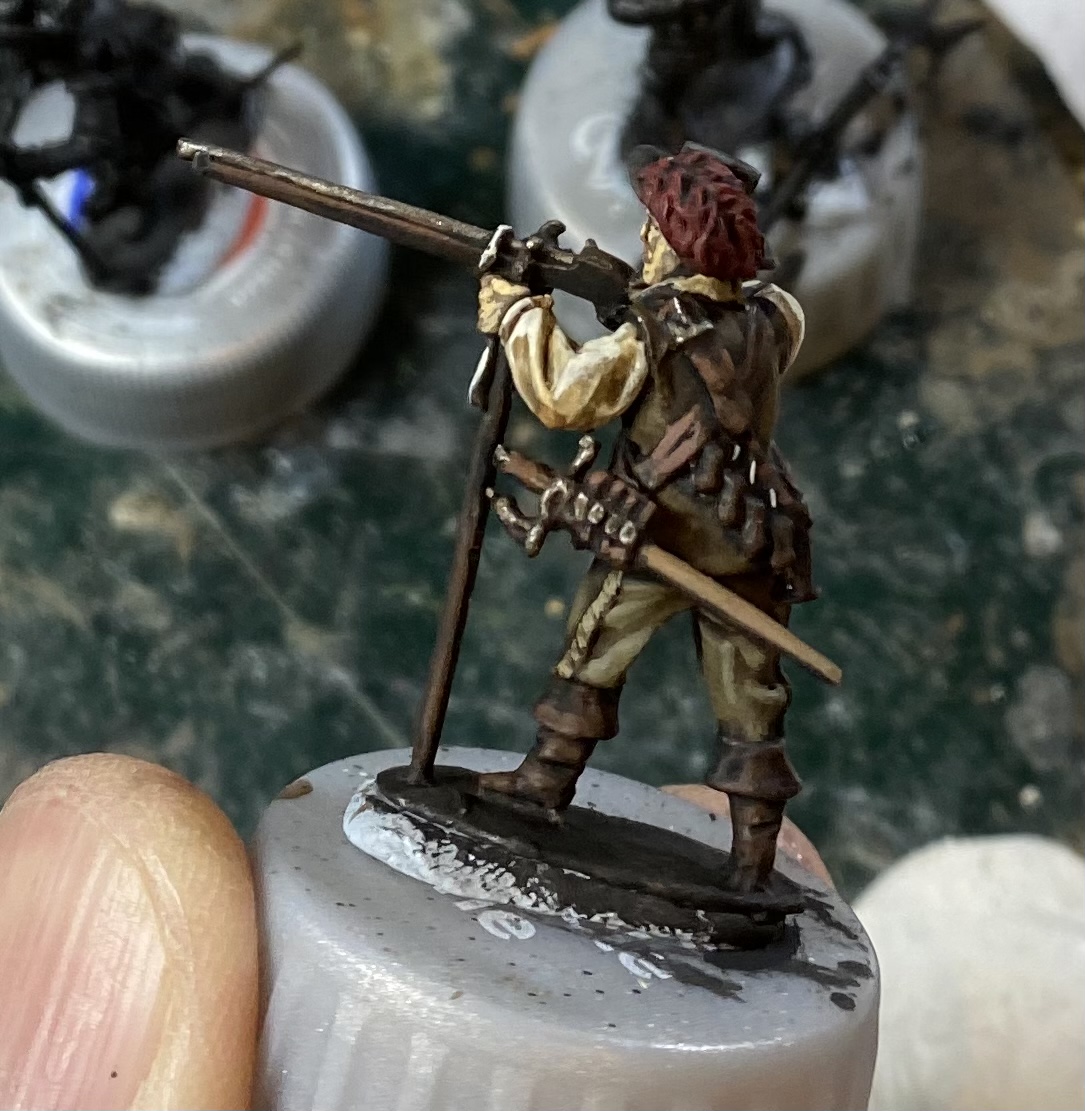
This gave a nice impression of what I think a 17th century soldier on campaign might have looked like. (This approach combines techniques I’ve learnt from Matt at Glenbrook Games and also Sonic Sledgehammer.)
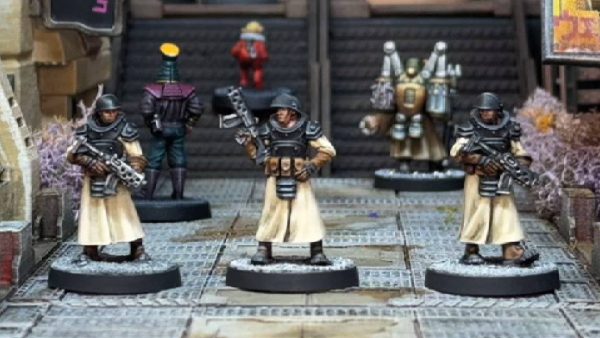
With the test figure done, I moved on to the rest of the unit. I used a fairly muted set of natural colours for the rest of the unit. Here they are, all based up. Front rank giving fire, and rear rank loading. A sergeant, with halberd, commands the unit.
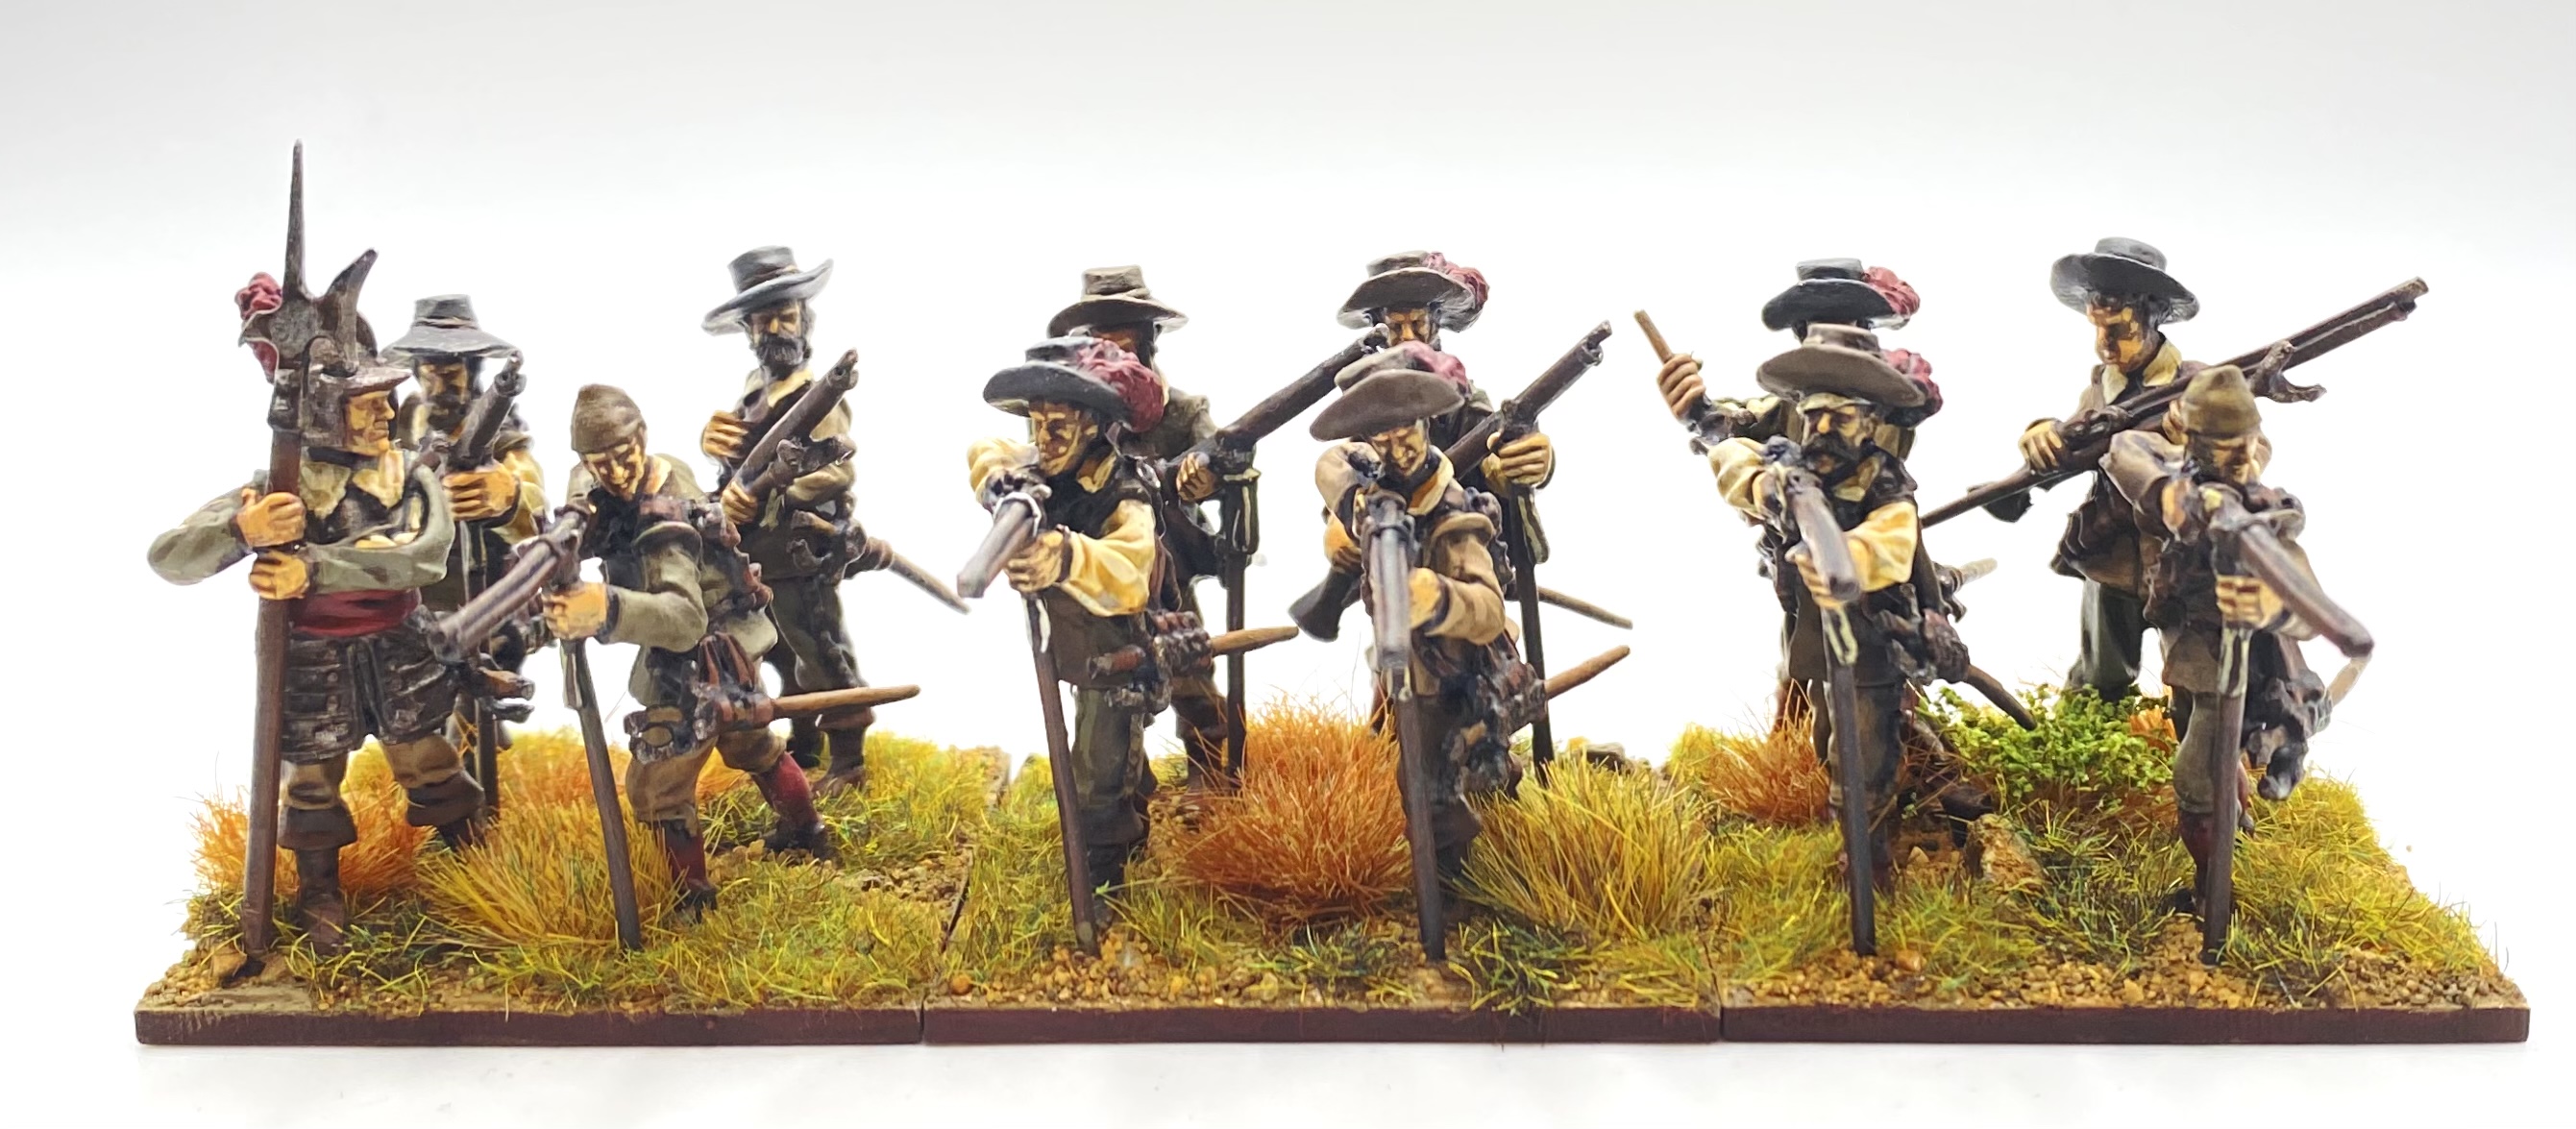
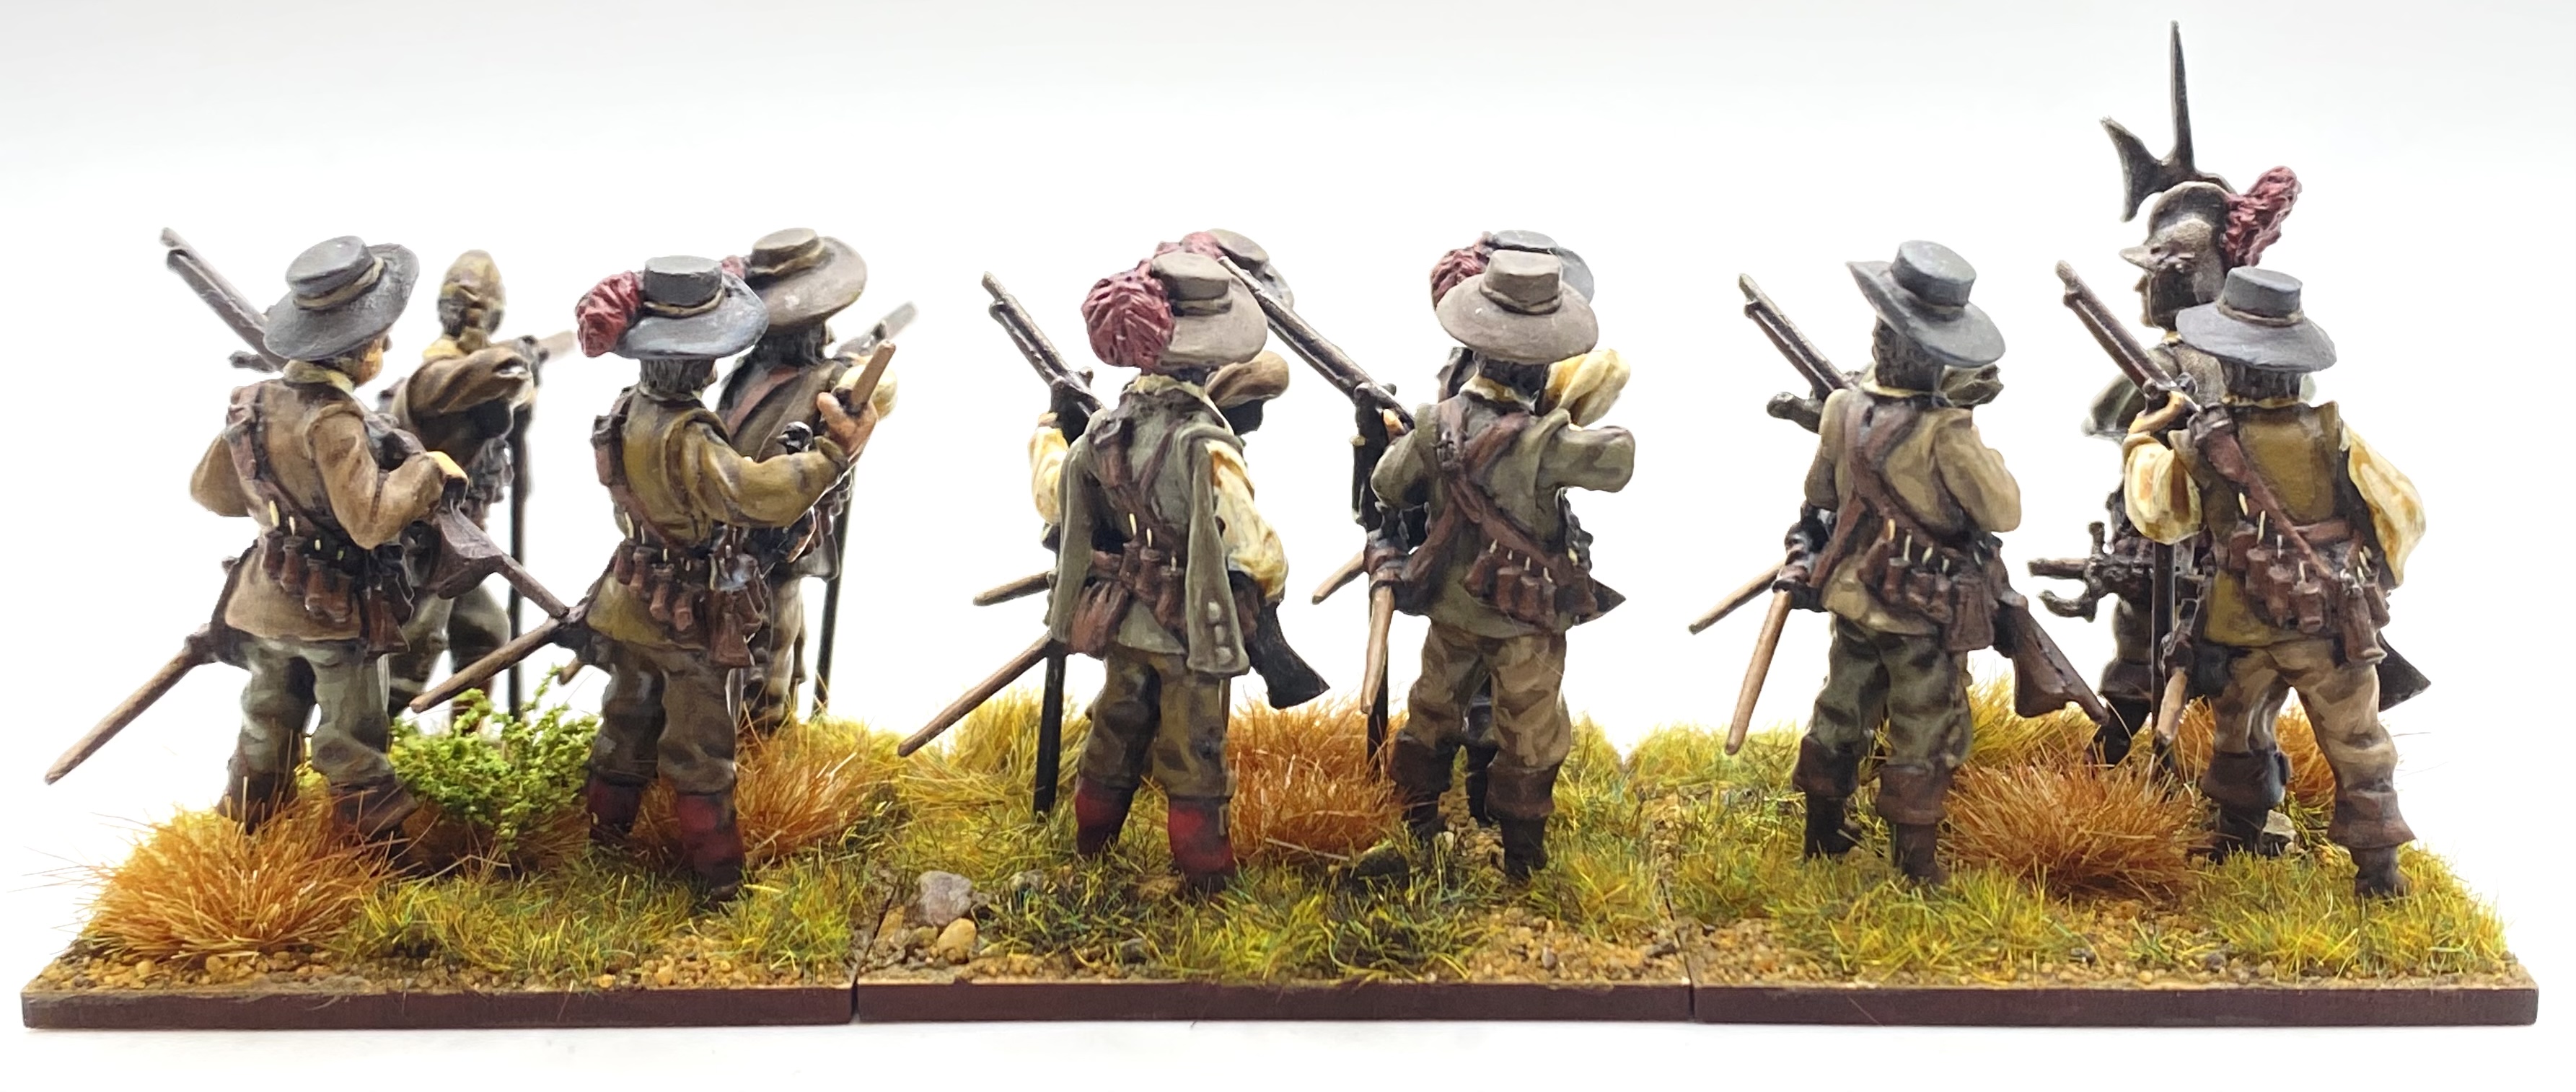

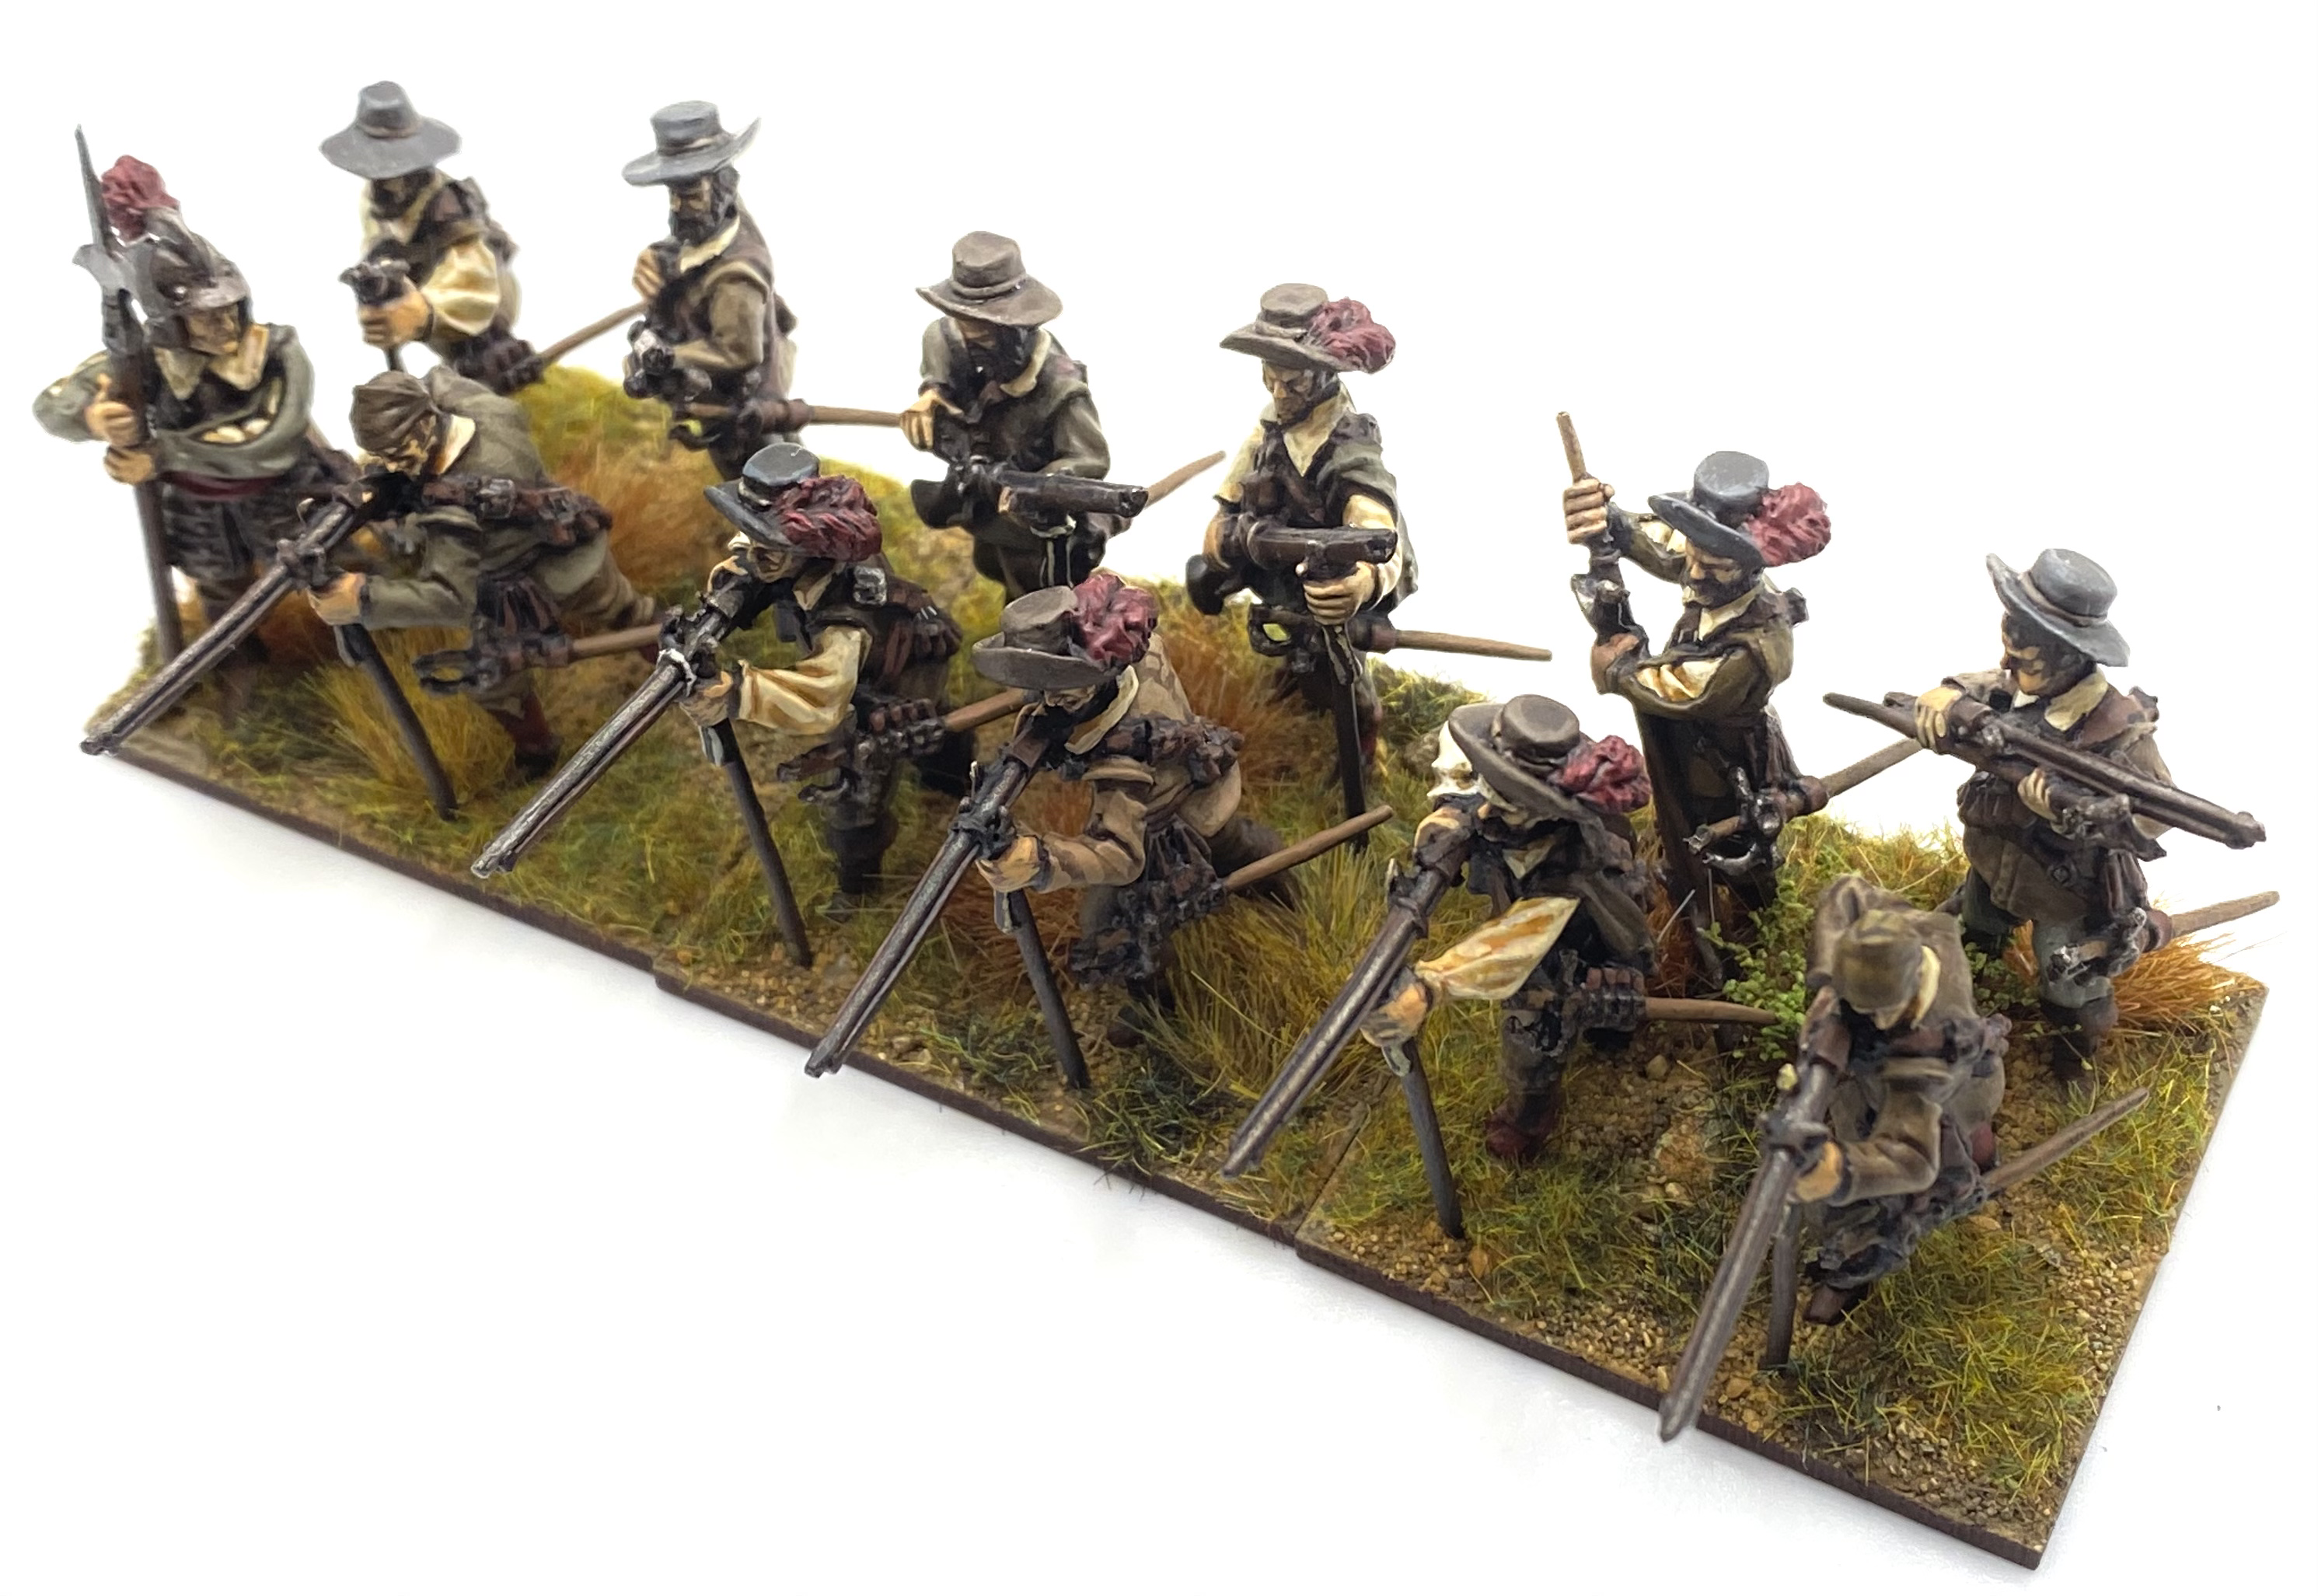
I really enjoyed painting these 1898 figures, and I’m pleased with how they came out. I have another 2 x 12 figures to do, before moving back to the mounted part of the force. I am also working on some command stands for the Foreign Infantry, and should have some figures from another smaller manufacturer to show.
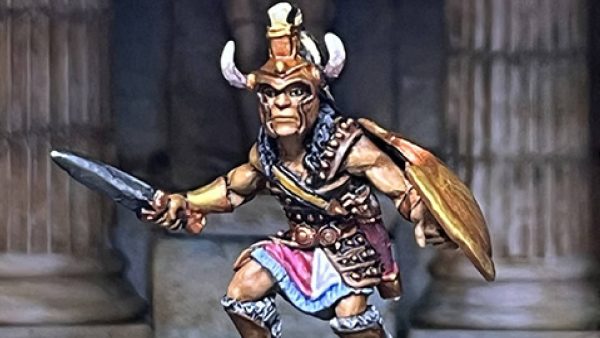
Foreign Infantry
In this entry I’m going to cover a new part of the Polish-Lithuanian Commonwealth army; the Foreign Infantry. Although cavalry were the most important part of the Commonwealth armies in this period there was an increasing focus on infantry. Any campaign involving sieges, as well as the need to hold settlements and river crossings, needed foot troops. In the campaigns against the Swedes in the 1620s, Polish forces found that they were involved in many sieges, as the Swedes would often avoid pitch battles in the open where the Polish cavalry could dominate.
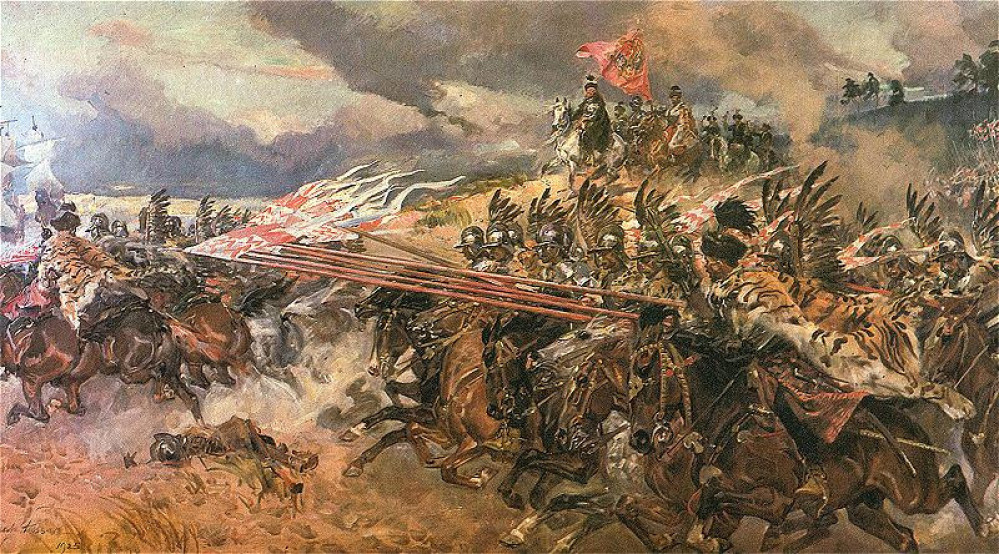
 A contemporary picture of infantry fighting in the first part of the 17th century.
The native Polish infantry, drawn from the peasant population, were effective but few in numbers, and the Polish nobility were reluctant to further reduce their work force by allowing more recruitment from the peasants in to the army. The Commonwealth therefore turned to hiring infantry from other sources, typically abroad. This ‘Foreign Infantry’ was recruited from across Europe but mainly from the German states to the West of the Commonwealth borders, and also from German speaking parts of the Commonwealth. (For this reason they were sometimes referred to as ‘German Infantry’.)
Recruitment of the Foreign Infantry worked in a similar way to the rest of Europe at this time. A colonel was commissioned to raise a certain number of troops and it was then the colonel’s responsibility to find suitable candidates. There were no uniforms as such, and so the recruits would be dressed in their regular ‘western’ clothes looking very much like the typical foot troops in the rest of Europe.
One difference may well have been the composition of the troops recruited. It was typical in this period to recruit infantry as one third pike armed troops, and two thirds shot, armed with a musket. One of the primary roles of pikemen was to protect the shot from cavalry. In the Commonwealth forces, with their superior cavalry, pikes were considered less necessary. In the 1620s campaign there is no evidence that the Foreign Infantry were armed with pikes, so it is possible that they were just musket armed troops.

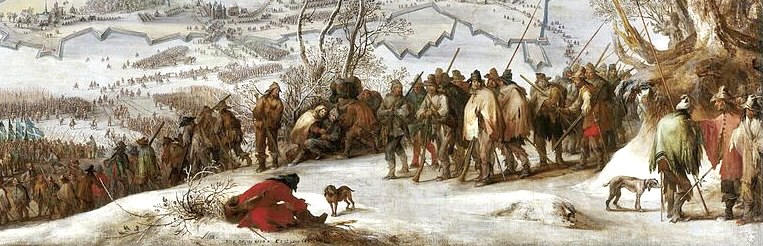 A detail from a contemporary picture showing the typical rag-tag appearance of troops in the TYW
For my Commonwealth army, based on the force at the Battle of Dirschau in 1627, I need some units of Foreign Infantry. I could just re-use some of my existing Thirty Years War Imperial foot to represent the foreign infantry, but I have plenty of potential candidates in the lead pile. I decided to paint up some figures from the 1898 Miniatures ‘Tercio range’ that have been accumulating in my lead pile since their release in 2019. These figures are a great representation of the typical foot from across Europe in the 1620s, 30s and 40s.
Here is link to the 1898 Miniatures site link, and also to a review of the figures I wrote for Wargames Illustrated link. In summary, I really like them! They are really characterful figures, and give a great impression of the typical non-uniformed troops from the TYW, wearing a mixture of styles and types of clothing. If you are interested in getting some of the 1898 figures then you can buy directly from them in Spain, or go to Empress Miniatures who are a UK stockist (here).
Next time I will cover painting the figures.
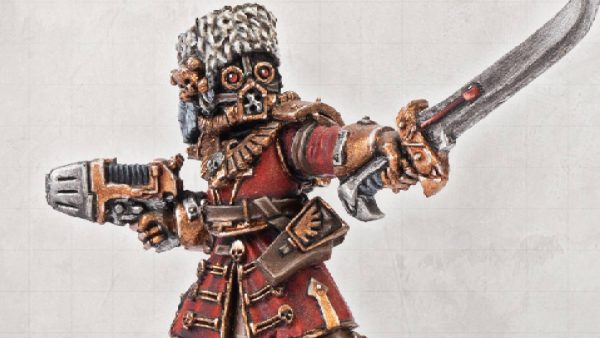
High Command
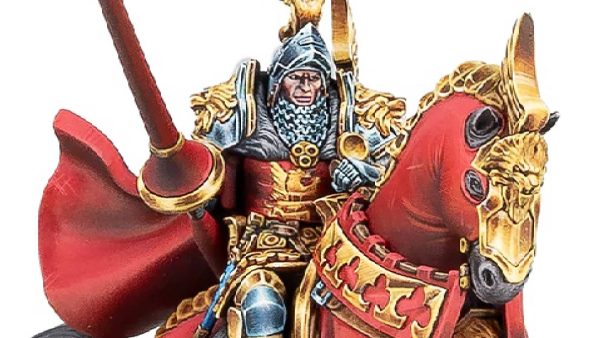
This time I’ve been working on another command base for my Polish-Lithuanian Commonwealth. This will be the overall commander for the battle of Dirschau, 1627, Stanisław Koniecpolski.
At this time the Commonwealth had two overall army commanders, appointed by the Sejm (the Commomnwealth parliament of nobles). The most senior was the Crown Grand Hetman, and the junior post was the Field Hetman. In 1627 the Crown Grand Hetman position was vacant, and Stanisław Koniecpolski was the Field Hetman (he was promoted to Crown Grand Hetman in 1632). He had risen quickly to this exalted rank and was also a very experienced general.
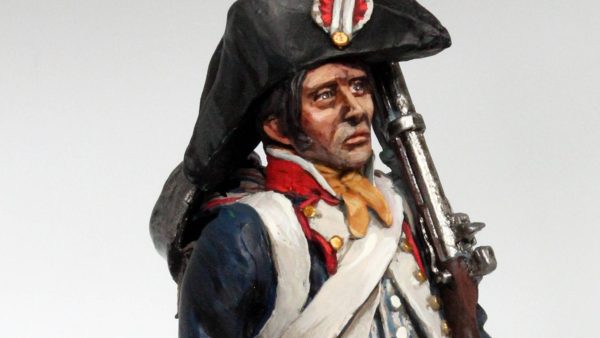
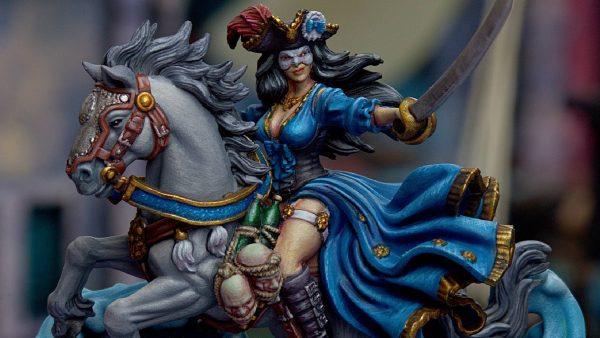
TAG produce a great looking Hetman figure, holding a ceremonial mace or ‘bulawa’, that was a symbol of a Hetman’s position. I used this figure to represent Koniecpolski. I painted him to mainly match the outfit in this portrait, although I jazzed up his zupan (long, top coat) a bit.
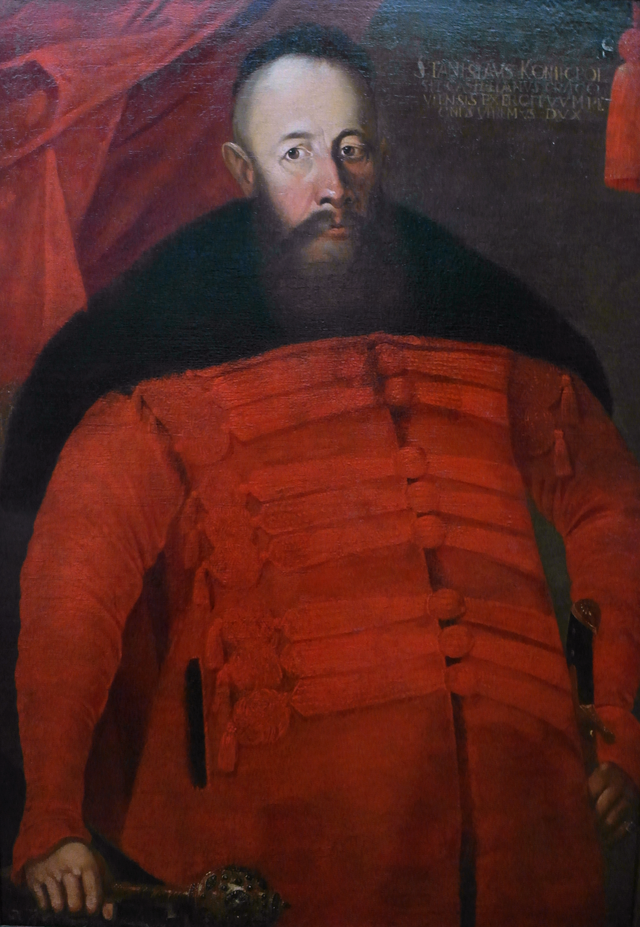 Contemporary portrait of Stanisław Koniecpolski
To accompany Stanisław Koniecpolski I thought of including a standard bearer on the command base. I have done this on other command bases before, especially when the historical general I’m representing has a known personal standard. I hadn’t seen this mentioned for Polish generals but was lucky enough to get a question answered by the super helpful, Michał Paradowski, the author of the recently released Despite Destruction, Misery and Privations. Michał explained that Polish generals in this period did not use flags, but the Hetman in command of the army would have a ‘Hetman’s Sign’ or ‘znak hetmański’ (see Wikipedia description here link.) This was only used by the overall, senior Hetman commanding in a campaign.


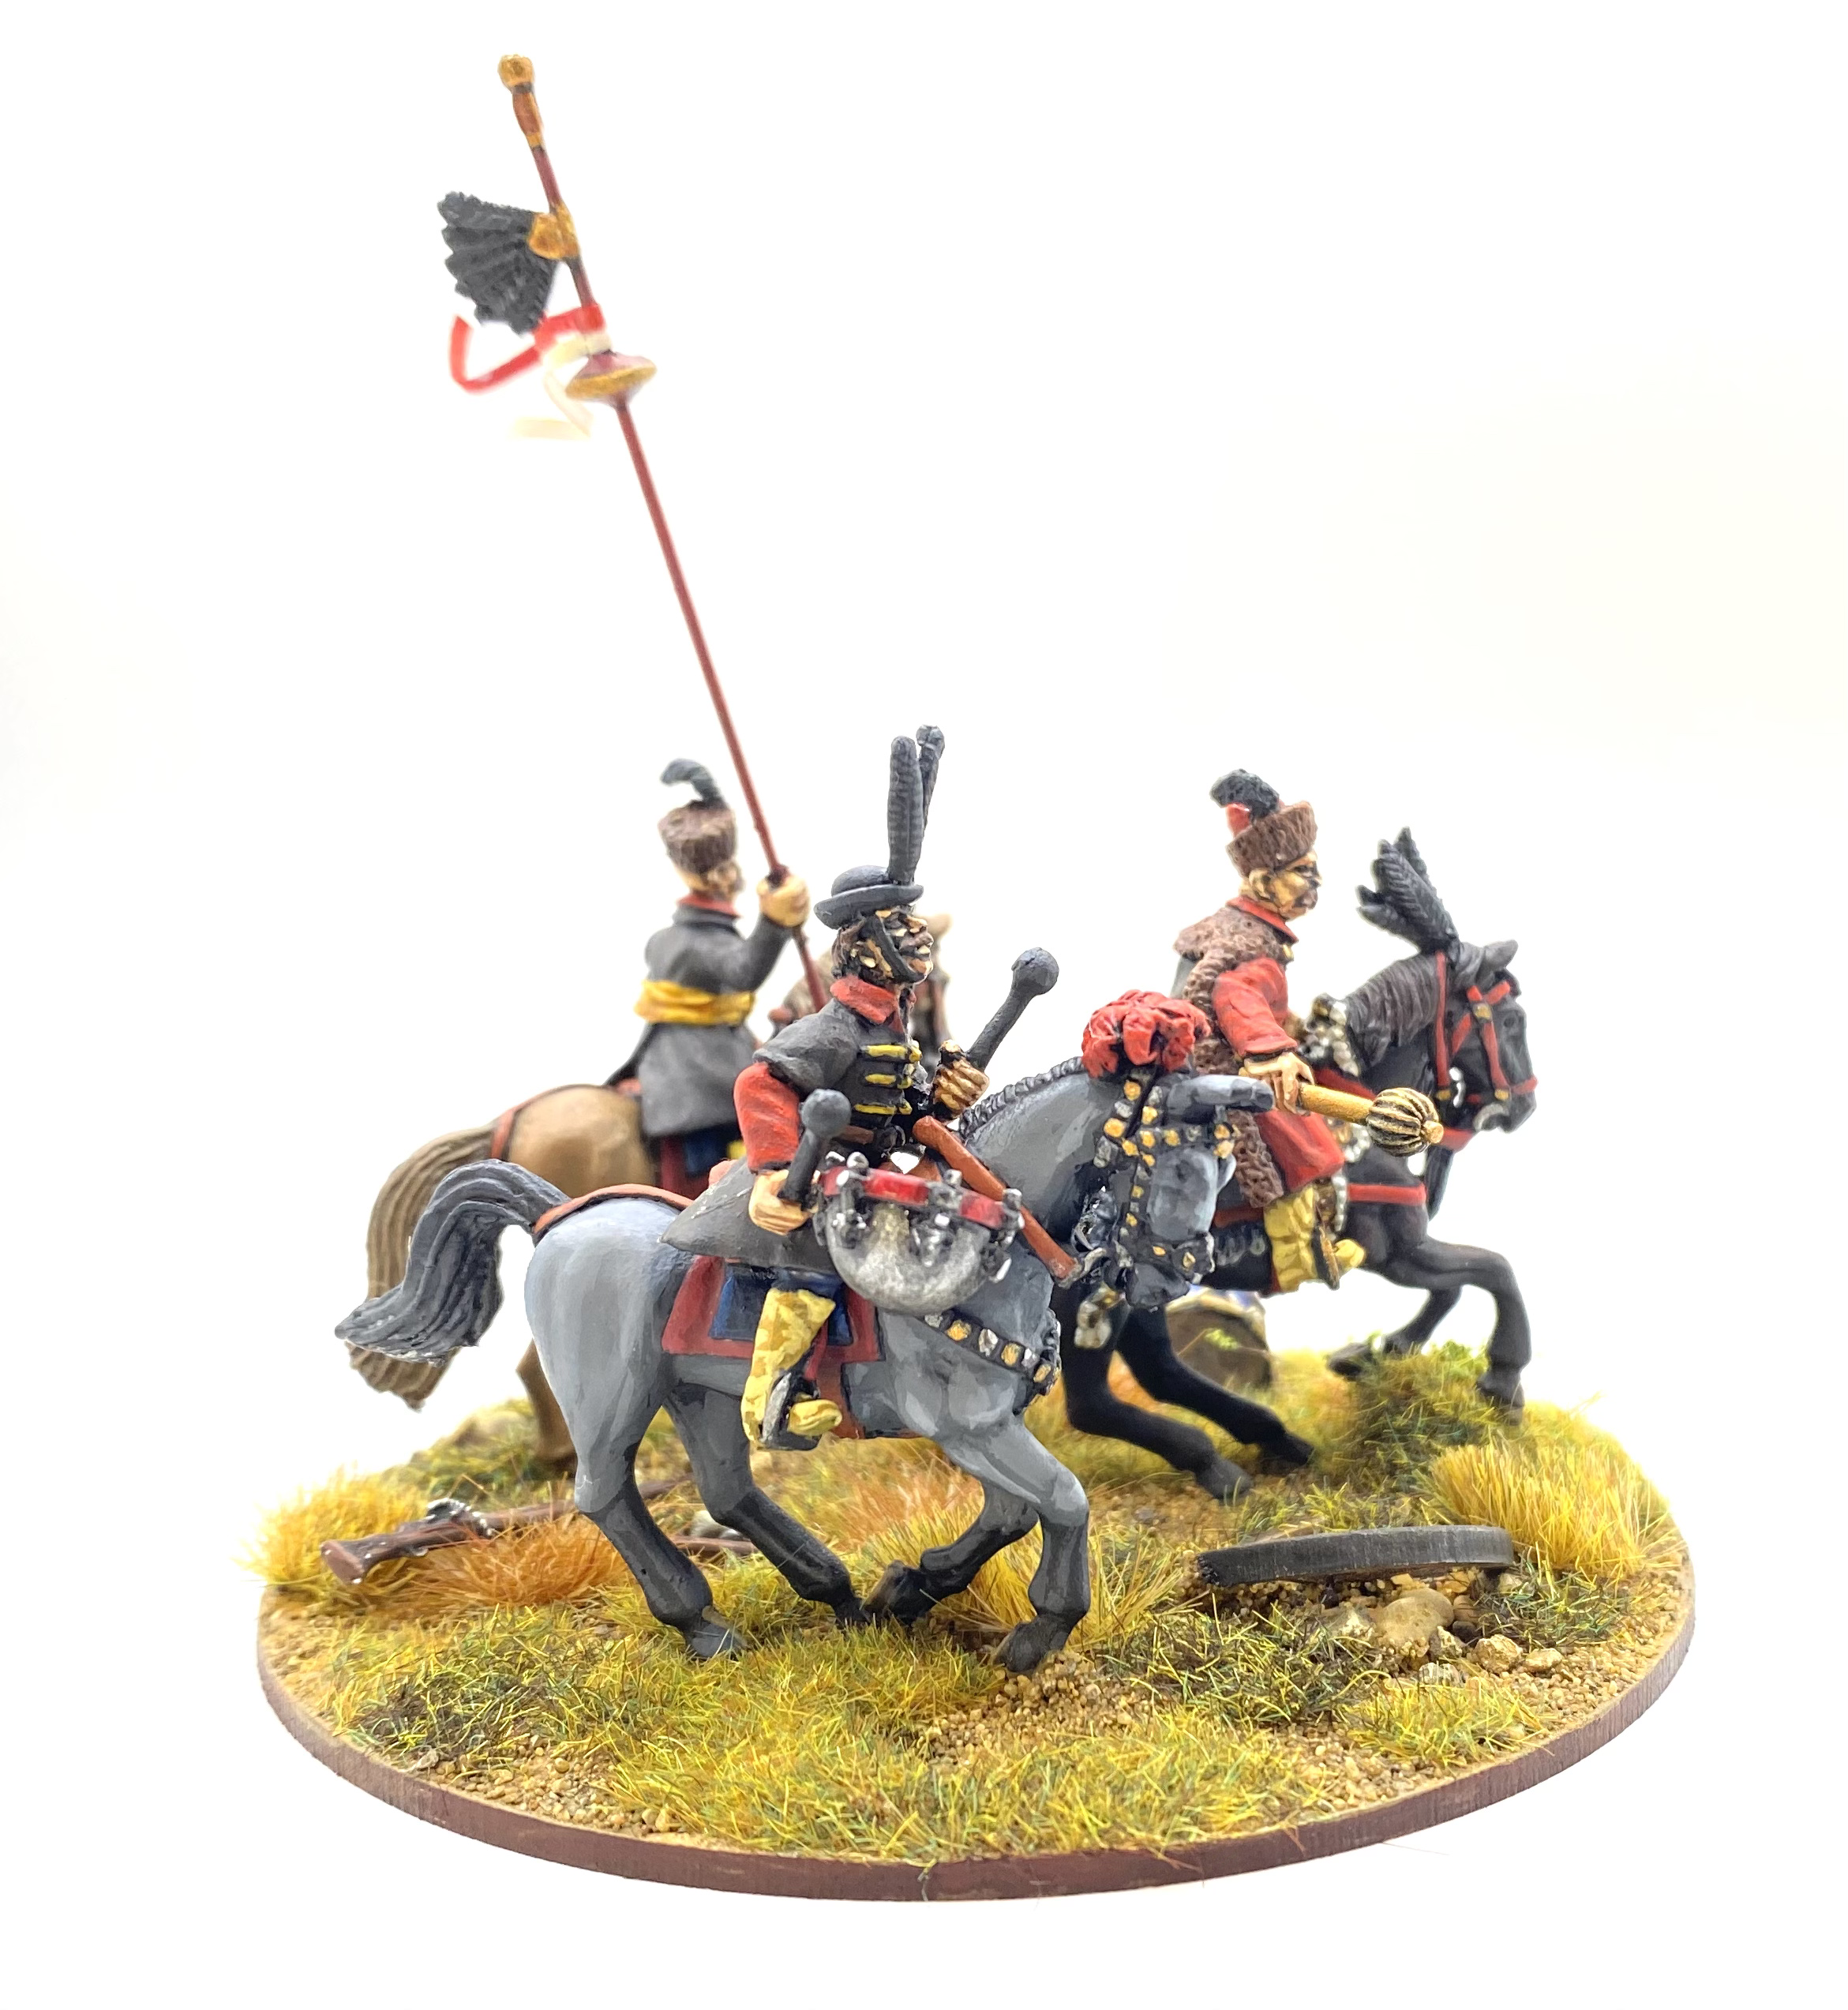
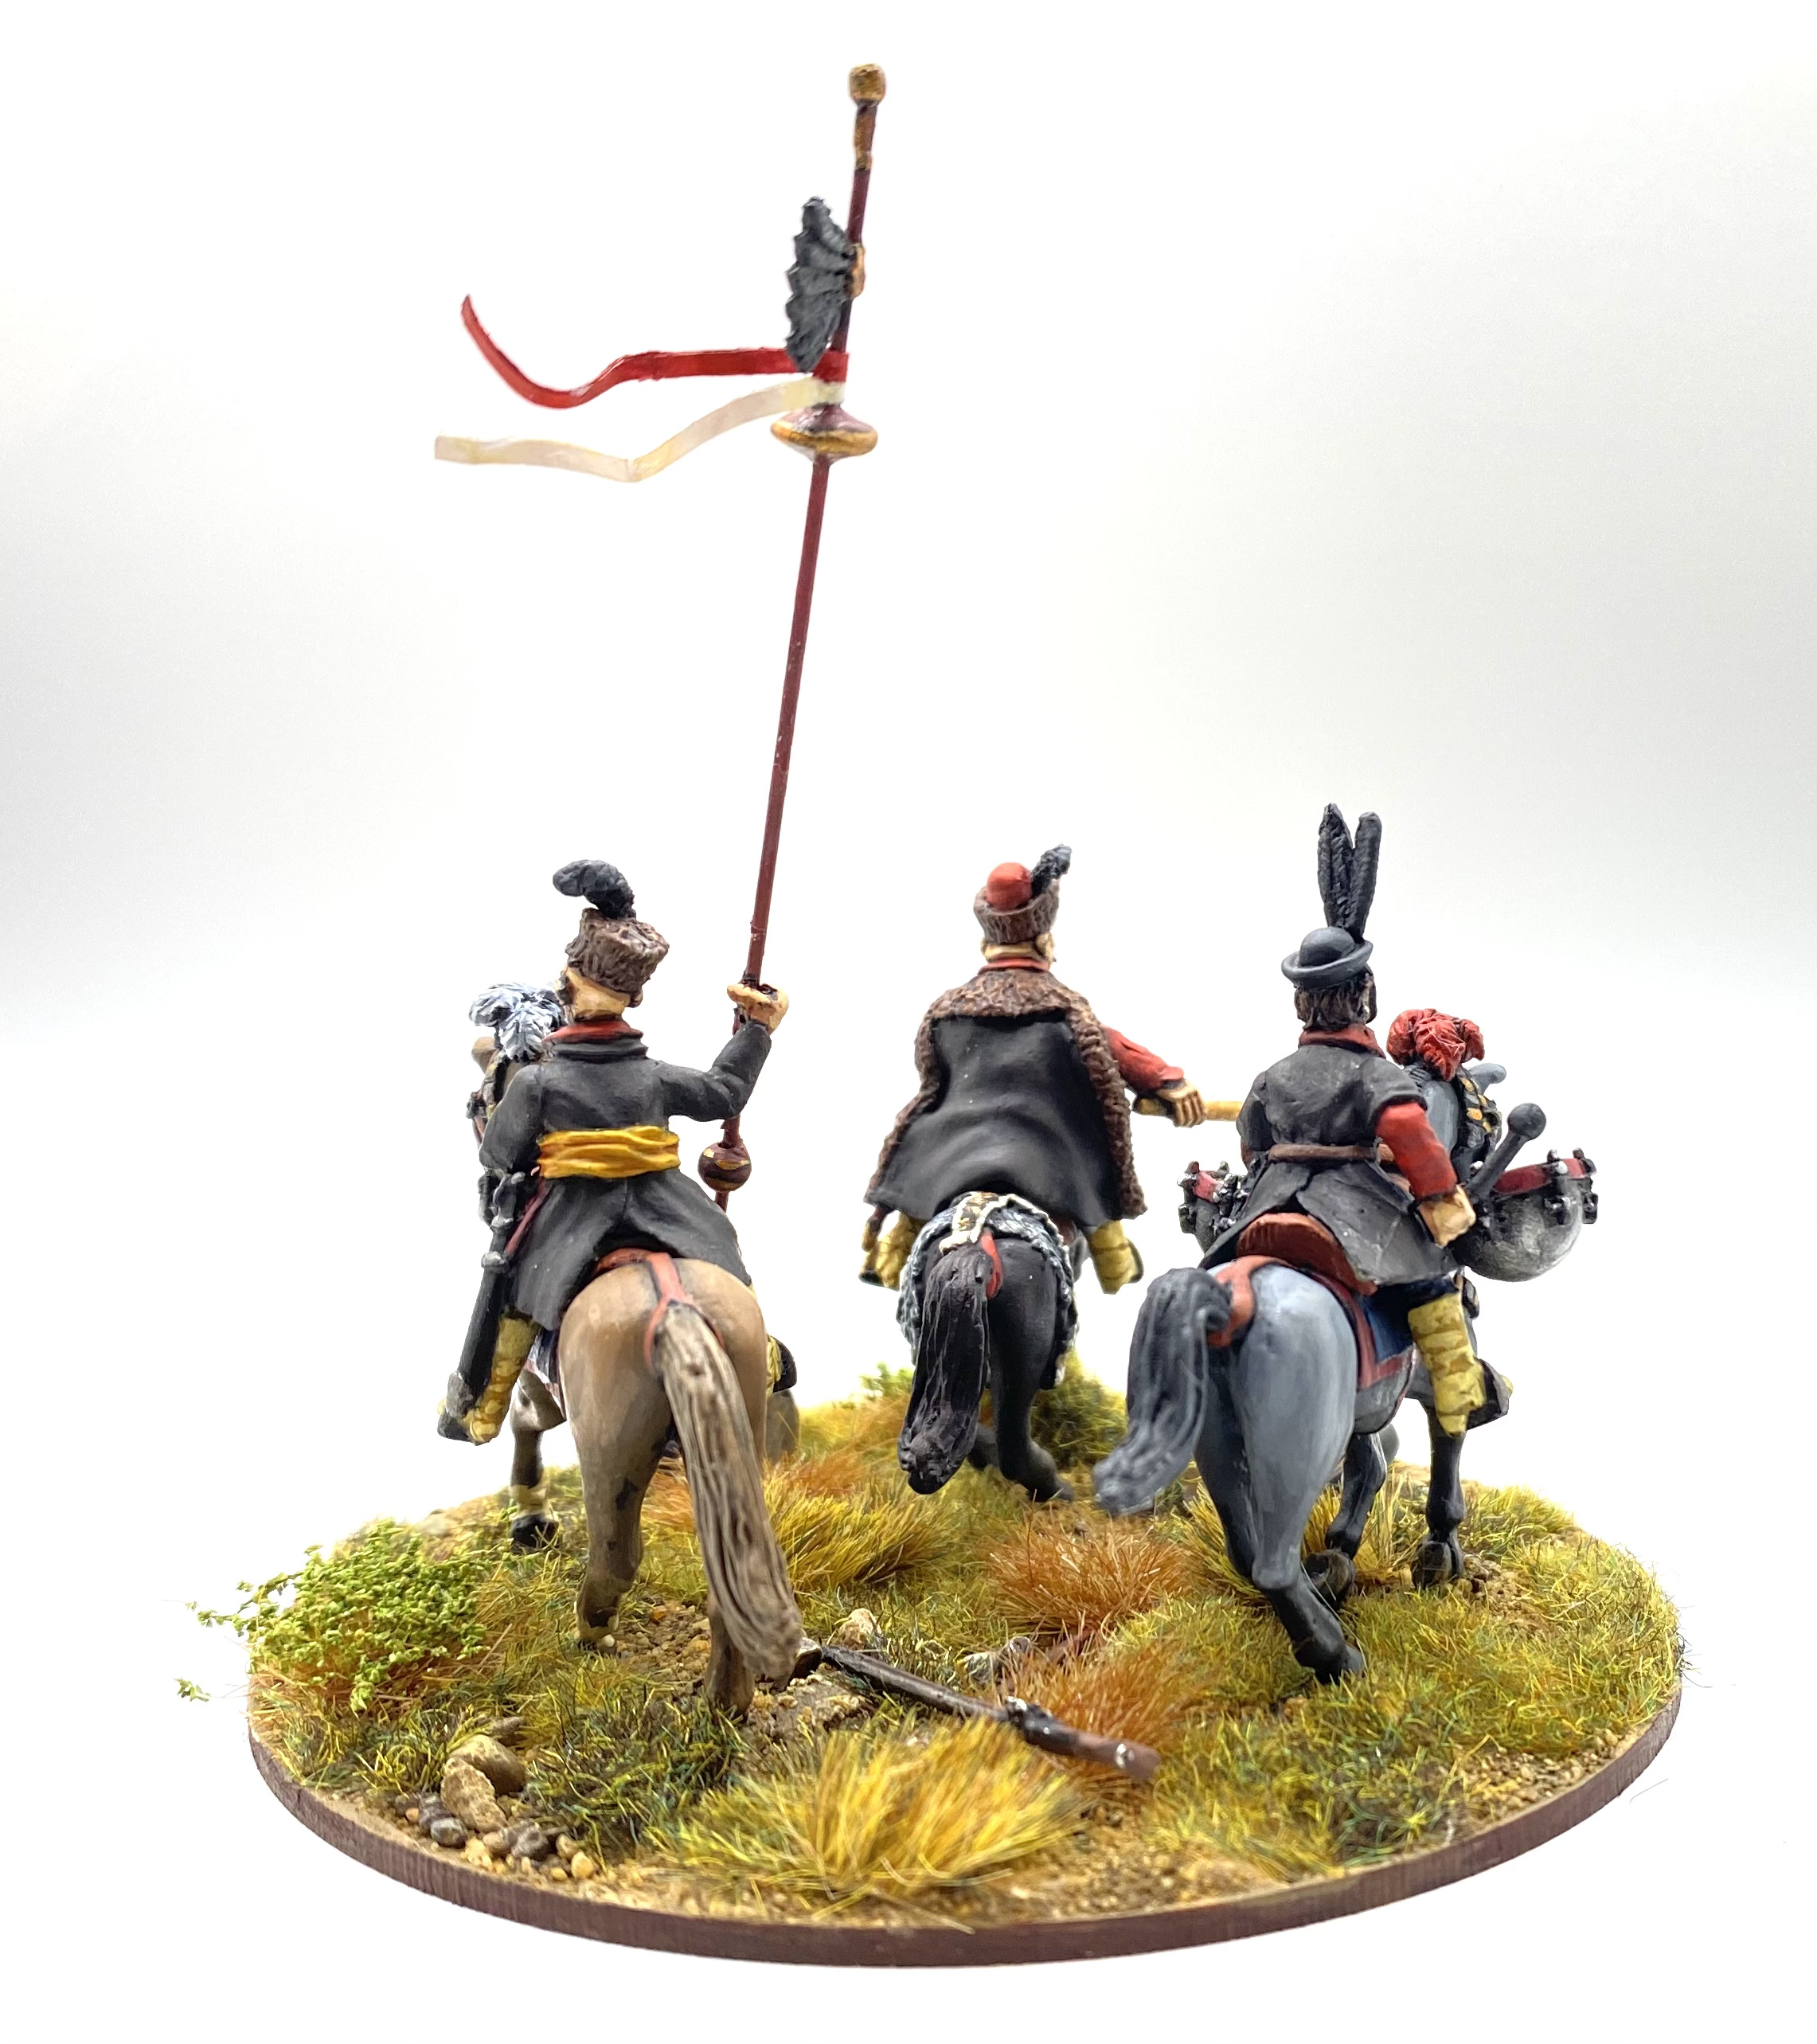
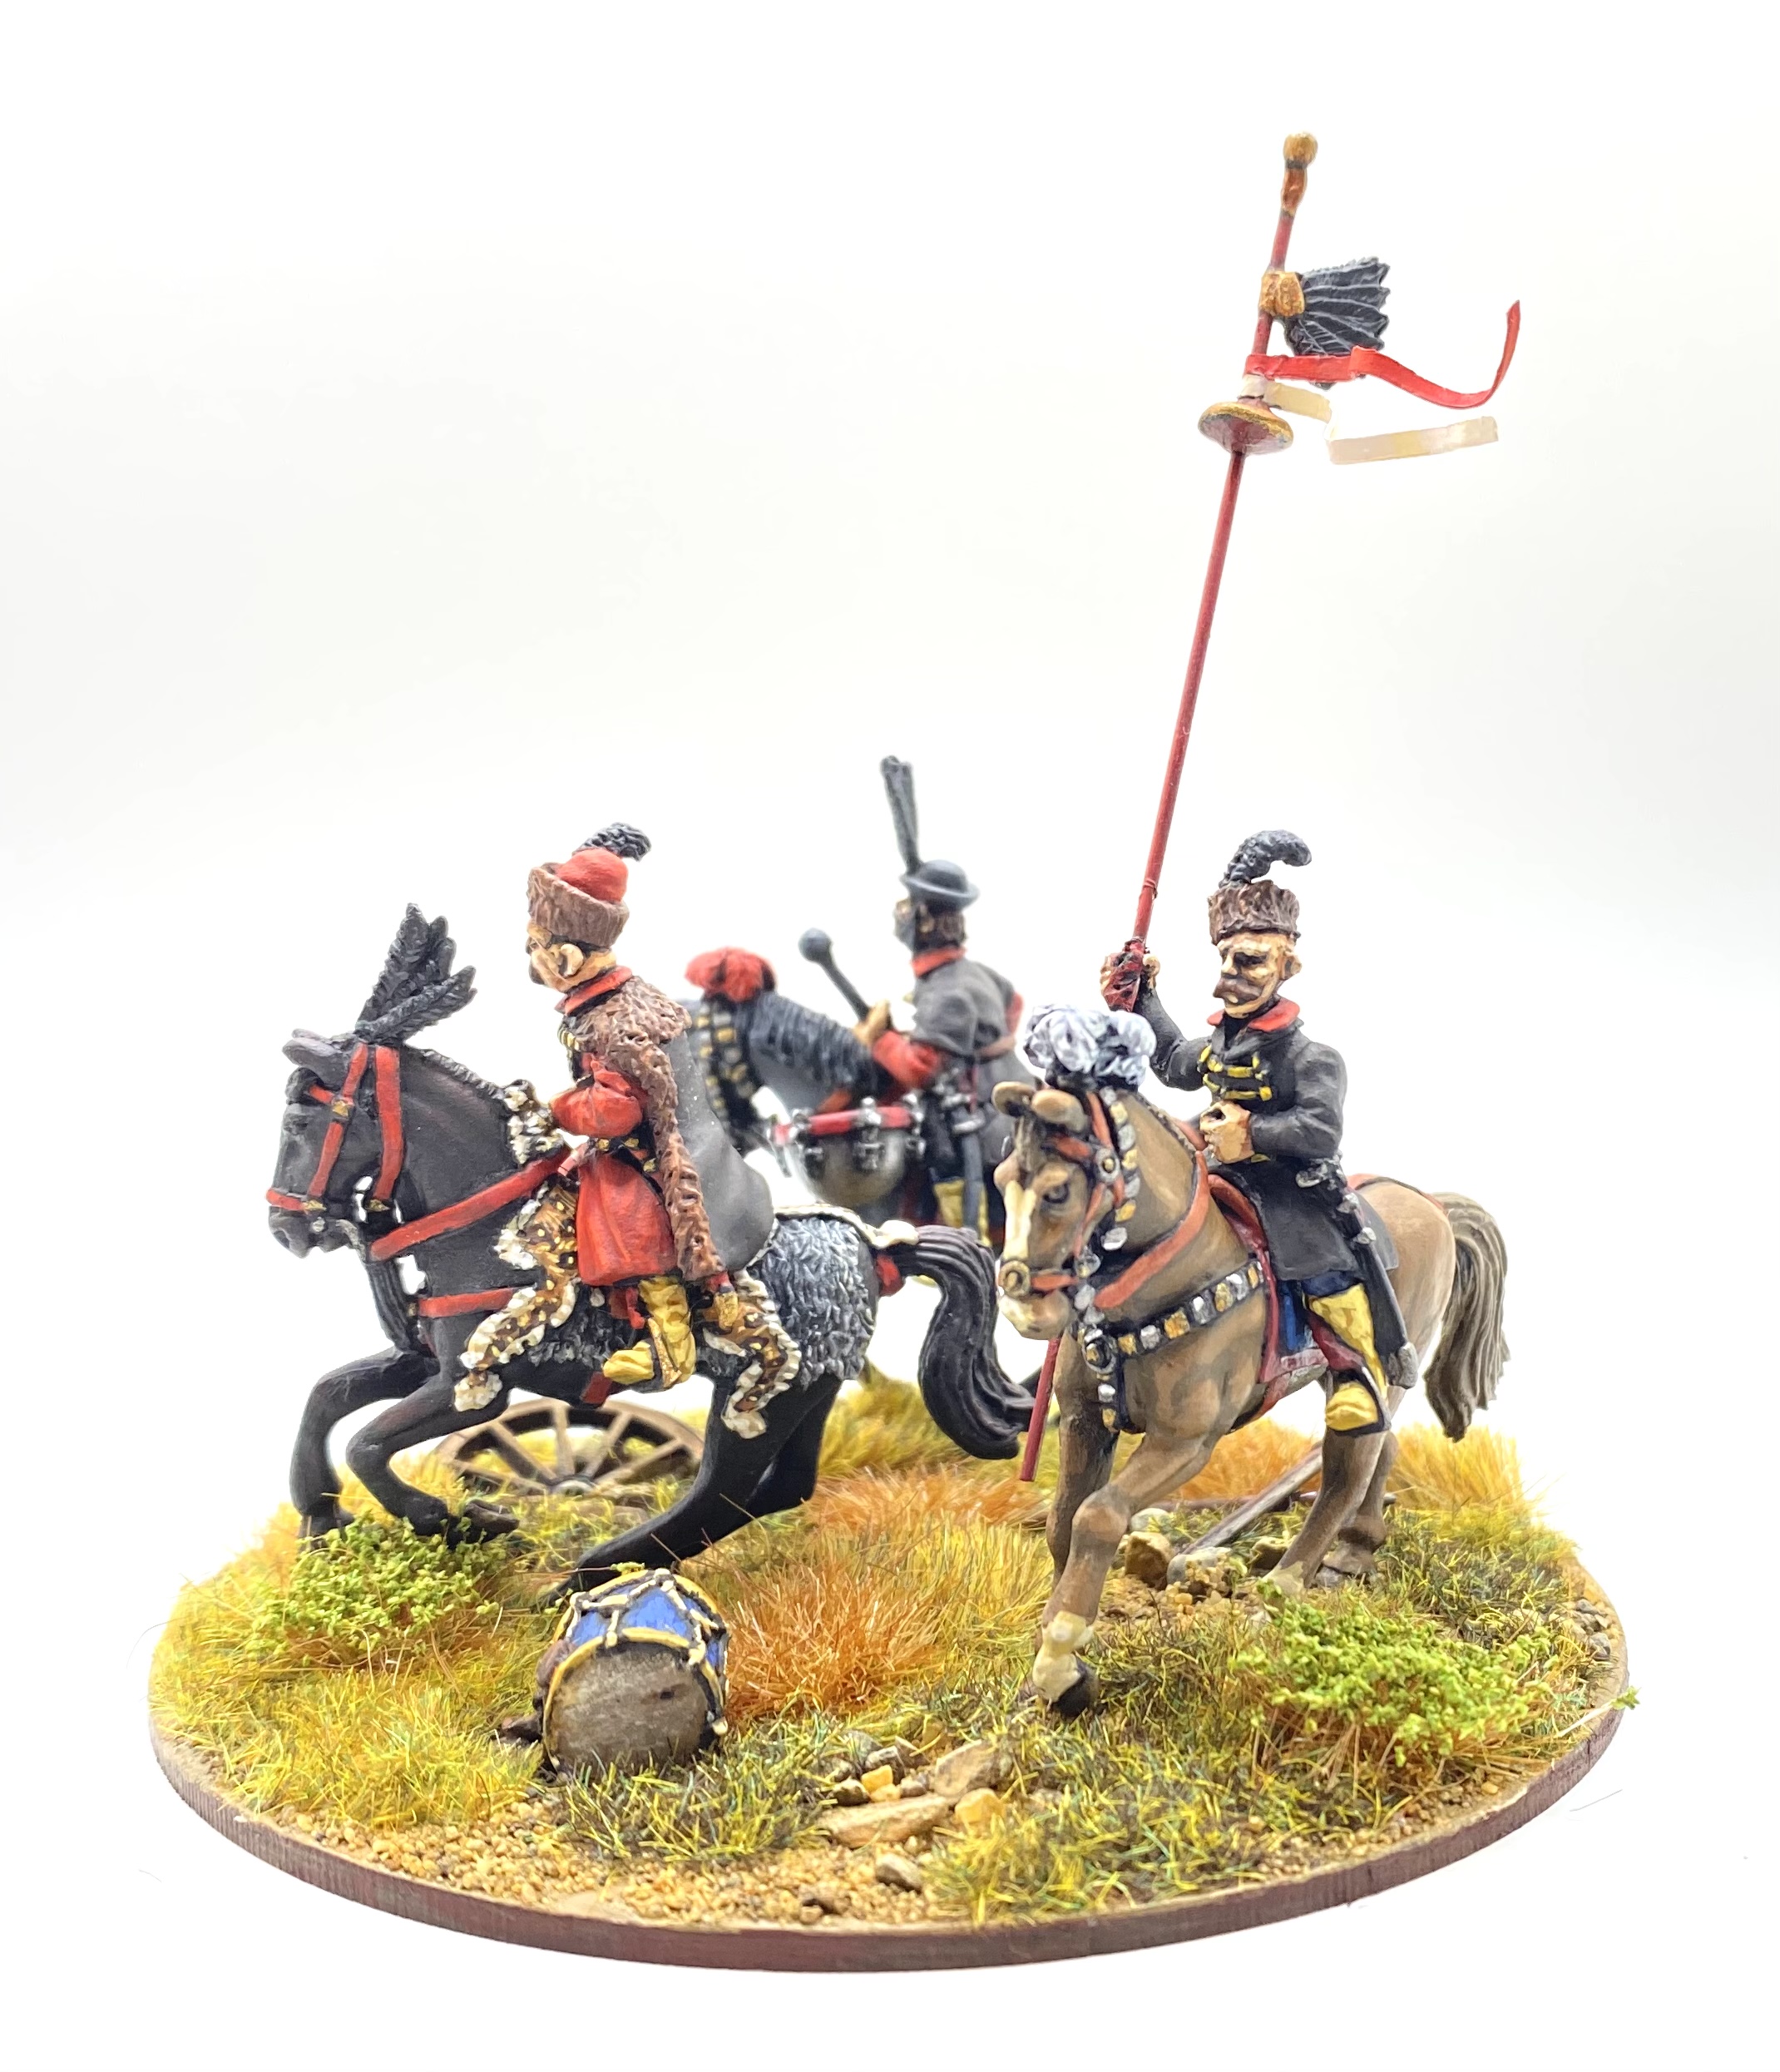
Above are a a couple of exerts from 19th century paintings that suggest what the Hetman’s sign might have looked like. These are the best I had to go on as I haven’t been able to find any more details of what exactly made up the Hetman’s sign. The sign is shown as a long spear or lance, featuring a small ‘wing’ of feathers, and a small disc below this. There may be streamers attached to the disc. Some pictures show a small sphere on the lance point, similar to what is used for some flags’ staves. (It seems that later on in this period the feathered wing was replaced with a horse-hair tail.)
I’ve not seen a Hetman’s Sign produced by a figure manufacturer yet. Based on the limited information the sign seemed fairly straightforward to scratch build. I decided to use a hussar lance as the basis for my Hetman’s sign. To make the disc I used a small piece of green stuff and moulded this on to the lance. For the feathers I used an off-cut from a hussar wing that seemed to match the illustrations above. This was filed to fit, and then super glued to the lance between the disc and the point. I then used some paper to make the streamers and glued these on to the lance just above the disc. Finally I glued a small bead to the lance point. I then painted up the model sign, with plenty of gold adornments.
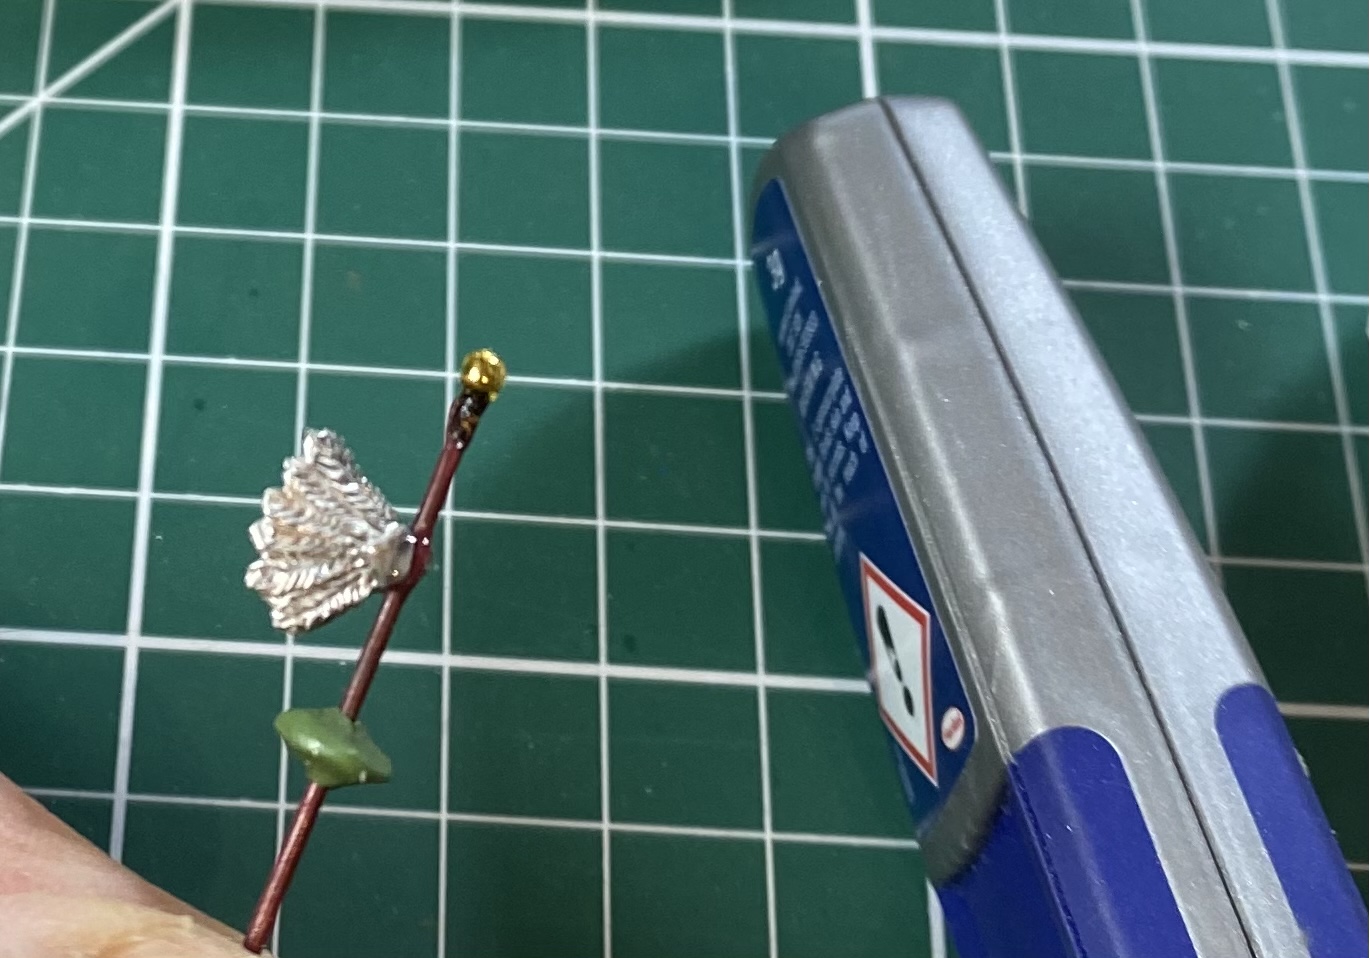

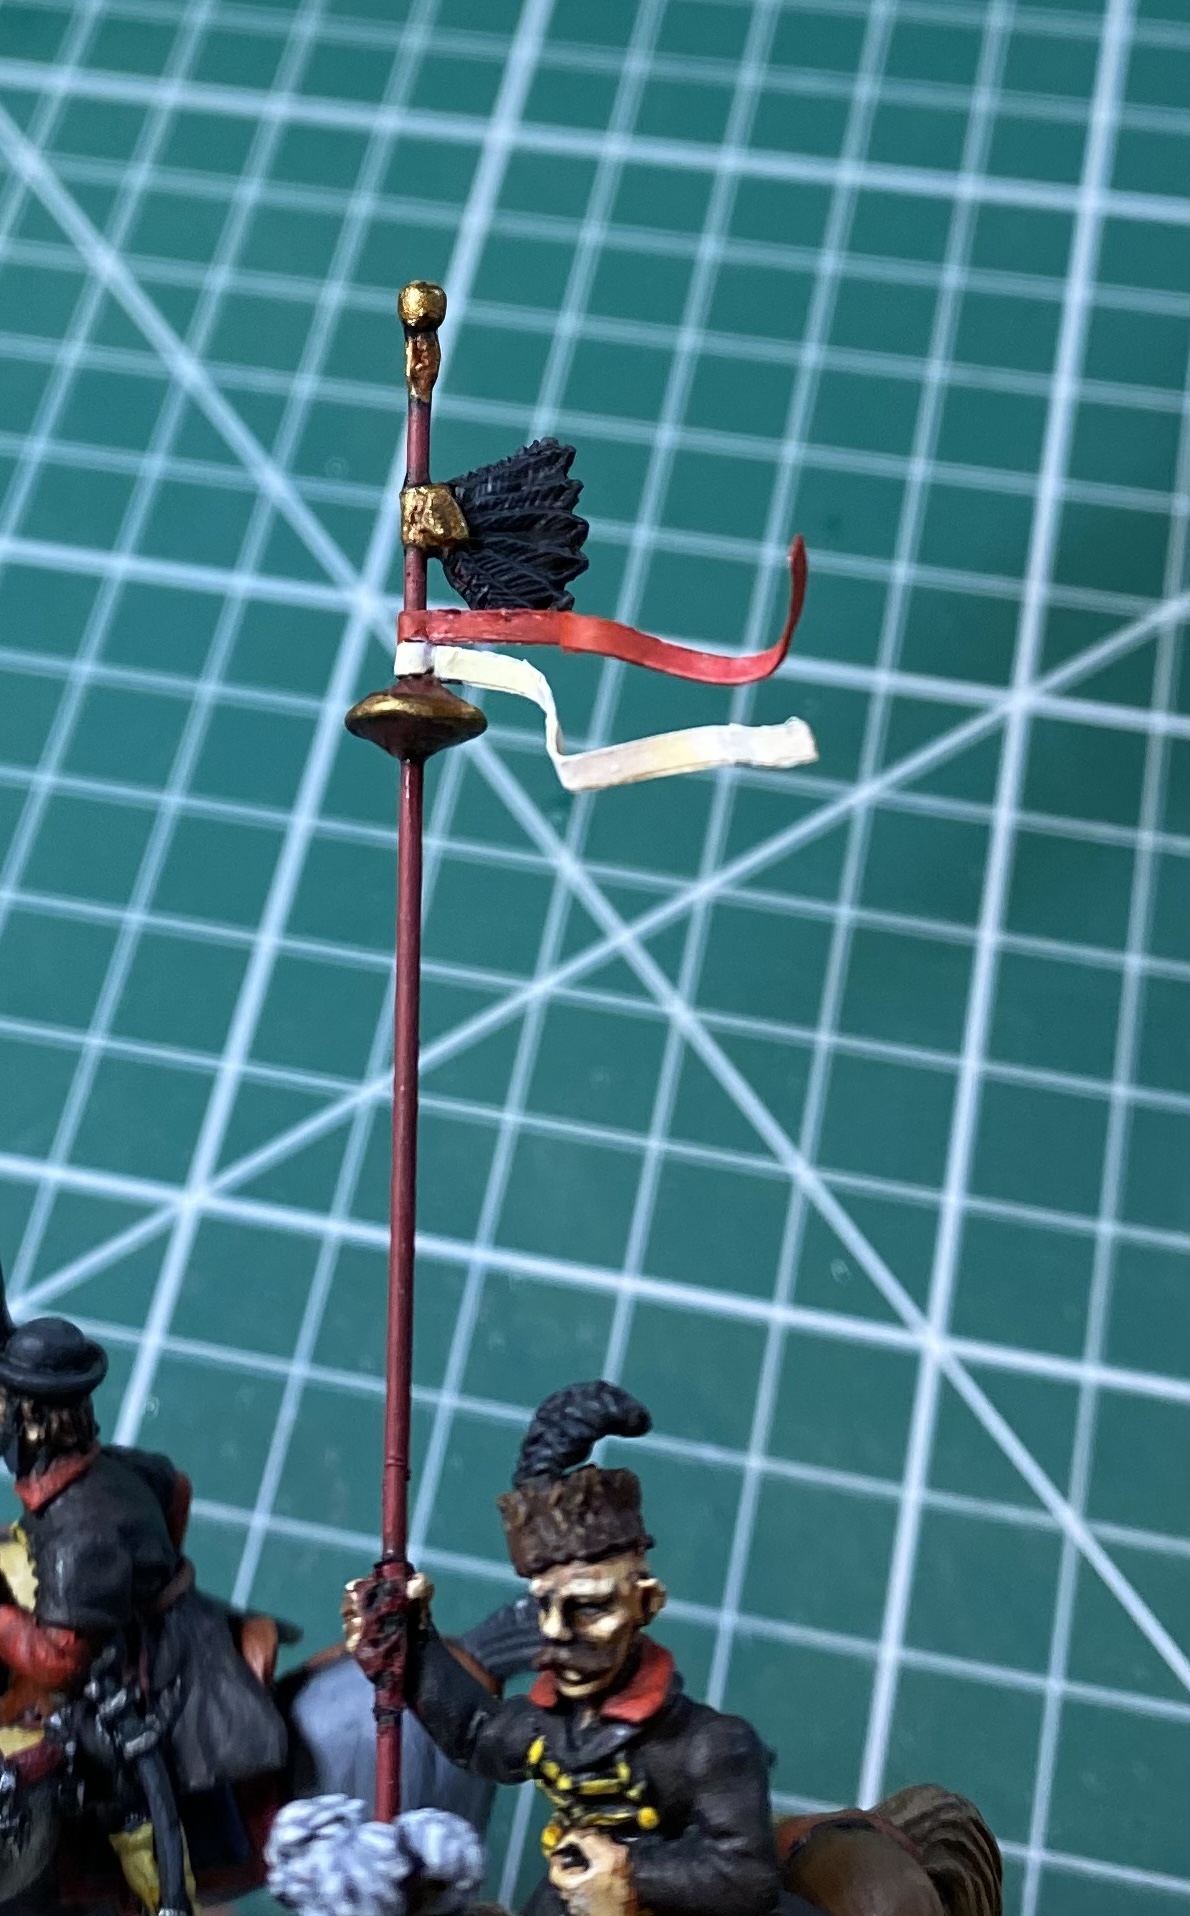
The finished Hetman’s Sign will make a nice distinctive addition to Koniecpolski’s base.
To accompany Koniecpolski, and a mounted figure carrying his Hetman’s sign, I have included another mounted kettle-drummer, this time from TAG. I went for very dark coats for Koniecpolski’s followers to match his cloak colour, and this hopefully helps the great man stand out more in his bright red zupan. With items of debris to add to this base in a similar way to the previous base I was done.
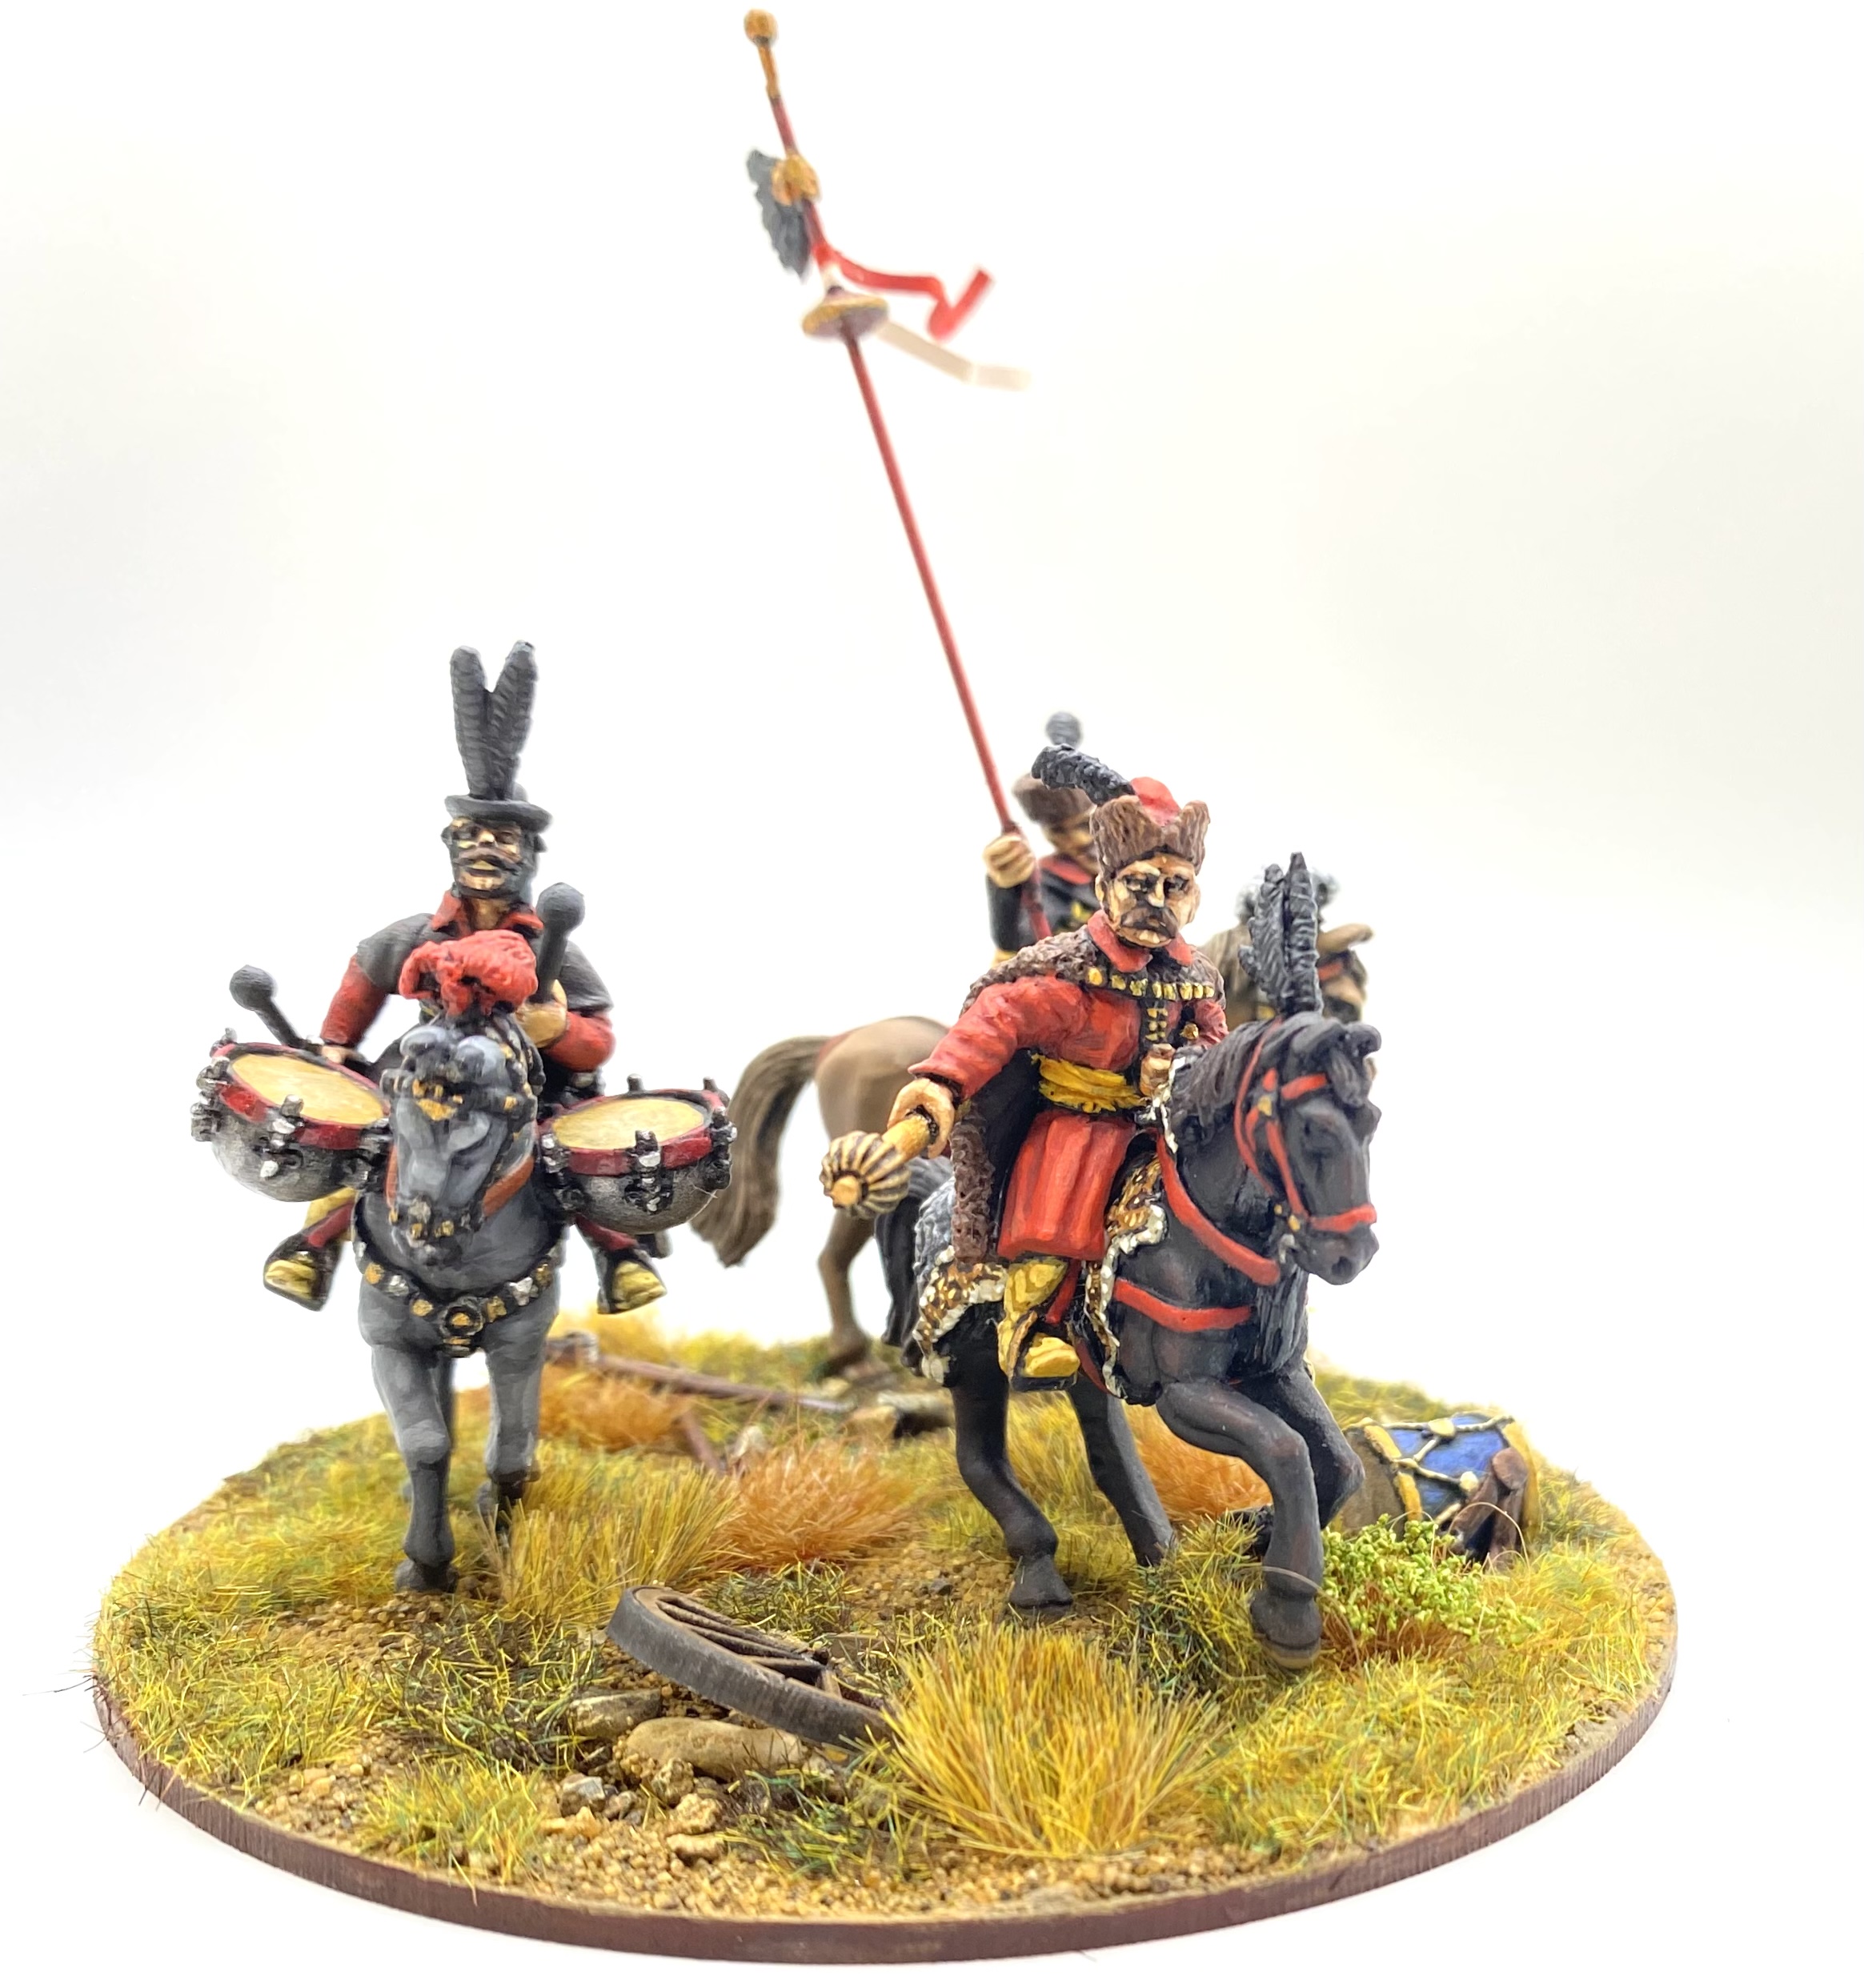

With two command bases done I can be sure that I’ll have generals ready to lead my Polish-Lithuanian forces to battle. I’ll need at least one more command base at some point, so I will need to think of some more ideas for suitable figures.
The next items on the painting table for the Poles are a step down in the hierarchy from the mighty Husaria and noble commanders. Next up is some Foreign Infantry, and I’ll be using figures from a manufacturer that is completely new to me.