













Ultramodern Wargaming – Ukraine 2024




Recommendations: 13004
About the Project
Lately, I've been running war games every weekend with members of the community via web conference. Players log on and play wargames with each other in real time, regardless of location, and we usually have at least a couple spectators as well. Many times it’s been Darkstar, but we’re also running wargames in Panzer Leader, Arab-Israeli Wars, and now Valor & Victory.
BoW/OTT community members @brucelea, @damon, @davehawes, and @rasmus have taken the plunge, leading battalions across thousands of meters of desert, starfleets in pitched battles across the heavens, or vicious firefights in the jungles of Vietnam, all without leaving the comfort of their home.
Hard-core, old-school command-tactical wargames can now be run (complete with spectators and recordings) in real time, with BOTH PLAYERS moving pieces across THE SAME virtual game board, thus maintaining player agency, speedy and instant results (no play by e-mail), interwoven turn sequences, any questions / feedback instantly received and addressed, and with the game being virtually recorded as it goes, a ready-made battle report can actually be created as we go.
All of this without the players having to install any new software on their computer, on any platform (PC or Mac). All that's needed is to agree on a time, a handful of dice, and a bellyful of courage!
Every weekend can now be a boot camp! All without costing me thousands of dollars in airfare, too!
Related Game: PanzerBlitz
Related Genre: Historical
This Project is Active
Assault on Kussiema - Replay for Testing
Last weekend @damon and I played a wargame in Avalon Hill’s The Arab-Israeli Wars, recreating the assault on Kussiema. This was part of the IDF’s initial ground offensive that opened their invasion of the Egyptian Sinai on 30 October 1956. The battle report is below in this project thread.
Long story short, my Egyptians won this game, and pretty handily, too. So much so, in fact, that I was actually a little concerned whether the scenario I had designed was actually balanced.
The Israelis have, predictably, overpowering advantages in mobility and firepower. The will win this battle, ten times out of ten. The trick with asymmetrical wargaming is to design a scenario that challenges the Israelis to win quickly enough, cheaply enough, etc.
Historically this is a good fit as well, as this assault (4th Brigade), originally meant as a supporting flank assault, was abruptly upgraded to the “main” attack when the original main attack (10th Brigade further north) largely failed. So 7th Armored Brigade was chucked in to support 4th in a new combined thrust around the Egyptian southern wing. Standing in their way was this Egyptian outpost at Kussiema. The point is, the Israelis have to win and win fast in order to turn the Um-Katef defenses from the south and thus crack open the larger Egyptian defense in the Abu Agheila region.
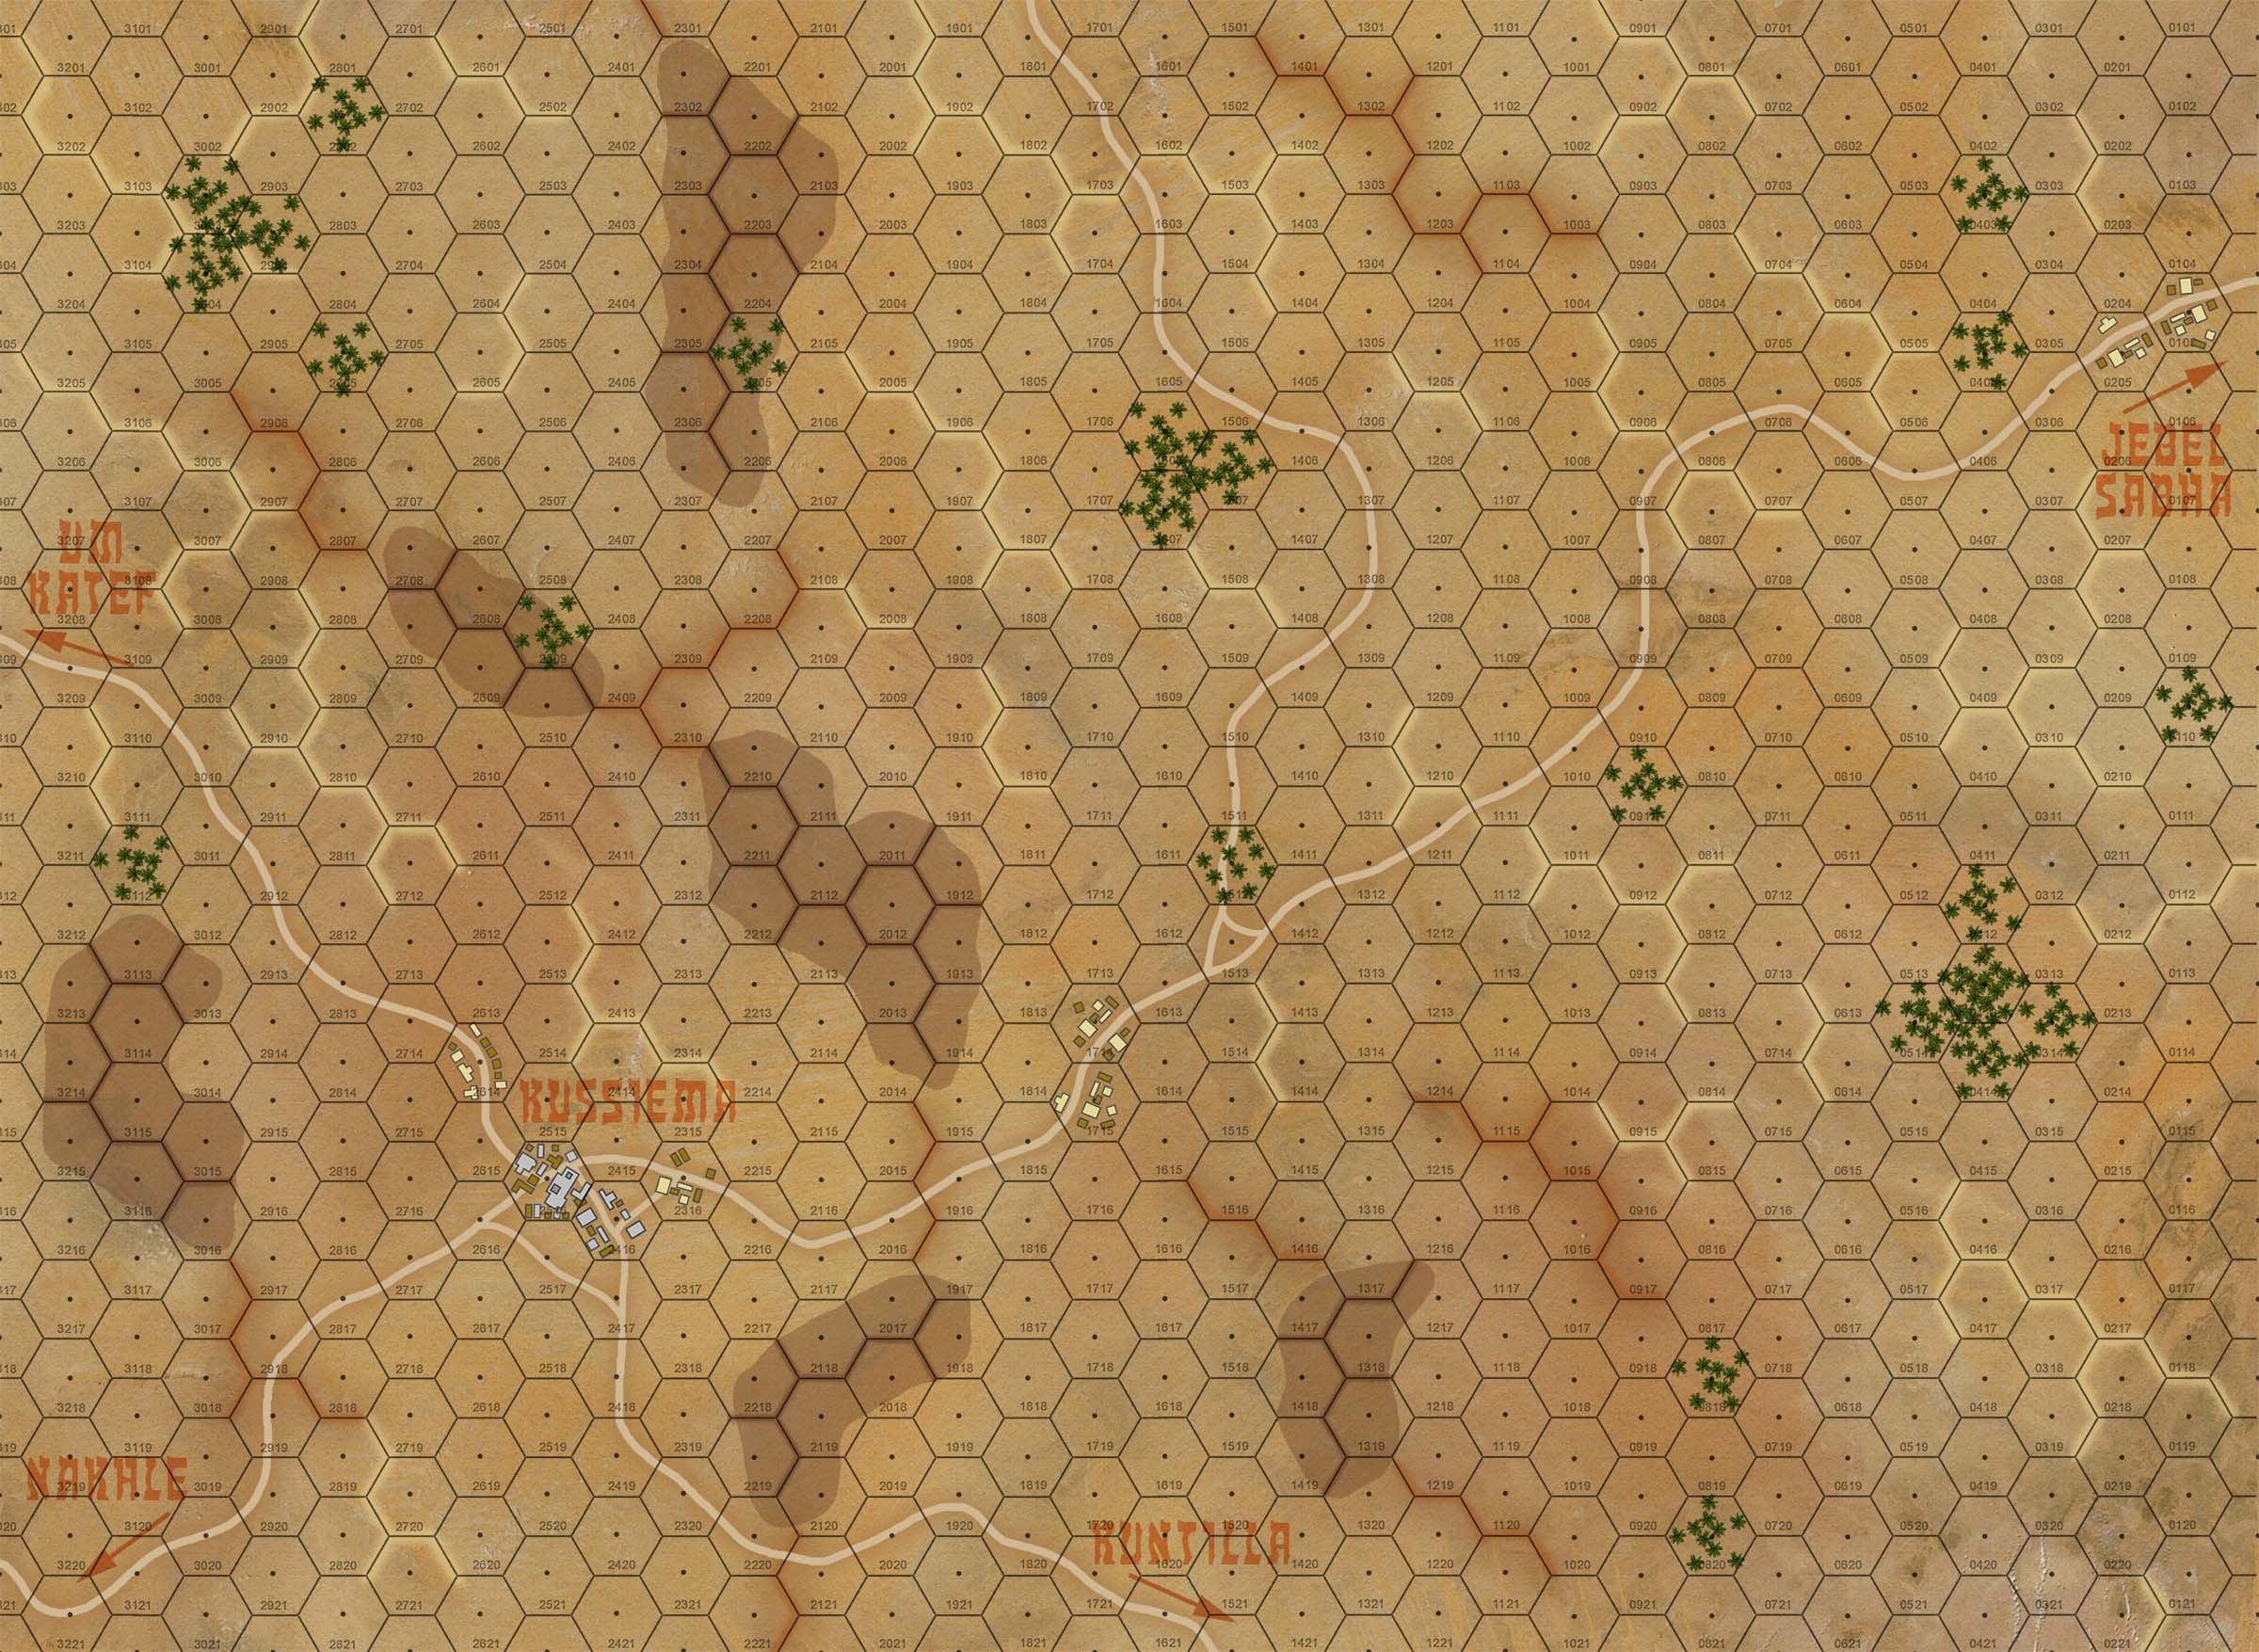
So the game has five objective hexes, set on crossroads and road exit points. The Israeli player is challenged with taking at least four of these hexes within ten turns. It may not be clear on the maps, but control of four hexes basically means that the Israelis have opened at least one complete route from their entry zone on the northeast corner of the board, off the western end of the table. Again, to facilitate larger-scale operations against the south and rear flanks of Um Katef.
Now in the game with @damon, he got two of the five. Israeli tanks barely laid eyes on the third objective hex. Did I give the Israelis enough time in this scenario?
So I reset the game and ran it myself, seeing if I can go hell-for-leather with the 7th / 4th Brigades and crack this game in ten turns or less.
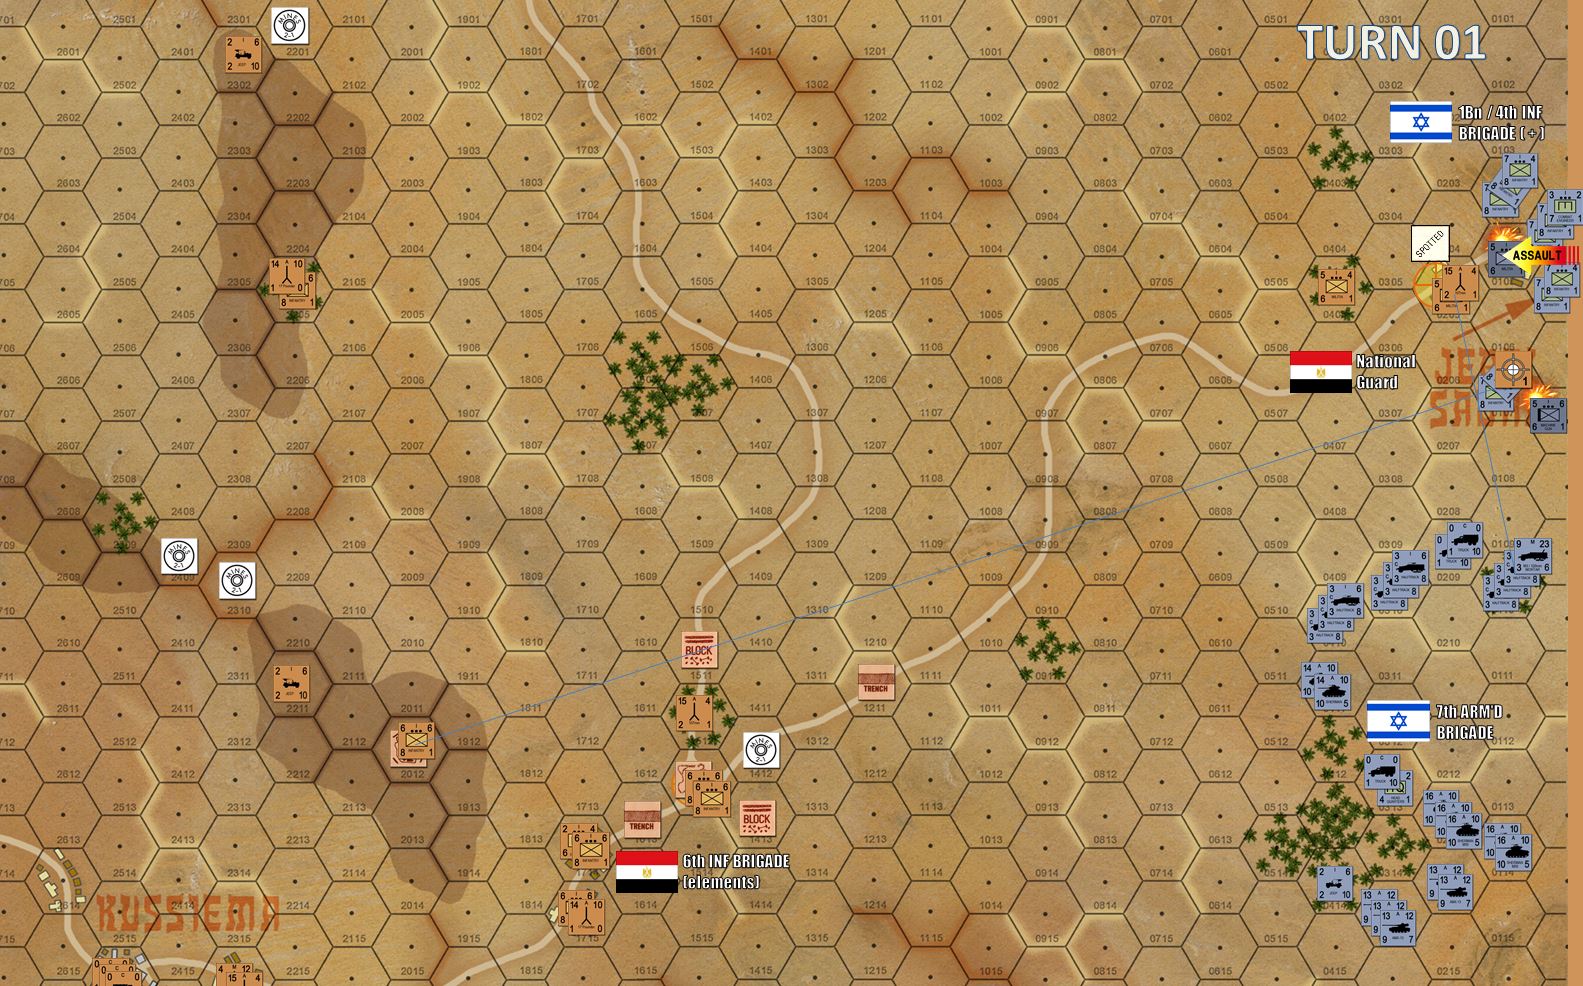 The Israelis come on the table swinging. Rather than even coming on the table loaded in their halftracks, they launch an immediate assault on the frontier outpost at Jabel Sabha. Egyptian opportunity fire does do damage and takes out one while Israeli machine gun platoon straight away, but again ... the Israelis are trading safety for speed here. Using the Quick March rule halves their defense against opportunity fire, and the Egyptian national border guards do have Czech 107mm recoilless rifles in there. But the assualt goes in, and the town is starting to fall.
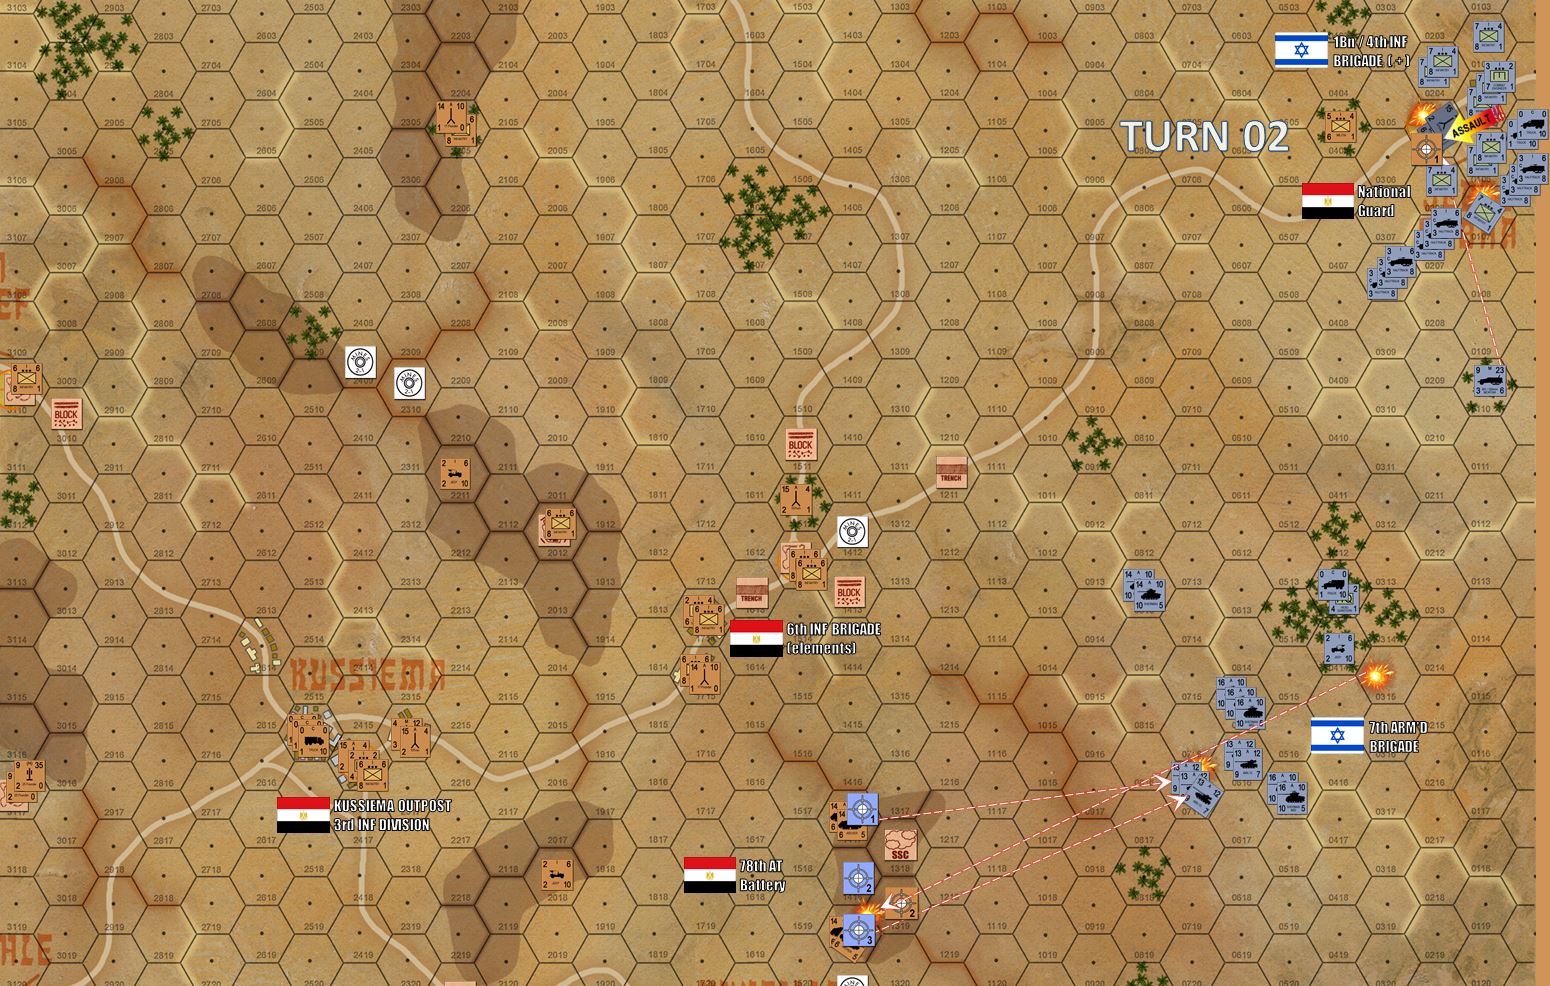 Turn 2 - the Israeli 7th Armored Brigade is now close enough with those loooong-ranged 75mm French AMX-13 guns to engage the Egyptian Archer tank destroyers on that southwestern ridge. Israeli tanks are also calling barrages from their off board 155mm howitzer batteries. Those shells will arrive next turn. Meanwhile, the assault into Jebel Sabha continues.
 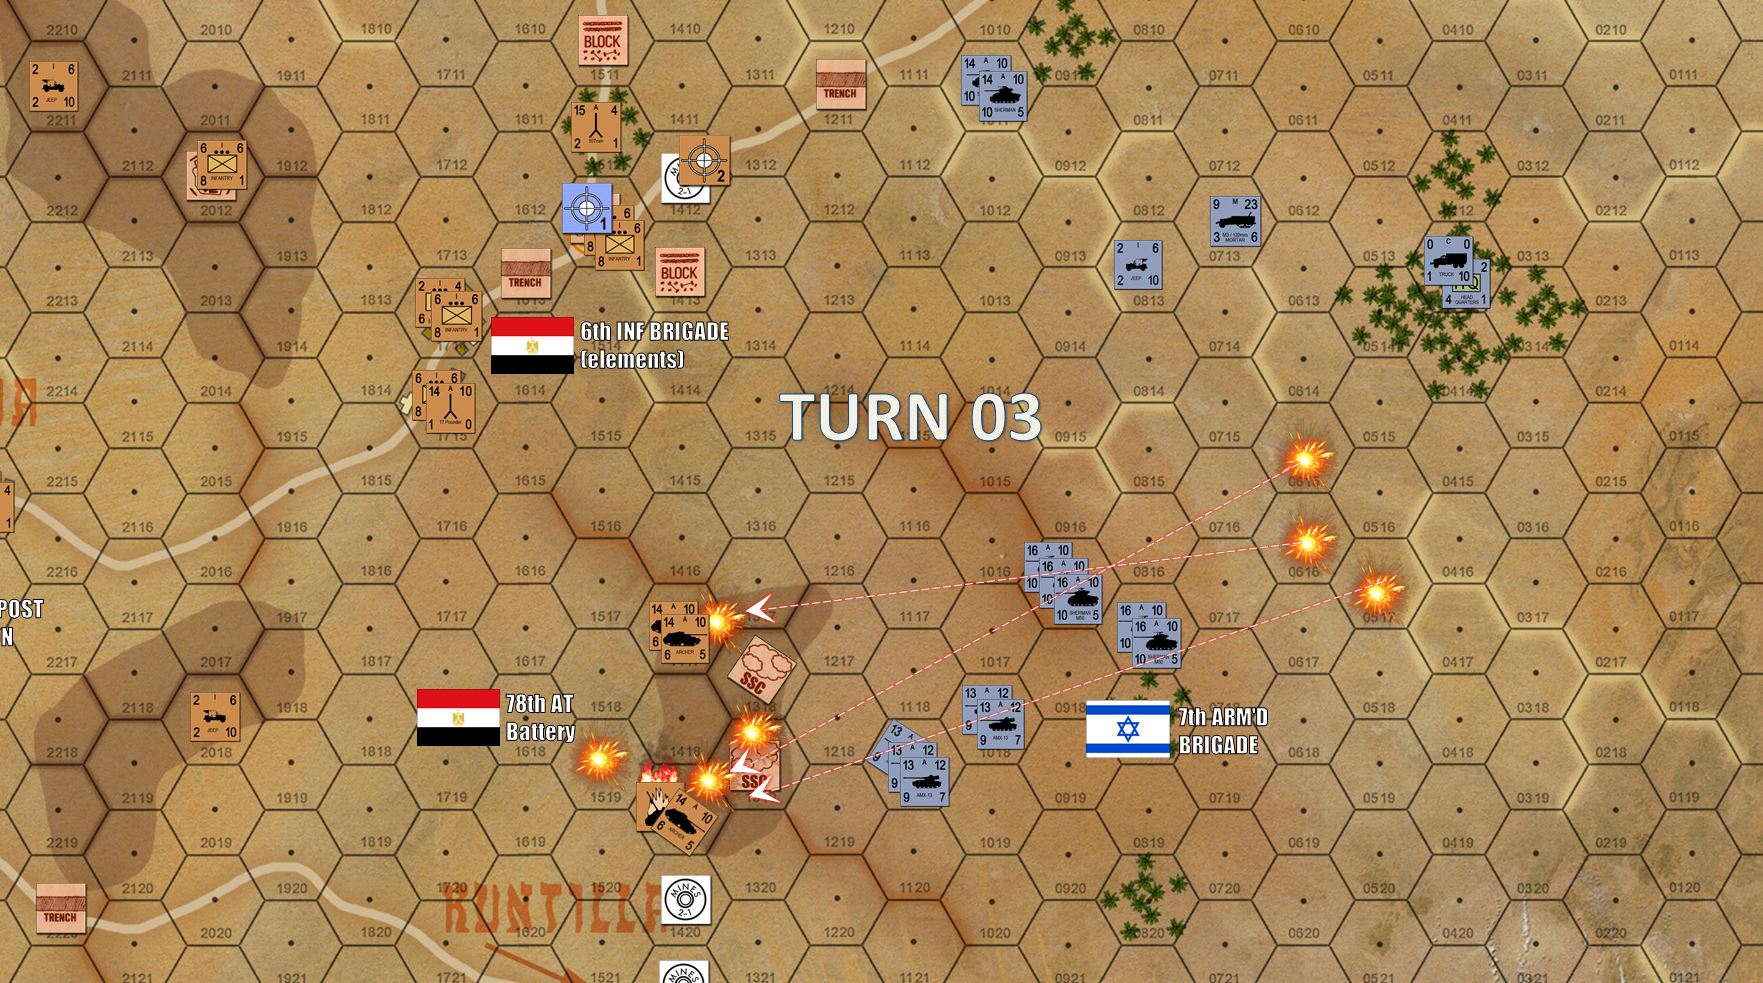 Turn 3 - in the north, the Israelis have had eyes on the next objective hex (two platoons of M1 Shermans spotting those eastern town hexes of Kussiema) and call in Turn 3 artillery missions that will impact on Turn 4. Meanwhile, Israeli artillery on "Archer Ridge" somewhat scatters due in part to Egyptian smoke screens fired from 82mm mortars). But some are dispersed (pinned),allowing the Israelis to again fire and move forward (Split Move and Fire rules is a big advantage enjoyed by Israeli turreted AFVs).
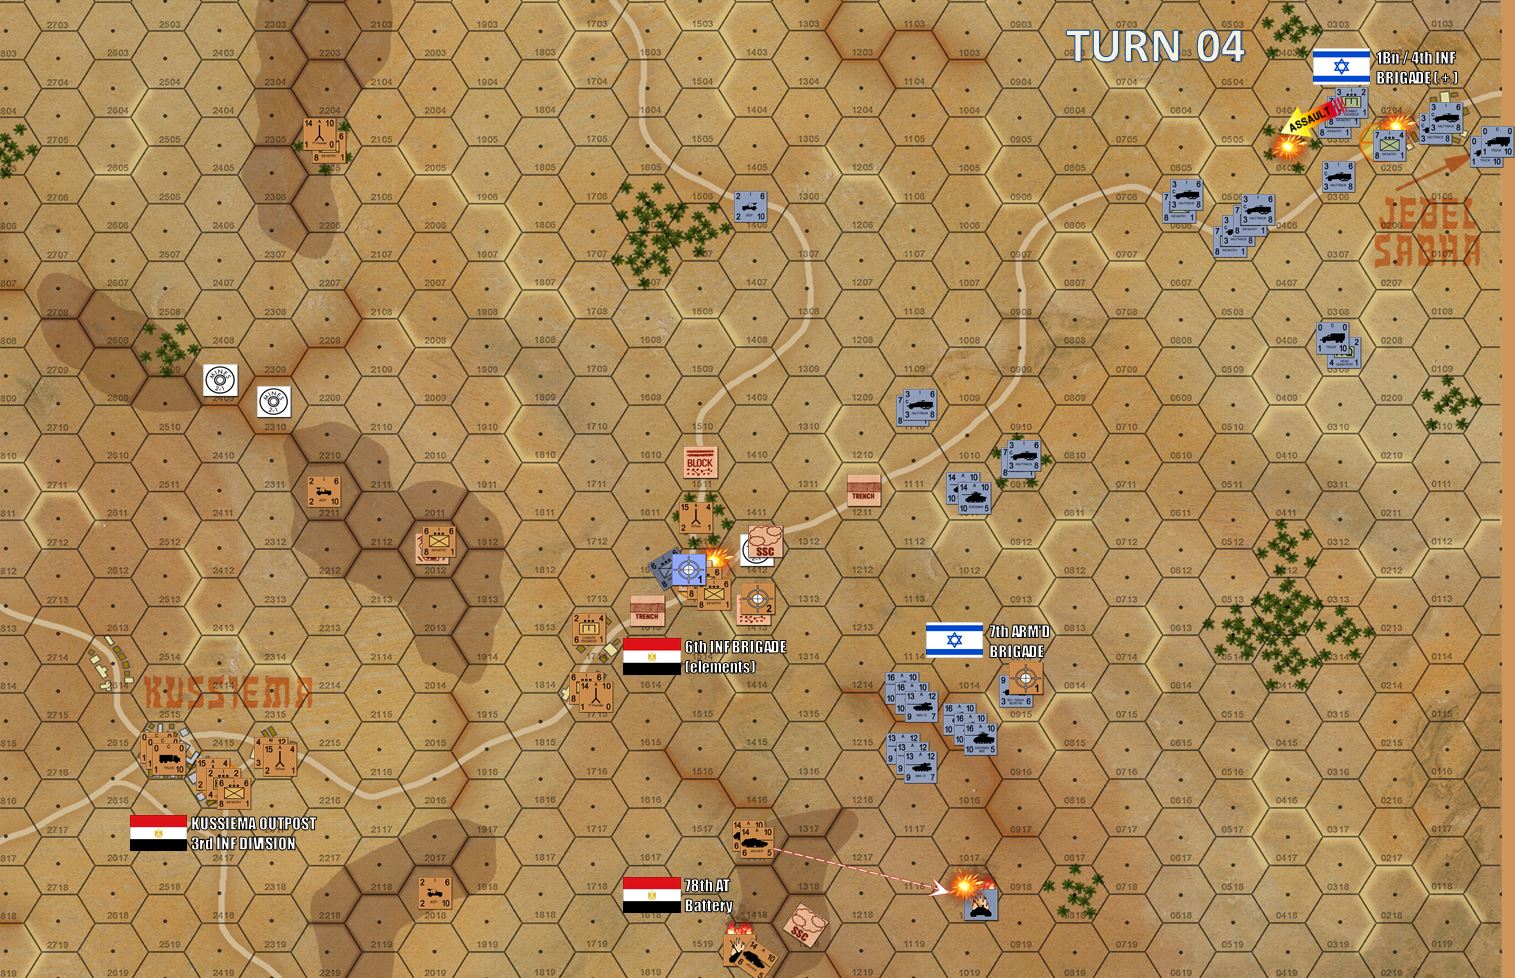 Turn 4 - Jebel Sabha is finally taken. The difference here is is that while the infantry were left behind to grind down Egyptian resistance in this border town, Israeli tanks and halftracks were swinging around this obstacle to simultaneously attack other objectives at the same time. For instance, 7th Armored has more or less suppressed Archer Ridge and is now threatening Kussiema East from the southeast. First Israeli artillery missions have landed on these hexes and started burning down Egyptian infantry platoons dug in on that crossroads objective hex.
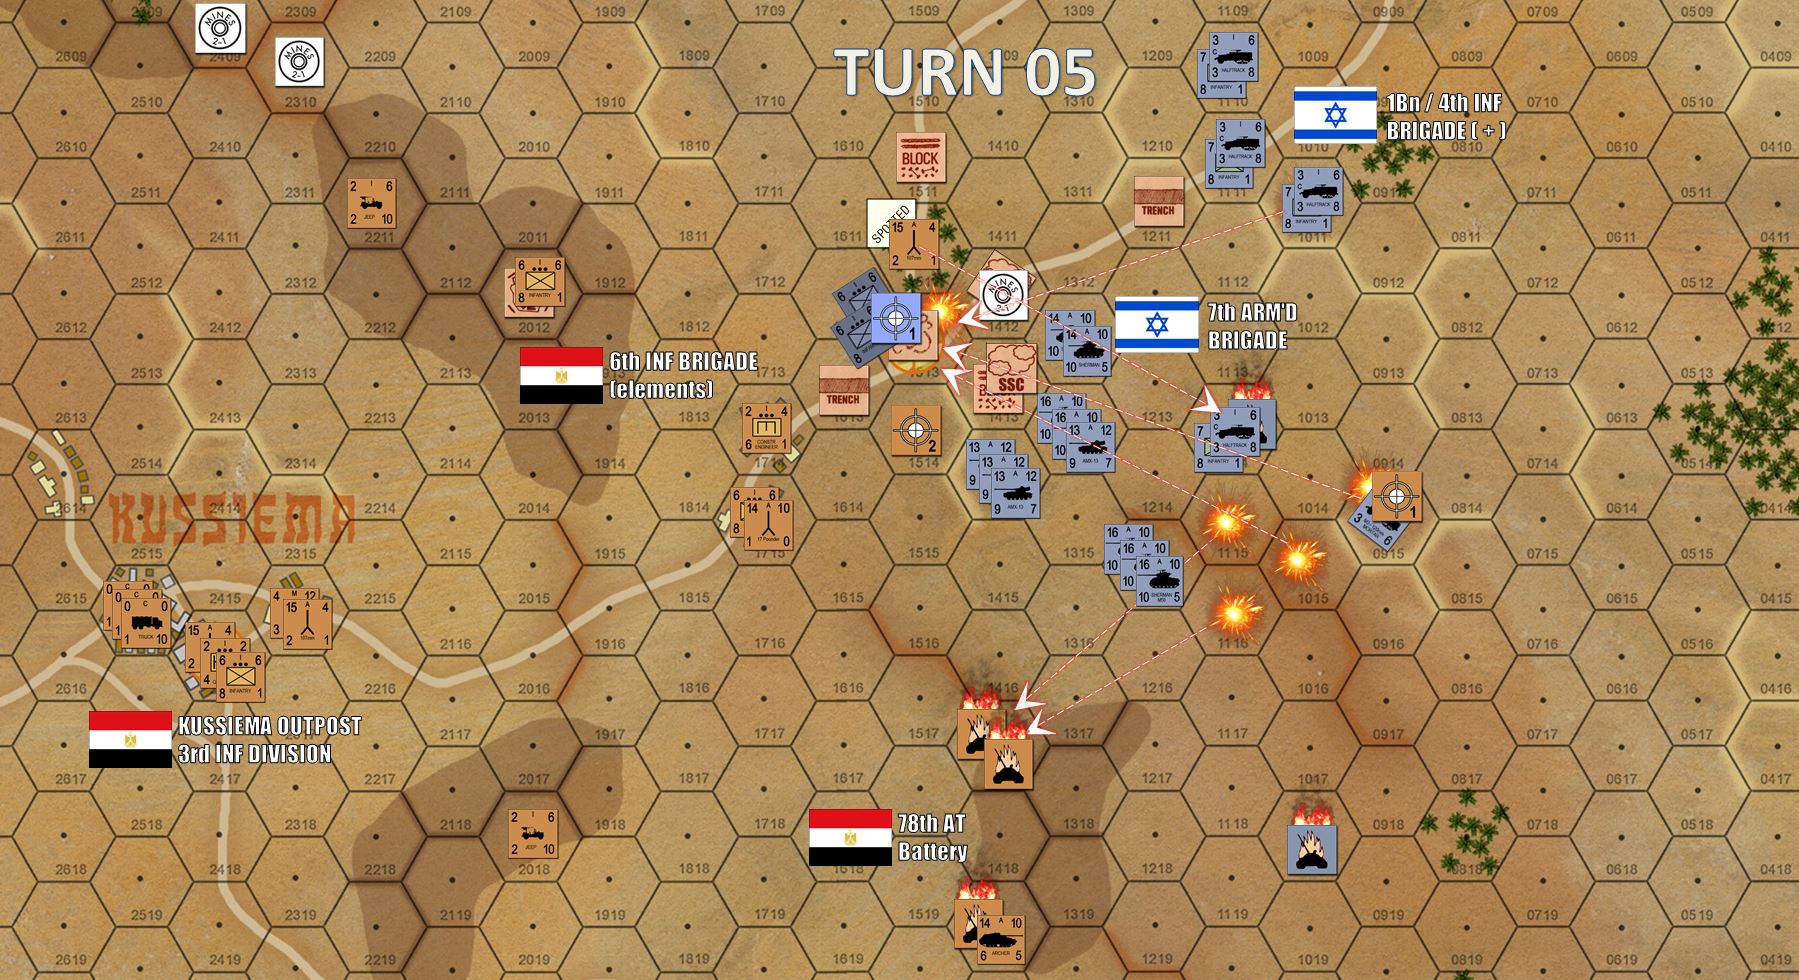 Eastern Kussiema is now badly under threat. Israeli artillery fire is really starting to tell, Archer Ridge is now more or less smoking wreckage, and 7th Armored Brigade is now applying direct fire against the crossroads southern flank.
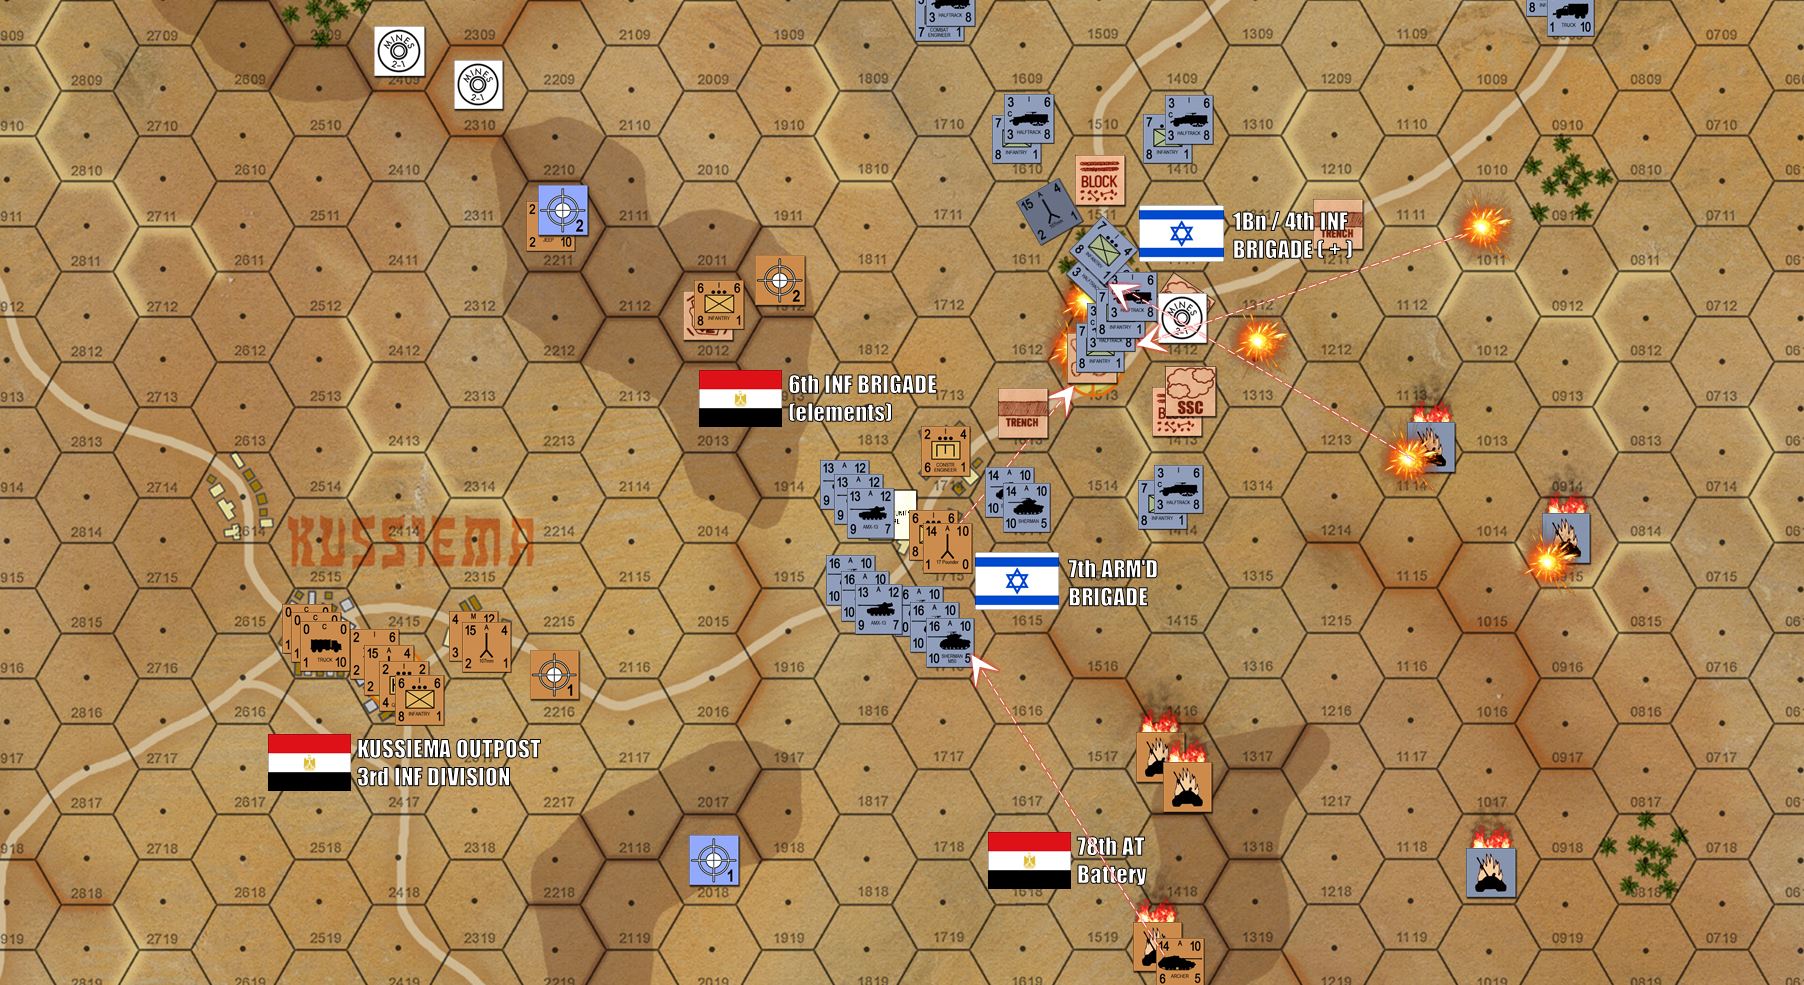 Turn 6 - The Kussiema crossroads have now fallen, although the Israeli victory (rushed) has not been bloodless at all. The tanks have again bypassed the town once the infantry have caught up and the Egyptians have been sufficiently reduced by heavy firepower, and Israeli infantry assault can carry the victory. The point is to already be on the next phase of your attack, thus cutting down the number of turns required by the overall process. Among the losses have been the Israeli halftrack mortar carriers, a critical loss considering how useful this weapon is as a direct-fire weapon to engage soft targets in town hexes..
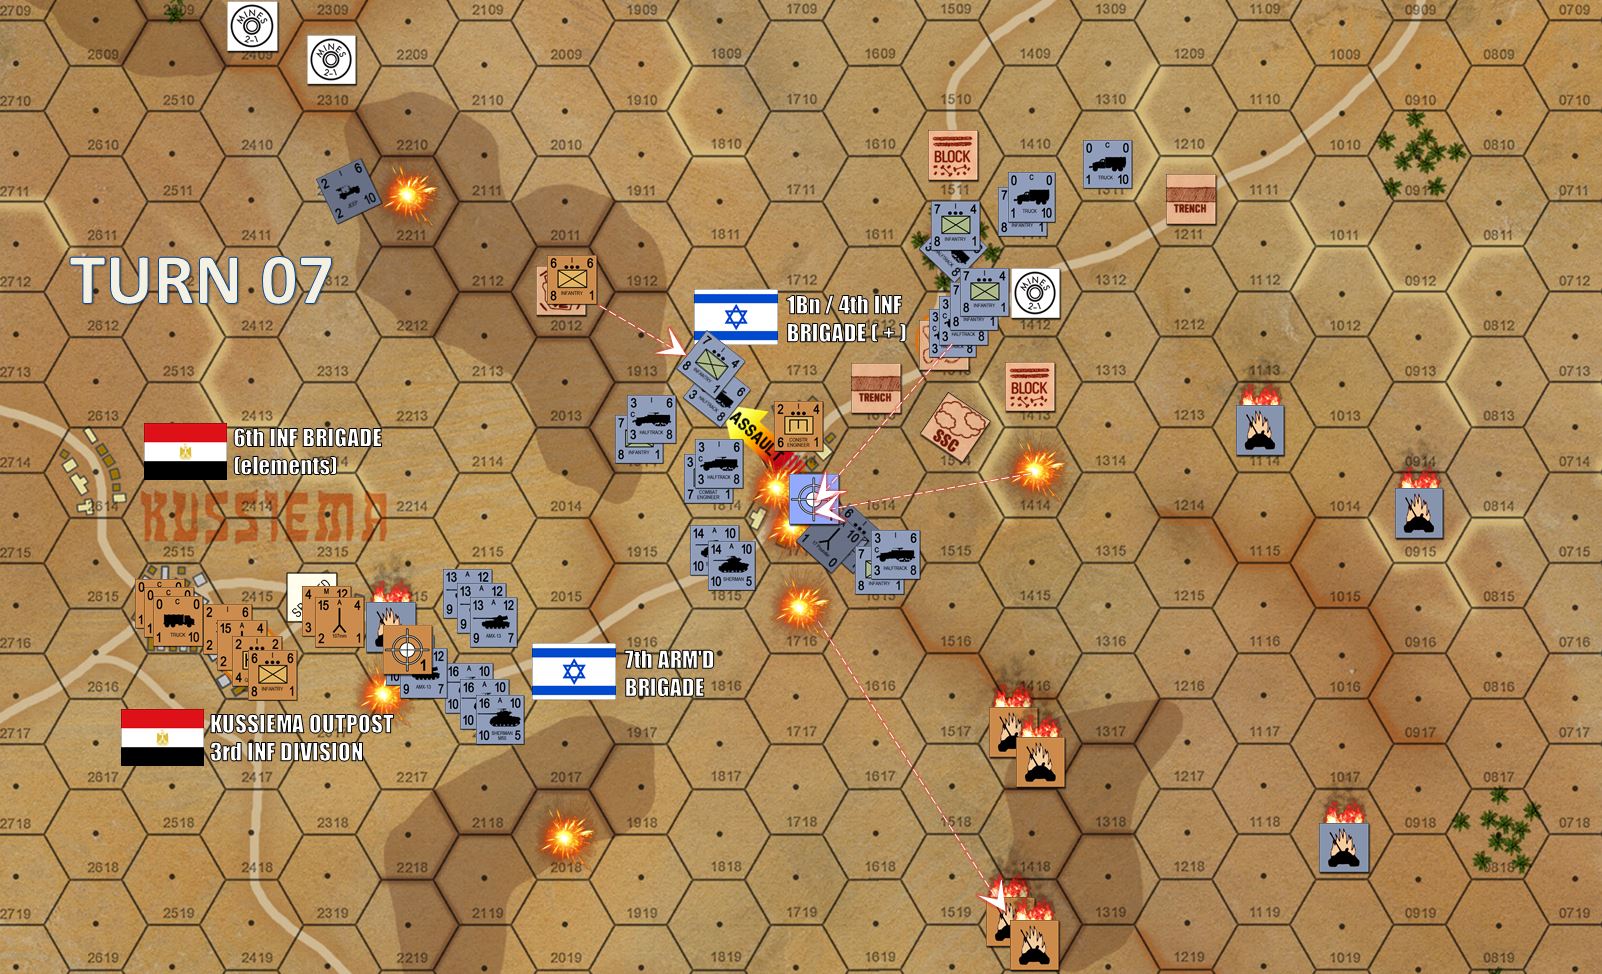 Mopping up Kussiema corssroads, Egyptian engineers, 17 pounders and 107mm recoiless rifles have to dealt with. Meanwhile, Israeli 7th Armored Brigade has already opened a
 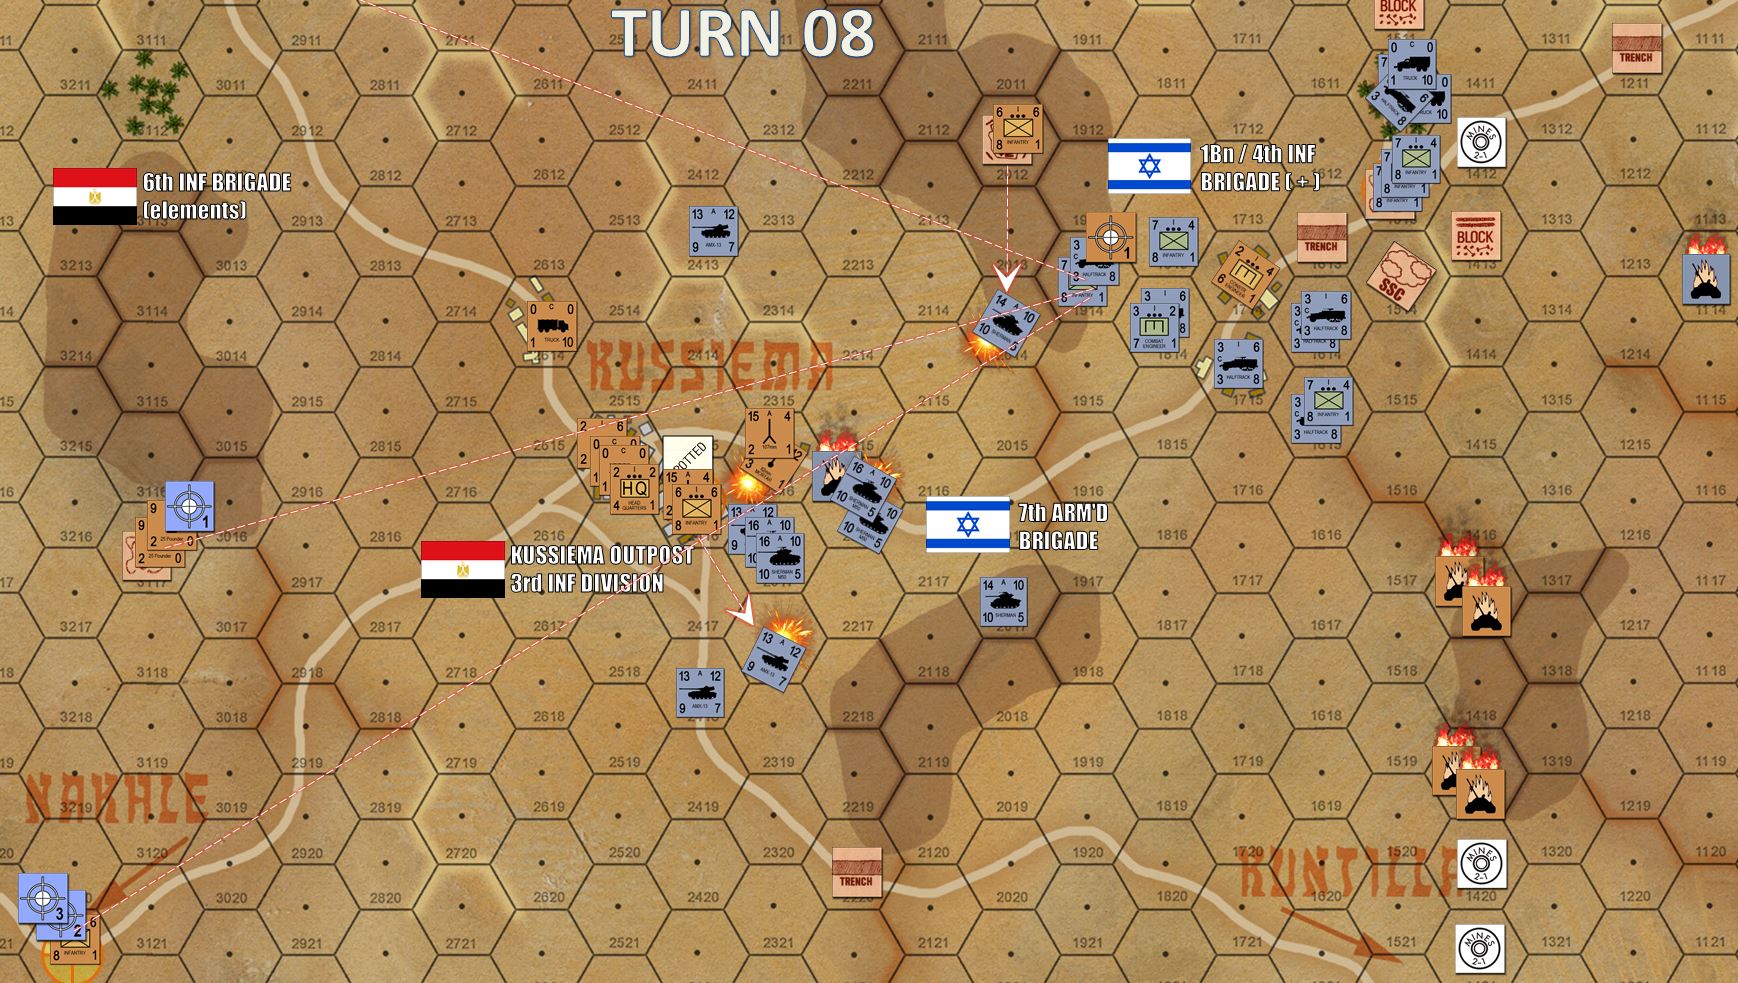 Turn 8: Critical development here, Israelis now have eyes on the ridge screening Kussiema itself. Right away they have eyes on the back two objective hexes for off-board Israeli 155mm batteries, including a line of sight on the Egyptian 25-pounders in the backfield.
 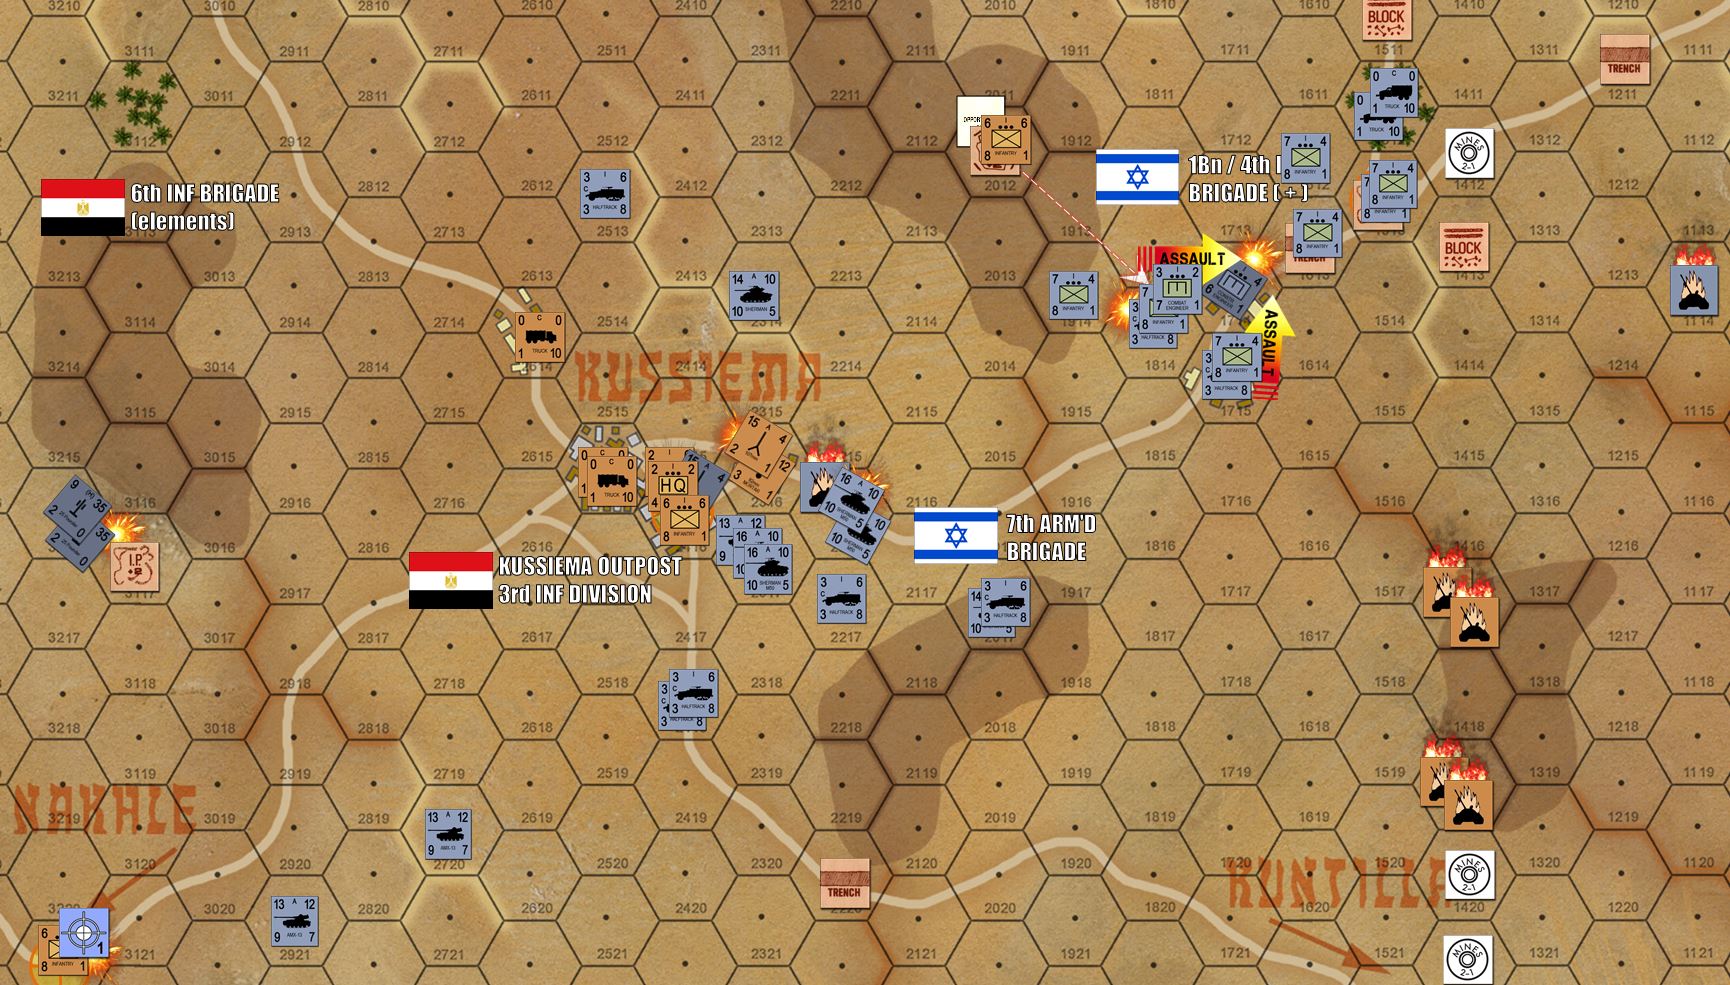 Turn 9: Egyptian artillery is toast, victim of Israeli counterbattery fire from 15 miles away. The objective hex on the Nakhle road has been bombarded as well, but the Egyptian rifle platoon holding his hex has rallied after being pinned. Meanwhile, Israeli tanks are positively leveling Kussiema in their attempts to blast their way in. However, thos Czech 107mm recoilless rifles are knocking out occasional AMX 13 platoons or Israeli halftracks,
  Tun 10: The Israelis actually DO WIN this game on Turn 10. Artillery again pastes the Egyptian rifle platoon on the Nakhle road, allowing Israeli tanks to occupy it for the objective hex. Meanwhile, another mass tank volley smashes what the Egyptians have in the central town hex of Kussiema (this was a VERY tough hex to crack, as the buildings here are concrete and not wood - adding +5 to the DF of the stack and adding +1 to any attacker's fire check (that +1 is a penalty, not a bonus). It doesn't all go the Israelis' way, though. Up north on the Um Katef road, Israeli tanks and halftracks try to overrun the Egyptian infantry platoon there, but their opportunity close assault actually breaks up this attack before it has a chance to go in. Therefore, the Egyptian 17 pounder batter on the northern bypassed ridge has a chance to take a shot and knock down another platoon of Israeli halftracks. Total Israeli losses are shown at the upper right. Definitely a lot worse, almost 30% of the entire force, but we did show that the Israelis CAN win this game in 10 turns.
 So is the game balanced? Eh … technically yes. I mean, I’ve been playing The Arab Israeli Wars on and off for almost 30 years, and I designed this scenario, and I played it once already, and I got some very hot rolls for the Israelis. And even with all those advantages, I barely got the required 4 objective hexes in 10 turns.
So honestly, against players of equal experience, I would probably give the Israelis 12 turns instead of 10. Maybe a few additional IPs for the Egyptians.
But all in all, this is a solid design. Ready for the portfolio! 😀
Arab-Israeli Wars - 1956 Sinai War
Just a quick battle report for a Weekend Web Wargame between myself and community member @Damon. Using Avalon Hill’s The Arab Israeli Wars, we tried a home-built scenario depicting the opening day of Israel’s ground offensive of the 1956 Sinai War.
Using web conferencing and shared desktop, we were able to play across the ocean in real time, with each player moving their own pieces and always seeing the same board.
The Arab Israeli Wars is a command-tactical level game, where each piece is not an individual but a unit. This allows wargames of the proper scale, ranges, timescales, and “tactical geometries” – without playing on a golf course or a tennis court. 😀
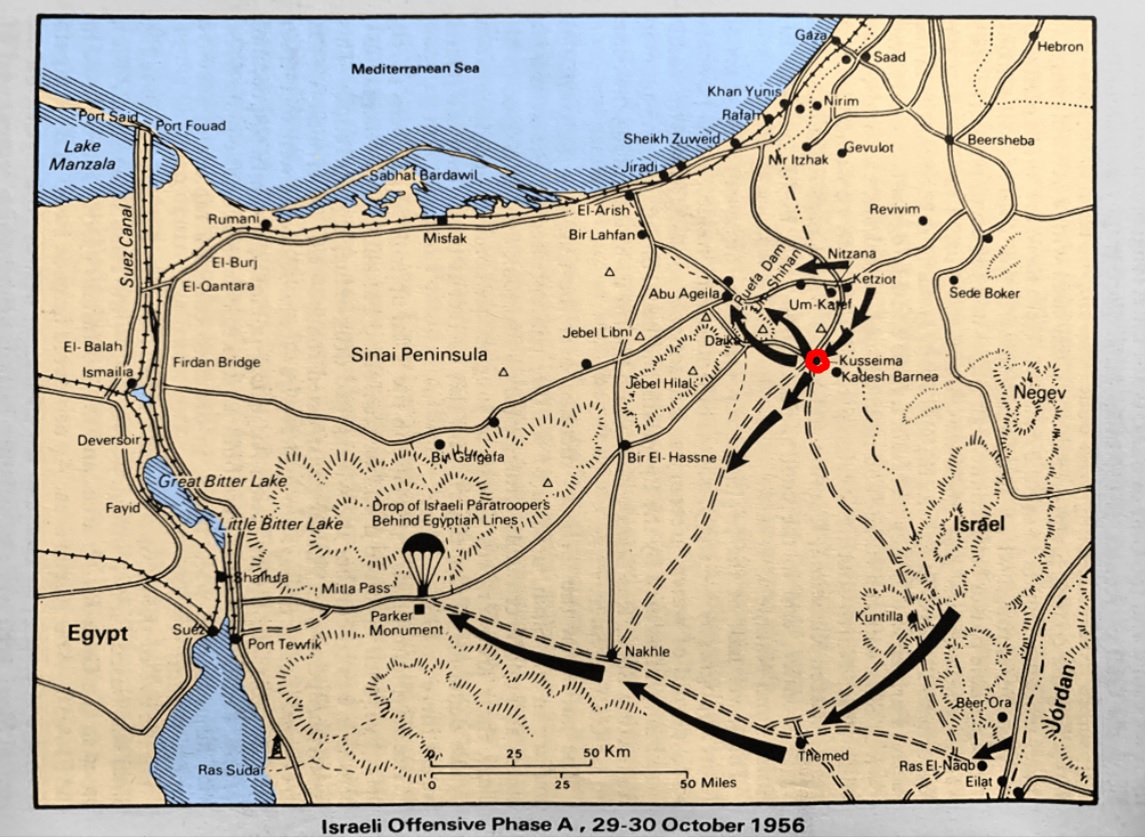 Some very quick background, showing the overall thrusts of the largest Israeli series of offensives at the outset of the 1956 War. The main assualt launched by 10th Brigade is breaking down to the north. The "supporting flank attack" of 4th Brigade is having more success in the south. So now high command has thrown in the 7th Armored Brigade to support, and the 4th Brigade's assault is now the main attack!
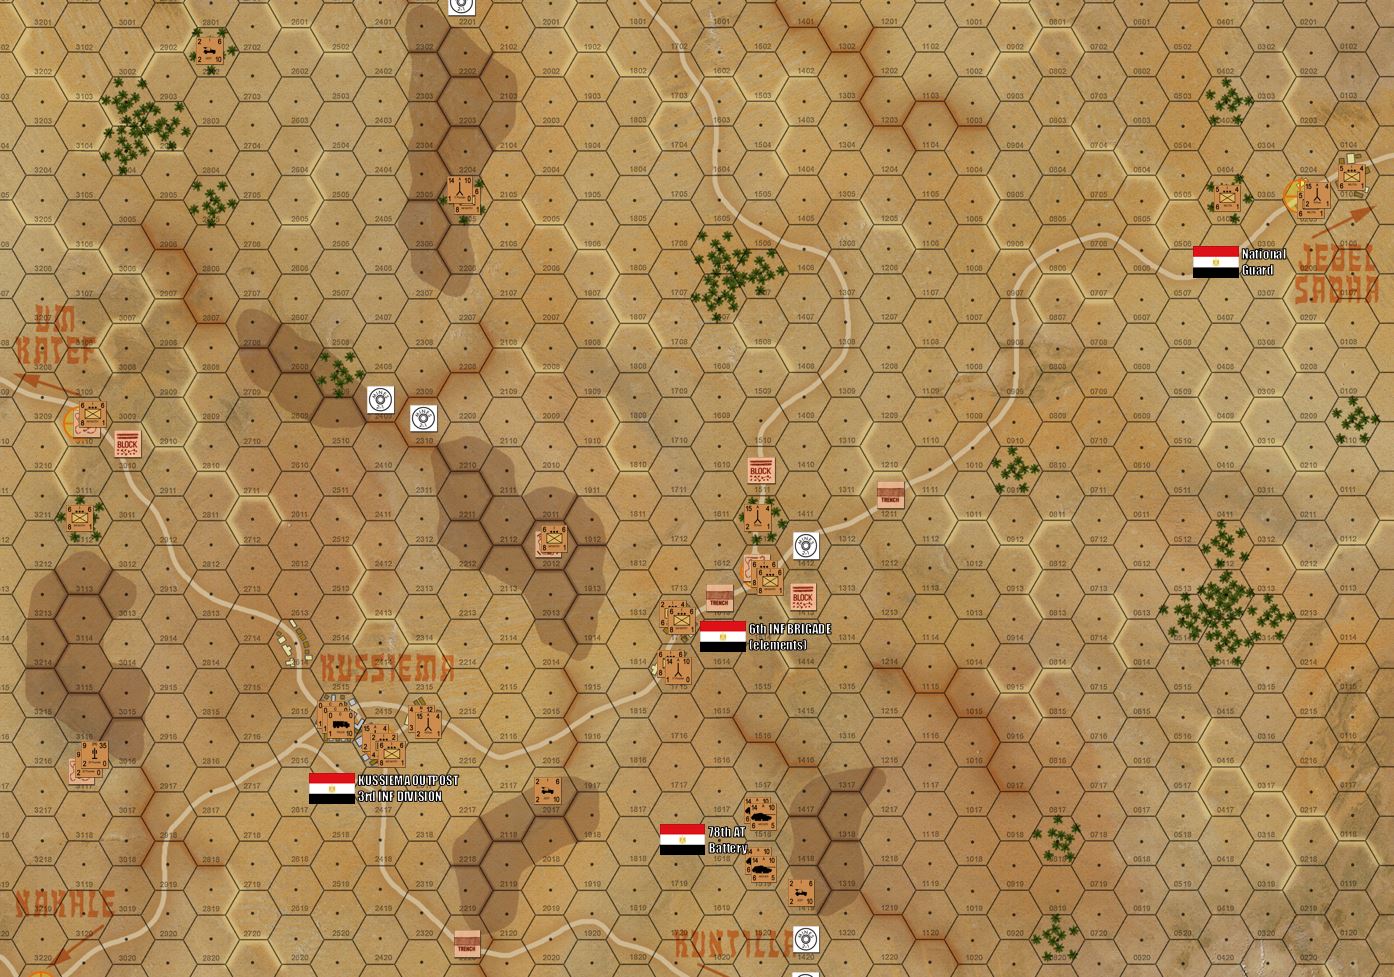 Here is the whole map, with elements of the Egyptian 6th Brigade / 3rd Division set up in defense of the roads leading from border outboast of Jebel Sabah, through Kussiema, then around to the flank and rear of the main Egyptian positions in this area like Abu Agheila and Um Katef. This battle at Kussiema is important because the it will allow flanking attacks on Abu Agheila and Um Katef. These main positions must be broken and these roads to the west opened in order for Israeli ground forces to reach paratroopers already dropped at Mitla Pass. SO THERE ARE FIVE OBJECTIVE HEXES marked with yellow "target" icons. Damon's Israelis are tasked to take at least four of them (thus opening at least one of the two roads off the west end of the board) by the end of Turn 10.
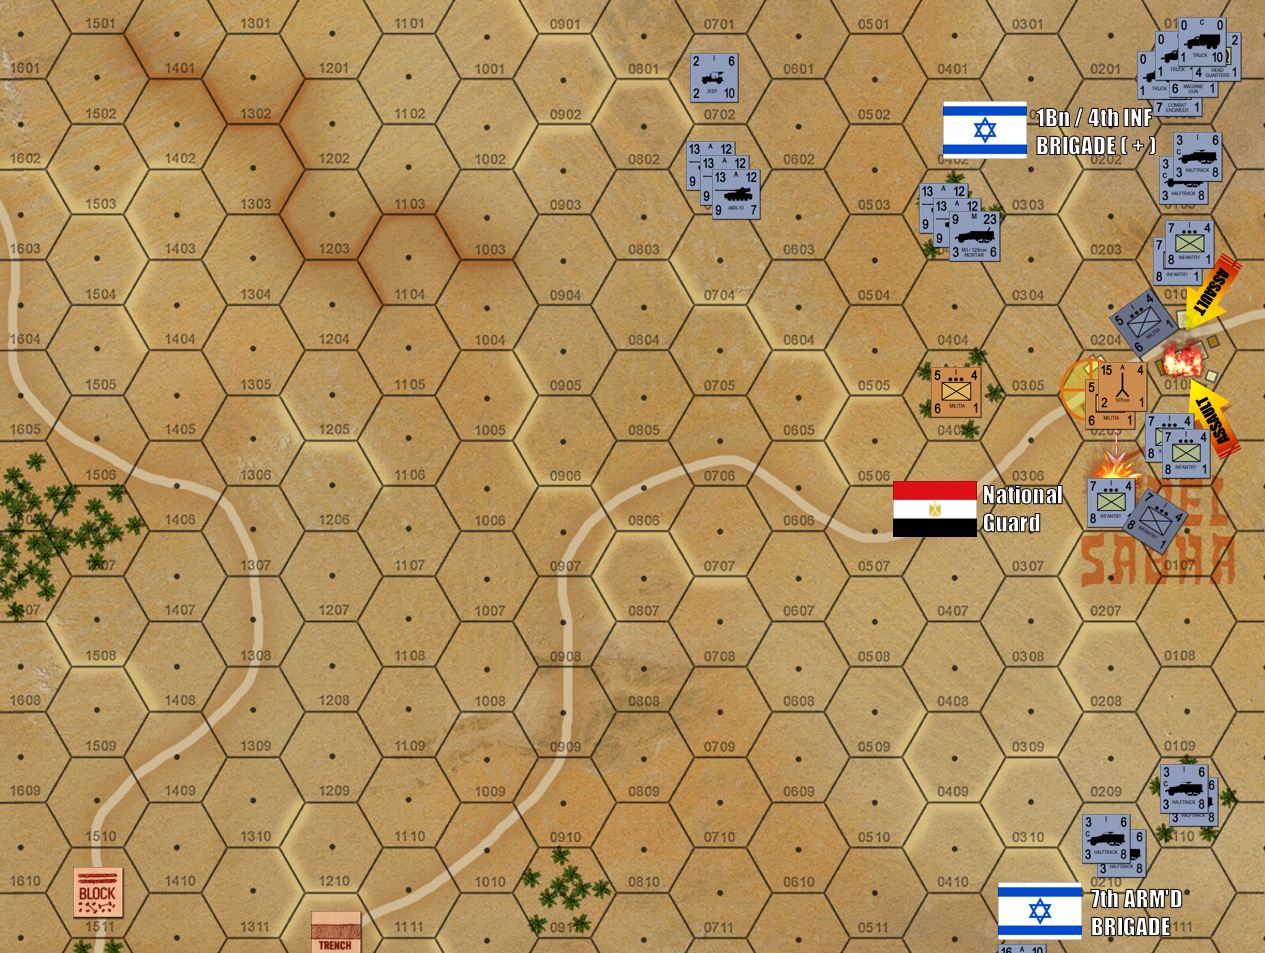 The game begins. Damon comes on from the northeast, immediately assaulting my Egyptian National Guard border boards (with Czech 107mm recoilless rifles) at the border outboast at Jebel Sabha. My counterfire knocks out one platoon of Isreali armored infantry, but that's it. Already the Isrealis have a foothold in the town. No worries, I certainly didn't expect this town to hold, this is a "speed bump" before Damon reaches my actual positions.
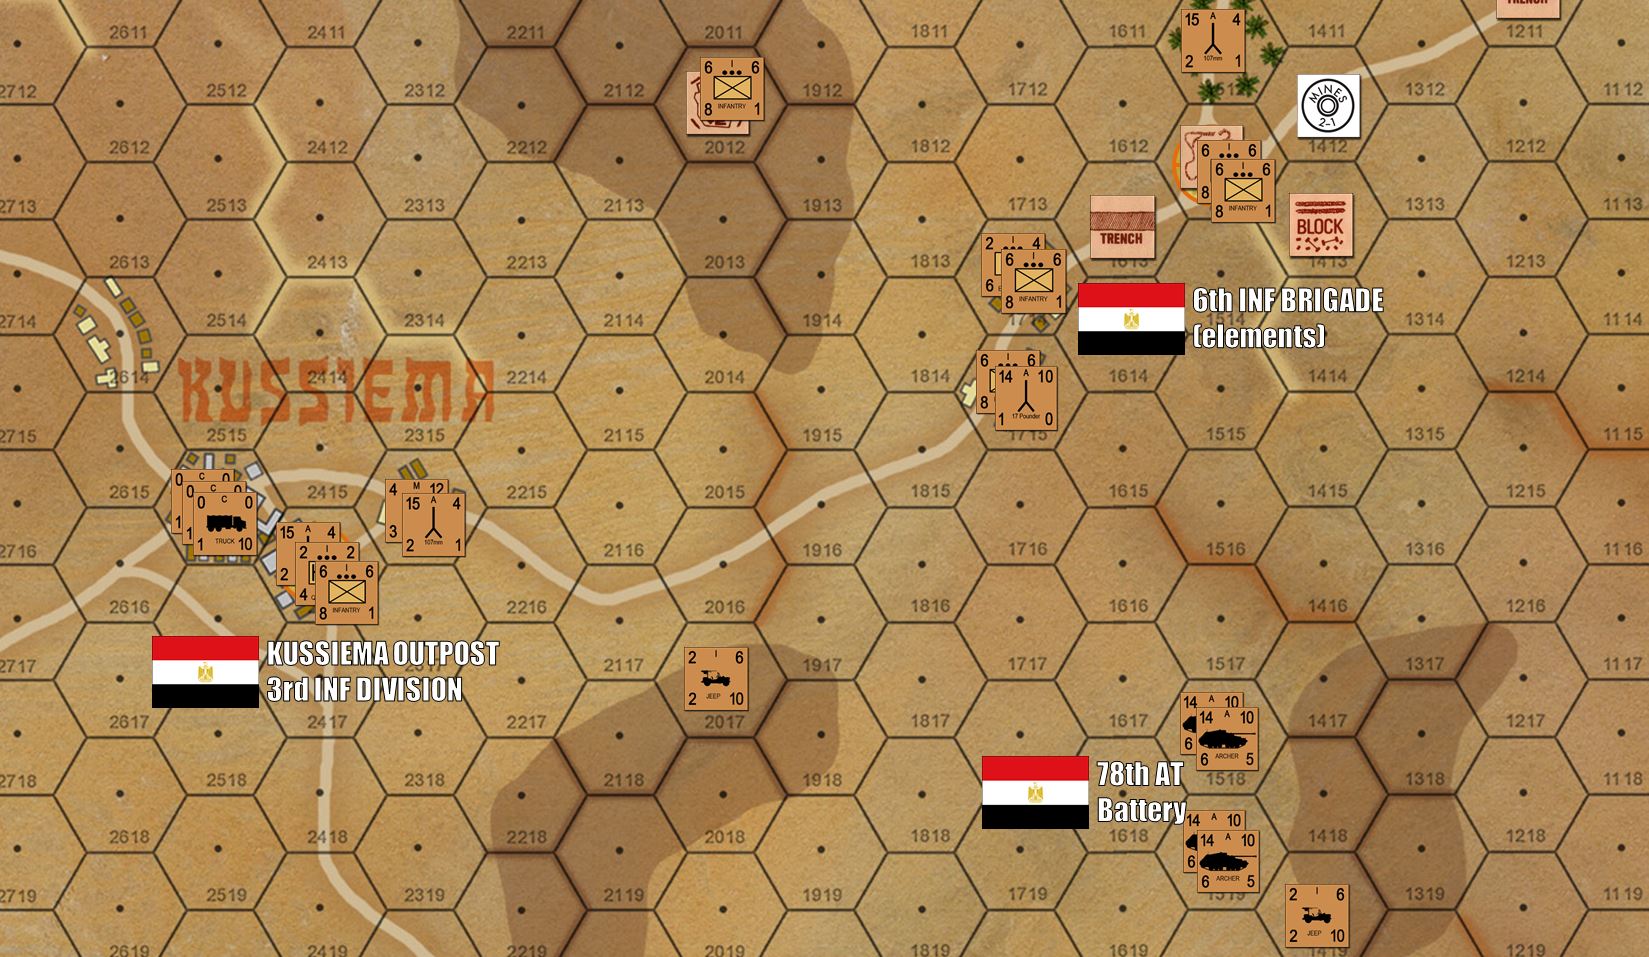
 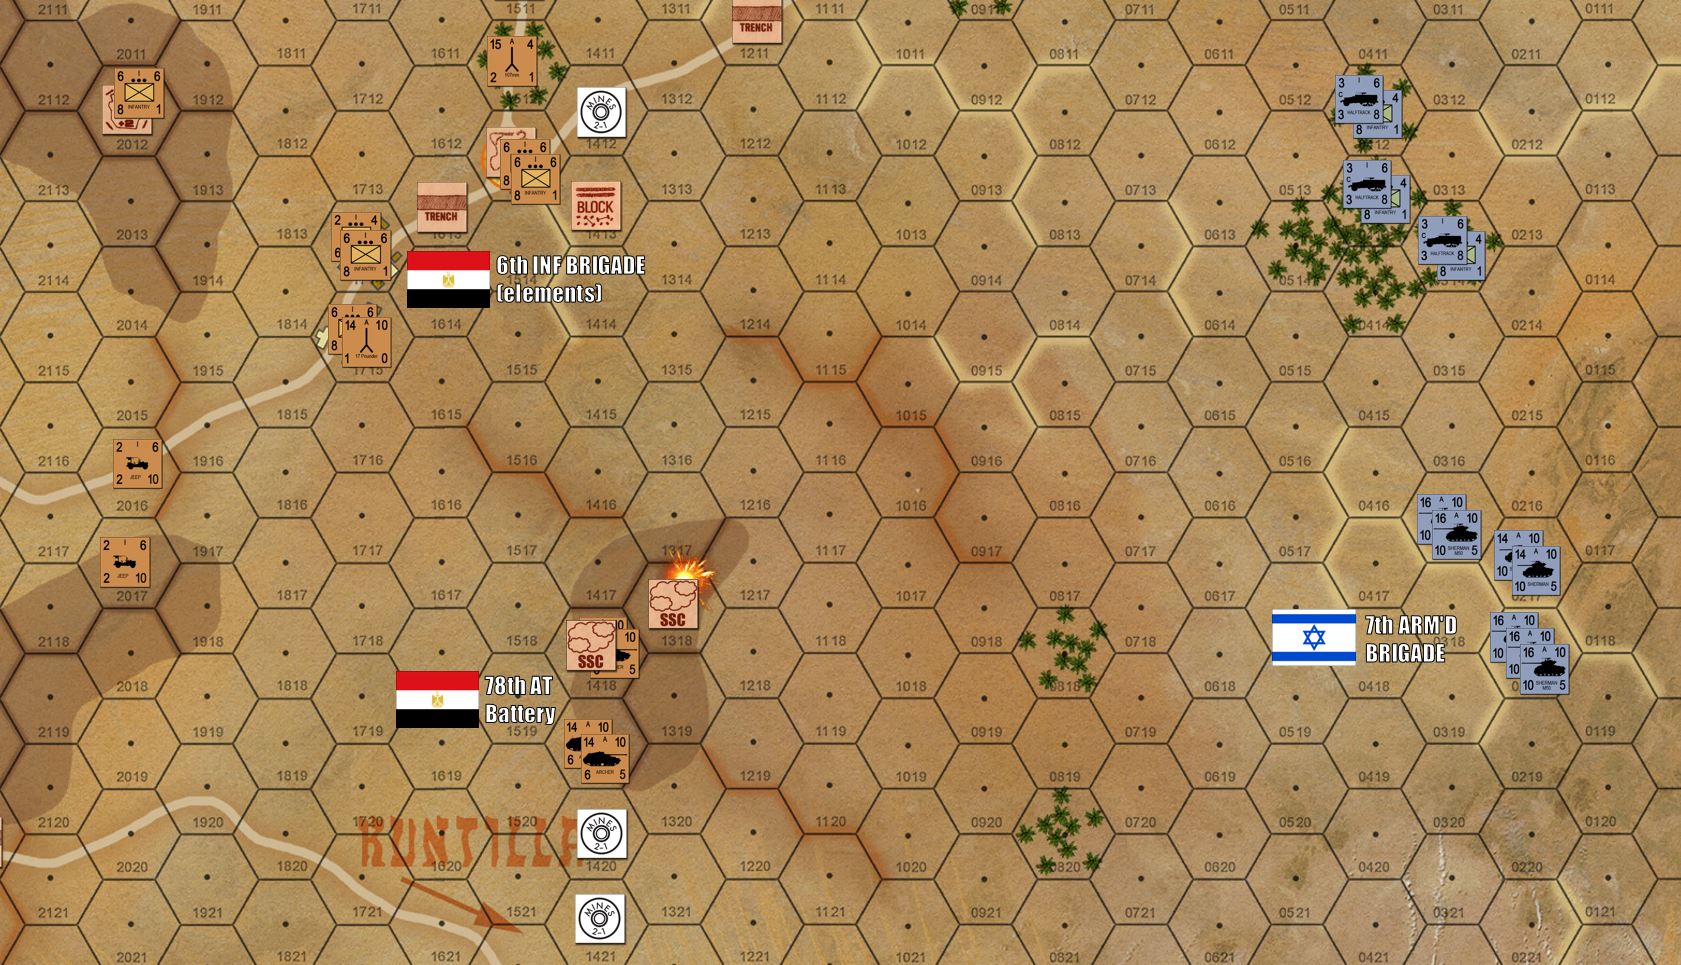 Further south, the M1 and M50 Shermans of 7th Armored are trundling toward my Archer tank destroyers of the 78th AT Artillery Battery.
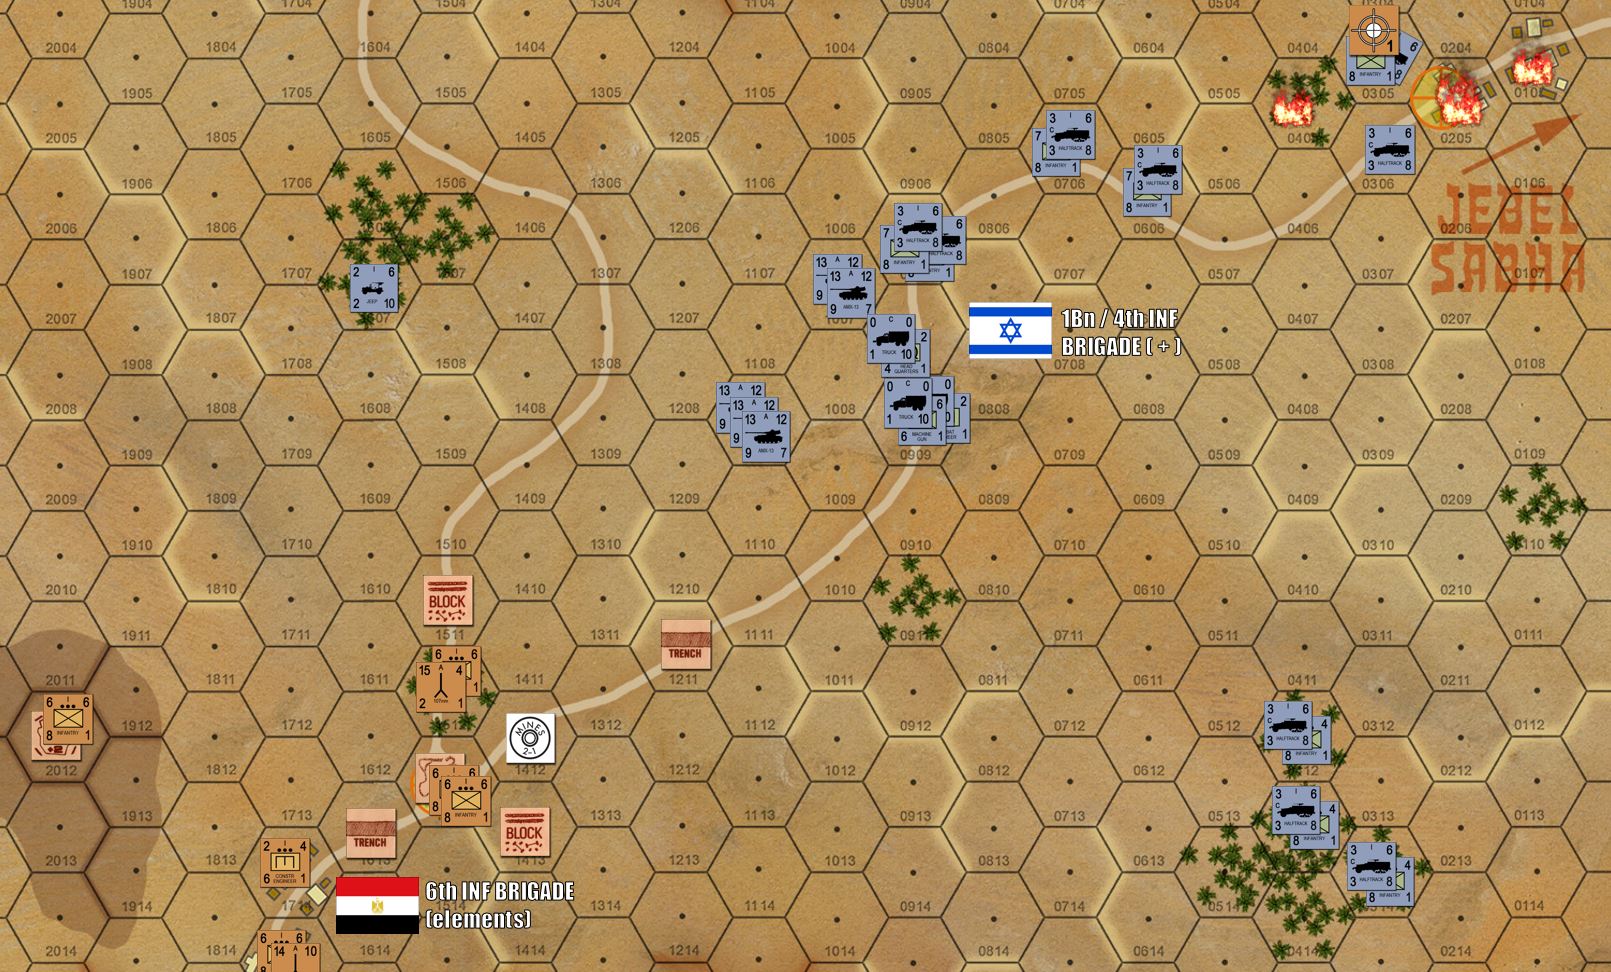 After a couple of turns, actually at least one more turn that I though, Jebel Sabha has fallen and the Isrealis have regrouped for a continued push southwest toward the outskirts of Kussiema. Here, I have 17 pounder AT guns, Egyptian Army infantry (no more National Border Guards), 25 pounder artillery, more Czech 107s, minefields, blocks, improved positions, etc. It's not a terribly big position (and Damon has three batteries of off-board 155mm howitzers which which he can play "finger of God" on the table), but again, for the Egyptians in 1956, it's all about playing for time.
 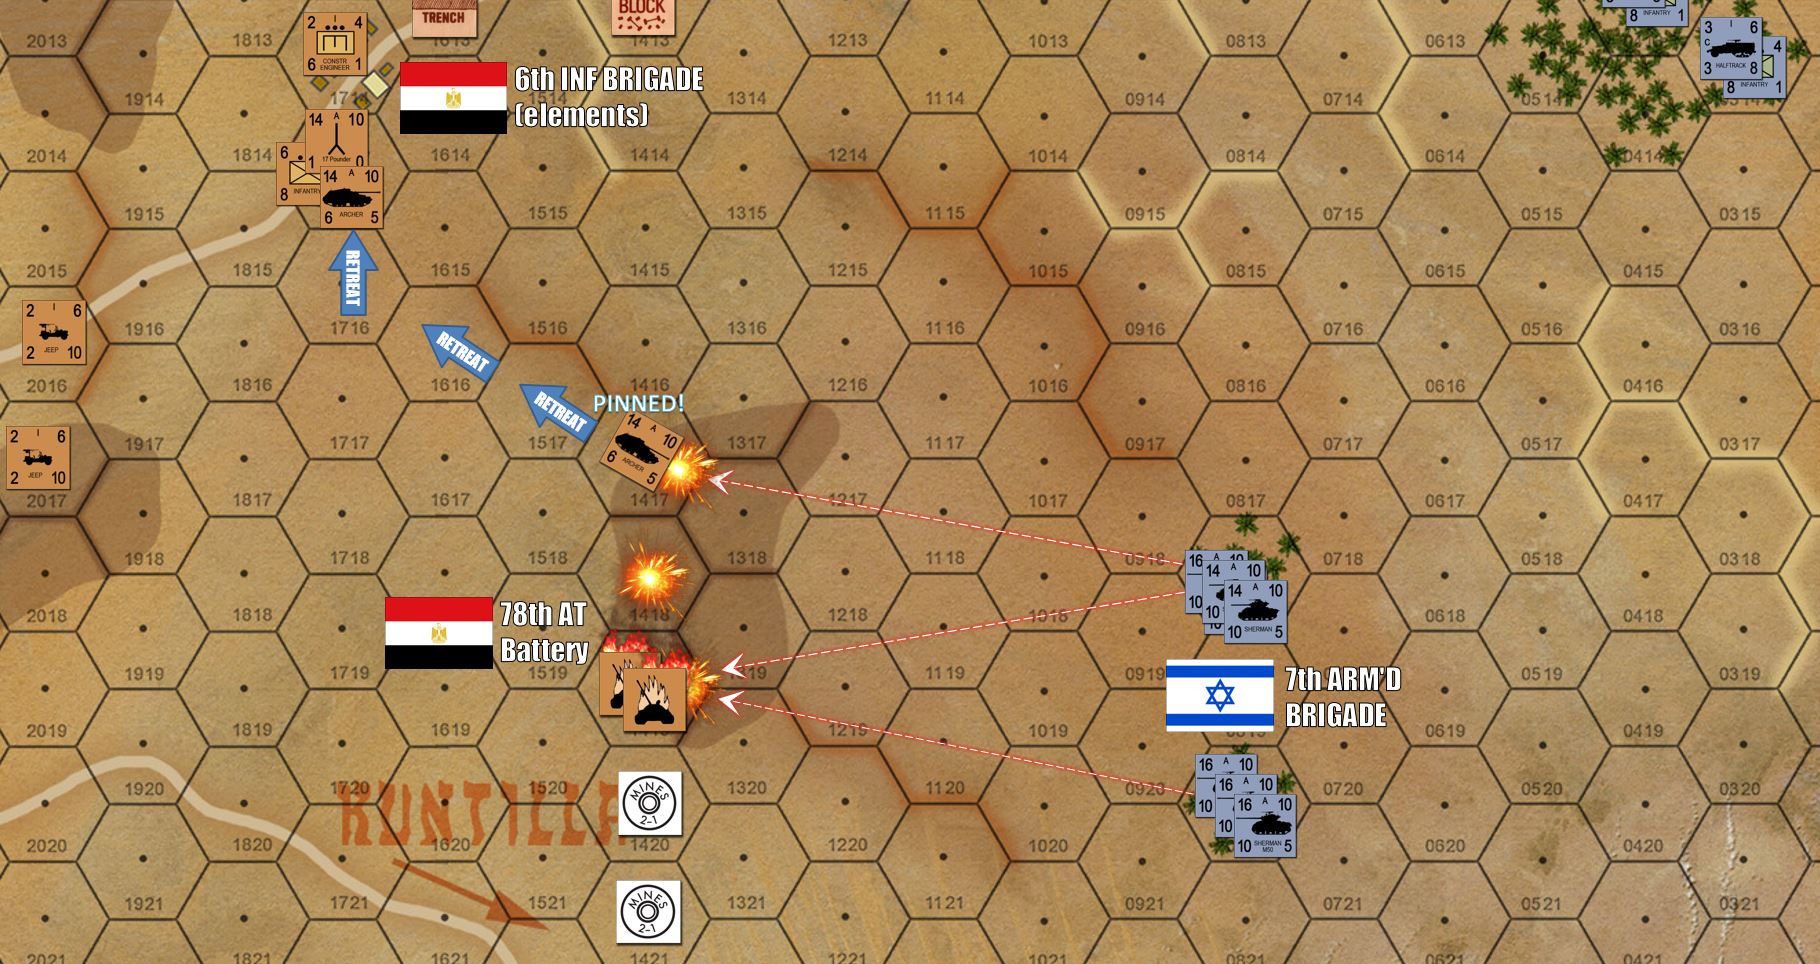 The 7th Armored hesitates for a bit before the 17 pounders of my Archer tank destroyers, deployed hull-down on the reverse slope of that desert ridge. However, a hail of 155mm HE comes down, knocks out two of the Archers platoons, and finally 30 Shermans sally forth to engage the Archers. A third platoon is quickly pinned, and the fourth runs for its like back to eastern Kussiema. Next turn the Shermans will handily mop up this platoon of Archers, leaving fifteen of them well and truly REKKED on the ridge, without the loss of a single Israeli tank. Combined arms, baby!
 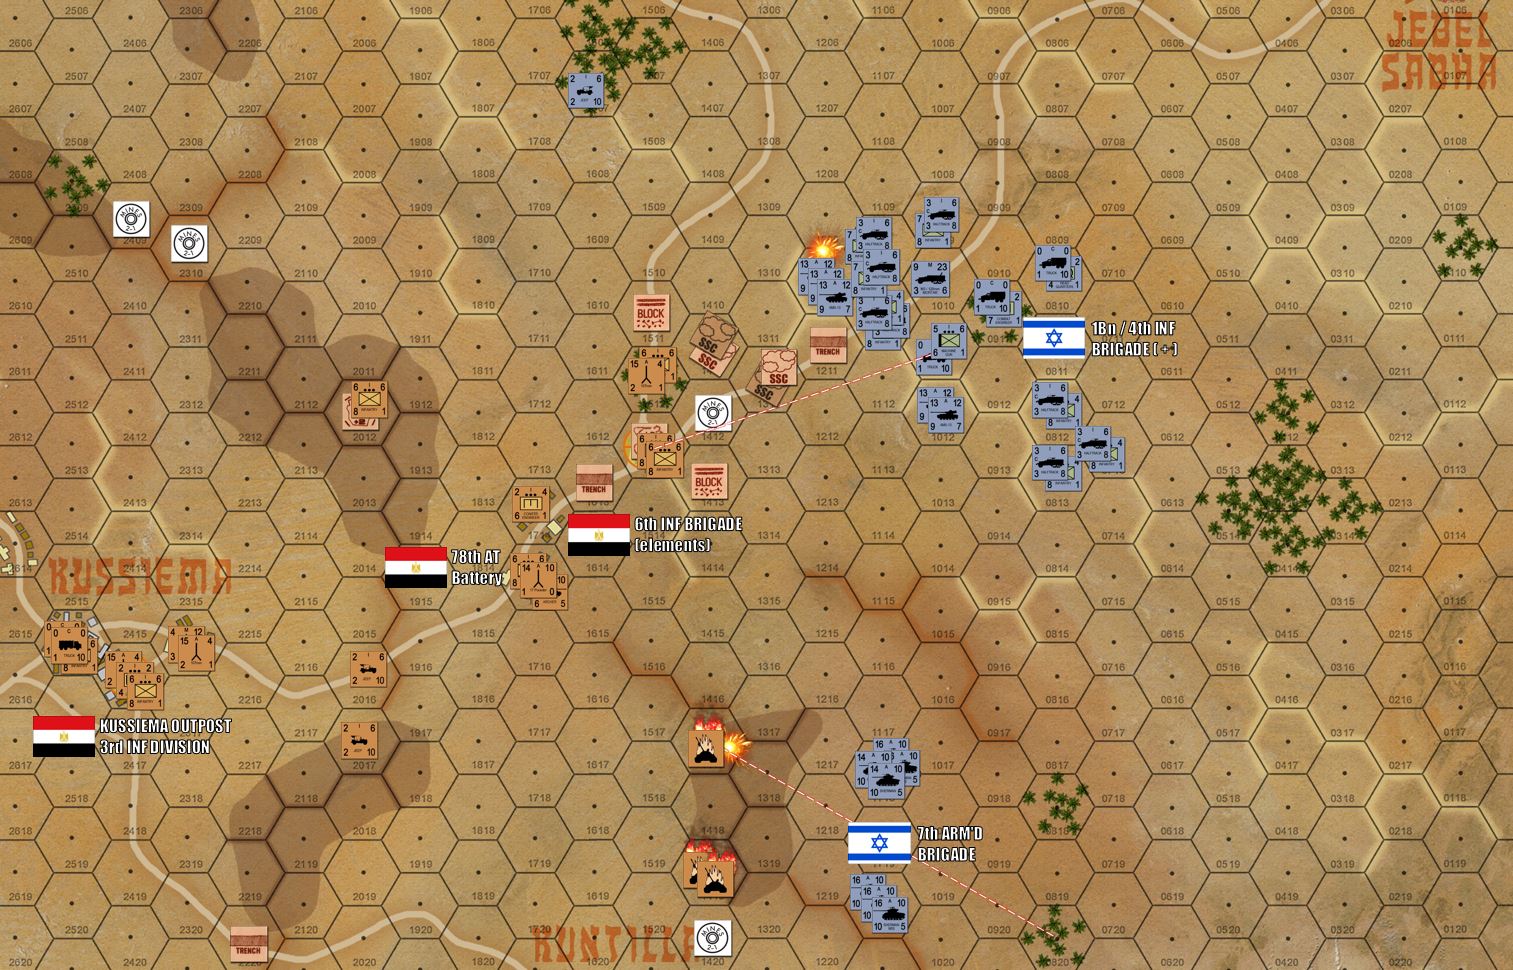 The 7th Armoured begins to apply pressure from the southeast, while 4th Infantry (reinforced with a MG platoon, engineers, and some of the 7th Armored's tanks) comes down from the northeast against 6th Brigade's main line of resistance.
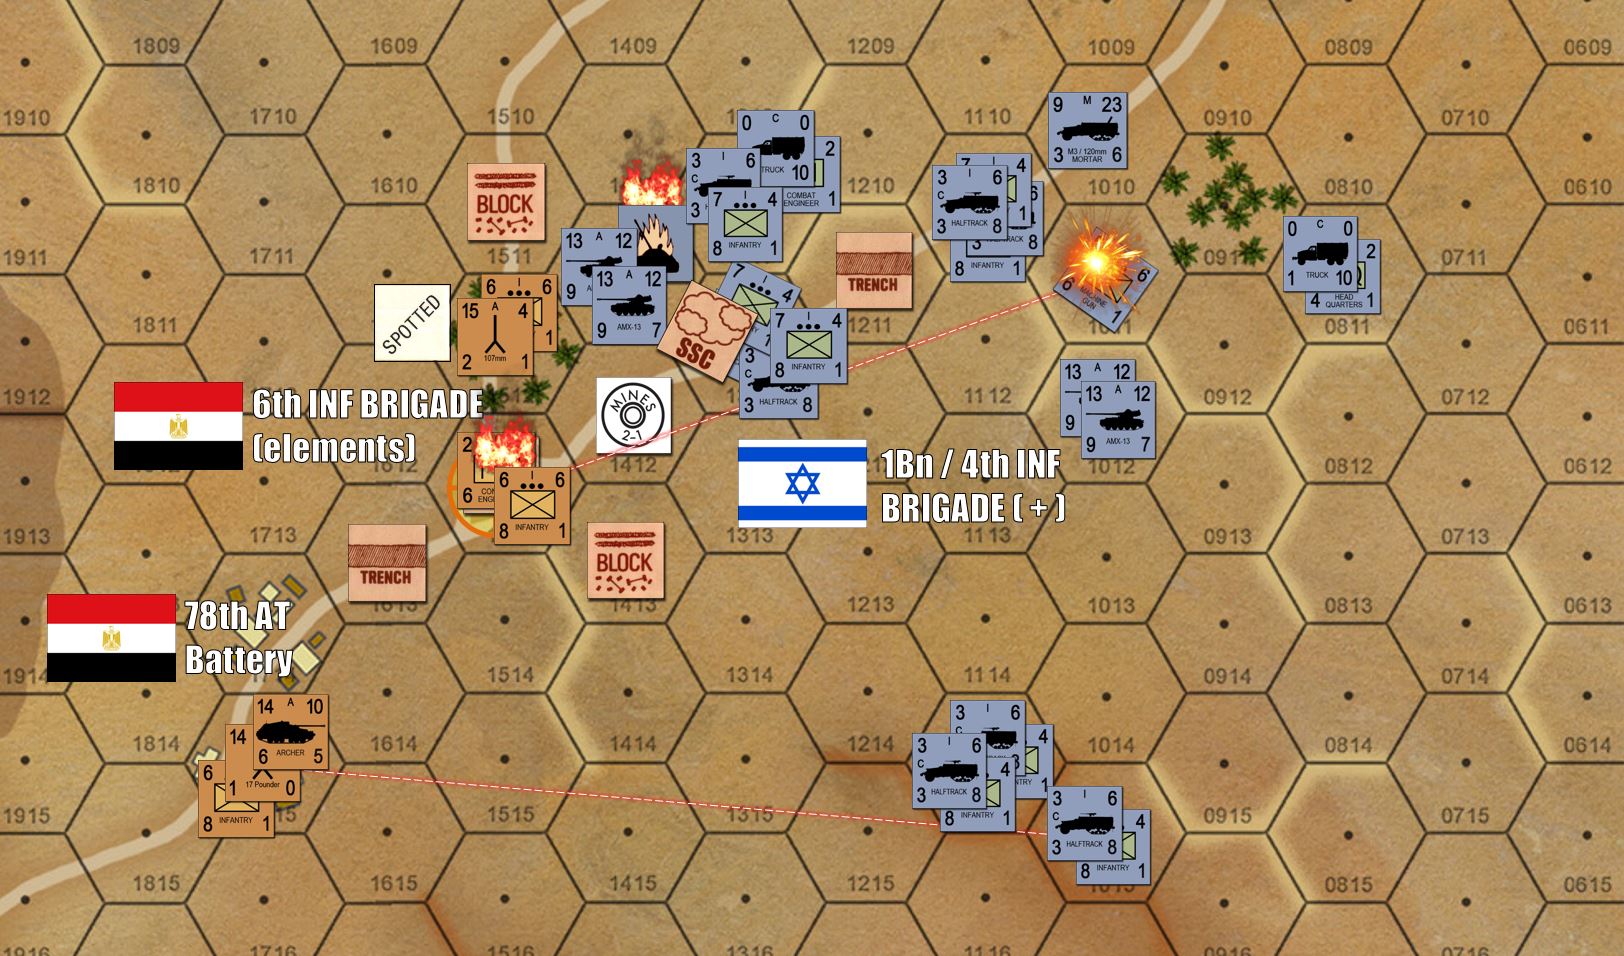 Contact is made and, man, things get messy fast. The Israelis are killing Egyptian infantry platoons well enough, but I have additional security and engineer units stacked up in secondary positions that can take their place, assuming I don't lose the whole objective hex AT ONCE so Damon has a chance to occupy it. I'm losing men fast, but perhaps more importantly, Damon is losing TIME.
 Casualties continue to mount on both sides, probably at a 3:1 ratio between the Egyptians and Israelis. But I'm out of reserves here, and this second objective hex is about to fall. And on top of all that, this position has also been outflanked on both wings by Israeli tanks.
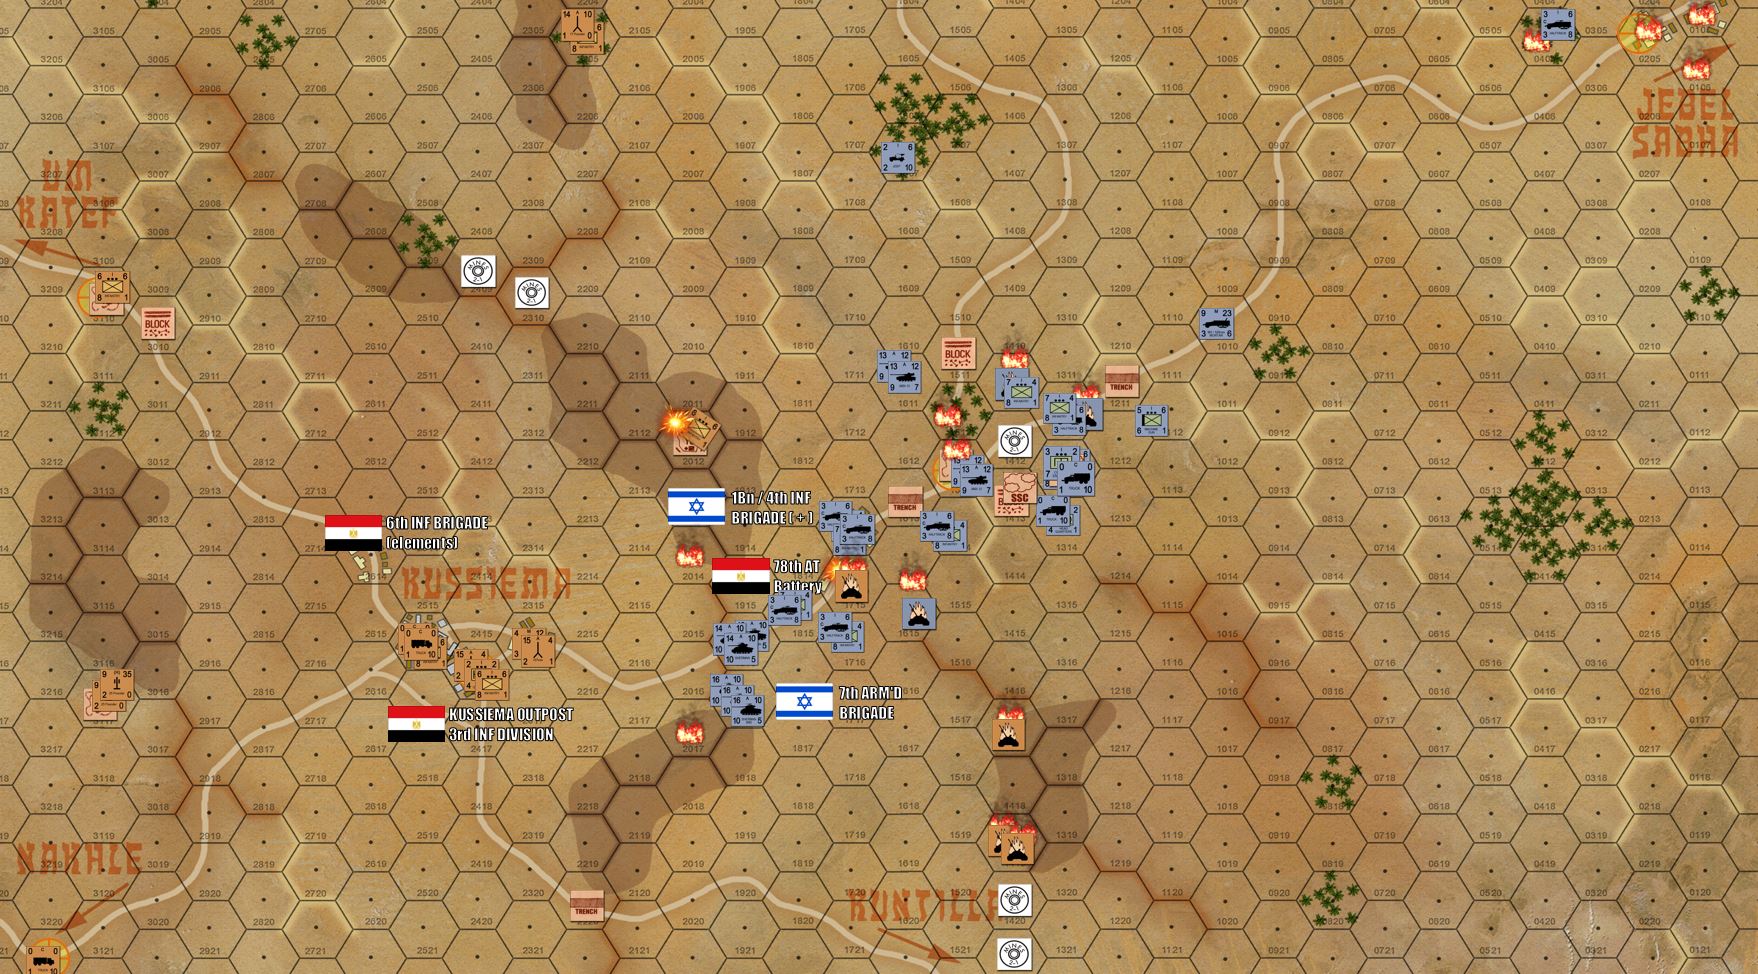 The end of Turn 09, and pretty much the final state of the game. The game is an Egyptian victory, with only two of the required four objective hexes even assaulted, let alone taken.
 So that’s the game. To be honest, I’m going to re-run this solitaire to see if I gave the Israelis enough time. I have a sneaking suspicion the game length should be increased to 12 turns. But even with 12 turns Damon would have not been able to take a third objective hex, much less fourth.
I probably won’t put up a FULL battle report for this solitaire game, but maybe an update.
Meanwhile, if you’re interested in joining in these web weekend wargames, we have people from three continents participating in a regular basis! Just drop me a PM and we’ll add you to the web conference!
Arab-Israeli Wars LIVE in 30 minutes
Israeli Assault on Kussiema – southern shoulder of the Abu Agheila “hedgehog.” October, 1956.
System: Arab-Israeli Wars (Avalon Hill)
Players: @oriskany and @damon
Ping me a PM if you’d like a link to this web conference. 😀 Hang out and chat, or check out a great game in progress!
Getting set for 1956 Arab-Israeli Wars Game
Sunday we have an Arab-Israeli Wars game set up, recreating part of the opening Israeli drive against the southern wing of the Abu Agheila “hedgehog” (Egyptian 6th Brigade / 3rd Infantry Division). This was part of the opening of Operation Kadhesh, undertaken in conjunction with French paratroopers and British Royal Marines at the Suez Canal (Operation Musketeer) in response to Egyptian President Nasser’s nationalization of the Suez Canal.
The game is scheduled live for 5PM GMT / 12 Noon EST between myself and @damon.
Interested in joining in or checking it out, just chatting with some hard-core wargamers? Ping me with a PM and I’ll send a web address for our web conference.
Wargames on the Web
Good afternoon, everyone ~
As usual, I’m sending an announcement / query to anyone who might be interested in either playing in or spectating a live wargaming web conference this weekend (Jan 26-27).
If memory serves, we’ll be running the rest of Andrew’s Eastern Front PanzerBlitz game this weekend (January 26-27).
Meanwhile, we also have:
Options:
Darkstar (anyone who’s interested, please let me know what faction, and what day works better for you).
Valor & Victory Vietnam
Arab Israeli Wars 1956-67-73
Panzer Leader (WW2 Eastern, Western, or Desert front)
Saturday 5PM GMT
Sunday 5PM GMT
Summary:
The more information I get from everyone the better on how I can plan the weekend. Also, please remember that I have to build these scenarios and send out the files, so if you are interested in trying something out, welcome aboard and let me know as soon as you can!
Brucelea v. Oriskany - PanzerBlitz Ostfront 1943 (p2)
Okay, we’re back for Part 02 of this battle between myself (playing a kampfgruppe of Grossdeutschland Division – 500 men and 70 tanks) against the main body of 12th Tank Corps / 3rd Tank Army (1250+ men, 70 tanks) played by Andrew (@brucelea)
Background and setting details are all below. Basically, Andrew’s set up his battalion of a Soviet motorized rifle brigade on the table on defense, now I have to assault with elements of Grossdeutschland Division (to include II. Bn, PzRgt “GD,” II. Bn, Fusilier Rgt “GD,” PzJgAbt and StgPzAbtg “GD,” and of course 13. Kompanie, PzRgt “GD,” some of the first Tigers to see action in this part of the war.
There are five objective hexes on the table. I have ten turns to take at least three of them. I took the first on the fly, but the second is heavily defended. I’ve spent several turns carefully setting up an all-out frontal offensive (really my only way into this objective), so now we’ll see how it goes.
 First up, my supporting attack to the south gets underway when Andrew moves from T-60A light tanks and T-34/c medium tanks up against my PzKpfw IVs of II. Bn/PzRgt GD, and StuG-IIIs of StPzAbtg GD. The KV-1s are too far behind to support. Honestly, I might have held back on those light and medium tanks until the heavy tanks could close the distance and support. So I have 10 StuGs (2 batteries) pin down the T-34s in the open, while three platoons of tanks (PzIVGs and PzIIIJs) take out the T-34s in the woods.
 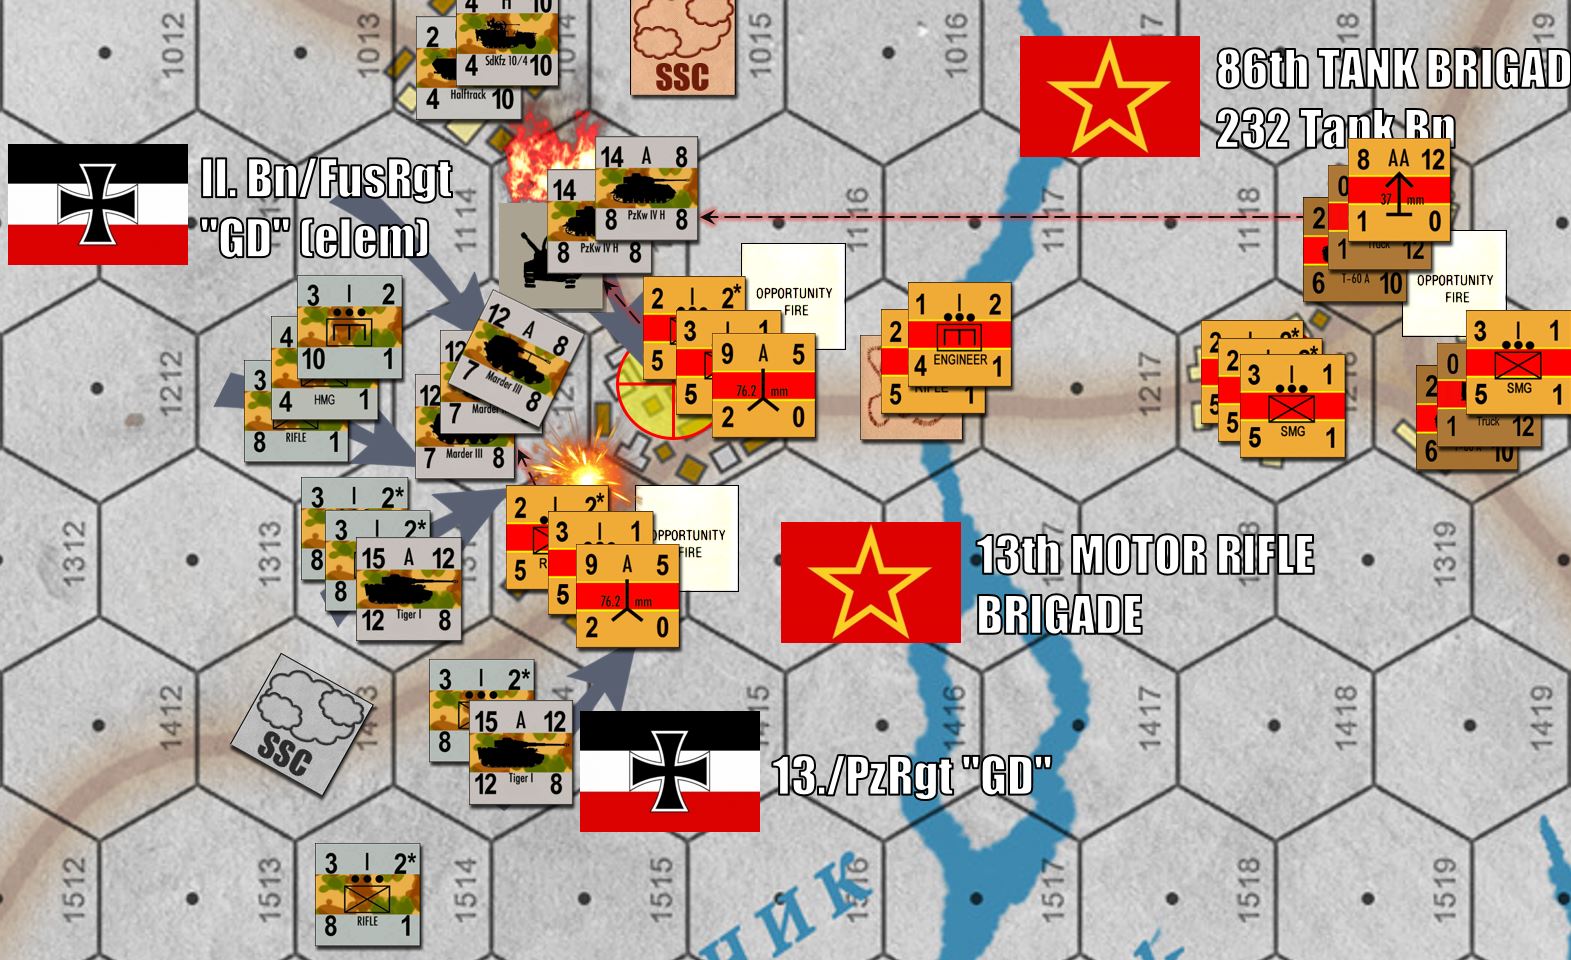 Finally, the assault in the center gets started on the town of Vll'khuvatka. I roll in with tanks from the north (PzKpfw IVs) and south (Tigers), using the shape of the town to screen each attack from at least some of Andrew's 76.2mm antitank batteries (9-A-5). The only unit exposed to a crossfire of both batteries are the Marders in the center, selected because, well, they're a little more expendable. They also have a lower defense than my tanks, so I'm hoping Andrew will fire at them instead of my tanks. Andrew doesn't entirely take the bait, however, pinning down one platoon of Marder tank destroyers but also KILLING one platoon of PzKpfw IVGs in the north. In this attack, the 76.2mm AT battery was assisted by Soviet 37mm AA guns firing from under cover across the Orchyk River.
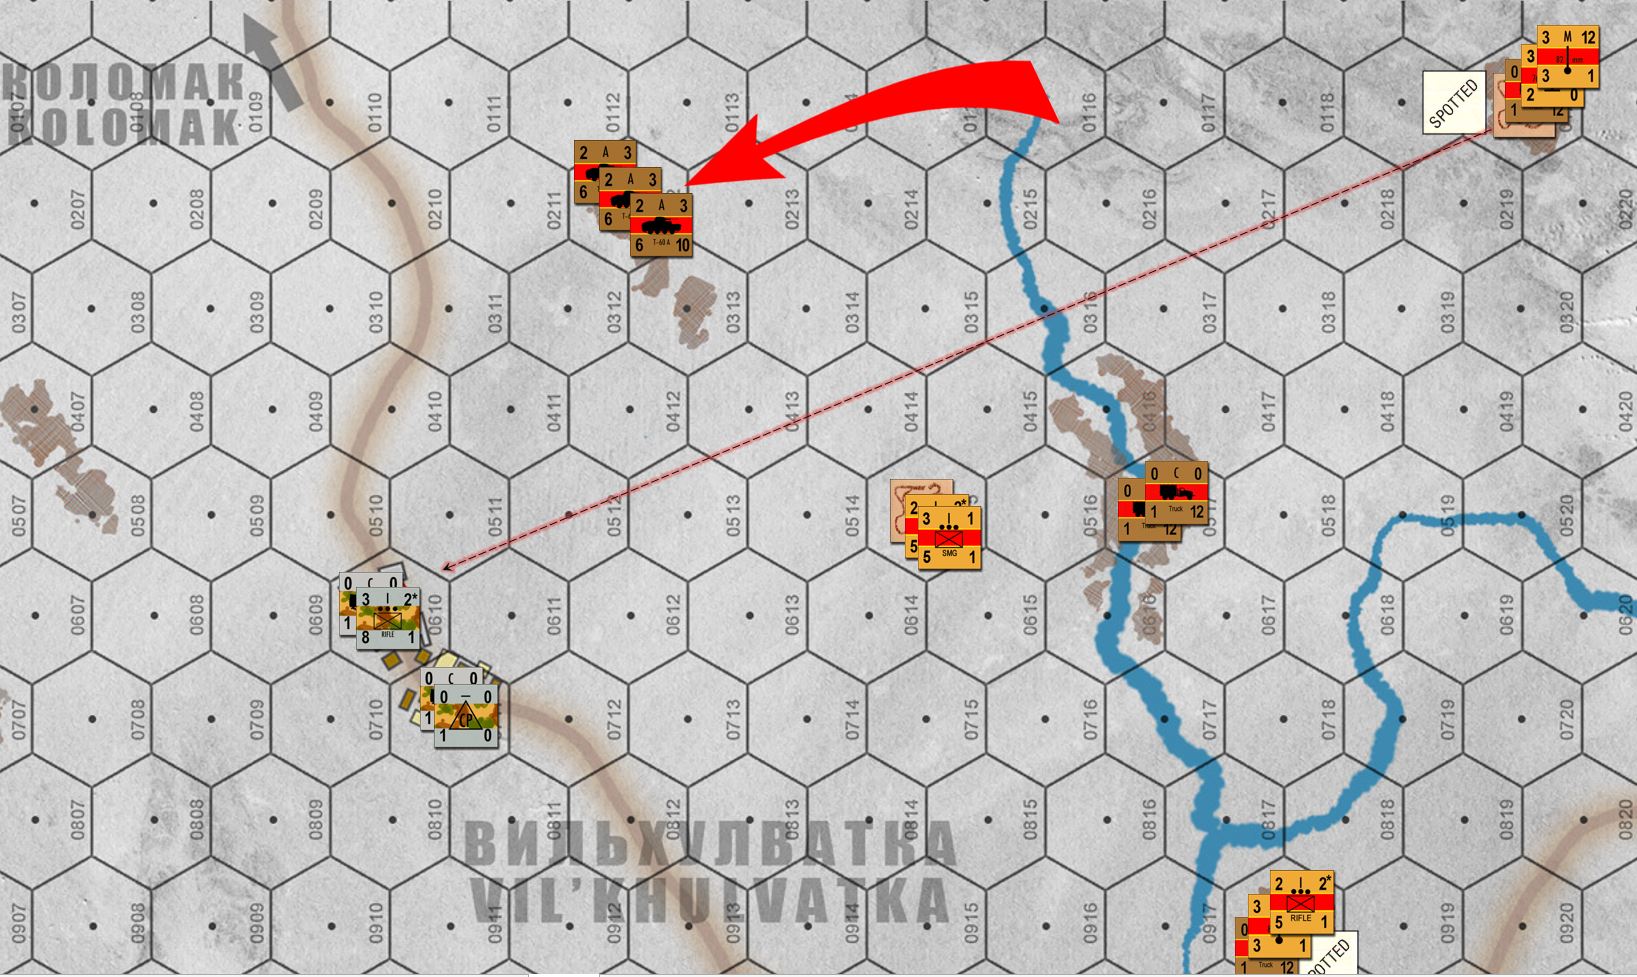 Andrew is also getting bolt up north, where fifteen T-60A light tanks are speeding across the steppe to threaten the objective hex I've previously taken in Vil'khuvatka. There's a lot of movement in this scenario, I should state that each hex measures 150 meters across (covering the area of a say ... two FoW tables).
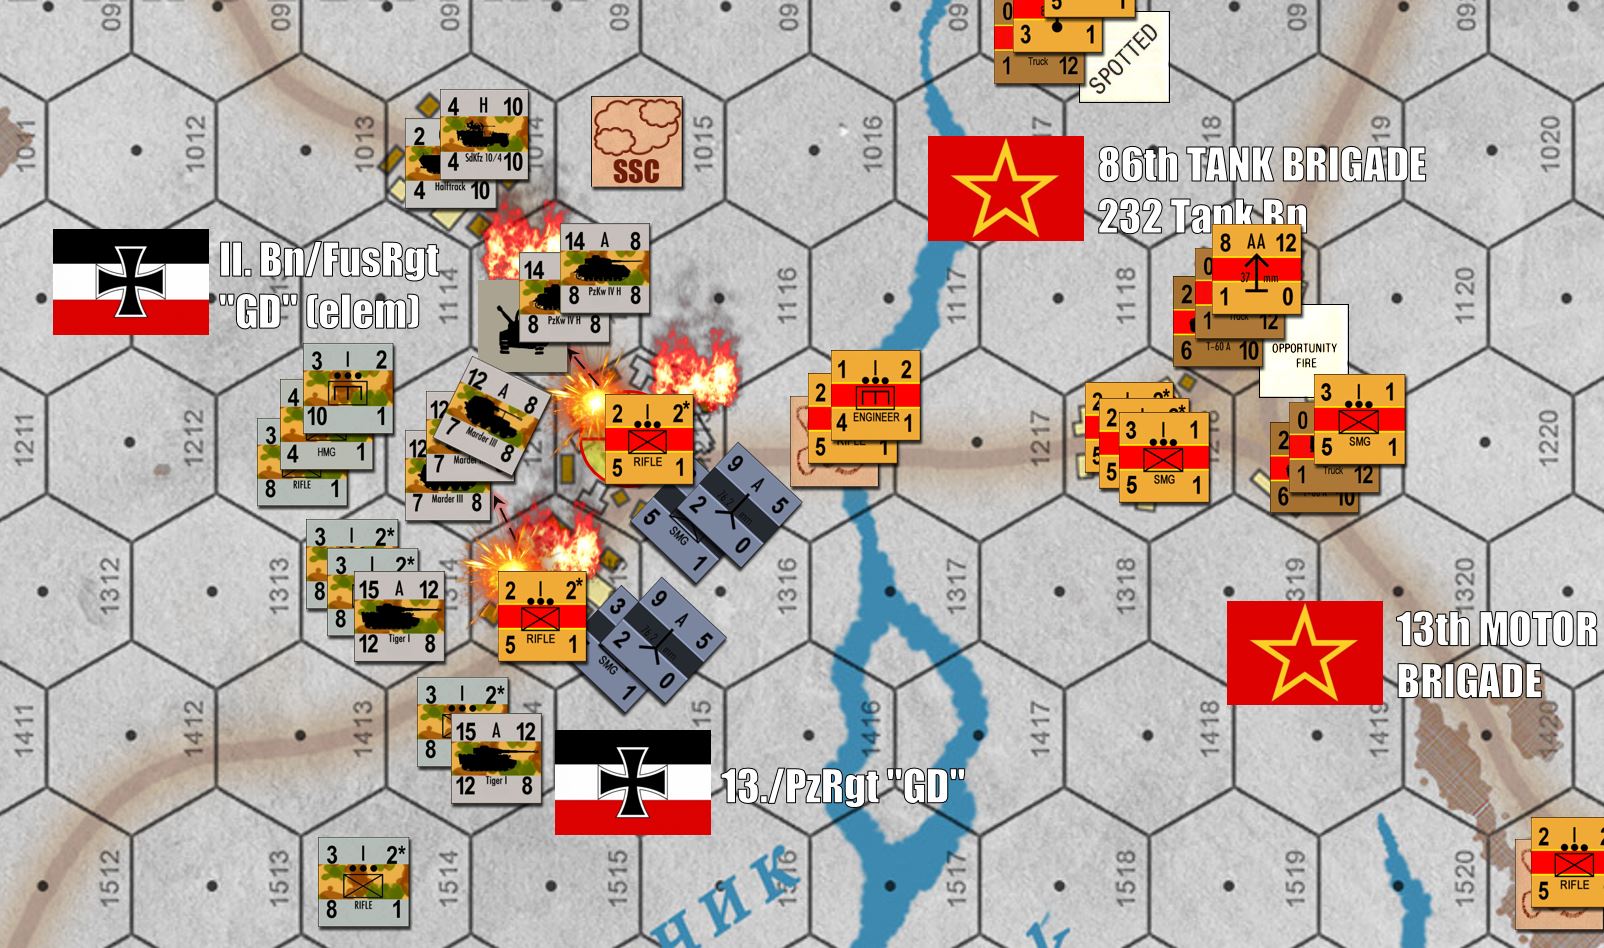 Now that I've closed the distance on Turn 3 and taken my lumps, on Turn 4 I can open fire point-blank into the town of Vilk'huvatka. Tigers, Mark IVs, Marders, halftrack MGs and 2.0cm FlaK autocannons all target AT guns first, along with Soviet SMG platoons to reduce the risk of close assault in the streets and approaches of that town. I won't lie, I get two pretty good rolls here, killing both AT batteries and SMG platoons.
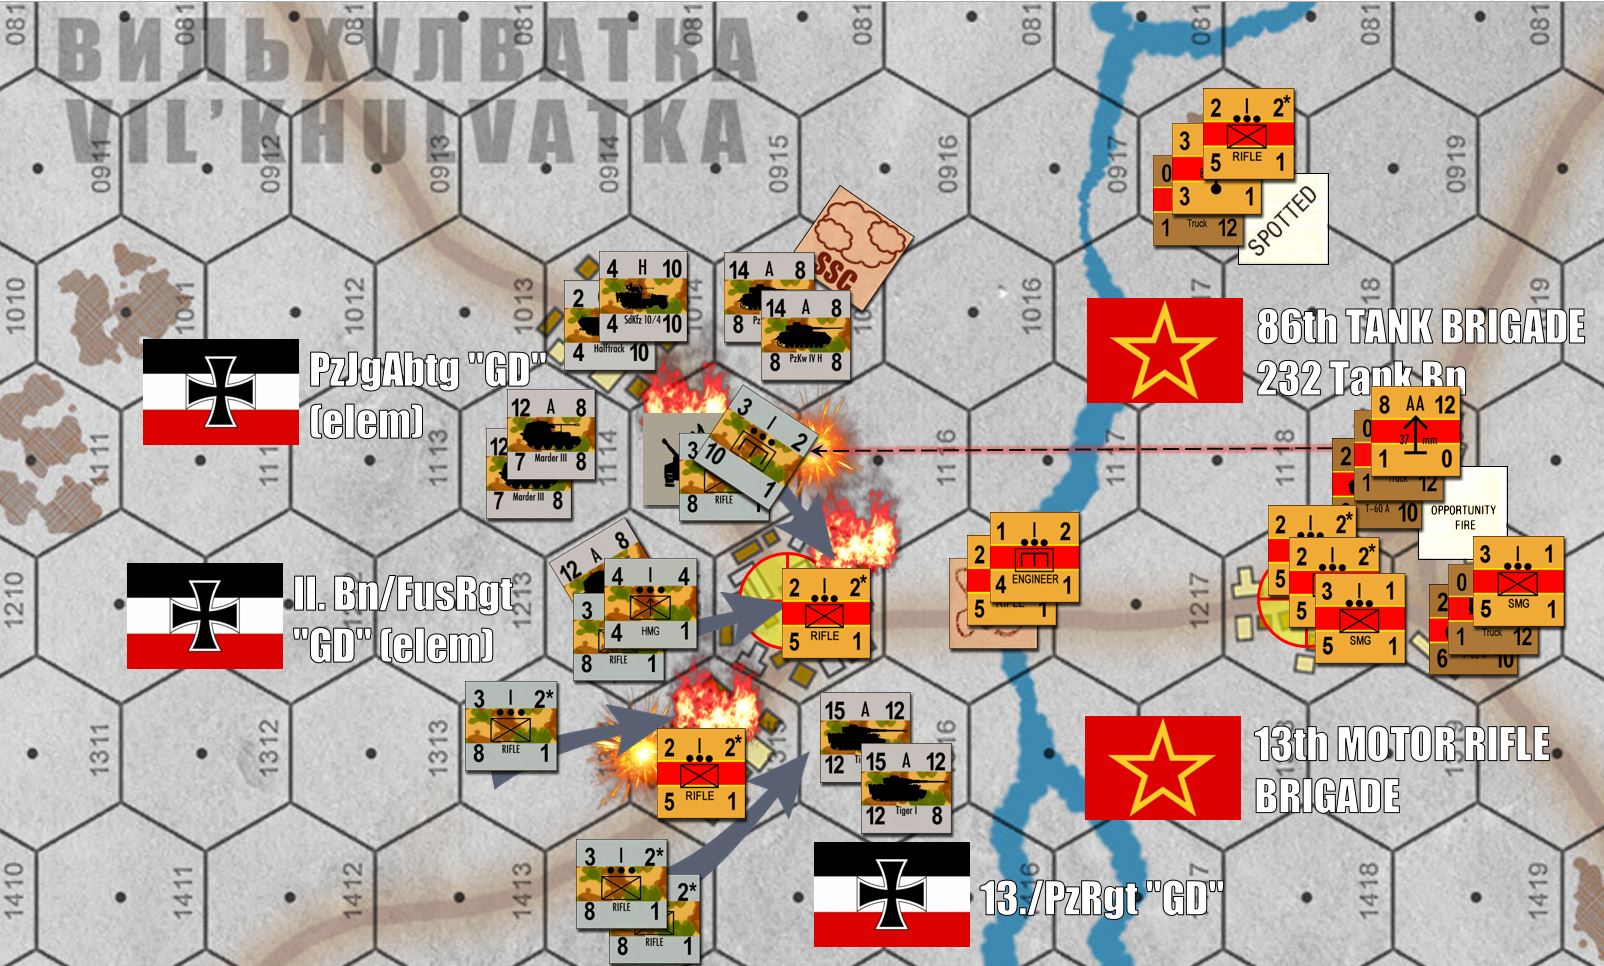 Now starts my movement phase. Using split move and fire (a little like "shoot & scoot" in other systems), my German TANKS only - see note below - can shift out of the way for German infantry, HMGs, and engineers to rush in for close assault Of course such movement is subject to Soviet opportunity fire, and Andrew makes damned sure to pin down the German "pionier" engineers (they would lend a pretty substantial bonus to any Close Assault Tactics - CAT). As a result, my infantry close assault more or less fails, only dispersing the remaining Soviet rifle platoons in the target hexes, not killing them outright. NOTE NOTE NOTE --- > Okay, in writing this battle report and reviewing the maps in detail, I realize I unintentionally cheated my ass off here. Those Marders are not turreted AFVs, and so do NOT get the Split-Move-and-Fire rule. This means I could NOT vacate that central assault hex, which means the Soviet rifle platoon in the northern objective hex at Vil'khuvatka would NOT have been dispersed. I don't think I would have made THAT much a difference since I failed to take the hex anyway, but I will make the correction and apply it to future turns.
 In the south, Andrew's KVs close up behind the remaining T-34s and T-60As and together they make a mad rush at my tanks. Now I've gotten a little too aggressive with the StuGs here, pushing forward in that river gully. So they CAN'T help with opportunity fire (they can't see anything down in that ravine, just as they cannot be seen in turn). This leaves the PzKpfw IIIs and IVs on their own. No worries, with my opportunity fire I can easily disperse the Soviet tank platoons before they hit me in an overrun. EXCEPT I ROLL A 6! (low rolls are better, so a 6 is the worst possible roll). The opportunity fire whiffs and Andrew BARELY misses killing the whole stack of German tanks. Even if they all rally (Grossdeutschland is an elite unit, they have Morale "A" in this scenario so they probably will), they'll still be clobbered again point-blank by the T-34s. PRO TIP when playing against the Soviets. NEVER EVER EVER let them get this close! At less than 150 meters, a 76.2mm T-34 hits almost as hard as a Tiger.
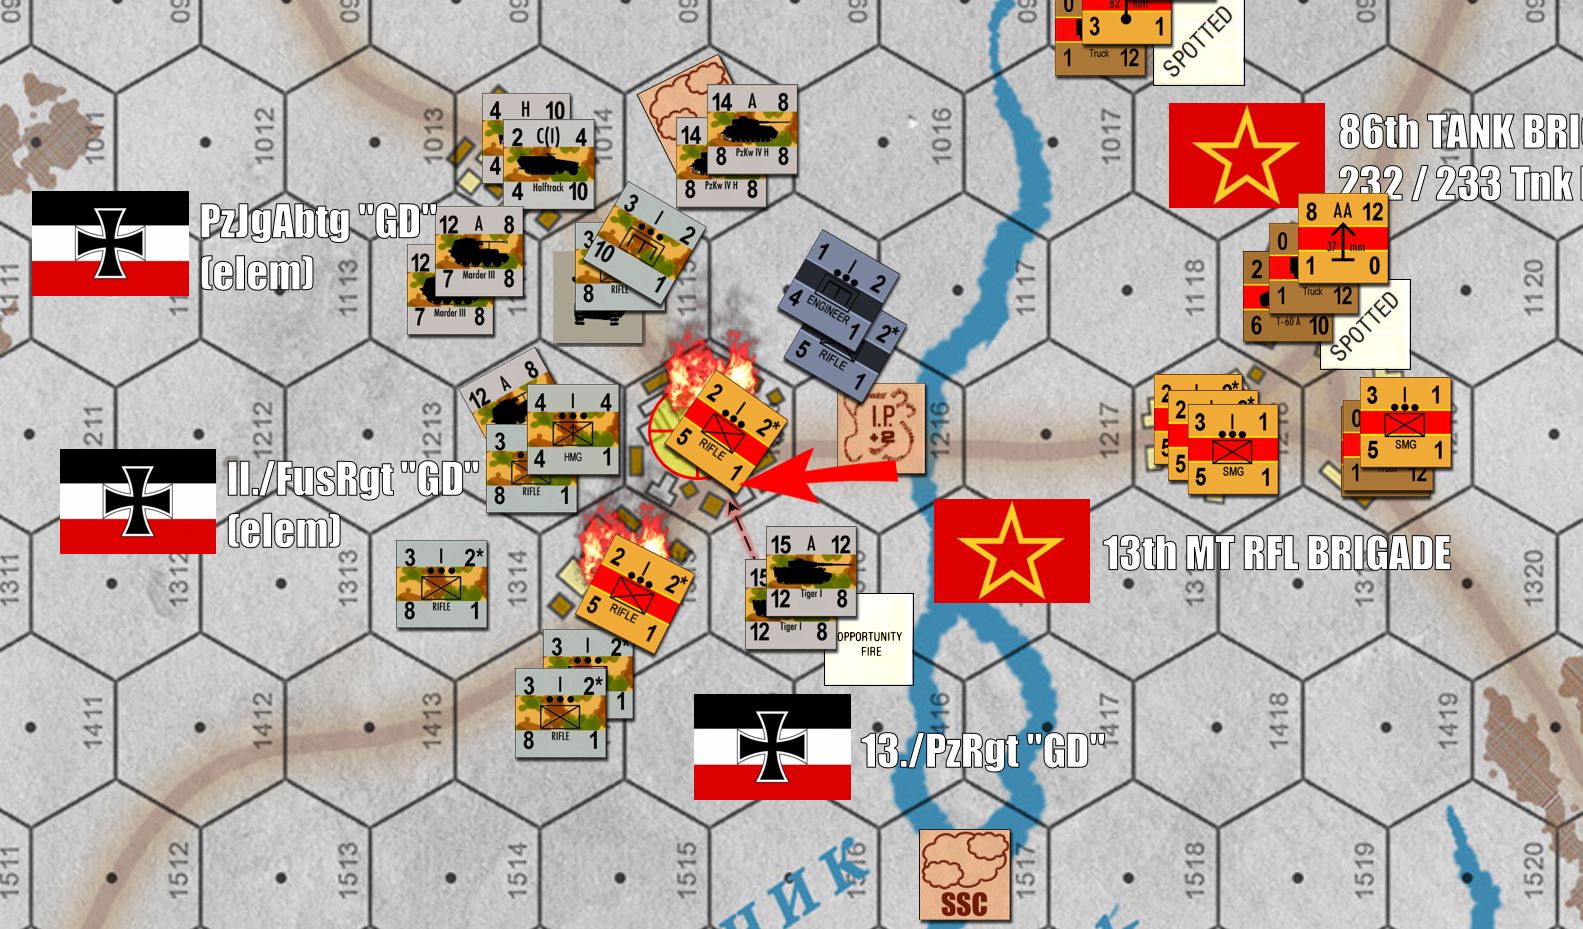 The furious street battle for Vil'khuvatka continues in the center. Now on Andrew's Turn 5, he tries to rush in some reinforcements. But my Tigers, which have been shifted during Turn 4's split-move-and-fire, get opportunity fire on the moves and blow the Soviet rifle and engineer platoons into kitty litter. That northern Soviet rifle platoon in Hex 1215 should be set upright (good order - see rules error above).
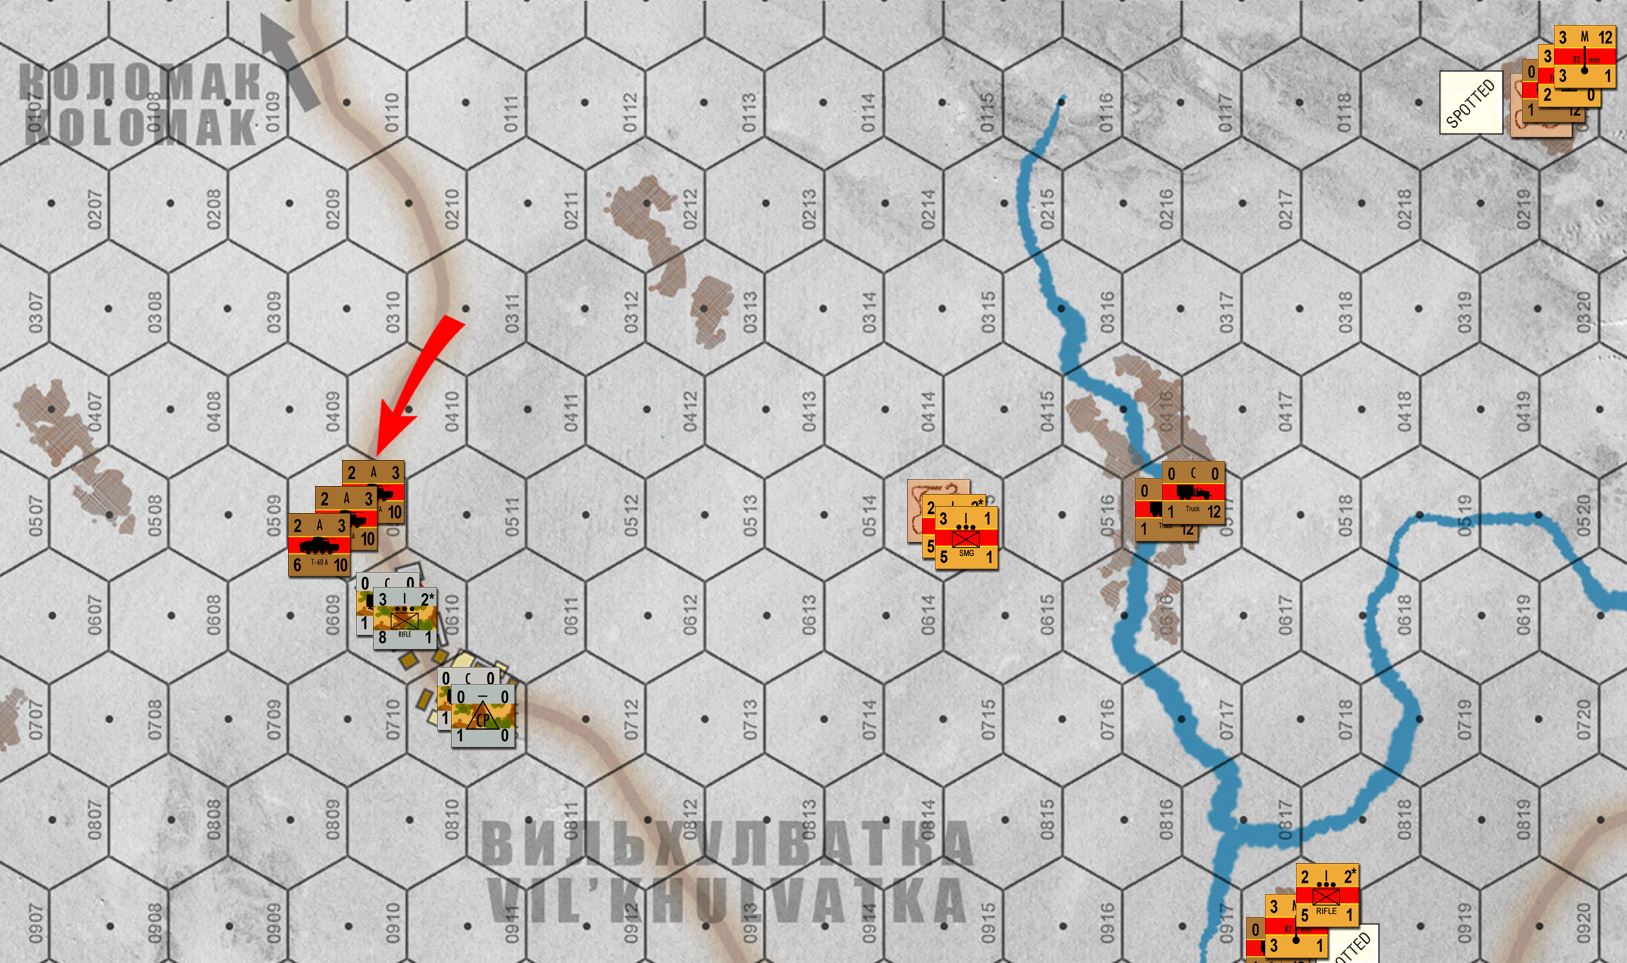 Uh oh, Soviet light tanks are now adjacent to my first objective hex up in the northwestern part of the board. I'm not too worried about it . . . for now. That German infantry platoon is well-positioned in that concrete town hex, and fifteen T-60As aren't likely to shift them. But if Andrew gets artillery or medium tank support up there, I could be in serious trouble. Also, that's my headquarters unit up there (CP) - if I lose that my morale drops to a "B." If nothing else, it's a distraction that might require me to dispatch a few platoons of Marders or PzKpfw IVs up that way, diluting my assault on Vil'khuvatka.
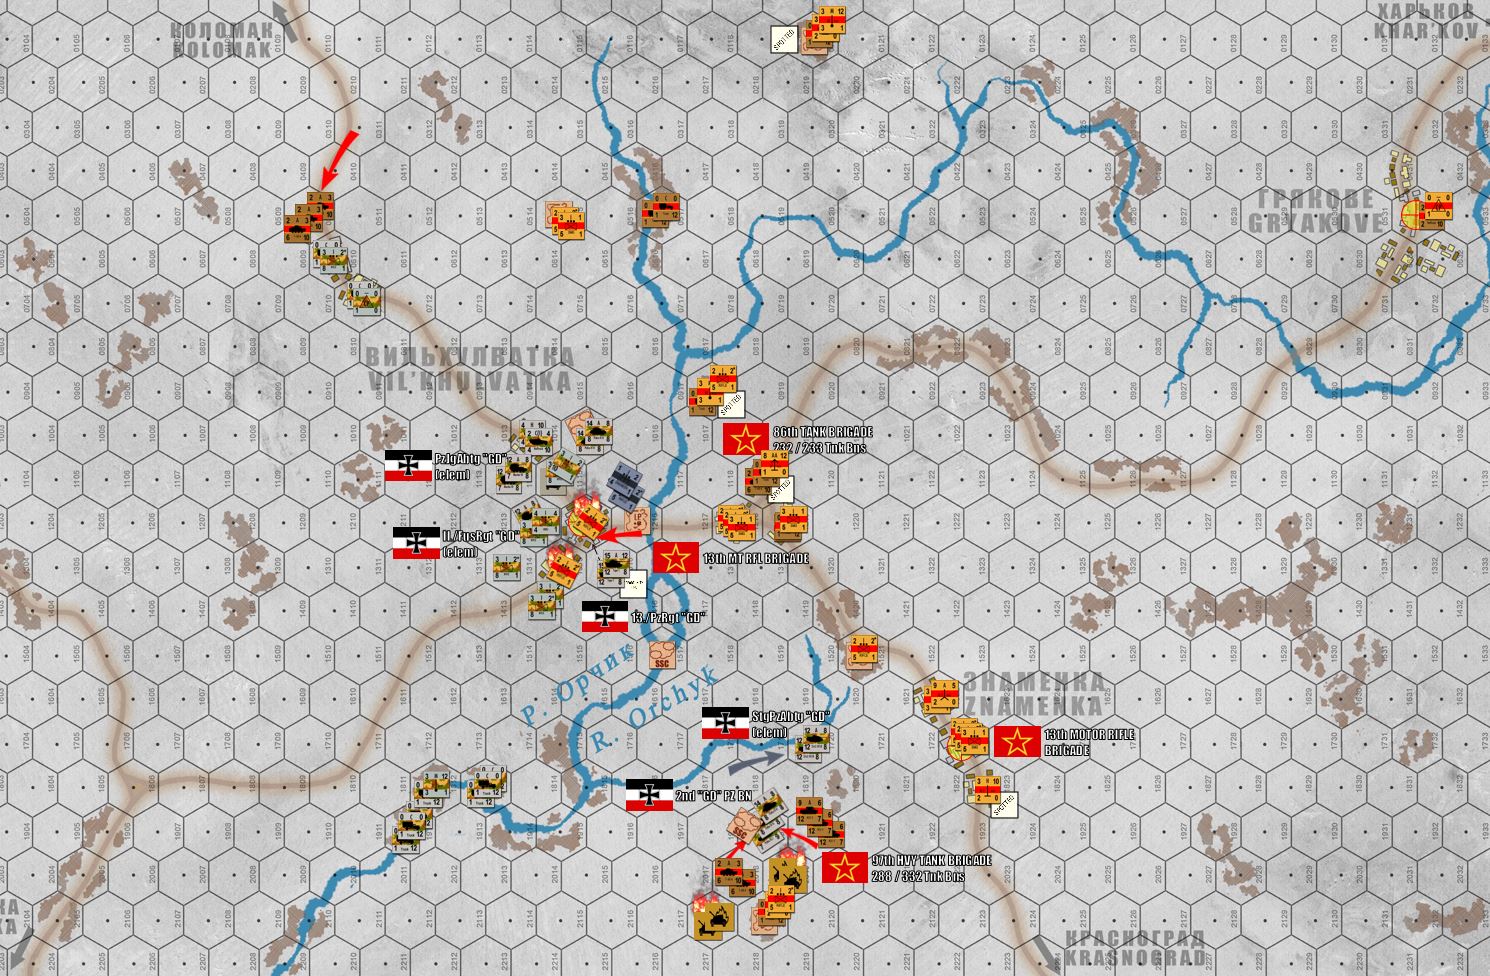 The overall situation HALFWAY through the game (end of Turn 5). I have one objective hex, hopefully I'm about to take a second. After that things are going to get very tense, very tight, and very rushed as the clock starts to run out on my attack.
So that’s where we stand for now. After 3 hours, we had to call the session for the moment, we will come back and finish this hopefully sometime in two weeks, Jan 26-27.
This one’s really on the razor’s edge, I think. My Grossdeutschland Germans have one objective hex, we’re on the cusp of taking the second one, on Turn 6. I don’t think I’ll be taking the southern one after that T-34 overrun, let alone reaching the one in the far northeast corner of the board (along the Khar’kov road).
This leaves me with the one on the east back on the river, where one hell of a battle is liable to open up as Andrew and I probably converge everything we can put there on the last 4 turns or so.
I have a lot of firepower but not much time, and of course Andrew can still cause problems for me in the backfield with his T-60As and my northwestern objective hex.
We’ll see what happens! Can Andrew hold on for the Motherland? Tune in and find out!
Brucelea v. Oriskany - PanzerBlitz Ostfront 1943 (p1)
This weekend saw the kickoff of another web wargame, this time between myself and @brucelea (Andrew) in the UK. Moving out of the Tunisian desert, we squared off this time on the Eastern Front, in the blood-spattered, snowy steppes of the northeastern Ukraine for a game of Avalon Hill’s PanzerBlitz (updated).
Setting: February 1943. The final death throes of the Battle of Stalingrad have finally ended. The whole German 6th Army and half the 4th Panzer Army are gone, trapped by a massive Soviet encirclement and killed or captured practically to the last man. To effect this encirclement, two more Axis armies (Romanian 3rd and Italian 8th) have been effectively annihilated in place. A gash hundreds of miles across has been ripped in the southern German line, and fresh Soviet fronts (spearheaded by Katukov’s 1st Guards Army and Rybalko’s 3rd Tank Army) pour through the breach. German Army Group “A” must be pulled out of the Caucasus in record time before they too are lost, along with the remnants of German Army Group “Don.” As bad as Stalingrad has been for the Germans, another disaster is about to eclipse that defeat by a several grisly order of magnitude.
To win desperately-needed time and stabilize the southern German line, Field Marshal Erich von Manstein engages in a campaign of mobile defense, falling back, allowing the Soviets to rush forward, then hitting back only in carefully-chosen, perfectly-timed counterattacks. He uses Soviet momentum against them, baiting them forward in the empty vastness of the eastern Ukraine, striking when forward elements have separated themselves from support columns, when Soviet spearheads have spread too far across the steppe, when Soviet tank and mechanized corps start to feel the iron tug of logistics tighten around their necks.
Of course Manstein has to trade space for time, and this includes the Ukrainian city of Khar’kov. In a nightmarish breakout, encircled German troops of the Grossdeutschland Divisions and Hausser’s II SS Panzer Corps have cut their way free of the encircled city, disemboweling Soviet tank and motorized formations in the process. Still the Soviet advance continues, driving desperately south and west, hoping to reach the northern shores of the Black Sea, and thereby slice off the entire southern third of the German army in the East (perhaps a solid million men, three times what was taken at Stalingrad).
But in the wake of the Khar’kov bloodbath, Soviet armies may have finally pushed too bar, they’re too spread out, too exhausted, suffered too many casualties, and are too badly undersupplied. Conversely, the Germans have been falling back on their supply lines and rail heads, and Manstein feels his moment has finally come.
This will be what history calls “Manstein’s Backhand Blow,” the re-re-retaking of Khar’kov, the stunning battle of maneuver that will slam the runaway Soviet advance in its tracks, and stabilize the German Army in the wake of the Stalingrad disaster.
One of the many opening attacks Manstein will launch, primarily along the routes between Khar’kov and Peter the Great’s old battlefield at Poltava, will come here, with the Grossdeutschland division, spearheaded by a handful of the precious new “Tiger” heavy tanks, hitting the 12th Tank Corps of Rybalko’s 3rd Tank Army.
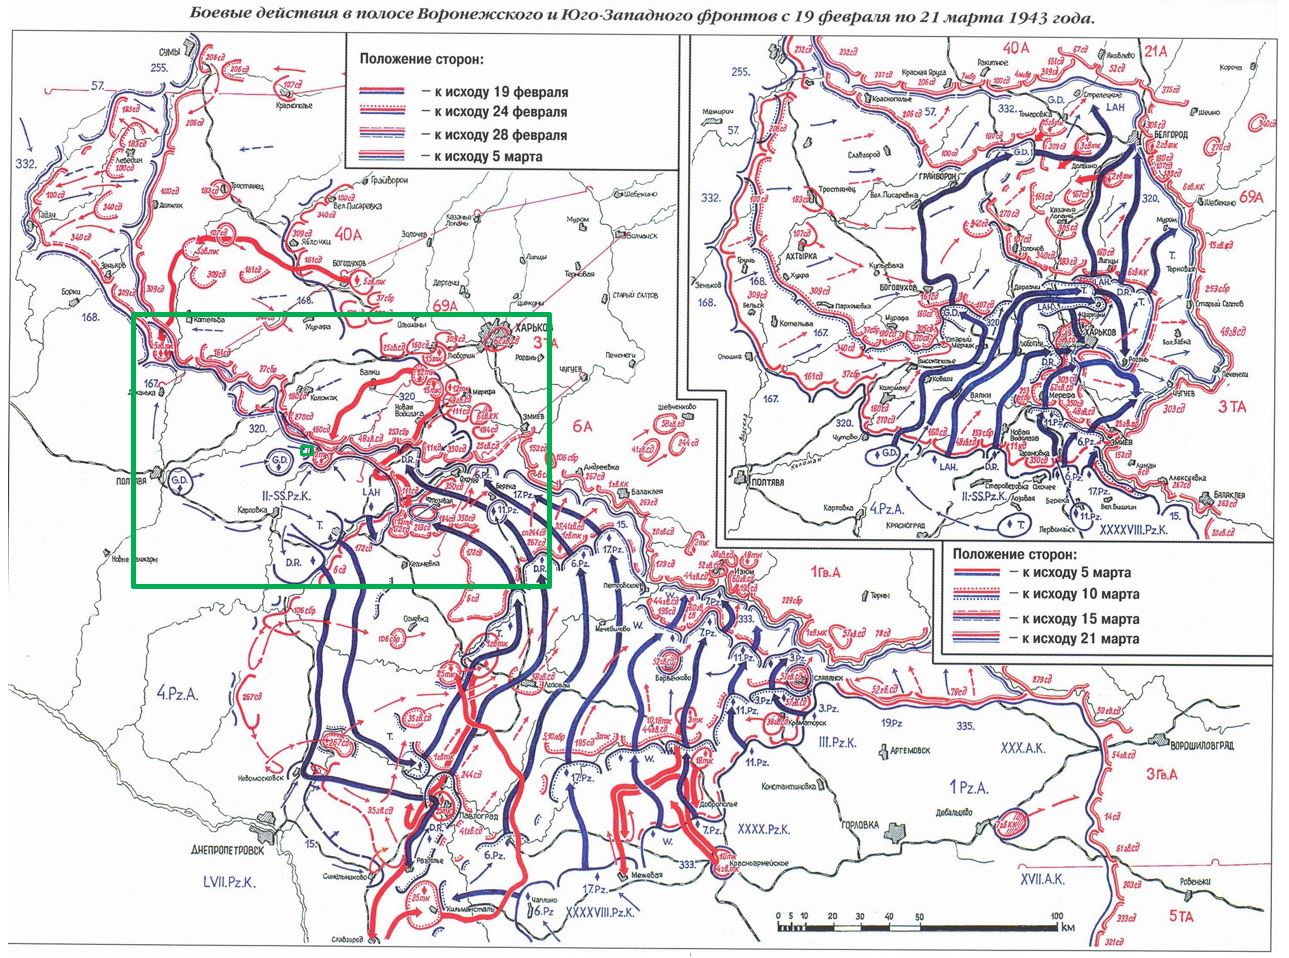 Some of the RKKA maps from this campaign, showing the final phases of the post-Stalingrad Soviet slashes down through Khar'kov, followed by the German counterattacks back up toward the Russo-Ukrainian border.
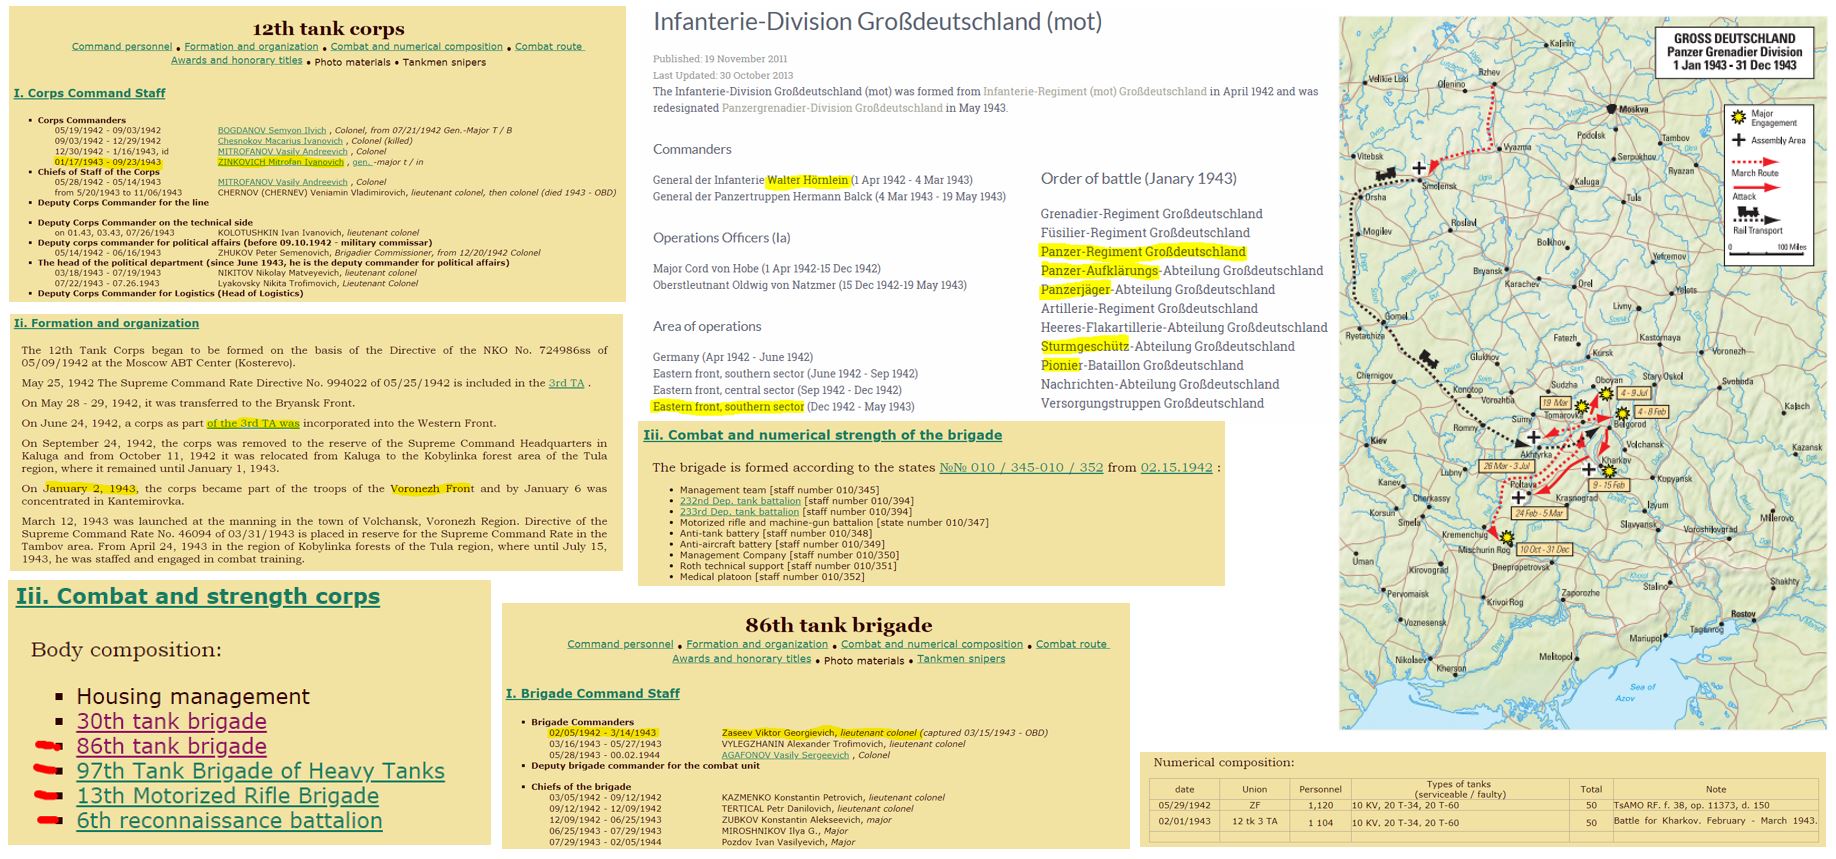 More historical research, allowing me to convert actual orders of battle for the identified units involved into PanzerBlitz army lists. You can get pretty detailed information, down to the staff officers, individual battalions, and actual tank types and unit counts for the brigades in question on the dates in question.
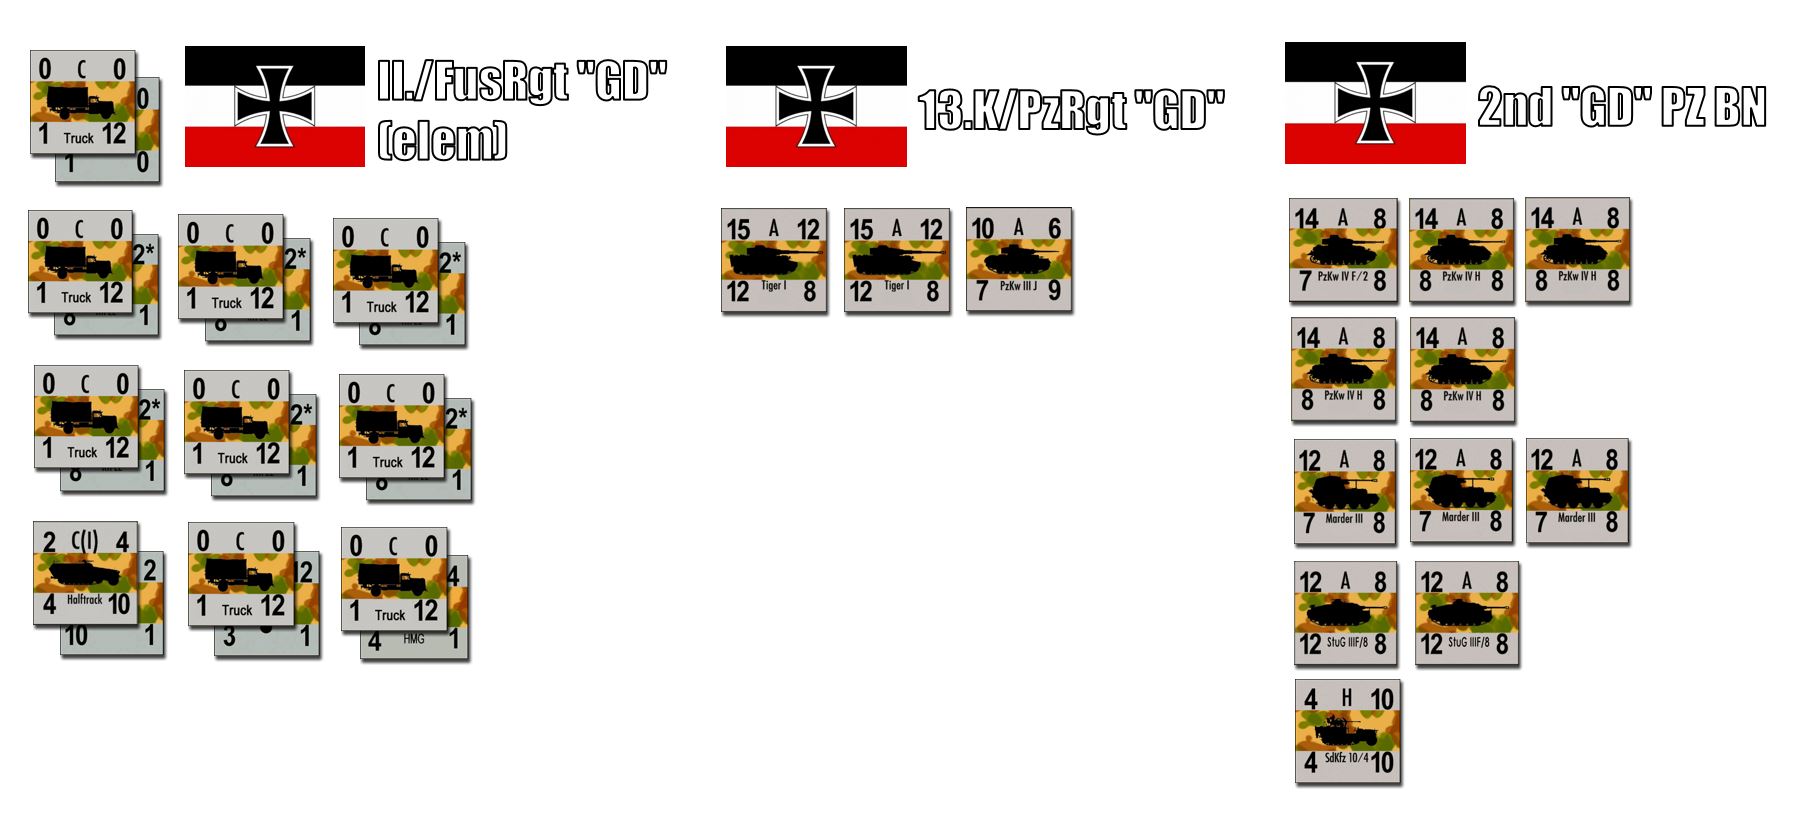 We're trying to keep this game a little faster, so we're leaving off a lot of off-board assets like air power and especially artillery. Here's the German force, including elements of II. Battalion, Fusilier Rgt Grossdeutschland, some of their panzers (with PzKpfw IV/F2s for HQ tanks, those SHOULD be PzKpfw IV Gs for the battalion tanks, but the game values are the same). PzKpfw VIE Tigers make up 13. Kompanie, PzRgt Grossdeutschland (along with a handful of late model PzKpfw IIIs). There are also two batteries of StuG-III, Marder PanzerJaegers, mortars, and engineers and FlaK SdKfz 10 halftracks. Call it 500 infantry and 70 armored vehicles.
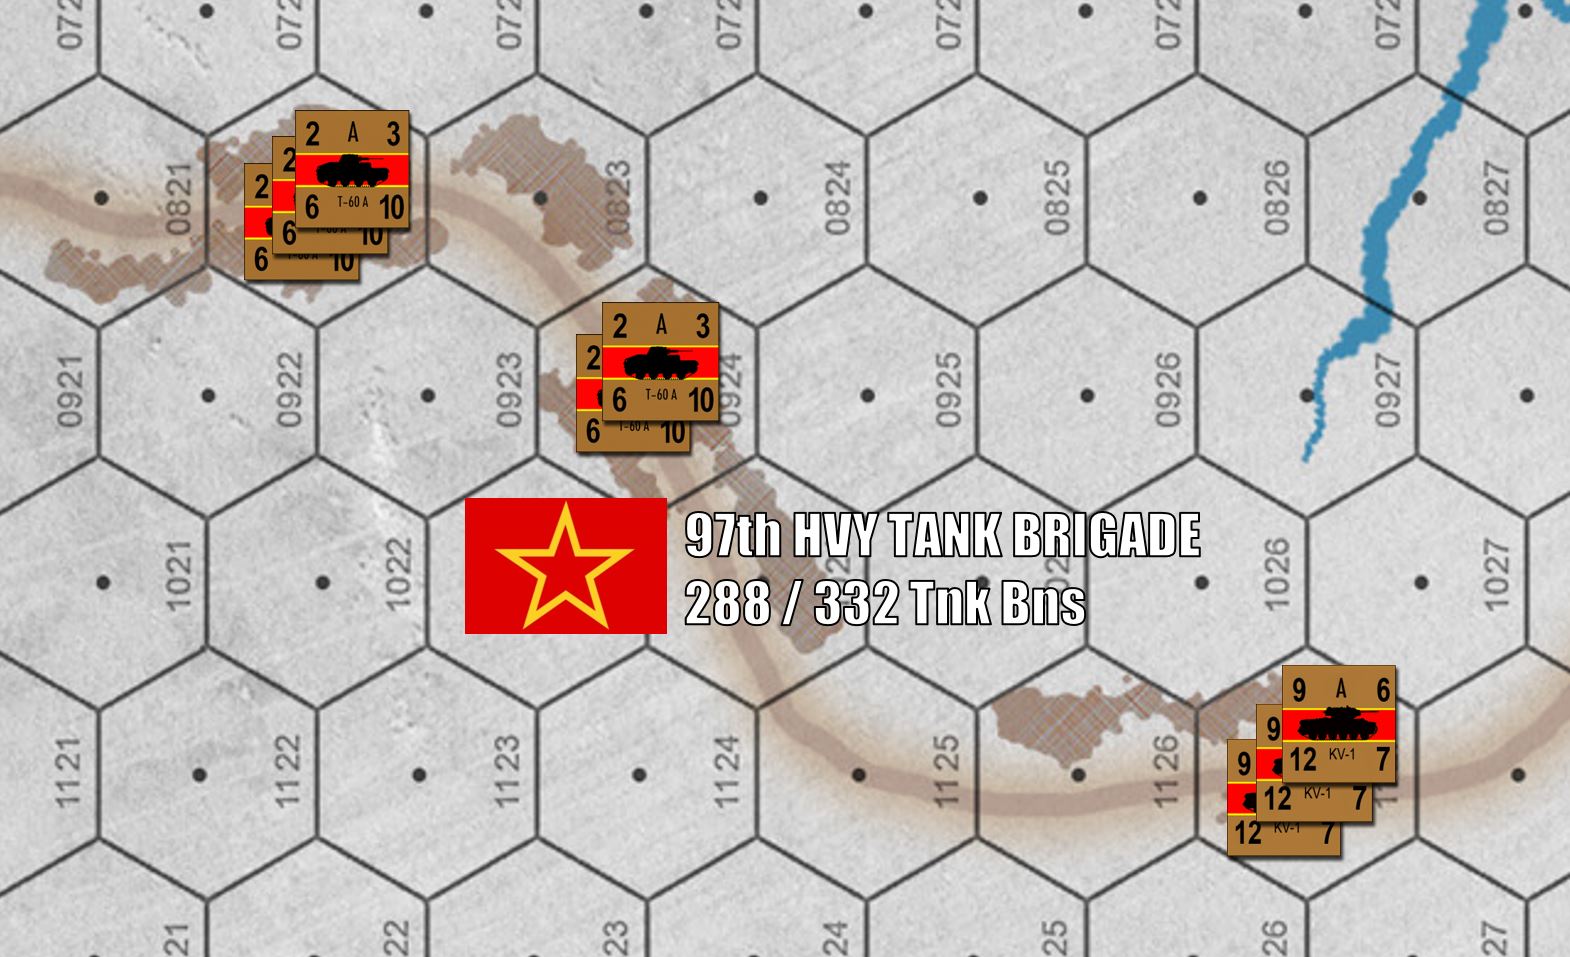
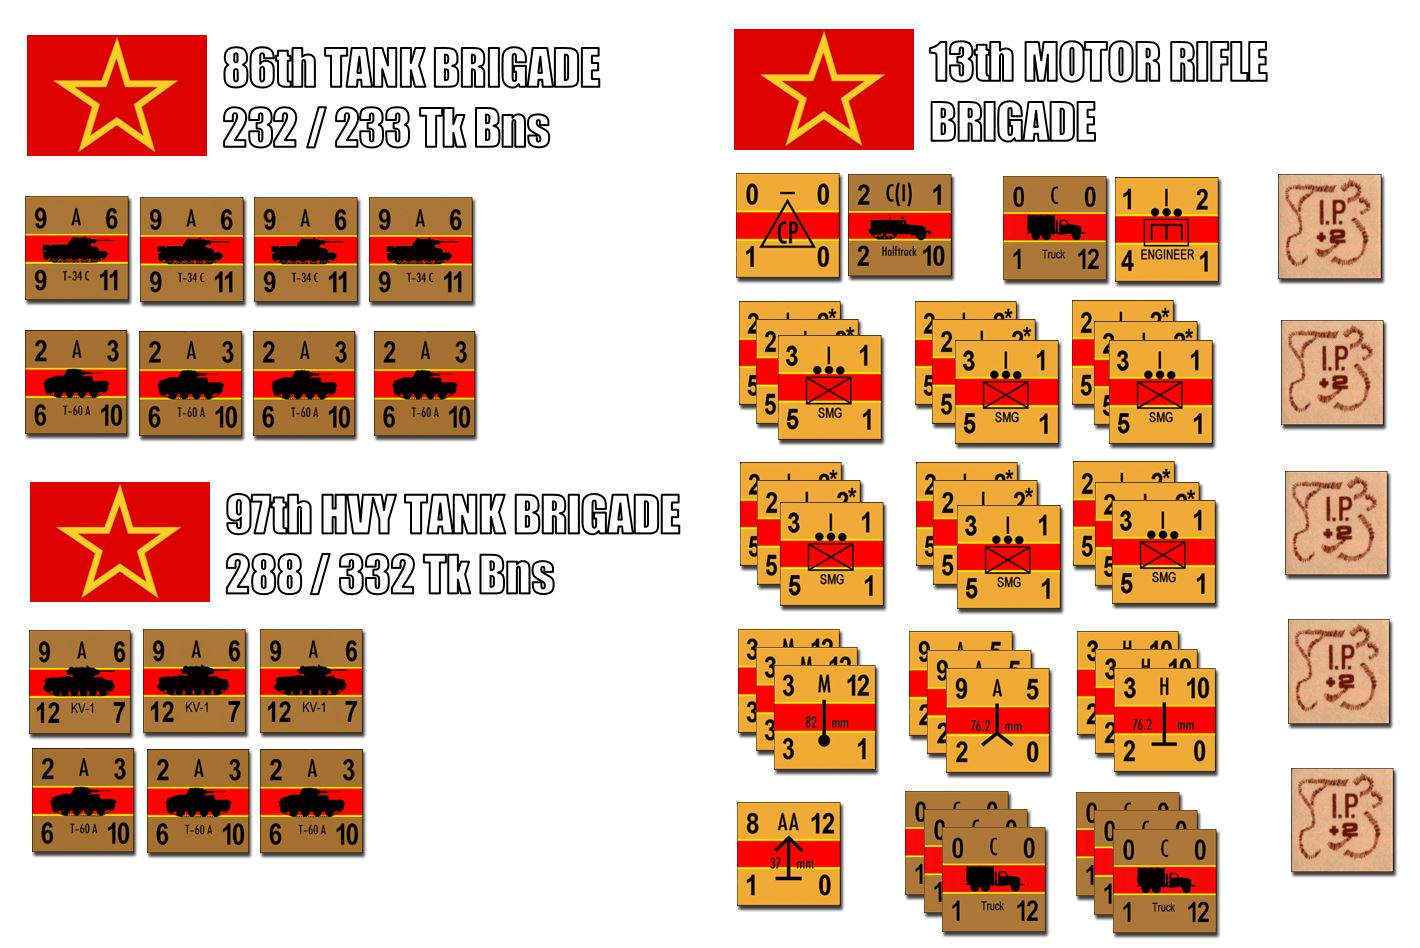 The Soviet force is at least 1300 strong, plus 70 tanks as well. But these tanks are nowhere near as powerful. Yes, those KV-1s of 97th Heavy Tank Brigade are great, and T-34/c medium tanks of the 86th Tank Brigade never go wrong. But about half the Soviet tank force are T-60A light tanks. Barely weighing 5.8 tons, they carry only a 20mm autocannon and armor sometimes as thin as 7mm. For all the press the T-34 gets, in early 1943 a huge portion of the Red Army's tank force was made up of hopelessly inadequate machines like this.
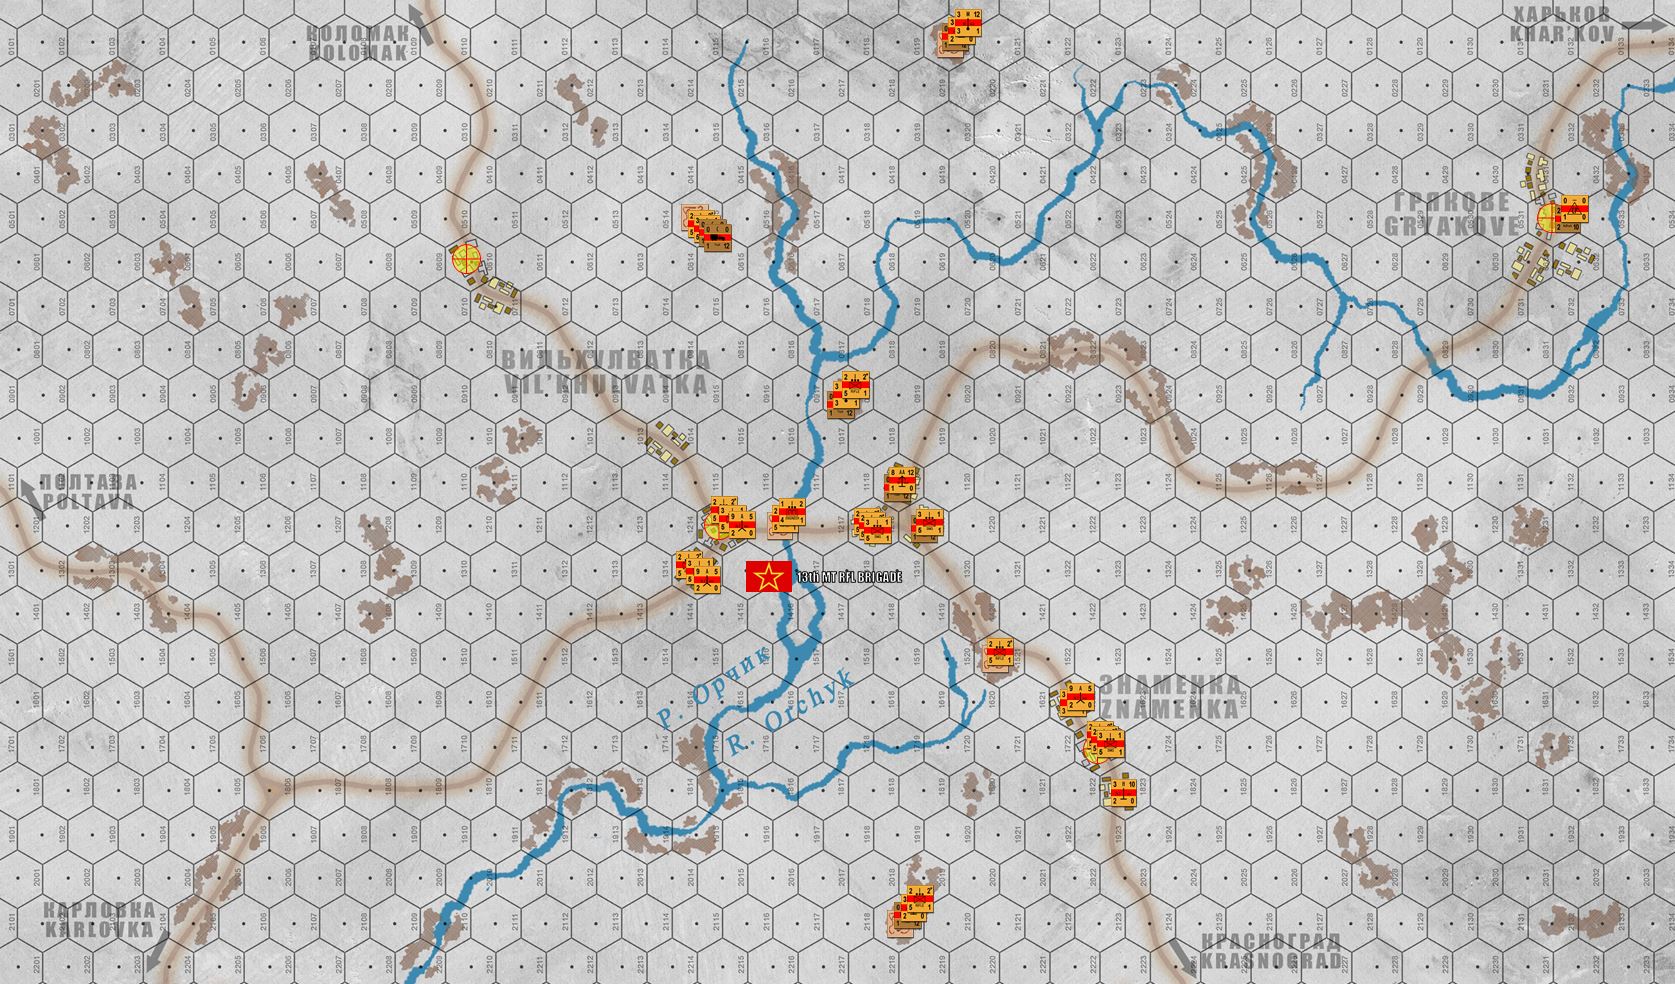
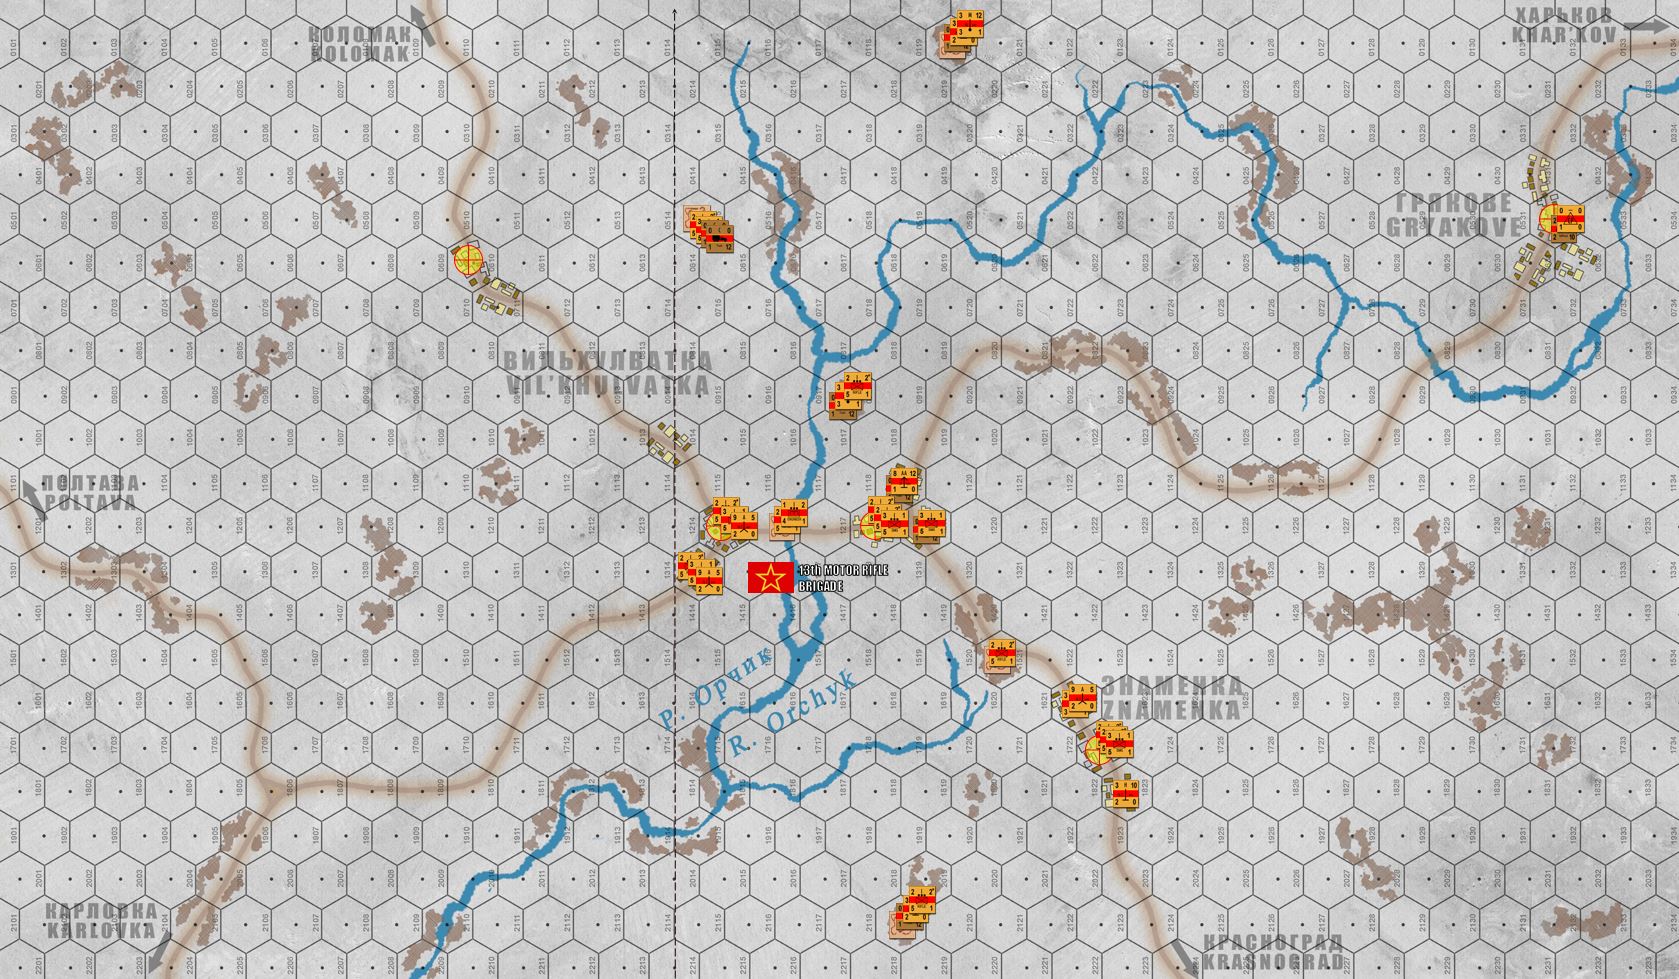 The Soviets get to set up the 13th Motorized Rifle Brigade (up to the line, 20 hexes / 5 km from the east end of the board). Scouts and partisans have alerted them to the approach of the Grossdeutschland kampfgruppe, and their two brigades of tanks get to arrive on the beginning of Turn 1 from the eastern end of the board. The Germans, of course, enter from the western end of the board. Note the small Soviet force in trucks in the norther-center part of the board, behind the village of Vil'khuvatka. These are perhaps intended to rush forward and seize that westernmost objective hex, at least slowing the German advance and forcing them to fight for this first objective. Please bear in mind that when I draw these maps and design these scenarios, I don't know which side I will wind up playing.
 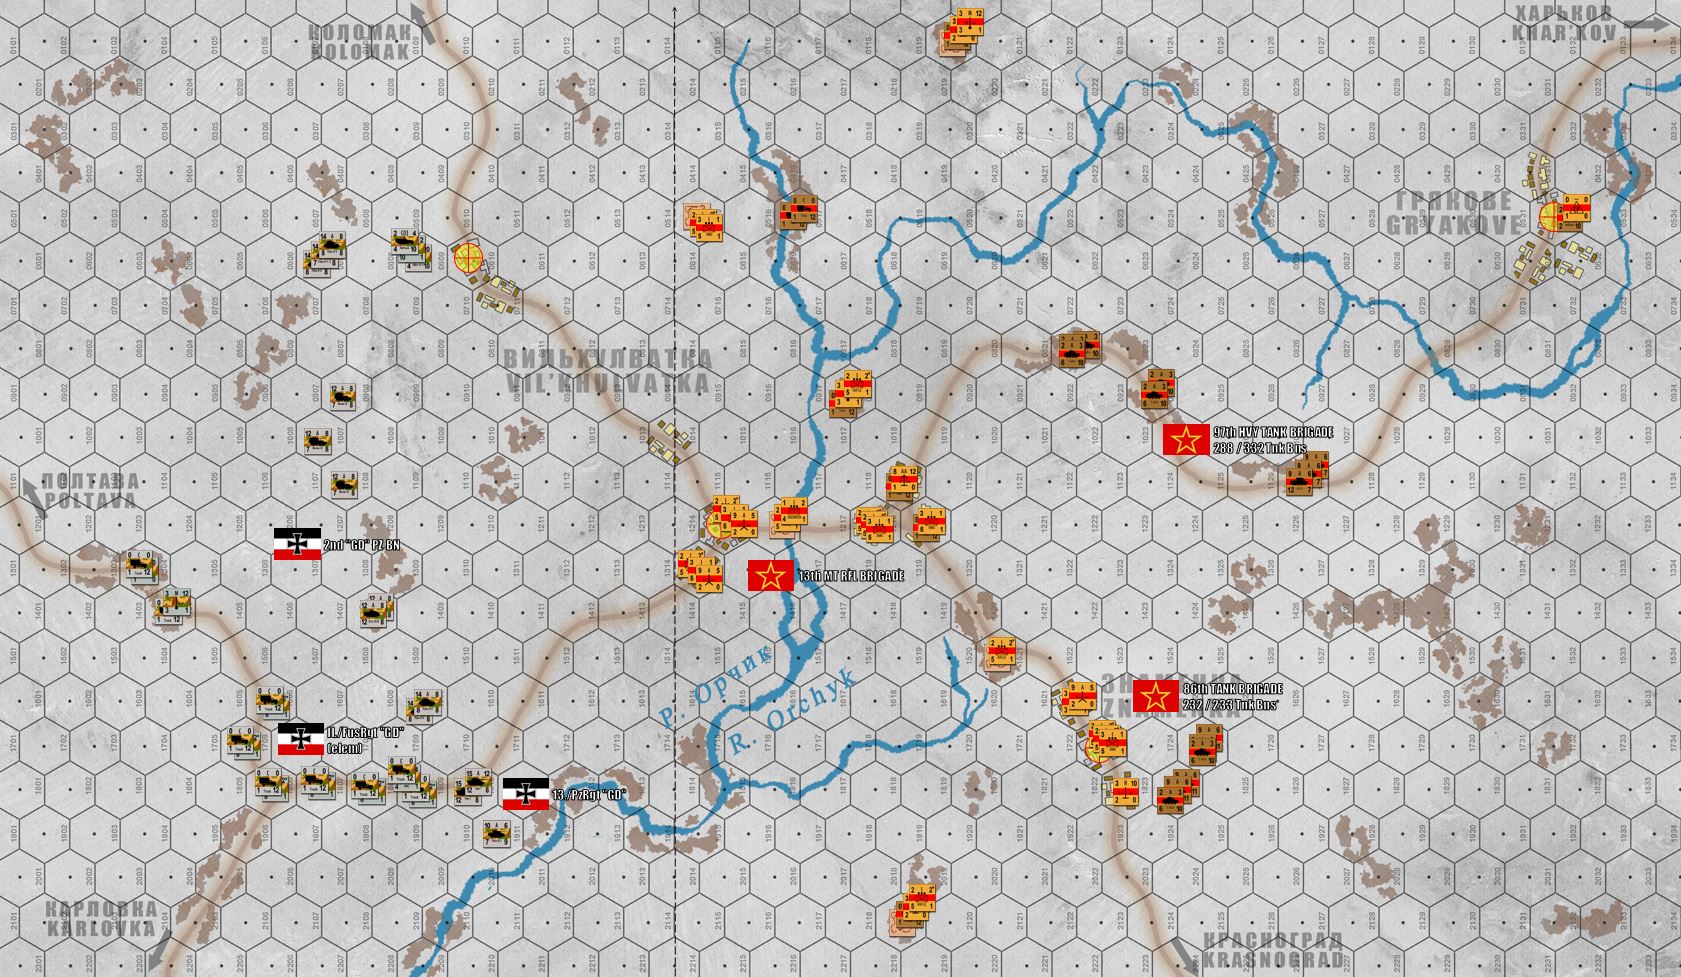 Game day! The web meeting begins and Andrew chooses to play the SOVIETS. So I thunder on the western side of the board with my Grossdeutschland kampfgruppe (far and away one of my favorite German divisions - all the elite troops and top-line equipment without most of the political "baggage" that comes with playing the Waffen SS). Note I have speedy halftracks (flak and pionier engineers) bolting for that northern objective hex. I can't quite make it in Turn 1, which means Andrew will get to force at least a brief fight there if he wants. Marder panzerjaegers and PzKpfw IVs move up in support. Meanwhile, I have a column of trucks carrying my fusiliers, led by my Tigers, approaching the main crossing village hexes of Vil'khuvatka, while more PzKpfw IVs, IIIs, and my StuGs cross the puny and frozen Orchyk River (more of a creek at this point) to threaten the southern objective hexes of Znamenka, or (alternatively) pivot north to assist a larger assault on Vil'khuvakta.
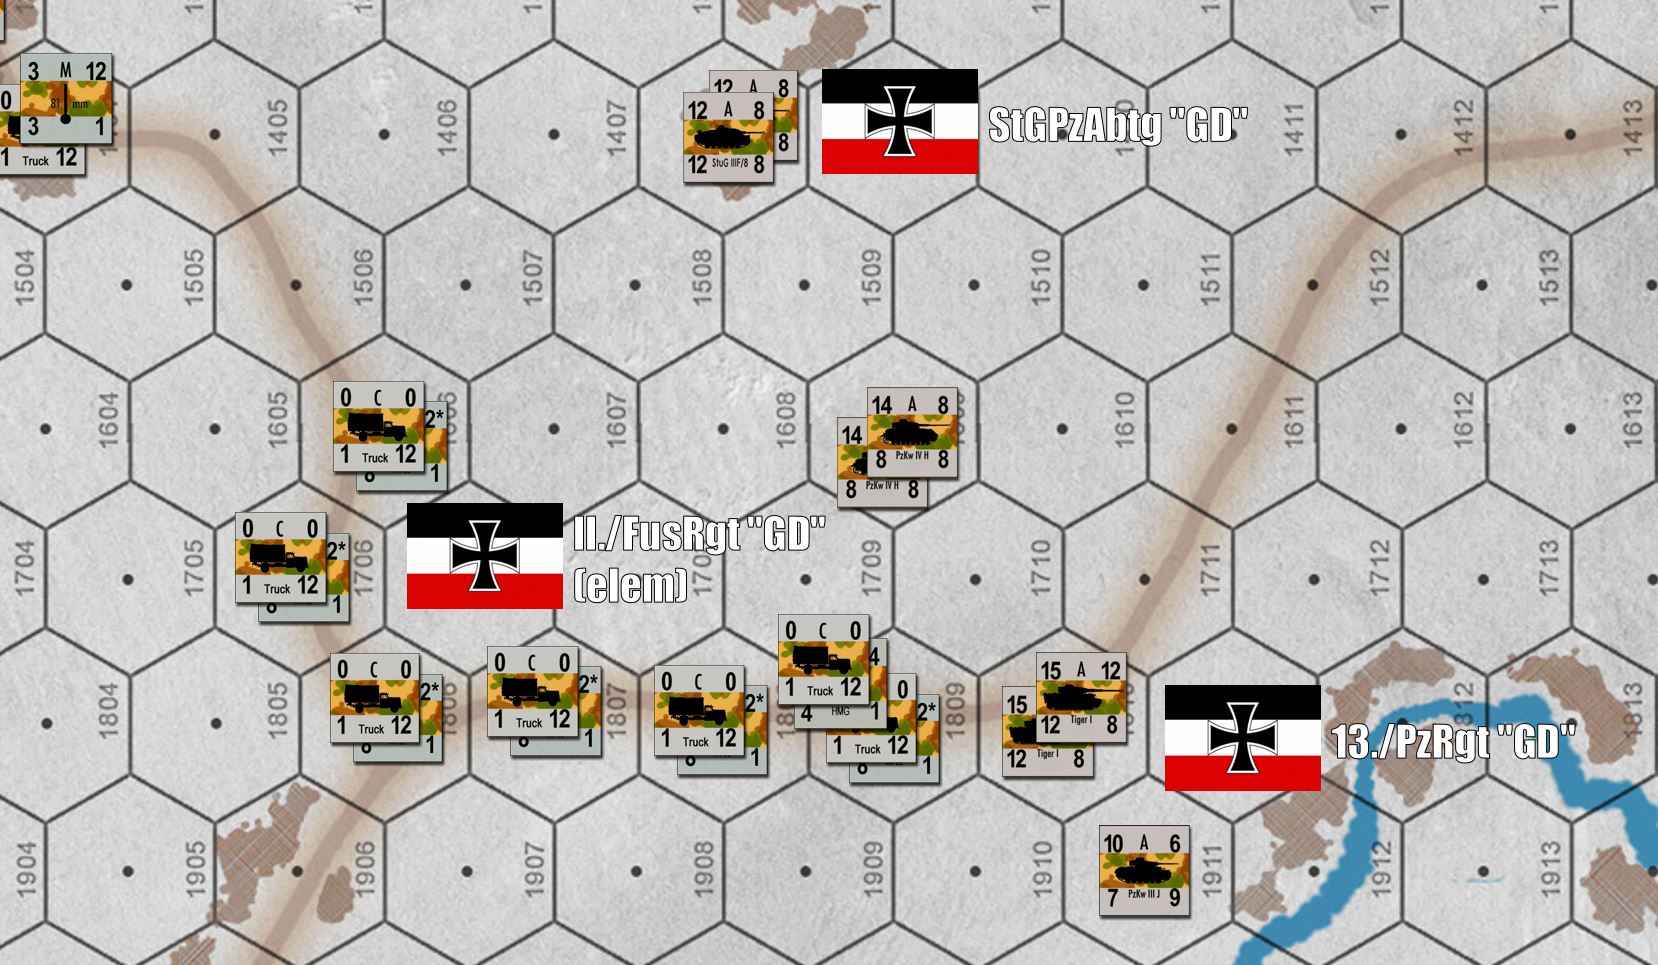 A close-up of my "schwerpunkt." Tigers, baby! Let me see if I can NOT waste them this time by being overaggressive like I was in the last game against the British in southern Tunisia.
 Of course, on his Turn 1, Andrew gets to bring on his tanks. In a tank fight, I'm winning this game hands down. But he's beating me in infantry and artillery, and of course he's also got time and distance on his side. This is a German assault, so it's up to me to take the objective he starts off holding with fortified troops. The burden of victory is on me.
 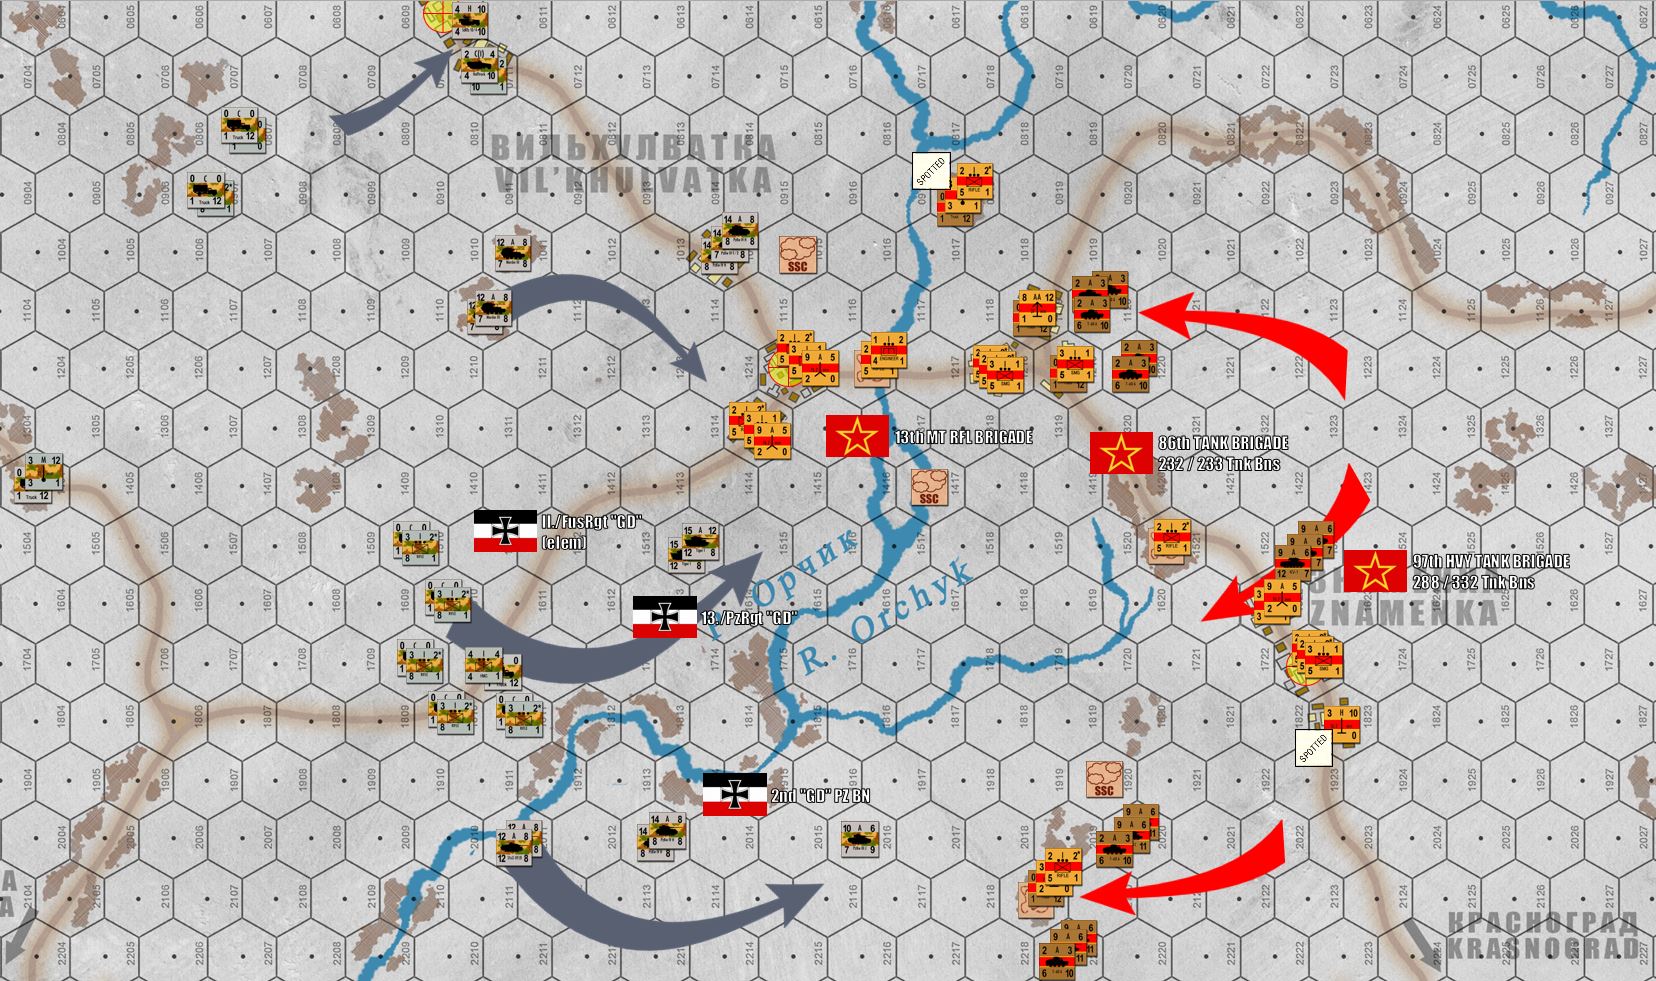 So far, so good. Andrew has opted against a showdown in those northern town hexes, so I take the first of five objective hexes (I have to take at least 3 of 5 to win). I am 1/3 of the way to victory without firing a shot. The second objective hex will not be so easy. There's no real way to take this except by frontal assault, but even a frontal assault can be carried off with speed, precision, and relatively few casualties if handled just right. PanzerBlitz is a game about DETAILS, careful balance and combination of arms, utilization of the turn sequence, large-scale planning and small-scale execution. It will take me a few turns to set up, but I believe I can kick down the front door in the middle and take that objective hex, probably destroying the bulk of Andrew's firepower in the process.
 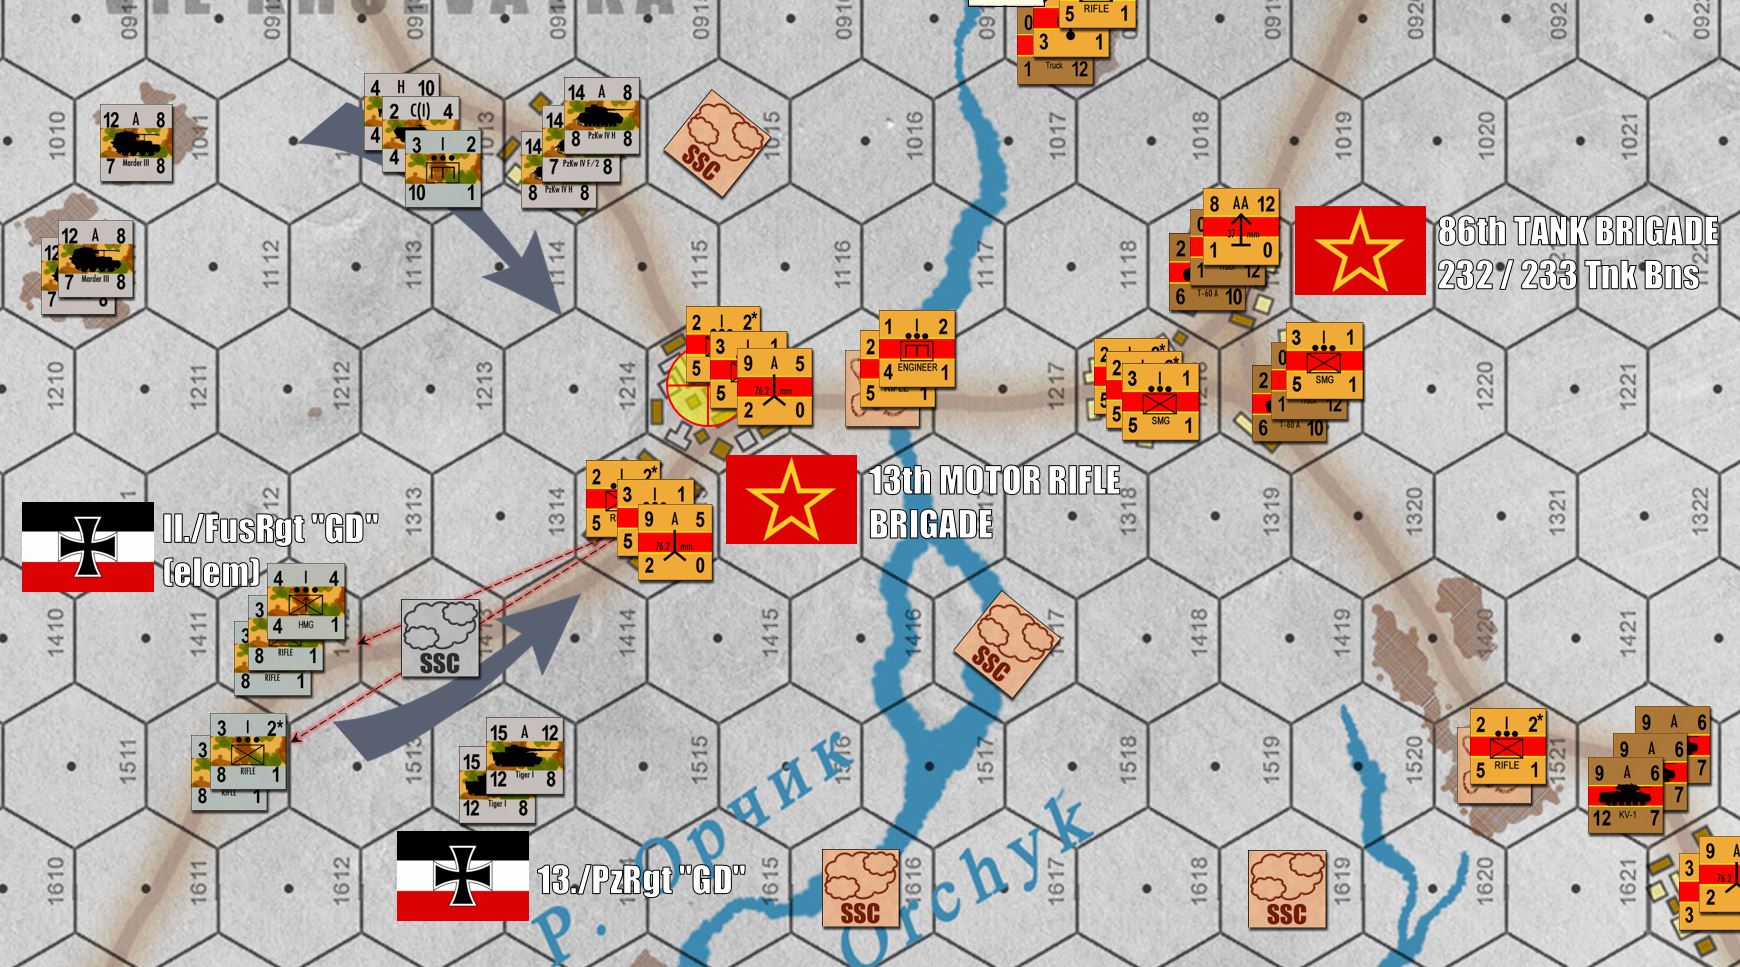 I continue to set up for my assault in the center. German smoke screens (dropped by my battalion 81mm mortar battery) screen the advance of my infantry. Tigers, PzKpfw IVs, and Marders will lead off, while Mgs from halftracks and 20mm flak will also pour in to soften enemy positions. I'll take some AT fire coming in from those two batteries of Soviet 76.2mm AT guns, but I'm trusting the Tigers to bear the brunt of that, while my more expendable Marder IIIs will take the "crossfire hex" in the center. Finally, the "pionier engineers" will spearhead the infantry assualt INTO the town hexes, supported by German HMG and 81mm mortar fire, as well as plenty of HE direct fire from the tanks (especially the Tigers). But you know what they say about battle plans, and how well they survive first contact with the enemy . . .
Sunday's Game: Germans v. Soviets, Feb 1943
This afternoon we have a live on-line game of PanzerBlitz scheduled for 17:00 GMT, pitting Germans up against Soviets in a command-tactical level wargame set on the frozen steppes of the northeastern Ukraine during the final days of February, 1943.
The scenario sets elements of Grossdeutschland division up against leading elements of 12th Tank Corps (Rybalko’s 3rd Tank Army), during the Third and Fourth Battles of Khar’kov, during Erich von Manstein’s “Backhand Blow” campaign that stabilized the German southern line in Russia and the Ukraine after the disastrous defeat of Stalingrad.
Ping me a PM if you’re interested in checking out the game live, chatting with the participants, or just seeing how we run global-community wargames every weekend on the web. If not, we’ll have the battle report up sometime next week!
The map is set up, with 13th Motor Rifle Brigade / 12th Tank Corps / 3rd Tank Army deployed. 86th Tank Brigade and and 97th Heavy Tank Brigade are entering the table from the east. But so are the Germans, with II. Bn / Fusilier Rgt / GD Division, along with units of Grossdeutschland’s StuG Battalion, Panzer Regiment, and of course 13. Pz Kompanie, one of the first Tiger units to see action in the East, attached to Grossdeutschland (before the division would later get its integral schwere Panzerabteilung Tiger battalion).