














Ultramodern Wargaming – Ukraine 2024




Recommendations: 13004
About the Project
Lately, I've been running war games every weekend with members of the community via web conference. Players log on and play wargames with each other in real time, regardless of location, and we usually have at least a couple spectators as well. Many times it’s been Darkstar, but we’re also running wargames in Panzer Leader, Arab-Israeli Wars, and now Valor & Victory.
BoW/OTT community members @brucelea, @damon, @davehawes, and @rasmus have taken the plunge, leading battalions across thousands of meters of desert, starfleets in pitched battles across the heavens, or vicious firefights in the jungles of Vietnam, all without leaving the comfort of their home.
Hard-core, old-school command-tactical wargames can now be run (complete with spectators and recordings) in real time, with BOTH PLAYERS moving pieces across THE SAME virtual game board, thus maintaining player agency, speedy and instant results (no play by e-mail), interwoven turn sequences, any questions / feedback instantly received and addressed, and with the game being virtually recorded as it goes, a ready-made battle report can actually be created as we go.
All of this without the players having to install any new software on their computer, on any platform (PC or Mac). All that's needed is to agree on a time, a handful of dice, and a bellyful of courage!
Every weekend can now be a boot camp! All without costing me thousands of dollars in airfare, too!
Related Game: PanzerBlitz
Related Genre: Historical
This Project is Active
USMC vs. NVA, Hill Battles near DMZ, 1967 (replay - finish)
December 1967, South Vietnam, Quang Tri Highlands, near the DMZ. To finish up the replay of Lima Co / 3rd Bn / 4th Marines / I Corps hitting an NVA-occupied village northwest of Camp Carroll (320th PAVN Division) during the infiltration and build-up to the Tet Offensive …
System: Valor & Victory (Vietnam Edition)
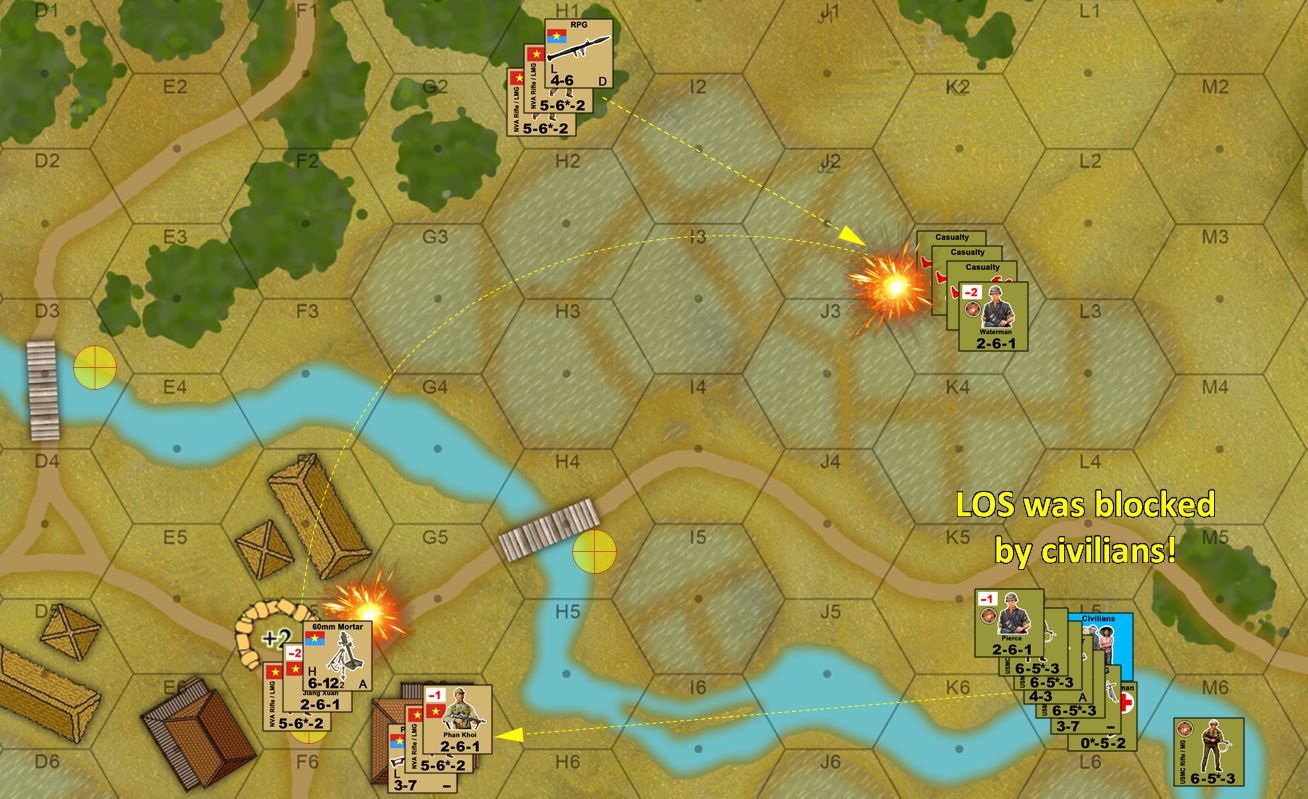 OKay, so when we last left Captain Waterman's HQ platoon, he was pinned down pretty badly in the rice paddies north of the village, with RPGs, AKs, and PKMs on his right, a DShK on his left, and 60-mm mortar providing base of fire for the NVA to his front. Now a new reinforced NVA squad has moved into the buildings facing the paddies, putting him in even further jeopardy. If you're wondering why 2ndLt Pierce's platoon wasn't able to put down any supporting fire last turn, one thing I forgot to mention was the random movement of one of these civilian groups actually put the civilians into his line of fire. Free World forces are FORBIDDEN to put fire any fire through or into a hex containing civilians. However, using the advance and assault phase at the end of Marine Turn 4, Pierce is able to move up into the civilian hex, thus clearing the obstruction. He'll have to wait until next turn to put any more fire down, however, meaning Waterman and his men will have to survive ANOTHER whole turn of NVA fire and possible assault. -- SPOILER ALERT: he does not. The NVA on their Turn 4 positively smash Waterman's platoon, he's basically the last man left standing after I pay all the required casualty points.
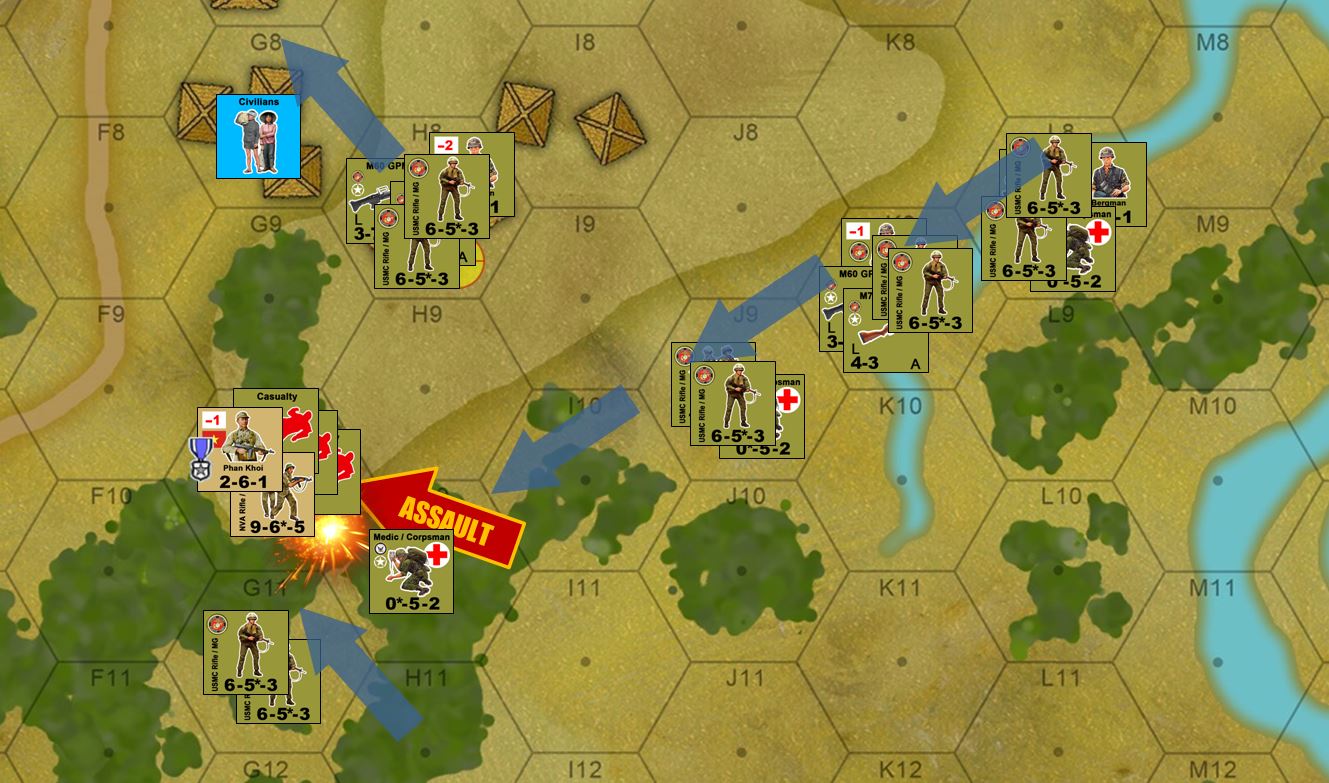
 In the south, we saw where Collins carried off a risky but successful assault against NVA squads holding the southern approaches to the village. Occupying that hex, Collin's platoon now has a clear (but long) LOS finally against the back of that mortar pit. Yes, he can get assualted (like Rasmus did to me last game), but this time I still have a satchel charge ready to defeat any charge before it hits me. Meanwhile, Bergman's platoon has to use full movement (booby trap roll 11 or 12) to get up on that ridge and occupy those first hooches, advance and assault phase sees him actually in the of the objective hexes. The Marines might finally be turning this around!
 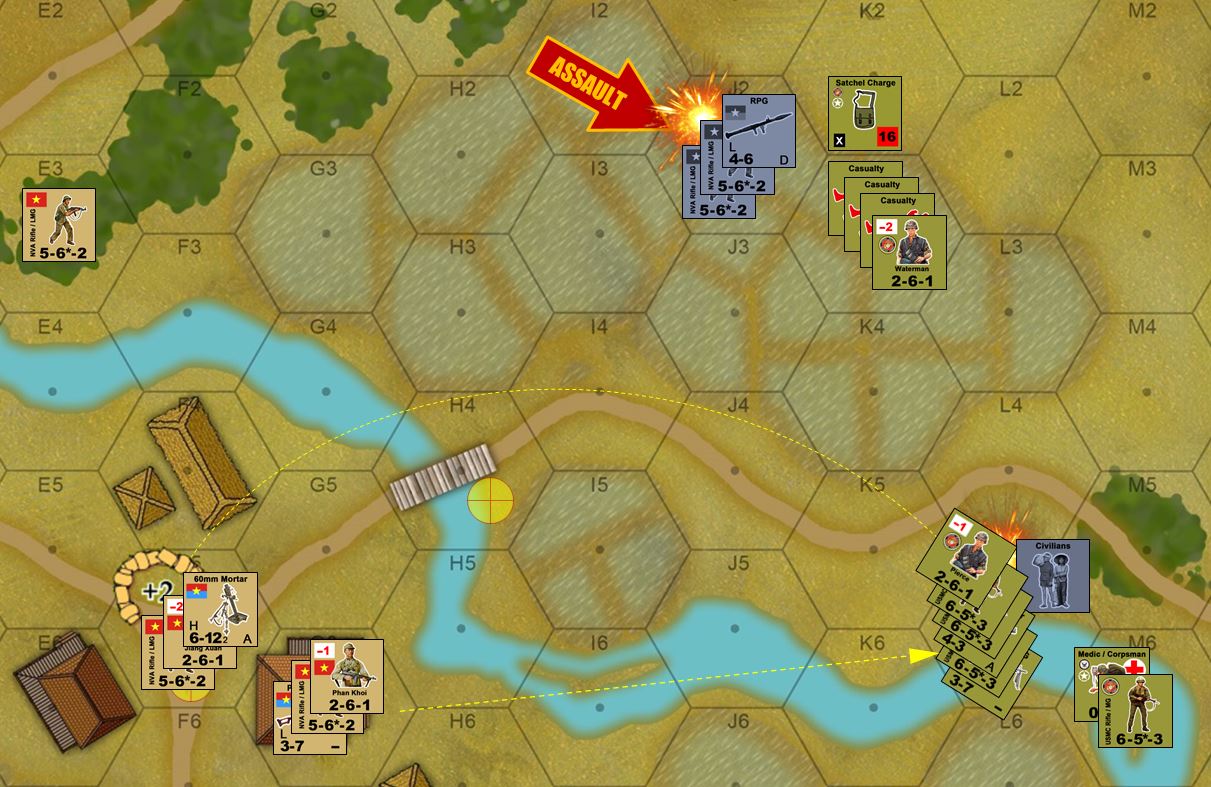 Okay, time for the NVA to win this game. If they can assault Waterman's hex, all those casualties are considered "captured" and thus worth extra NVA victory points (quick note: I have already adjusted the victory points a little further AGAINST the Americans, giving the NVA 4 points per casualty marker inflicted, 8 if they are "unsecured" or captured). So this will be 32 victory points if they win this one hex, since Waterman himself will count as a casualty marker and all FOUR markers would then fall into NVA hands. But Waterman has 2 firepower points, adds in his satchel charge (last one), and then rolls a 4 on 2d6! Awesome! The roll is adjusted +1 for the NVA partial cover (rice paddies), but Waterman's firepower is considered 2+16=18 for the satchel charge (commanders can either apply their bonus OR their actual firepower rating, not both), then -2 for point blank opportunity fire. So on an adjusted 3 on the APFP table (18 row) yields 6 casualty points, more than enough to wipe out this assault before it reaches him! Captain Jiang Xuan and his mortars, however, and Lt. Phan Khoi pour fire into Pierce's struggling platoon, inflicting 6 casualty points. The first two are absorbed by the civilians in that hex, killing them. Four more pin down the rest of that platoon.
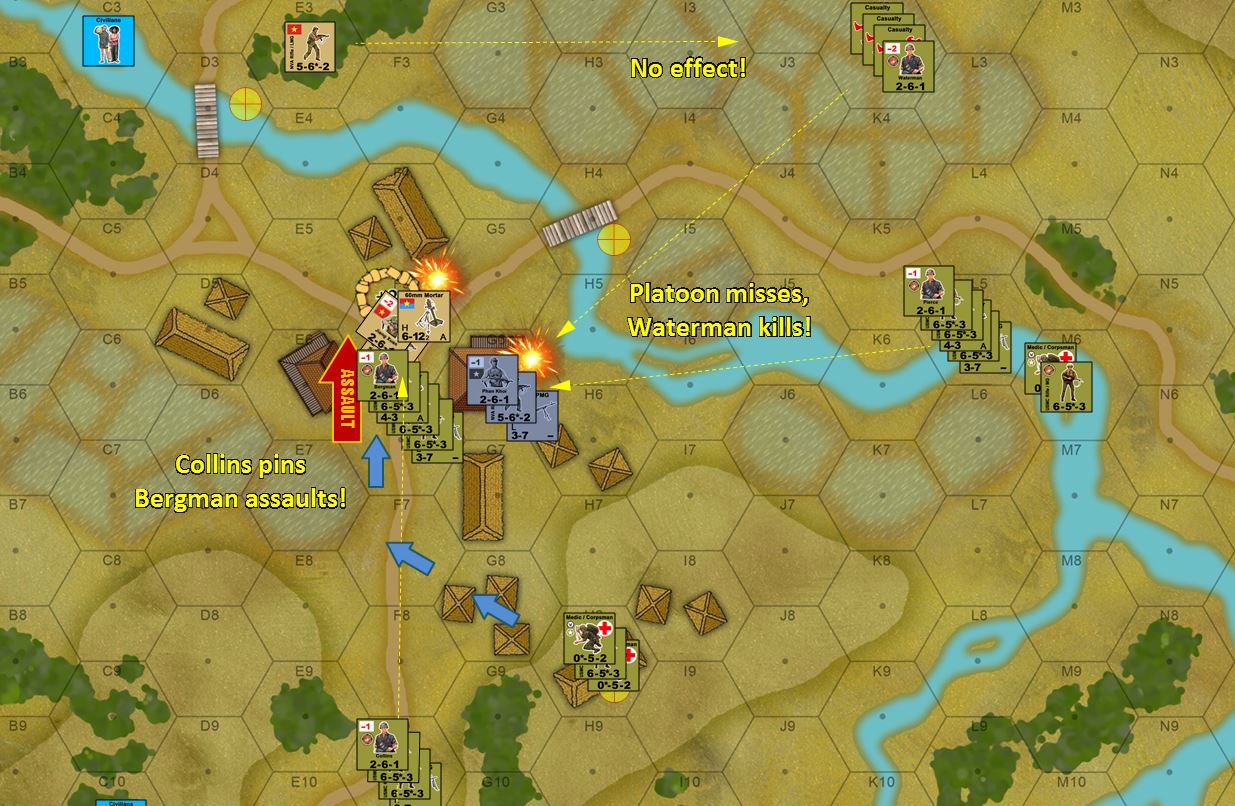 The beginning of Marine Turn 5 sees more heroism from Captain Waterman. An NVA fireteam to the west of the rice paddies fails to pin him down. Then he gets another monster roll against the Phan Khoi's hex, while the hapless 2nd Lt. Pierce (although rallying during the American command phase) fails with a very pool roll. Waterman's roll is good enough to actually take out the stack (admittedly he rolled obscenely well, I think a 3 on 2d6). Maybe Pierce's platoon flushed Khoi's shooters from cover. Meanwhile, Collins has taken the NVA pit under fire from the rear, pinning them down. Now, with Khoi's hex killed off and Jiang's hex pinned, the way is clear for Bergman to conduct a bloodless assault and take the whole village ... assuming he doesn't hit any booby traps. He has to NOT roll an 11 or 12 since he's using full movement rate . . . no whammies, no whammies . . . SUCCESS! Jiang's sand bag mortar pit is assaulted and no casualties taken. The whole village in now in USMC hands, and only one NVA fireteam remains on the board.
 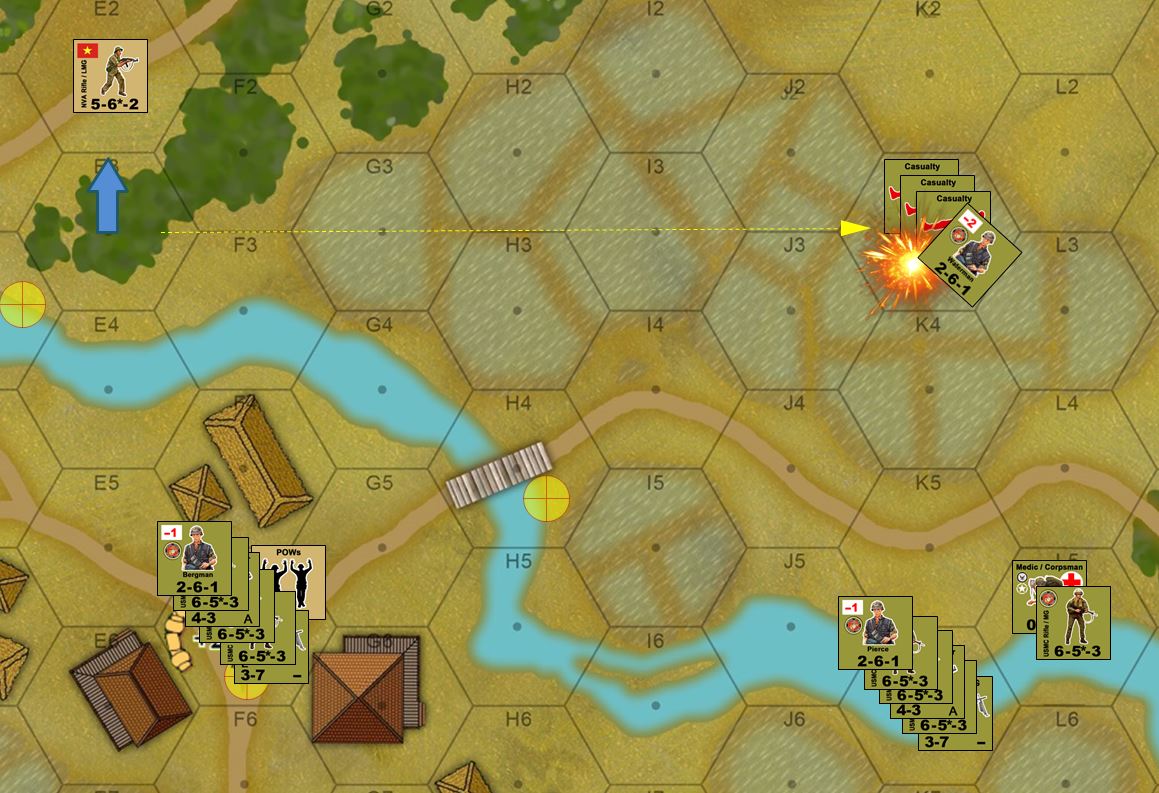 Captain Waterman is finally pinned down by that lone NVA fireteam, who uses advance and assault phase to fall back one hex to avoid USMC counterfire next turn. Waterman had +1 defense for the rice paddies, and +1 defense for the NVA fire just scraping by the jungle in hex F2, two cumulative modifiers that JUST saved his life. Meanwhile, Bergman has prisoners but I won't get extra points for them since I wont be able to get them evacuated before the end of the game (I might change the rules on how POW evacuation works, I have a pretty good idea for a possible option for how Free World Forces can do this).
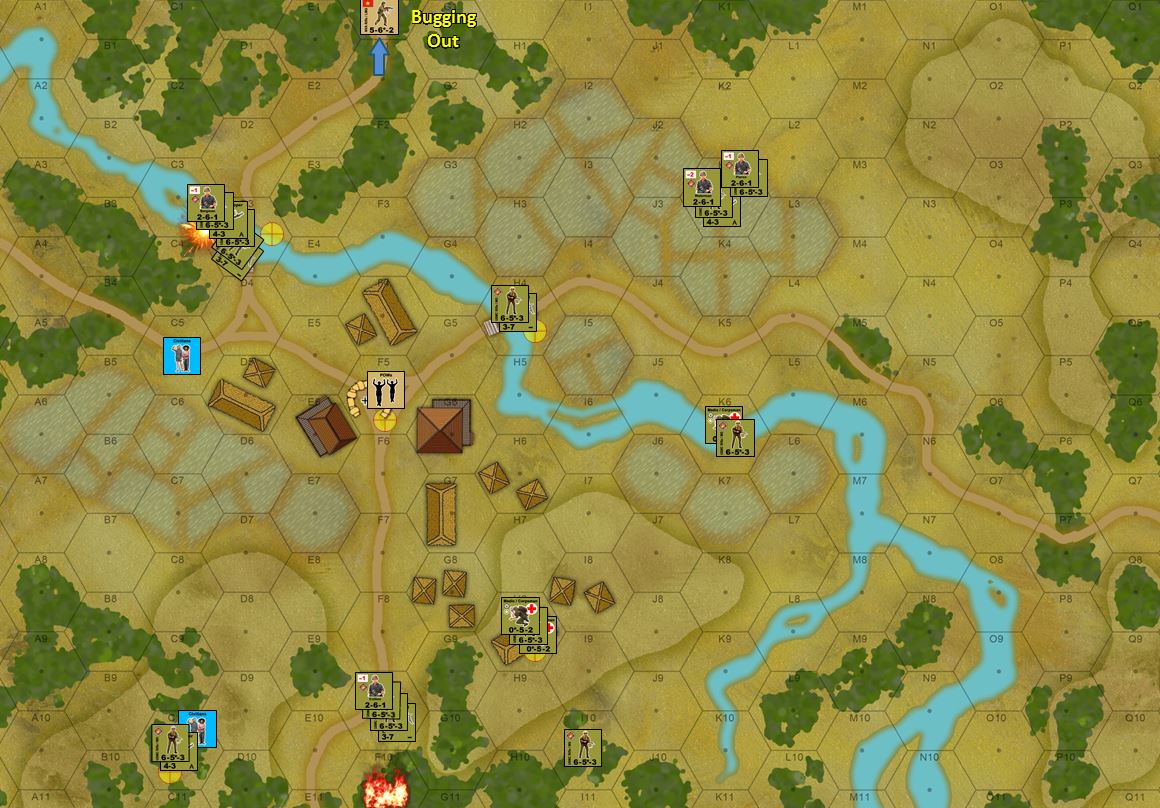 Okay, the last turn of the game. The Marines, using "Assault Move" in some places (slower movement rate, but +1 cover and less chance of hitting undetected booby trap) moves to secure the last objective hexes. Also we HAVE to evacuate the casualties in Waterman's hex or they will count for 8 NVA victory points instead of 4. Captain Waterman actually failed his roll on Turn 5, so we have to get all three evacuated on Turn 6. Each infantry unit can make one check (I can't get any actual Navy Corpsmen to them in time). So I need to load up that hex with as many infantry units as I can. 2nd Lt Pierce saves one, Waterman saves another, and the remaining infantry save the third. Phew. That last NVA fire team, meanwhile, inflicts FOUR casualty points on a stupid-lucky roll on German's platoon securing that western bridge. Now ... here is why the Americans like moving around in large, heavily-armed groups. One, it reduced risk of boobytraps. Two, it makes their stacks "spongier" and thus more resilient when absorbing casualty points. I don't mind such "gaminess" in a system when it reinforces and encourages real-life tactical and historical doctrines and behaviors. By moving in such a big group, the fire is spread out among them and they whole stack can be pinned rather than anyone actually taking a fatal wound.
 So here’s the final score.
The NVA have knocked out eight USMC fireteams, no officers, and one US Navy Corpsman (nine units), at 4 VP each = 36 points. All casualties were secured, and the NVA hold no objective hexes. One civilian counter was killed but it was the NVA that did it (no VP for the NVA). Final NVA score remains at 36.
The USMC has knocked out 23 NVA fireteams and officers = 23 points. Two POW counters successfully evacuated = 6 points. USMC owns all five objective hexes = 15 points. Total score = 44 points.
USMC has won this one, probably due to Captain Waterman up in that norther rice paddy, hopefully winning a Bronze Star at least if not a Silver Star or a Navy Cross.
USMC vs. NVA, Hill Battles near DMZ, 1967 (replay)
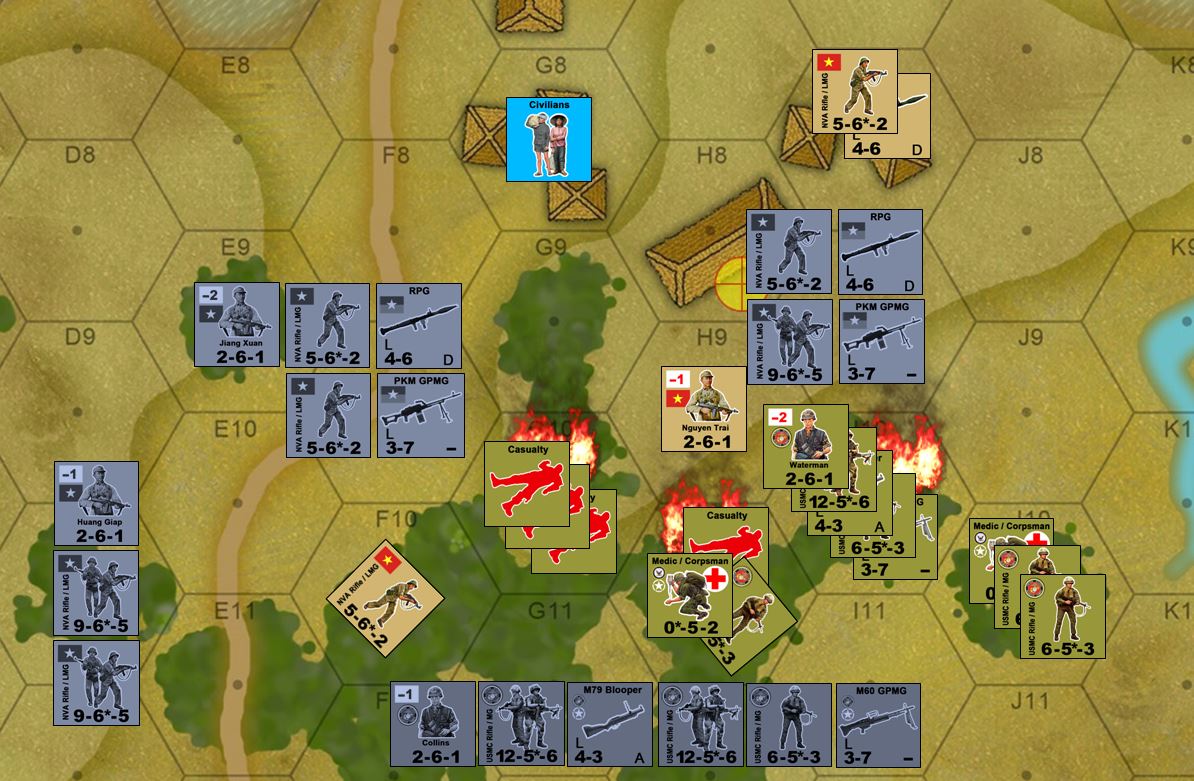
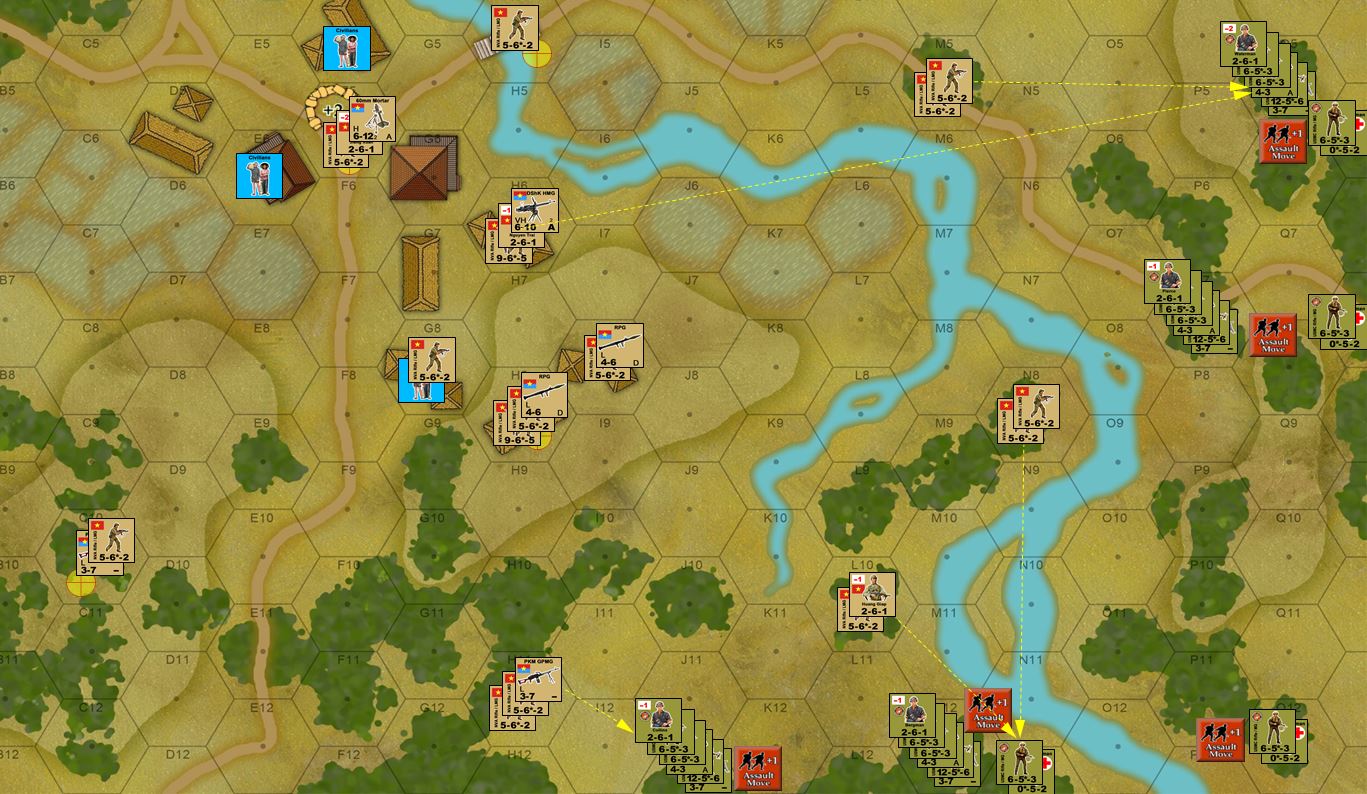 Okay, so the replay commences. A few changes to the rules on booby traps, the Marines are now in danger of hitting one every time they move a stack, on a 2d6 roll of 11 or 12 (it was just 12 before). However, they cannot hit one on advance and assault phase, and they can reduce the chance to only a "12" result IF they use "Assault Movement" rules. This is basically half movement rate, but +1 cover bonus and reduced chance of undetected booby traps. You can see where NVA opportunity fire is greeting the Marines the second they walk onto the battlefield.
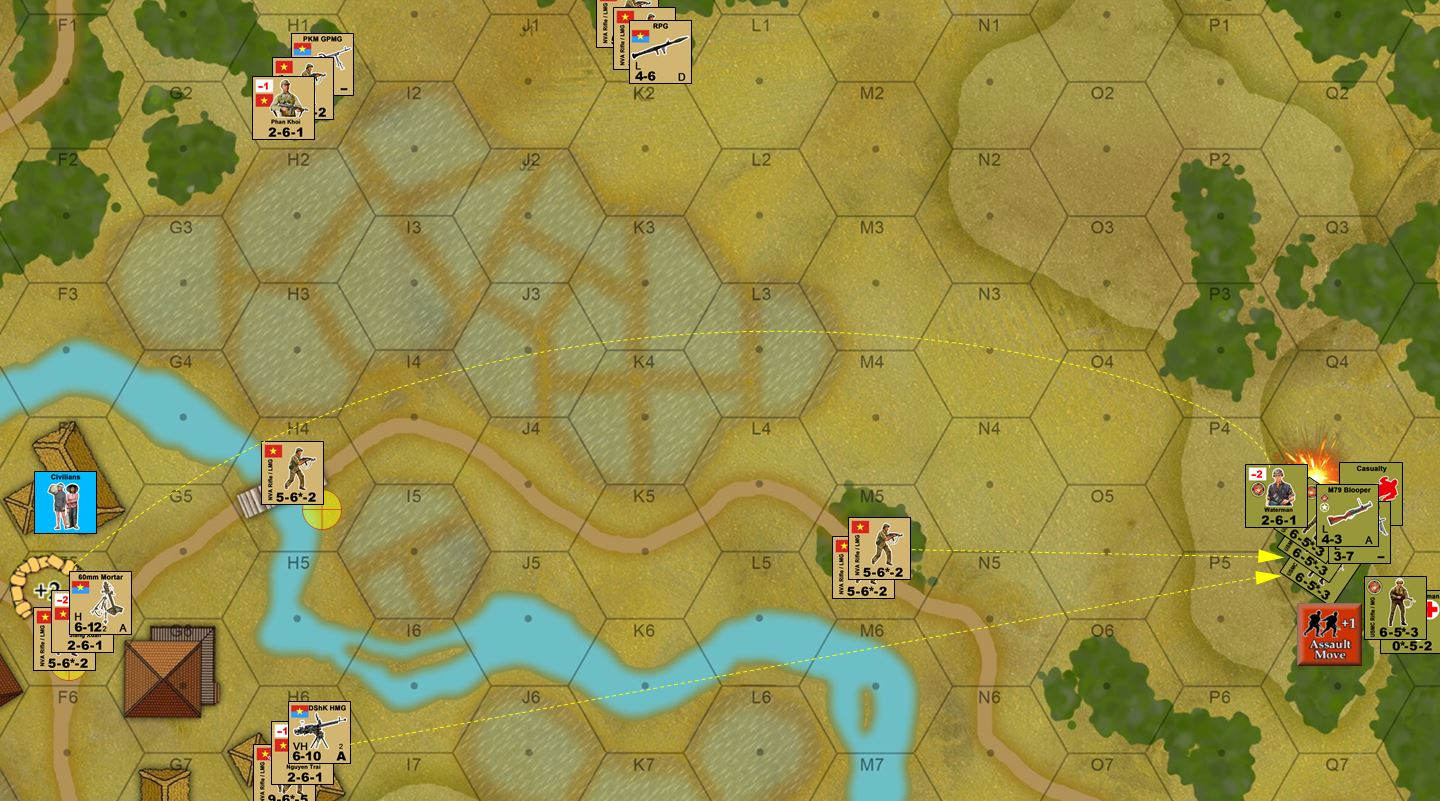 The worst opportunity fire comes in the north, where Captain Waterman's HQ platoon is hammered by very accurate fire from the NVA DShK 12.7mm HMG and that captured 60mm mortar (now commanded by the +2 NVA captain).
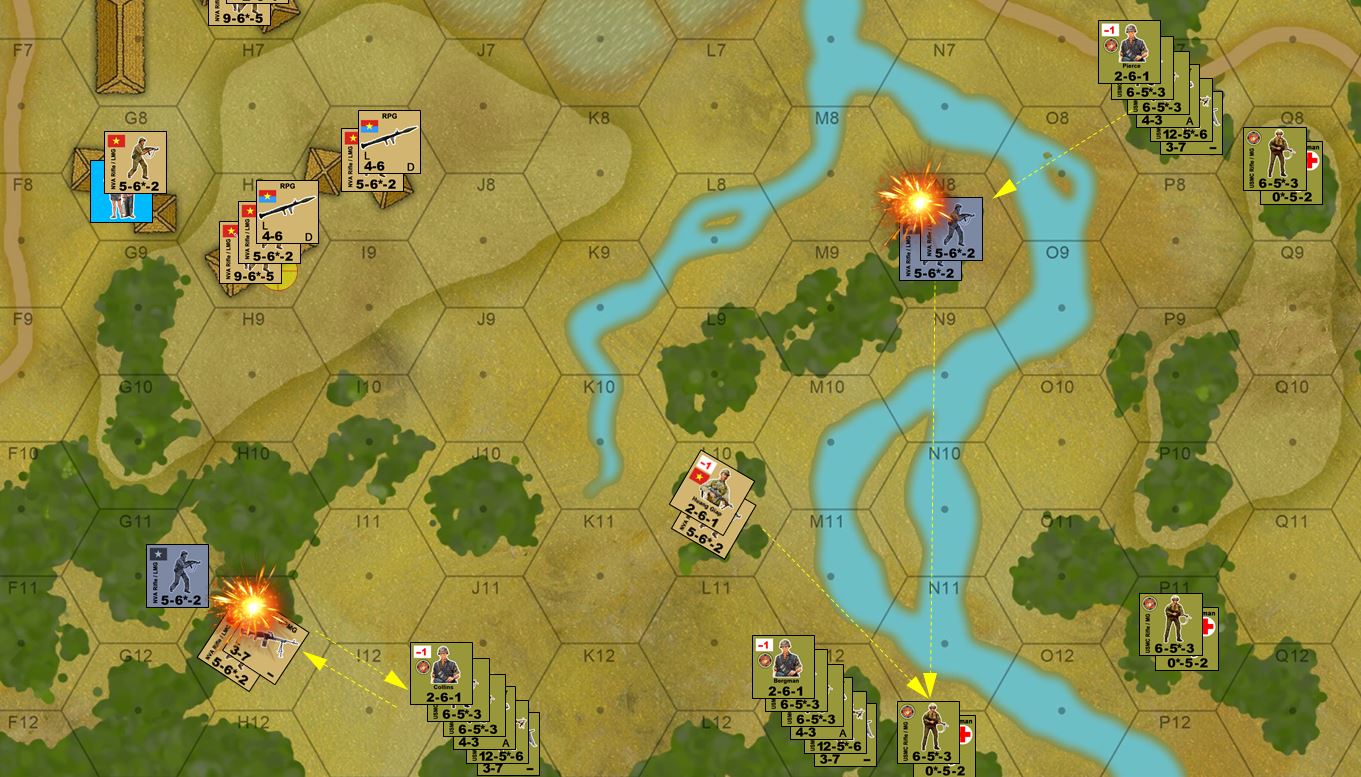 During the defensive fire phase of the NVA Turn 1, the Marines finally get a chance to hit back. Their firepower is ferocious, but they (as always) suffer from a frew drawbacks. One is range. Their 5.56mm (.223 Remington) M16A1s don't shoot as far as Soviet / Chinese AKMs (7.62mm COMBLOC), while the M79 "blooper" 40mm grenade launchers doon'
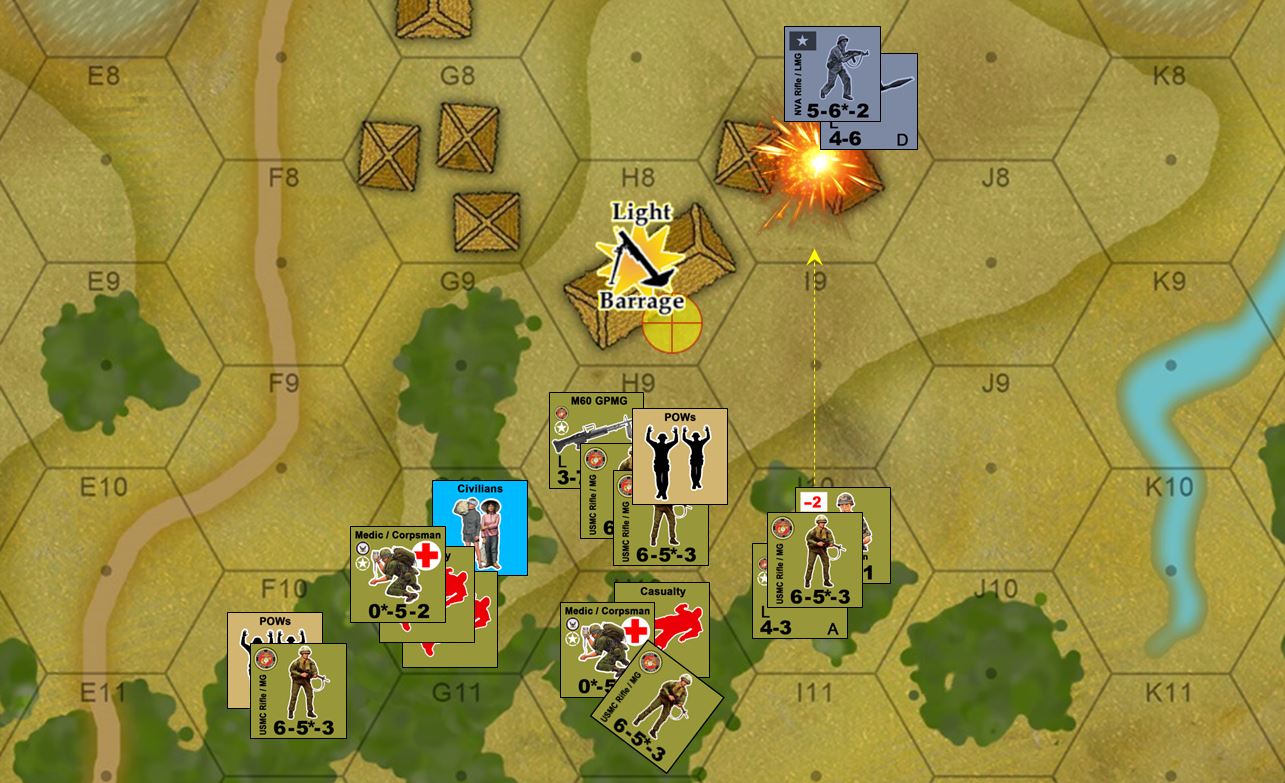
 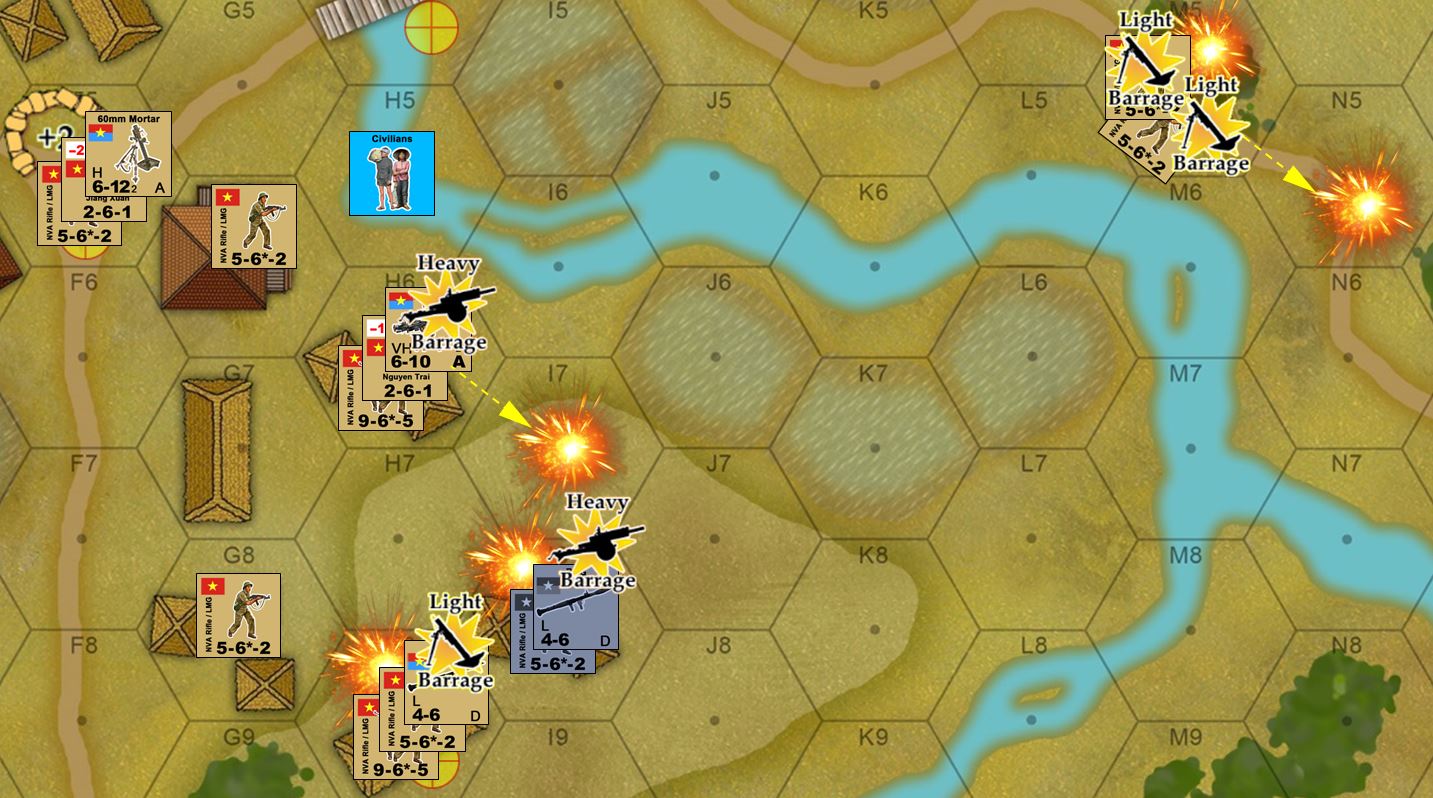 Marine Turn 2 starts with the Command Phase, when they call in all their off-board artillery. The "Light Barrage" and "Heavy Barrage" counters show where they're targeted, but they can drift, as shown by the explosion markers. Units set at an angle are pinned, units in gray are destroyed.
 With NVA units in the south having failed to rally from Marine defensive fire in Turn 1, plus the mortar barrages, the Marines are thus ready to launch a few "bloodless assaults" against entirely pinned NVA stacks ... assuming they don't hit any booby traps along the way. The new booby trap rules make them a little more dangerous, but also give the Marine player a chance to manage the risk by having his squads take their time moving through terrain, and thus the overall mechanic is less random.
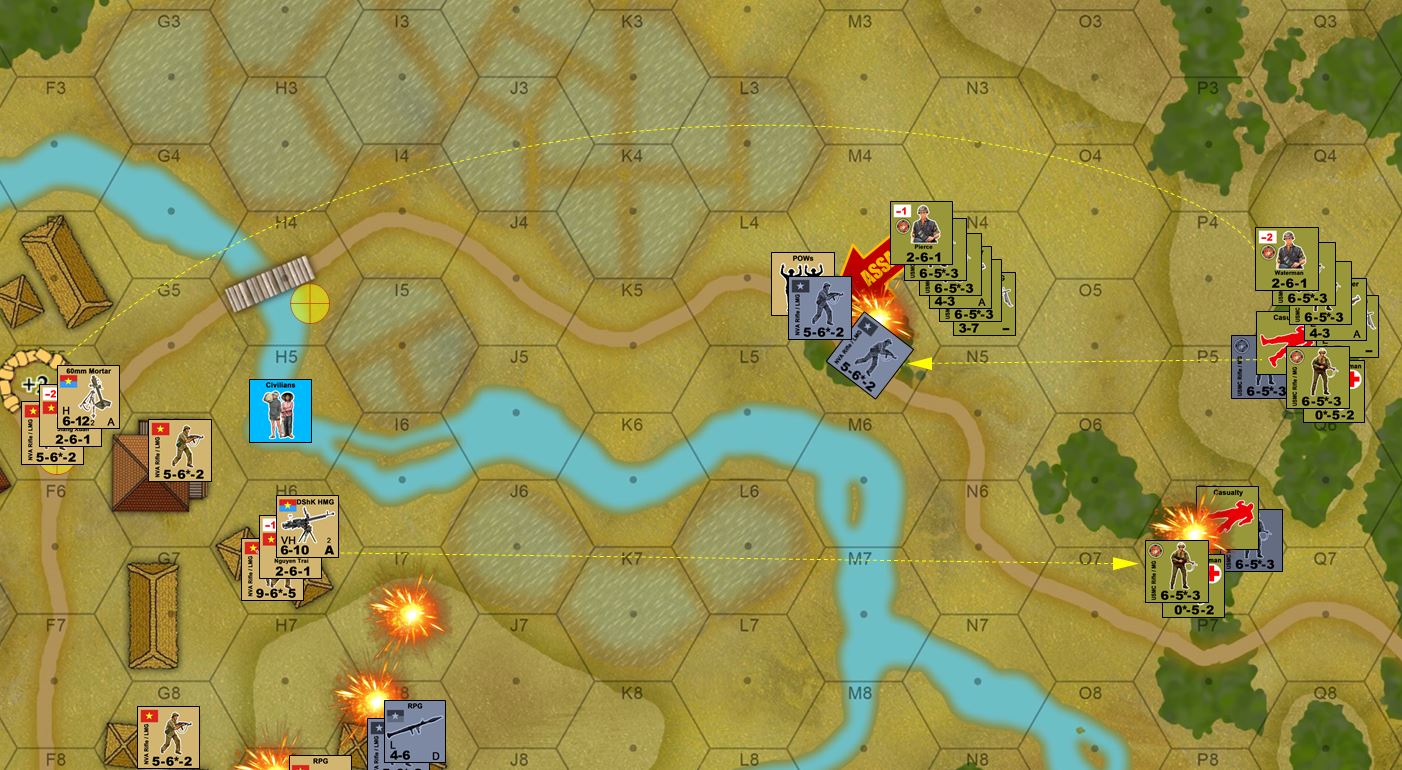 Further north, the Marines are having a rougher go of it. More bloodless assaults are being carried out against pinned NVA stacks, but NVA counterfire (that damned DShK and especially that mortar) are positively mauling Capt. Waterman's and 2ndLt. Pierce's platoons.
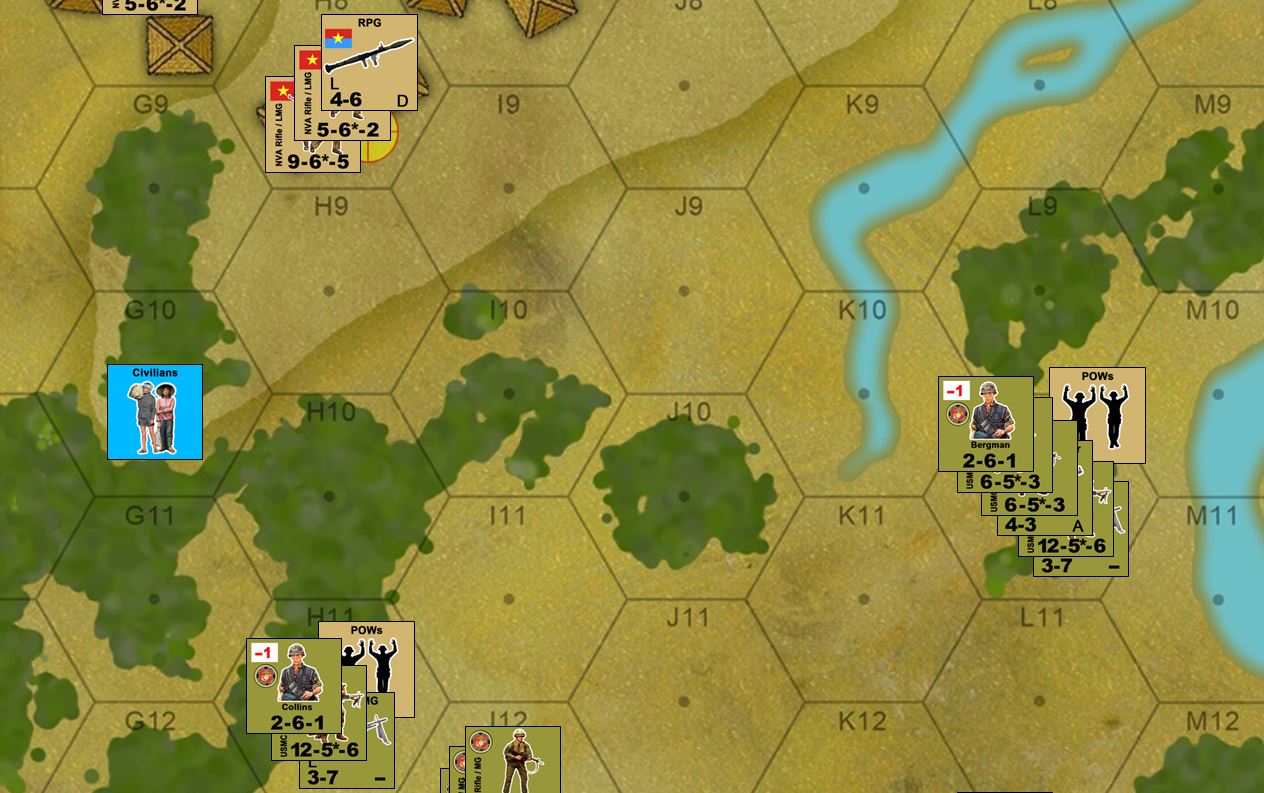 In the south, the battlefield falls momentarily quiet. All units are rallied, and its time to start evacuating prisoners back to the rally point.
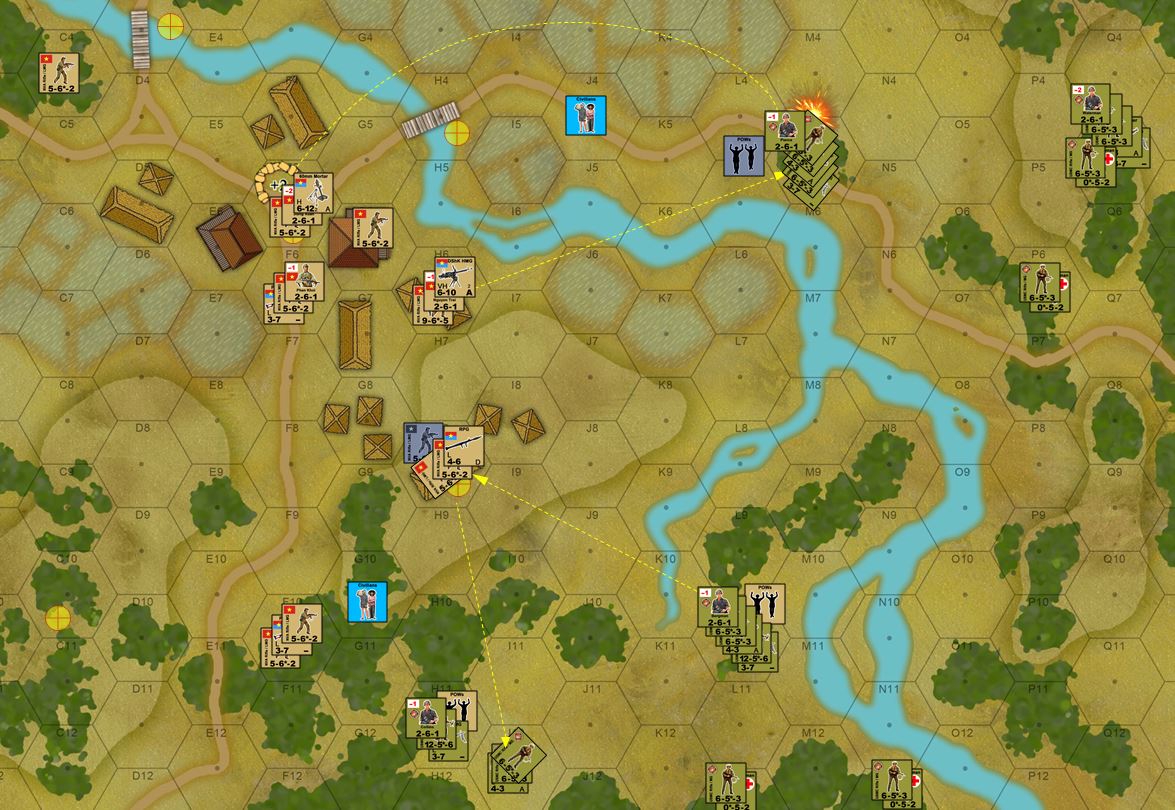 Pierce's platoon moved forward to try and get a bead on that mortar pit, but is now being pinned down by savage NVA mortar and HMG fire. There were actually POWs in the stack when it was hit, and these took the first casualties. The NVA are now basically gunning down their own men to keep them from falling into American hands.
 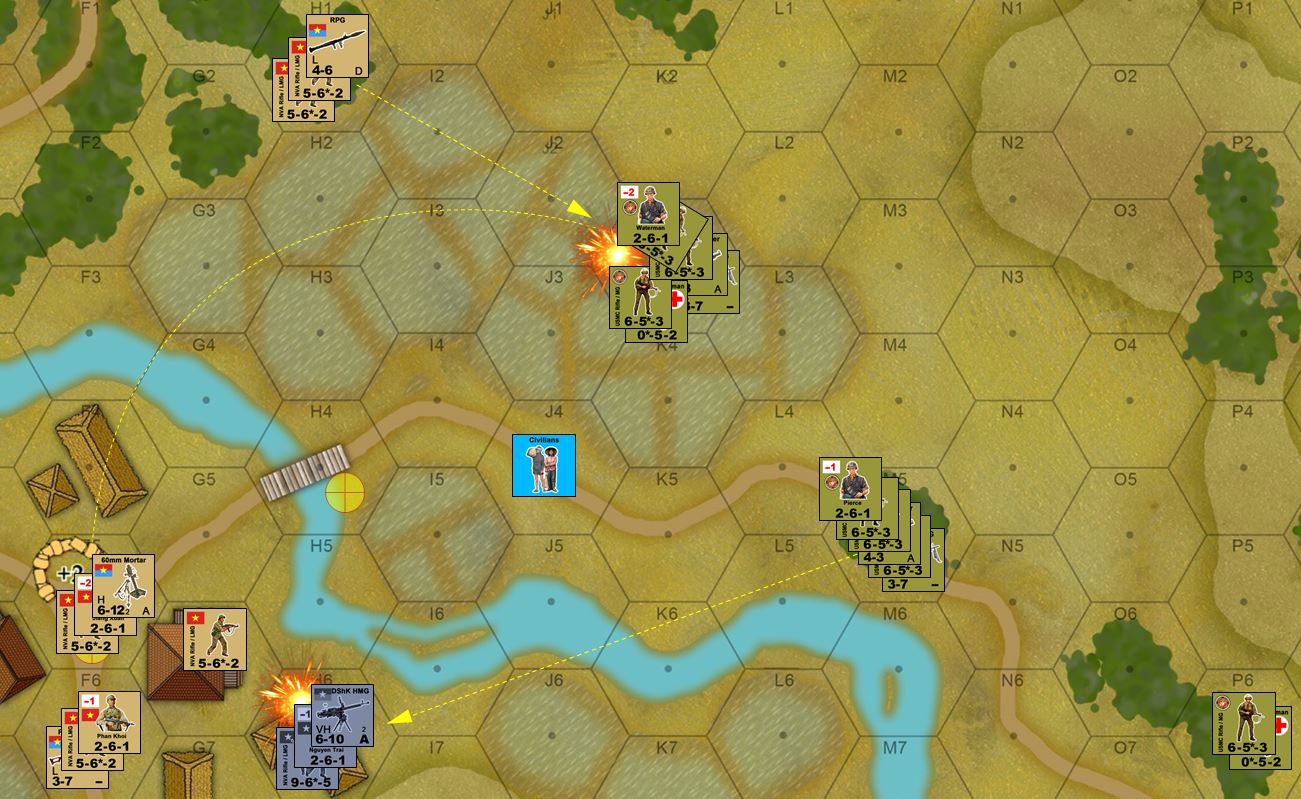 Captain Waterman rushes up with three fireteams in an attempt to take some of the pressure off of Pierce. This is a bad, bad move, and will really come close to losing the game for the Marines right here. Pinned down out in that rice paddy, with that murderous mortar team (assisted by +2 officer) continually dropping shells on them, and now in a cross fire of AK, PKM, and RPG fire, Waterman's men are in for a very bad day.
  Things take a very nasty turn for the Marines in the south as well, where TWO booby traps are hit, one where Collin's platoon is trying to get prisoners off the table and reconsolidate their position (I'm not over-extending this wing like I did in my game against Rasmus) and another booby trap goes off where my Navy corpsmen are trying to rejoin their platoons. At least Bergman's platoon is clearing NVA positions out of the hooches up on that ridge.
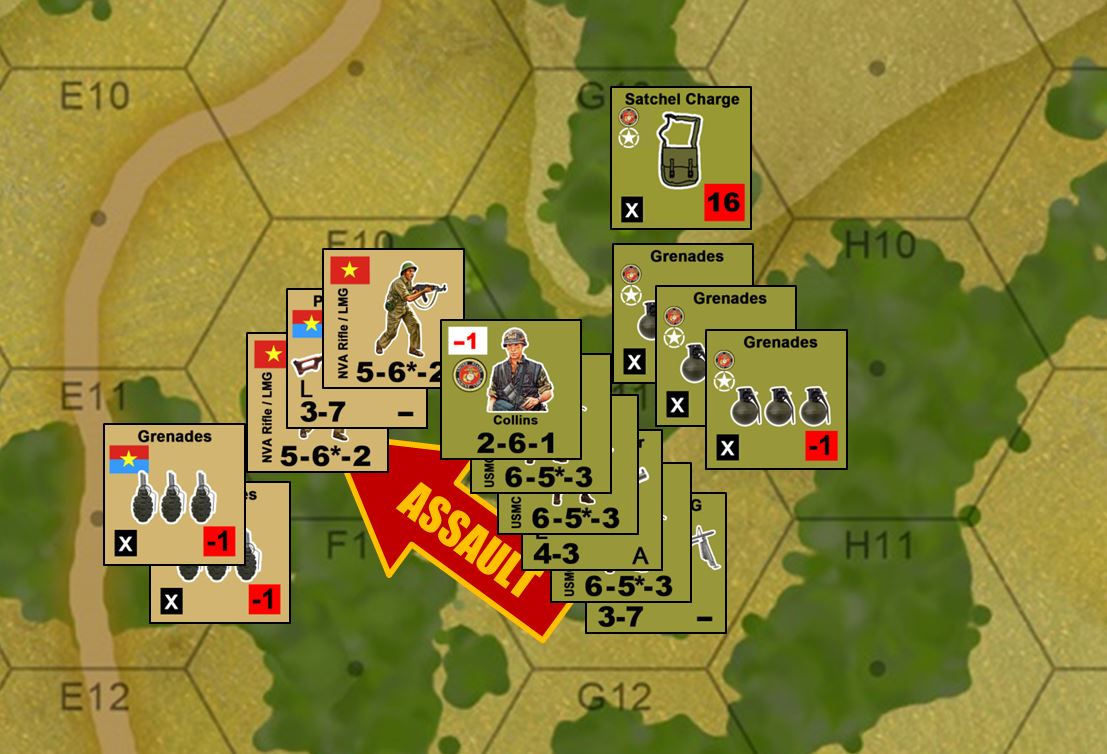 With Waterman and Pierce in real trouble up north, I have to break things loose in the south and hopefully put pressure on that MG and mortar pit from the south. Collins gets the order, and he leads his platoon in. The Marines have to lucky a few times here ... they have to NOT hit a booby trap running through the jungle (11 and 12 on 2d6), they have to dodge most of the NVA opportunity fire, then they have to win the assault, then they have to rally enough of their pins so t hey are not susceptible to counter-assault. Believe it or not, they more or less pull it off, assisted in no small pert by (again) ridiculous American firepower, and the judicious tossing of a satchel charge to help make their assault a lot easier.
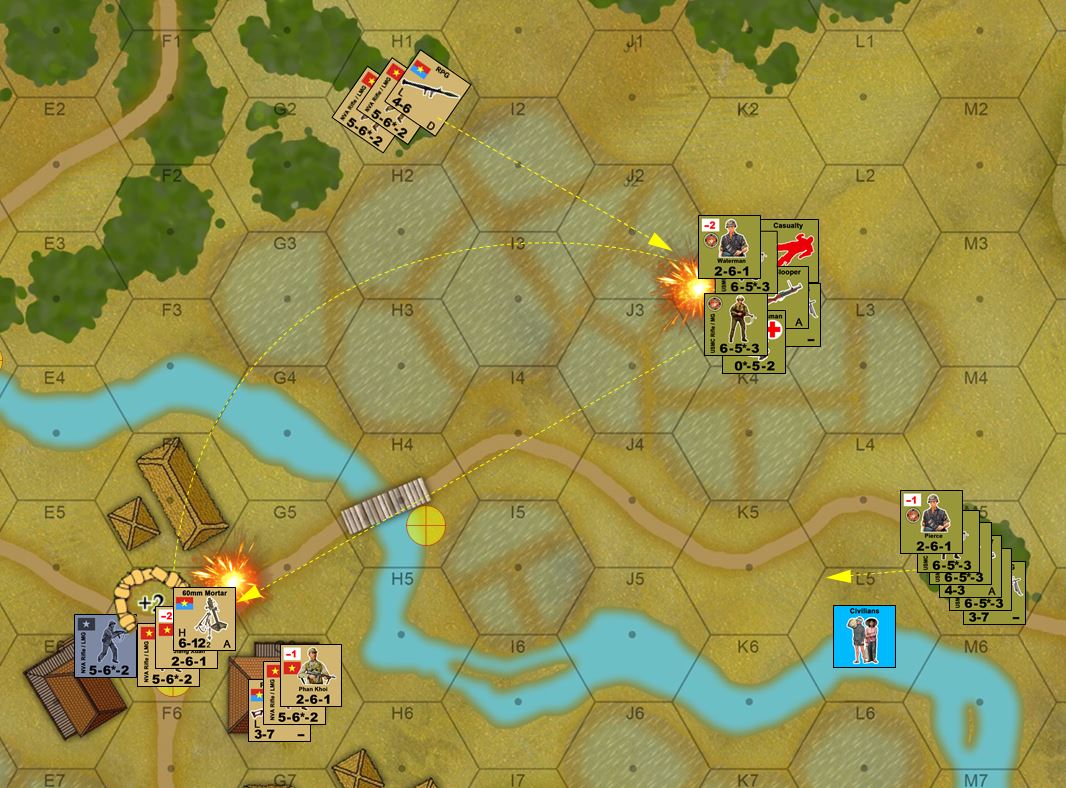 They'd better do something fast, because although Pierce and Waterman (pinned down in those rice paddies) are chipping away at the MG and mortar teams facing them, they're being scissored apart in turn. Damn, I REALLY wish I had saved at least one or two of those off-board artillery missions for that mortar pit. The Marines didn't have eyes on the target at the time, I should have waited. That mortar team has a +2 officer making their fire all the more accurate, and is rolling like a friggin' BOSS on top of that.
USMC vs. NVA, Hill Battles near DMZ, 1967 (replay)
So I’m trying this again, just to see if I get the balance right. I’m adding the US off-board artillery back in, but making the NVA booby traps a bit nastier, IF the Marines do not use Assault Movement (reduced speed, more safety, a Valor & Victory rule I didn’t use in the live game with Rasmus). Also firmed up the victory conditions and other rules for the scenario (most of which are more or less standard for Valor & Victory Vietnam).
Casualties: Every American Half Squad or officer or medic eliminated = a Casualty marker. After Action Phase: Medic can automatically evac one casualty marker assuming he is stacked with the casualty after Advance and Assault. Others can evac if they roll “Rally” (6 or 7).
Evacuated casualties = 3 VP for NVA player.
“Captured” casualties = 6 VP for NVA player.
NVA casualties = 1 for the US player.
NVA POWs (if evacuated) = 2 for the US player.
Civilians: Move during both sides movement phase. 1-3, no movement. 4-6, they move 2 hexes. 1d6 for direction. 1 = north, clockwise from there. Americans lose 6 VP for any civilian counter they kill. They are worth 2 casualty points if struck by intentional / unintentional fire.
POWs: Every NVA stack eliminated via close assault creates one POW. They have to be evacuated by an American infantry unit physically off the table via a friendly edge. One infantry type can carry off many POW counters. Must get to friendly edge of map, infantry unit can then rejoin the rest of the game. They are worth 2 casualty points if NVA wants to shoot at them.
Booby Traps: Every time a US stack moves in Movement Phase (not 1 hex in Advance and Assault Phase), roll 2d6 for the etack. 11-12, a booby trap is hit, immediately eliminates one half squad / medic / officer, replace with casualty marker. US can reduce chance of only a 12 on 2d6 by using Assault Move (+1 Cover) rules.
Objectives: Each objective is worth 3 VP for the owning player at the end of SIX TURNS.
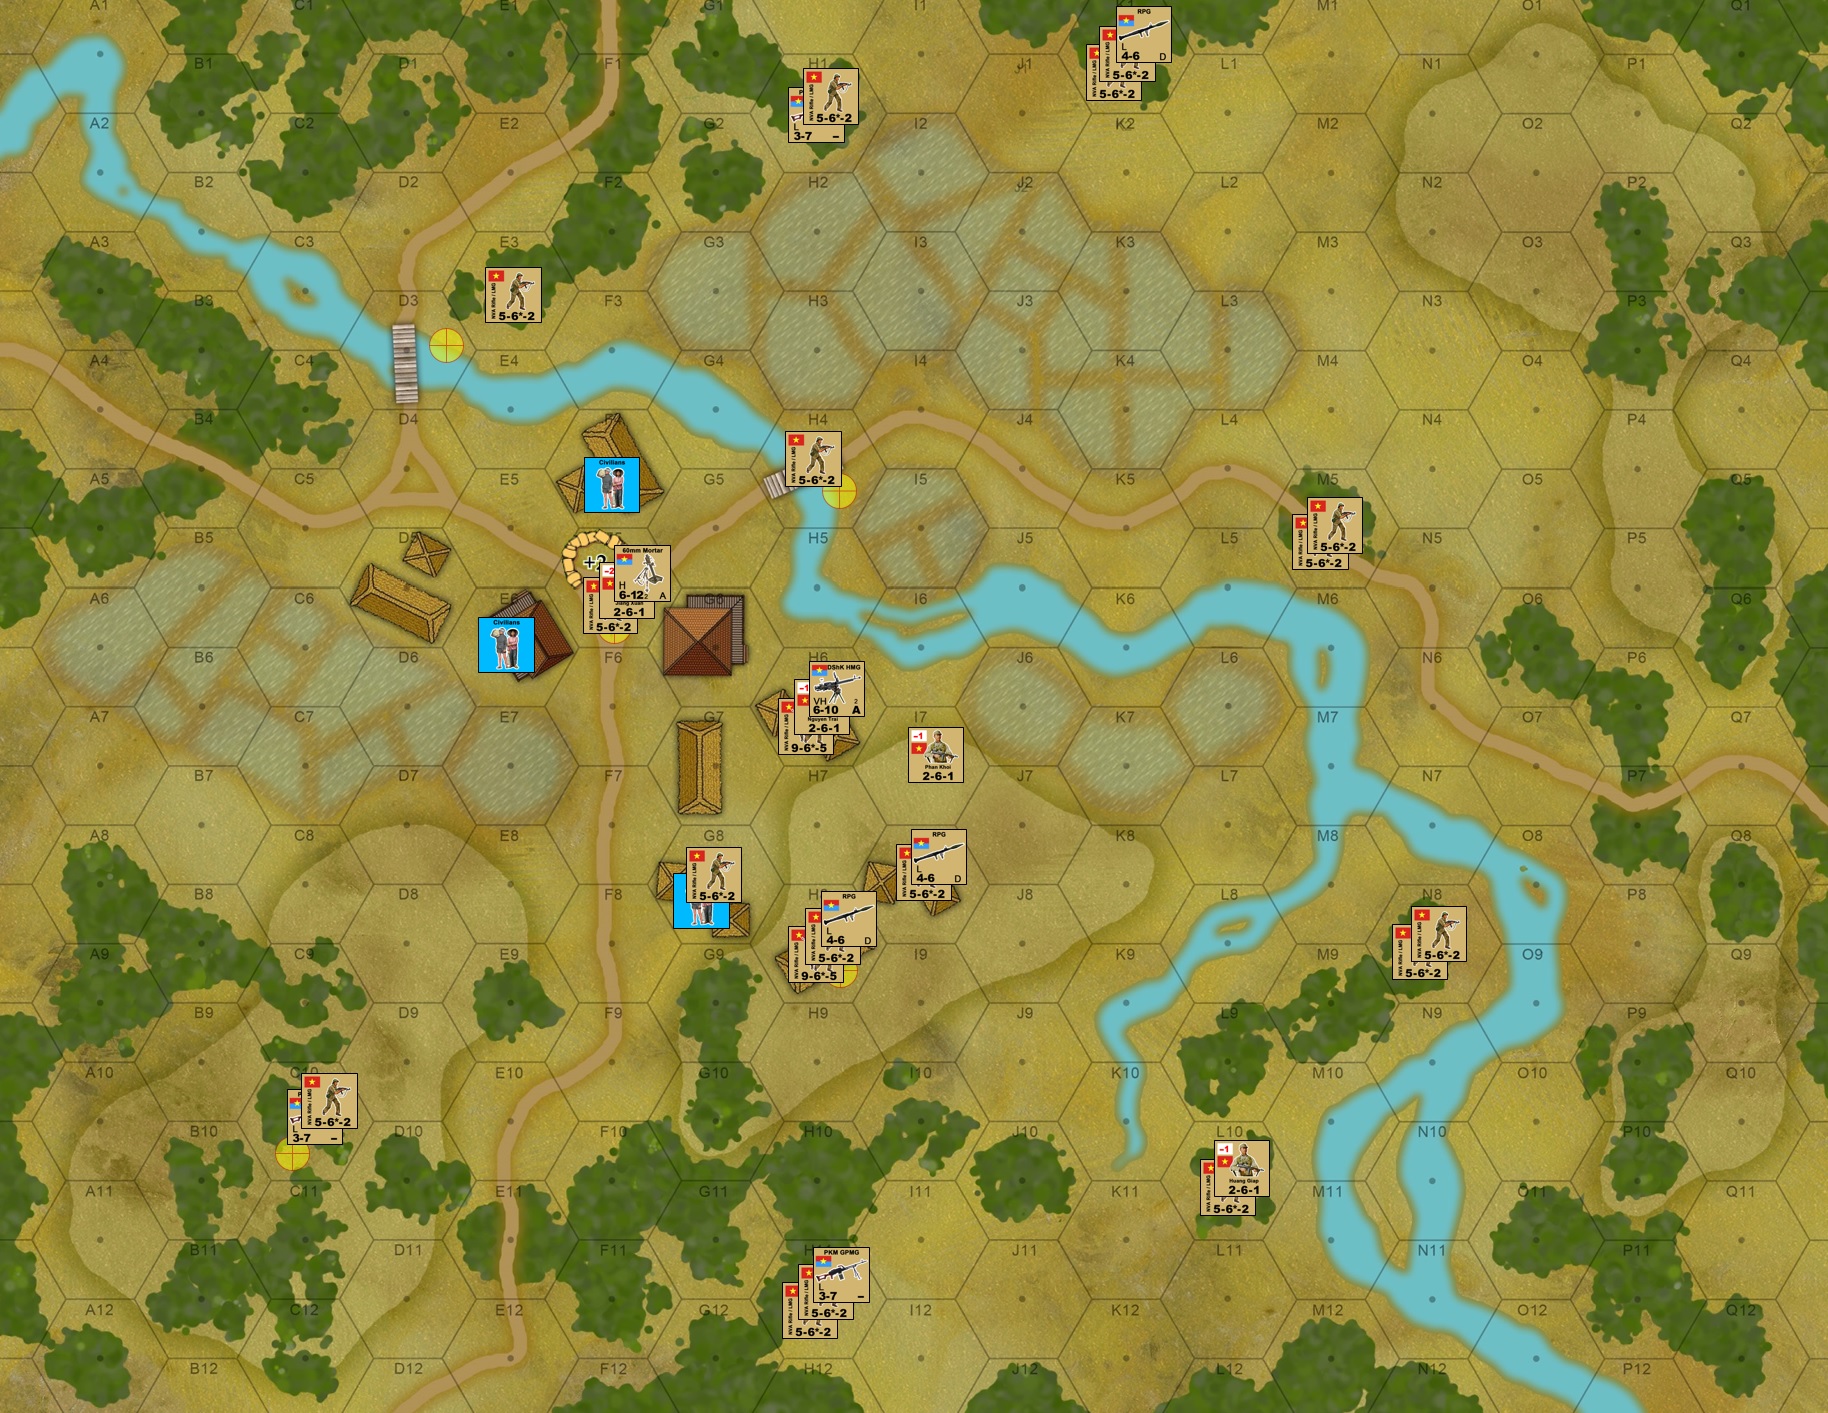
So below we have the NVA set up. I have broken more squads into fireteams (half squads), have the +2 commander with the mortar team, and was a little more aggressive in “tripping” the Marine entry onto the eastern, northeaster, or southeastern edges of the table with forward deployment of NVA spotter / GPMG teams
USMC vs. NVA, Hill Battles of Vietnam, 1967 (p3)
The battle of @rasmus ‘ NVA (320th PAVN Division) against my Marines of “Lima” Company, 3/4th Marines (Camp Carroll, 3rd MarDiv, I Corps) continues …
*System: Valor & Victory (home-written “Vietnam Edition”).
*Setting: December 1967, near the DMZ between North and South Vietnam, along tributary of the Quang Tri River, toward the Laotian border.
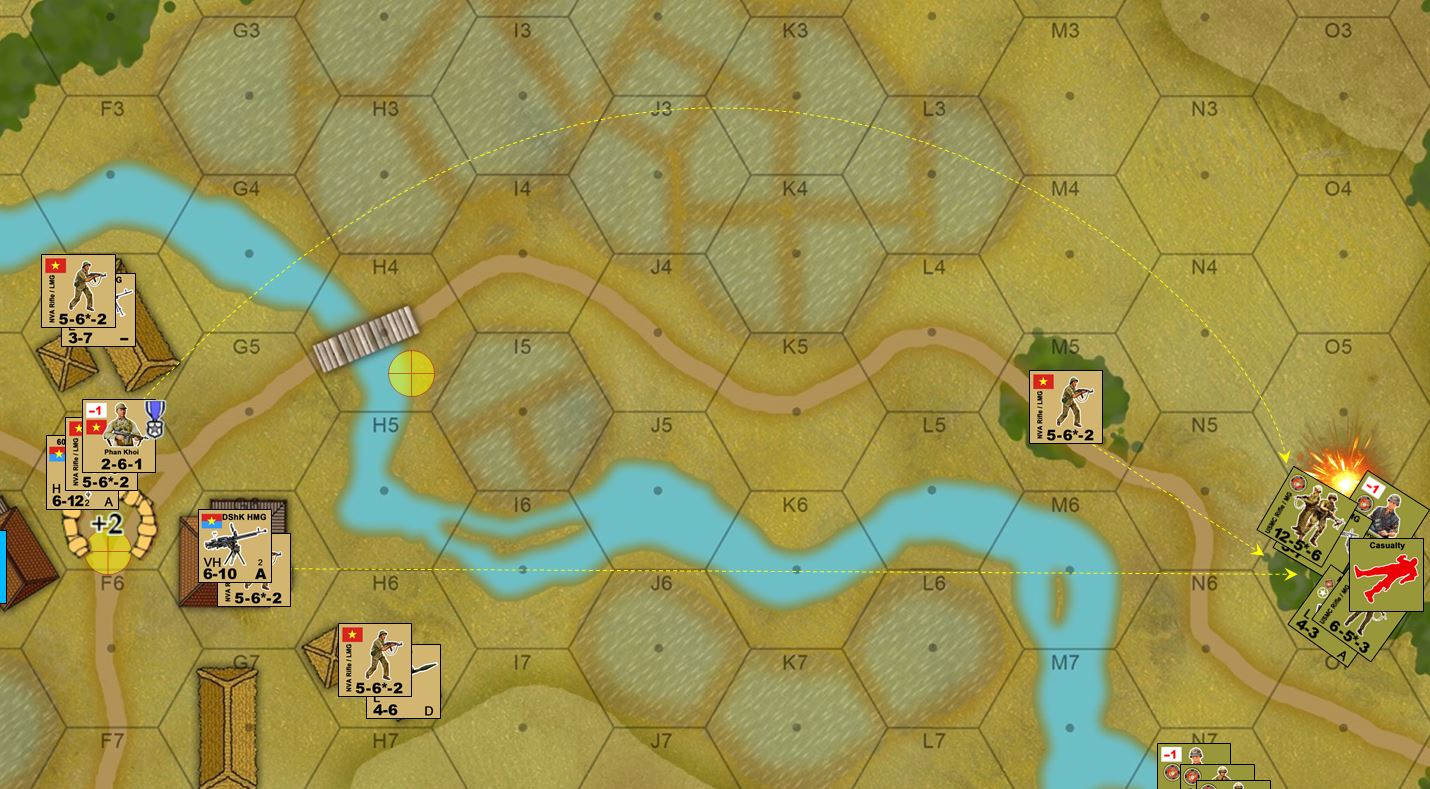
Already things are going pretty badly for my Marines, trying to approach and clear this NVA-held village. Their over-extended left wing has already been hit twice by devastating and bloody close assaults by die-hard NVA assault groups, their commanders all-too eager to exchange squad-for-squad with far more “expensive” USMC infantry. The right wing of my advance has been more or less halted by pinpoint MVA mortar and DShK heavy MG fire from the village, streaking out across those open rice paddies. My battalion 81mm mortars have more or less splashed all over the place and honestly didn’t kill anyone.
Now, to add insult to injury, as I try to pull my right-wing assault down to reinforce my left wing assault, as the last squads fall back to redeploy (screened from more of that DShK fire), they instead hit a booby trap, instantly knocking out a fireteam and causing another casualty counter that must be evacuated from the battlefield.
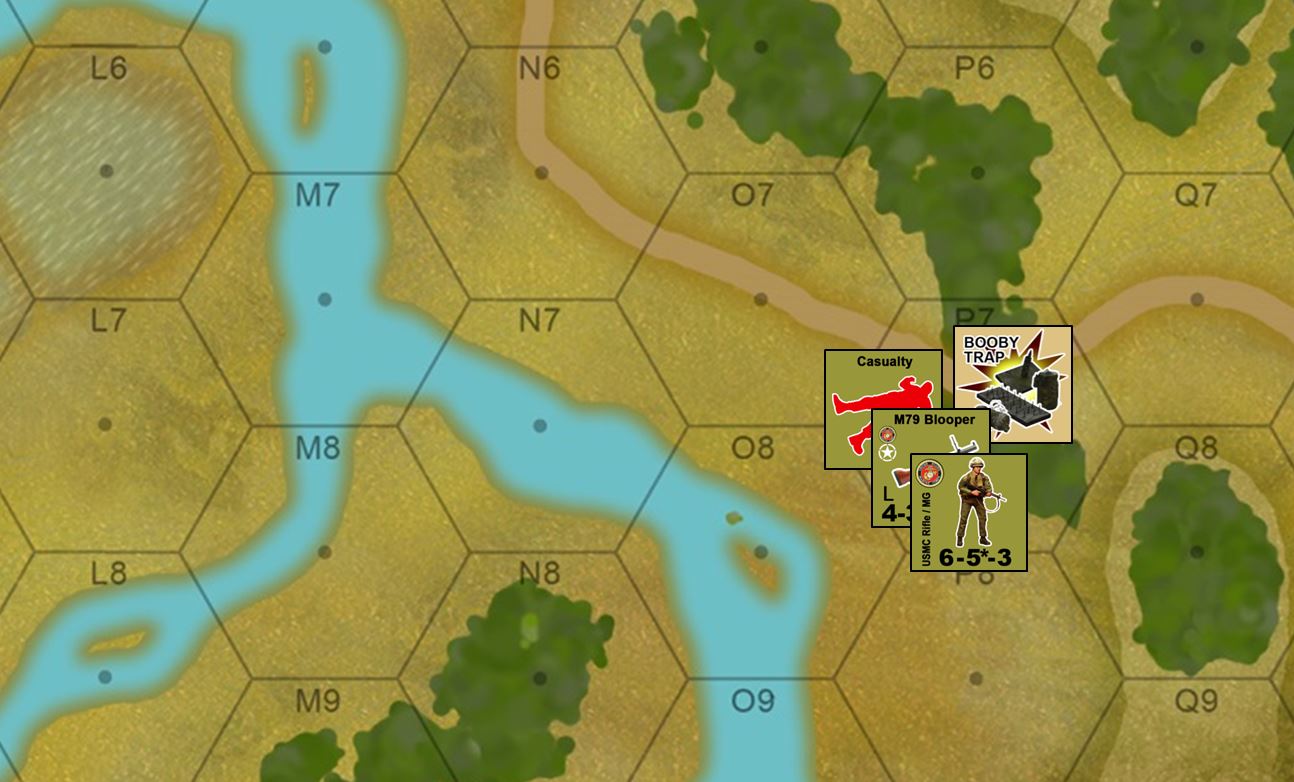
The big picture at the beginning of Turn 4, with Captain Waterman pulling in the platoons of 2ndLts Pierce and Bergman into a renewed push on the village from the southeast. If there’s any silver lining to the Marines’ clouds, it’s that these desperately bloody NVA charges have seriously depleted Communist manpower and killed off all their officers, leaving the remaining fireteams huddled in the center of the village (fortified mortar pit dug in with sandbags).
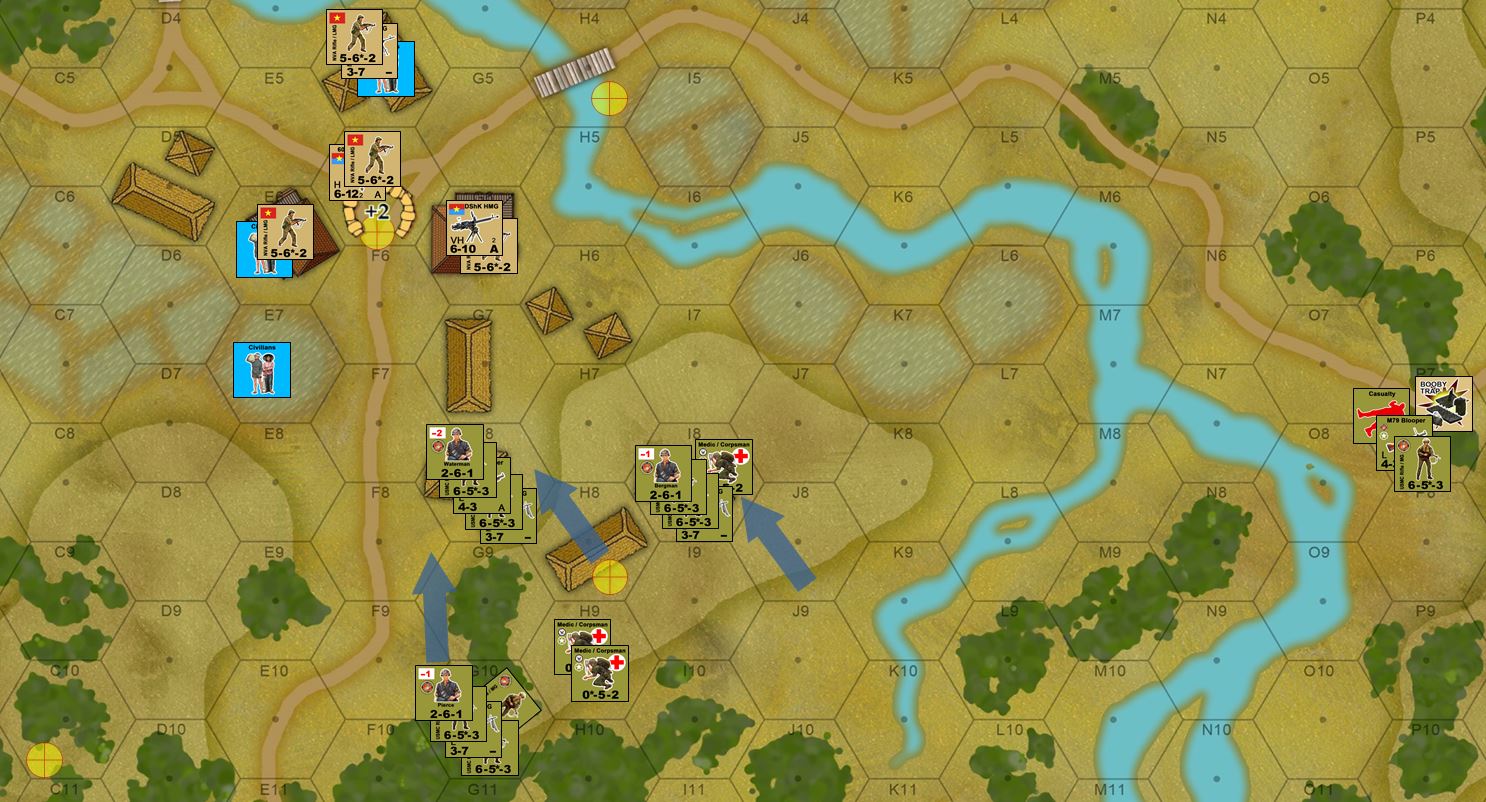
So Rasmus has two choices here. Pretty much the only way I can even come close to winning this game is if I take all the objective hexes, and perhaps some prisoners as well. He can either make a last stand, and hope to cut another bloody swath out of my Marines as we mount the game-ending assault. Or, he can accept the fact that I’ll take all the objective hexes, and instead use the time-honored Vietnamese tactic of melting back into the jungle and off the table, denying me the victory points of NVA casualties and POWs.
For better or worse, he chooses the former. The NVA will mount an uncharacteristic stand. Perhaps it’s the fact that there are no officers left, and their last orders were to fight the American imperialists.
In any event, Captain Waterman has pulled his company together for the final assault.
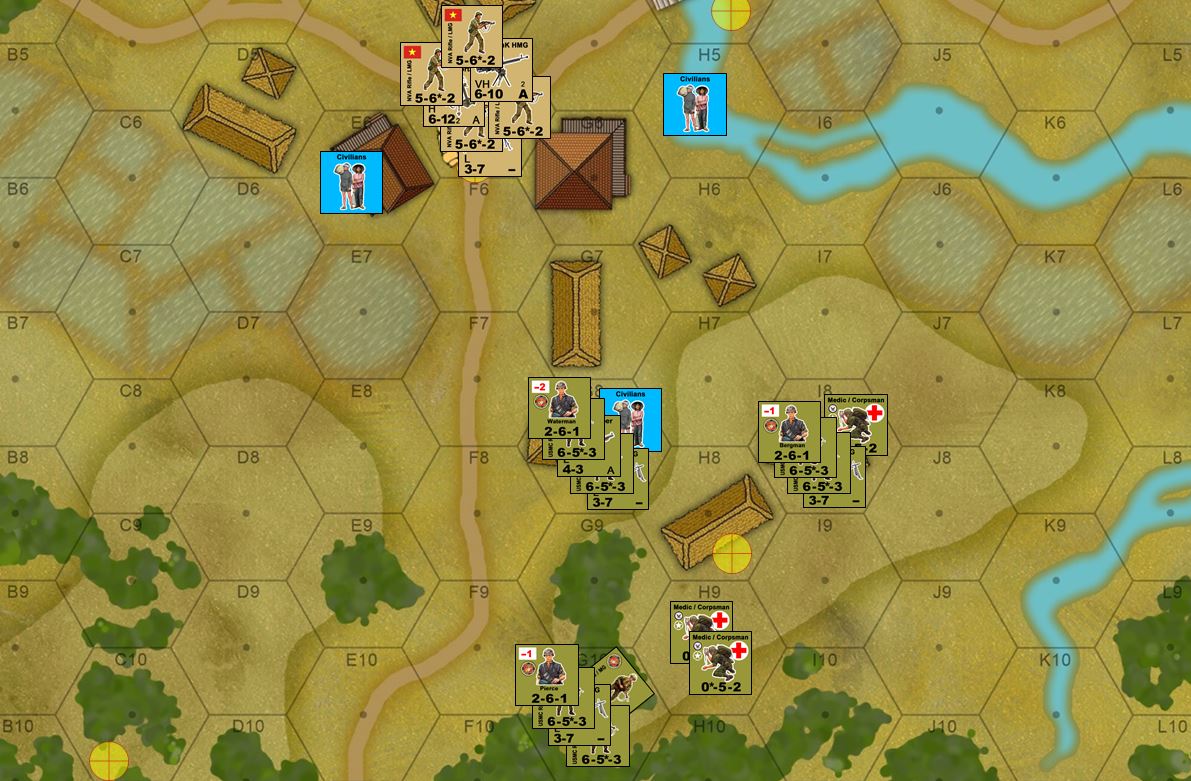
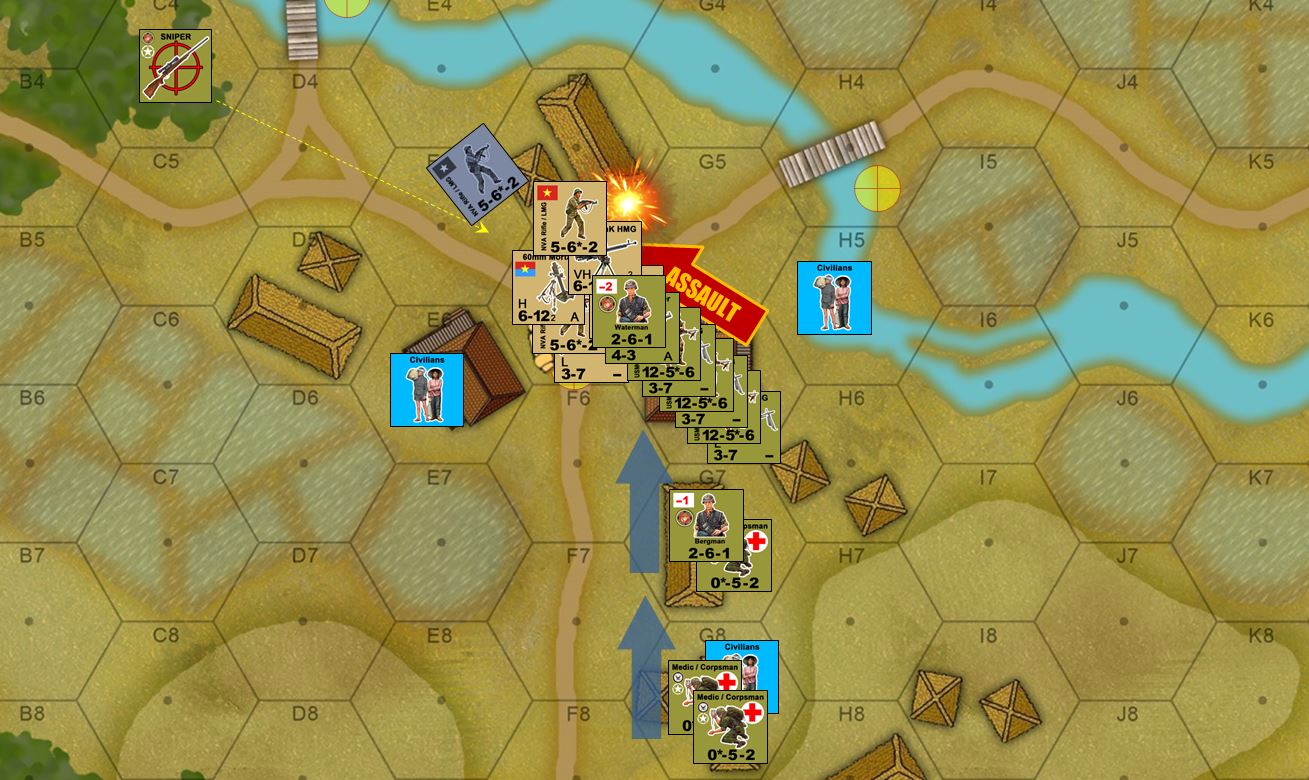
Captain Waterman personally leads the assault into the final NVA position on Turn 5. Now here, the Marines finally catch a real break.
Rasmus adds up everything in his hex into a final opportunity fire, hoping to gun down Marines as they rush his position. Here’s what happens, though. He rolls boxcars (all the firepower checks in this game are 2d6, low rolls better, so boxcars are the worst possible roll. Not only does all the NVA fire miss (perhaps panicked as they realize their end has indeed come), but per Valor & Victory rules, whenever you roll boxcars on a firepower check … an enemy sniper appears.
So a Marine sniper, with his M40 rifle emerges from the jungle behind the NVA and immediately makes a sniper attack on the stack that rolled the boxcars. I roll a d6, score a 4, subtract the +2 defense bonus afforded by those sandbags, and thus knock out an NVA fireteam (2 casualty points per half squad).
Alternatively, Rasmus could have chose to pin down two fireteams rather than killing one, but that would just lead to two fireteams immediately dying as soon as my assaulting Marines jumped into the sandbags and put a pistol, entrenching tool, or K-Bar into someone’s face.
The assault goes in and with a positively sick number of firepower points, wipes out the NVA position, “tabling” Rasmus’ force. But honestly, he’s the NVA, he’s supposed to be tabled or run away. It’s all about playing for time, and inflicting American casualties, of which there has already been far, far too many. And this assault has cost me still more, with three NVA fireteams and +2 sand bags = 5 required casualty points. I kill off half a squad for 3 casualty points and pin down two more fireteams, ending the battle.
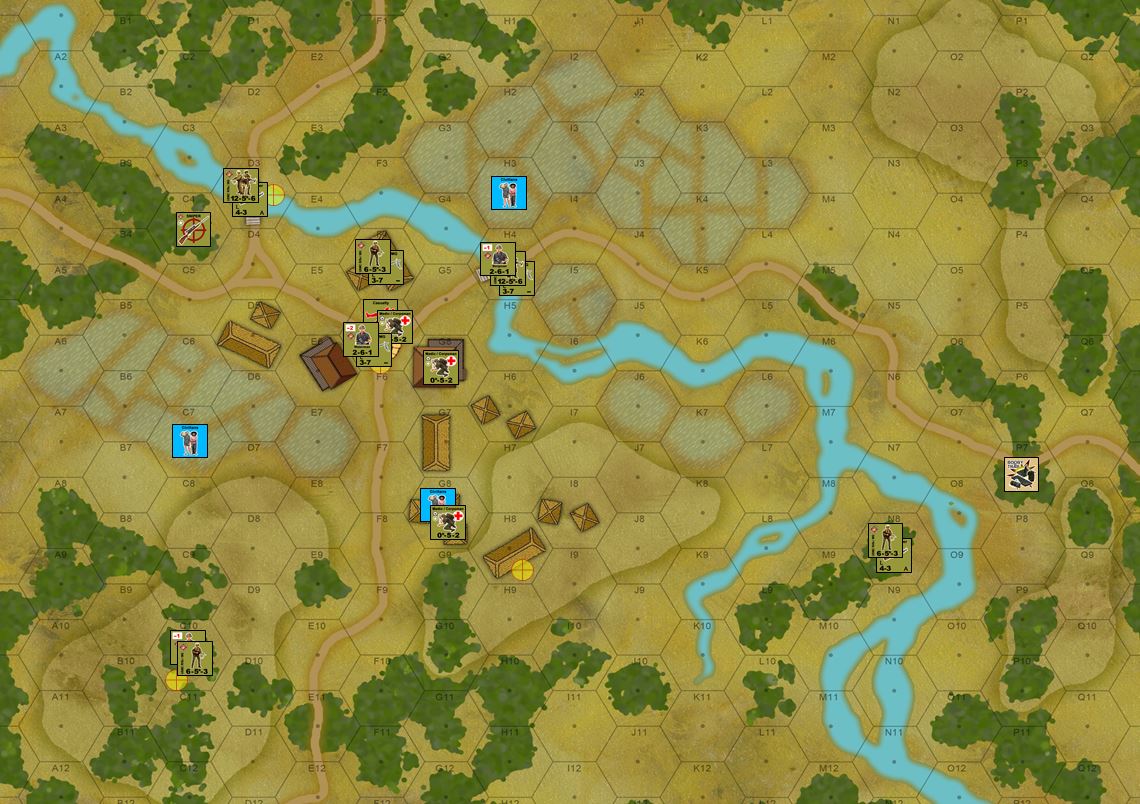
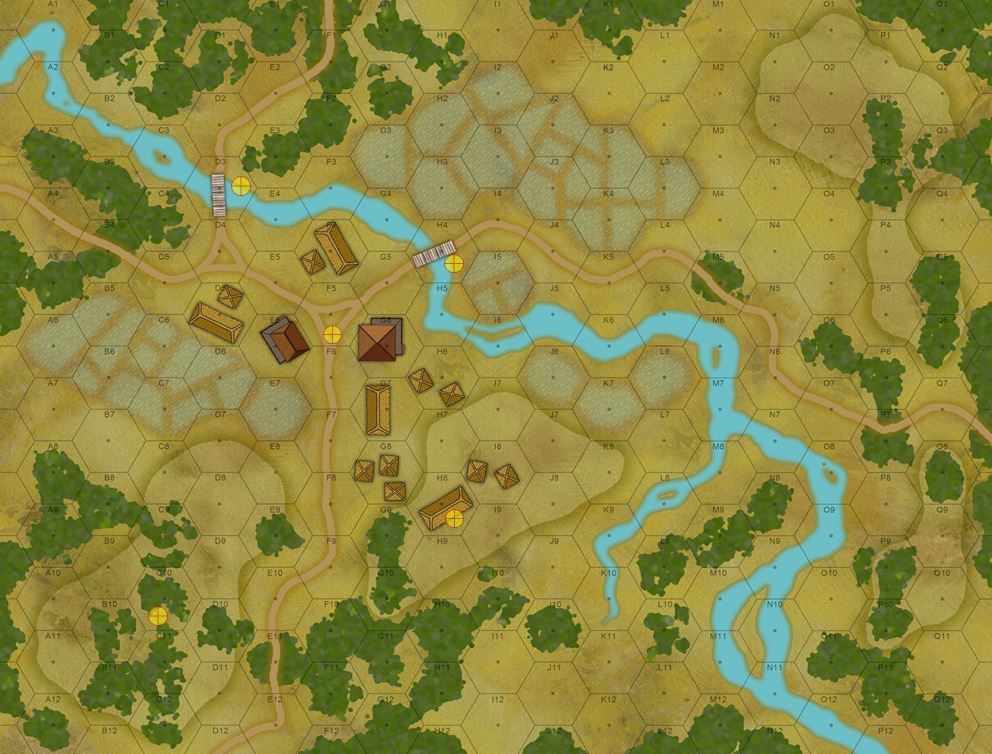
On Turn 6, I have enough time to spread out and take all the objective hexes (bridge hexes H4 and D3, village hexes F6 and H8, and high ground hex C10). Last-minute casualties are successfully evacuated during the after-action phase of Turn 5, and no civilians were hit. Honestly, I would also have taken an NVA POW counter here (successful US assault on a Vietnamese position), but I would not have had time to get him evacuated, so wouldn’t get the victory points for this anyway.
So here’s the score. As often happens in asymmetrical warfare, the “stronger” side wins the battle but loses the game. There’s just no way in virtually any realistic Vietnam War game that the NLF or PAVN will ever stand up and defeat American units in a face-to-face fight. They will never hold the field. They will either be wiped out or make a frustrating withdraw off the field, melting into the jungle in true guerilla war style. They’re real objective is either stalling for time or causing unacceptable Free World casualties.
In this, Rasmus has succeeded admirably, as shown in the scoreboard below.
Now, the only thing I would add to this is the one POW counter we forgot to add back on Turns 3 and 4 (Lt. Phan Khoi in hex G10). I would have had time to evacuate that POW to the rear, thus giving me 3 more victory points. But even so, the score would have been 48 to 54, still a clear NVA victory.
So while the operation was an American success (the village was taken completely), it’s more or less crippled Lima Company’s ability to conduct further sweeps through the Hill Country northwest of Camp Carroll through the rest of December, 1967. Accordingly, 3rd Bn / 4th Marines will have a tougher time countering further NVA infiltration across the DMZ and overall buildup or the 320th PAVN Division in preparation for the Tet Offensive at the end of January, 1968.
Congrats to Rasmus on the win!

USMC vs. NVA, Hill Battles of Vietnam, 1967 (p2)
The battle of @rasmus ‘ NVA (320th PAVN Division) against my Marines of Lima Co, 3/4th MArines (Camp Carroll, 3rd MarDiv, I Corps) continues …
*System: Valor & Victory (home-written “Vietnam Edition”).
*Setting: December 1967, near the DMZ between North and South Vietnam, along tributary of the Quang Tri River, toward the Laotian border.
Here we see the aftermath of that opening firestorm in the south. Note that Marine losses are not simply removed, but replaced with Casualty counters. These casualties must be evacuated by Navy Corpsmen (medics), of by their comrades if they make the required roll (all men have first aid kits, field dressings, morphine syringes, etc.).
This may have looked like a suicide charge by the NVA, or simple matter/antimatter annihilation of forces. It isn’t. Remember these are squads and fireteams, an eliminated unit means it is “combat ineffective,” each 4-man fireteams is probably 1 killed, 1 seriously wounded, 2 lightly wounded or panicked, etc. But whether or not to divide or combine squads, who fires, who moves, who uses grenades or satchel charges, how to apply casualty points, when to pin, when to bite the bullet and take the losses, where to apply your officer bonuses, there are many tough tactical decisions being made in this furious and incredibly violent opening to our Vietnam Valor & Victory game.
In all, may have overextended my left wing a little with Collins’ platoon, an opportunity Rasmus seized upon and hit very, very hard. He’s actually winning right now, badly, in victory points.
Turn 2. Now that I’m on the table with spotters and radios, I call back to battalion for my mortar strikes. They’re very disappointing. One drifts completely off the target and actually almost lands on civilians and my own wounded. The other two land on the DShK position (I can’t see his mortar pit) but do very poor damage due to some bad die rolls. Actually no one is hurt, Rasmus is able to cover the inflicted casualty points with some pins. So the gun is silenced for now, but will be back up in a minute.

In the south, Captain Waterman tries to get control of the chaos.
Civilians are running into his company area. Civilians, by the way, move almost like zombies in The Walking Dead. Neither side controls them. At the start of every movement phase, they roll to see if they move. If they do, they move 2 hexes in a random d6 direction. So these civilians are rushing towards us for some reason (perhaps some of them have collaborated with the US MACV or Saigon government, and fear reprisal at the hands of the NVA).
Gunfire from two fireteams (supplemented by some 40mm frags from the M79 “Blooper”) kills off that RPG team lurking in those hooches to the north. This clears the southern slope of that hill for movement, including more an assault on Lt. Trai’s position. He’s eliminated, but whenever an NVA position is successfully assaulted by US unit (and not immediately counter-assaulted), an NVA POW counter is created. I also bag a prisoner to the west, as Waterman’s Marines mop up NVA survivors of the bloodbath assault on Collins’ platoon. Meanwhile, Navy Corpsmen are rushing in to start securing and evacuating casualties from Collins’ platoon.
In all, it’s a classic Vietnam scene here. Casualty triage and dustoff, Vietnamese civilians in the way, NVA prisoners being secured, checked for intelligence, and evacuated to the rear.
The problem is, this all takes time. My whole Turn 2 is going to be pretty much just sorting out this mess, when I would rather be rushing forward and taking all those objective hexes suddenly left open. Rasmus is using this time to shuffle his remaining NVA officers, squads, and support weapons, ensuring that this battle is actually far from over.
Turn 3, and I finally have the southern slope of this village hill secured and cleaned up. Two POW groups evacuated. Most casualties secured for dustoff. I’ve given up on that approach from the east(that DShK is too threatening and these is very little cover across those open rice paddies), Lts. Pierce and Bergman are moving their platoons down the river to join with Waterman’s platoon for an new combined push over that hill to enter the village from the south.
Meanwhile, Capt. Waterman himself has taken some men to the high ground and secured the first objective hex.

Disaster strikes! Again, I left that left wing a little too exposed, and Rasmus seizes the chance. Lt. Phan Khoi, the lieutenant who has more or less halted my eastern attack with the DShK and 60mm mortar, now blitzes south down the road, assaulting some of my exposed Marines where corpsmen are still trying to clear up casualties. I do next to nothing in opportunity fire, and none of the other Marine units can actually see what’s happening.
This is bad. As the NVA attack comes in, it naturally succeeds, although one NVA squad is destroyed in the process. But the Navy Corpsman and the Marine fireteam in the hex are now casualties, and because this assault succeeded, the NVA occupies the hex. This means these two casualties just inflicted (plus the one already in the hex the corpsman was treating) are in NVA hands. This will count as 6 victory points each for the NVA, not three.
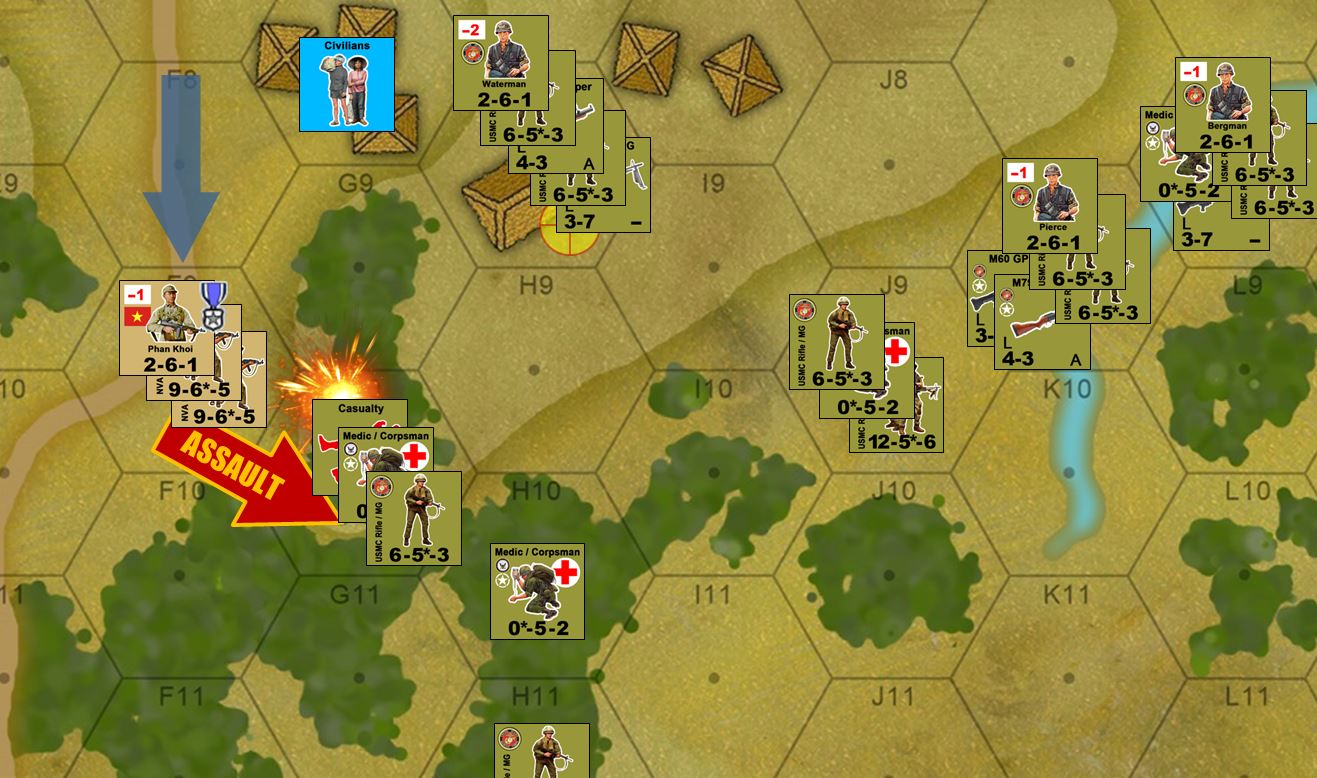
2ndLt. Pierce gets the order and he rushes down the rest of that river bank, thank hooks up with his platoon for an immediate counterassault into Phan Khoi’s hex. This assault succeeds, although almost any assault (especially one in woods or buildings) will cost casualty points I can already not afford.
Now one thing I honestly forgot here is that this assault was supposed to produce another POW counter I could evacuate, perhaps getting 3 victory points back. But to be frank, I think I’ve lost so many points already that this game might be a hopeless cause anyway.
See if I can save this in Part 3!
USMC vs. NVA, Hill Battles of Vietnam, 1967
Good morning, OnTableTop / Beasts of War!
Okay, as you may know, we’ve been running war games every weekend with members of the community via web conference. Players log on and play wargames with each other in real time, regardless of location, and we usually have at least a couple spectators as well. Many times it’s been Darkstar, but we’re also running wargames in Panzer Leader, Arab-Israeli Wars, and now Valor & Victory, the squad-based command-tactical wargame designed and published by Barry S. Doyle.
Originally written for World War II as sort of a “spiritual love letter” to the 1980s classic Advanced Squad Leader, Valor & Victory takes everything that was great about that game (but got perhaps a little too complex and cumbersome in later variants) and boils it down to a fast, pick-up-and-play system that the community (especially on BoardgameGeek) has embrace to update, add to, create new scenarios, units, and maps, and generally have a great time with.
Well, as you may remember from the Tet Offensive 50th Anniversary series we ran last January and February, I was able to rebuild Valor & Victory to play Vietnam era games, complete with US Army, US Marine, US Military Police, ANZAC, ARVN (Army of Republic of Vietnam), NLF (National Liberation Front, or Viet Cong), and PAVN (People’s Army of Vietnam, or NVA) forces.
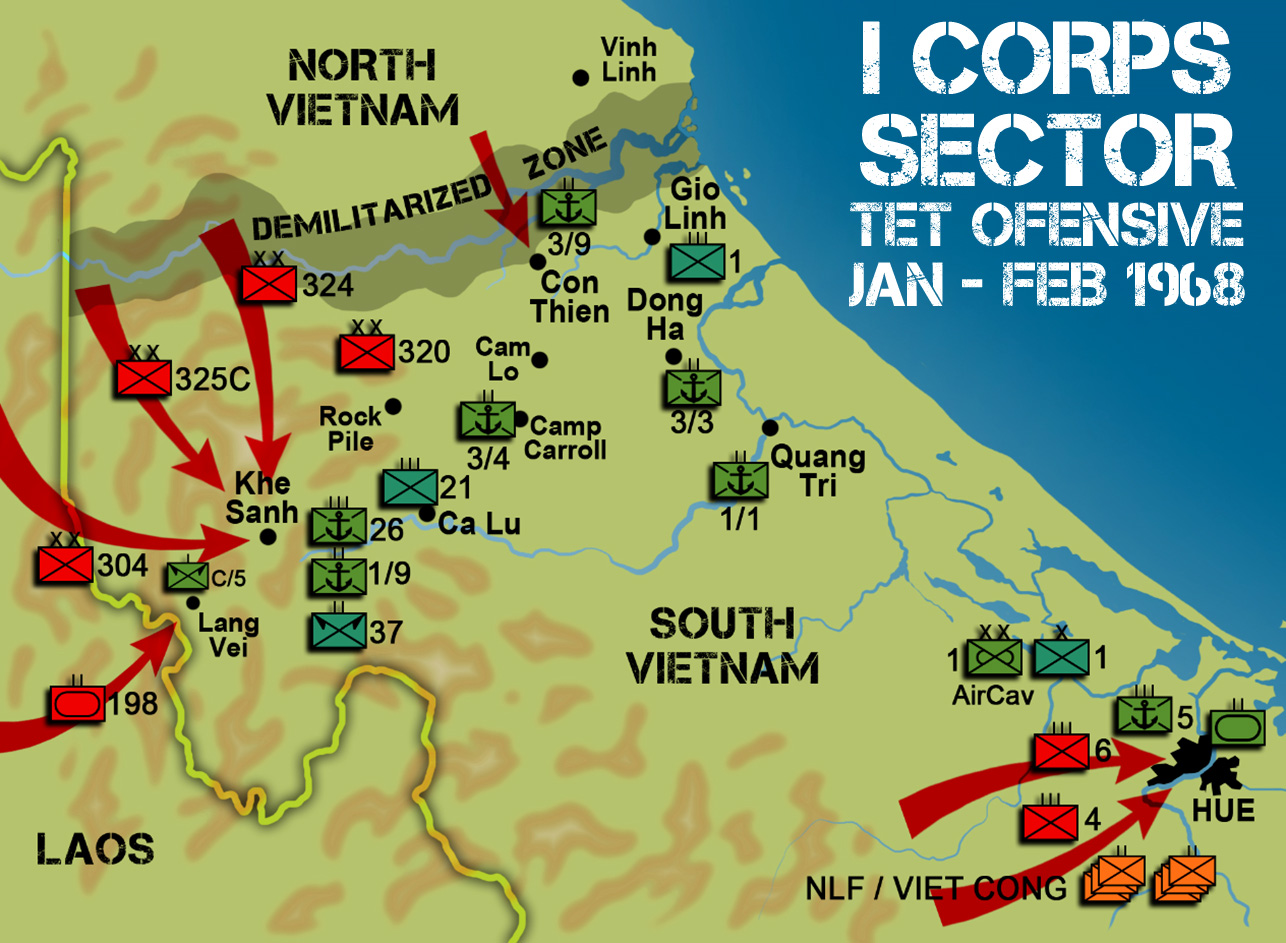
So Saturday, Rasmus and I ran a Valor & Victory game in Vietnam. He took the NVA, trying to hold a “hill country” village with a detachment of the 320th NVA Division, I took Lima Company, 3rd Battalion, 4th Marines (3rd Marine Division) in an attempt to clear the village. This battle took place near Marine Corps firebases of “the Rockpile,” Camp Carroll, and Cam Lo, dear the supposedly “Demilitarized Zone” that formed the border between North and South Vietnam. The date is sometime in late 1967, during the period called the “hill fights,” where NVA divisions increasingly leveraged into position from North Vietnam and Laos via the Ho Chi Minh Trail, setting up for the imminent “Tet Offensive” that would strike on January 30-31, 1968 (leading to famous battles like Lang Vei, Khe Sanh, and of course Hue City).
So here is the imminent battlefield. Rasmus will set up his NVA force (89 officers and men) wherever he wants. I will come on anywhere on the eastern edge, or the eastern half of the northern and southern edges. The mission is simple. Control of the five objective hexes marked with yellow targeting symbols. These are buildings, bridges, and high ground that Marine Regimental HQ has deemed are important for continuing operations to deny positions the NVA will want for artillery batteries, rocket positions, and artillery spotters in the ongoing “Hill Country” battle around these Marine Corps fire bases.
Very quickly, here are the victory conditions: As usual for Valor & Victory, the game lasts 6 turns. The Marines get 1 point for each NVA fireteam or officer eliminated, 3 points if I can take them prisoner and successfully get them off the board. The NVA get 3 points for every fireteam or officer (or Navy Corpsman) eliminated, 6 points if any of these casualties are “unsecured” (left bleeding on the battlefield or even worse, if they fall into NVA hands). The Marines also lose 6 victory points if they hit any civilians. At the end of the game, the each s ide also gets 3 points for every objective counter they still hold. The Marines also have to watch out for booby traps, and of course the “burden of victory” is on them as the NVA start out holding all five objective hexes.
Now this sounds terribly unfair to the Marines. But in fact the Marines are much more powerful, better armed, better equipped, and have off-board artillery support. In all my force contains 84 officers and men, and includes satchel charges, 24 M60 GPMGs, 4 M79 40mm grenade launchers, off-board 81mm mortars. The NVA are well equipped as well, with a captured American 60mm mortar, a DShK .50 cal heavy machine gun, plenty of PKM GPMGs, and three B-40 / RPGs.
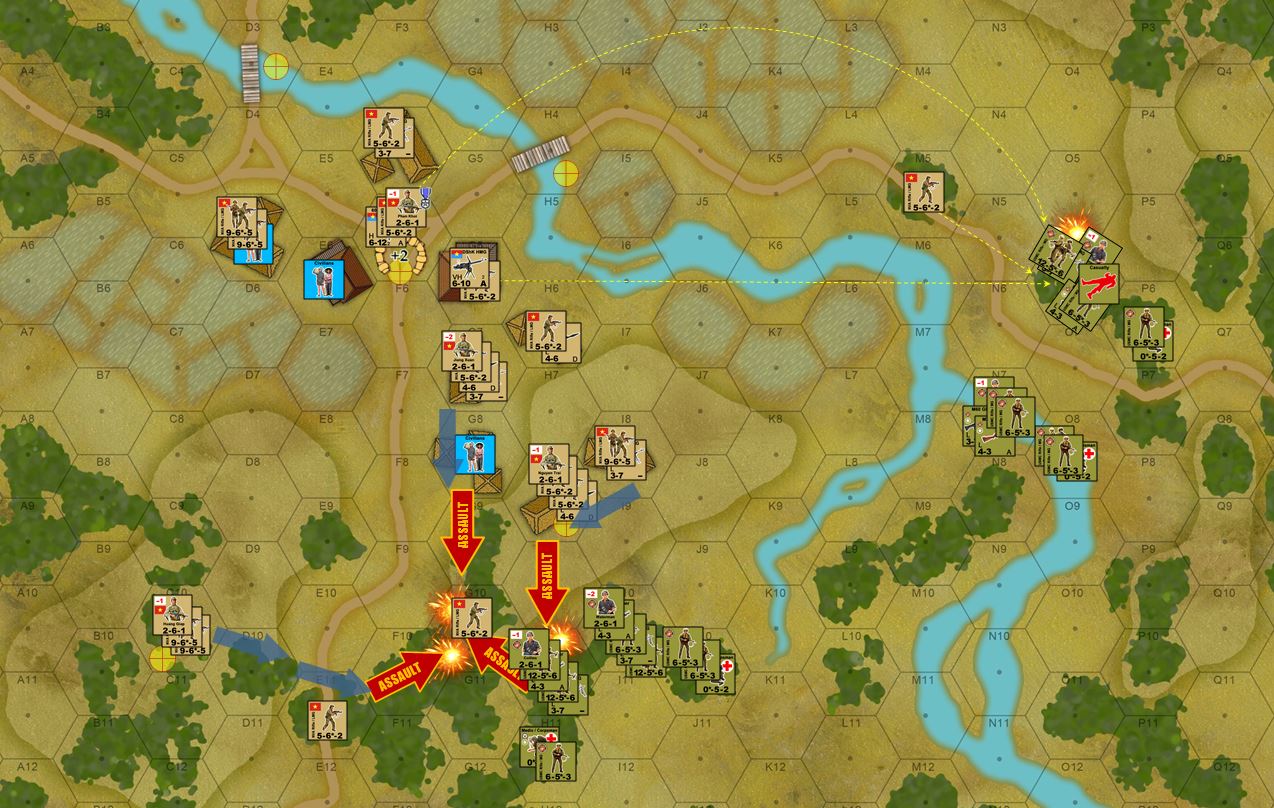
The game begins as the Marines enter the board. I have two platoons coming on from the south (Captain Waterman, 2ndLt Collins) and two more platoons from the east (Lts. Pierce and Bergman).
Things kick off in a very big way … right off the bat.
This is going to take a while to unpack, as a lot happens. Suffice it to say that the NVA put up some very serious fire in the north and in the south, Lt. Collins’ platoon is immediately in the thick of a very serious battle for their lives. As they launch an assault on an NVA scout fireteam, they will then counter-assaulted from three directions. This will the main action of Turn 1, so we’ll break it down in a little more detail.
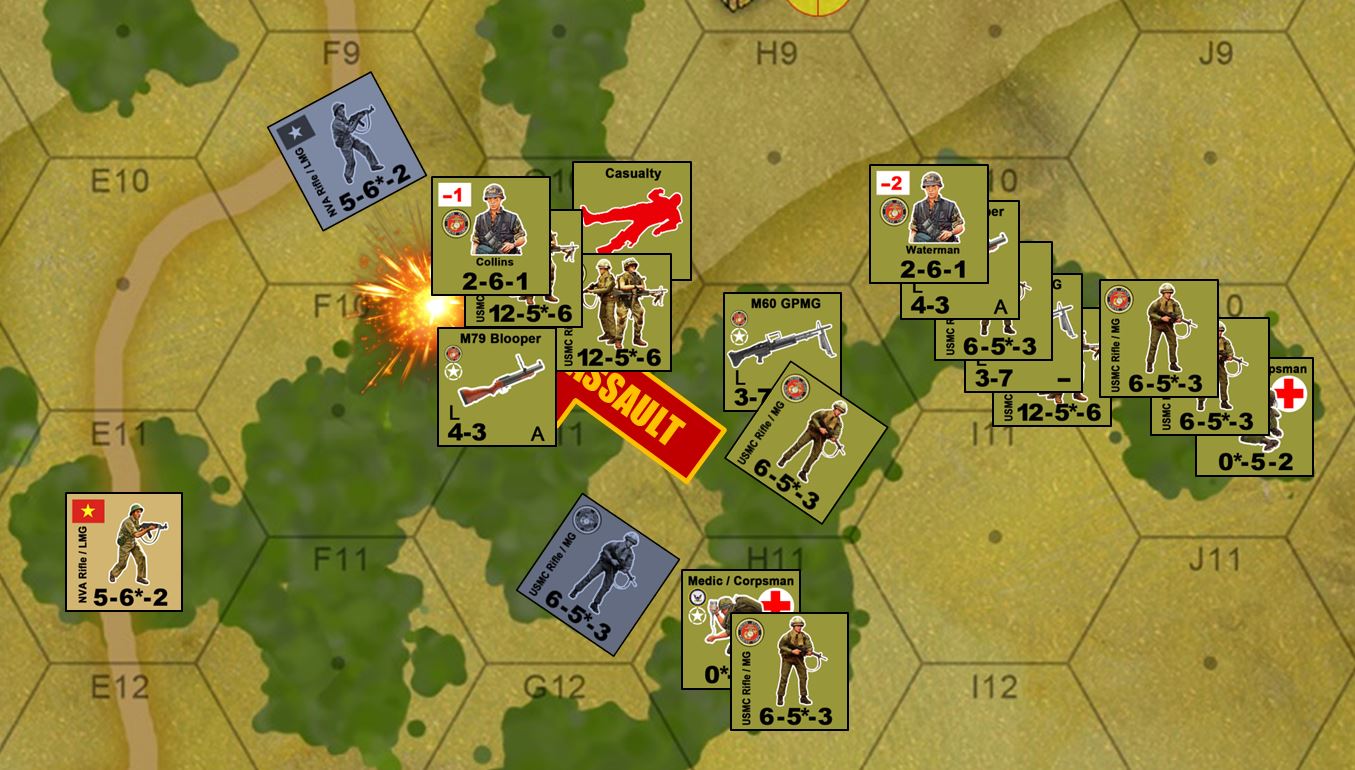
First comes Collins’ assault on that NVA spotter platoon. Probably not the best move I’ve ever made, as I should have tried to pin him down first. But since you can’t move and fire in the same turn in this game, pinning down enemy units for an assault requires either a fire and maneuver element (one platoon pins, another platoon carries in the assault), or wait until next turn.
Splitting up my squads into individual fireteams (dilutes my striking power due to stacking limitations but makes my units more resilient to casualties, basically my men are spreading out in their assault), I still have to leave one fireteam pinned to NVA opportunity fire, and then lose another fireteam in the assault itself. The position is taken, but it probably cost me too much, especially since Rasmus (on his turn 1) will be counter-assaulting from three directions.
Further north, Lt. Pan Khoi with the mortar positively nails his check, with a “snake eyes” roll that pins down almost Pierce’s whole platoon (the Americans have to keep casualty points down in these Vietnam games, so I’m electing to pin down many more of my units rather than let far fewer of them actually be eliminated. The DShK also opens up, although that does far less damage. The scout fireteam of NVA rifleman (AKM assault rifles / SKS battle rifles and one PKM GPMG) also add to my problems on the Marine northern wing.
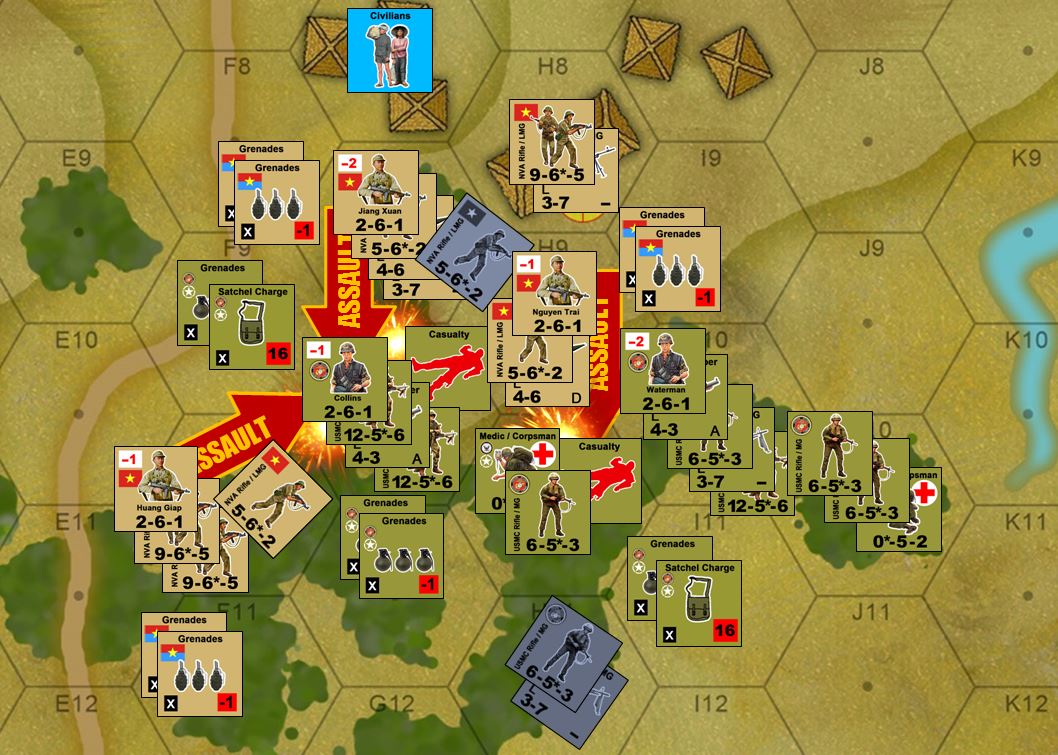
Ever see the final scene of Platoon? Well, Rasmus has decided that will be the start of this little movie instead of the end.
So first we have Lt. Huang Giap attack from the southwest, rushing in with his two squads plus the scout fireteam he picked up from the jungle trail along the way. I pin one fireteam down with opportunity fire, but the rest of the attack goes in. He invests two grenades from his pool, as do I. The assault is broken, and the NVA force is wiped out (except that one pinned fireteam because they didn’t actually participate in the assault).
But I’m down three casualty points as a result, forcing me to kill off one of my fireteams (half of one of this 12-5-6 squads).
This only softens up Lt. Collins’ position for the bigger assault coming down from the south, led by the NVA commander, Captain Jiang Xuan. I cannot throw in in more opportunity fire, I already fired at Giap’s platoon to the southwest. Again Rasmus tosses in two grenades, I have to toss in a grenade and (in a desperate attempt to save myself), a satchel charge. This assault is also broken, wiping out the NVA force (Marine firepower is nothing to scoff at), but the casualty points are so high that Collins’ position basically wiped out as well.
Finally we have Lt. Nguyen Trai’s assault to the east. Now this starts out bloody for me off the bat, as I have a pinned fireteam in the target hex. Once that hex is assaulted, that pinned unit is killed automatically. The rest of the Marines in the hex fight desperately (Lt. Trai is pinned down before his assault even goes in), throwing in yet more grenades and the last of my satchel charges, countered by yet more grenades from the NVA. This assault actually succeeds, but without Trai leading it, losses are so high that it’s basically annihilated as well. Trai is ironically the only “combat effective” man left in that platoon.
5 June 1967 - Opening Hours of Six Day War - Pt 03
The opening ground battle of the Six Day War continues in Avalon Hill’s Arab Israeli Wars, fought between my Egyptian and Palestinian Liberation Army forces (elements, 7th Egyptian Infantry Division and PLA 20th Infantry Division) and Damon’s Israeli forces (leading elements, 7th Armored Brigade, Tal’s 84th Division).
Again, the Israeli objective is to strike out of the southeast, seizing road junctions (yellow objective hexes – at least 4 out of 7) and thus cut off Egyptian and Palestinian forces in the Gaza Strip (extending o the northeast) away from the interior or the Egyptian Sinai (extending west and southwest). The Israeli “big picture” objective here is to rapidly open an invasion route down the north coast of the Sinai, allowing them to strike quickly westward through the Jeradi Pass, El Arish, and toward Port Said and the Suez Canal.
So far, however, the Israeli offensive is a little unfocused, allowing me to make stands in key points (southern Khan Yunis and Rafah). This is one of Damon’s first games of Arab Israeli Wars, and honestly I don’t think he understands just how powerful his units (especially Centurions of the 82nd Tank Battalion and M48A3 “Magach 5s” of the 77th Tank Battalion) really are yet.
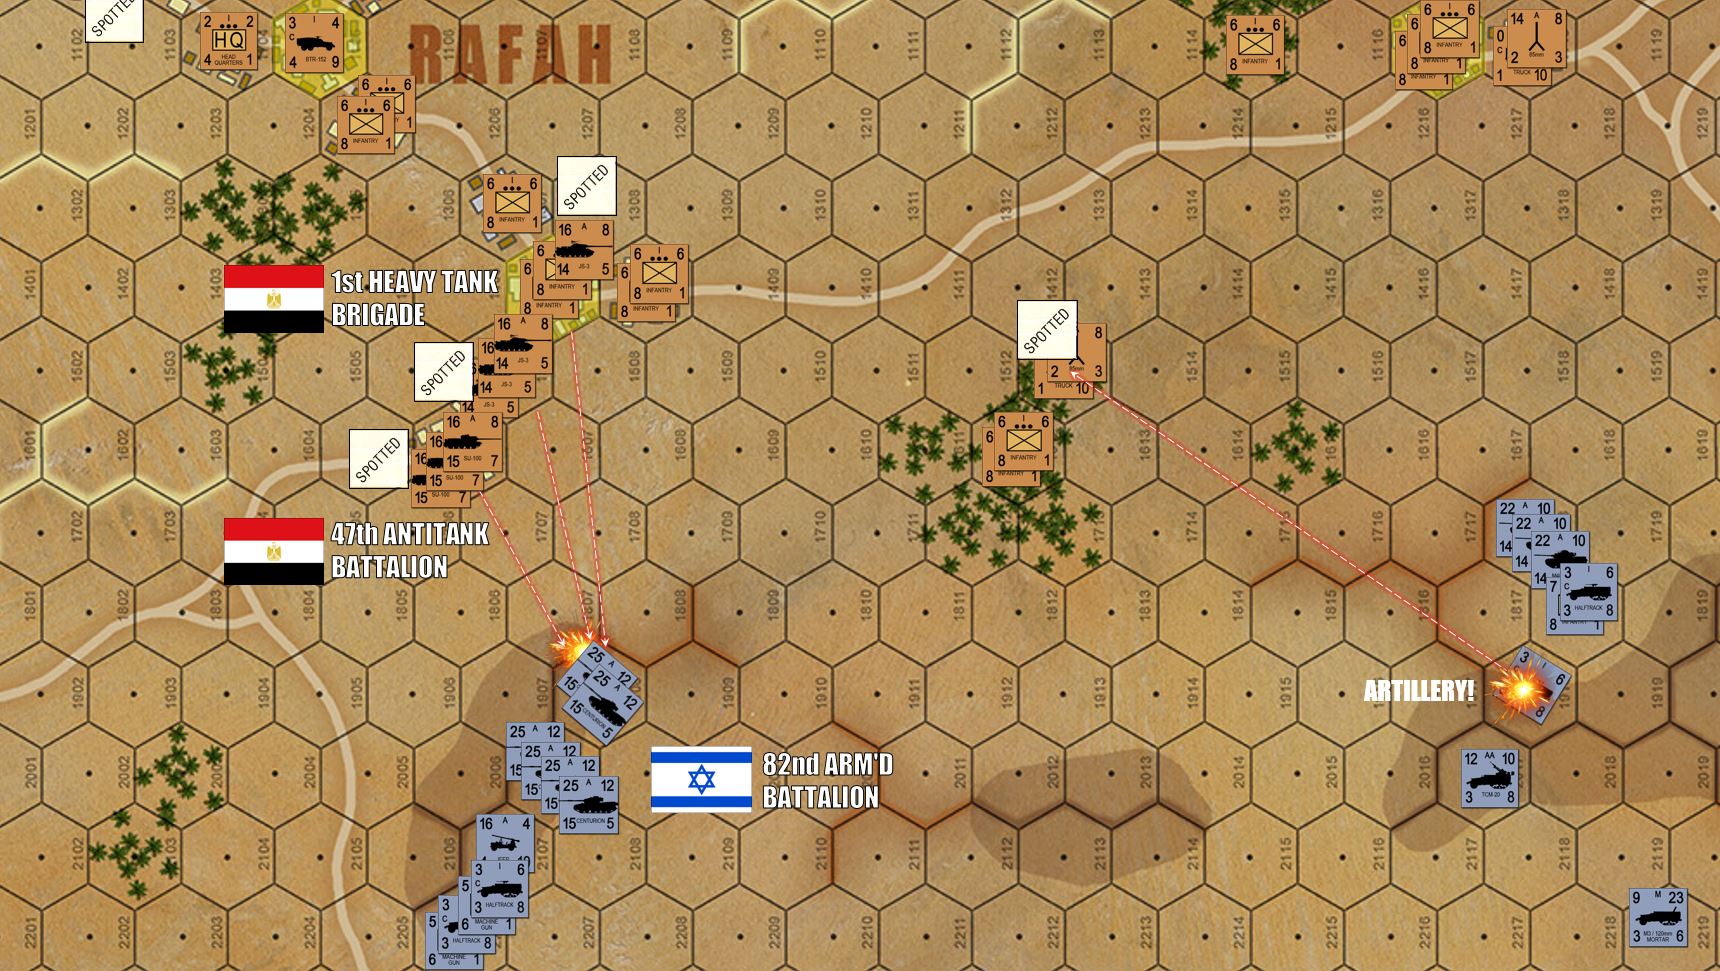
Here we see things finally come to a head on the west flank, where 82nd Tank Battalion has taken the high ground, using overwatch fire positions to hopefully engage my heavy JS-3s of 1st Heavy Tank Brigade and SU-100 tank destroyers of 47th AT Regiment. He has the high ground and hull down shielding. However, I am concealed in those urban hexes, he can’t fire at me until I am spotted. I can be spotted two ways. He can move a unit adjacent to them (basically sacrificing his spotter), or I can open fire.
The trade-off is that I get the first crack, and rarely do the Egyptian get the first round off in a tank duel against Israelis. I probably shouldn’t but I can’t resist. Twenty JS-3s (122mm guns, so large the ammo has to be leaded into two components) and fifteen SU-100s speak in one voice, firing at ranges between 500 meters and 1250 meters.
But here is where some of the Israeli advantages come into play, not in simple “overpowered” units, but tactical positioning. Not only am I shooting uphill, but also against Israeli tanks in hull down “reverse slope” positions. Then the range has been chosen where some of my tanks will have to fire at range penalties (northernmost JS-3s – bear in mind some of my tanks are shooting at what would be 74 feet on a 28mm table) but all of Damon’s Israeli tanks will get a full crack at me in return.
To get this position, Damon just had to accept that I would hit him first. Classic risk/reward. Fortunately for him, I don’t roll very well, and only manage to disperse a few of his tank platoons.
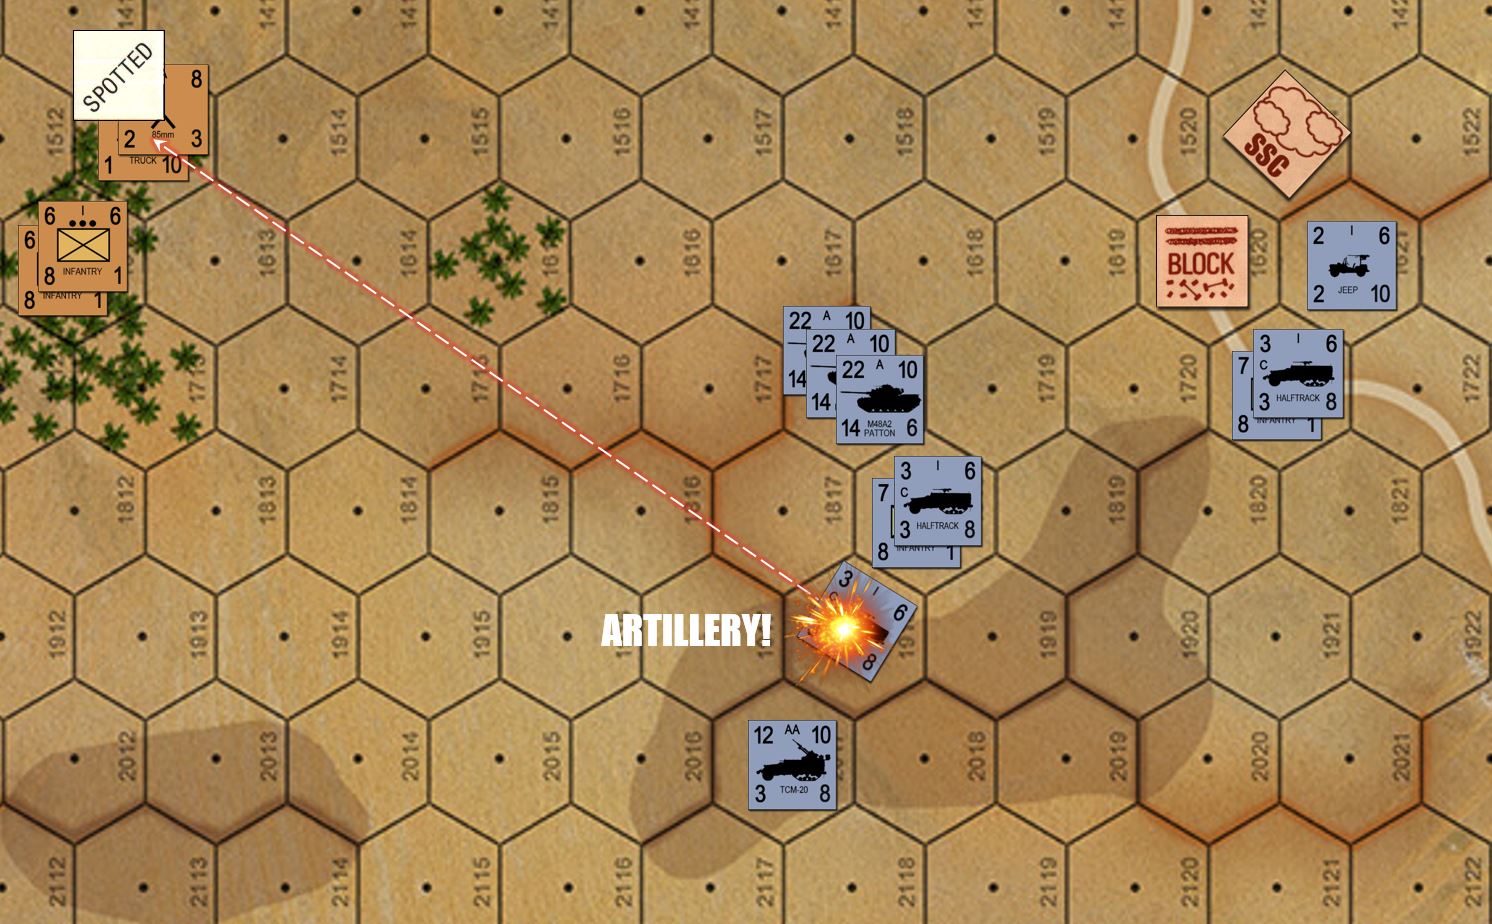
Meanwhile, my artillery does a better job and splashing some of his paratroopers that were pinned down earlier when my AT guns hit their halftracks. Meanwhile, these AT batteries are coming under counterbattery fire from 202nd Brigade’s M3 mortar halftracks. Also, some of the tanks on that western ridge can just see over some of the intervening trees and town hexes … and spot my D-30 122mm howitzer batteries firing from five+ kilometers away. So even as my artillery is tearing up his paratroopers, my artillery is in turn in big trouble from off-board M50/155mm howitzer batteries of Israeli 215th Artillery Regiment.
Israeli counterfire off that ridge starts killing and dispersing JS-3 platoons – but not fast enough. We’re now into Turn 4, where the Egyptian 14th Tank Brigade shows up, forty more tanks, this time T-55s. Meanwhile, Israeli 81mm mortar batteries start dropping smoke in front of my position, blinding some of my tanks while leaving line of sight open for him to engage new tanks showing up. Damon’s trying to divide and conquer, and I’m playing for time. I’m on defense, after all.
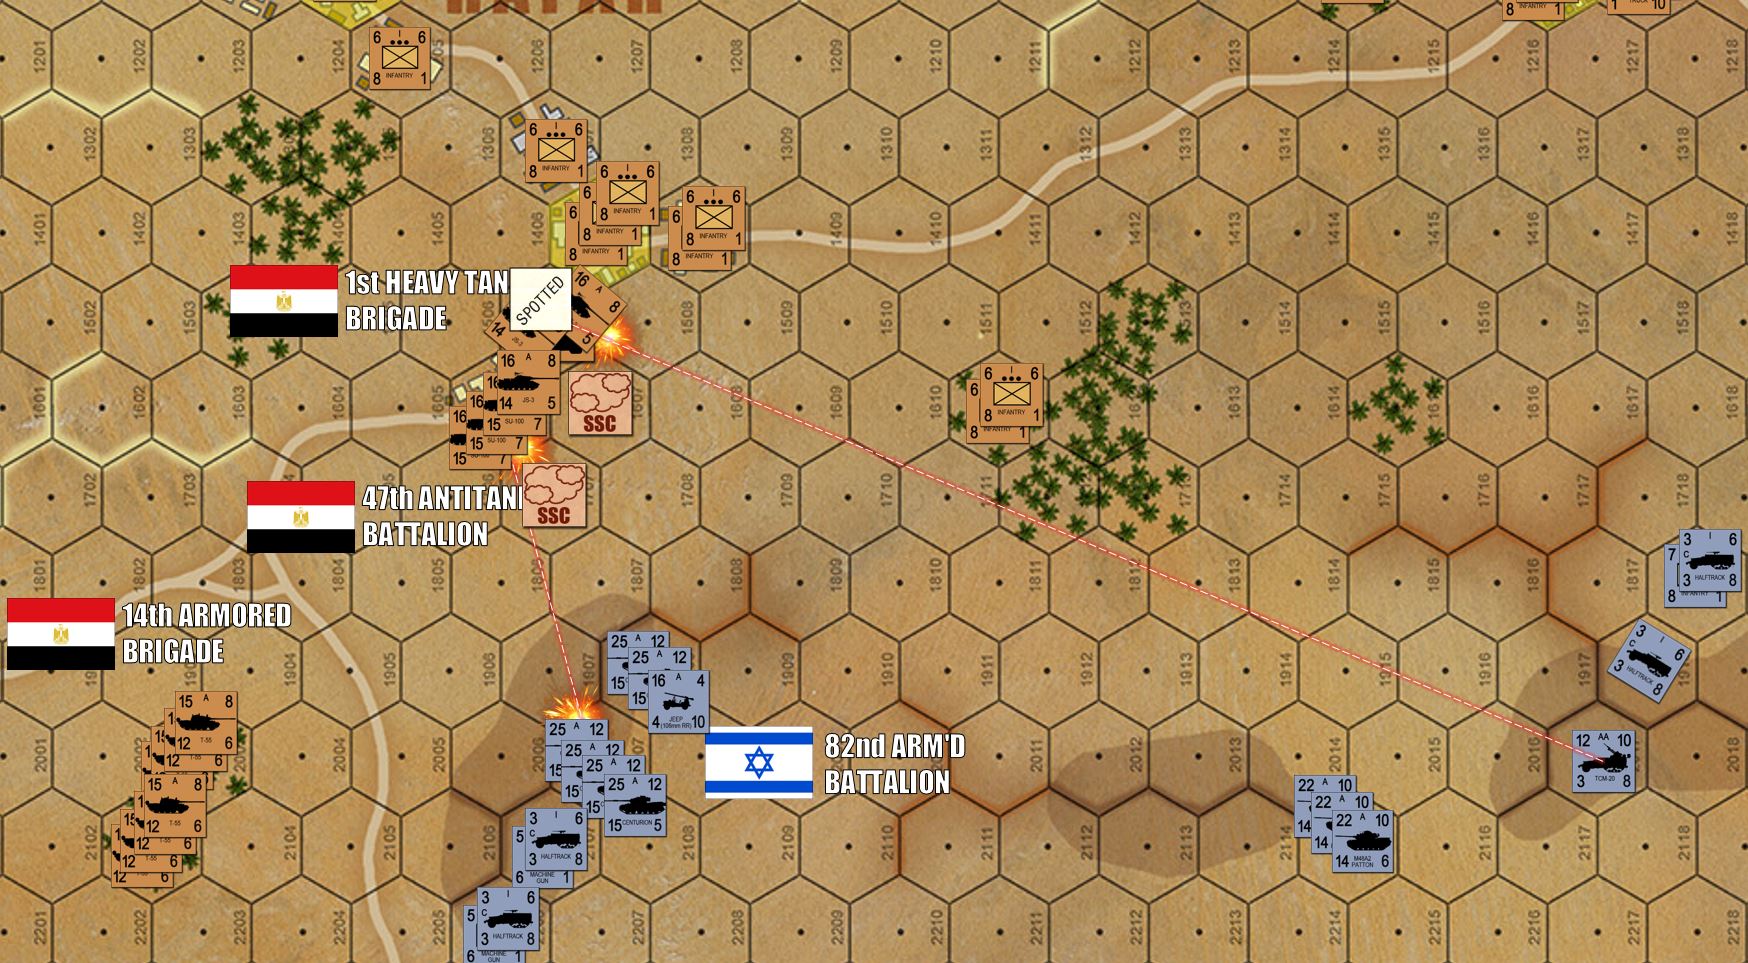
Here’s a wider view of the western and central sectors of the battlefield, where you can see where some of the tank and support platoons of 82nd Tank Battalion can see far back into the Egyptian backfield and spot those 122mm D-30 batteries firing. They’re doing pretty serious damage to Israeli paratroopers, and are not mobile. I was able to “blind” some of Damo’s fire missions earlier in the game by dispersing or killing spotter units, but this time that’s not going to happen. Those artillery batteries better get their shots in now, because Israeli 155s are gonna be howling in from off board any second …
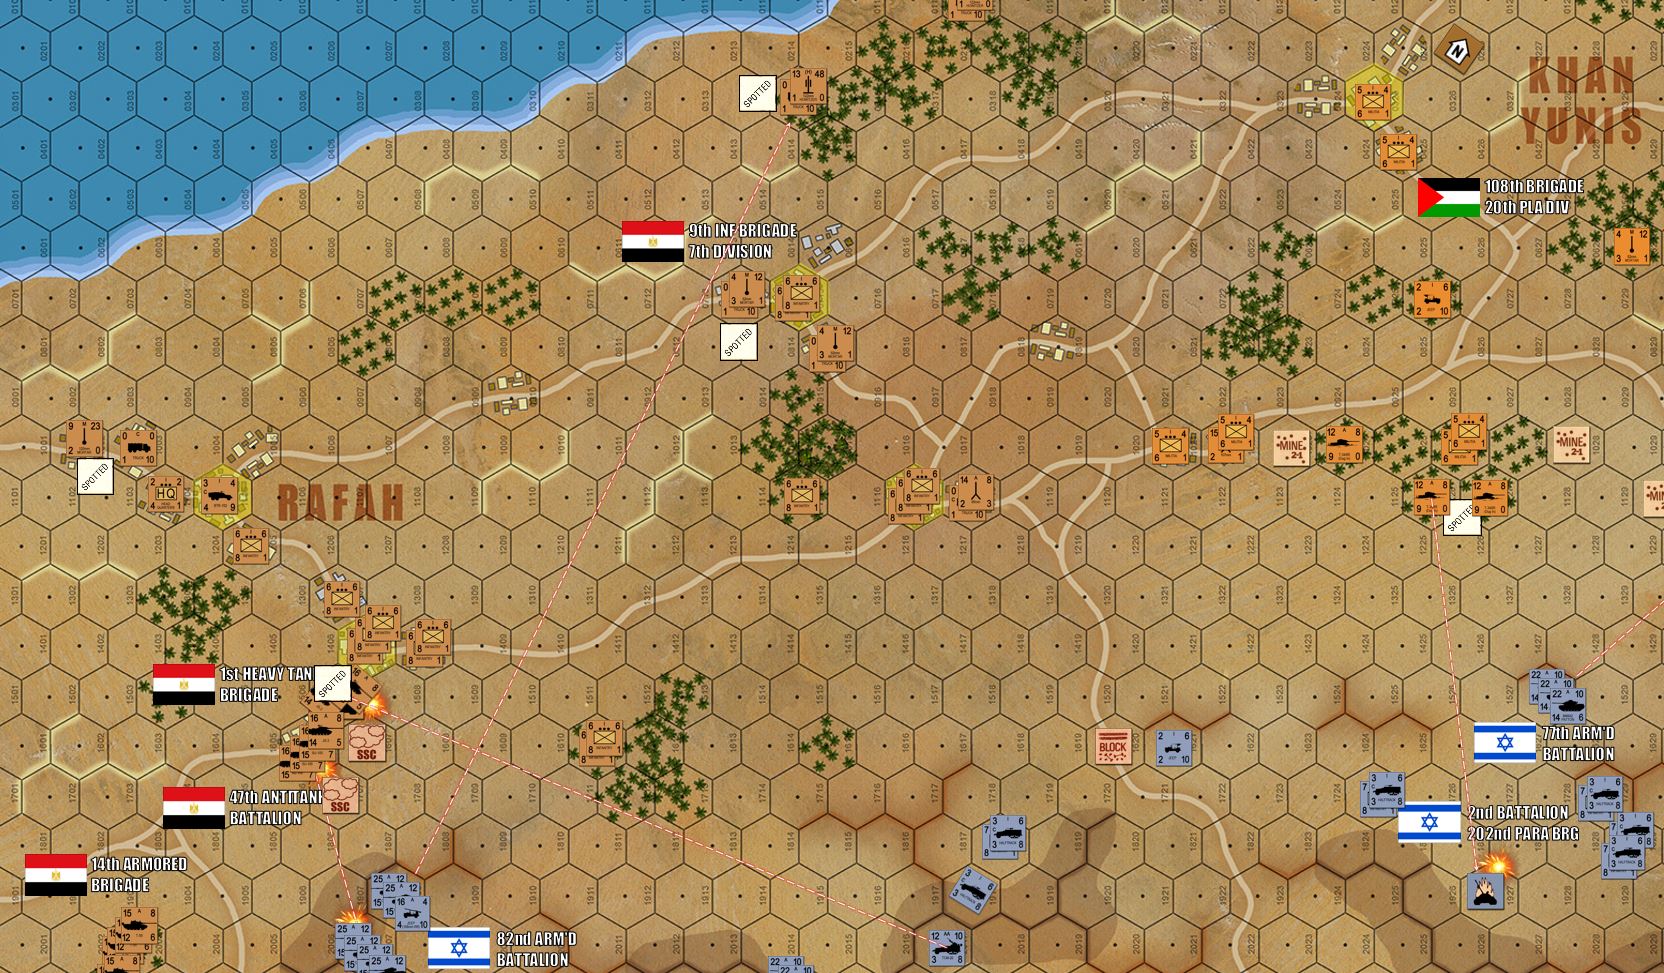
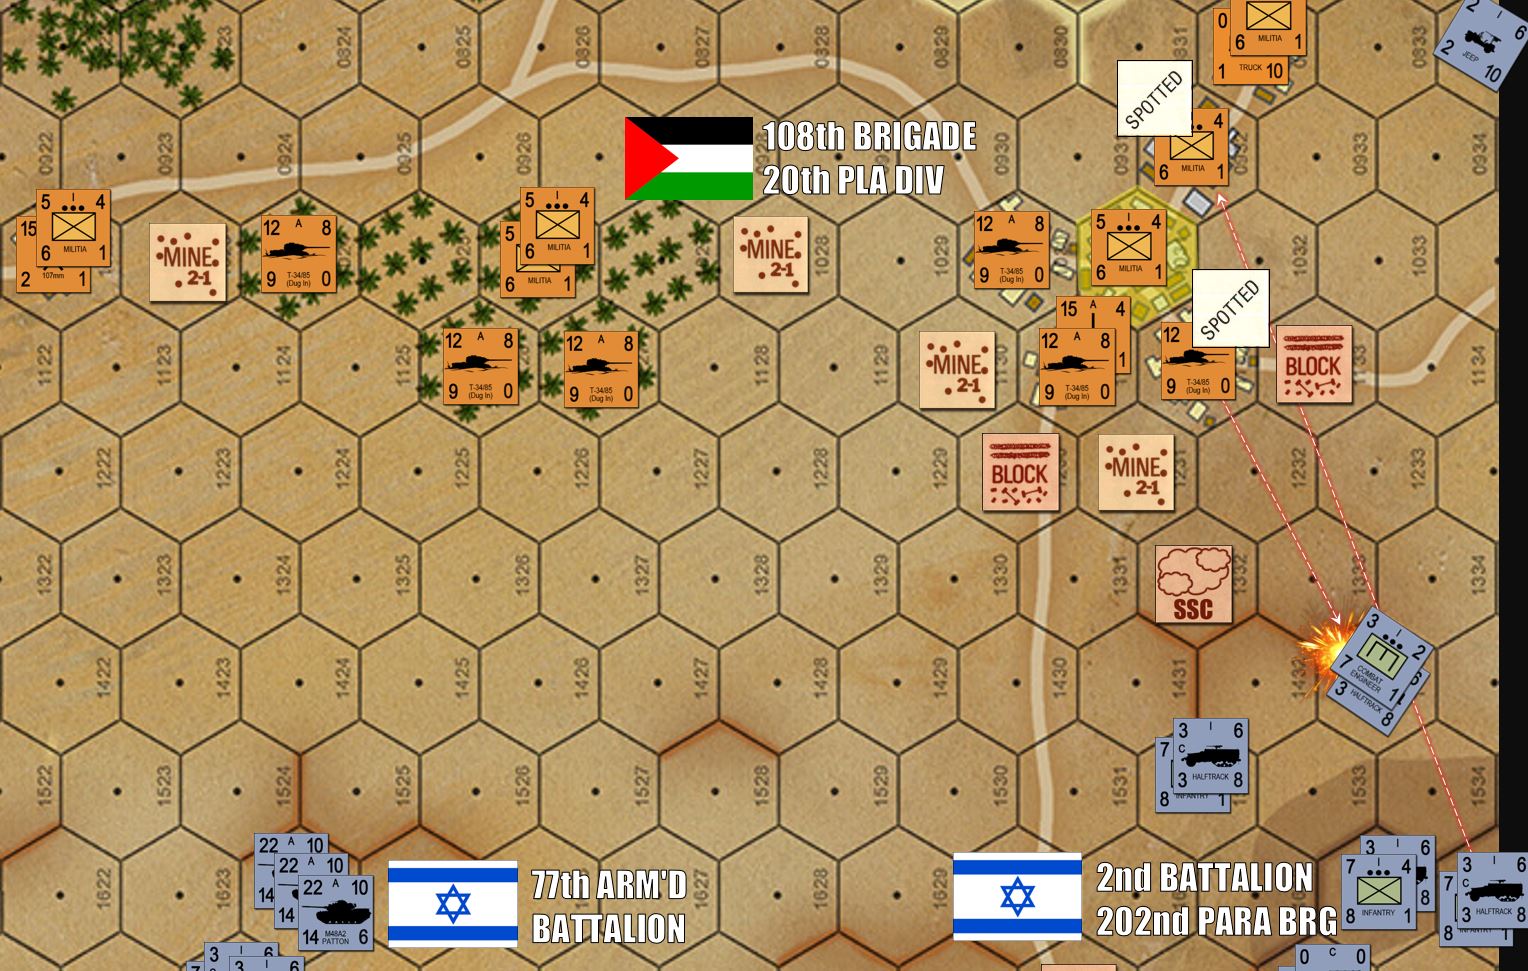
To the east, things are heating up as well. Realizing that sooner or later he’ll just have to smack the Palestinian 108th Brigade somewhere, Damon forms up 77th and the right wing of 2/202nd Brigade and makes a push at southern Khan Yunis. Some of those T-34/85 “pillboxes” are burning, but too many more remain hidden. Damon decides to bait them out with some halftracks, I take the bait (knowing full well what is coming) because of those bait pieces is the halftrack platoon carrying the headquarters of 2/202nd brigade. Those two T034/85 platoon pillboxes are beyond toast (those M48A3s will blow them into the middle of next week now that they’ve fired and revealed their position), but ten immobile T-34s is more than fair price to pay for an Israeli battalion headquarters.
This would have played much harder into the future turns. With their battalion HQ knocked out, Morale drops from an A to a B. This is critical in the series of infantry firefights and close assaults the Israelis are going to need to clear out those town hexes of Khan Yunis. The odds against him doing this are now greatly diminished (at least on time), I’ll be able to slow down the elite Israeli infantry assault into Khan Yunis and turn it into a wild, confused street brawl, just like the PLA likes it.
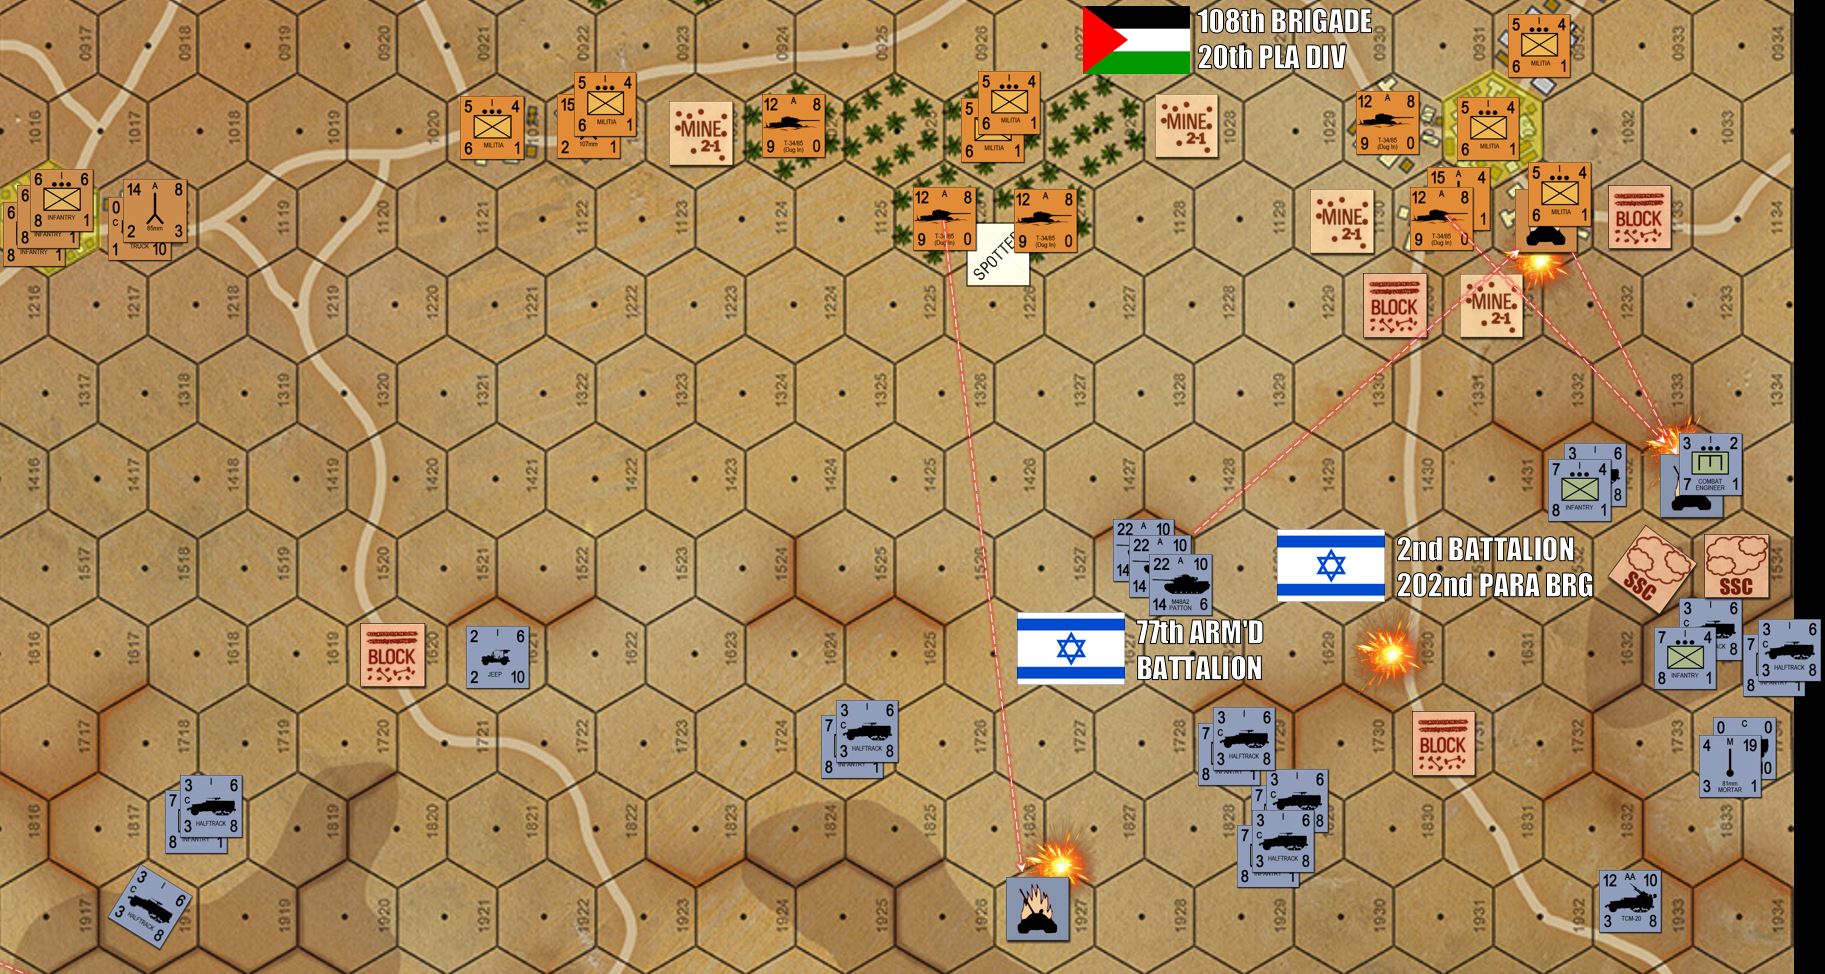
This is where we called the game, at least for now. Clearly the Egyptians are winning this game. There seems little way the Israelis can crack these town hexes and take at least four of those seven objectives by the end of the game.
This was my fault as a “gamemaster” and scenario designer on two levels. One, Damon is still getting used to Arab Israeli Wars and I really threw a lot of scale and additional rules complexity into this scenario. Two, I only finished designing the scenario a few hours before the appointed game time and Damon had no opportunity to review the battlefield, formulate an attack plan, and execute it. Arab Israeli Wars is not a game you approach lightly (well, at least not scenarios like this). You have to look at your forces, enemy forces, look at the terrain, and formulate a single, cohesive “big picture – broad strokes” battleplan and then execute that plan in minute tactical detail. Damon never had the chance to do this, he was handed a map and with a resounding “Good luck … GO!”
So we can continue this game IF HE WANTS, or I can finish it up and see just how far the Israelis can get in salvage and damage control. Or we can just call it, I can build a smaller, less ambitious scenario that we can use as a “staircase” game building into larger, more complex games like this.
But for now that’s if for this one. 😀 We’ll see what the future weekends bring as I continue to run web wargames on line for the OTT / BoW Community!
5 June 1967 - Opening Hours of Six Day War - Pt 02
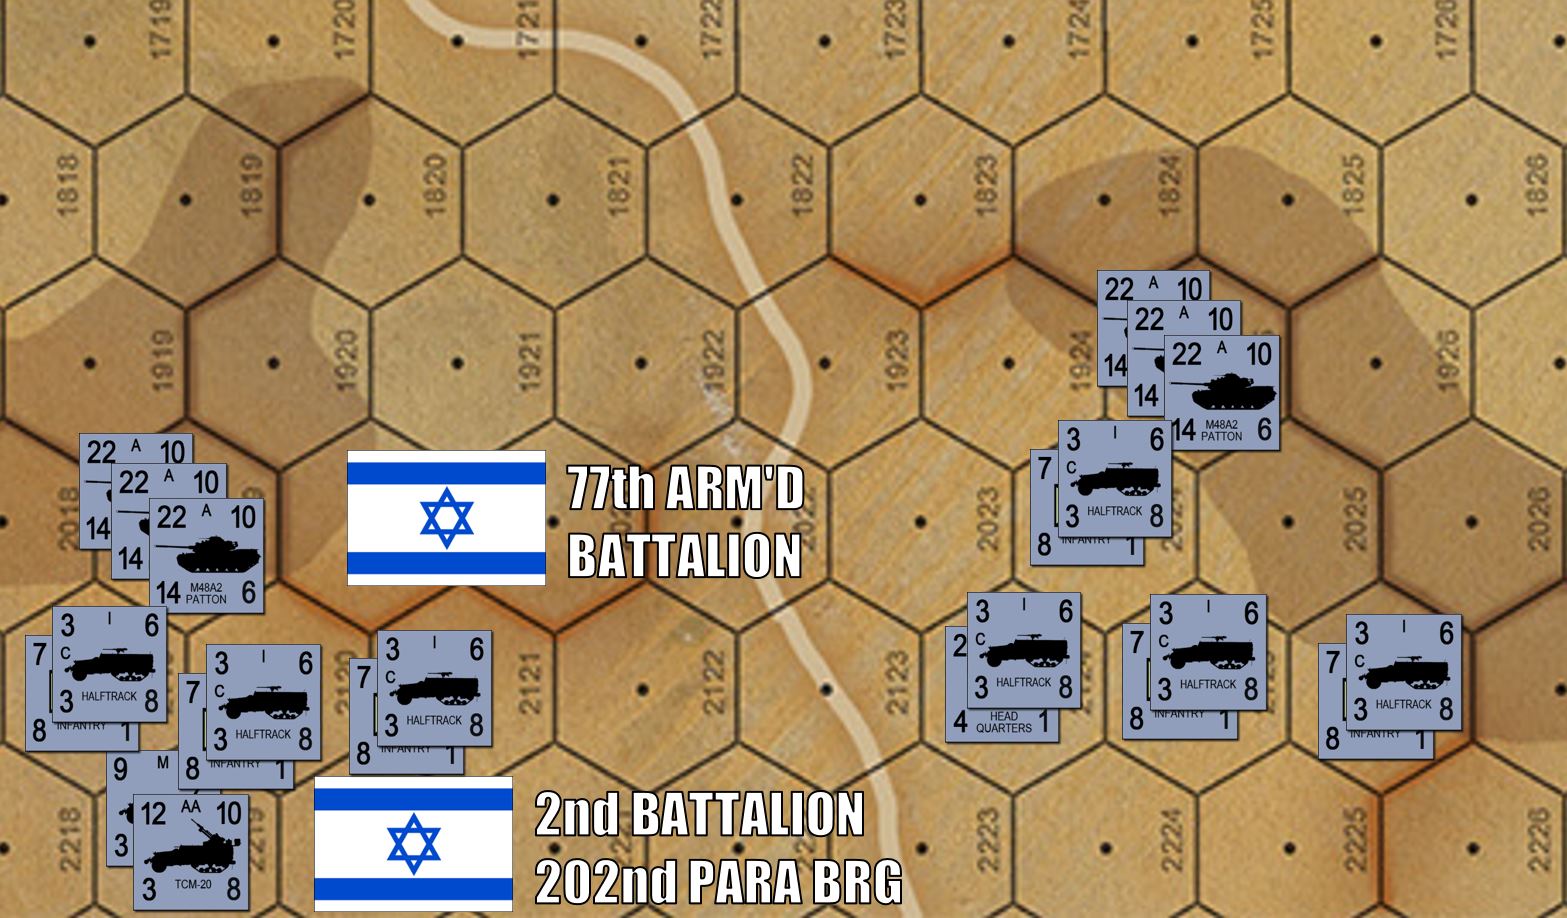
The game begins as the Israelis come on the table. They have four basic battalions in their force, two of tanks (82nd Battalion is outfitted with Centurions with 105mm L7s and 77th Battalion with M48A3 Pattons with 90mm guns), one battalion of armored infantry (2nd Battalion, 202nd Paratrooper Brigade, mounted in M3 Halftracks), and one of artillery (elements of 213th Artillery Regiment). All of this is basically welded into 7th Armored Brigade, leading attack element of General Israel Tal’s 84th “ugda” Division, one of three divisions striking into the Sinai today.
Israeli morale for this game is A. Egyptian Morale is usually B, but for this game we’re reducing this to a C. This is because they have already lost contact with their headquarters, divisional and regional command, and they know their Air Force has basically been annihilated by the Israeli air strikes that started the war a few hours ago.
By the way, no Israeli air strikes will be coming in to support this attack. Israeli aircraft that just blew up the Egyptian air force and command / communication / control systems throughout the Sinai, Suez, and Nile regions, are now being turned around for preparation for phased strikes into Syria and Jordan.
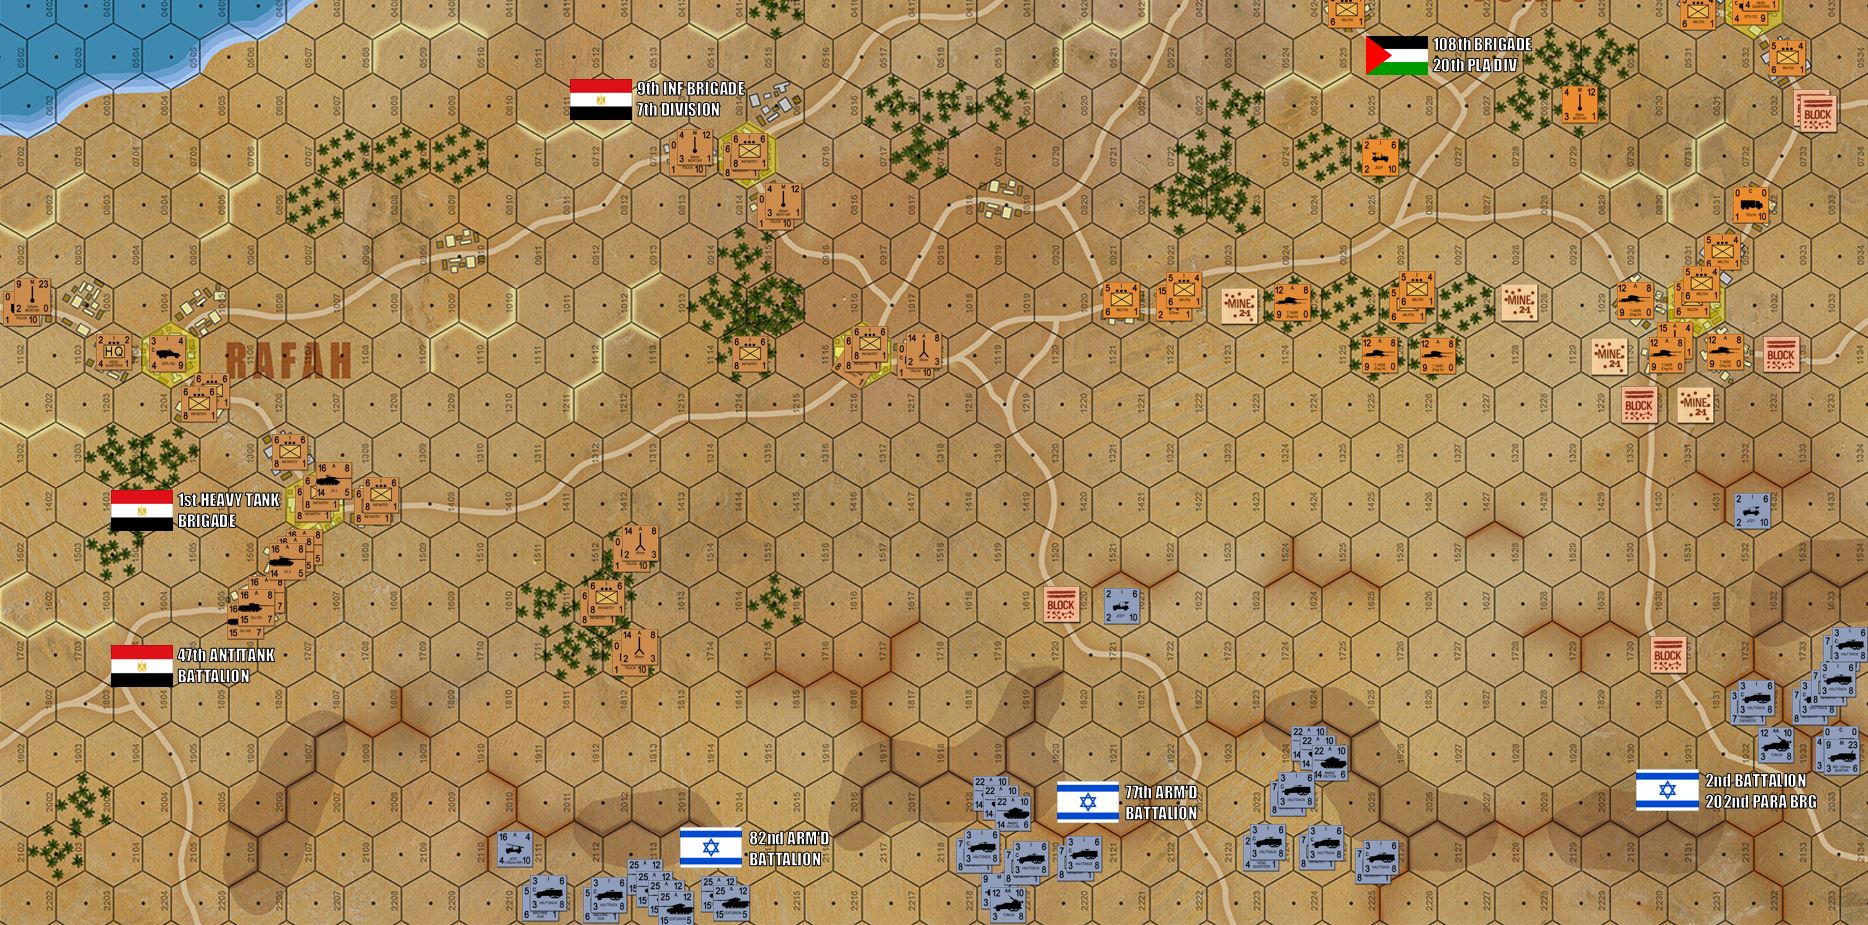
There’s a helluva death match forming up to the west along the approaches to Rafah, where 30 105mm Centurions are about to square off with 20 JS-3s and 15 SU-100s. If the Israelis make that ridge, they’ll have the benefit of high ground and hull-down shielding, but the Egyptians will have concealment and defense bonuses for firing out of those town hexes.

Close-up of 77th Armored Battalion. One of the company commanders here (stack of three M48A3 Pattons) was Captain Avidgor Khahalani. Later in the 1973 war he’d have the whole 77th Battalion, by then switched over to the Centurion with 105mm. He would famously fight one of the most epic tank battles in history, the Valley of Tears at the Golan Heights, and write the book “Heights of Courage.” He’d later command a division as a general in the 1982 “Peace for Galilee” invasion of Lebanon.
CONTACT! First shots fired on Turn 3. The explosion marker in the middle of nowhere shows where one of my artillery barrages guessed one of Damon’s units would be this turn (you have to plot and call in your artillery missions one turn in advance). One of his TCM-20 AA halftrack platoons is being used to spot my tanks in southern Rafah, which just fired on that jeep recon platoon and failed to knock it out. My 85mm ATGs give up their concealment to fire on halftracks loaded with Israeli paratroopers. I don’t kill them straight off but managed to disperse them, pinning them down for artillery next turn.
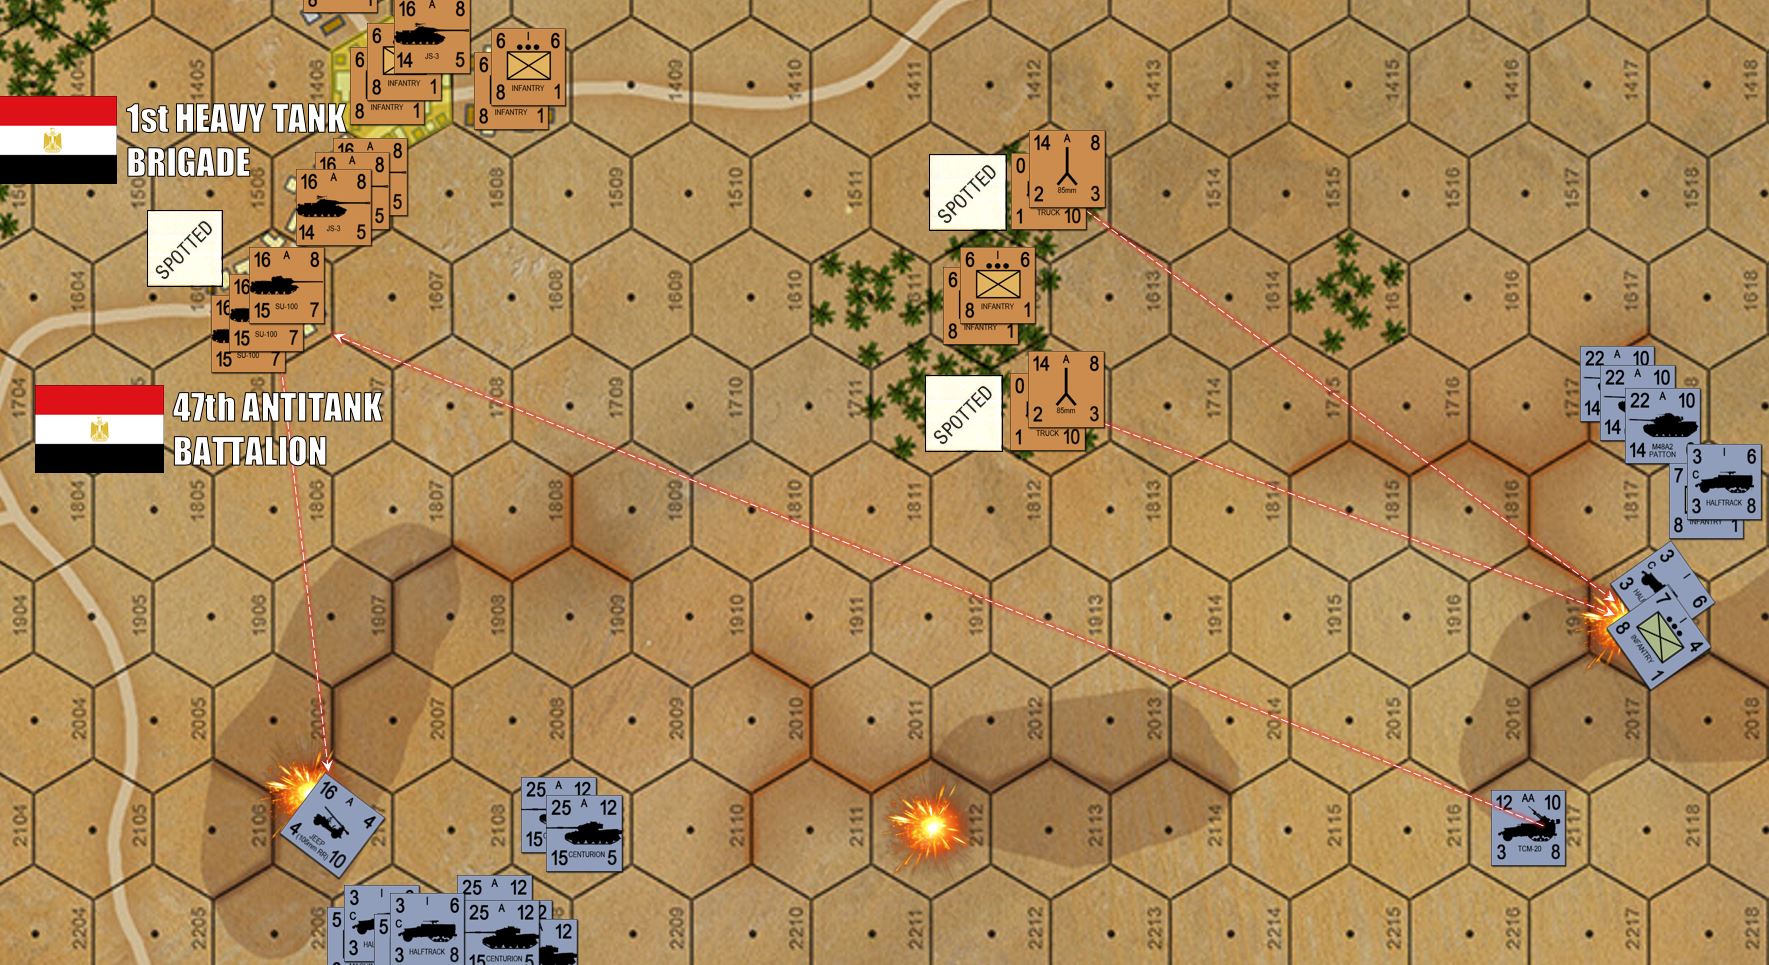
To the east, Damon may have overextended his poor jeeps a little, racing them far behind PLA lines. Makes sense for artillery spotting, but they’re caught out in the open (spotter positions really need cover and concealment). My T-34/85 “pillboxes” manage to tip over a hew M3 halftracks and spill some paratroopers, but again, now they are spotted as well for Israeli artillery.