











Ultramodern Wargaming – Ukraine 2024



Recommendations: 13004
About the Project
Lately, I've been running war games every weekend with members of the community via web conference. Players log on and play wargames with each other in real time, regardless of location, and we usually have at least a couple spectators as well. Many times it’s been Darkstar, but we’re also running wargames in Panzer Leader, Arab-Israeli Wars, and now Valor & Victory.
BoW/OTT community members @brucelea, @damon, @davehawes, and @rasmus have taken the plunge, leading battalions across thousands of meters of desert, starfleets in pitched battles across the heavens, or vicious firefights in the jungles of Vietnam, all without leaving the comfort of their home.
Hard-core, old-school command-tactical wargames can now be run (complete with spectators and recordings) in real time, with BOTH PLAYERS moving pieces across THE SAME virtual game board, thus maintaining player agency, speedy and instant results (no play by e-mail), interwoven turn sequences, any questions / feedback instantly received and addressed, and with the game being virtually recorded as it goes, a ready-made battle report can actually be created as we go.
All of this without the players having to install any new software on their computer, on any platform (PC or Mac). All that's needed is to agree on a time, a handful of dice, and a bellyful of courage!
Every weekend can now be a boot camp! All without costing me thousands of dollars in airfare, too!
Related Game: PanzerBlitz
Related Genre: Historical
This Project is Active
5 June 1967 - Opening Hours of Six Day War - Pt 01
Good afternoon, OTT/Beasts of War:
Okay, with the Darkstar rulebook v1 finally complete, I can start turning my attention back to some other wargaming projects, threads, and campaigns. First among these is the ongoing games of Arab-Israeli Wars between myself and @damon . We had the beginnings of a rather large game some time ago, I wanted to post just a little of a battle report to show that with 2019 now underway, I fully intend and hope to get back to on-line wargaming with members in the community on a fairly regular basis.
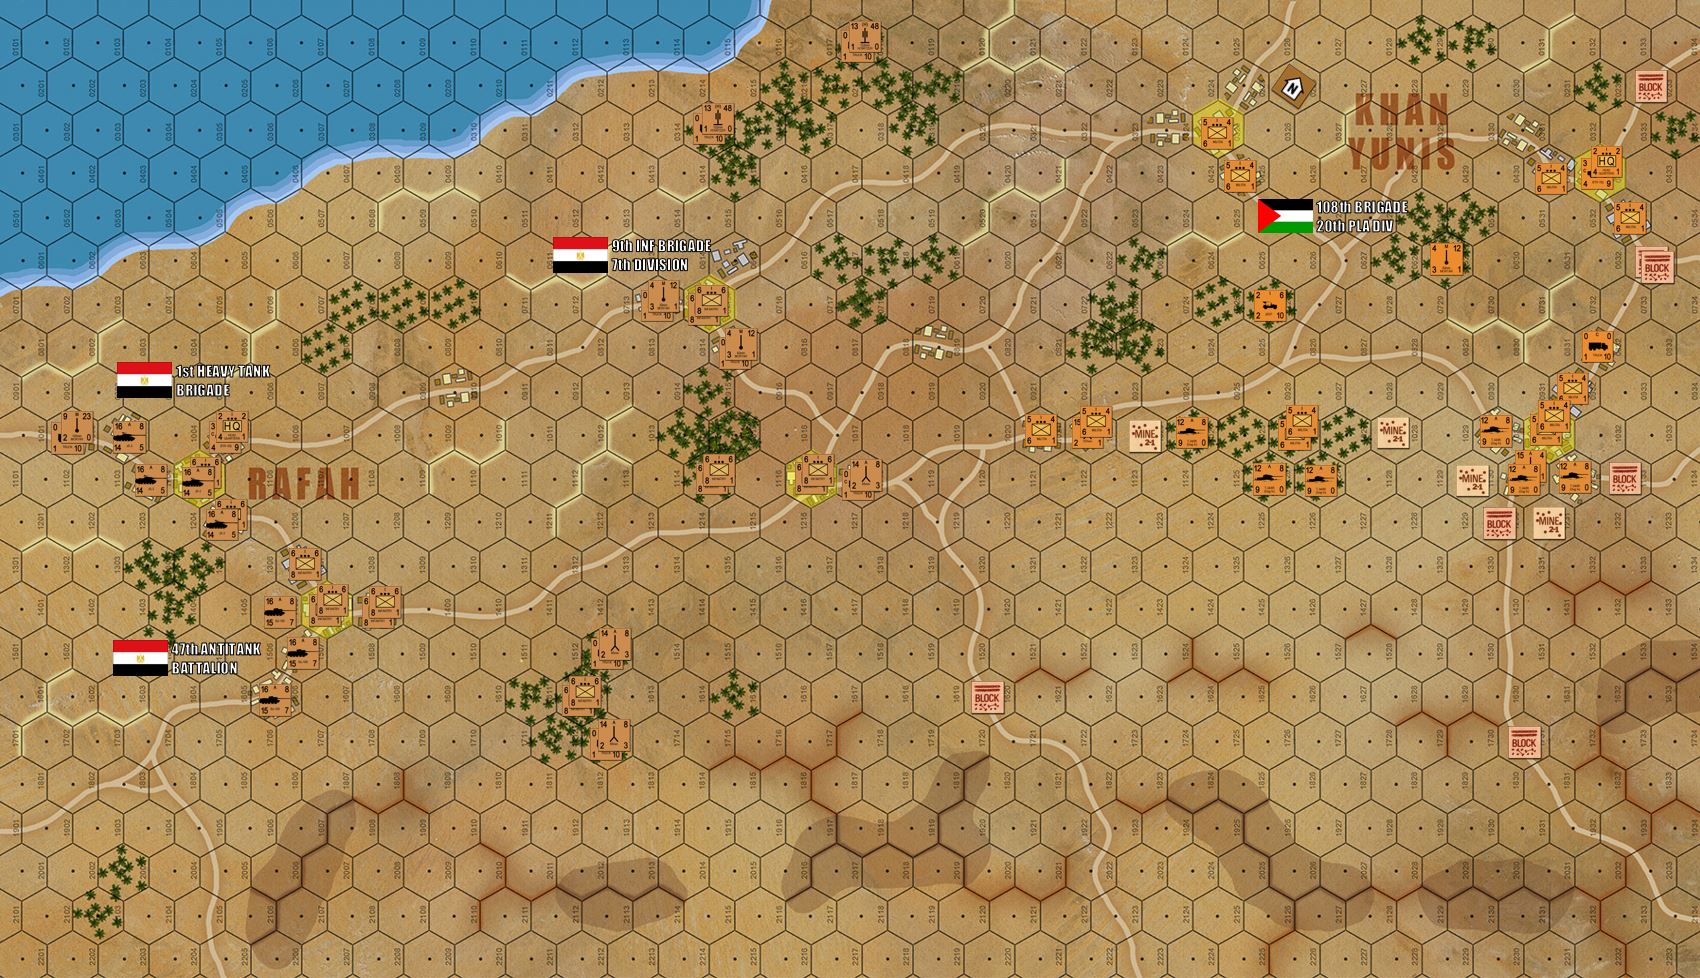
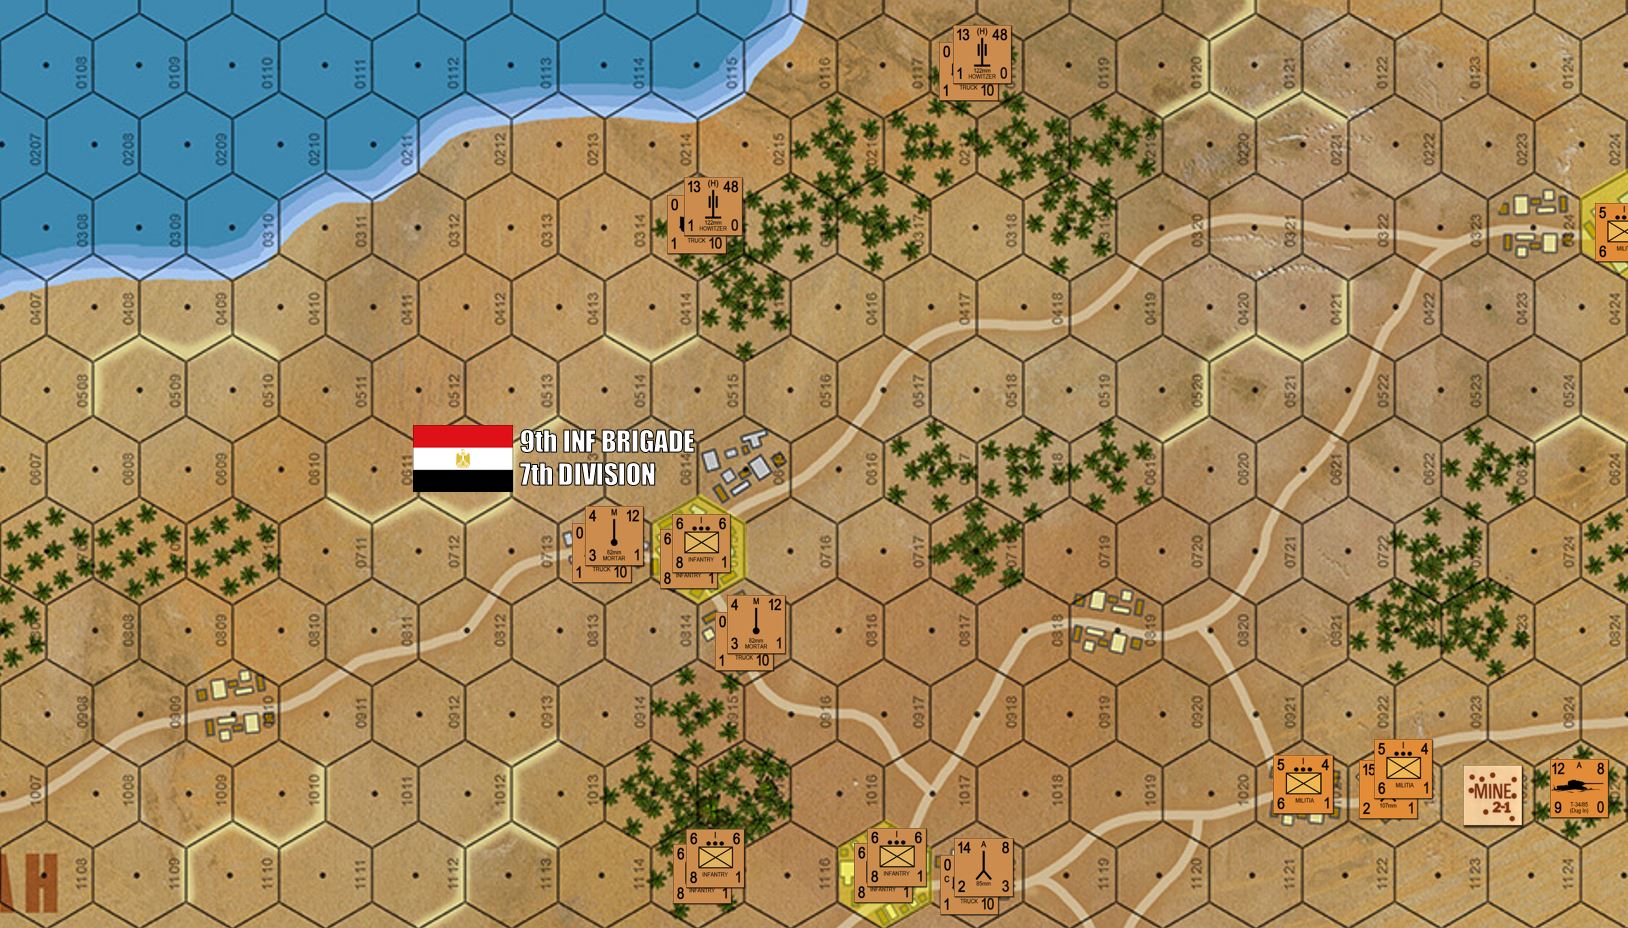
So this is a scenario from the first hours of the ground operations, 5 June 1967, opening day of the Six Day War. I have the Egyptians and Palestinians on defense, Damon has the Israelis on attack. I have the “meat” middle of the Egyptian 7th Infantry Division (9th Brigade), holding the “neck” of the Gaza Strip, where it attaches to the main body of the Egyptian Sinai near the towns of Khan Yunis in the east and Rafah in the west.

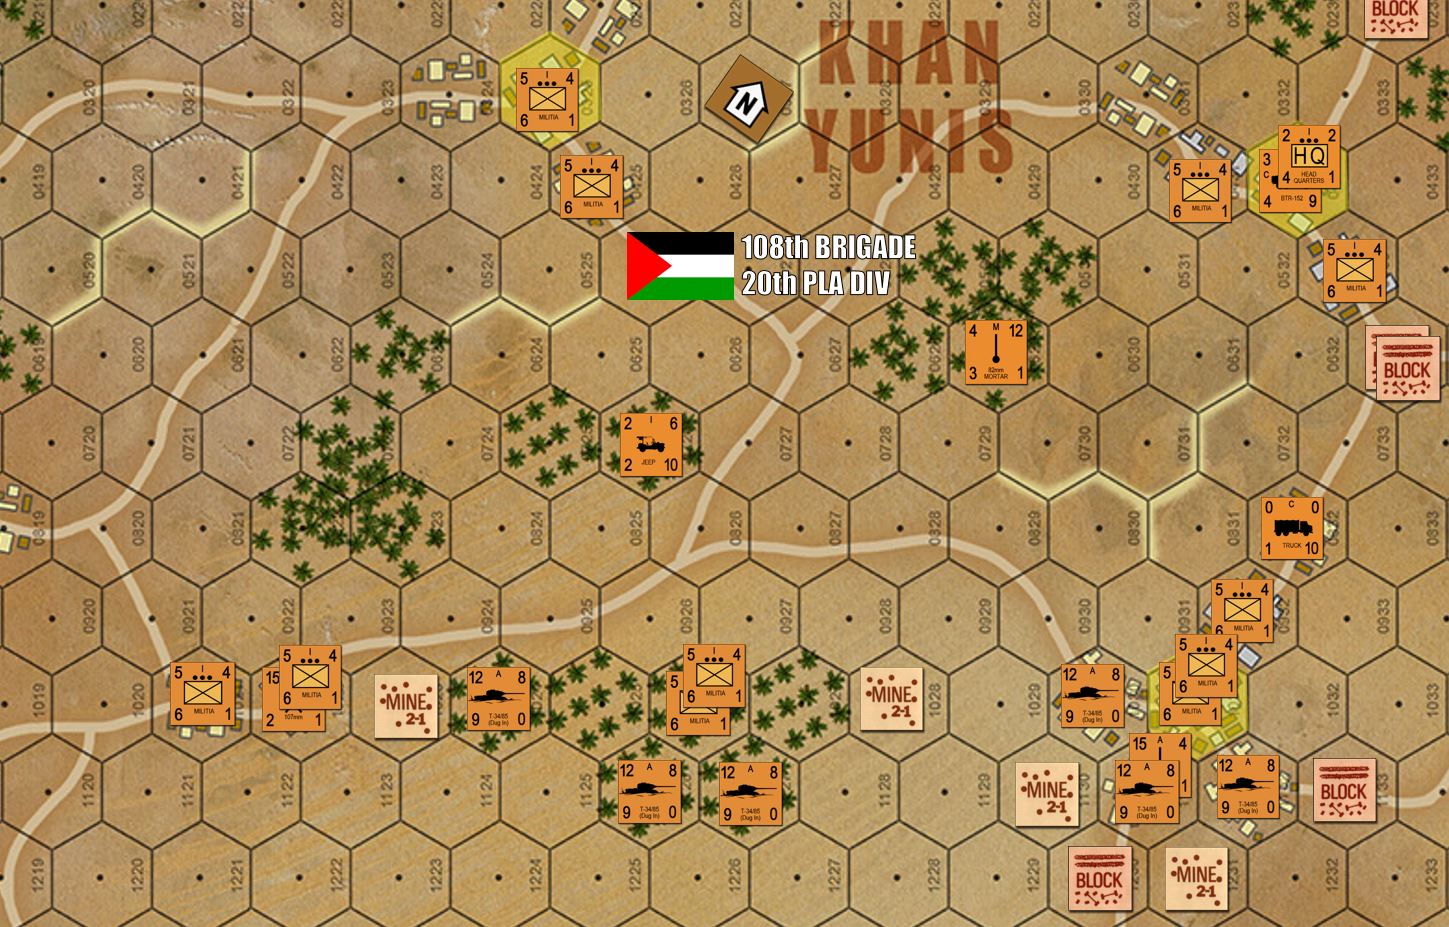
On my left, centered in the Palestinian city of Khan Yunis, I have the 108th Brigade of the 20th PLA Division (Palestinian Liberation Army). Note the dug-in T-34/85s (+1 defense, movement of zero), along with “Militia” infantry platoons, recoiless rifle batteries, antitank guns, blocks, minefields, etc.
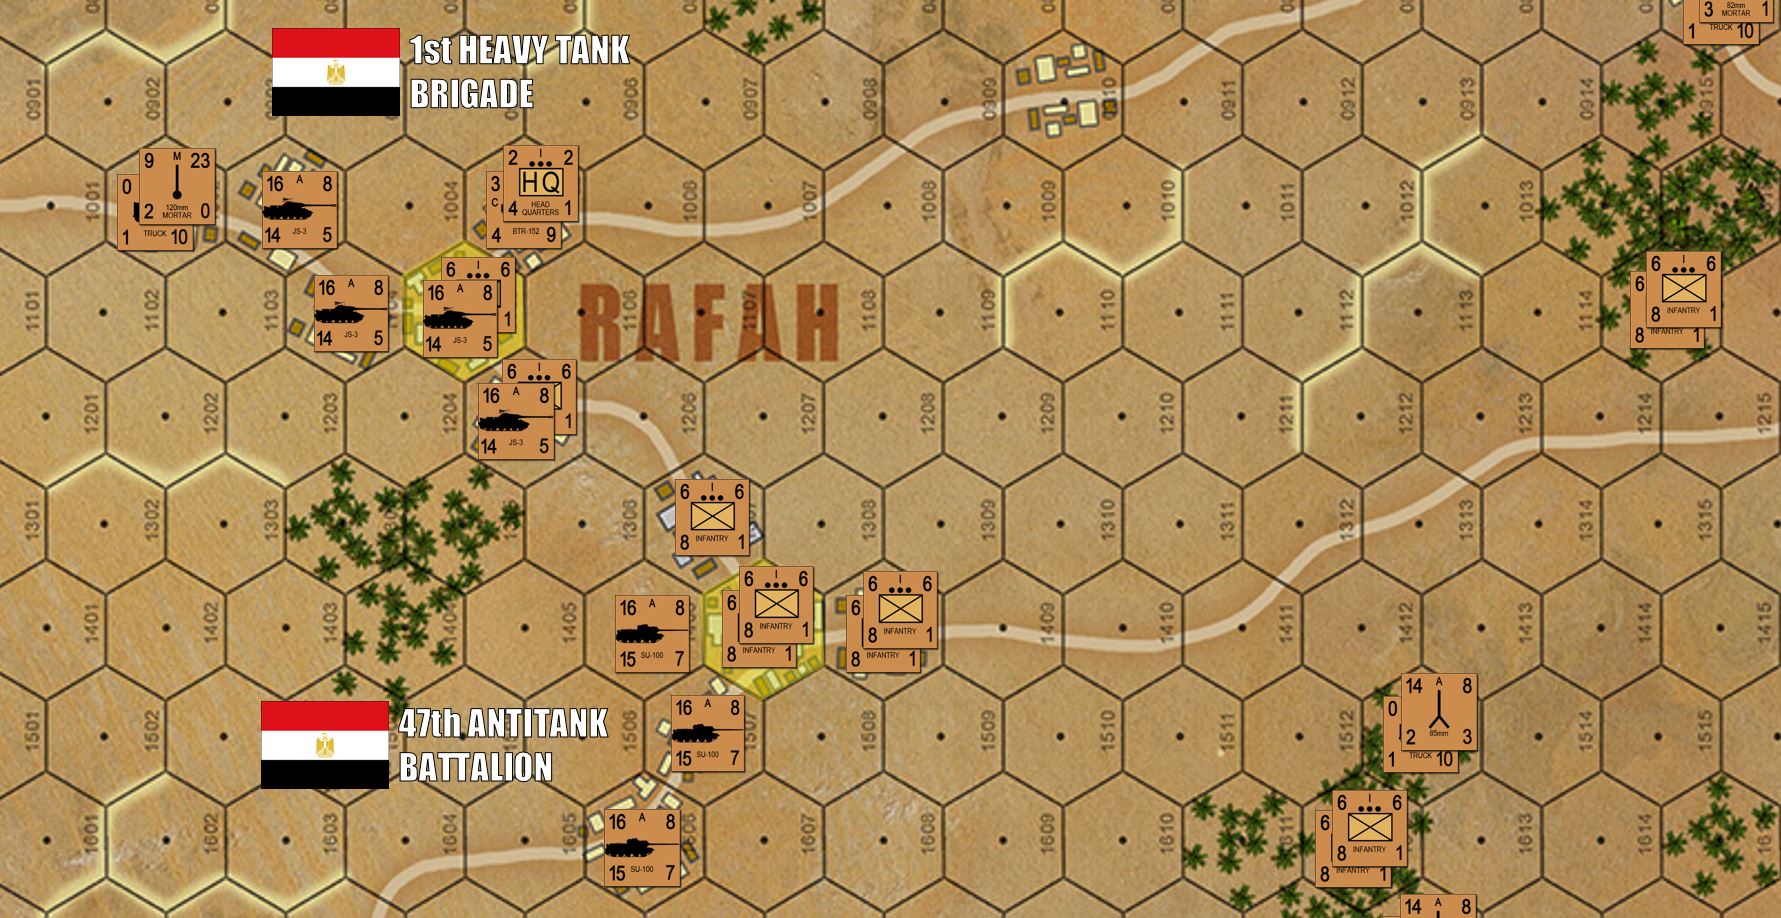
On my right, sitting in Rafah on the roads that actually lead into the Egyptian Sinai proper, I have 47th AT Regiment (SU-100s tank destroyers), and 1st Heavy Tank Brigade (JS-3 battle tanks), with the main body of 9th Brigade/7th Infantry holding the two wings together. I have Soviet 120mm mortars, 82mm mortars at battalion level, and 122mm howitzers hiding up by the coast.
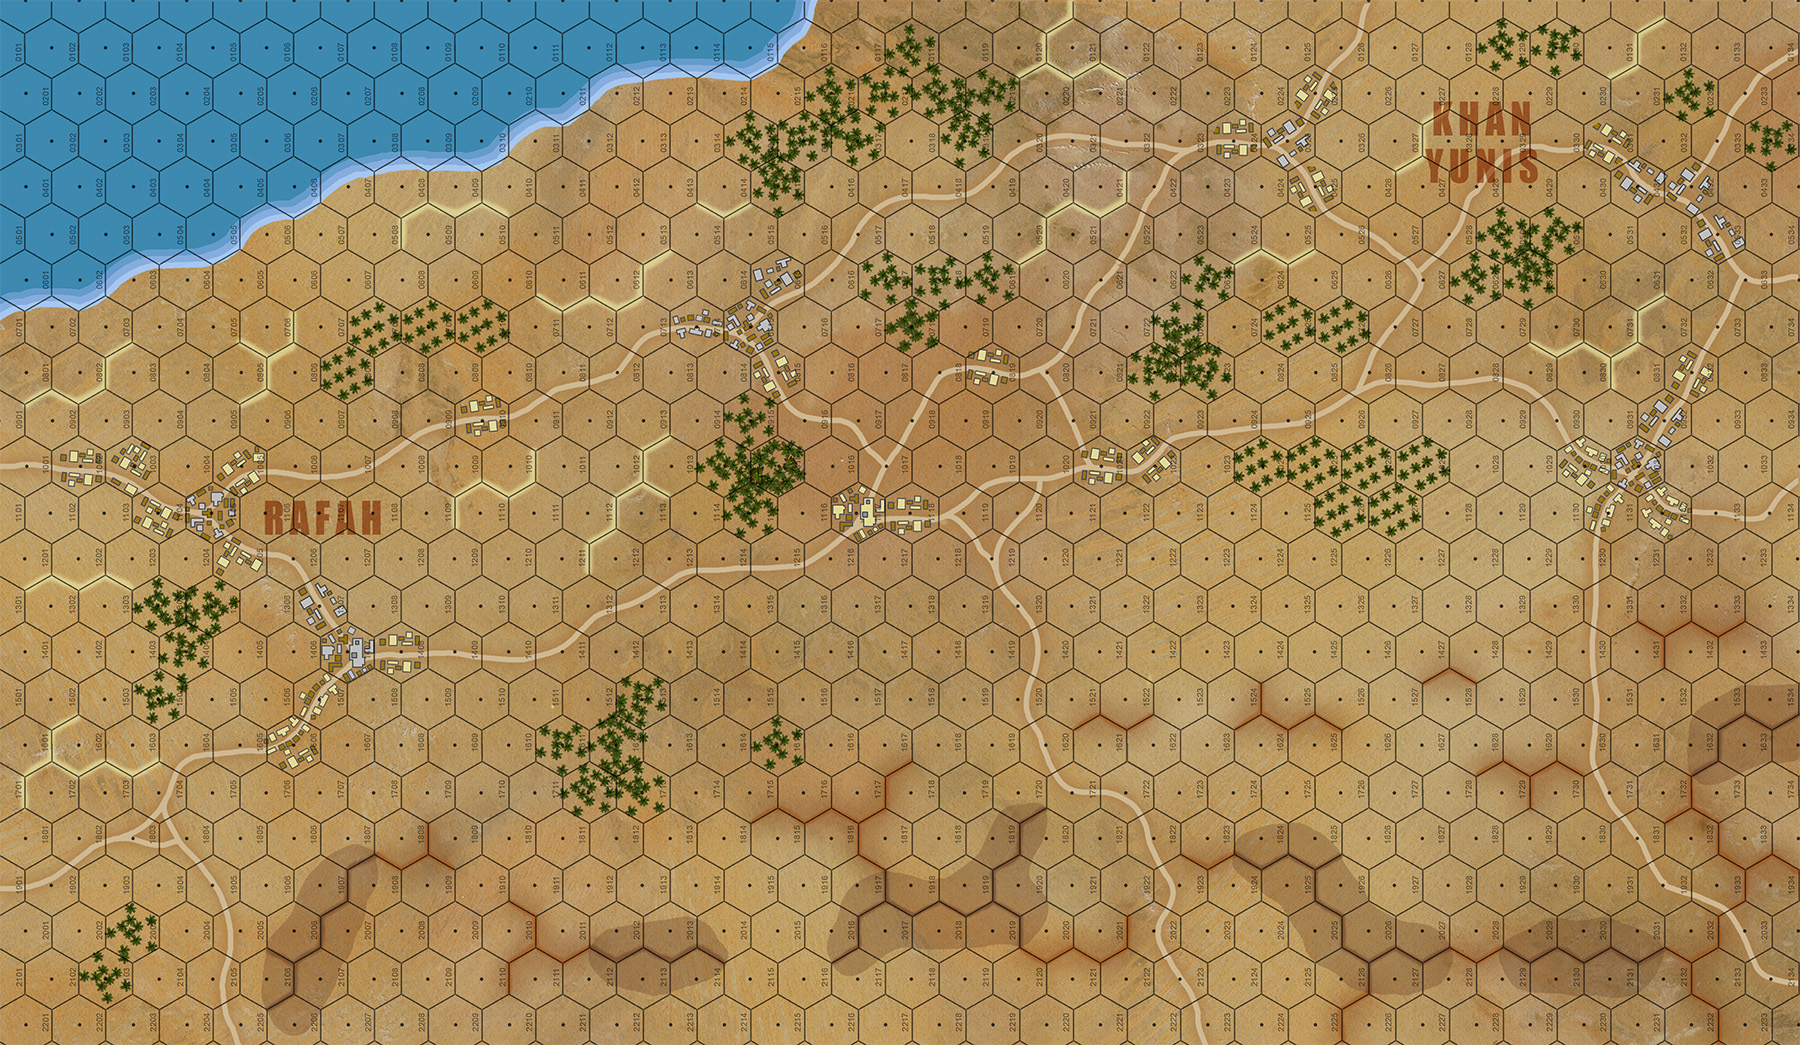
It’s a pretty serious force. In all I have 68 counters on the map initially (a further brigade of T-55s arrives as reinforcements on Turn 4 historically this is the 14th Armored Brigade). So we’re looking at around 3000 men and 150 tanks and AFVs.
Each counter is a platoon of 5 vehicles, battery of 6 guns, or platoon of 45 infantry or so. In all the map is 8 kilometers across and about five kilometers deep.
The Israelis will be coming in from the southeast. Their objectives will be to take at least four of the seven objectives hexes (highlighted yellow). The idea here is to take the majority of the road junctions, and thus cut off the Palestinian forces in the Gaza Strip (extending northeast) from the bulk of Egyptian forces in the Sinai (west and southwest) – and open the major routes leading to the west (through Rafah, off the table, and eventually leading to the Jeradi Pass, El Arish, Port Said, and the Suez Canal).
The Egyptian right wing, centered on Rafah. You can see the Josef Stalin 3s of 1st Heavy Tank Brigade and SU-100 tank destroyers of 47th AT Regiment. There’s also some infantry platoons (each piece is a platoon of 45 men or so), a couple batteries of 85mm antitank guns, mortars, both battalion 82mm mortars and brigade 120mm mortars.
The Egyptian center, built around the main body of 9th Brigade / 7th Infantry Division. At top you can see two of my D-30 howitzer batteries (122 mm). I’m hoping to use some of these to pin down the Israeli paratroopers as they enter the board in their halftracks.
Me left wing, centered on 108th Brigade / 20th PLA Division in Khan Yunis (eastern third of the board). Note the T-34/85 tanks dug into the earth. The Militia platoons here have lower values than my Egyptian regulars further to the west. They also have 107mm recoilless rifles instead of dedicated antitank guns, no heavy artillery, and definitely not mobile tanks or reinforcements (unlike elements of Egyptian 7th Division to the west). This is definitely the “soggy” part of the Egyptian-Palestinian defense, I can really only hope to bog down Israeli tanks and paratroopers in all these urban hexes.
Getting ready for next Arab-Israeli Wars game
So our wargaming by webinar experiments continue to find success and expand into new games and genres. Earlier today we took it into Darkstar and ran not only a full-scale, full-detail Darkstar game remotely, but a taught a new player, and with a carrier battle group no less (definitely a step up in intricate detail and rules complexity).
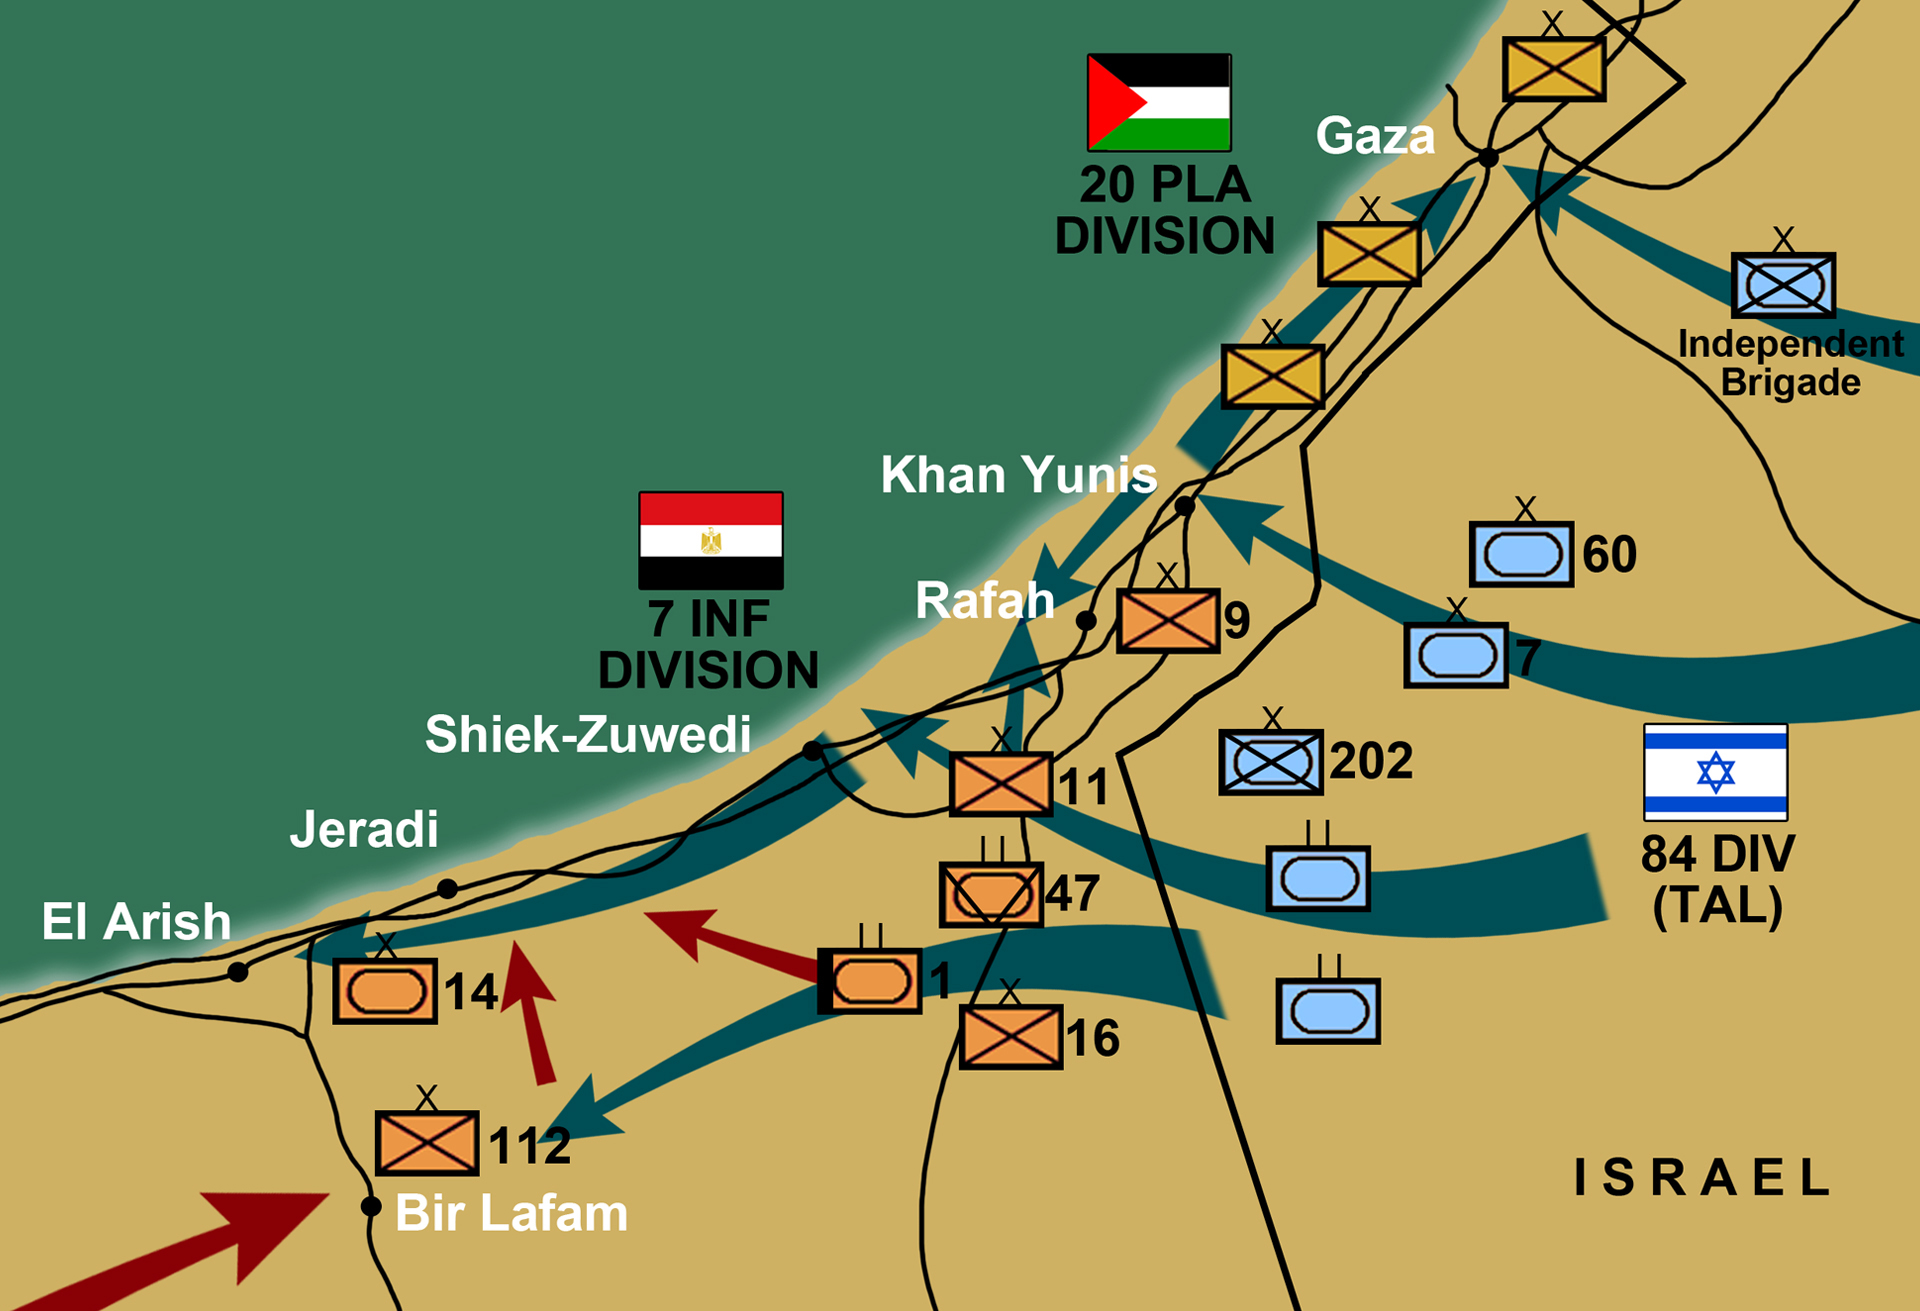
Meanwhile, we’re also getting ready for a Sunday, 2 December wargame of Arab-Israeli Wars. This time we’re moving it forward in time a little, from the 1956 Sinai War to the 1967 Six-Day War. We’ll be looking at some of General Tal’s assault into the Gaza Strip on the opening day of that war, where @damon will be taking 82nd Armored Battalion (Centurions) and 77th Armored Battalion (M48A3s) pushed into the gap between Khan Yunis and Rafah, along the norther coast of the Sinai Peninsula / Gaza Strip, trying to open the Jeradi Pass leading toward El Arish and eventually Port Suez along the Canal.
My defending units will include the elements of the 20th PLA (Palestinian Liberation Army) Division and detachments of Egyptian 7th Infantry Division, to include units of 1st Heavy Armored Brigade (JS-3s) and 14th Armored Brigade (T-55s).
1956 Arab-Israeli Wars in the Sinai - Damon vs. Oriskany (Part II)
Good afternoon, all.
So we’re back for the conclusion of the small introductory scenario we game last weekend between myself and @damon – getting Avalon Hill’s Arab-Israeli Wars off the ground.
We were playing Situation B-1 (Bir Gifgafa, November 2, 1956), recreating one of the closing actions of the 1956 Sinai War.
In this situation, a battalion of Israeli armor (M1/M4 and M50 Shermans, together with French-built AMX-13 light tanks) of Ben Uri’s 7th Armoured Brigade, was trying to push through the Bir Gifgafa road center in the north-central Sinai Peninsula. The Israeli invasion of the Sinai had started about four days ago, and the objective was now to push to the Suez Canal and seize the whole Sinai Peninsula. Israeli motivation for this action had been continued PLA terrorist, rocket, and artillery attacks out of this area into the Negev settlements and inciting unrest in Gaza, all with the Egyptian army and government (President Gamal Abd-el Nasser) conveniently looking the other way.
Meanwhile, Nasser had also nationalized the Suez Canal, triggering a military response in the form of British and French air and naval units, to include British Royal Marines and French Paratroopers in the canal zone itself (Operation Musketeer). To what degree IDF ground units and these British and French expeditionary insertions were supposed to be coordinating remains a bone of debate.
In any event, Damon’s orders here were clear. His Israelis, with their harder-hitting and longer-ranged guns, were supposed to smash my Egyptian 1st Armoured Brigade (remnants, rear guard) and get as many of his units off the west end of the board by the end of Turn 8.
In short, this is a classic breakthrough scenario. Smash the enemy lien of resistance, push past it as fast as you can. Your battle is only a small part of a larger operational picture in which speed and exploiting enemy disarray is paramount.
For my part, I have no hope of actually stopping the Israeli attack. I can slow it down, bleed it a little, and perhaps pin down some of the Israeli units so they don’t get off the board in time.
So far I’m not doing too bad. I have denied battle as long as I could, finally counterattacking Israeli vanguard which became a little too outstretched for all its elements to support each other. It cost me a company and a half of T-35/85s, but I also claimed a full company of Israeli light armor. That’s not a bad trade when you have the Egyptians up against Israeli tanks.
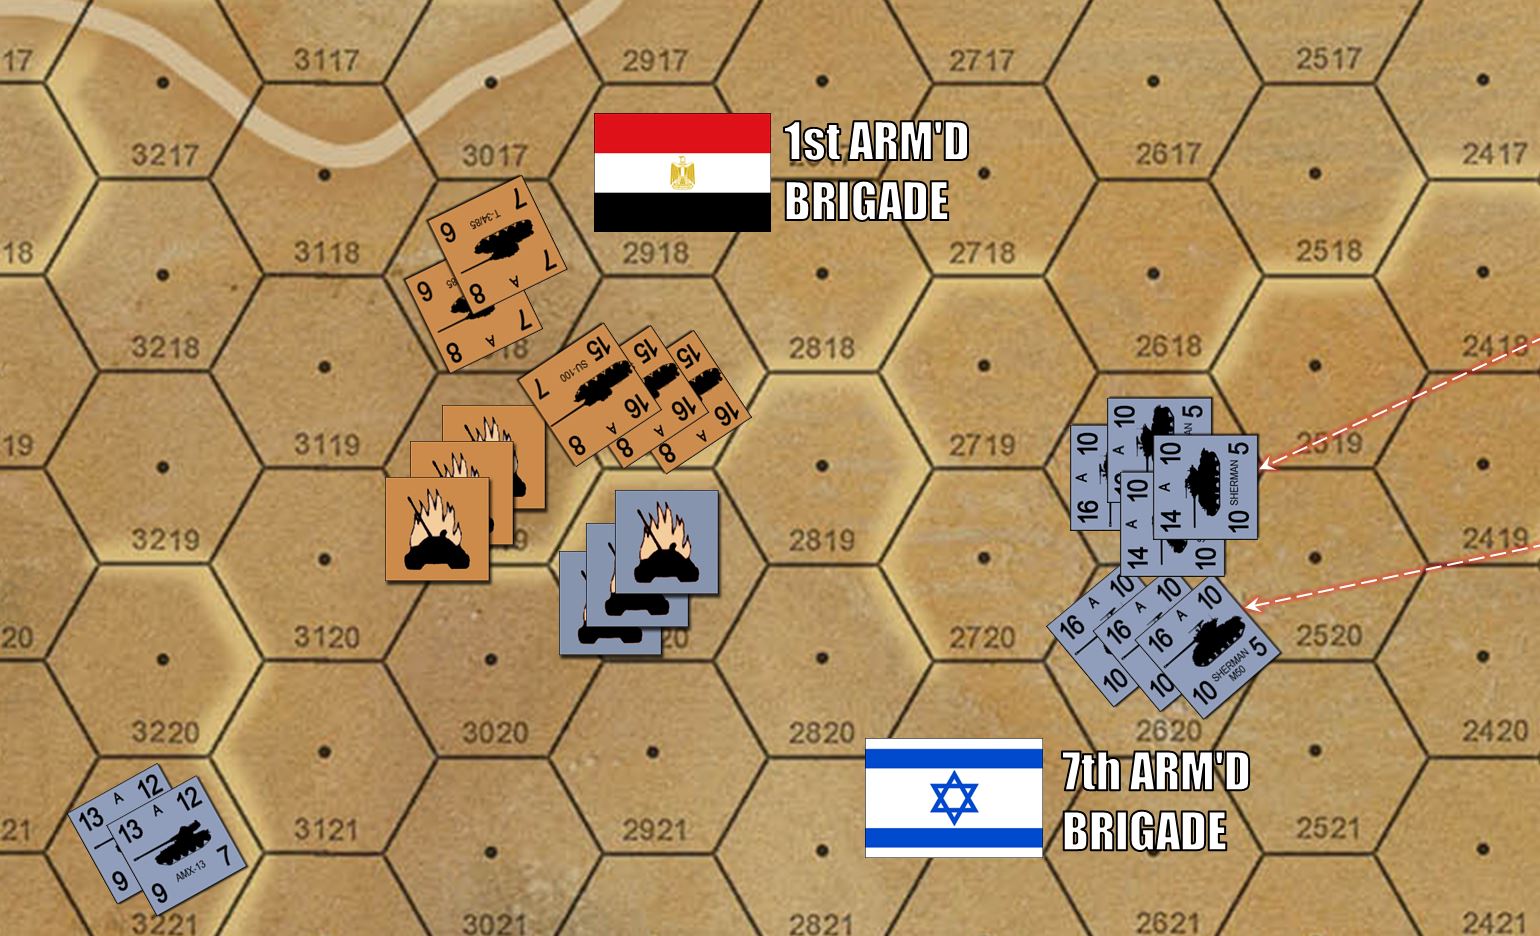
Now Damon’s column is starting to compress a little, but it’s taken enough time to allow me to scrape together my battered 1st Brigade and launch another overrun on these two AMX-13 platoons trying to get off the extreme southwest corner of the board. Damon tried to go for maximum dispersals on his opportunity fire (i.e., forego shooting for kills, and instead try to pin down more enemy units, an an attempt to break up the overrun and survive the attack).
The odds were against it, and the dice came down with the odds. He dispersed two platoons of T-34s, but those three platoons of SU-100s took care of the remaining AMX-13s.
But now the Israeli Shermans (slow as they are) are finally trundling up to the scene, too far away to overrun me right now (this screen shot shows them at the END of their movement), but I will definitely have problems from here on out.
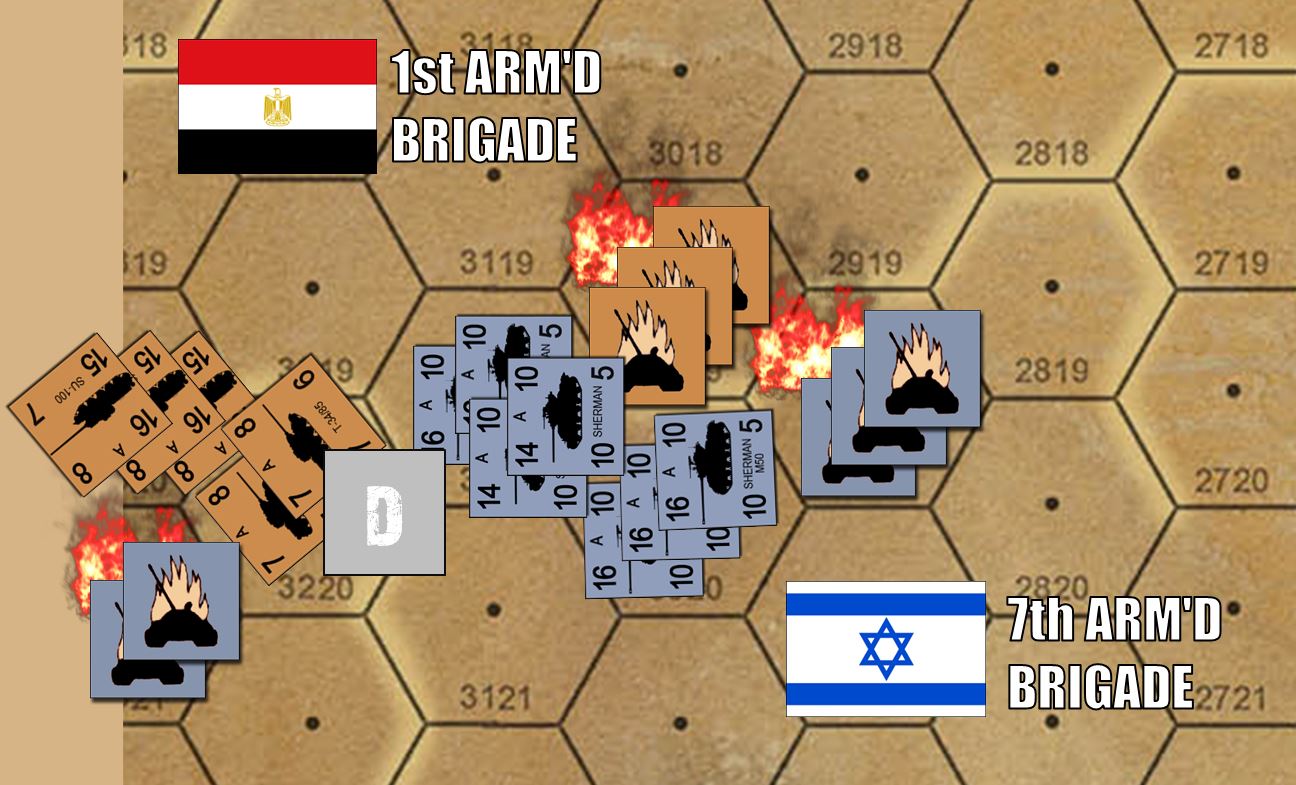
Okay, those Shermans have blown those two platoons of T-34/85s into the middle of next week, and using the Split Move and Fire rule (available to Israelis but not to Egyptians, at least in 1956) they have started to scoot off the table and thus earn more victory points for Colonel Damon. 😀
My SU-100s had one shot at opportunity fire, failing to kill two platoons of M1/M4 Shermans to the south and one platoon of M50s to the north, but pinning them all down. By the way, I chose to include fire on this trying to get by me to the north because I have 30 more T-34/85s trying to close up from the east. If by some chance those Shermans don’t rally next turn, these new tanks might get a shot on them.
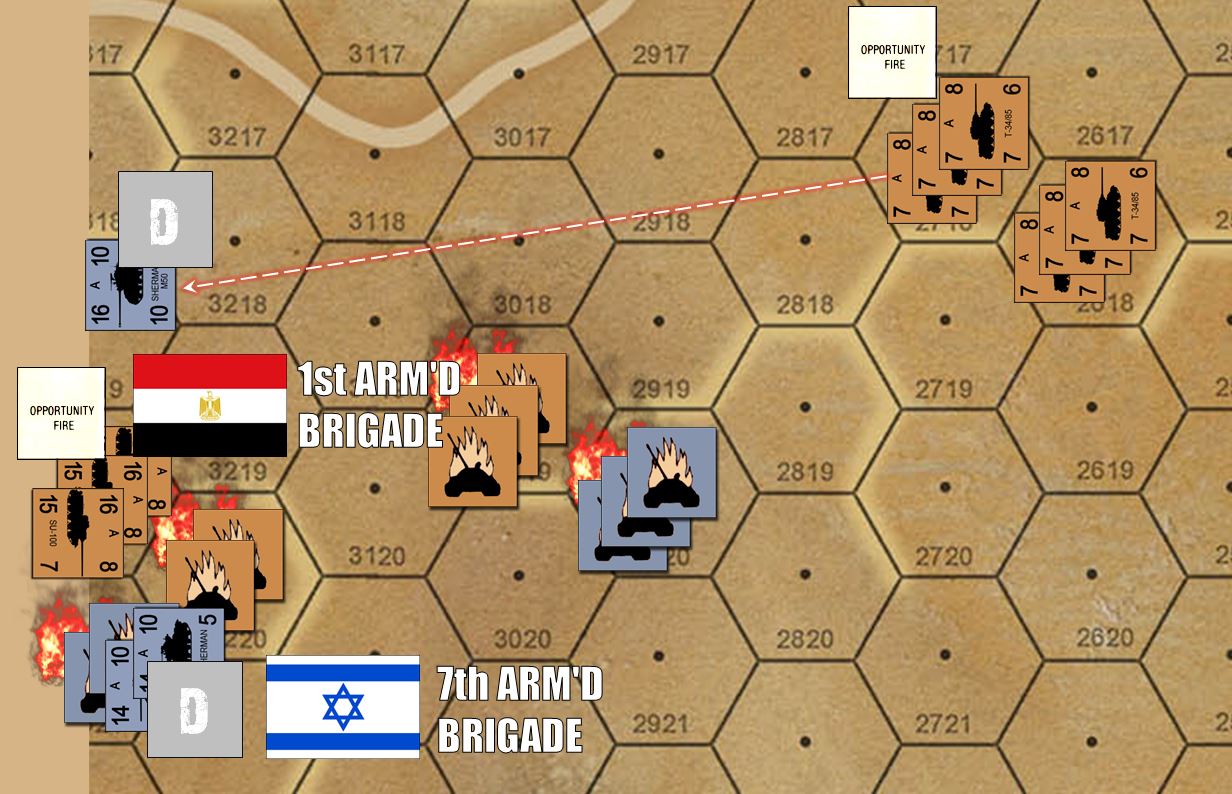
In the end, those two platoons to the south managed to rally and get off the board, the platoon to the north failed but I didn’t get another shot at them. So it’s not destroyed, but it’s still on the table so counts as 1 Egyptian victory point.
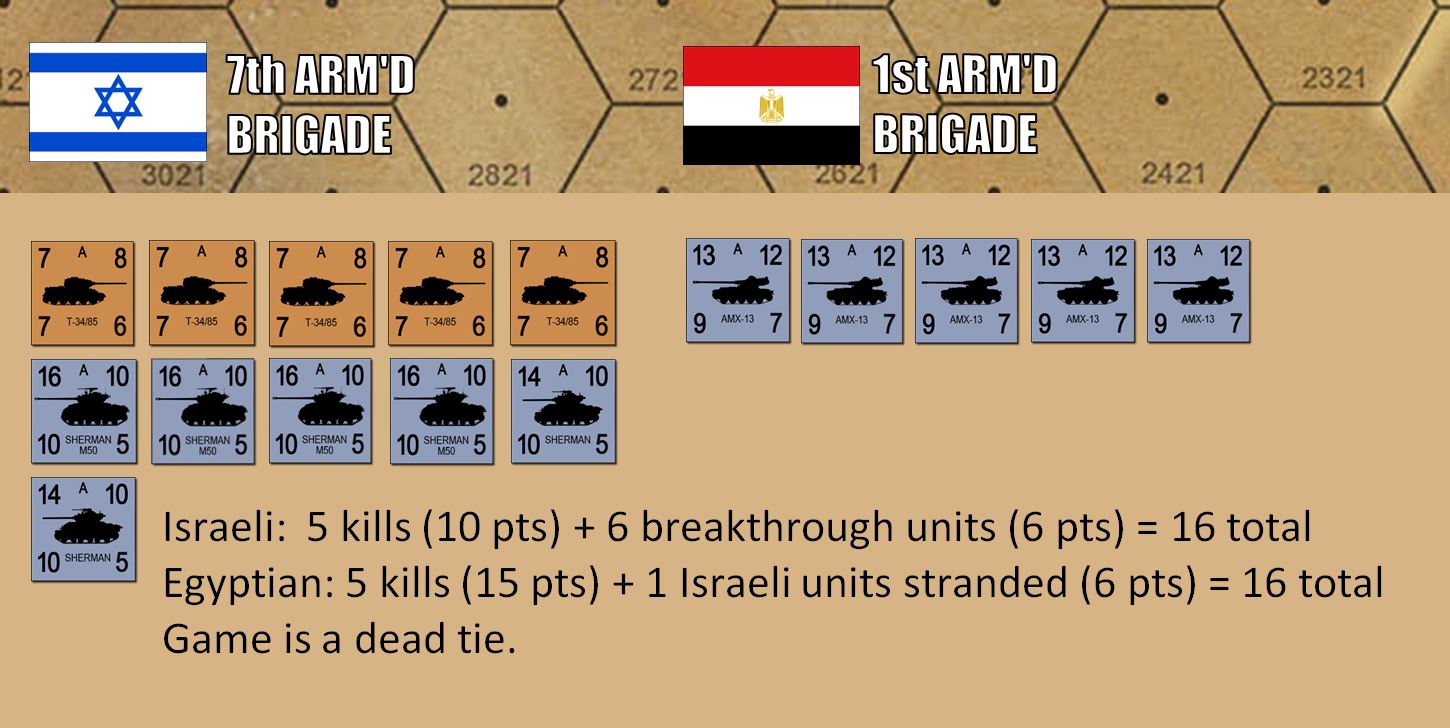
The final score, as shown below … 16 to 16. A dead tie.
I’m not gonna lie, for the Egyptians at Bir Gifgafa, that’s a damned good result.
To his credit, this was Damon’s first try at the game, we invented new rules for platoon facing and flank fire on the spot, and he was playing a guy who’s bee running the scenario for 20 years.
Although I have never tied with the Egyptians before … I use this scenario as a literal “training tool” to introduce new players to Arab-Israeli Wars, it’s challenging enough to test new players and teach the the basics of the system, but honestly the Israelis are almost fated to win, even after my scenario updates / modifications.
IN SUMMARY: This idea of wargaming via web conference is simply awesome. I earnestly hope to do this over and over again, @brucelea and @damon have both vowed they want to try more games.
We’re trying this out with Darkstar with a new player on December 1.
Talk has been mentioned of doing this with World War 2.5 or Valor & Victory.
Honestly the sky’s the limit. As fast as I can draw new maps, we can run more games.
So if this kind of thing interests you, ping me a PM and we can add you to the schedule / running order.
Sinai - Damon vs. Oriskany (Part I)
Here are some quick photos and an abridged battle report from the recent Arab-Israeli Wars game between myself and Damon. Again, this was played via web conference so we could have real-time video, chat, shared desktop (so each player could move their own playing pieces) and even a “Twitch style” spectator, all in real time … actually more than Twitch because @brucelea could advise @damon and the people playing the game could actually hear and reply. 😀
Anyway, we’ve already gone over the background and details of the 1956 Sinai War in October and November 1956. So the gist of this game is the the Israelis are invading westwards across the Sinai, driving toward the Suez Canal. The Egyptians are trying to delay them, while maintaining some kind of a cohesive force in withdrawal toward the canal (where French paratroopers and British Royal Marines are already on the ground as part of Operation Musketeer, but that’s getting off on a tangent).
So Damon has the leading elements of Ben Uri’s 7th Israeli Armored Brigade, made up of Shermans, M50 “Super” Shermans (although of course they weren’t really called that), while my Egyptians are built around the remnants of 1st Armored Brigade.
I enter the west side of the map first. My mission is to damage and delay. I get one point for any Israeli unit that doesn’t make it off the west edge of the board (i.e., doesn’t get past me), and 3 points for Israeli unit destroyed. My force is T-34/85 tanks and SU-100 tank destroyers.
Damon enters the west edge of the map. He gets 2 points for any Egyptian units destroyed, and 1 point for any Israeli unit that makes it off the west edge of the map.
The map shows the situation at the end of Turn 1. The Israelis have 60 tanks, the Egyptians have 75 tanks and tank destroyers. Each hex is 250 meters across. The overall map covers just under 50 square kilometers – 8 kilometers across and 6 kilometers tall.
The game lasts eight turns.
As always, for best results select the image, then open in new tab.
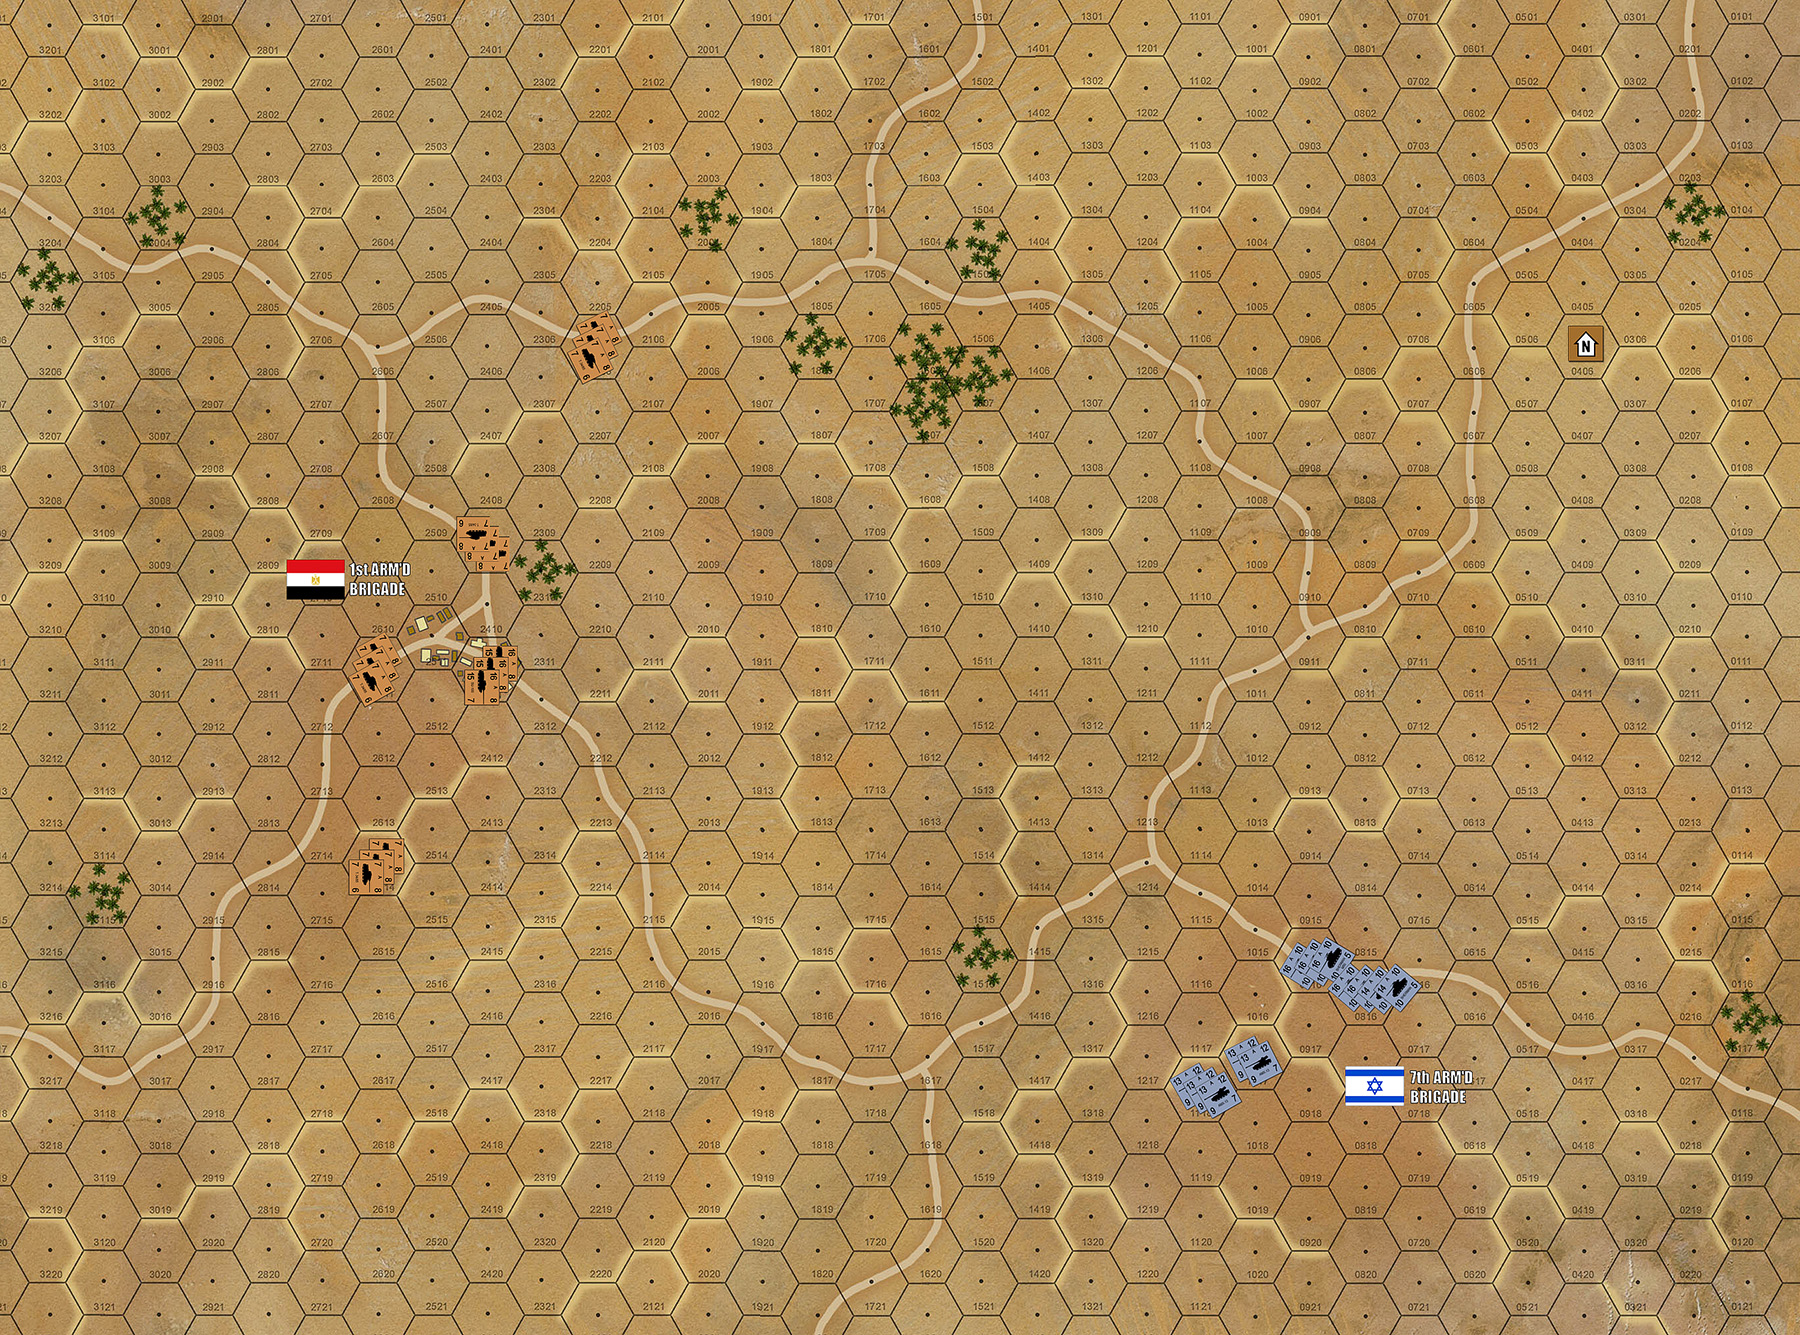
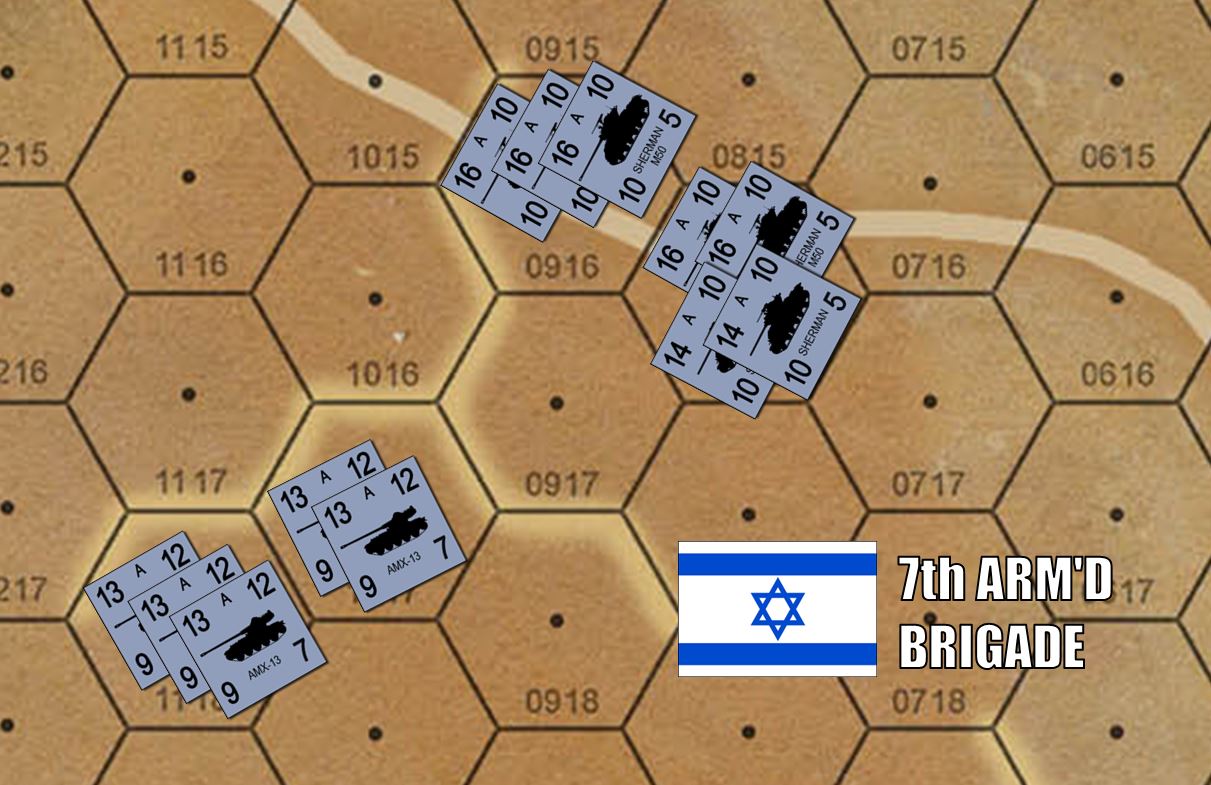
So in this game we decided to experiment with some facing rules for AFV platoons. The top of the unit’s counter designates the unit’s facing. When the counter top is facing toward a hex side, the unit is in road / march / column formation, and presents and very narrow front facing and extended, exposed flanks, but gets double movement of roads. When the unit is placed in the hex so that it’s top faces a hex point, the unit is in some kind of tactical dispersion / combat formation, and the flanks of the platoon are much less exposed but still vulnerable from certain angles (frontal arcs described by the hex grid)
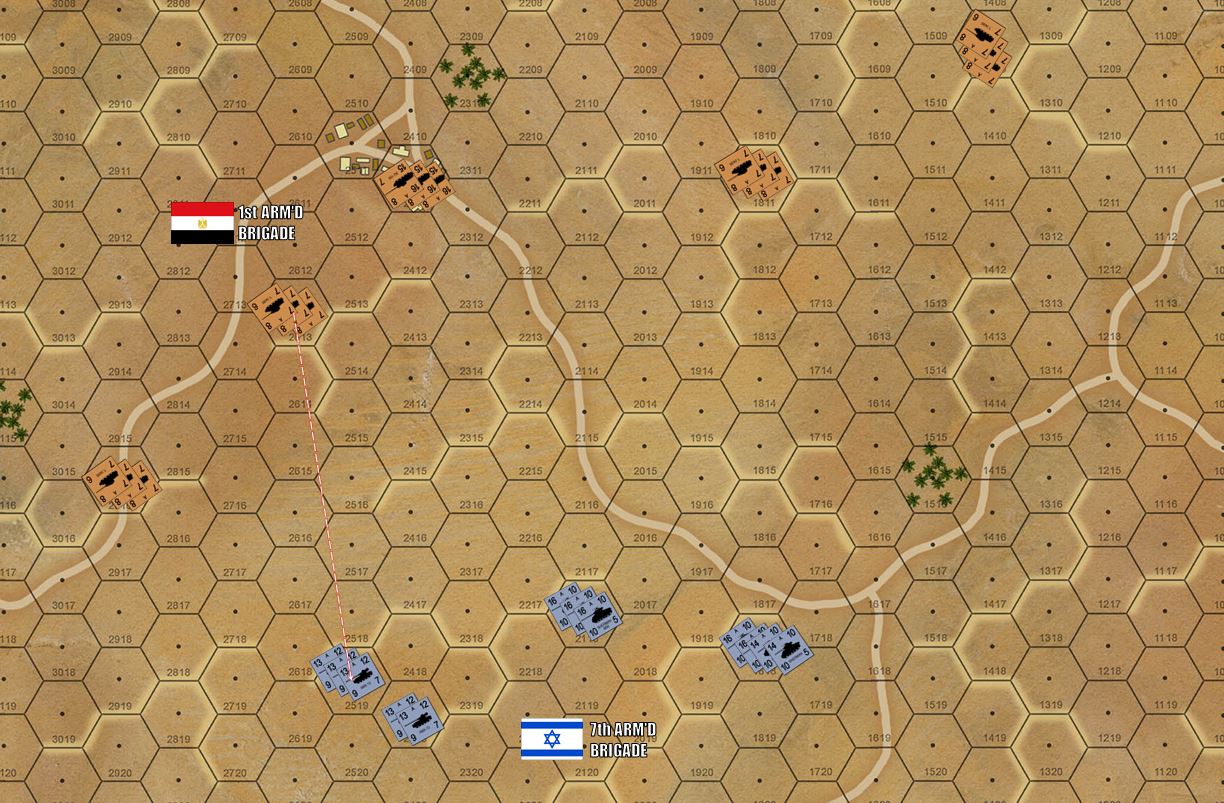
The Israelis are on the board and making their approach, making a generally southerly push westward across the board. As the forces close to within five kilometers, I’m sidestepping with my Egyptians south, using my center and right wing to block / delay the Israeli advance while slinging out my left wing to envelop and threaten the Israeli north flank.
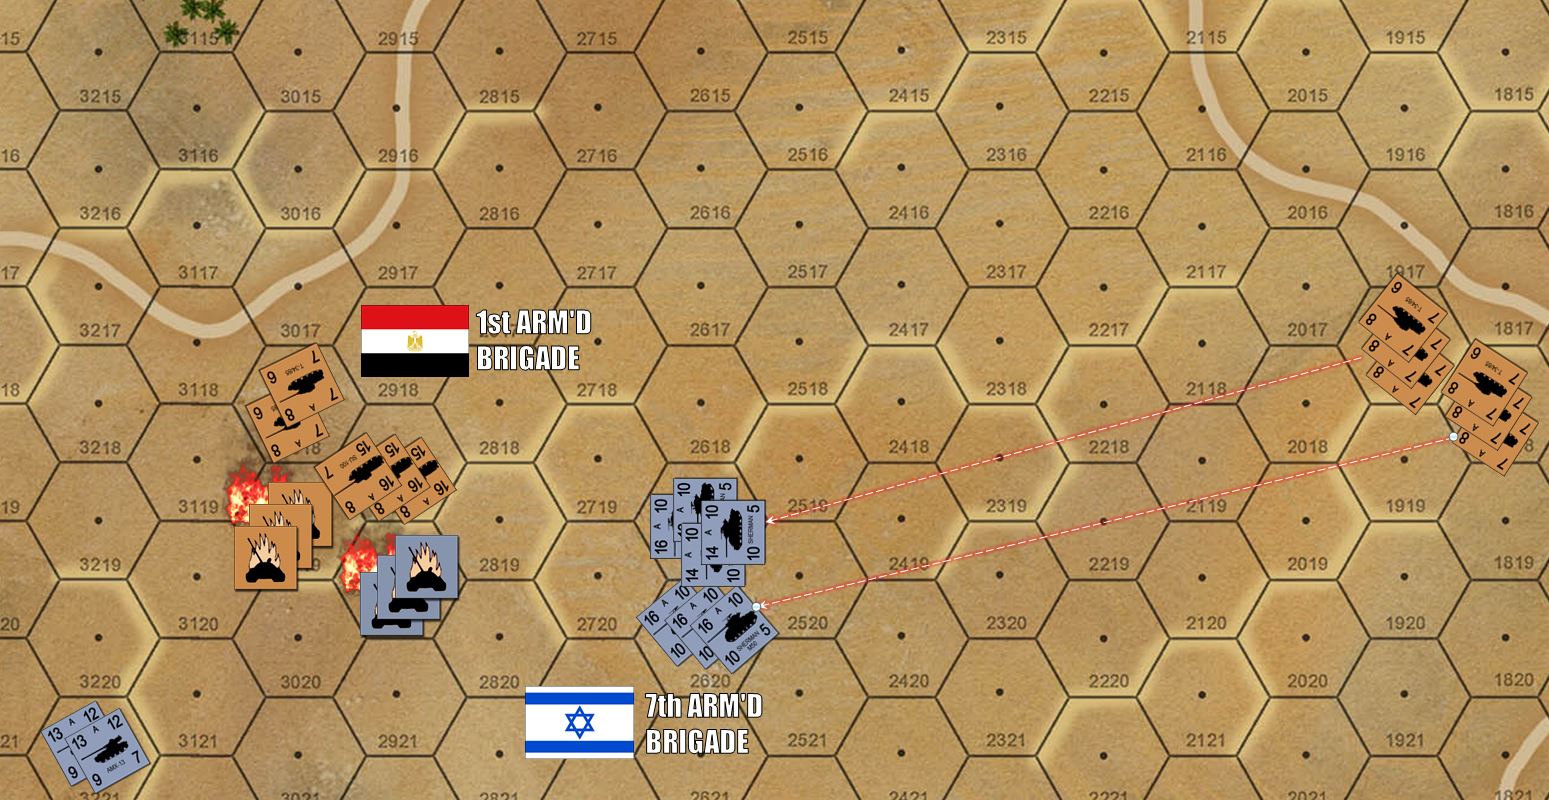
Contact! And delaying battle as long as I could (Israeli guns are much stronger than mine, and even worse, much longer-ranged). I finally pounced with the biggest overrun attack I could muster. Typically in this scenario (Bir Gifgafa, 2 November 1956), the Egyptians get one real crack at the Israelis as they make their run across the table. It’s not the best (I’ve over extended my left wing a little), and Israeli opportunity fire mauls my hapless T-34/85s as they rush in, but by 15 SU-100 tank destroyers go in against those AMX-13s, and leave three platoons of them as smoldering wrecks as well.
Any time the Egyptians can trade the Israelis in tanks on a 1-1 basis … it’s a good day for the Egyptians.
Meanwhile, I have three other companies of T-34/85s (6 counters = 30 tanks) behind the Israelis at this point, made up primarily of M4/M1 and M50 Shermans. They’re too far away to really score any hits, can’t draw an LOS over those dunes, and in any event are too far east to coordinate gunfire attacks with my other units.
But these 30 T-34/85s are hopefully pushing the Israelis forward (well, that and the turn limit), driving them westward into the guns of my SU-100s. Hounds to the hunters, and all that. Alternatively, Damon can turn around and annihilate my 30 T-34/85s, probably with little effort. It would sure feel good, and admittedly score some Israeli victory points, but would also cost the Israelis at least a full turn, possibly two. Again, this could lose the game for the Israelis. Either way, I’m hoping to scrape out at least a draw here.
Tunisia - Brucelea vs. Oriskany (Part IV - Conclusion)
Okay, here we go with the last part of last Saturday’s game between myself and @brucelea – British vs. Germans in southern Tunisia, March 1943, a battle where the British have seized a key bridge over a deep wadi and try to hold it until reinforcements arrive … while the Germans counterattack with orders to drop that bridge in the wadi, at all costs.
As you may have seen, the Germans have almost succeeded in part of their mission. Their panzer battalion shoved across the bridge easily enough, while panzer pionier engineers tried to blow the bridge up. They failed, but the bridge was then assaulted by 400 or so men of my schützen infantry battalion, and finally destroyed. However, my panzer battalion was tghen systematically cut to ribbons by arriving Crusader IIIs and Shermans of British dragoons, thanks to some bad deployment on my part and well-executed coordination between infantry, engineers, and tanks on the part of @brucelea and his British.
More bad news for the Germans came when the armoured engineers managed to get their Valentine bridgelayer tanks up to the northern arm of the wadi and throw a replacement bridge over the wadi. So now the game is tied for bridges (we each get 20 points for each bridge either blown up or established across the river) – this will come down to sheer casualties. The Germans get 2 points per British unit eliminated, the British get 3 points per German unit eliminated (German units are always stronger, although you wouldn’t know it the way I’ve been playing them).
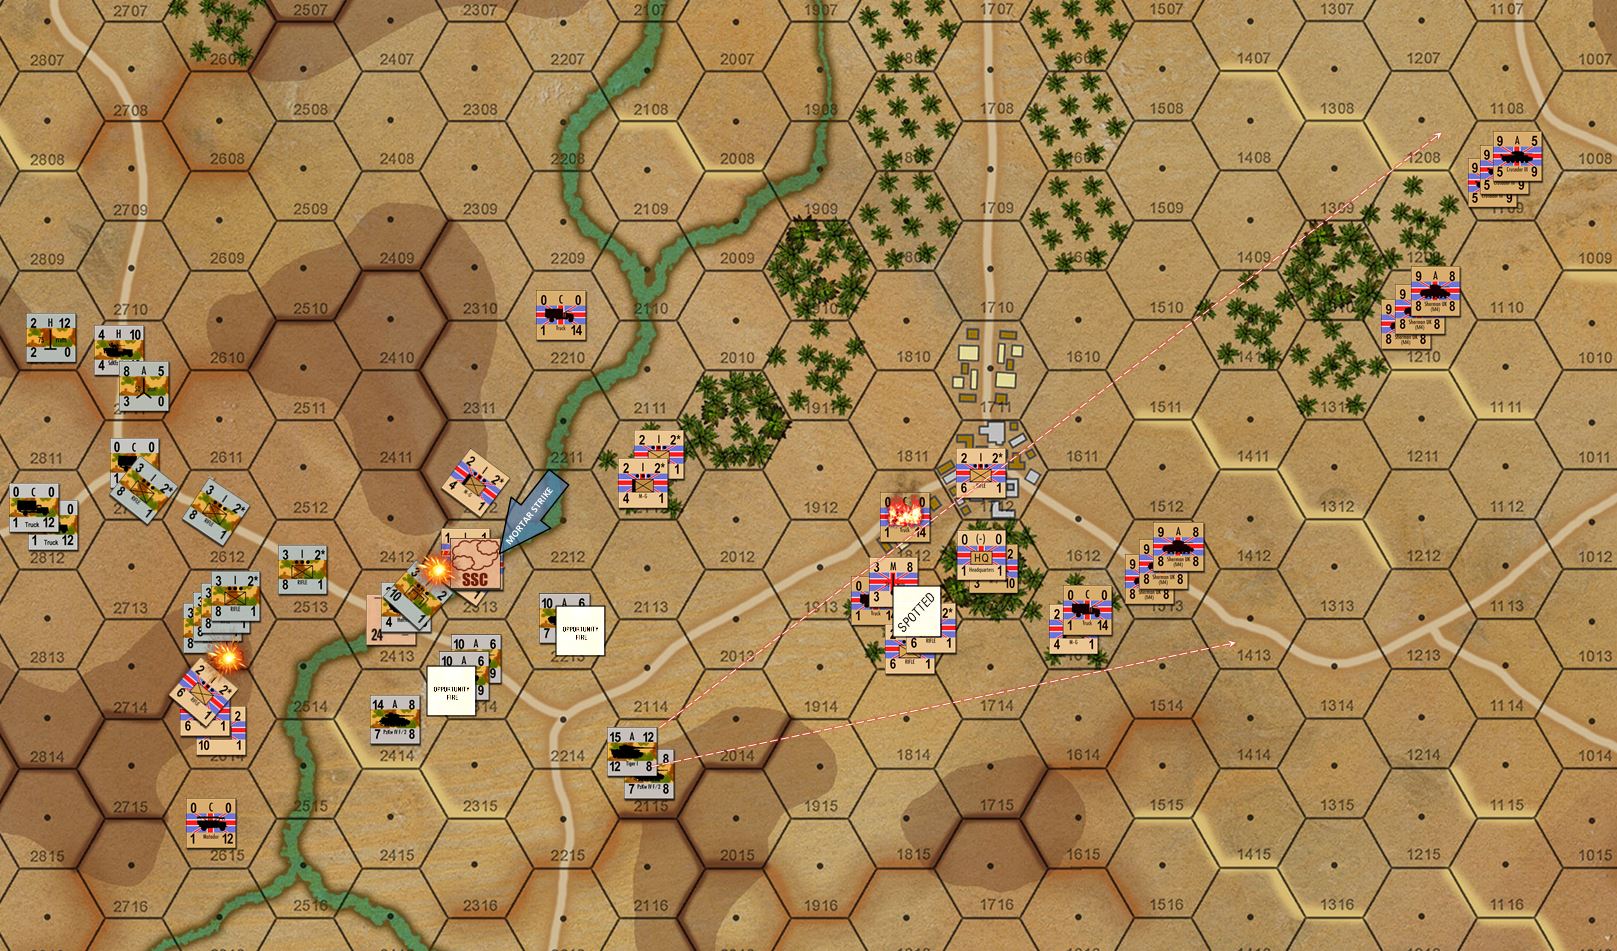
So we start in the south, where my three platoons of PzKpfw IIIJ “Specials” is sadly trapped on the wrong side of the river now that friendly infantry has burned down the bridge behind them. To make matters worse, they’re now being overrun by Shermans of the British Dragoons. My choice for opportunity was a stark one, do I try to disperse two or three incoming Sherman platoons, or kill one? Kills are always more gratifying, but by pinning more units, I might break up that overrun and just perhaps survive.
The tactic works, sort of. Two Sherman platoons are pinned down, reducing his overrun from 5 platoons to 3 (25 tanks reduced to 15). My Mark IIIJs survive, although they are pinned. If they can rally next turn … they can use Split Move and Fire rule to just maybe escape for another turn or two …

Up north, meanwhile, @brucelea has set up his bridge, the bridge laying tank is across the wadi (now empty), and two platoons of Crusader IIIs are also across. The German “gun ridge” from which all my mortars, infantry guns, antitank guns, flak halftracks, etc … have been based, are now under threat.
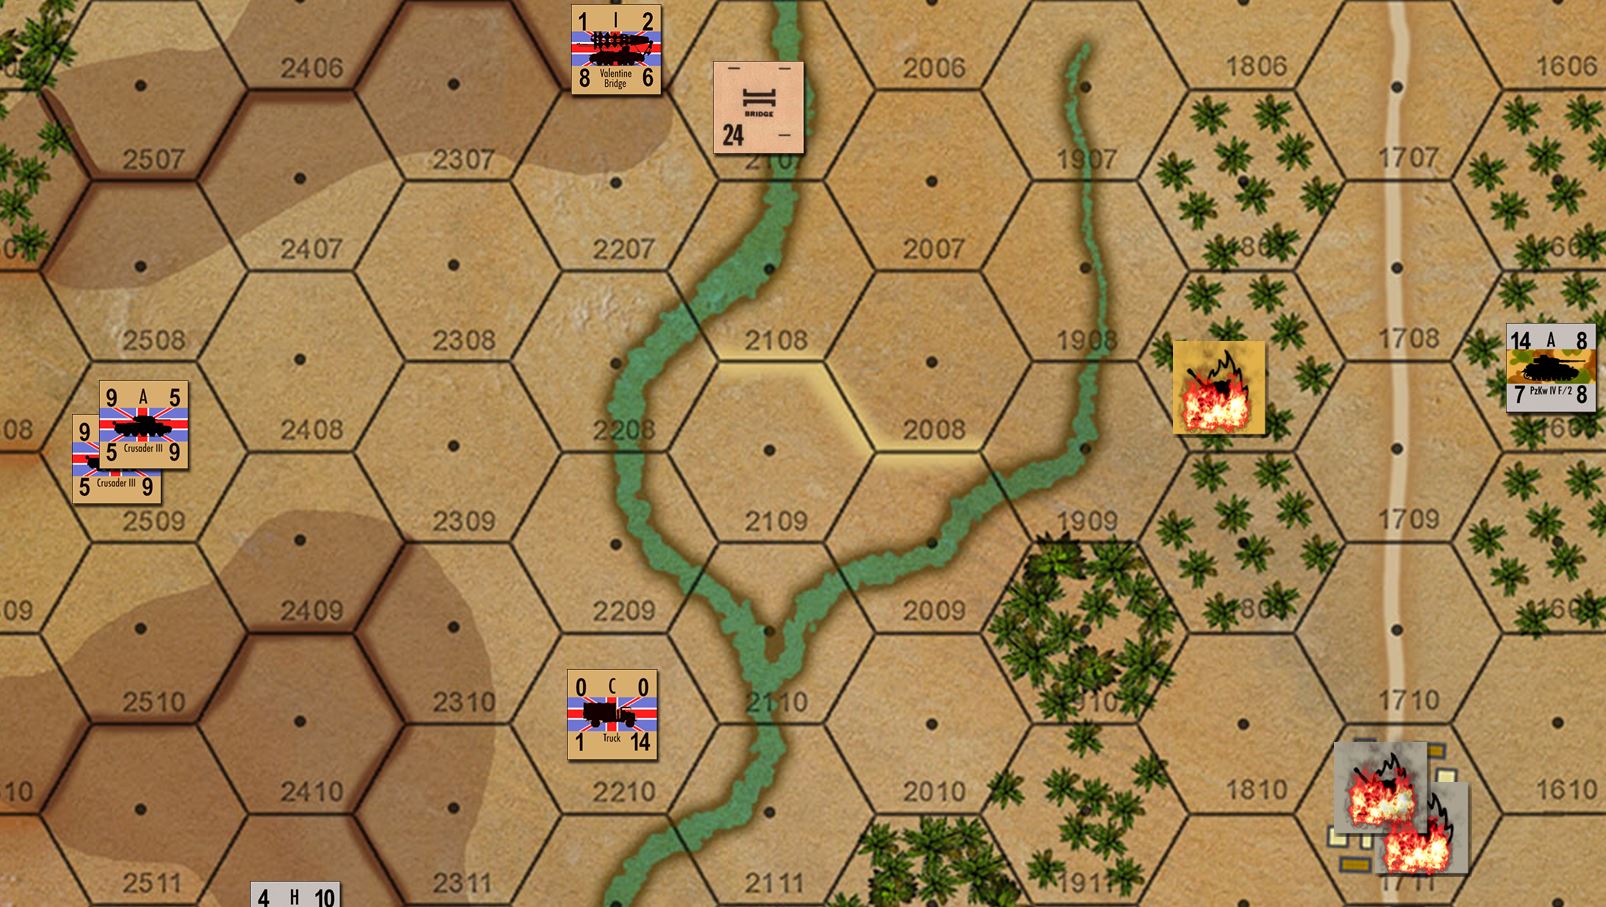
Situation at the end of Turn 9. As my artillery starts to evacuate that northwest ridge, the Crusaders take my trucks under fire. My 5.0 cm guns get away, but my 7.5 cm infantry guns do not. Meanwhile, the British have thrown a second company of infantr into the ongoing firefight in the north wadi, including the battalion commander.
Determined to play as a gentleman, I politely point out that that battalion HQ only has a defense of 1, and is meat on the hook ready to be slaughtered. Furthermore, knocking out the enemy command unit reduces the morale of all his units from a “B” to a “C” – making it much easier for me to kill dispersed units. This is a “realistic” command platoon, twenty men with radios, binoculars, maps, radios, half of them armed with only pistols, the rest shaky clerks with rifles they haven’t fired since boot camp. Hardly fitting to send them into a 14-platoon (600+ man) battle royale with heavy machine guns, rifles, SMGs, LMGs, and light 5.0 cm and 2-inch mortars.
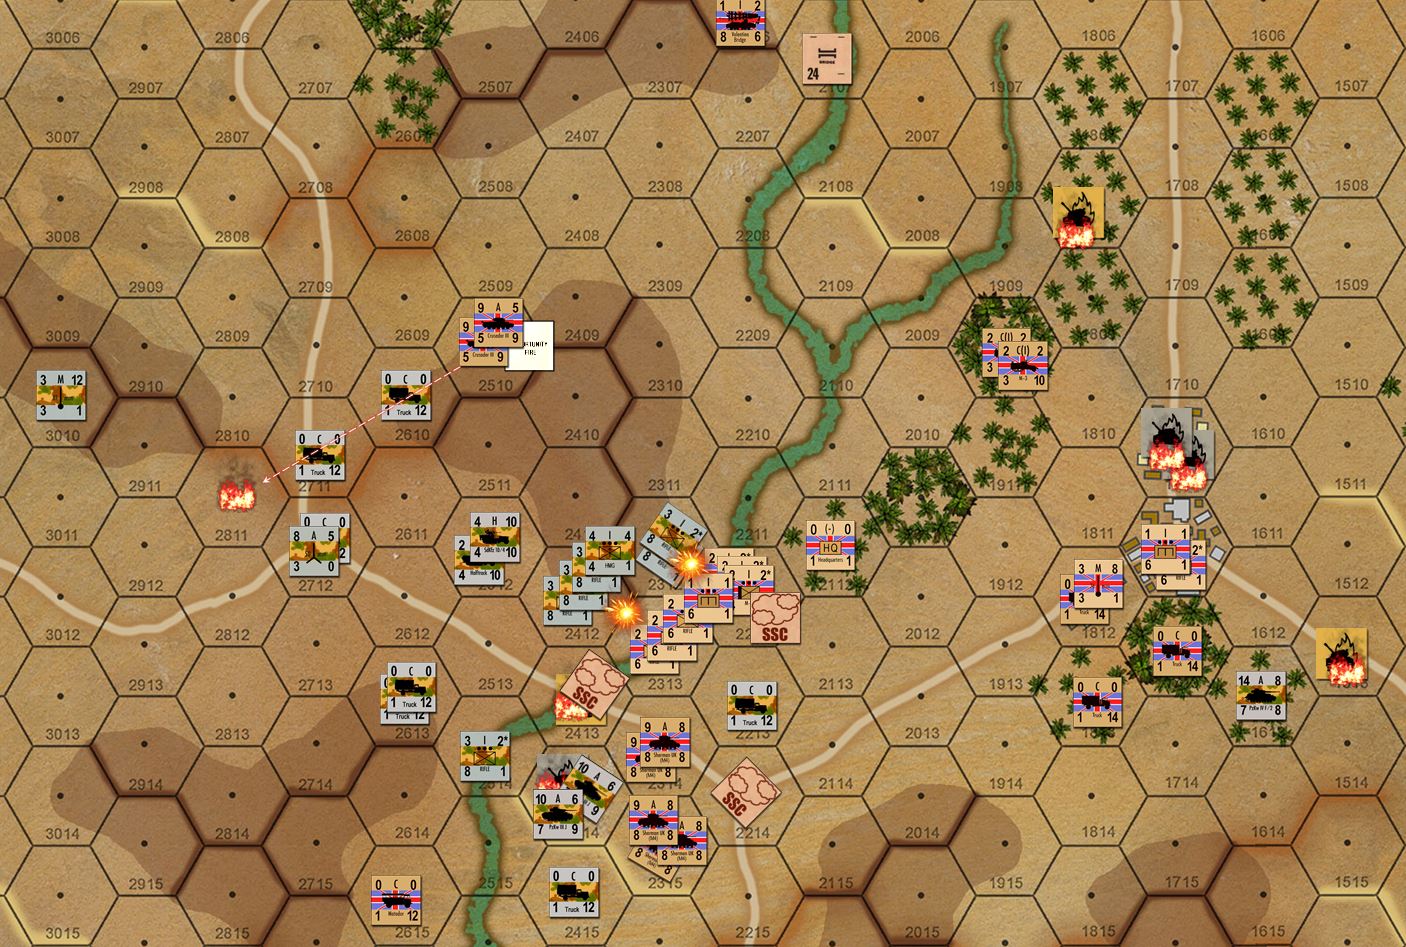
So the headquarters unit hangs back. I start killing British rifle platoons as they are fed into the battle (but he is inflicting losses on me as well) while to the south, @brucelea’s Shermans are finally putting my stubborn but helpless PzKpfw IIIJs to the sword.
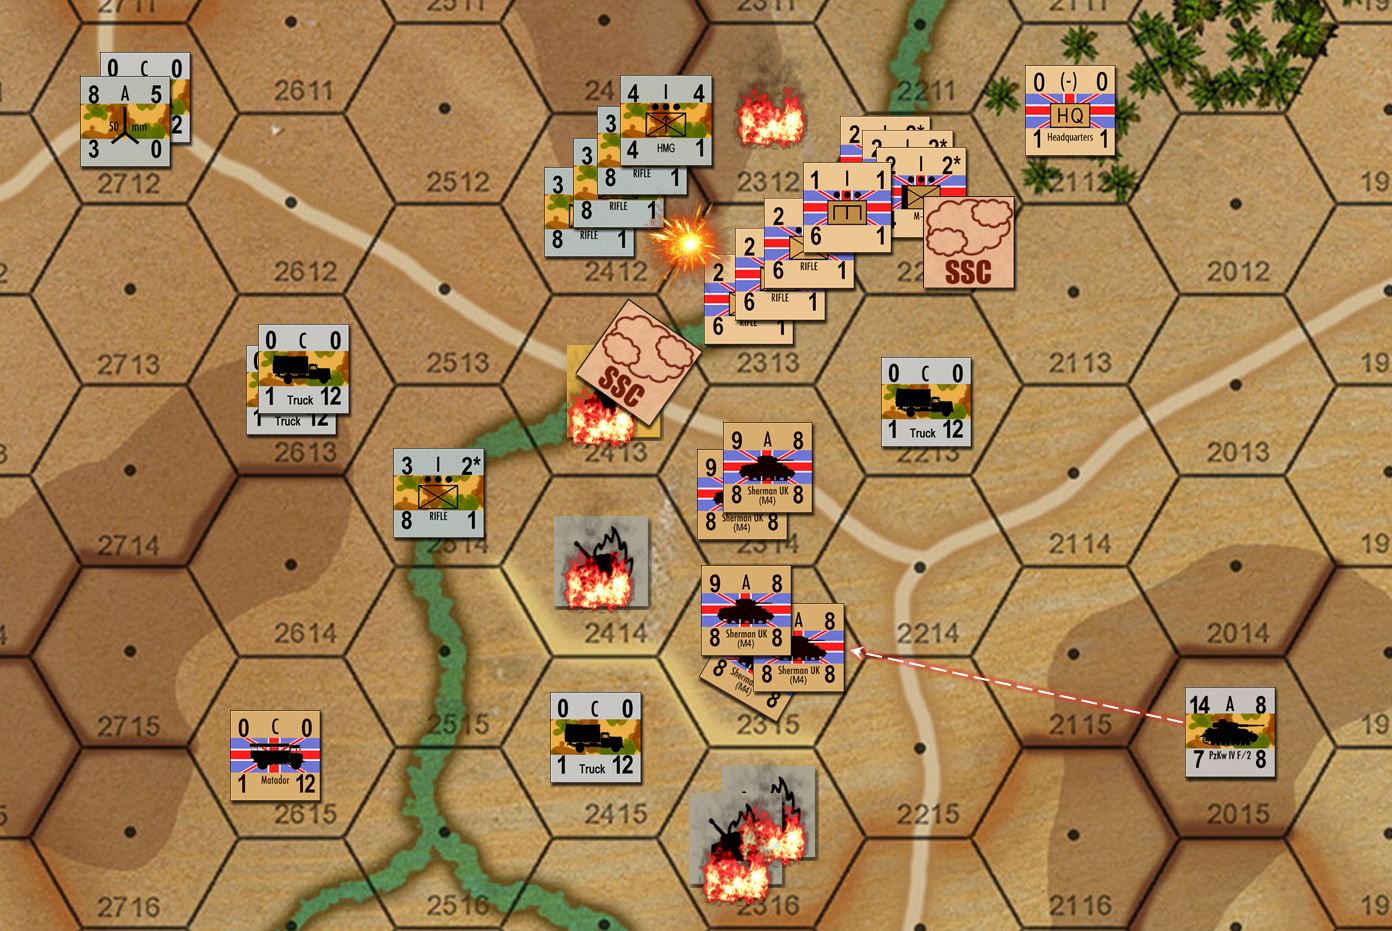
The final situation. I have succeeded in destroying the initial bridge, as per my mission. But I paid far too much to do it, leaving me with not enough strength (especially armored strength) to counterattack @brucelea’s second bridge he managed to get into position up north. If I hadn’t squandered those two platoons of PzKpfw IVs and Tigers, I might have been able to blow up this bridge as well (tank bridges are metal, considered armored targets, and thus pretty vulnerable to long-range tank fire).
In summary, we both succeeded in our missions partially. But the British have a lot more firepower on the table at the end. I paid too much for my “partial win” – @brucelea only has a partial win but now controls the field through weight of numbers and Shermans alone.
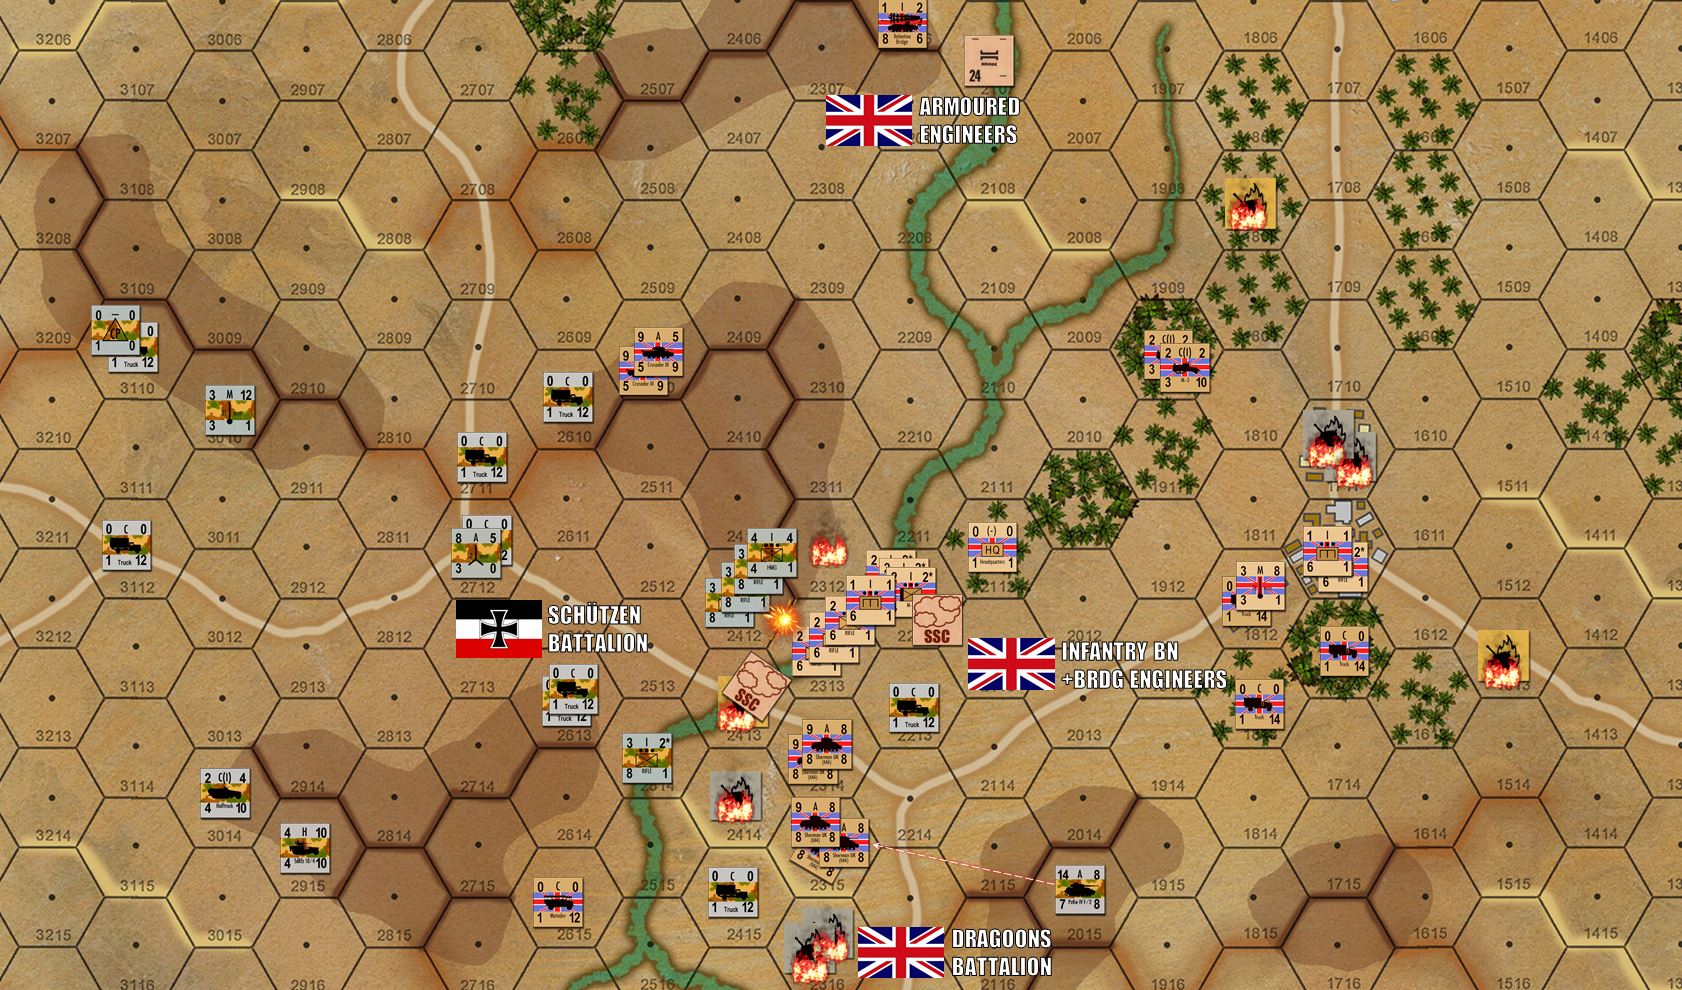
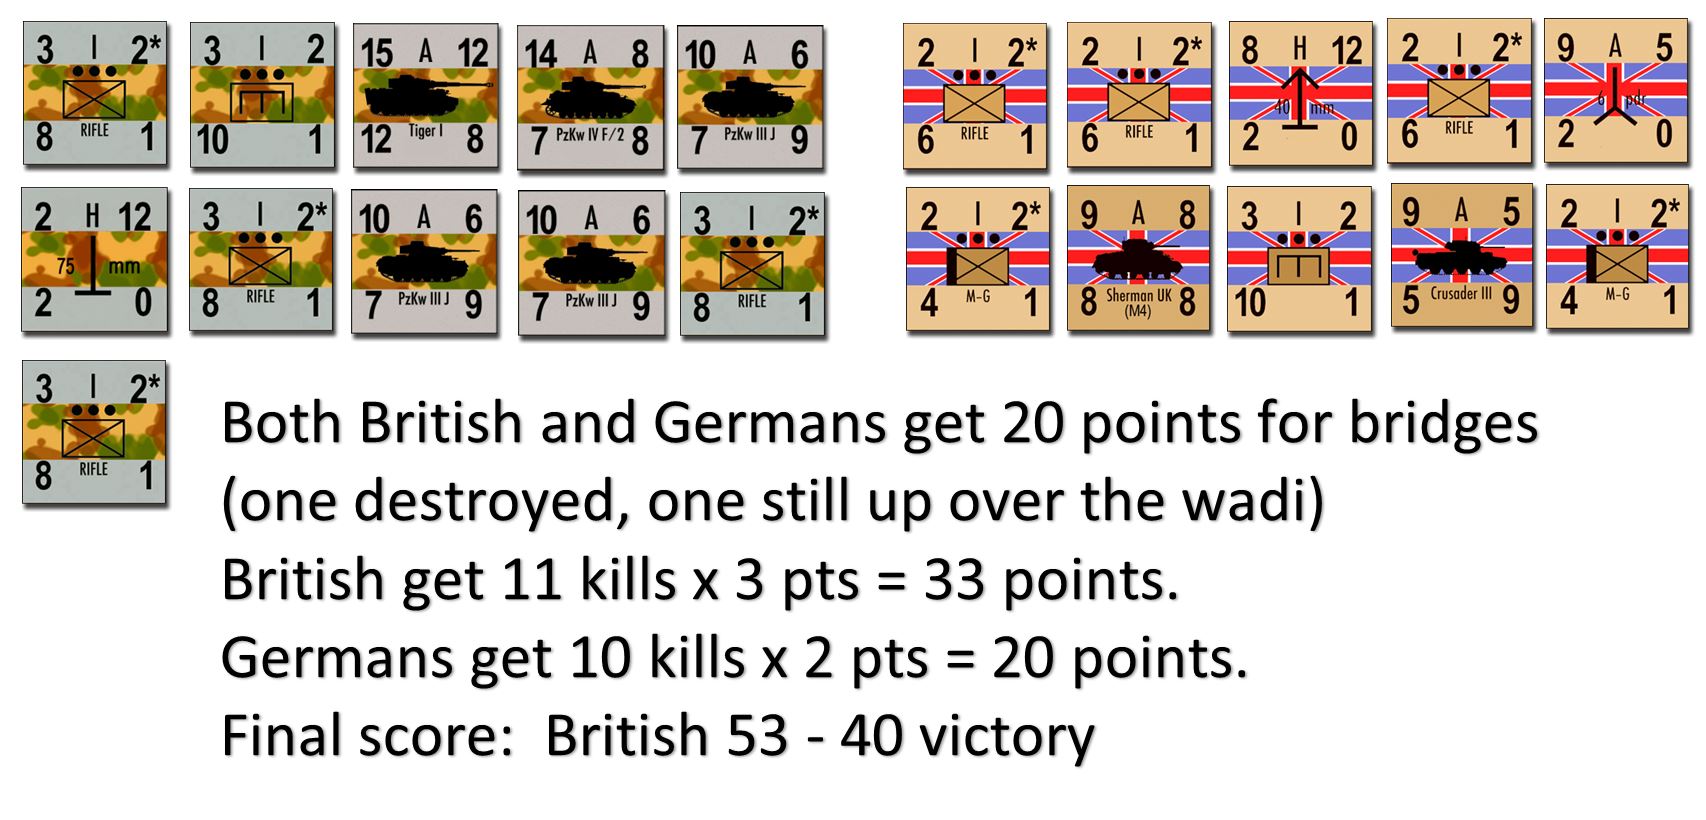
So here’s the boneyard and the final score. I might have been able to squeeze out a draw if I had let @brucelea move that HQ unit into the northern wadi hex – that would have been one more kill for me, two less kills for him, making the score 47 to 42 … and then the rest of his units would have been easier to disperse and keep disperse, and thus kill. Definitely would have been a long shot. I actually lost this game fair and square when I pushed those tanks into that town.
No worries! I’m just glad it came down to a fair, fun, and enjoyable game. As a scenario designer you always feel weird winning your own game anyway, especially against a relatively new player.
So 100 thanks to @brucelea for the great game! I totally look forward to doing this again, and most certainly we will (Darkstar and holidays permitting).
Meanwhile, I’ll start posting the battle that @damon and I had in Arab-Israeli Wars, Egyptians vs. Israelis, Sinai Desert, Bir Gifgafa, 2 November 1956.
More great gaming, enjoyed in real time across the ocean thanks to web conferencing!
Tunisia - Brucelea vs. Oriskany (Part III)
The virtual game board engagement of Panzer Leader between myself and @brucelea continues!
So here is where I really start to pay for my overly-aggressive move into the the northern hex of that Tunisian town.
The idea was sound, get heavy armor up into that town and use its defense bonuses to forestall British armor coming down from the northeast against my tentative bridgehead over the wadi.
What wasn’t so sound was how it was executed – putting tanks into urban terrain without infantry support.
There’s a rulebook somewhere, where all t he ghosts of all the great tank generals in all the wars write on page one … never do this! Never send tanks into cities without infantry support!
Well, this is what happens.
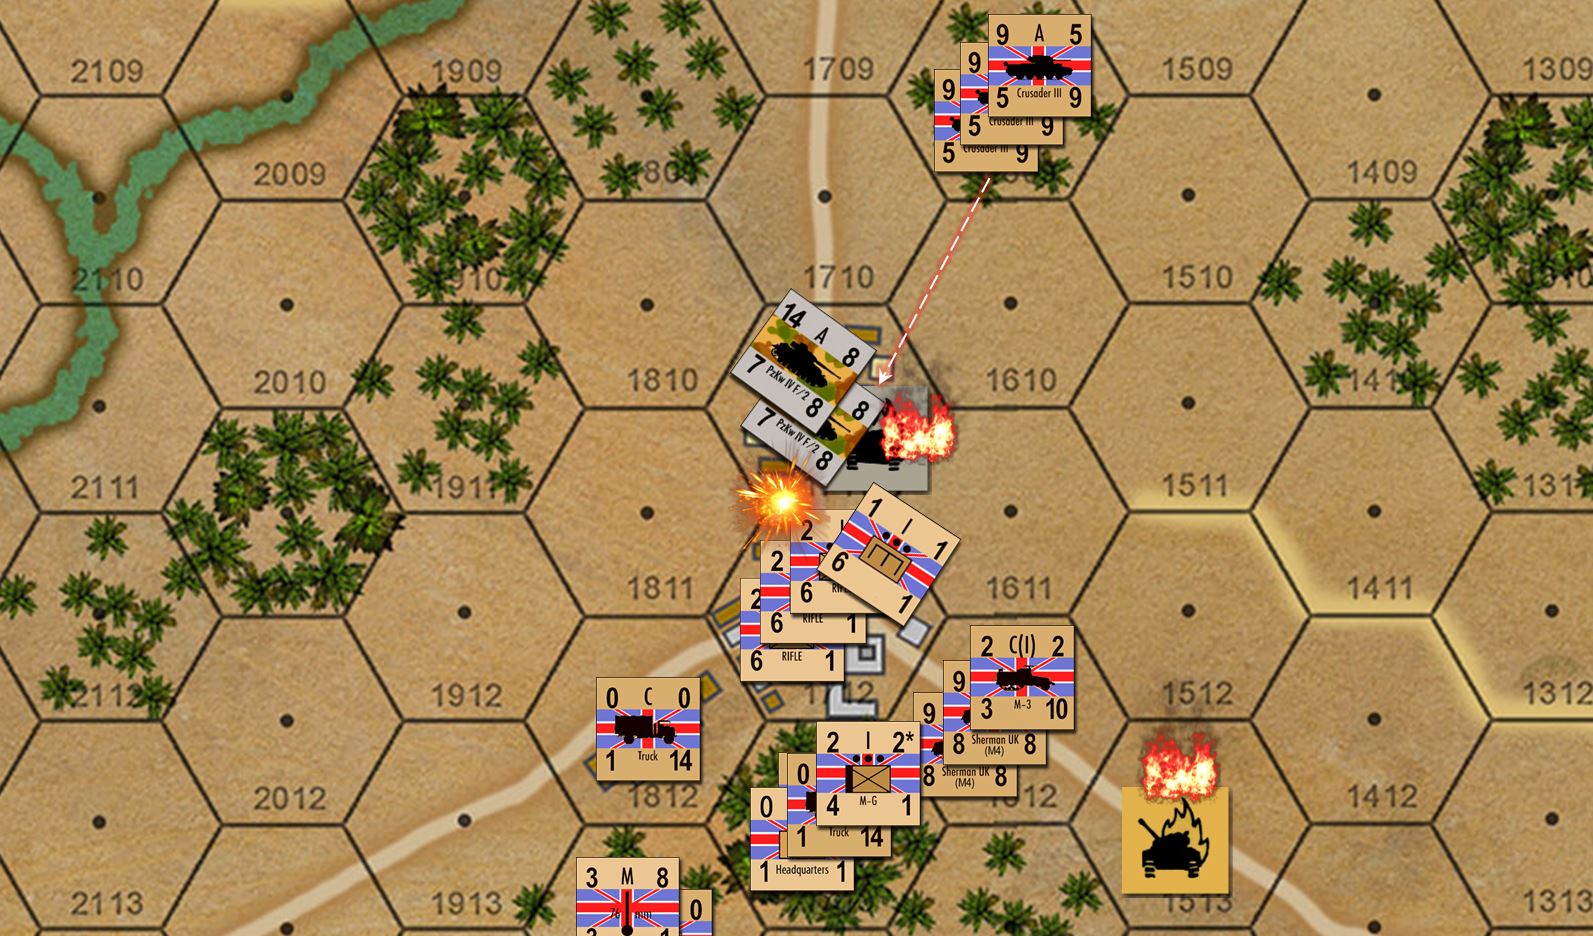
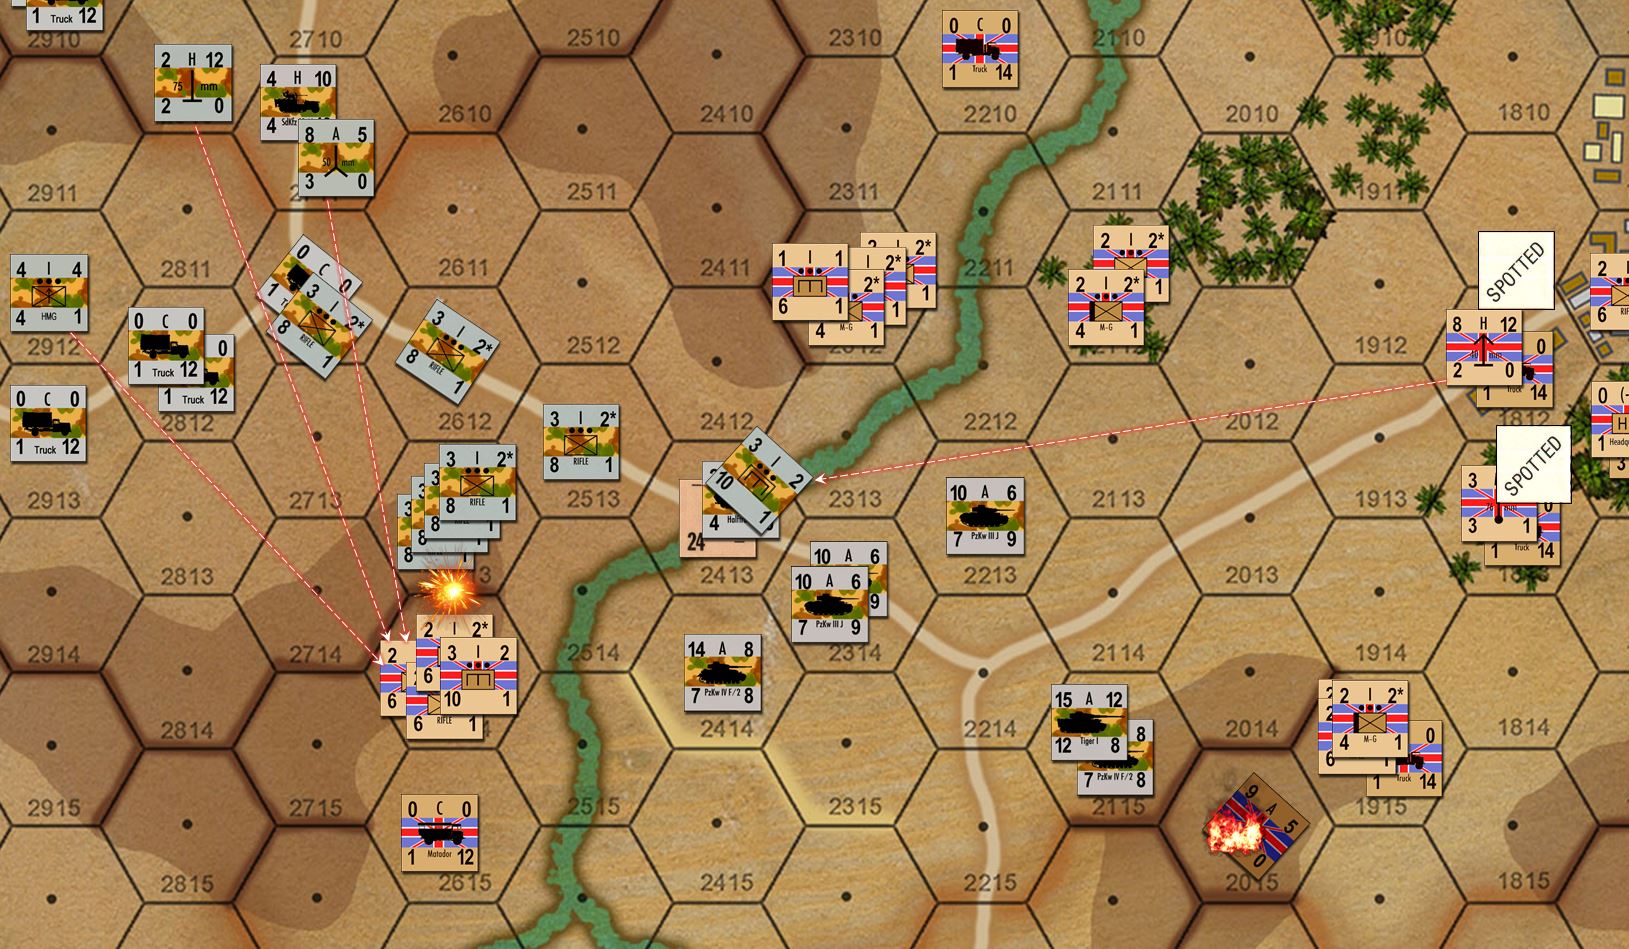
Direct fire from the fifteen Crusader IIIs, at point-blank range, blasts away into the town hex and with a solid roll (and point blank range, and 3-1 advantage in numbers, and upgunned to 6-pounders), actually knocks out that platoon of Tigers.
How can those Crusaders see me? They have friendly infantry swarming over me (adjacent hex to the south) probably marking the Tigers with colored smoke and flares. Here they are, boys! Come and get ‘im! Shoot straight for once, you tanker pukes!
With the Tigers burning, the close assault then comes in at the end of infantry movement phase. More bad news, the British infantry is now being supported by a platoon of engineers moving in from the southeast.
This is very, very bad news for my two platoons (ten tanks) of PzKpfw IV/F2s. And they are put in a very tough position where they are faced with two really shit choices.
Those engineers only have one attack point, but because they are engineers, lend that combined four-unit close assault some very big bonuses. So, do my Mark IVs counterfire against those engineers in an attempt to save themselves?
Or to they accept the inevitable and go out in a blaze of glory … blasting away at those Crusaders who have now revealed themselves by shooting up those Tigers?
After being too aggressive in moving in here, the German tanks now get too timid, and try to save themselves.
They pun down the engineers, but the three platoons of rifles close assault anyway. Admittedly it is a weaker assault, but @brucelea rolls well enough where it disperses those two platoons of Mark IVs.
Now the Mark IVs will never get a shot off against those Crusaders. 🙁
THEN both Mark IV platoons will fail their rally checks next turn, allowing the British infantry and Crusaders (who now have them in a north-west crossfire, and they are still dispersed) to pick them off more or less at their leisure.
Definitely a bad day for the Panzerwaffe.
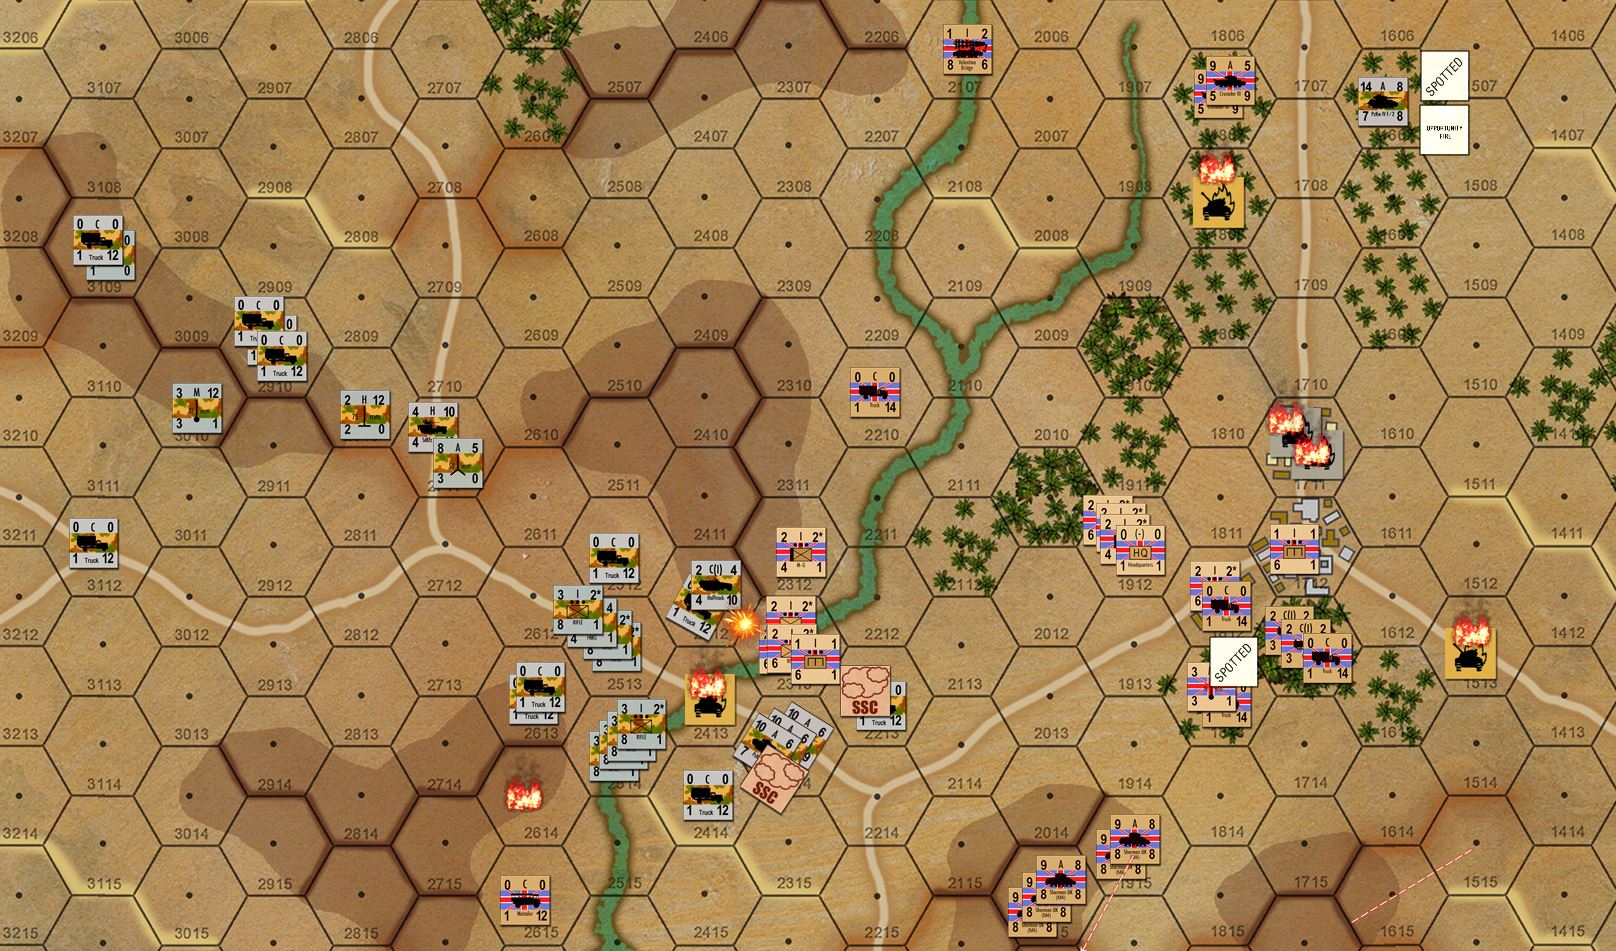
The end of Turn 7, where I zoom out a little so show some seriously dramatic developments in this ongoing battle.
So in the south is the good news for the Germans. Even though my engineer platoon was dispersed and finally killed, meaning I can’t blow up the bridge in an elegant, professional, “proper” way … I can mass 400 German infantry and simply assault the bridge and try to literally tear it apart with satchel charges and stick grenades and integral 5.0 cm mortars.
It took two turns, and two assaults, and only succeeded because of some good dice on my end (finally) and plenty of smoke screen cover dropped in by the 8.0 cm mortars.
So my 400 men, with plenty of flak, 7.5 cm infantry gun, antitank gun, and mortar support, literally assaulted the bridge twice and finally succeeded in basically burning it down.
One engineer platoon with the proper training and equipment would have been better. But either way, we finally got the job done.
Up north, things are not going so well for me. As previously described, the British armoured dragoons have now blown up another platoon of PzKpfw IVs, the last one miraculously rallied and escaped into the woods to the north. How? where did those Crusaders go? They withdrew to the north to cover that platoon of Valentine bridgelayer tanks, which is trundling toward the wadi to lay a second bridge across the wadi to the north.
Remember the victory conditions – the Germans get 20 points for each British bridge destroyed, the British get 20 points for each bridge still across the wadi at the end of Turn 10. So, if @brucelea can get that second bridge across, the game is tied for bridges and it will come down to destroyed units (British get 3 points for each German unit destroyed, Germans get 2 points for each British unit destroyed).
But as we see in those northern woods, there has already been a bit of a tank firefight as that last platoon of PzKpfw IV/F2s has tried to get around those Crusaders and put a hole through those Valentine bridge layers.
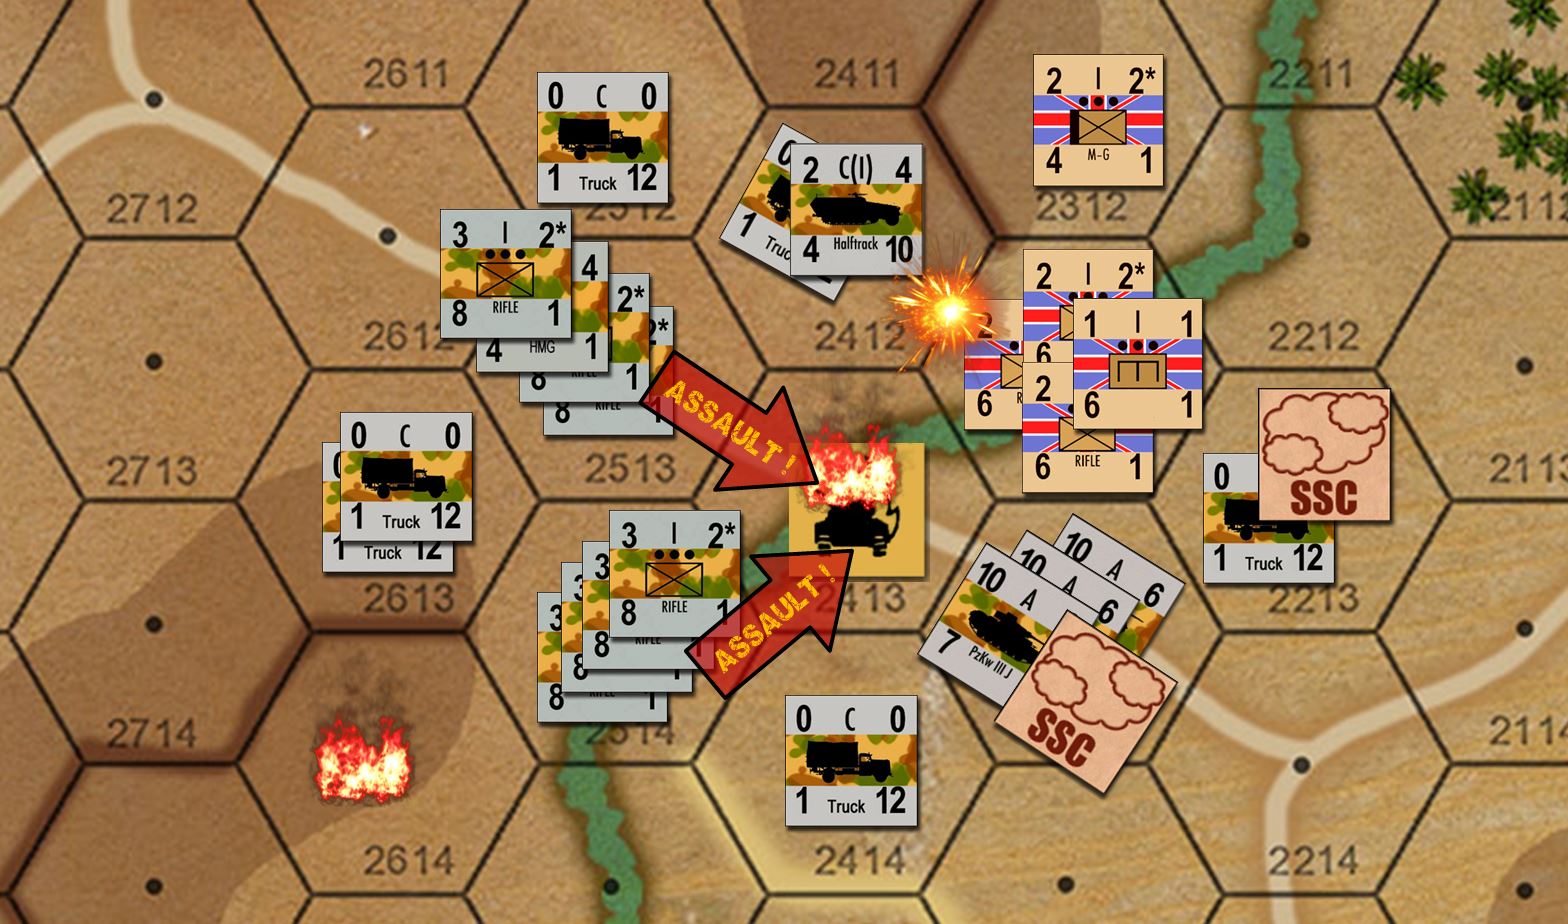
A close up of that bloodbath in the wadi, where my German schützen infantry finally managed to burn down that bridge. The bad news is that my panzerkompanie of PzKpfw IIIJs is now trapped on the British side of the wadi, and several platoons are already “dispersed” by Sherman fire pouring in from off screen to the right.
Note where the bridge used to be is a counter showing a burning British tank. This may not make sense. Basically, these burning tank counters are not just for bragging rights or decoration, they also effect the properties of that hex (stacking, movement, etc). Too many wreck counters can actually “clog up” a hex to a certain degree. So when a bridge is destroyed, a wreck counter is placed there to show the effect of that collapsed metal.
Meanwhile, that stubborn British company of rifles (with bridging engineer support) is still causing trouble in the norther part of the wadi.
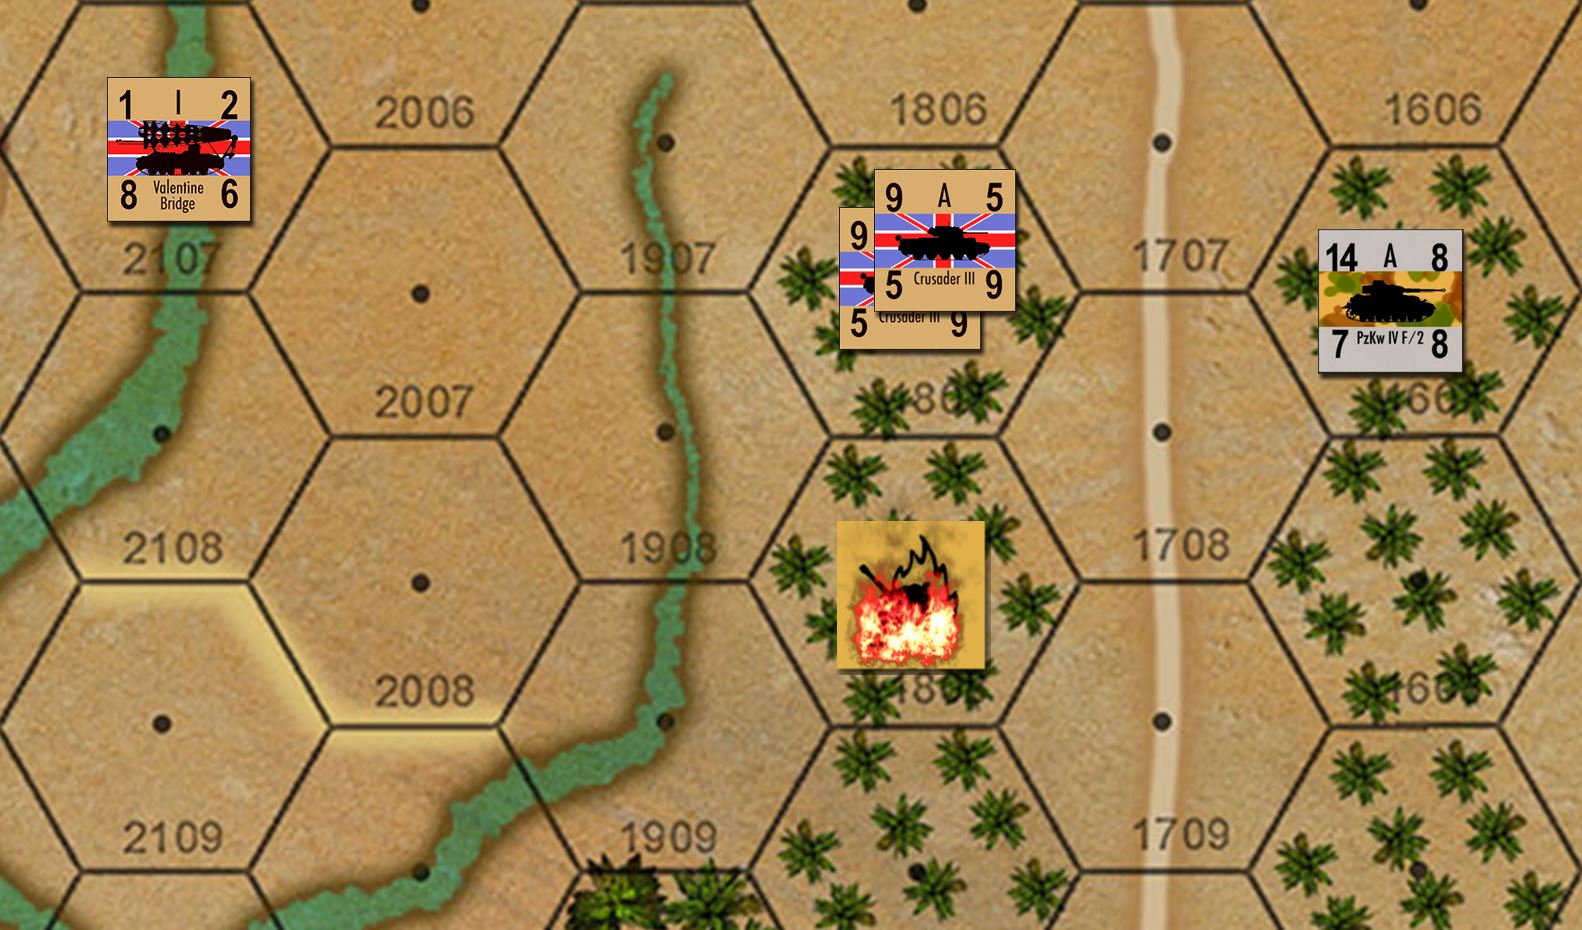
The Valentine bridge layer has reached the norther stretch of the wadi! A new bridge is being thrown across the terrain obstacle! After a brief window of German victory, it looks like this “Battle of the Bridges” is being tied up again!
Tunisia - Brucelea vs. Oriskany (Part II)
Here are a little more battle report materials for the recent game between myself and @brucelea (Panzer Leader, British v. Germans, Southern Tunisia, March 1943).
There’ll be a little more to come, I can’t put the whole battle report in full detail on here (a full battle report in Panzer Leader grows into novella length in very quick order). And of course I still have Darkstar rules to write tonight, and I eventually want to take care of @damon’s battle of Arab-Israeli Wars as well.
So here’s a little bit of a zoom-in on the situation at the end of Turn 2. In the center, you see my German engineers have reached the bridge, only to be suppressed by 40mm AA HE pouring down from that Bofors AA mount Andrew has hidden in that town. The good news for him is that my engineers are “dispersed” (note they are displayed at a cocked angle), but that Bofors battery is now spotted, and the Tigers lurk just to the south …
Meanwhile, I have a battery of 7.5 cm infantry guns, MG-34s on tripod company support role, 5.0 cm antitank guns, and 8.0 cm mortars all pouring fire on that reinforced British company on the slope of that hill overlooking the south shoulder of the wadi. Furthermore, I have a kompanie of schützen infantry up the hill after them, launching repeated close assaults.
Meanwhile, my Tigers and Mark IVs pave made quick work of that annoying battery of 6-pounders to the southeast … Mark IIIs are now across the bridge as well, setting up a perimeter to allow the engineers (if they ever rally) to set their charges per Panzer Leader engineer demolition rules, and blow that bridge sky-high.
End of Turn 3. That 40mm Bofors AA battery, having given away their firing position, is long gone. Andrew certainly saw this coming, he joked that the crews of those guns fired the weapons, pinned down those engineers, and then ran like hell back into the town to the nearest pub. Good thing, too, because HE fire from those Tigers and Mark IVs reduced the Bofors AA mounts to twisted scrap.
But my engineers start a spectacular series of failed morale checks. That gamble and sacrifice on the 40mm AA really pays off for the British, as the German engineers don’t rally for several turns, buying the British several more turns before I can start laying charges on the bridge again.
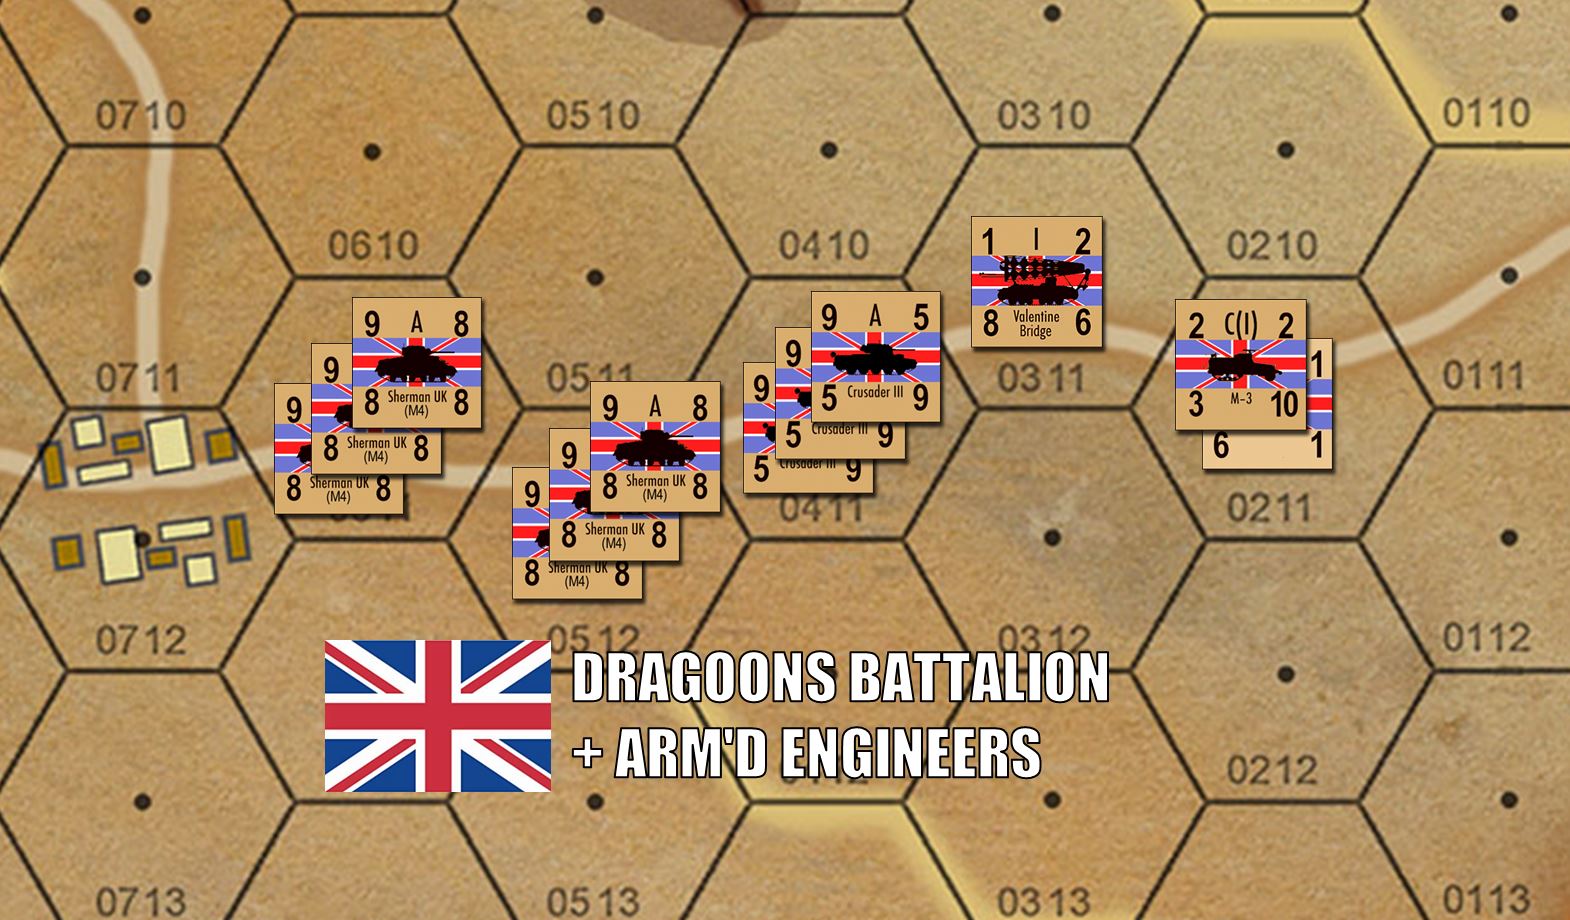
Meanwhile, look to the northeast … the first squadron of Shermans has arrived from that dragoons battalion. In all, some 45 Allied tanks are arriving on the field. Desperately outgunned, the British infantry may be saved at last!
Meanwhile, to continue putting pressure on my pionier engineers on the bridge, Andrew’s other infantry company is coming down from the north, advancing into a smoke screen laid down by his 76mm mortar section, to start launching close assaults on my engineers. It’s a long shot, but it might work, as this small infantry company has bridging engineers stacked with it, and any engineer unit in a close assault lends tremendous help in a close assault because of specialized equipment (satchel charges, explosives, bangalore torpedoes, perhaps even flamethrowers for combat engineers).
All the while, I continue to chew down that powerful British infantry company to the south. Those 7.5 cm infantry guns, MG-34s in HMG configuration, and 5.0 cm antitank guns are now joined by a 2.0 cm FlaK gun on a halftrack, all blasting away at the stack as hard as they can. As British platoons are pinned down, by follow-up assault wipes them out. Rinse, repeat. That stack of British counters keeps getting smaller.
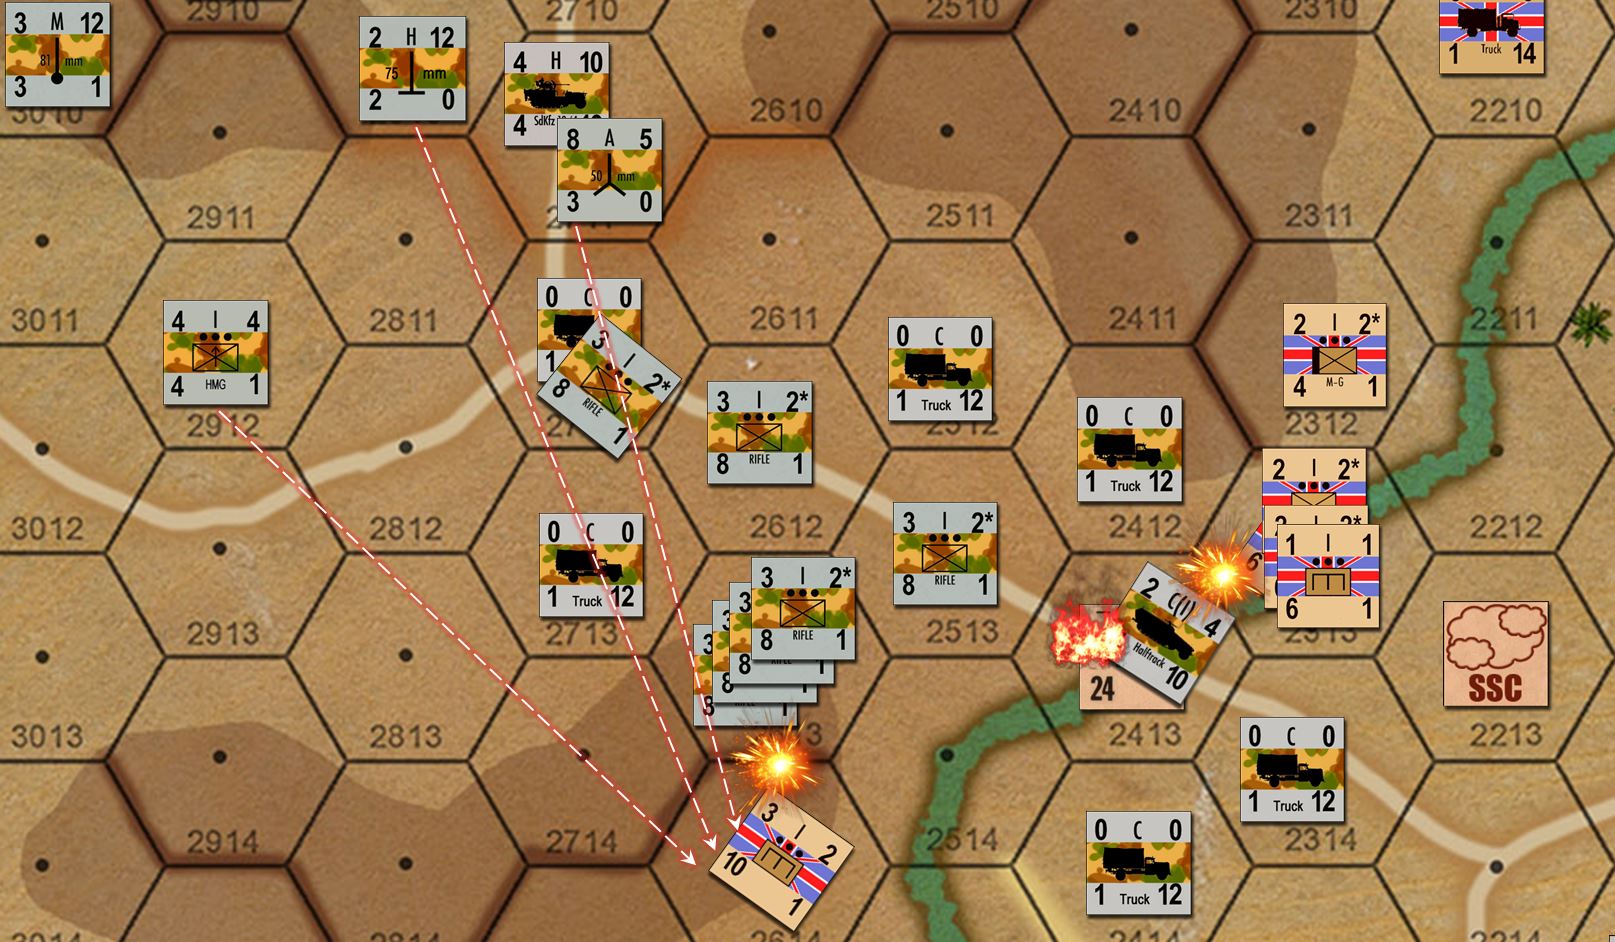
Okay, here’s where I make a really critical mistake, and to be honest, Panzer Leader is not a forgiving game. Anxious to keep his tanks away from that bridge (at least until I blow it up), I shove forward with my Tiger platoon and two platoons of PzKpfw IV/F2s, the fifteen German tanks pushing into that northern town hex. Yes, that gives me advanced cover, some concealment, and a defense bonus against advancing British Shermans and Crusaders.
It also gives me a vantage where I can blow that first platoon of Shermans inside-out at very close range (for a Tiger), note the burning British tanks to the southeast (three hexes = 450 yards, three FoW tables, spitting distance for a pack of five big cats).
But the rest of this Tunisian town is swarming with hundreds of British infantry. And fifteen Crusader IIIs with the new six-pound guns are rolling up on me from the north … and at just 300 meters, those 6-pounders hit pretty hard, especially against my relatively thin-skinned PzKpfw IV/F2 (these don’t even have hull schürtzen, remember).

Disaster, for both sides on the west bank of the wadi!
For the British, the last infantry are finally wiped out on that southern hill, leaving the Royal Engineers platoon (admittedly a powerful unit) now alone and pinned down under withering German fire from no less than eight units (six infantry howitzers, a dozen heavy machine guns, 200 infantry, five halftracks with 2.0 autocannon, and six 5.0 cm antitank guns lobbing HE shells into their perimeter.
However, more British fire and counterassaults have finally killed by hapless engineers. They never really rallied long enough to even start laying explosive charges. The German pionier effort to blow that bridge has ended in complete failure.
First Games Run!
So here is a wide-angle screen shot of the first game.
System: Panzer Leader (with Arab-Israeli Wars imports to rules engine)
German player: Oriskany
British player: Brucelea
Setting: Theoretical Engagement – Southern Tunisia – early March 1943
As Axis positions in the Mareth Line are finally outflanked and dislodged, German and Italian remnants of Panzerarmee Afrika fall back before a renewed advance of the British Eighth Army, pushing up out of Libya. The overall objective is a link-up with American, British, and French forces pushing in Algeria, currently engaged in the mountains of Tunisia’s “Eastern Dorsal.” Once established, this combined front can then turn north toward Bizerte, Tunis, and the final eradication of the Axis in North Africa.
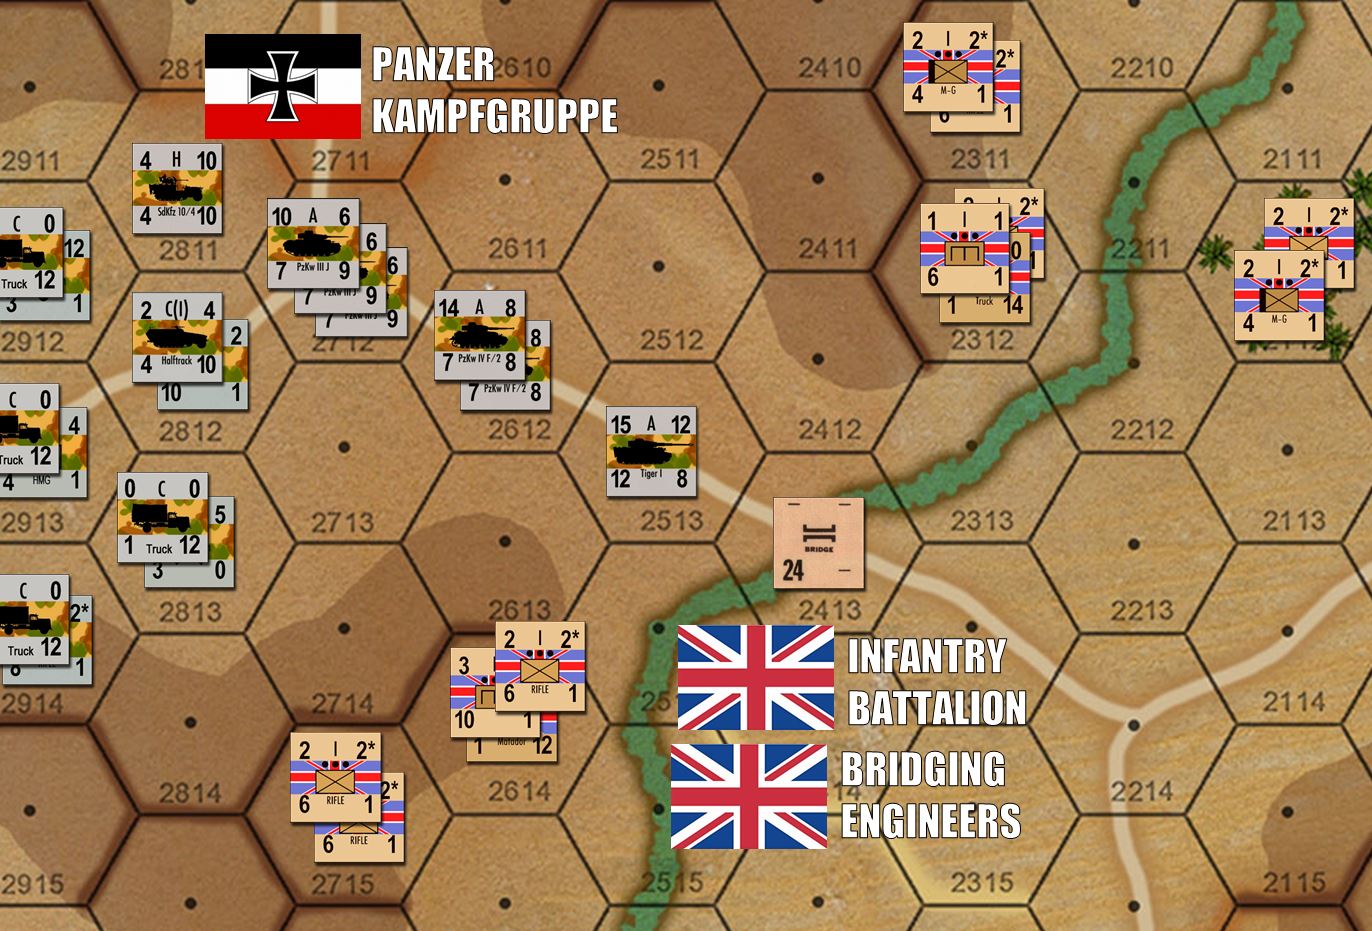
Here we see where a British infantry battalion has reached a key crossing over a Tunisian wadi, flooded with spring water melting off nearby mountains. They have taken the crossing, and a company of bridging engineers has erected a temporary bridge over the wadi. This bridge is critical, as it is the only place any vehicle can cross the wadi so long as it is flooded.
Aerial reconnaissance, however, has spotted an approaching German counterattack. Clearly the Germans have recognized the importance of this crossing, as they have scraped together a small but powerfully-equipped kampfgruppe to eliminate the threat.
Having called for help, the British infantry and engineers now grimly brace to meet the onslaught. They are hopelessly outgunned, but take solace in the knowledge that a full battalion of friendly armor is en route from the east. This mixed force of Shermans and Crusader IIIs also includes a section of Valentine III bridgelayer tanks. No matter what, a bridge must remain standing over this wadi to facilitate larger bridge, division, or even corps operations deeper into western Tunisia.
The Germans, for their part, are equally determined to ensure that bridge is knocked down, as well as any new bridges the British might erect. A British bridgehead here not only threatens the flank of what remains of the Deutsche Afrika Korps, but might also open a road toward Patton’s II Corps pushing east near El Guettar.
Victory Conditions:
• Germans get 2 point for each British unit destroyed.
• British get 3 points for each German unit destroyed.
(Trucks never count as victory points)
• British get 20 points for each bridge standing at the end.
• Germans get 20 points for each bridge they destroy.
Game lasts 10 Turns.
Set Up:
Bridge counter is placed at Hex 2413. British Force A (infantry battalion + bridging engineers) can set up anywhere east of the wadi, or west of the wadi within two hexes. British force B (tanks + Valentine armored engineers) enters from the east end of the board on Turn 3.
Germans enter along the western end of the board on Turn 1.
For best results, click on the image below, then open image in a new tab and zoom in.

The British have deployed their initial force – their infantry battalion and understrength company of bridging engineers. Brucelea has opted to stage reinforced infantry companies on the high ground bracing both shoulders of the road leading to the objective bridge. Counters indicate infantry platoons, MG sections, and engineer platoons. In all there is about 400 British troops shown on this shot (each hex is 150 meters across – about one FoW table or 2-3 Bolt Action tables).
The Germans, for their part, wasting no time. Leading with a platoon of five Tigers, then two platoons of PzKpfw IV F/2s, then three platoons of PzKpfw IIIJs, they are rushing straight up the road. My objective is to cross the bridge in force as fast as I can, use tanks and support artillery to establish a perimeter around the bridge, lay smoke to block Bruce’s LOS on the bridge (delivered by my 8.0 cm mortars), and then deploy my panzer pionier engineers in halftracks to get on the bridge and start setting explosive charges.
Meanwhile, the Panzers will be able to meet the Shermans and Crusaders when they arrive on the board on Turn 3, probably reaching this immediate battle zone on Turn 4. If I get lucky I’ll also put some holes in those Valentine bridgelayers, thus winning in a clean sweep.
By the way – I have resisted the urge to call this “The Battle of Biffin’s Bridge.” 😀 😀 😀
They’re not on the map yet, but here is the column of 45 tanks (30 M4 Shermans and 15 Crusader IIIs with the new 6-lb guns), plus a section of Valentine bridge layers, and the armored engineers in halftracks. In all, 50 tanks here, five halftracks, 240 men. The column is 750 meters long
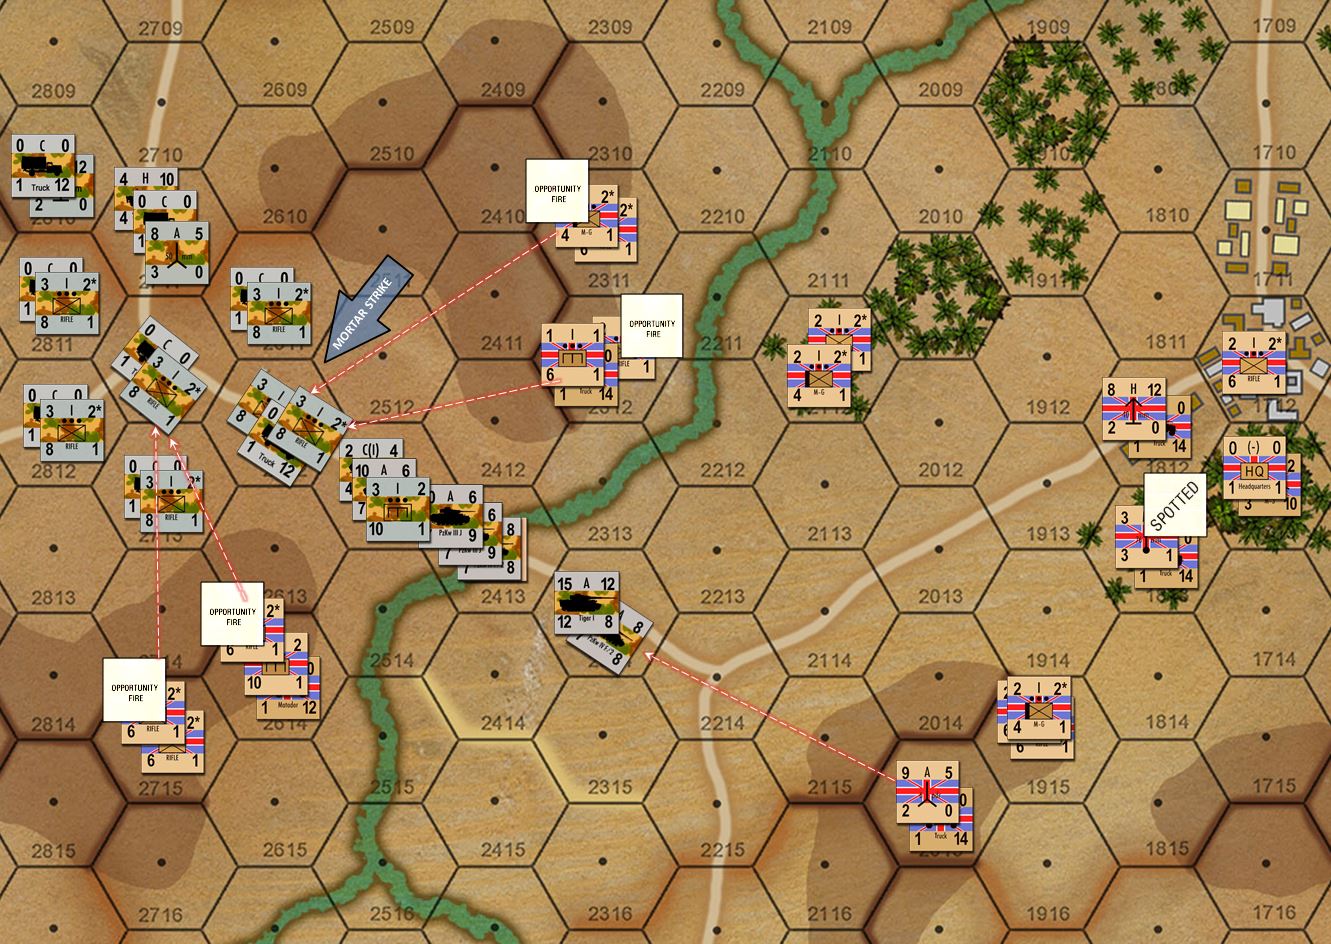
First fire! The British infantry open up with long-range rifle fire, Bren guns from their MG sections, and 76mm mortar fire on the Germans, pinning down several platoons and even killing one platoon while they are still vulnerable in their trucks. But my tanks are across the bridge, only for my PzKpfw IV/F2s to take fire from the batter of 6-pounder antitank guns that Bruce has hull down behind that ridge to the southeast.
A lot more on this to come.
Not to be outdone, we also has @damon engaging in another wargame on Sunday, playing a modified variant of Arab-Israeli Wars scenario B-1, Bir Gifgafa (November 2, 1956).
System: Arab-Israeli Wars
Egyptian player: Oriskany
Israeli player: Damon
Setting: Historical Engagement – Sinai Desert – November 2, 1956
This is the very first scenario in the Arab-Israeli Wars book, to which I’ve made a series of changes in the interest of play balance, especially when using intermediate and advanced rules like Israeli split-move-and-fire.
To make a long story short, this is a historical scenario (i.e., this battle actually happened) during the closing days of the 1956 Sinai War. Egyptian President Nasser had been turning a blind eye to PLA rocket and terror attacks against Israeli settlements along the Negev Desert and up toward the Gaza Strip. Israel had been keen to invade and clear out these nests, but to invade Egypt might bring down the weight of international opinion, which Israel desperately needed to survive these early years.
Nasser finally went too far and nationalized the Suez Canal, royally pissing off the British and frightening the French (still with strong interests in Syria, Lebanon, Algeria). So Operation Musketeer was envisioned, with British Royal Marines and French paratroopers dropping into the Suez Canal zone to take it back from the Egyptians.
The problem was the sheer size of the Egyptian Army. To tie down the bulk of the Egyptian Army in the Sinai Desert, the British and French reached out to the Israelis, and offered them assistance and “international support” in the UN to condone an invasion (Israeli Operation Kadesh).
That’s the very simplified version. Long story short, Israel invaded Egypt in the Sinai, while British and French forces eventually arrived at the Suez Canal behind most of these Egyptian forces.
The Sinai Desert is very rocky in places, traversible only through certain passes. The Israelis have already won most of the border battles and are now pushing in a 100-hour blitzkrieg through the passes in the inner Sinai. Bir Gifgafa is actually a road center that sits at the mouth of one of these passes, through which Ben Uri’s 7th Armored Brigade is emerging on their way to the Suez Canal. The Egyptians have 1st Armored Brigade, or at least its rear guard, ready trying to delay the Israelis and facilitate a cohesive Egyptian withdrawal to the canal.
This is a very flat table, truly “open desert” with only very short sand dunes, a scattering of vegetation, and a tiny roadside town. Hexes are 250 meters. Israeli forces include “M1” Shermans, upgraded M50 Shermans, and French AMX-13s. Egyptian forces are mostly T-34/85 hand-me-downs and SU-100 assault guns.
Israelis get points for Egyptian units destroyed and for getting their own units off the west end of the map.
Egyptians get points for Israeli units destroyed and for any Israeli unit stranded on the map, even if they are not knocked out.
The game lasts eight turns – the Israelis are really under a time pressure here. Orders have come down from division … GET TO THE CANAL!
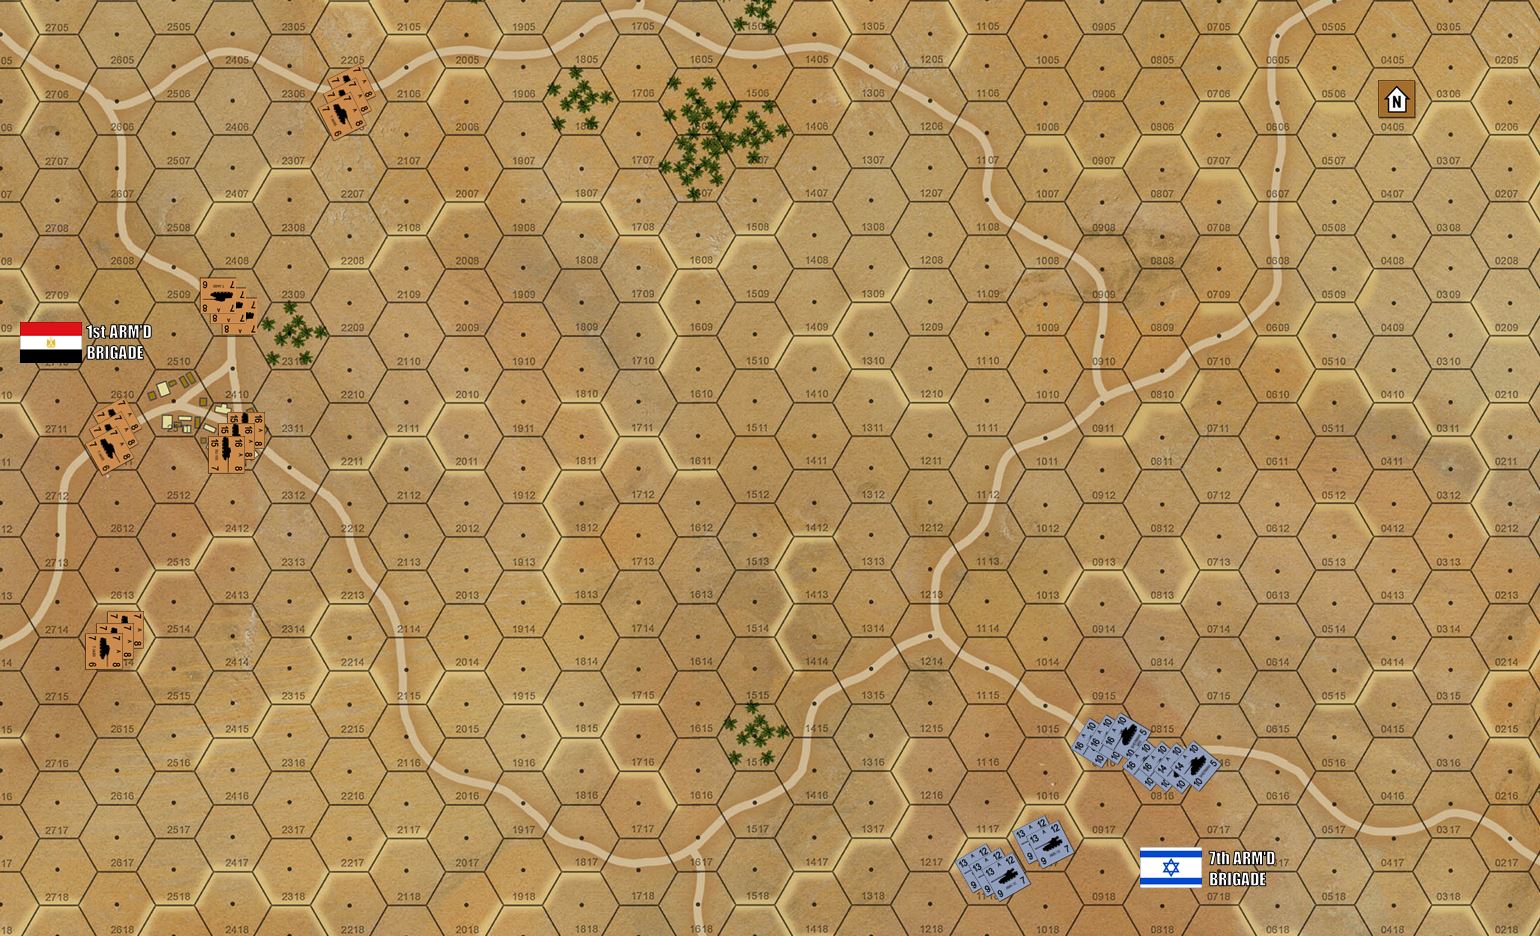
A zoom in of one of the later turns, where the Egyptians have run out of space, and the Israelis have run out of time.
One thing @damon and I added to this game was some quick rules on platoon facing, so we can get flank shots, etc. Combat formation and road / march / column formation are how incorporated, indicated by how the counter is placed on the map within the hex.
Using reverse slope tactics, I was able to force @damon into actually trying an overrun against my SU-100s and T-34s in hull-down positions, but even as t hose AMX-13s take grievous losses, those Shermans and M50s are ready to counter-overrun and really do some damage, or escape off the west end of the map per their scenario objectives (or both).
I’ll say this much, for being pretty much the first time playing these games, both Brucelea and Damon did great, considering I’ve been playing these games for going on 25 years.
Best of all, the new web conference engine worked damned near flawlessly. In all, this weekend we hand a three-man, 10 hour mini virtual boot camp.
I’ll be adding more pics and battle report details in the coming days, but for now suffice it to say we have opened a gigantic new potential for wargaming in the BoW/OTT community, especially for crunchy, heavy tactical wargames like this.
We’ll definitely be running some more in the not-too-distant future! 😀