












Ultramodern Wargaming – Ukraine 2024




Recommendations: 13004
About the Project
Lately, I've been running war games every weekend with members of the community via web conference. Players log on and play wargames with each other in real time, regardless of location, and we usually have at least a couple spectators as well. Many times it’s been Darkstar, but we’re also running wargames in Panzer Leader, Arab-Israeli Wars, and now Valor & Victory.
BoW/OTT community members @brucelea, @damon, @davehawes, and @rasmus have taken the plunge, leading battalions across thousands of meters of desert, starfleets in pitched battles across the heavens, or vicious firefights in the jungles of Vietnam, all without leaving the comfort of their home.
Hard-core, old-school command-tactical wargames can now be run (complete with spectators and recordings) in real time, with BOTH PLAYERS moving pieces across THE SAME virtual game board, thus maintaining player agency, speedy and instant results (no play by e-mail), interwoven turn sequences, any questions / feedback instantly received and addressed, and with the game being virtually recorded as it goes, a ready-made battle report can actually be created as we go.
All of this without the players having to install any new software on their computer, on any platform (PC or Mac). All that's needed is to agree on a time, a handful of dice, and a bellyful of courage!
Every weekend can now be a boot camp! All without costing me thousands of dollars in airfare, too!
Related Game: PanzerBlitz
Related Genre: Historical
This Project is Active
Gold Beach Wargame - Second Video Posted
Part II of our Gold Beach Panzer Leader game (myself with the Germans, @brucelea and @damon with the British) has now been posted on the Sitrep YouTube channel. Now that all the rules, units, history, and initial landings are out of the way, this video jumps straight into the carnage with improved sound, music, and a lot more combat. We see Royal Engineer AVREs blowing up beach obstacles, pipers striding out of landing craft, steadfast defense by German coastal troops, British armored bridgelayers, and Flail tanks clearing lanes through German minefields.
The Germans are just about starting to crack (maybe ???) But have the British lost too much already? And will my reserves be able to seal the breach? 🙂
British units: 1st Hampshire Rifles, 1st Dorsetshire Rifles, 2nd Devonshire Rifles (231st Brigade), “B” Assault Squadron / 6th Royal Engineers, Winchester Dragoons.
German units: Infantry Division 352 (Grenadier Rgt 916, III. Battalion) and elements of 441 “East” Battalion, Infantry Rgt 726, 716 Static Infantry Division.
Gold Beach Wargame - First Video Posted
Things are just getting started here, everyone. Myself, @brucelea , and @damon go over the map setup, the units involved on both sides, some of the objectives and special rules. Finally we get into the opening shore bombardment barrage from HMS Warspite and her escorting destroyers … and then look into the first wave of landings of 1st Hampshire and 1st Dorsetshire.
This one gets bloody fast!
There will be at least two more videos. Again, just the highlights, this game went for nine and a half hours, I wouldn’t even try to record, render, and post that much video. 😐
I hope some of you will check it out! We really try to recreate the historical conditions and tactical situation of 50th Northumberland’s right wing on that fateful day, putting the leading elements (first wave on our table is about 1300 men), 231st Brigade on Jig Green and Jig Red assault beaches.
Gold Beach D-Day Landing Game - COMPLETE (9 Hours!)
Gold Beach Panzer Leader game: COMPLETE
Run Time: NINE HOURS
Result: EPIC
Losses (both sides): BRUTAL
Decision: LAST TURN
Players: (@brucelea and @damon): WARGAME HEROES
D-Day 75th Anniversary: COMMEMORATED
>> End Transmission.
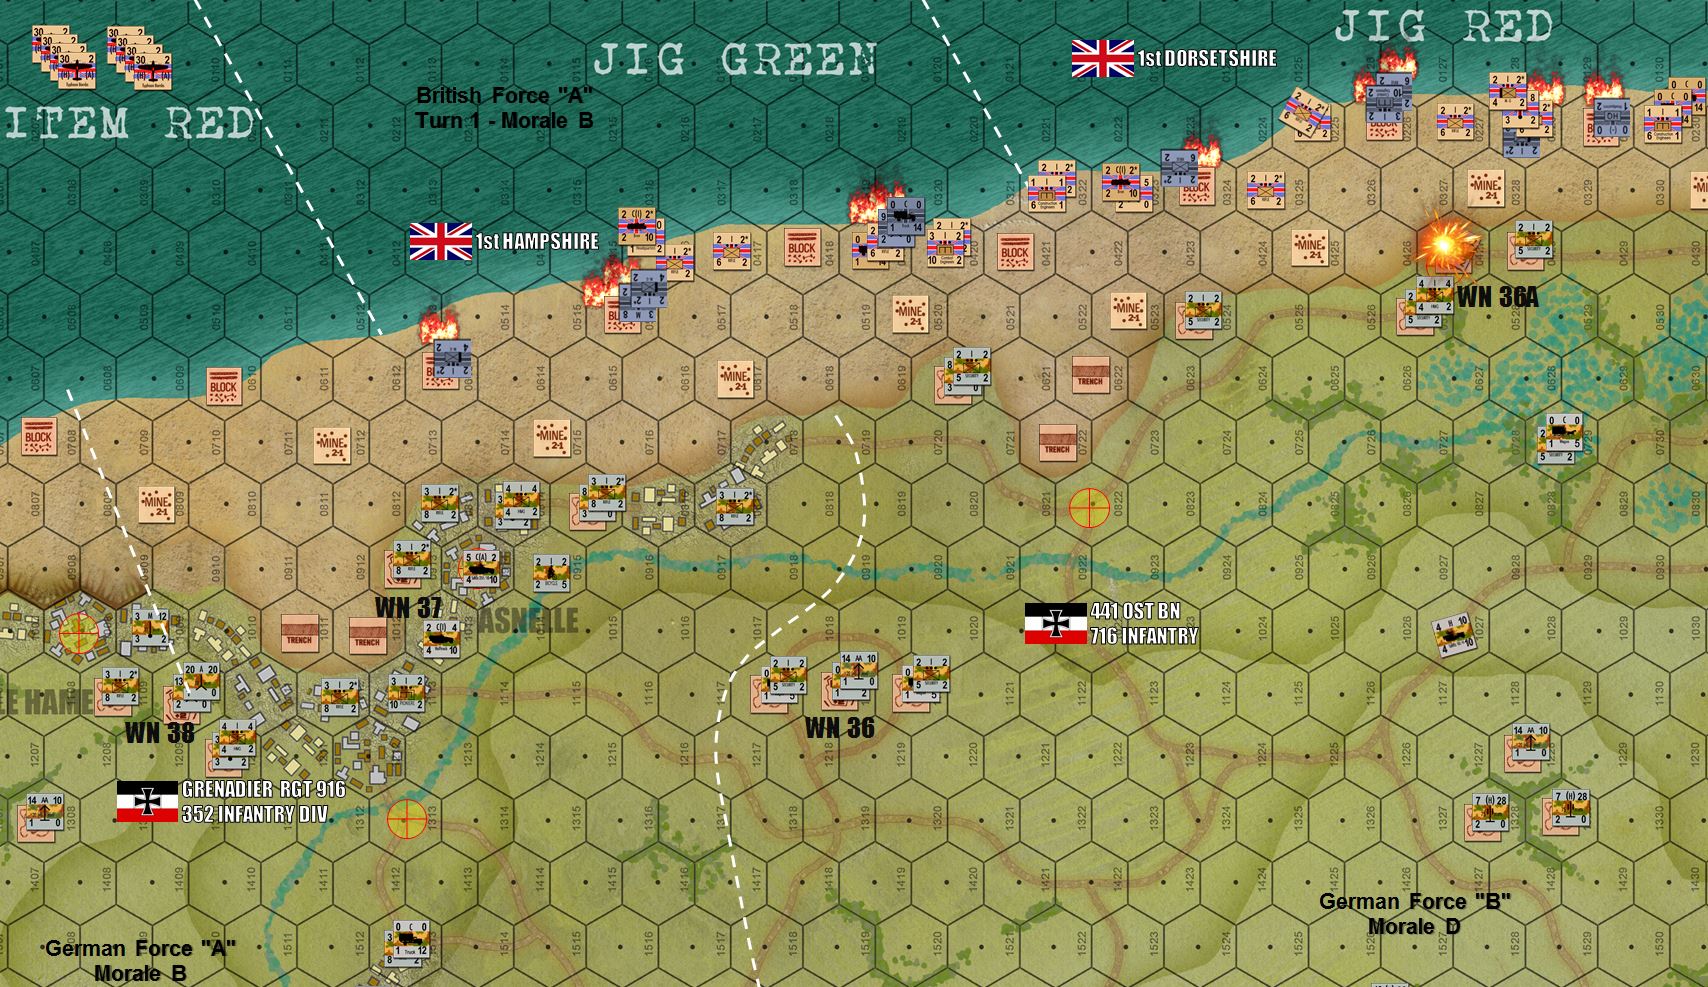 Initial Landings. Already British losses are horrific to German fire and beach obstacles.
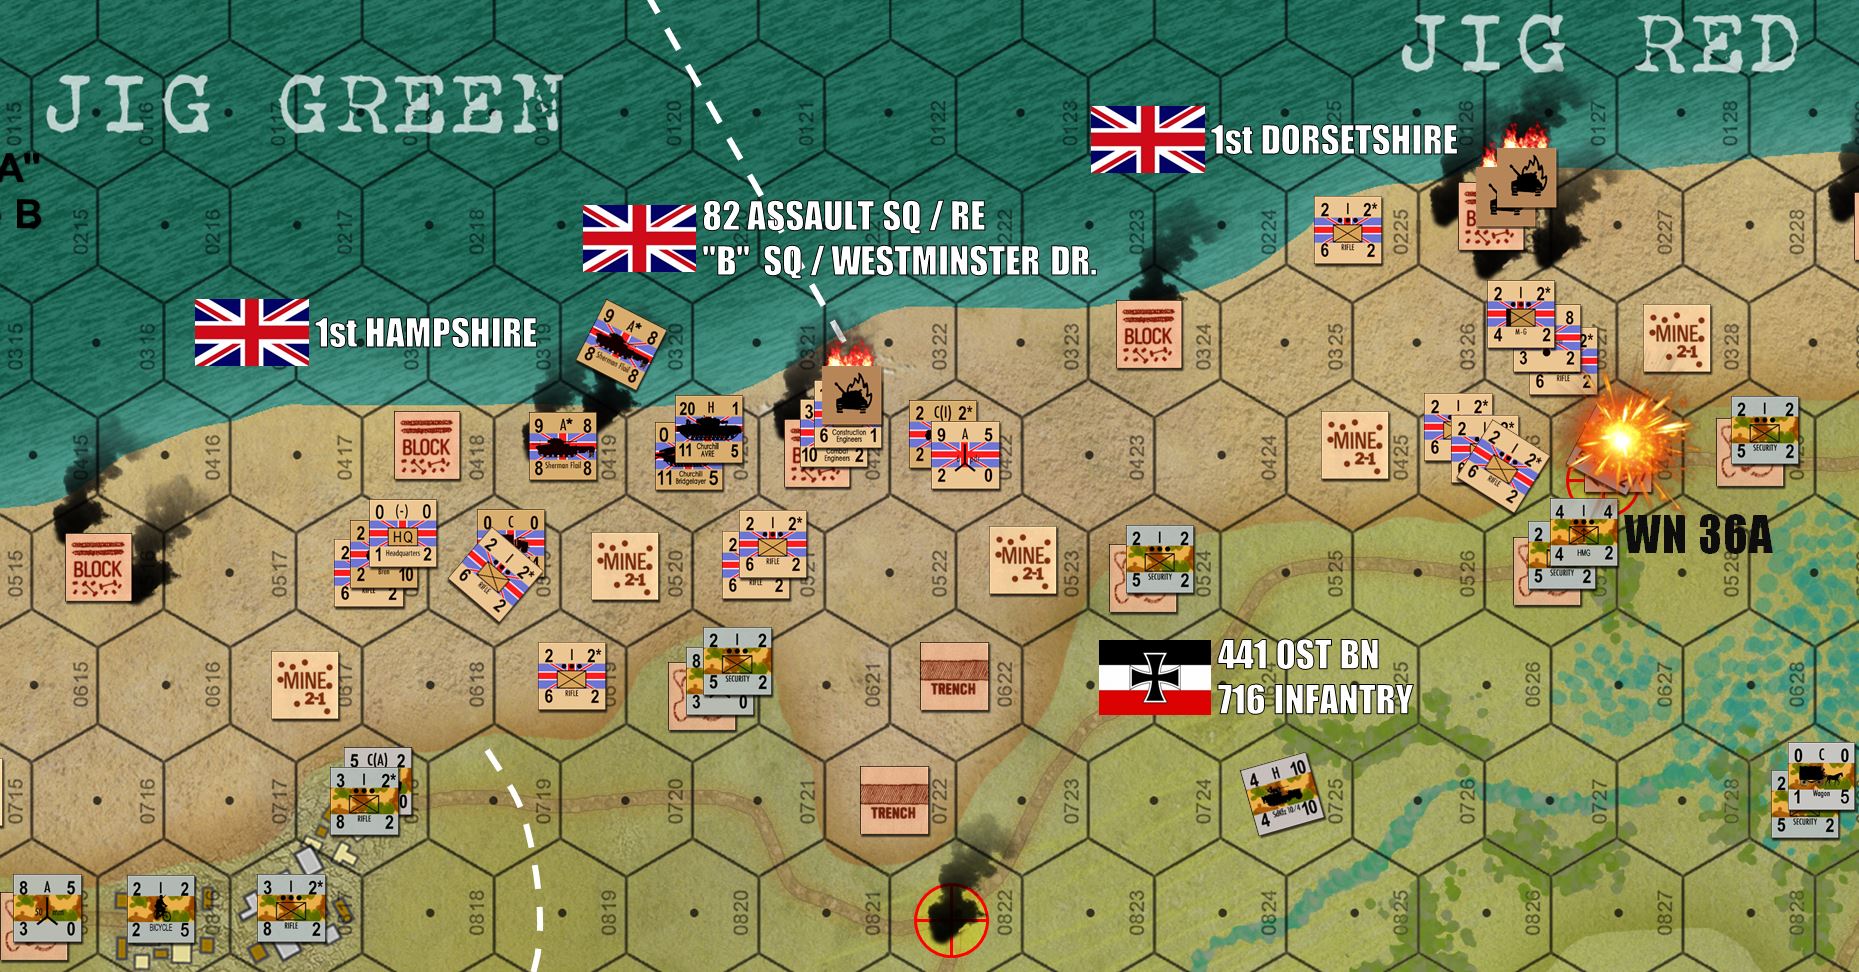 First British armour struggles ashore, but still more is lost to mines and beach obstacles.
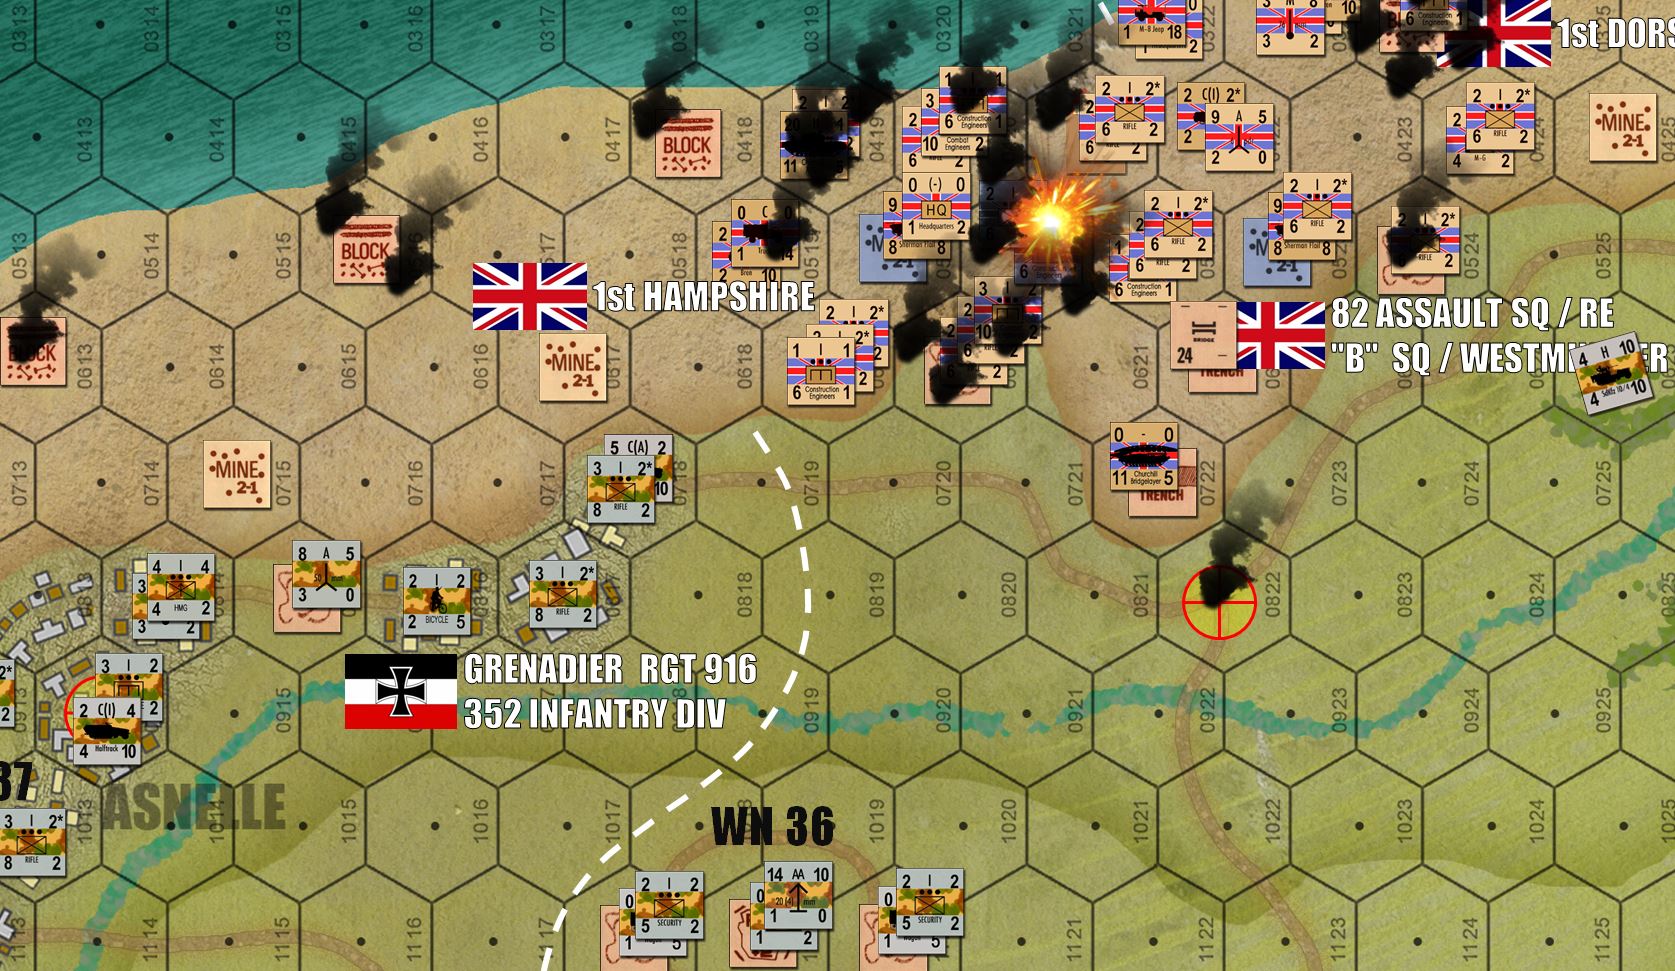 Even amidst this carnage, the Churchill Bridgelayer and other engineers units clear mines, and lay bridges over German antitank ditches. That yellow target icon (hex 0822) is the first objective hex the British will reach.
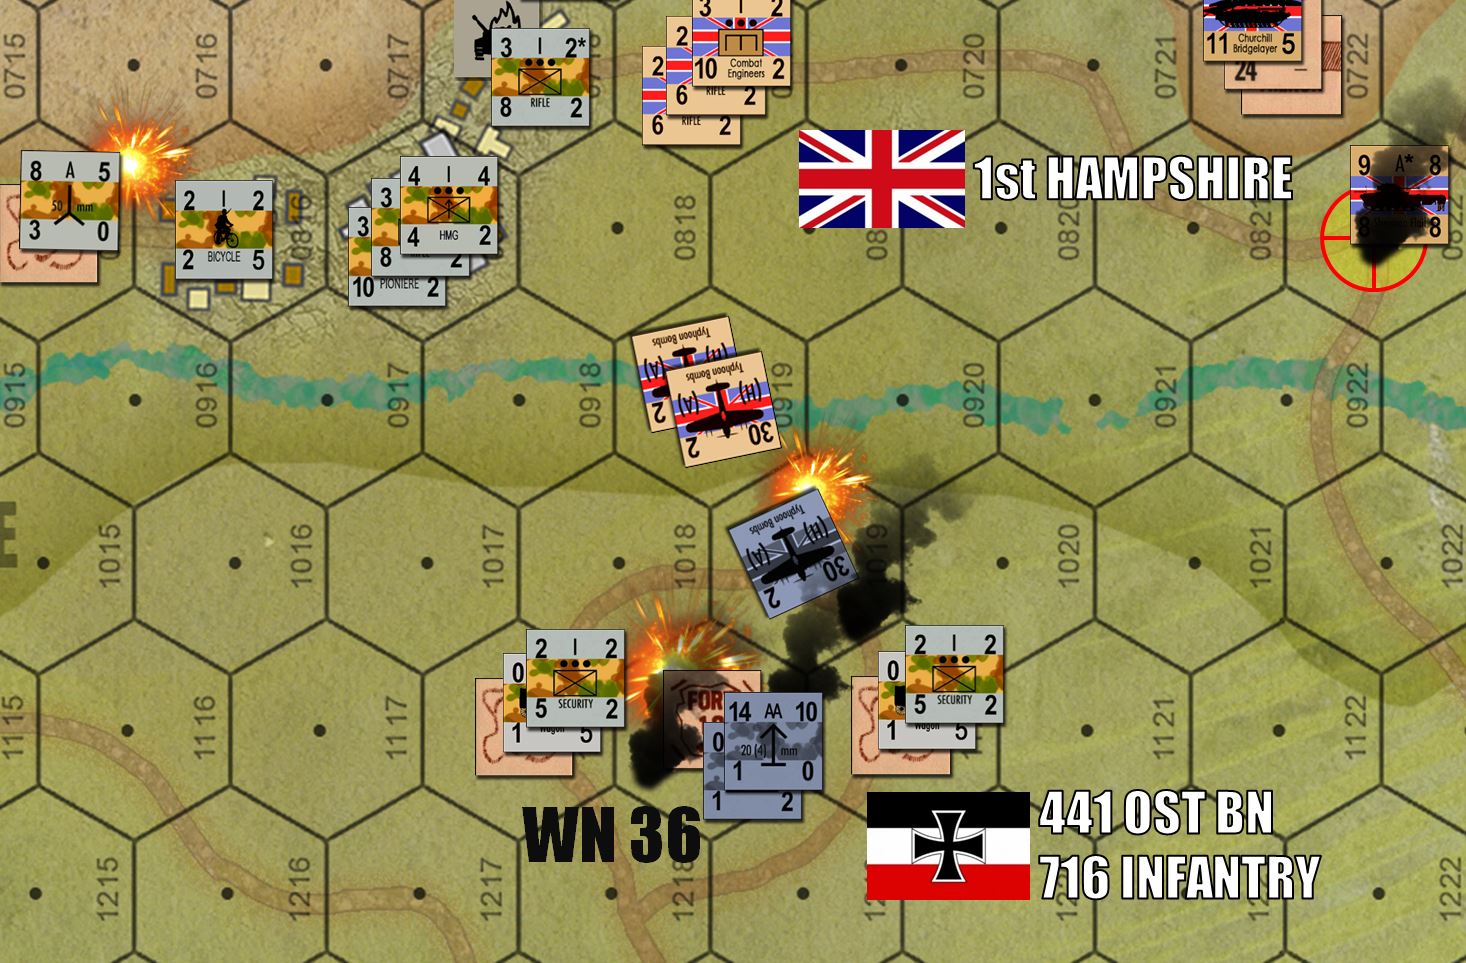 Typhoon airstrikes go in. The first one is shot down, but the two behind it pulverize the HQ of 441st Ost Battalion / 726 IR / 716 ID.
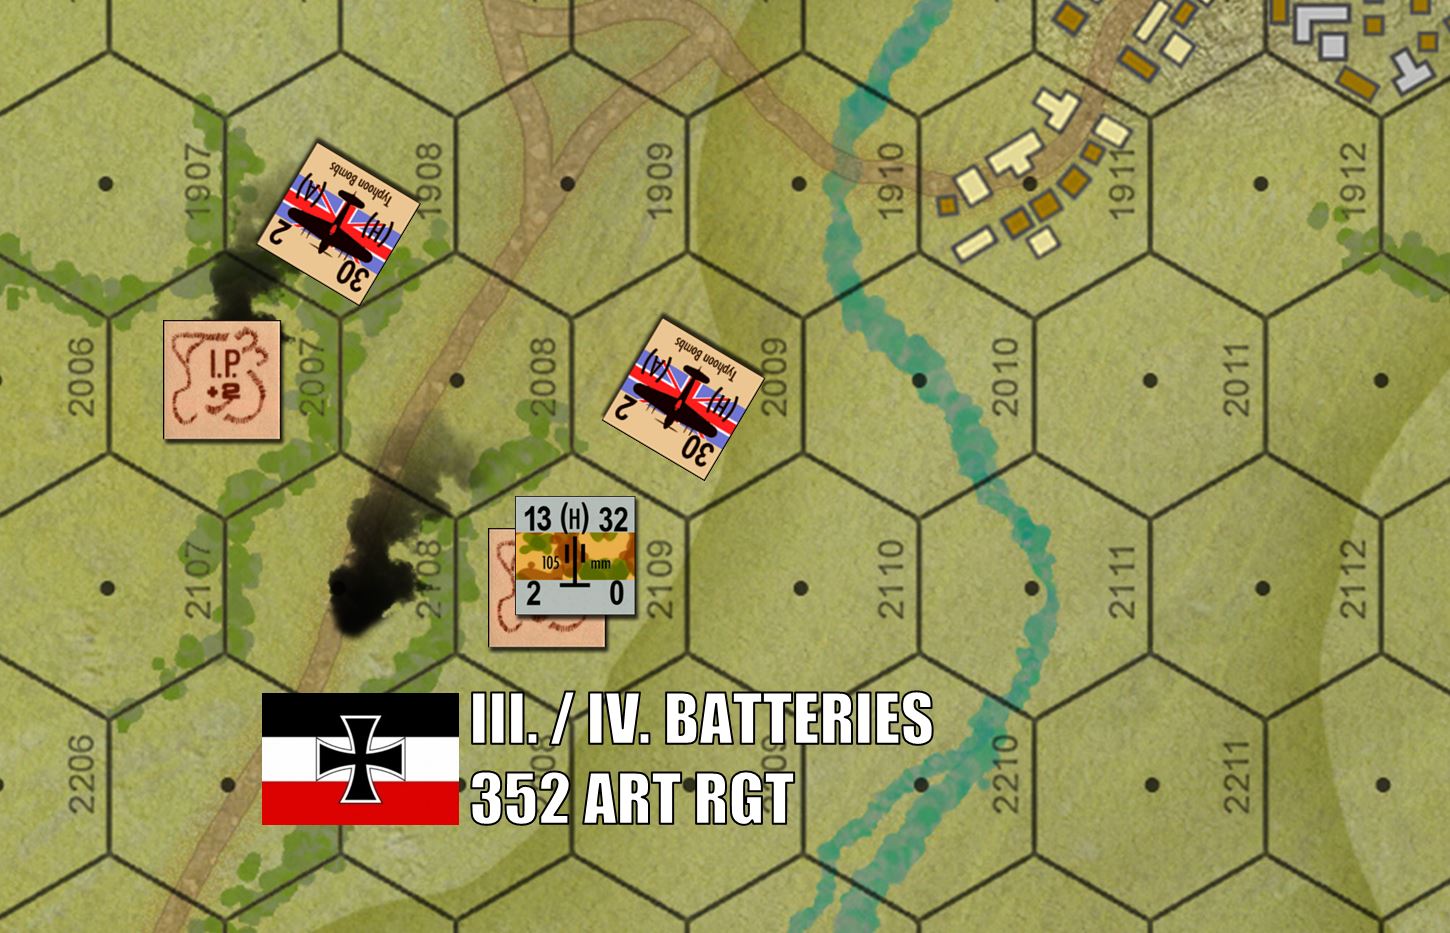 Miles behind the beach, other Typhoons go after 10.5 cm artillery batteries of 352nd Wehrmacht Infantry Division.
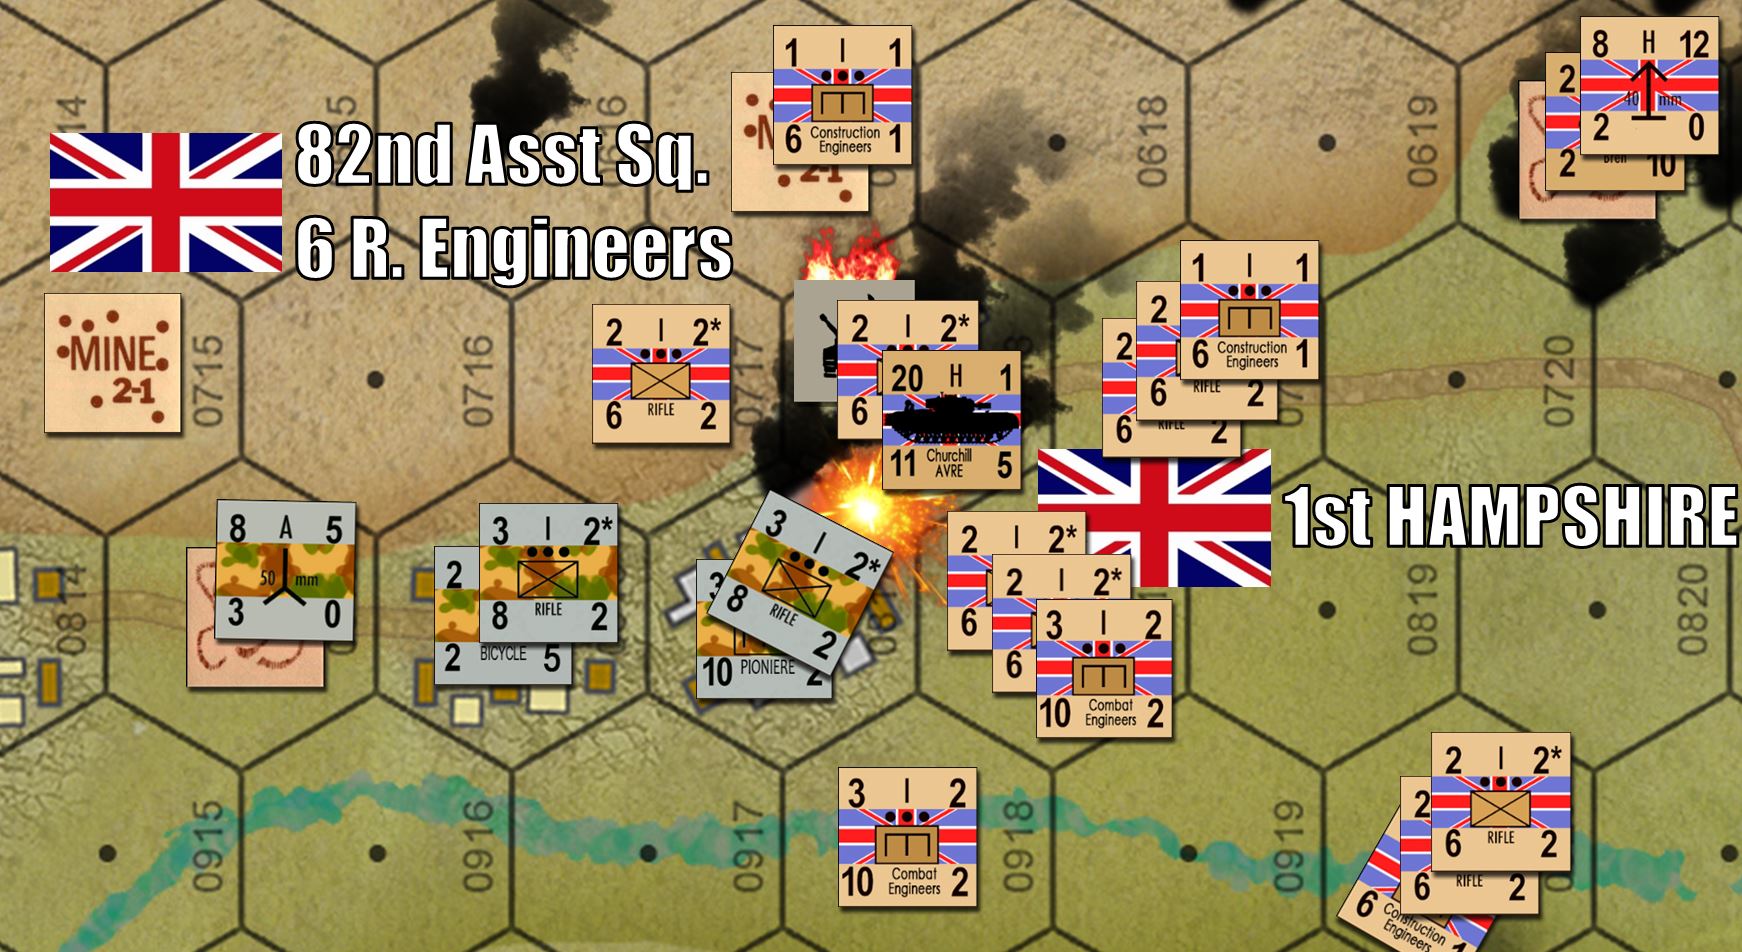 The Churchill AVREs have shoved themselves off the beach and now start launching "flying dustbins" mortar demolition charges into stubborn German defenses (III. Bn / Grenadier Regiment 916 / 352nd Infantry).
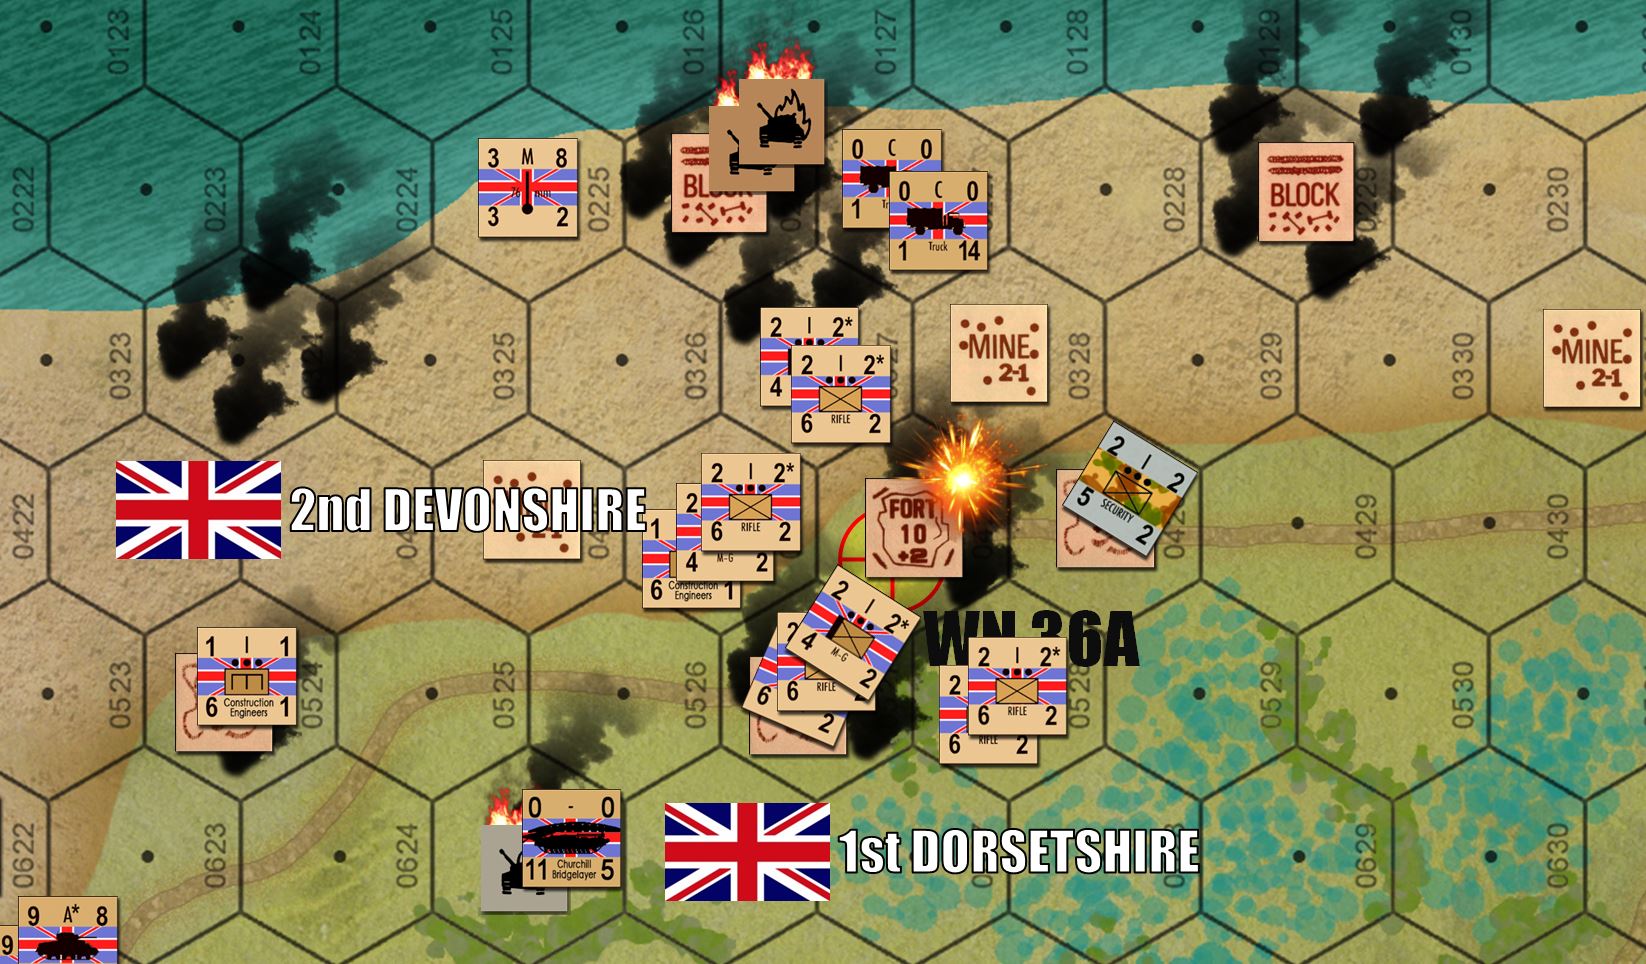 Although the 441 "Ost" Battalion put up a rather pitiful fight historically, here these platoons have stood TALL in the face of Damon's 1st Dorsetshire Rifles and 2nd Devonshire Rifles. It took four turns and two fire missions from battleship HMS Warspite and escorting destroyers to finally dig these badasses out of that "wiederstandnester" bunker complex.
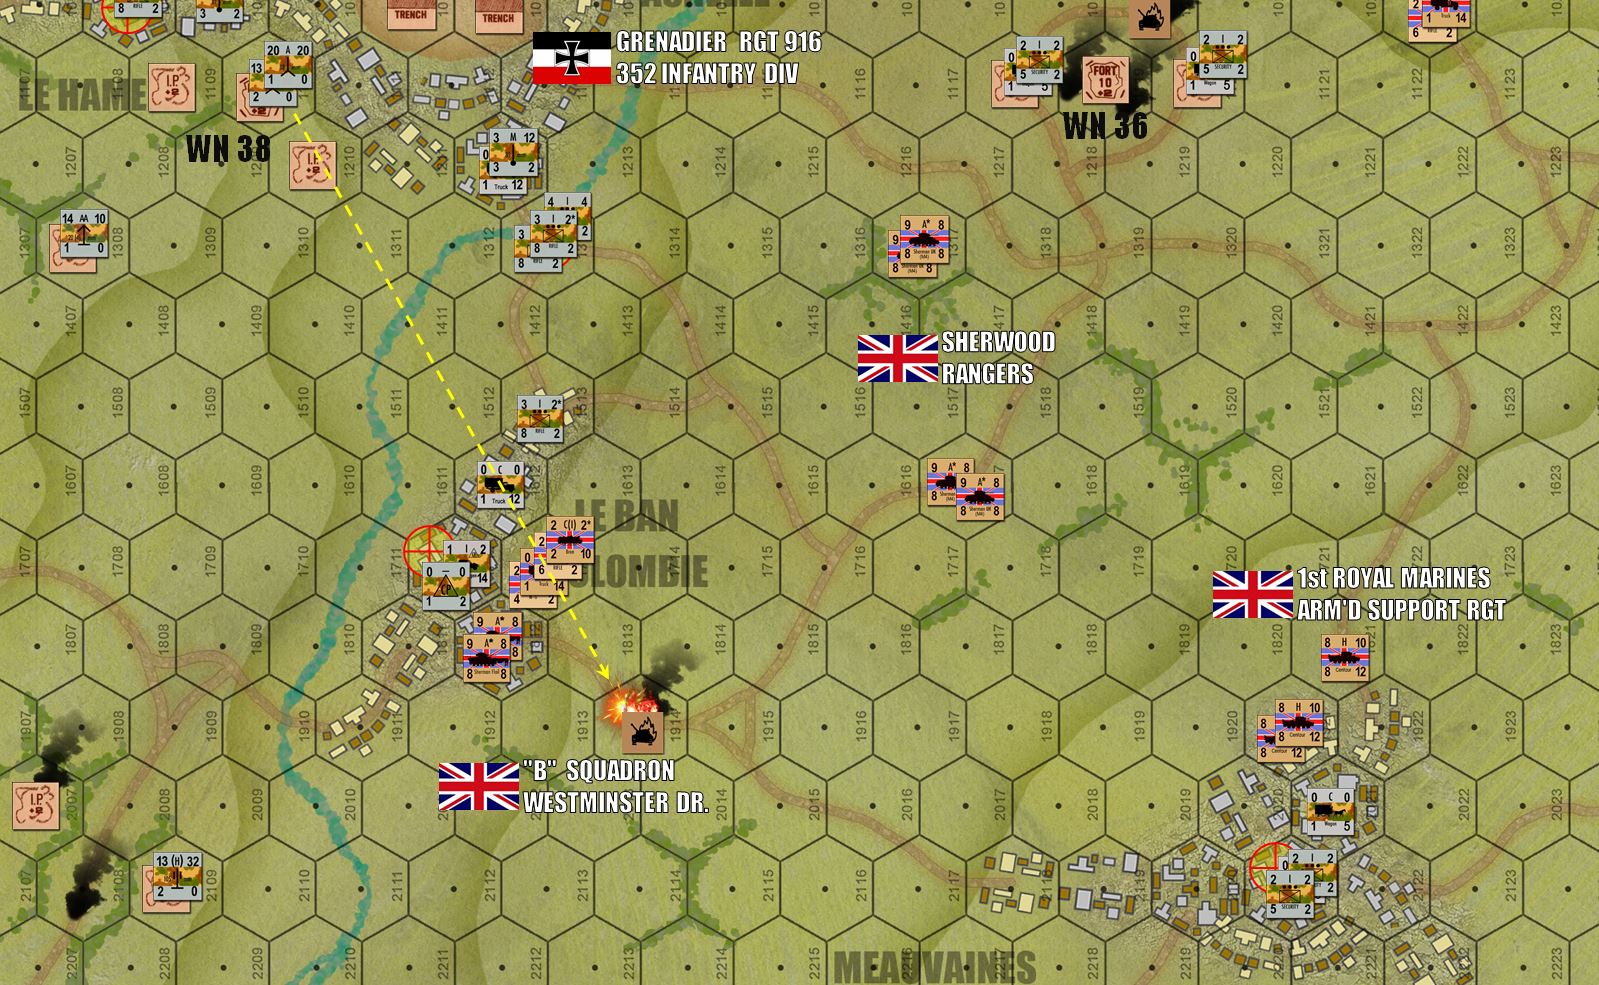 Turn 8: With more armor on the beach, the British now break deep inland, curling southwest (exactly as was done historically) to push for objective hexes in the German backfield.
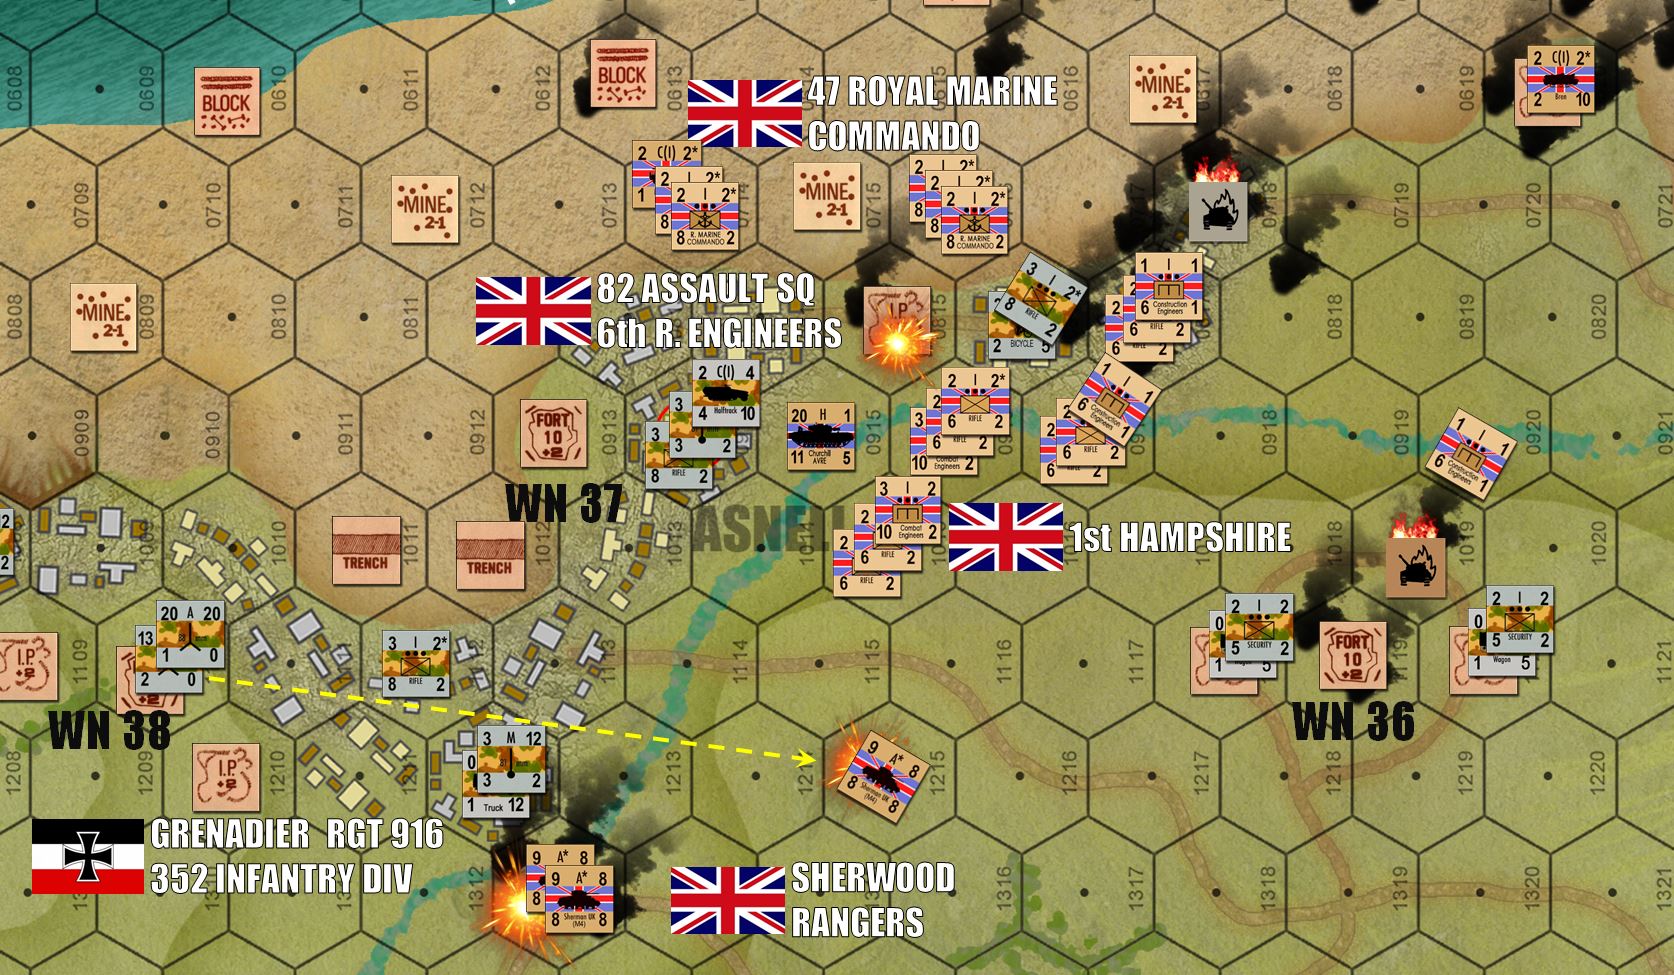 Royal Marine Commandos are now ashore, ready to help British assault engineers and 1st Hampshire with clearing operations of Asnell and Le Hamel. Historically, these were brutal fights that lasted all through the early afternoon of D-Day. Also, we see DD Shermans of Sherwood Rangers push toward the beach exits behind Asnell, one of them pinned down by 8.8 cm fire and a battery of ex-Polish 77mm guns brought over after the 1939 Campaign.
 Finally, almost three kilometers inland from the beach, the game is decided in a fire-scorched, blood-soaked, smoke-stained decision on the very last turn. Leave it to the Royal Marines!
  Final Result. Every smoke column shows where a platoon was destroyed. Full battle report videos will start going up on YouTube soon. I've also added "Panzer Leader DSOs" for players Damon and Brucelea! :D
 Counters Complete - Map Finalized - Special Rules Posted
Okay, we’re all set. Game starts in 1 hour (minus). 😀
SPECIAL RULES:
LANDING:
- Coastal hexes are designated either SEA hexes or BEACH hexes by the color of the hex beneath their central dot.
- At the end of movement, during the turn BEFORE they are scheduled to land (or in the initial set up for first wave units), British units are placed in a SEA hex adjacent to their planned beach landing hex.
- Germans may then fire at them during their subsequent turn.
- RULE SHORTCUT: Unlike “official” Amphibious Landings rules in Panzer Leader, where landing British units are inverted (so Germans cannot see which boats carry which units) – here we will roll a d6. On a 1-2, the German attack hits the intended target. 3-4, the attack hits the “next unit to the left.” On a 5-6, the attack hits the “next unit to the right.”
- As per Panzer Leader XI.D.3, all units except DD tanks are assumed to have an armored DF of 8. DD Shermans get normal DF, Germans must add +2 DRM to DF attacks (obscured target).
- Landing takes place FIRST during the movement phase of the subsequent British turn.
- DD tanks make a d6 roll. On a 1-5, they land normally. On a 6, they sink and are removed.
- All units (including surviving DD tank units) must also make a landing placement roll. Once the British player indicates which hex the unit INTENDED to land, roll a d6.
- 1-2 = unit lands normally.
- 3 = unit lands one hex to the west.
- 4 -5 = unit lands one hex to the east.
- 6 = unit lands two hexes to the east.
- Any unit that hits a block counter while trying to land is destroyed.
- Getting onto the beach hex is that unit’s whole movement.
- Exception: DD Tanks can land and hove half their movement.
- Any units that are CARRIED (towed guns, etc) must debark loaded in their carrier vehicle.
- Non-DD tank units cannot move half once they land (unloaded from LCTs, etc).
- Units scheduled to land on a given turn MUST land on that turn. They cannot “wait” until the beach opens up.
- Any hex that winds up “overstacked” (3 units to a hex) must IMMEDIATELY “lose” a unit per overstacking rules. This takes place BEFORE previously landed units move out of the hex.
- Once all units land on a given turn, units that were already landed in previous turns can now move normally.
- German units taking opportunity fire do not have to make the “shortcut randomizer” roll mentioned above if they shoot at units as they land (using normal unit DFs and target classes).
TERRAIN:
- All Beach hexes cost vehicles double movement.
- Entering a hex where the unit climbs one elevation level costs double movement (infantry included).
- Climbing a bluff hex off a beach hex costs 4 vehicle movement, 2 infantry movement, 6 truck movement. Churchill Bobbin Funnies can lay a carpet in these hexes to make it “clear.”
- Stream: This is a shallow stream. Costs infantry 2 MP to enter. Costs vehicles 4MP to enter, trucks 6MP to enter. Stream does not block LOS. Stream gives +1 DRM. Road negates stream. Churchill Bridgelayers can bridge the stream.
BEACH OBSTACLES:
- Trench rules: Normal. Cannot be crossed at all by any vehicle. No effect on infantry. Can be bridged by Churchill Bridgelayers.
- Mines: Normal. Can be removed by flail tanks per AIW rules. Can be removed by Combat or Construction engineers which move onto the mine hex and roll a 1-2 on 1d6.
- Blocks: No effect on LANDED infantry. Sinks any landing unit that drifts into them. No vehicle can enter a block hex. Can be removed by LANDED engineers who move into the hex and roll a 1-2 on 1d6. Can also be removed by Churchill AVRE that is adjacent to it and declares an attack (BOOM). Removed blocks no longer blow up landing units in subsequent waves.
- Churchill Bridgelayers can lay three bridges. Normal AIR Bridgelaying rules.
- Churchill Bobbins can lay three “roads.” Renders beach hexes and beach bluff hexes normal for movement purposes.
NAVAL GUNFIRE (SHORTCUT RULES):
- British get 50 points of (H) class INDIRECT naval gunfire support on every ODD turn.
- This can be split up into two attacks if desired (20/20, 30/10, 35/5, etc).
- Must be within LOS of the north side of the table (any beach or bluff hex)
- Can also be called in by any non-dispersed, unloaded combat unit (not trucks).
- On a 1-4 it lands as targeted. On a 5-6 the shellfire drifts one hex (1d6).
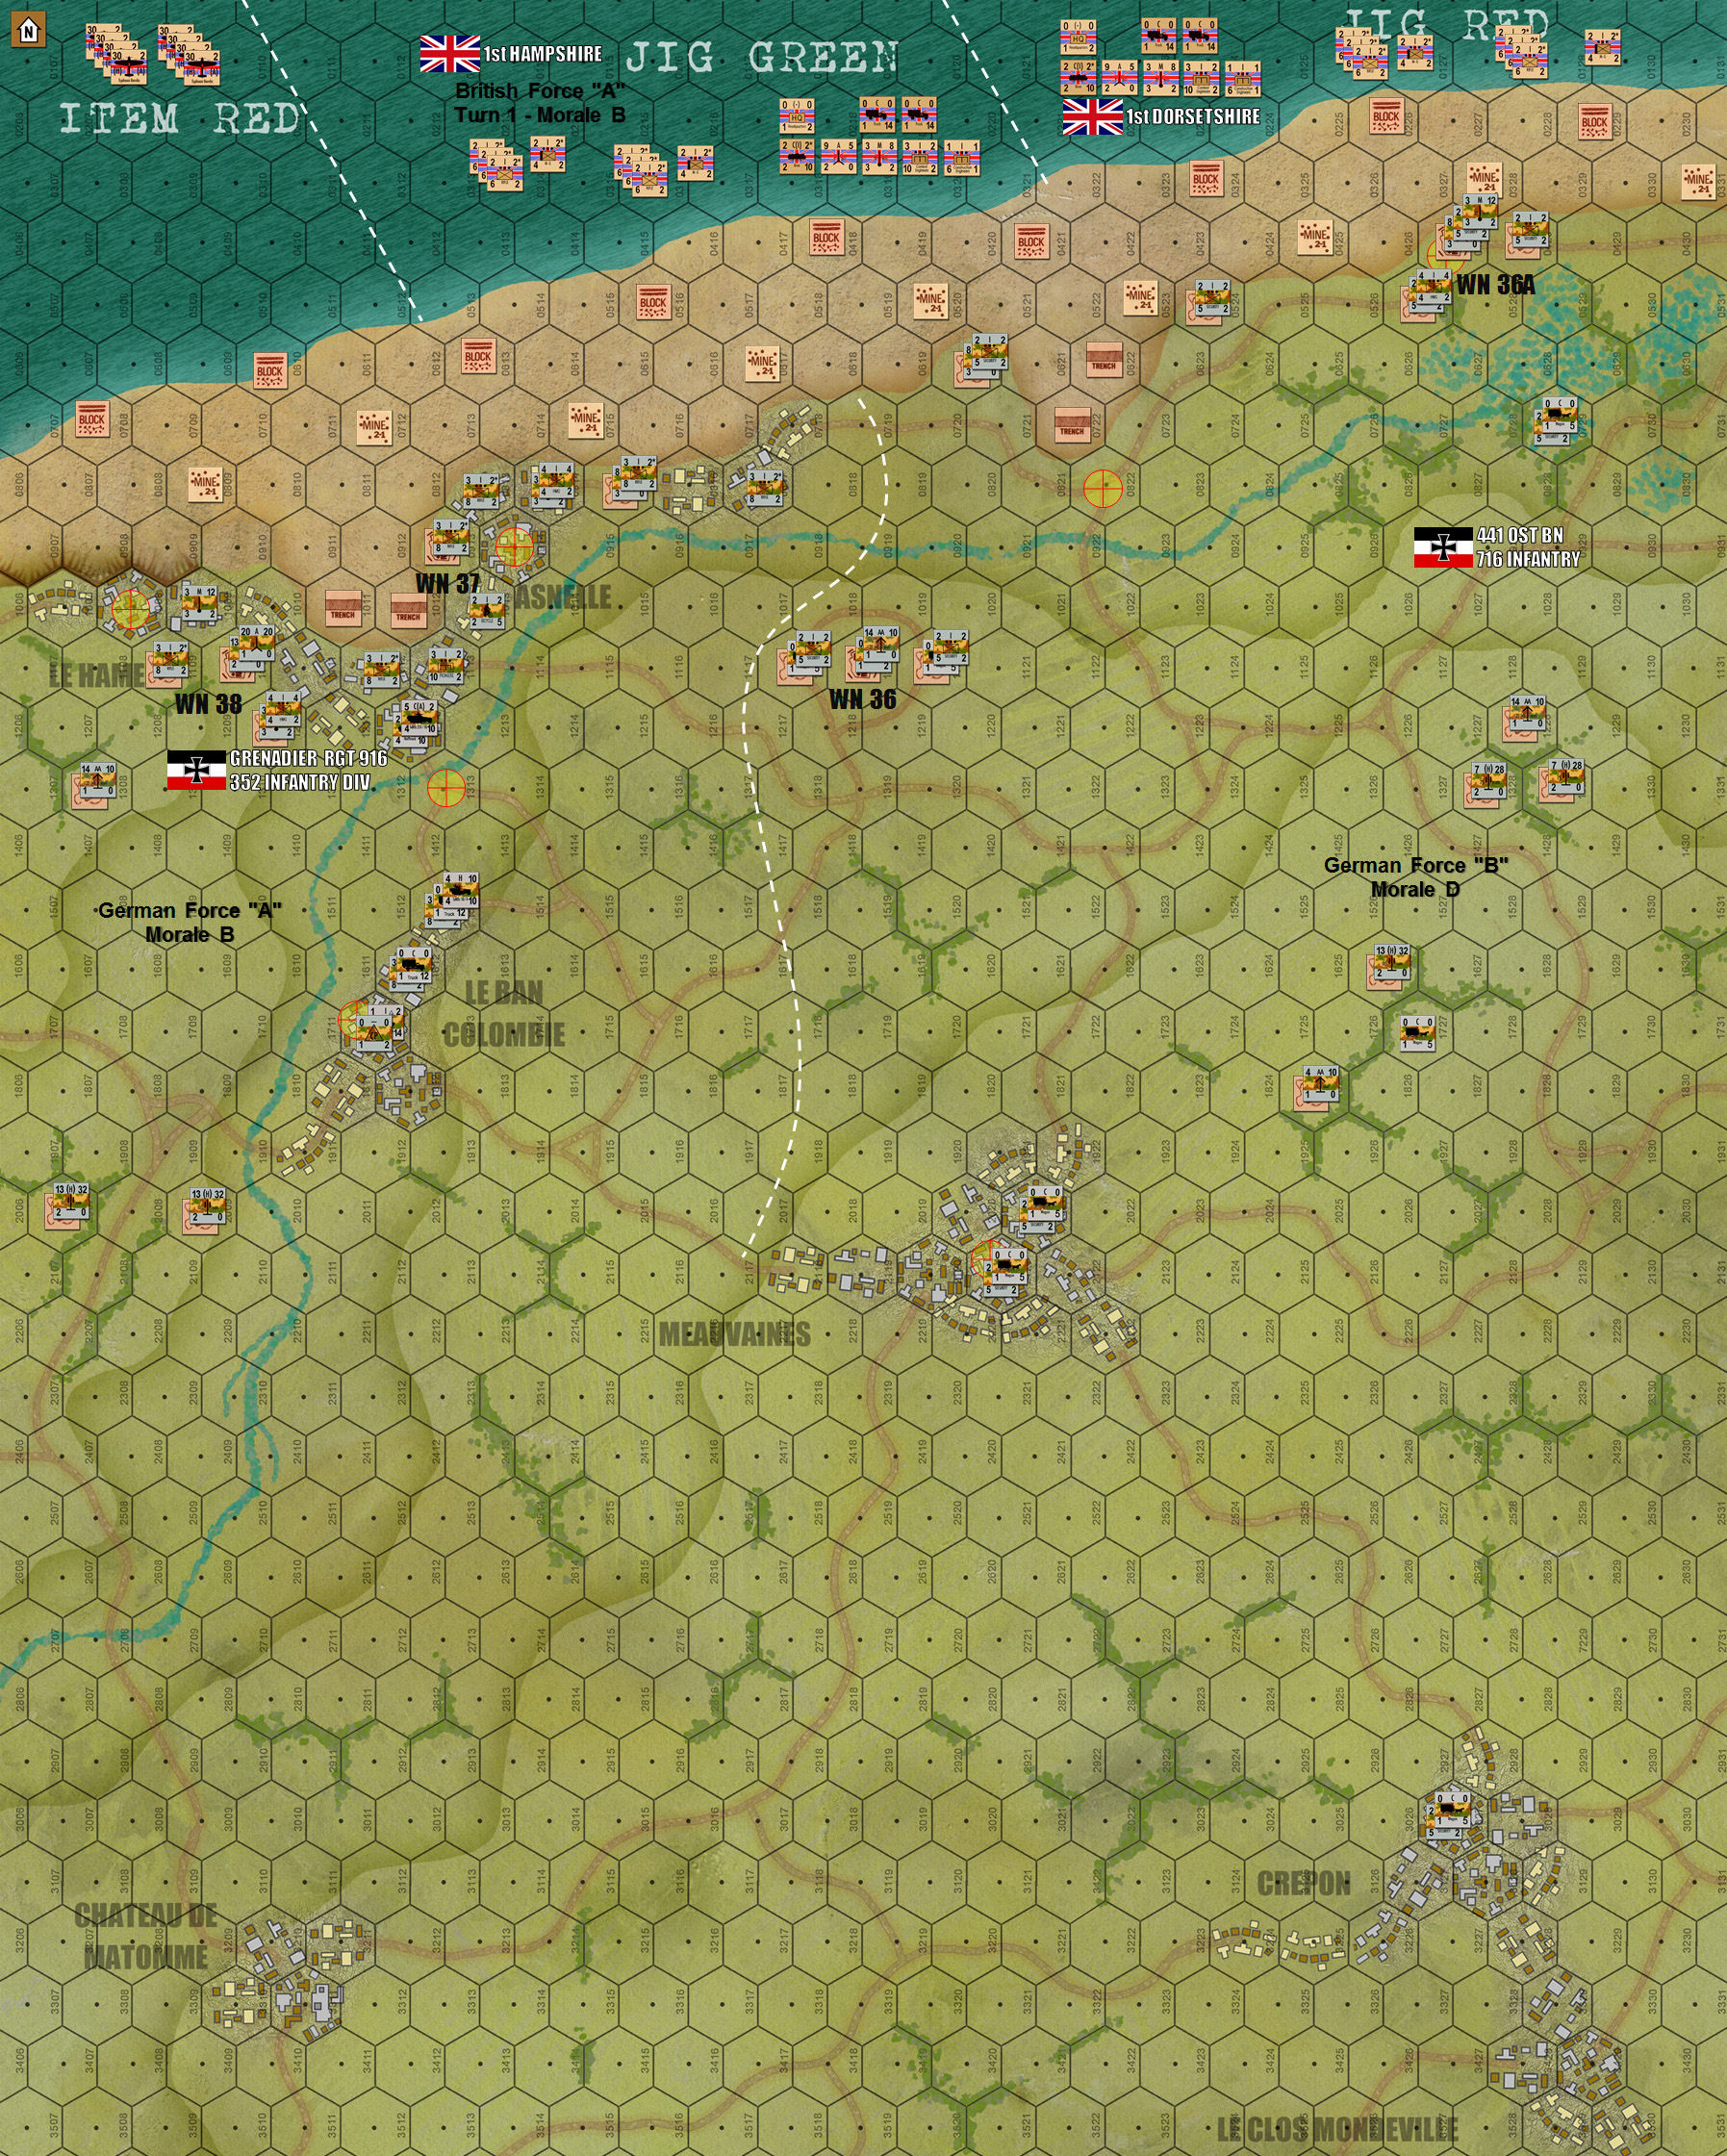 The finalized map. Now includes unit deployment areas, force labels, and morale levels, and full German deployment. "Open in New Tab" for full resolution.
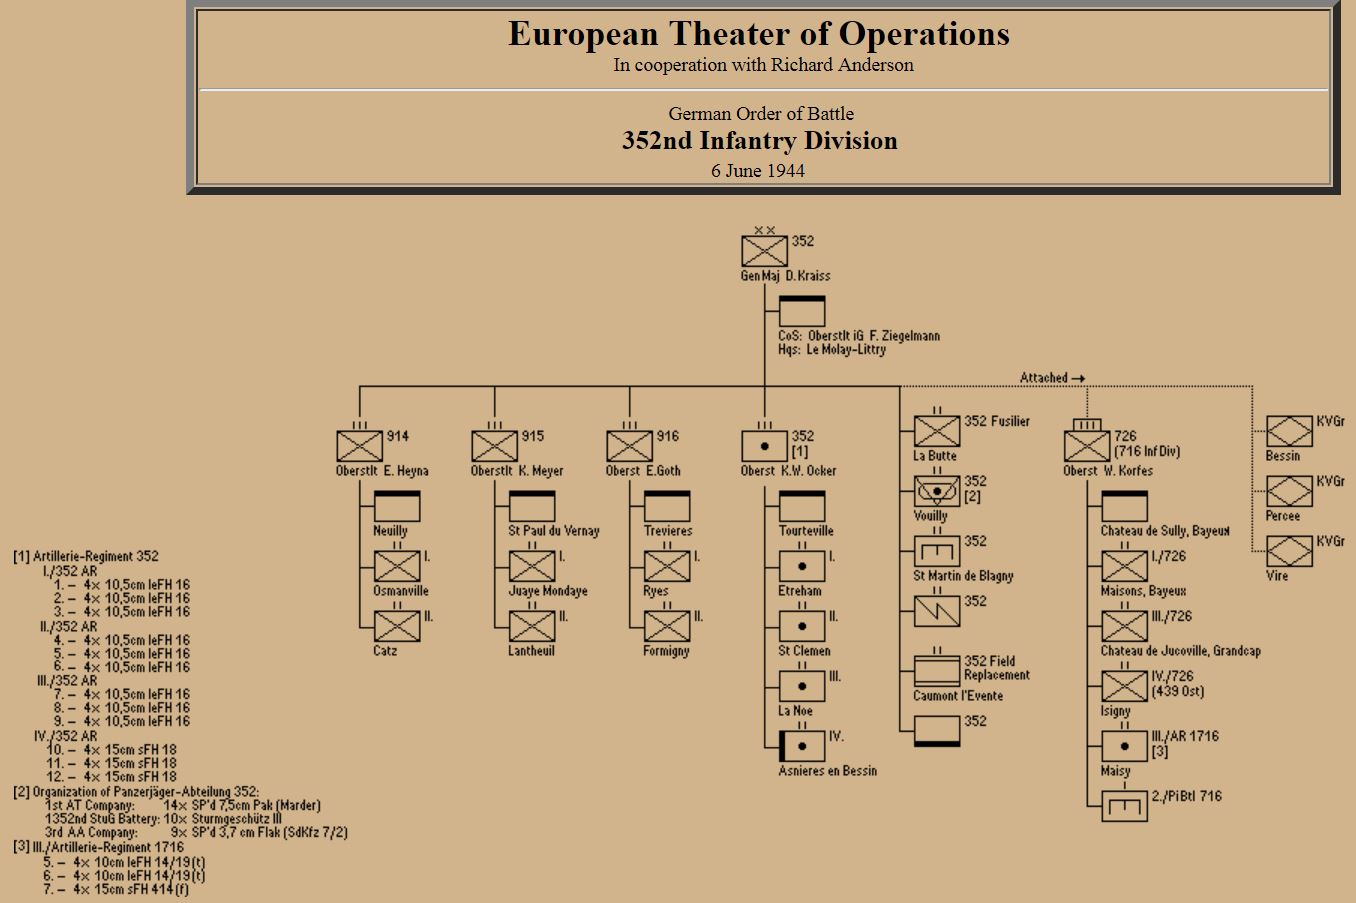 Research on the composition of the German 352nd Wehrmacht Infantry. This division would face both the British at the very west end of Gold, and the Americans at Omaha. Definitely the best German unit in action on the first day.
Counters *Mostly* Complete - Setting up Map
Work continues on the Gold Beach Panzer Leader game scheduled for Saturday, June 8, 4PM UK time.
We created some of the counters and set up some of the map live on Sitrep Twitch Channel last night. We had some great conversation with the role of research in “high-history” games, naval bombardment, the potential role of the panzer divisions, the real reasons why Omaha was so much bloodier than the other beaches, the Juno Beach landings, and different eras of Canadian flags.
After we signed off I tinkered a little with the Germans, and started with a general map set up. I will fill this out and get everything completed later tonight in time for tomorrow’s game.
But for now …
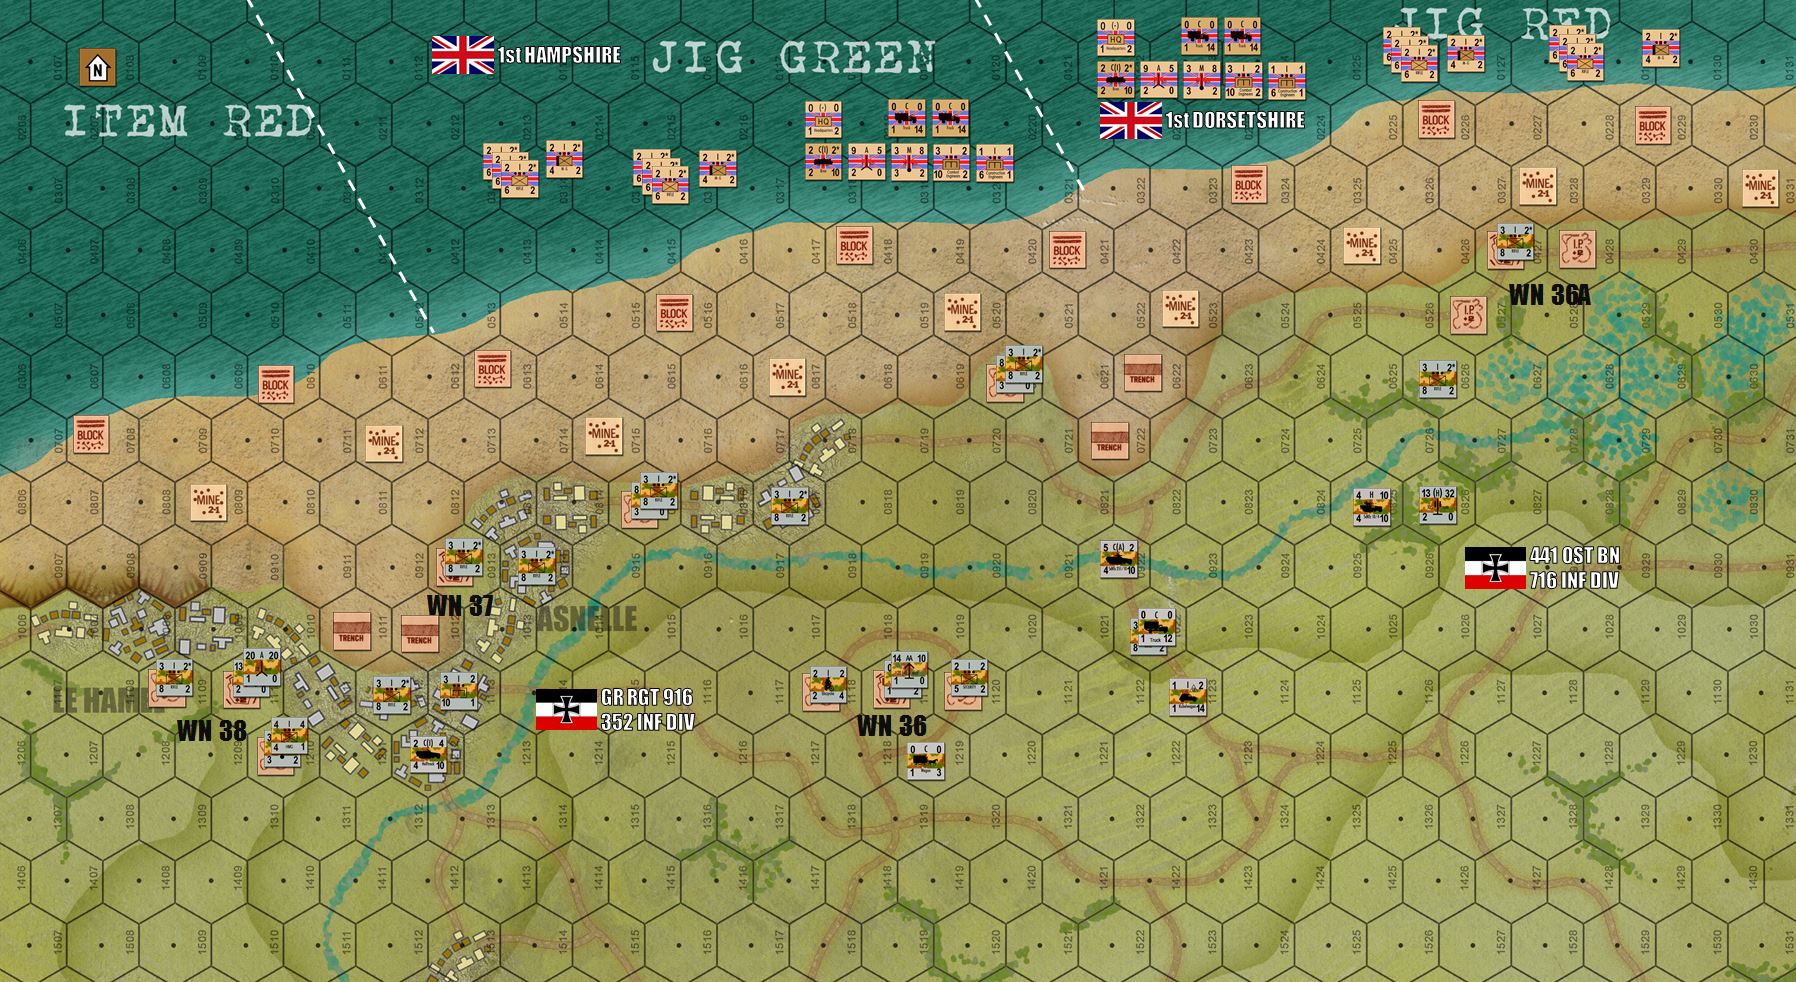 German beach defenses are now in place. WNs = the historical locations and numbers of individual “wiederstandnester” strongpoints, fortification blockhouses represented by “Fortification” counters, flanked by two “IPs” (improved positions – slit trenches, MG nests, mortar pits, sandbags, barbed wire, etc). I also have “Trenches” (antitank ditches) covering the beach egress draws. Minefields are placed in the beach, as well as “Block” counters representing Czech hedgehogs and anti-boat pilings. The British are coming in with A & B Coys, 1st Hampshires and 1st Dorsets, along with their battalion support companies and command groups. Germans are set up with two very distinct troop quality levels, the hard-core 352nd Infantry to the west and the much softer 441 “Ost” Battalion of the 716th Static Division to the east.
 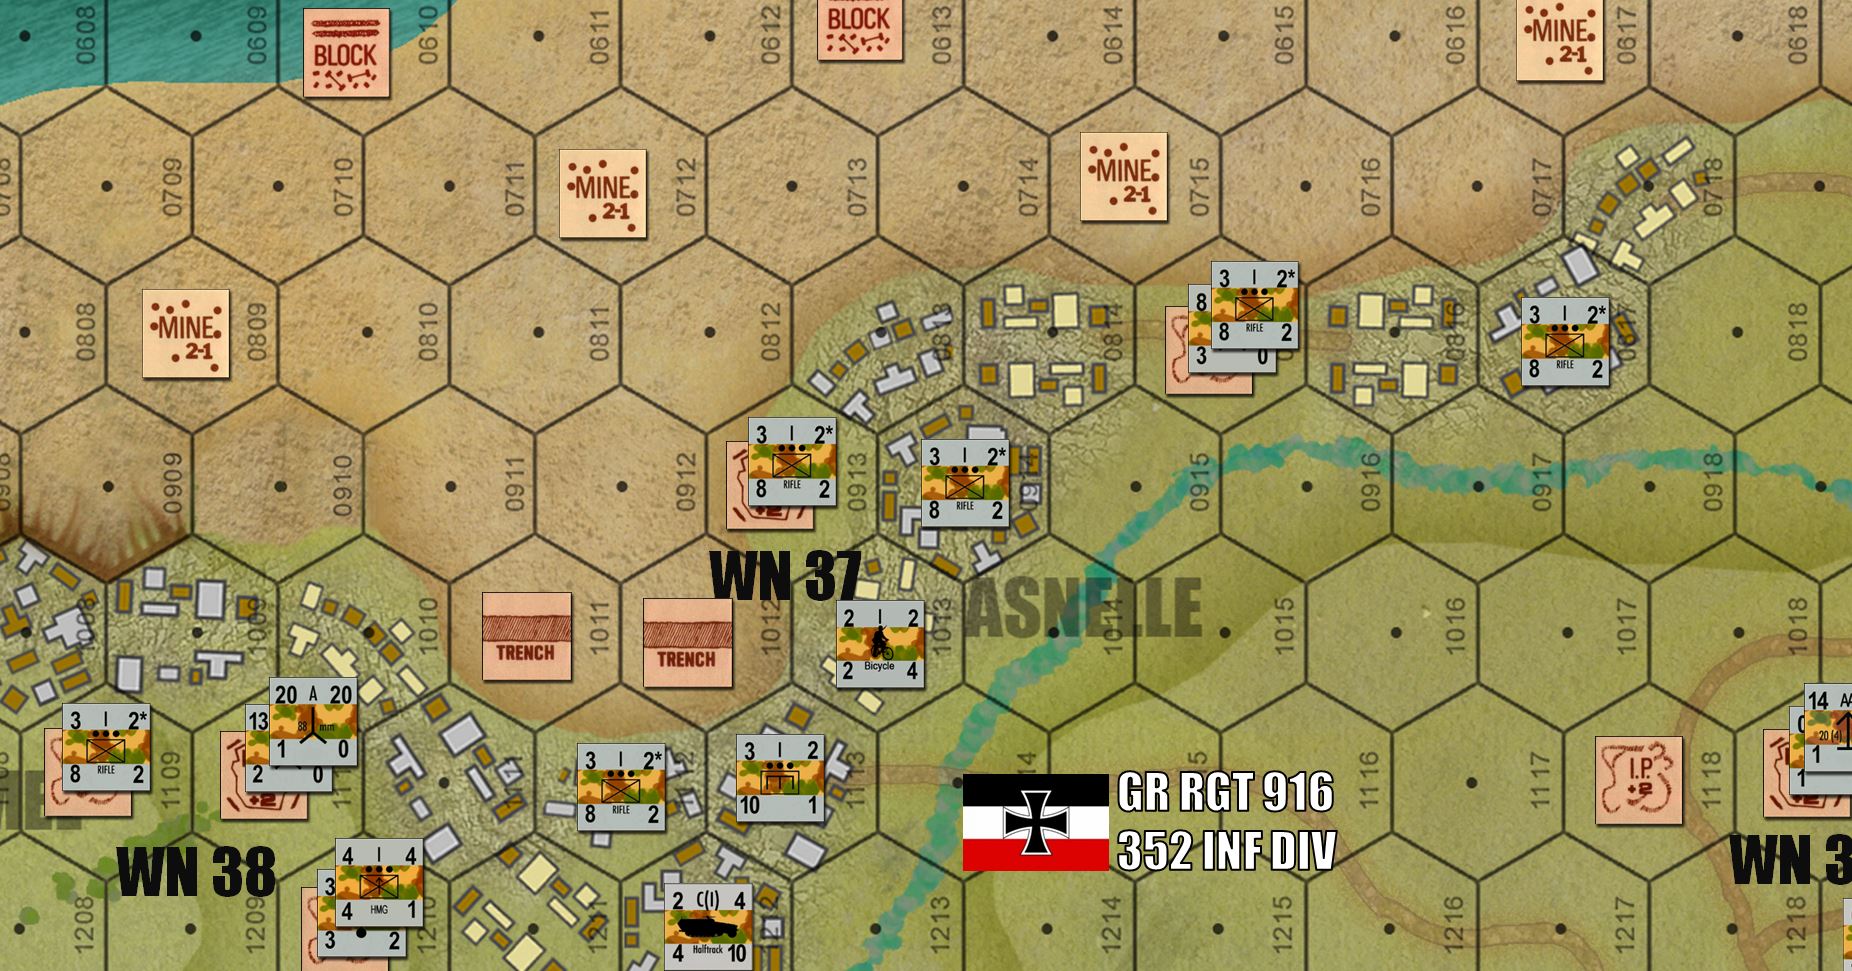 A close up of German defenses. Their 5.0, 7.5, and even a battery of 8.8s are staged in their approximate historical locations, along with FlaK (2.0 cm, x4 2.0cm), HMG sections, HQ troops, transport (halftracks, trucks, and yes … horse-drawn wagons), mortars, off-board artillery (10.5 cm and 15.0 cm howitzers), etc.
 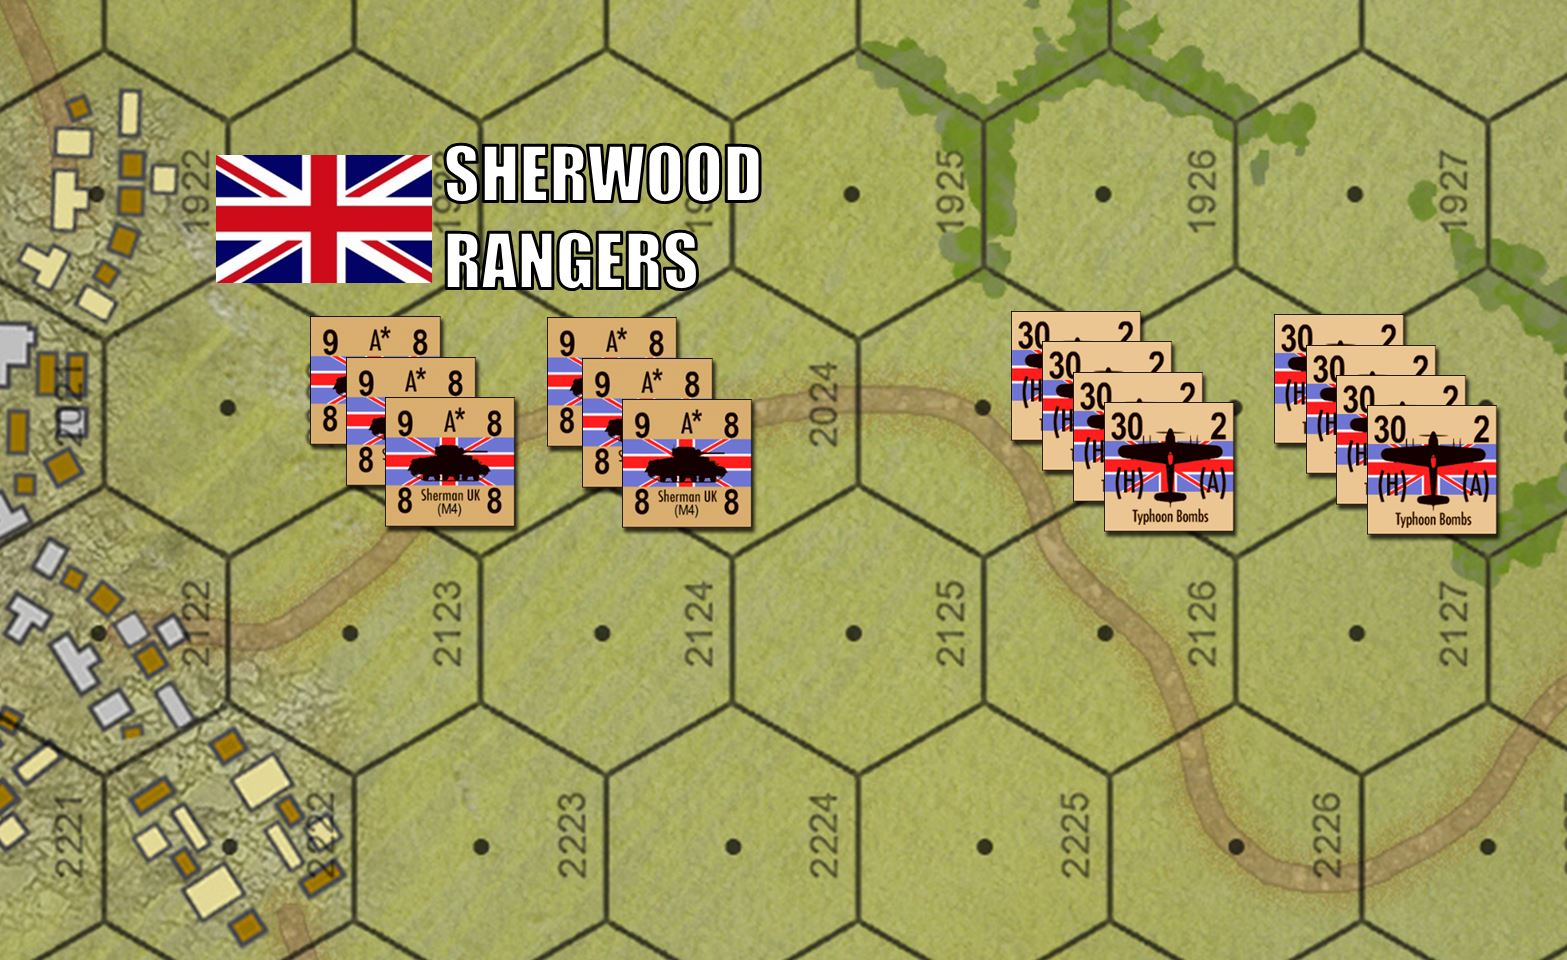 Sounds like a tall order. Fortunately, support is close behind. These two squadrons (companies) of the Sherwood Rangers were actually supposed to land at 07:20, five minutes BEFORE the first infantry leapt from the Higgins boats. Didn’t happen, they arrived late, but they will arrive. Of course we have plenty of air support for the British as well. I made sure to include an EVEN number of air strike counters so Damon and Brucelea can split them evenly. No fighting over the Typhoons, please!
 Not gonna lie, I am cheating here SLIGHTLY when it comes to the timing of these units. The mish-mash of 82nd Assault Squadron / 6th Royal Engineers and scattered elements of “B” Squadron, Westminster Dragoons were there at the outset to help the infantry on the beach. I don’t think they had any AVREs, though. The flails, the bobbins were there, though, and will help with getting British vehicles off the beach and clearing German minefields. The Bridges and the AVREs show up later in the afternoon, but like I said, cheating SLIGHTLY and including a sample of these units just to show them off in the game. Same with the 47th Commando. These guys will show up late in the game, but still far sooner than their historical 14:00 hours would indicate.
Looking forward to a great game tomorrow! 😀
British Company Research
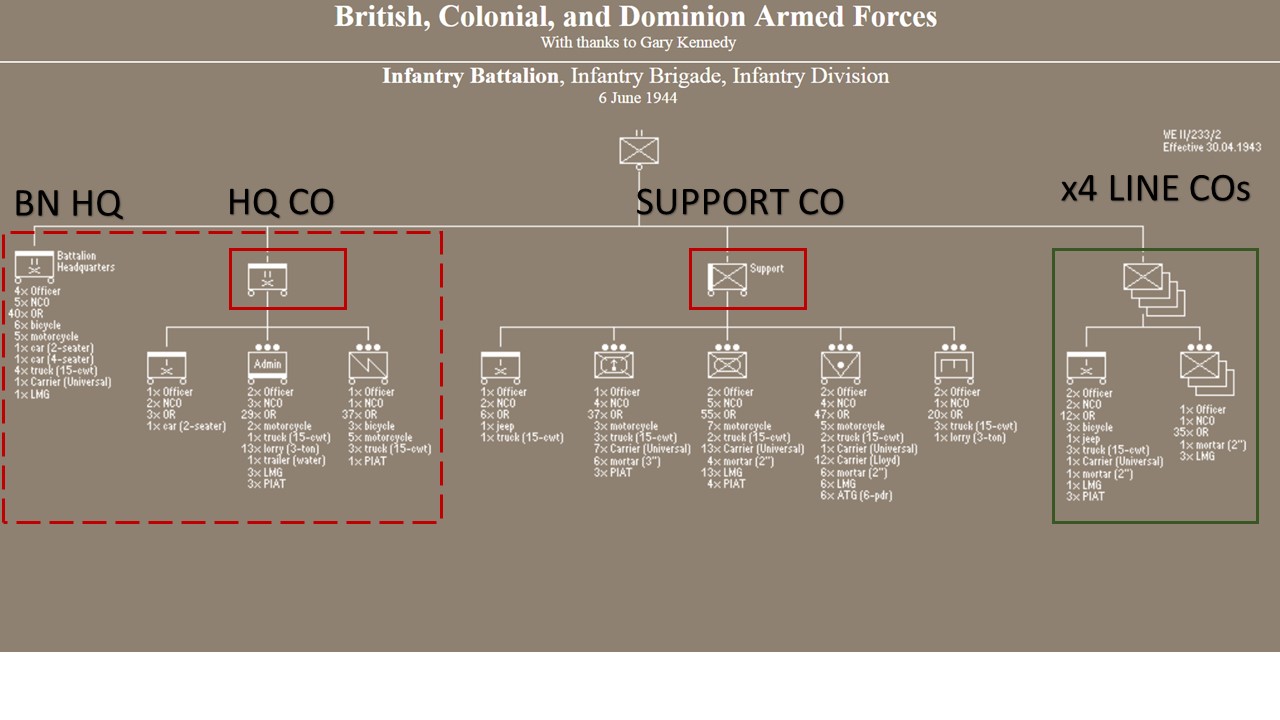 Drilling down a bit, getting the actual compositions of British rifle companies for 1944, and by extension, battalions like 1st Dorsets, 1st Hamps, and 2nd Devons (to be featured in Saturday's game). Next, conversion to Panzer Leader to counters can be created. To be honest, most of these are already created, but they may have to be tweaked since they were last used in the Desert 1942- early 43 games. One example, note that Support Weapons Platoons now contain PIATs - which they did not have in Tunisia. I hope to have some counters up later today. :D
British Unit Research (detail) and Map Re-draw
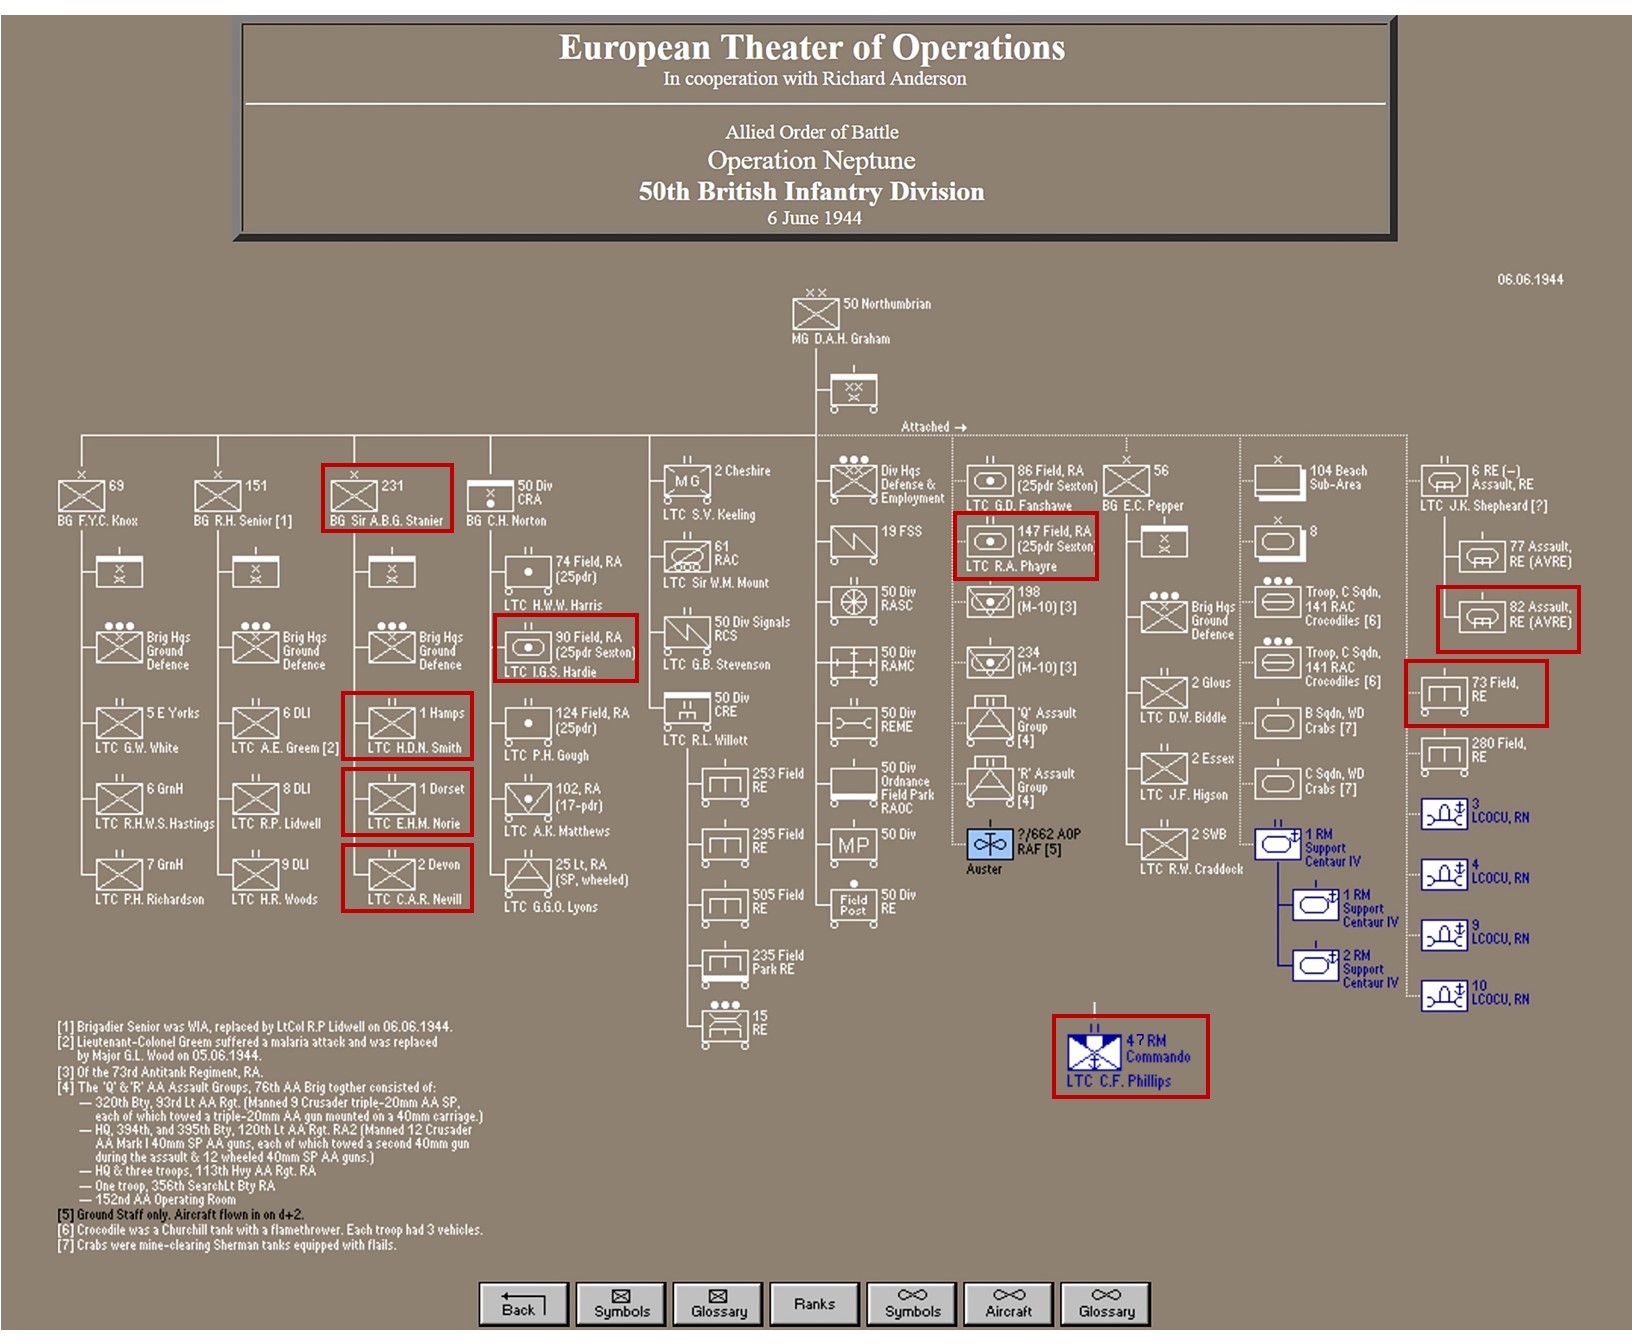 Here are the units I have cross-referenced and verified from at least two sources that WERE THERE at Gold, Jig Sector, first hours of the battle. 1st Hampshires (A & B Coy) lands at Item Green. 1st Dorsetshires (A & B Coy) lands at Item Red. The DD Tanks of Sherwood Rangers that were supposed to land with them were late, but they had a few tanks in the form of specialist armour drawn from 82 Squadron, 6 Assault Regiment / Royal Engineers and "B" Squadron of the Westminster Dragoons. A lot of these are Flails and "bobbins" funnies. Later, 2nd Devonshires lands in a second wave, along with the Sherwood Rangers, a company of the 73rd Field Engineers, two batteries of artillery (Self propelled? Verifiying), and finally the 47th Royal Marine Commando. All this combined makes up the first big wave of 231st Brigade / 50th Northumberland. More details to come.
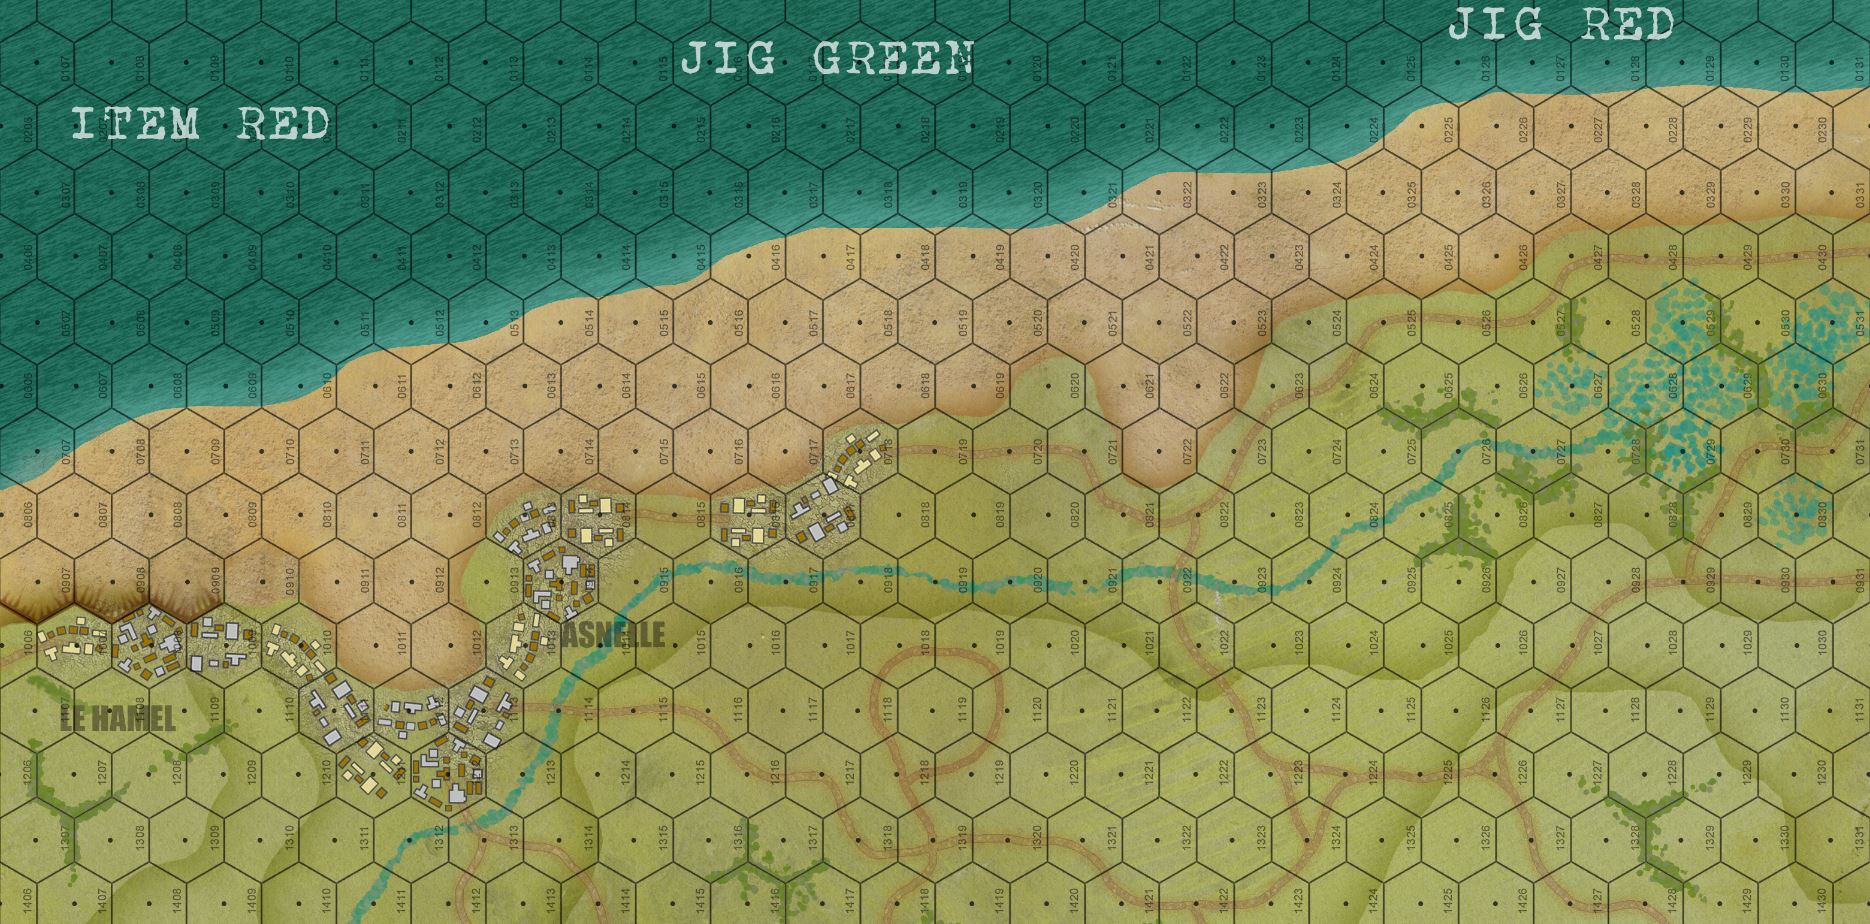 And yes, I know I said I wasn't going to re-draw this map, and in my defense, I didn't ... fully. But I reverted from the "Arab-Israeli Wars" style tree HEXES to the "Panzer Leader" tree HEXSIDES. This will cause less confusion on terrain rules for Saturday's game and besides, I was able to use the HEXSIDE design to better approximate the thin treelines / hedgerows actually on the inland battlefield. I also clarified the cliff hexsides to the extreme west (for those who've been there, these are the cliffs that continue to extend west until you hit those memorials that overlook the Mulberry remains and Museum at Arromanches itself). OPEN IMAGE IN NEW TAB to get a much better resolution.
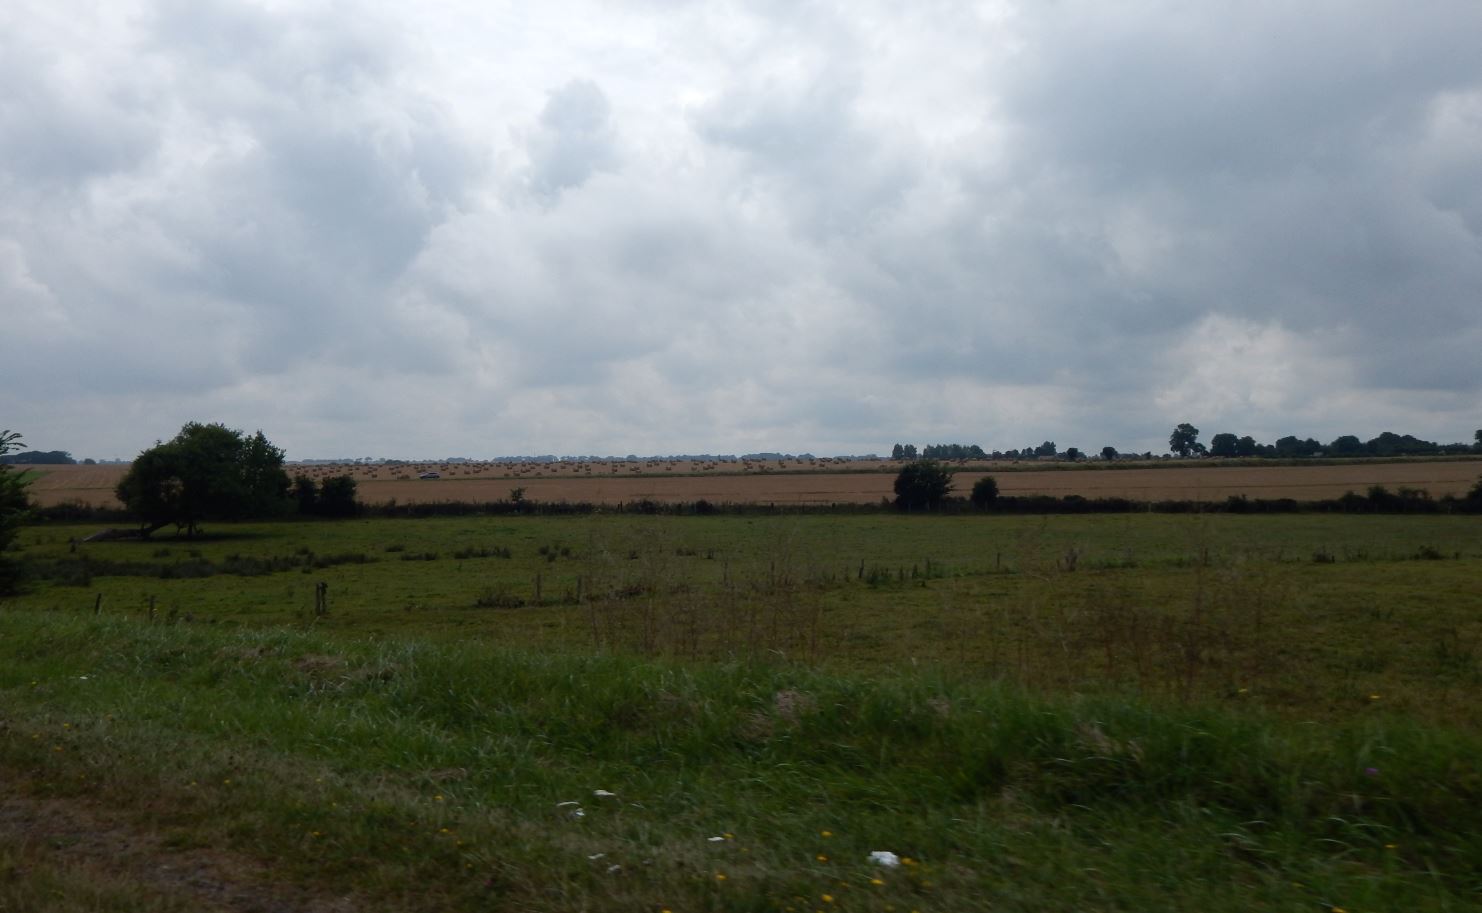 A view if THIS battlefield as it looked in the summer of 2014. You can see the thin tree lines I was trying to recreate on the Panzer Leader mapsheet
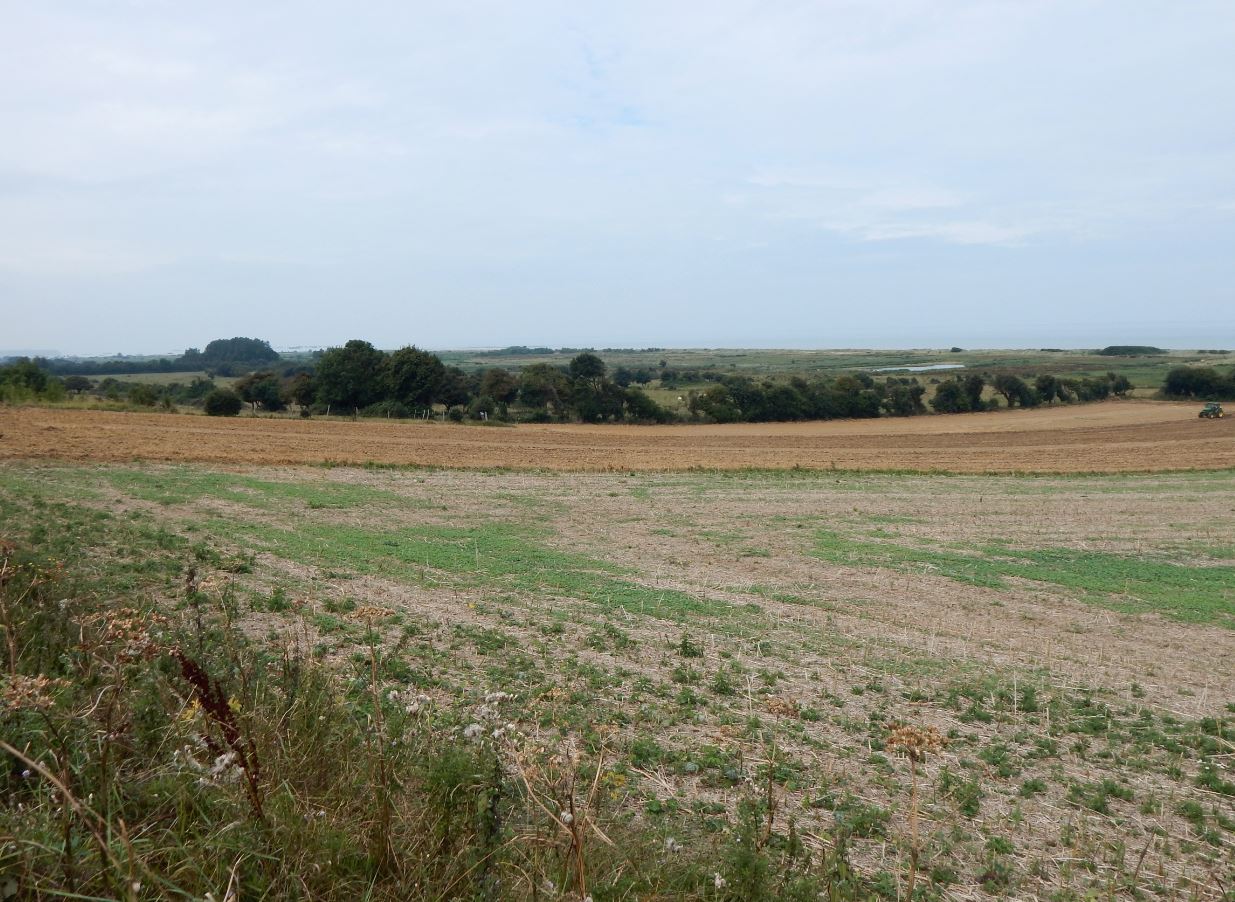 A view if THIS battlefield as it looked in the summer of 2014.
Map complete - starting counters
Okay, the map is now complete. It’s actually complete whether I like it or not, apparently this afternoon I didn’t save it properly as editable layers … so large scale changes are lo longer possible without re-drawing the whole thing. Apparently the gods are trying to tell me something …
It’s fine! Stop obsessing and get some sleep!
I chose this sector for a number of reasons …
- My two players wanted to try British units (reasonable enough).
- Pretty sure Gold was “tougher” than Sword.
- This part of Gold (“Jig” Sector, turning west inland to fight toward Arromaches in “Item” Sector) is one of the few times we see British seaborne infantry actually fight true German troops that day (as opposed to “Ost” battalions, largely drawn from Belarus and Ukraine).
- We get some Royal Marine Commandos in the second wave (and after all this Falklands work, I loves me some Royal Marine Commandos).
- Two squadrons of tanks also land here (Sherwood Rangers – I think later renamed the Nottinghamshire Rangers?)
- The terrain here is interesting, with substantial towns right on the water, tough German beach defenses and “wiederstandnester” strongpoints, cliffs to the west leading toward Arromanches (about 20 hexes off off the west edge of the map), marshes and farmland (which are still here today), and even a small river which … rather bizarrely, never reaches the sea (?), apparently diverted east to a series of canals and marshland.
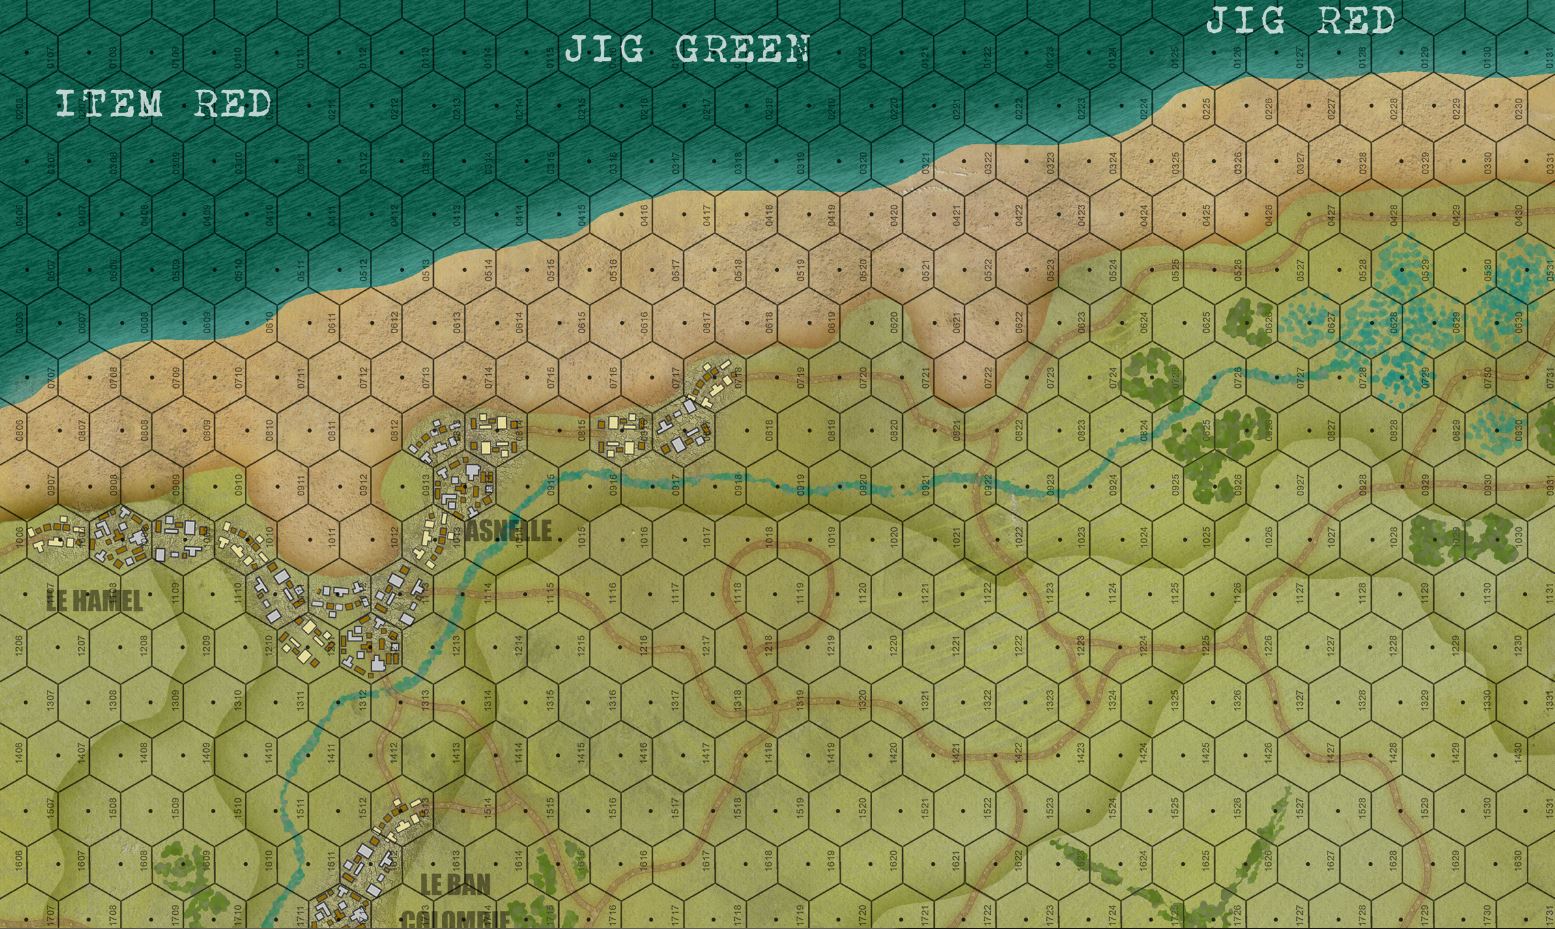 So here is the top third of the map. Each hex is 150 meters across, and so would fit two 6' Bolt Action tables end-to-end, or one 5' Flames of War table. We're going to be landing three battalions of infantry here, plus commandos, plus two squadrons of tanks, AVREs, etc. In all, about 2200 men and 30 tanks, plus bulldozers, flails, maybe even a platoon of AVRE Churchills (if we cheat slightly with the strict historical timeline and landing schedule).
 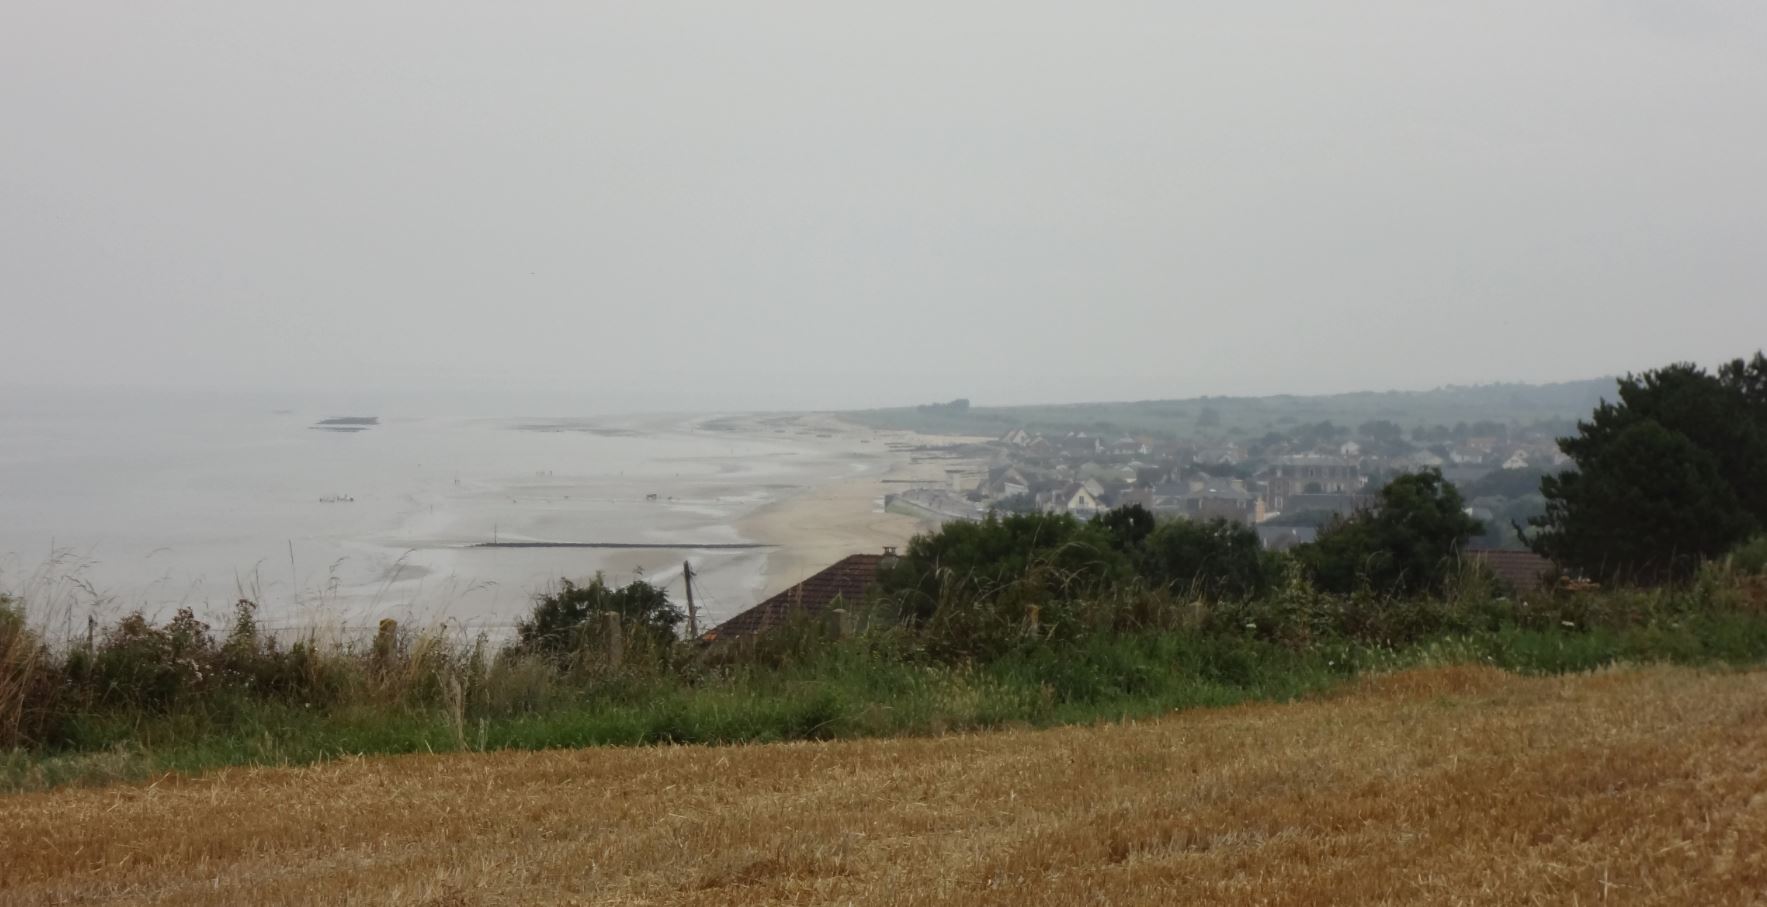 A few years ago I travelled to ALL the Normandy beaches, landing zones, and battlefields, from Pointe du Hoc to Falaise. These are some of my photographs of Gold Beach. This is looking east from atop the bluffs east of Arromanches, so I believe this is looking down onto either Jig or King Sector assault beaches. The trip was a few years ago. Either way, the beaches on our Panzer Leader board look a lot like this.
 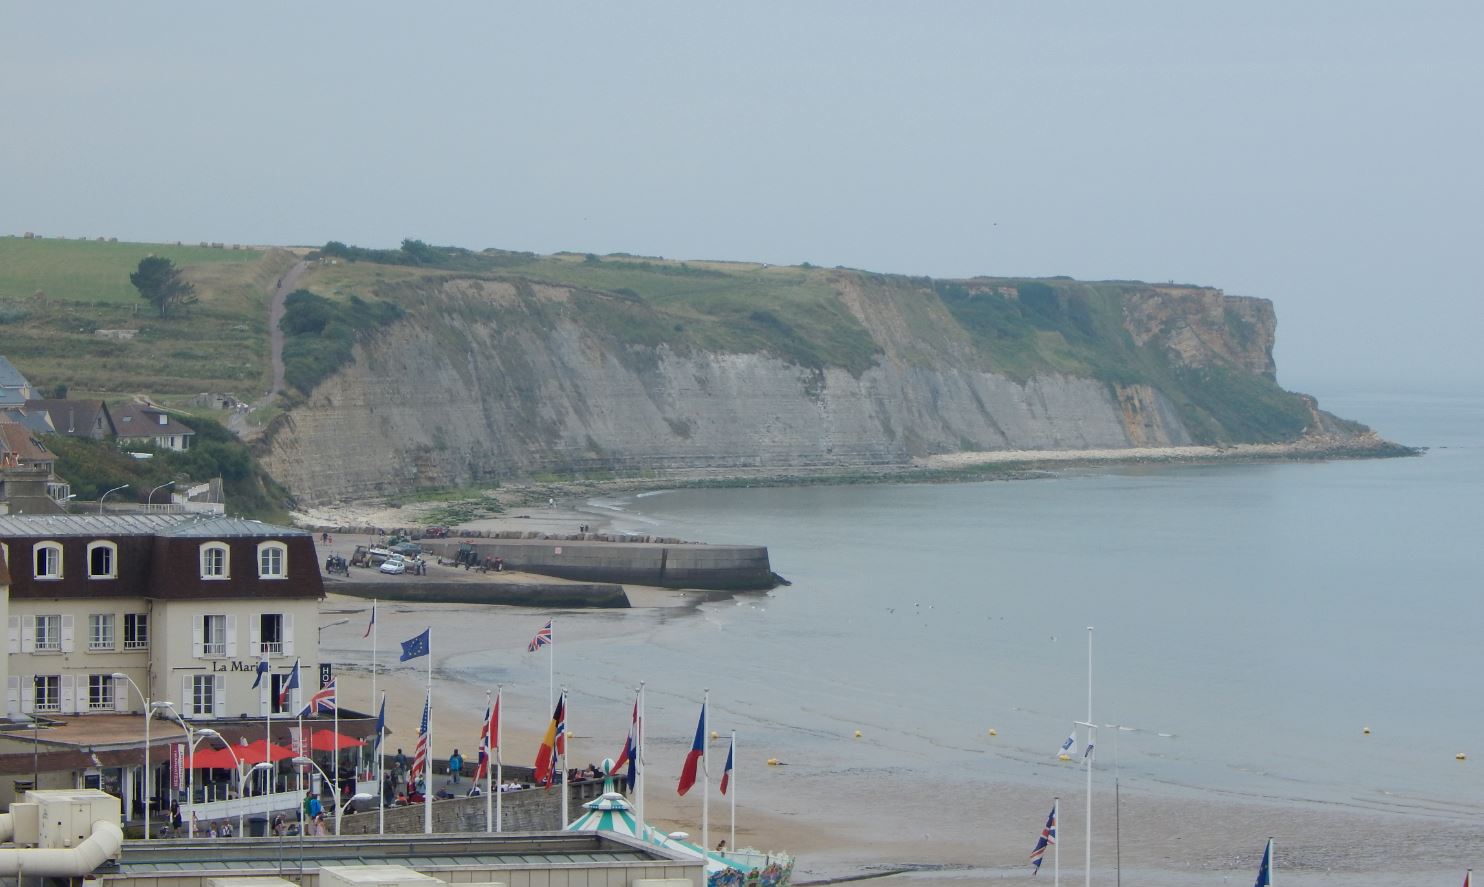 Looking west across the beach at Arromanches. This was in Item sector, and so far as I can tell wasn't actually "landed" on on D-Day, but assaulted from the east by troops that landed earlier in the day on Jig (231st Brigade, 1st Dorsetshire, 1st Hampshire, later 2nd Devonshire and 47th Royal Marine Commando).
 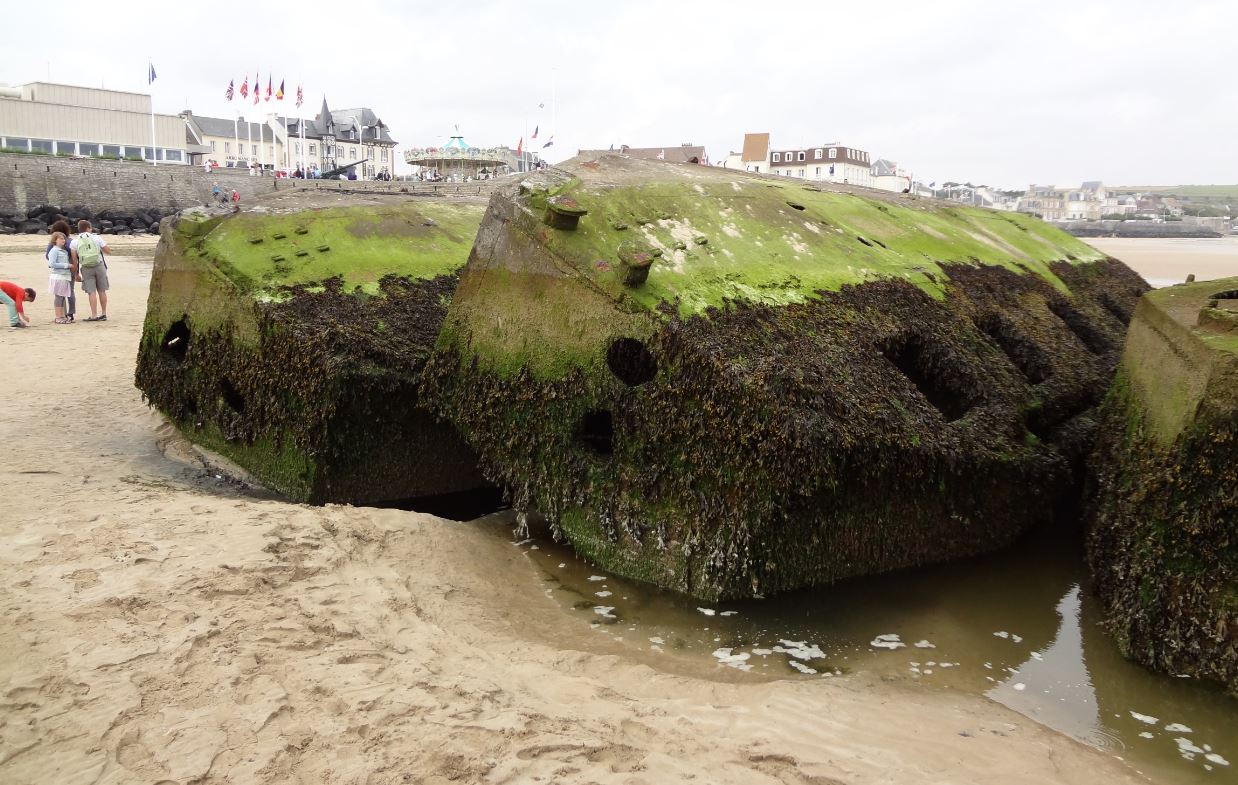 75 years later, the remains of "Port Winston" Mulberry artificial harbor is still in place.
 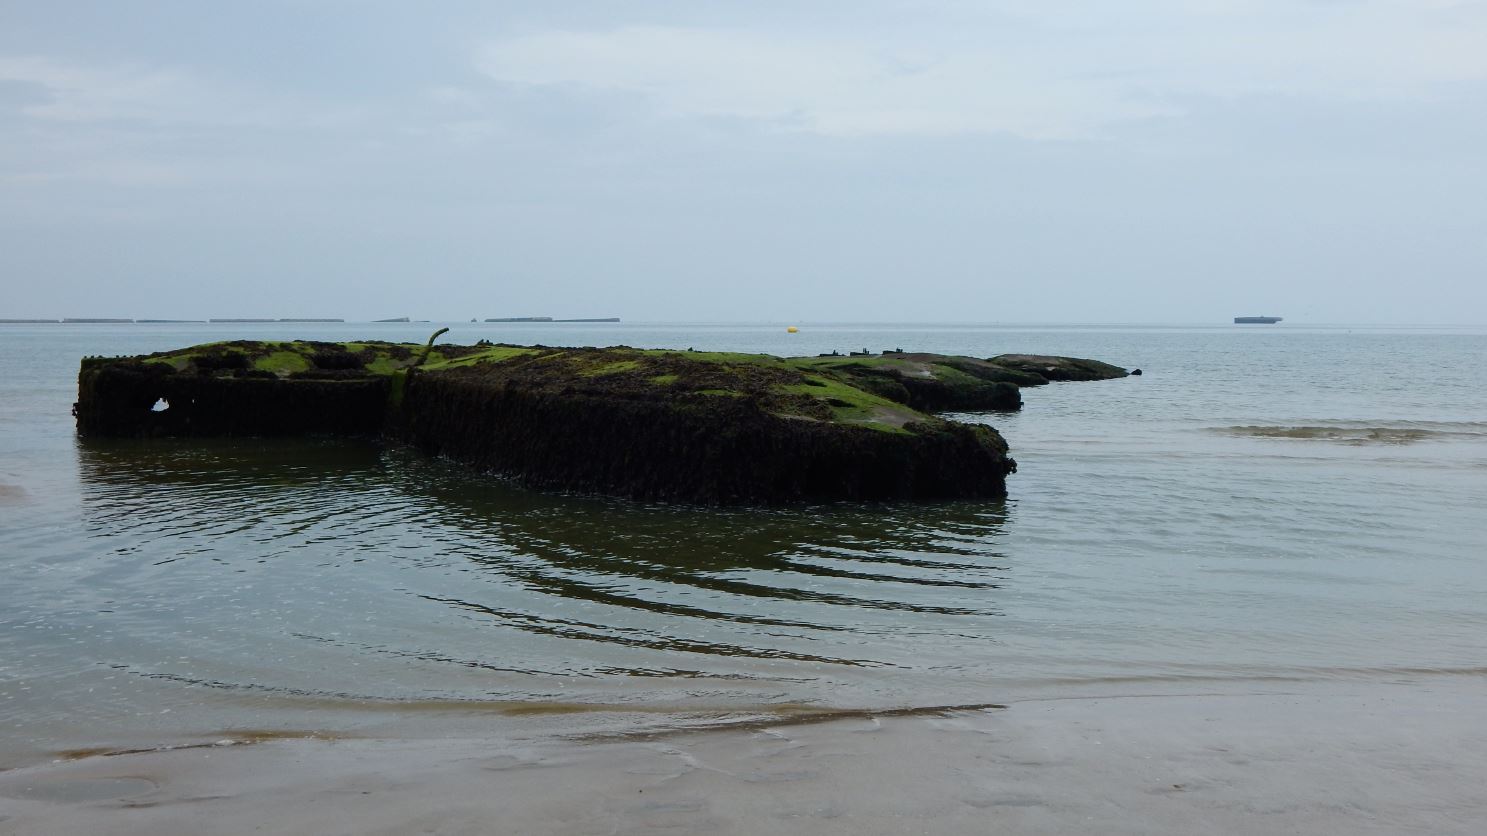 More of the Mulberry remains.