










Ultramodern Wargaming – Ukraine 2024



Recommendations: 13004
About the Project
Lately, I've been running war games every weekend with members of the community via web conference. Players log on and play wargames with each other in real time, regardless of location, and we usually have at least a couple spectators as well. Many times it’s been Darkstar, but we’re also running wargames in Panzer Leader, Arab-Israeli Wars, and now Valor & Victory.
BoW/OTT community members @brucelea, @damon, @davehawes, and @rasmus have taken the plunge, leading battalions across thousands of meters of desert, starfleets in pitched battles across the heavens, or vicious firefights in the jungles of Vietnam, all without leaving the comfort of their home.
Hard-core, old-school command-tactical wargames can now be run (complete with spectators and recordings) in real time, with BOTH PLAYERS moving pieces across THE SAME virtual game board, thus maintaining player agency, speedy and instant results (no play by e-mail), interwoven turn sequences, any questions / feedback instantly received and addressed, and with the game being virtually recorded as it goes, a ready-made battle report can actually be created as we go.
All of this without the players having to install any new software on their computer, on any platform (PC or Mac). All that's needed is to agree on a time, a handful of dice, and a bellyful of courage!
Every weekend can now be a boot camp! All without costing me thousands of dollars in airfare, too!
Related Game: PanzerBlitz
Related Genre: Historical
This Project is Active
Open invite to community - WARGAMING THIS WEEKEND
Good afternoon, everyone ~
After an amazing weekend at the Fort Lauderdale Air Show, I am back and it’s time to start planning for another weekend of gaming.
If anyone wants to play in any of the wargames listed below, please send a PM to let me know what game, what day and time, and which faction you’d prefer, as soon as you can so I can start building the scenario.
All you need is an internet connection. No software download required, it’s just a web conference. You can either play or just hang out in the web conference, chat, and watch if you’re interested. I just send you the link if ping me with a PM.
Options (Saturday or Sunday 1700 GMT):
- Darkstar (please let me know what faction you’d prefer)
- Valor & Victory (VWW1, WW2, Vietnam, Lebanon, or even Falklands if I can get some counters and maps put together)
- Arab-Israeli Wars (1956, 67, 73, or 82 Lebanon)
- Tactical Combat Middle East (Panzer Leader in 1991)
- Panzer Leader WW2 as always. 😀
- AirWar C21 for the Falklands, 1982.
- First test of NAVAL COMMAND for Falklands, 1982?
- Again, IF INTERESTED – either in playing or in spectating, please let me know.
I would like to keep SUNDAY something MODERN-THEMED (Falklands Naval Command, Falklands AirWar C21, Falklands Valor & Victory, Arab-Israeli Wars, Gulf War, etc). We will probably be streaming this Sunday Modern game live on Twitch a well.
First come first serve, and I need time to build the scenarios.
I’ll send another e-mail later this week to confirm and send the link. 😀
Hope to see some of you there! Either way, have a great weekend!
JIM
ANZACs in Vietnam - Elessar vs. Oriskany
As part of our ongoing weekly web wargames, Sitrep content for modern warfare, and our small way of observing the recent ANZAC Day, @elessar2590 and I streamed another great game of Valor & Victory: Vietnam. The game pitted Elessar’s Australian infantry (“A” Coy, 7th RAR, 1st ATF) against elements of a VC / NLF main force battalion, Phuoc Tuy Province, summer 1968.
The game is available on our Sitrep Twitch Channel in its entirety (about a 3-hour game). In addition to the “modern-era” house rules for helicopters, casualties, POWs, and civilians, I also rolled out new experimental rules for obscured movement for the Viet Cong. Basically, all VC units are “masked” until they are spotted, either by moving adjacent to Australian units, Australian units moving adjacent to them, firing on Australian units, or just being in an open hex in Australian line of sight.
Let’s see how the new rules work out!
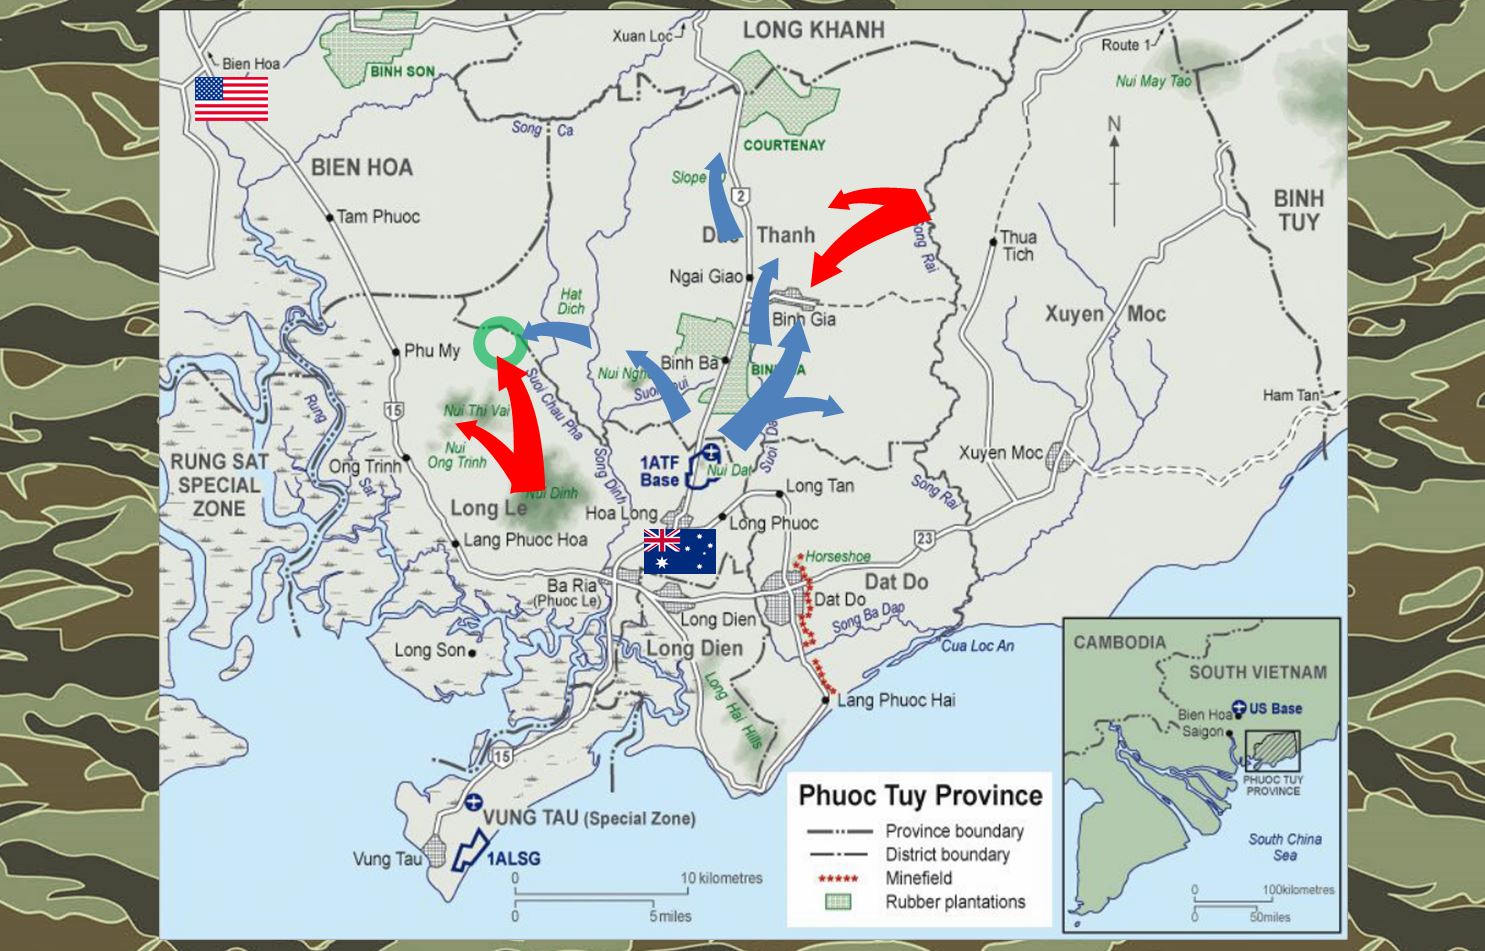 So here’s the general background. The Australian forces in Vietnam were mostly part of the 1st Australian Task Force, or ATF, which operated almost entirely in the Phuoc Tuy prince, southeast of Saigon. What we see here in the summer of 1968 is the aftermath of the Tet Offensive of January-February, where NLF and NVA / PAVN forces hit he Americans at Bien Hoa (upper left) very, very hard. This was a MAJOR battle of the Tet Offensive, as Bien Hoa and Long Binh were the HQ of II Corps. The Americans won that battle, but as Vietnamese forces tried to withdraw from the fighting, they ran across Australian blocking forces that forces some very brutal battles. Imagine a wounded animal trying to fight its way out of a trap or out of a corner. Faced with certain extinction, the NLF VC hit the Australians very, very hard here in desperate efforts to force an escape route. The Australians ensured very few made it. In today’s game we see some of the mopping up of these spring actions, with Australian airmobile companies moving into to former VC base areas to clear last embers of post-Tet resistance.
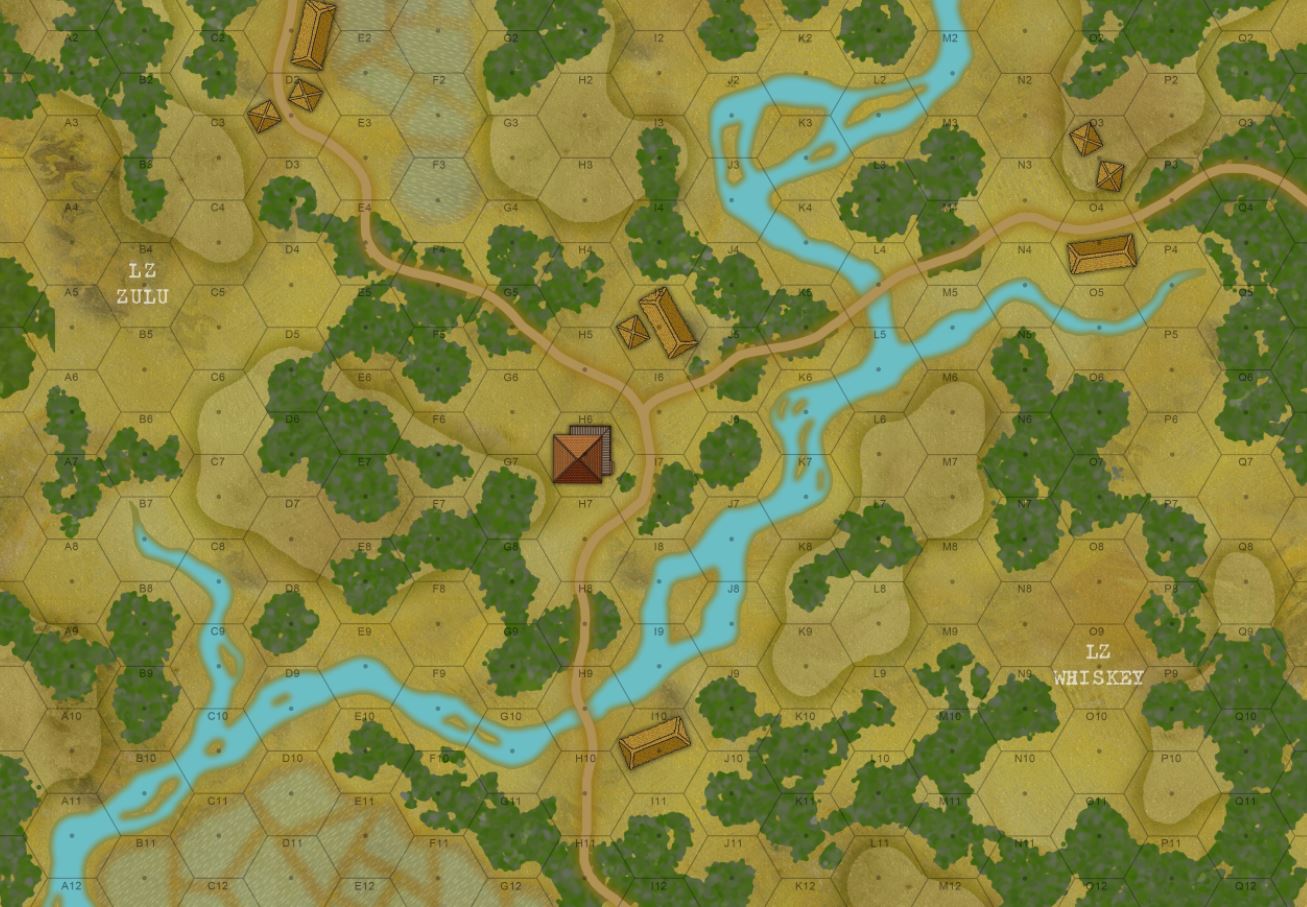
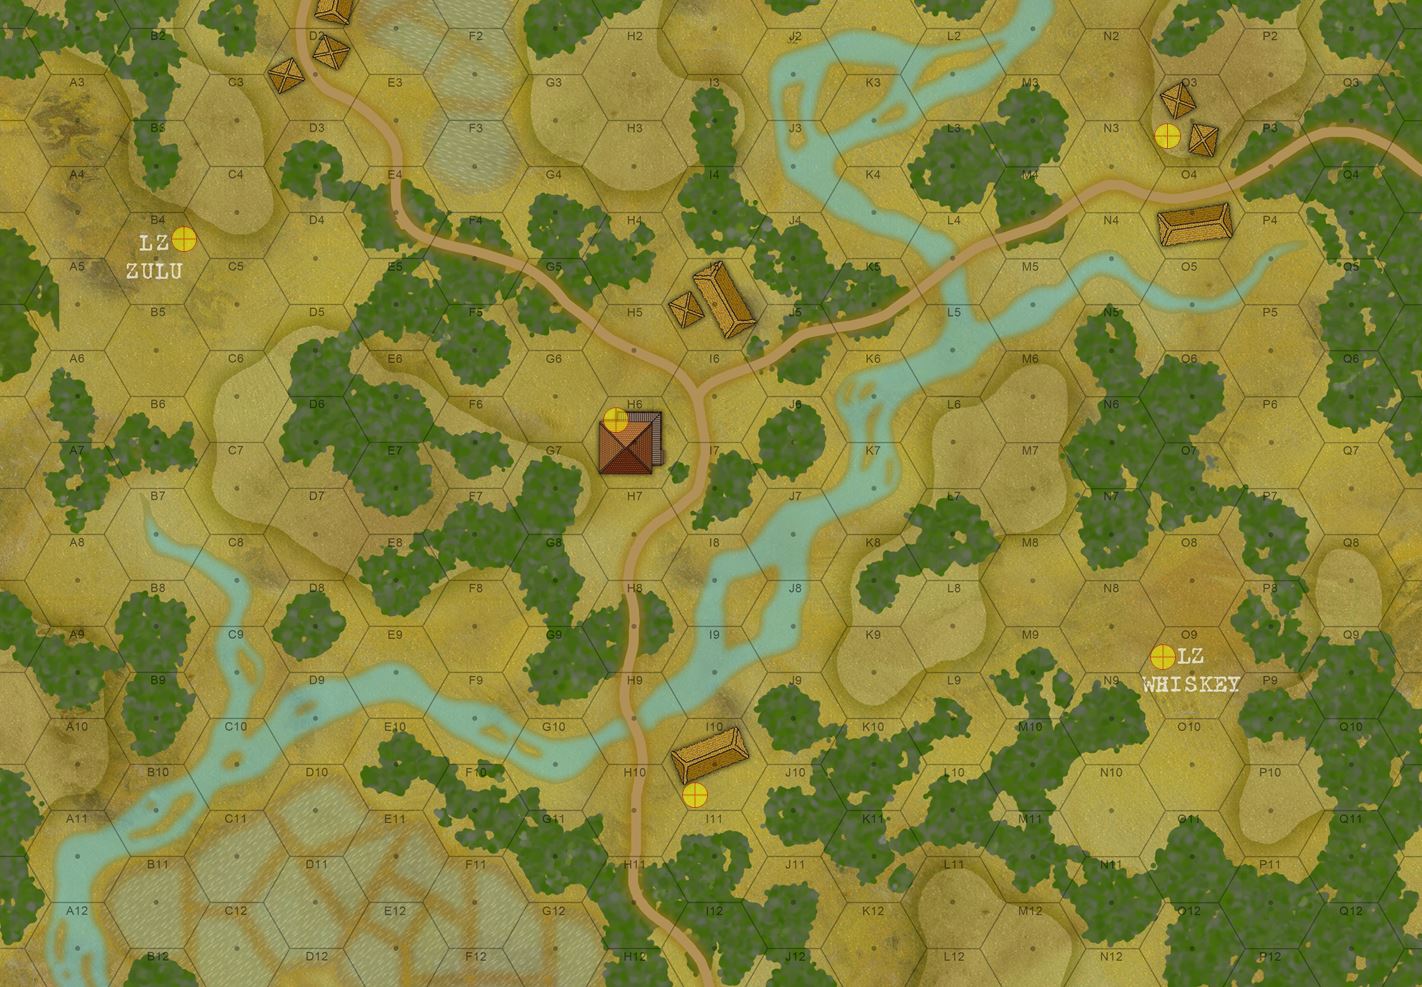 The map for today’s game. Elessar2590 is charged with taking as many of these objective hexes as he can (marked with yellow targeting symbols). Three are the usual crossroads and villages. Two more are designated LZs that battalion has earmarked for the next phase of this sweep and clear, LZ Zulu to the west and LZ Whiskey to the east. My forces set up anywhere they want on the map, ALL MASKED. Commanding a reinforced heliborne platoon, Elessar can enter the map from any side he chooses. He has six turns to get the job done. Now he WILL win the battle, Free World firepower and mobility and off-board assets (battalion 81mm mortars and even helo gunships) just make this a no-brainer. But will he win the GAME? I get a lot more victory points for every Australian casualty. I also have civilians I can hide behind, I start off masked, I get booby traps, and Elessar will never know exactly where I am until he actually hits me (and I have taken the first swing with opportunity fire). He also has to evacuate casualties, if I “capture” any of his casualties that is very, VERY bad news (and many more victory points for the VC). We’re really going for a Vietnam “sweep and clear” vibe here.
 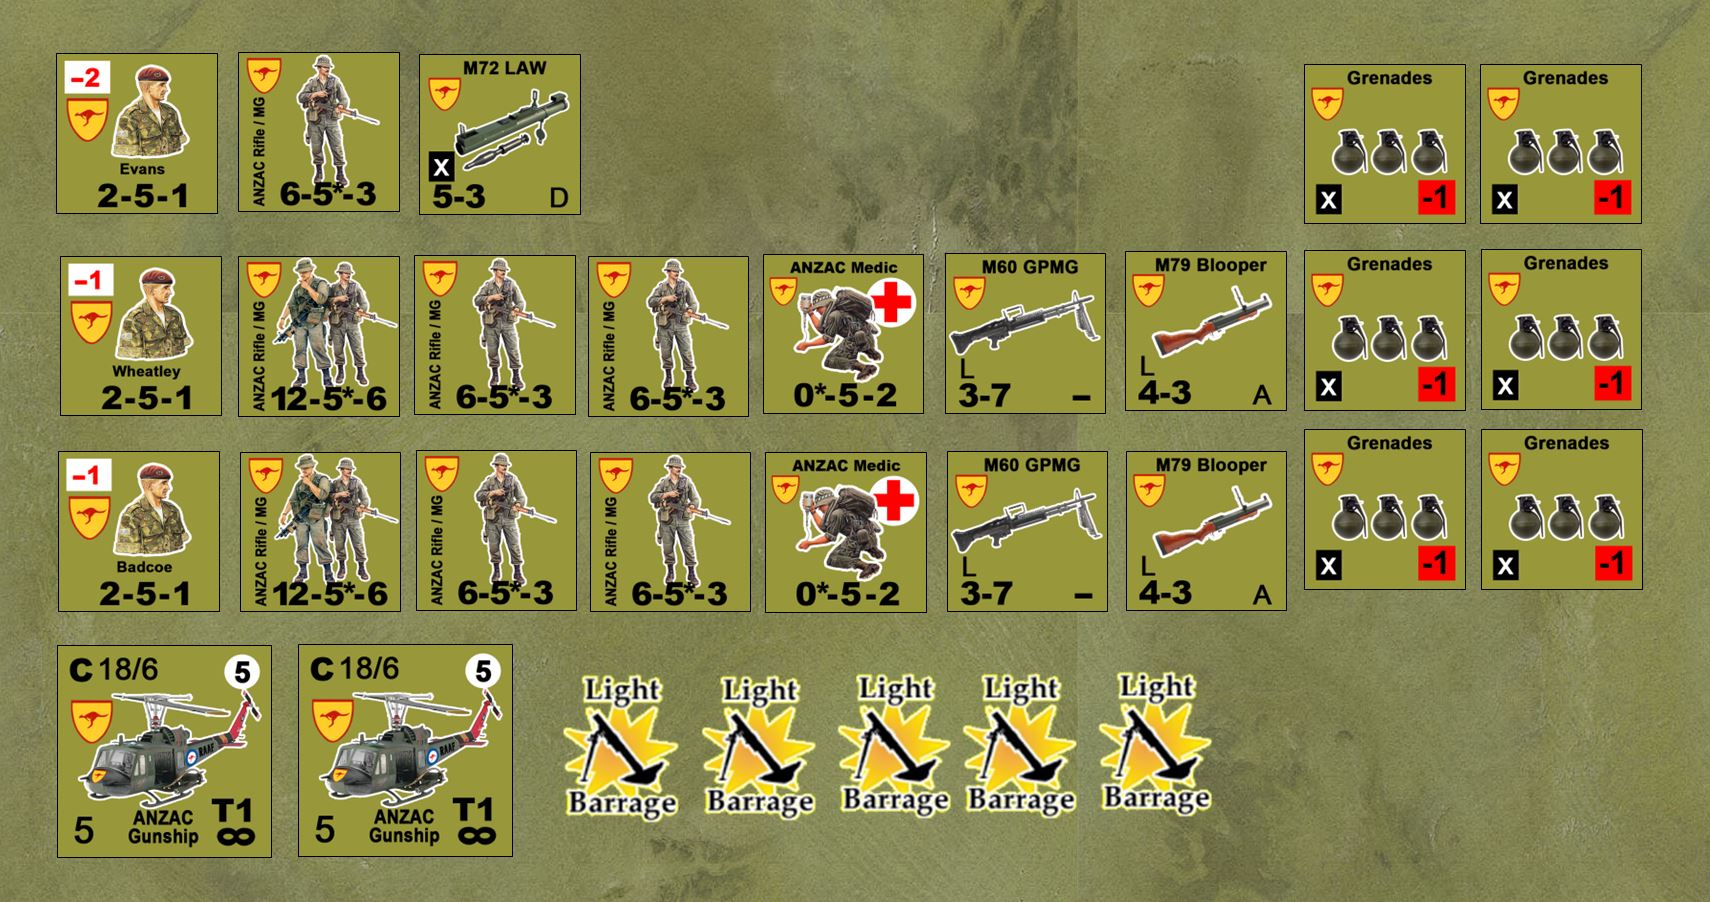 Australian forces. We have Lt. Evans commanding the force (a reinforced platoon), with two senior sergeants (Wheatley and Badcoe) leading the two major sections. 6-5-3 are four-man fireteams. 12-5-6 are full eight-man squads. Two two-man medic teams are ready to evacuate casualties. Support weapons include an M72 LAW, additional M60 GPMGs (in addition to those already “baked” into the fireteams), and M79 Blooper 40mm break-open grenade launchers. Five 81mm mortar fire missions are available from battalion, and two UH-1H gunships are available for fire support, emergency transport, and even spotting missions if required.
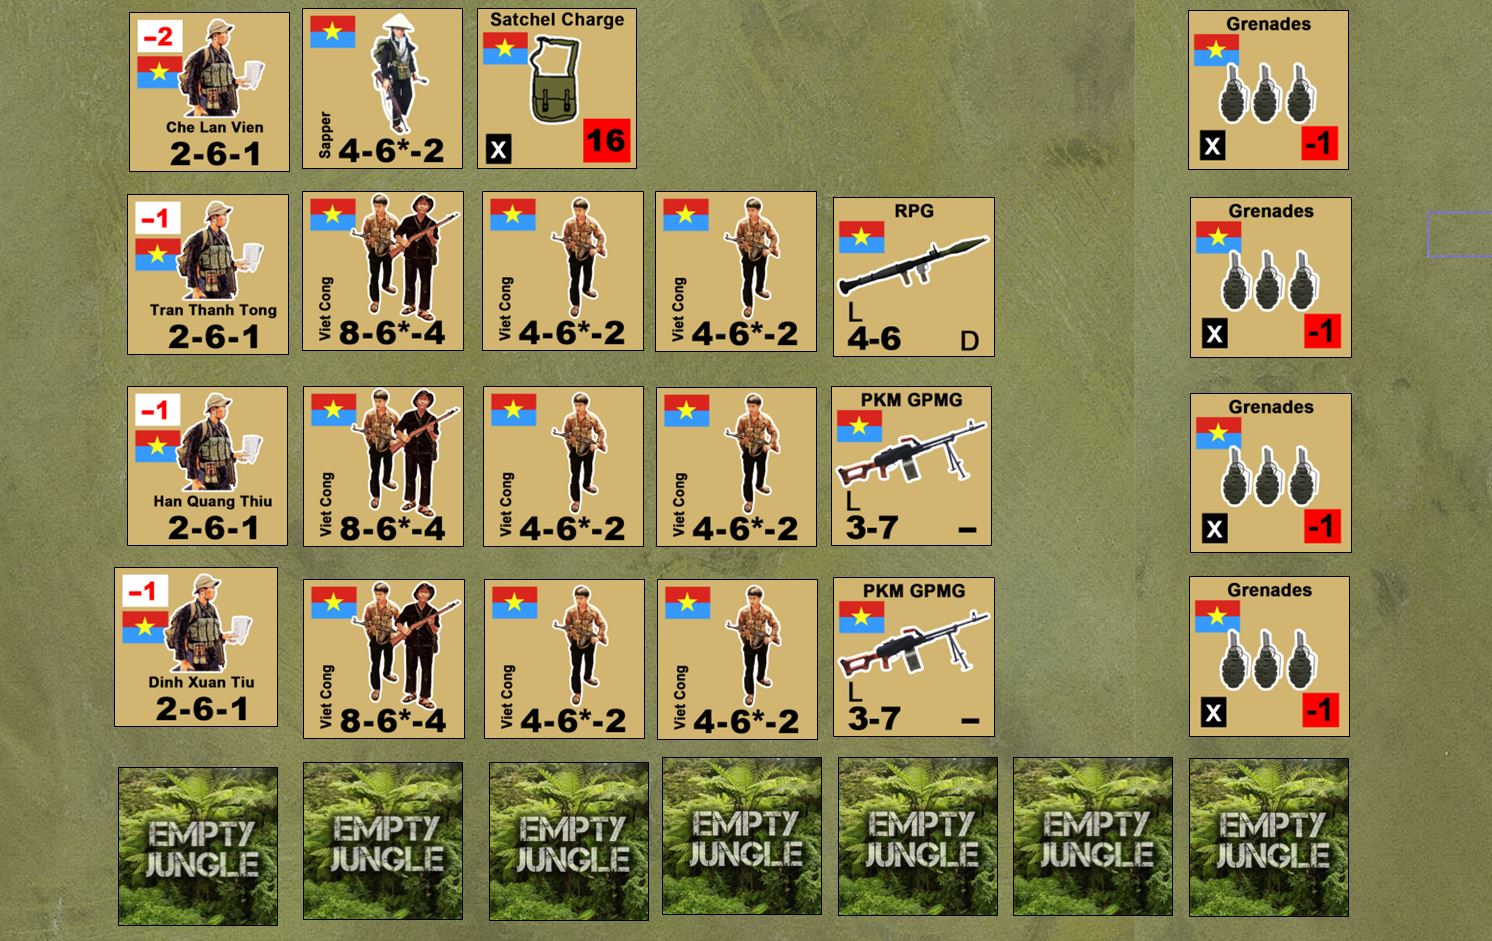 The NLF / Viet Cong force, naturally, is larger but of poorer quality. Note the lower combat values on the counters and far fewer support weapons. Secondly, I have no off-board artillery or (of course) helicopters. Again, however, booby traps are all over this map. Any time Elessar moves an infantry unit, he has to make a roll to avoid hitting one. Also, there are civilians, which will hamper his movement and fire but not mine. Finally, all my units are MASKED, and some of those masked units will be the “Empty Jungle” dummy counters along the bottom. Essentially this adds a fog of war element to the game, at least for the Australians. I always know where his units, he never knows for sure which masked counters are “real” and which are dummies, until I open fire and hopefully knock down that poor bastard on point.
 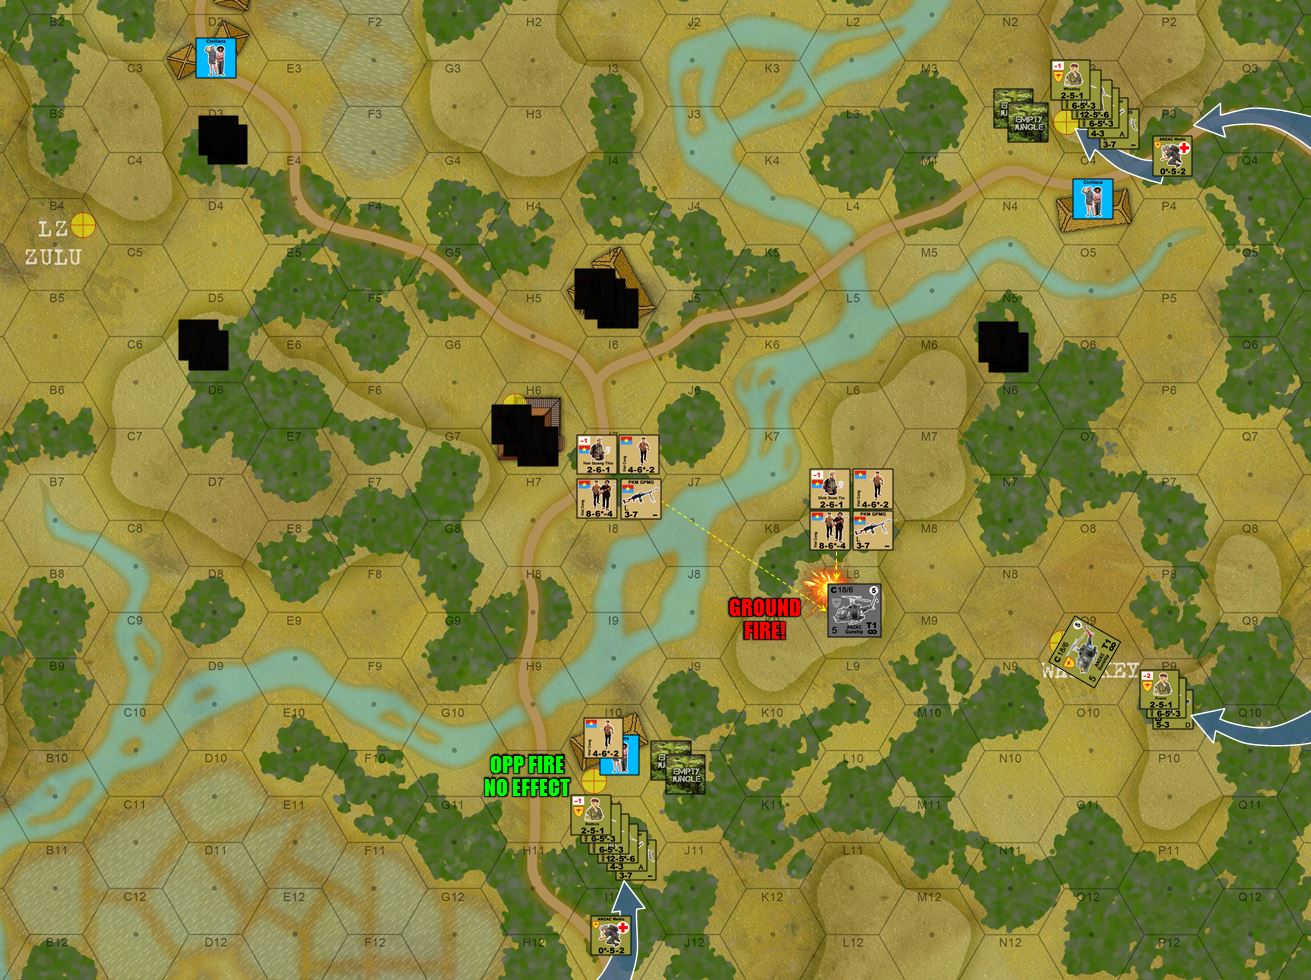 Okay, so here he comes. Sgt Badcoe leads his section on from the south, heading for that first hooch. There are three masked counters in that first hooch hex. Two are dummies. Elessar would love to assault the hex, but he can’t because CIVILIANS have moved in there (neither side really controls the civilians, they move almost like zombies in The Walking Dead). So I take free point-black opp fire on him from my hooch. THEN I get to shoot at him again in my turn. All the while, Badcoe’s section HAS TOHOLD THEIR FIRE because of those civilians. Elessar also sends in Sgt Wheatley’s section to the northeast, assaulting a hooch only to find there are only EMPTY JUNGLE counters in the hex. “I swear, Sarge, I could’ve SWORN I saw something move in there!” A wasted assault, and a sobering reminder that you never really know where the VC is. In the center (from the southeast), we have Evans and his command section, supported by two Huey gunships. I decide to reveal two of my positions here by opening fire on one of the helos, and I come DAMNED CLOSE to knocking one of them down. Literally one more point of damage would have done it. Smoking and shaking, the pilot veers off for now, probably dealing with wounded crew or a fire aboard his bird.
 Once the helo recovers, however, it releases its frontal MGs, door MGs, and wing-mounted rocket pods. The other helo, also fires its machine guns, but reserves its rockets for now. Good call, because the firepower of these two birds is enough to all but wipe out Lt. Tiu’s 12-man section (full squad plus PKM machine gun section). But who is that to the north? Are those “real” VC units?
 Let’s find out, shall we? Lt. Evans rushes up with his four-man fire team (carrying the LAW). Now if he wants to assault this hex, he has to declare it before I reveal what these counters are. Turns out ONE counter is a dummy, the other is real. The opp fire pins Evans, and the VC and Australian team basically destroy each other in the assault that follows. When Evans rallies, he will move up to the assault hex and evac the casualty.
  With more VC positions spotted and fixed (at some aggravation and delay), the Australians call in battalion mortar support. Two of the missions hit on target, the third drifts. Two were enough, though, given Elessar’s dice on this throw. Thiu’s 12-man section is WASTED.
 Here’s where it gets serious. So feeling the pressure of time, Elessar2590 hurls Sgt Wheatley’s section in a right hook over that northern stream, down into the hooches with three masked counters. No dummy counters here, that’s Lt. Tong and a full squad, including an RPG. Opportunity fire MAULS Wheatley’s force, putting down a full squad (two casualty markers). The assault is cancelled. On my turn, however, I flank him twice in a double envelopment! As I move up, one of those flanking assaults is revealed to be DUMMY counters (just trying to see if I can make Elessar cry for a moment here ... :D ) Australian opportunity fire tears up Tong’s platoon. The remnants of Tong’s platoon (including two more fire teams I’m bringing up from the rear) tries to toss in some direct fire before I launch a counter-assault of my own. BUT I ROLL DOUBLE SIXES! Box Cars are the worst roll in this game, not only do I miss but an Australian sniper appears and immediately puts down the rest of Tong’s section! STILL, I have more VC forces, Captian Vien and his female sapper section, who just happens to be carrying a SATCHEL CHARGE! In goes the satchel charge as part of my assault, which yes ... WIPES OUT Wheatley’s force, but my own assault is now so weak (only five people, Vien plus four women in the sapper team), is also lost. Long story short, ALMOST everything you see here is destroyed. Last VC survivors are PINNED, which means they can’t move into Wheatley’s former hex. This is big news, as it means that those four Australian casualty markers remain uncaptured. If Elessar can get help to them and evacuate them in time ...
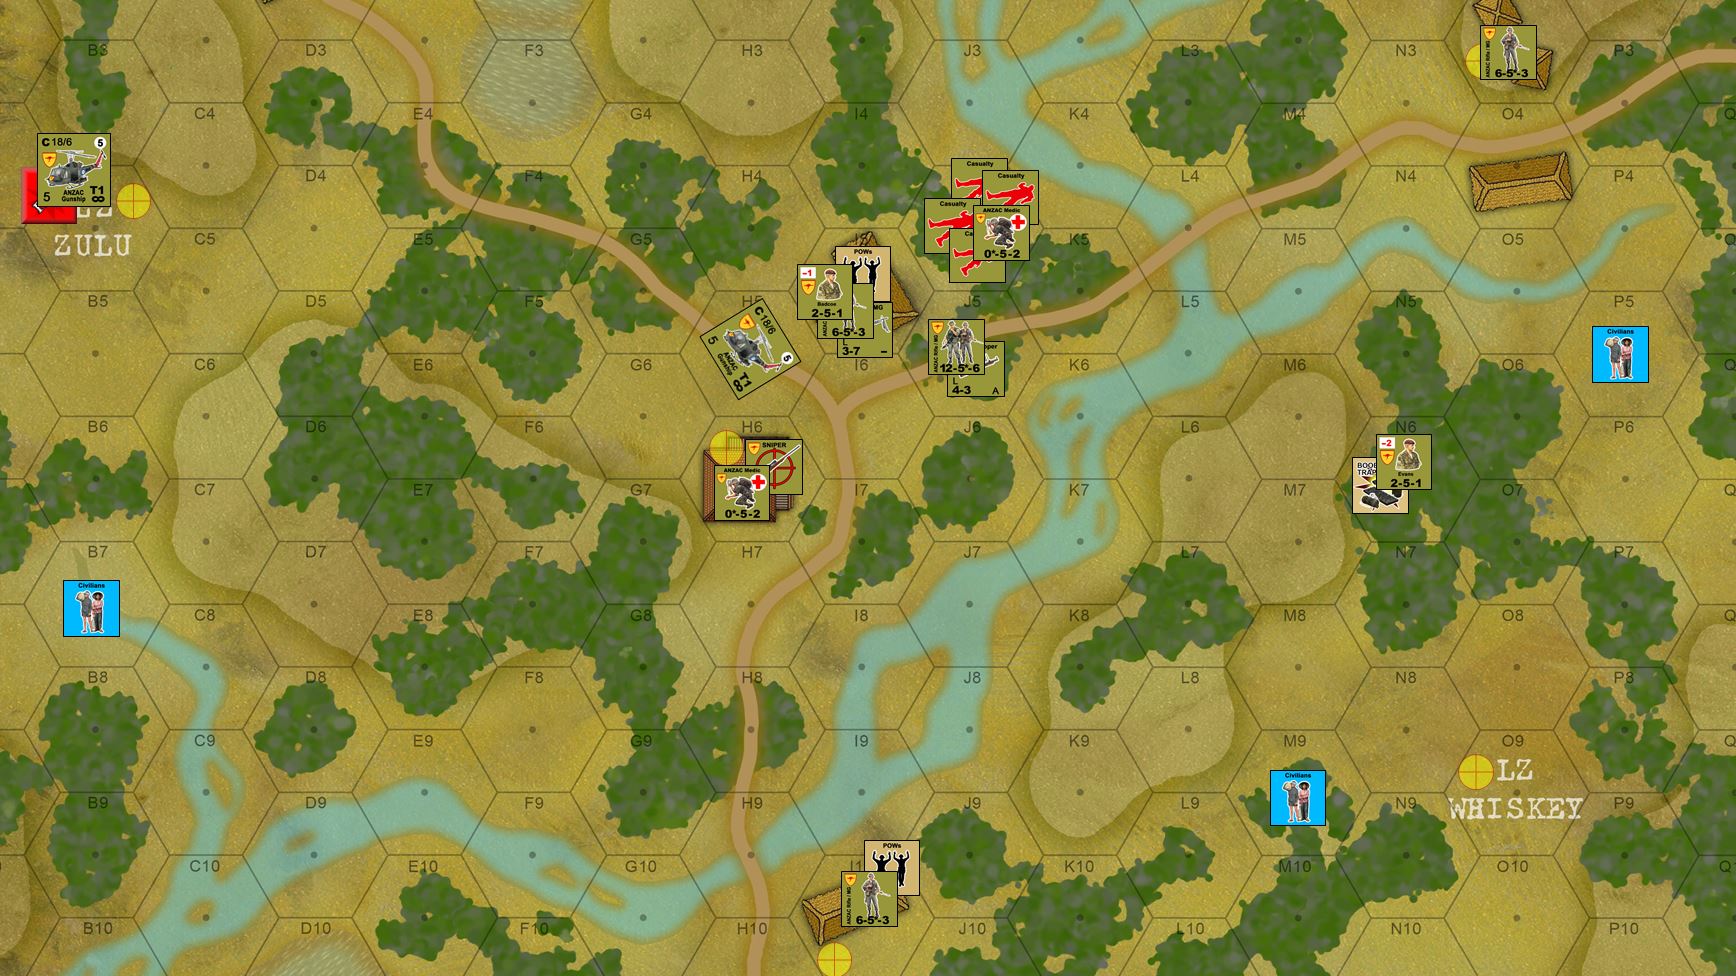 The final situation. VC losses re, as expected, total. When those civilians FINALLY moved out that southern hooch hex, Bedcoe quickly pasted the VC team in the hex and moved up to support the overall assault on the crossroads village. They assault the VC survivors (who failed to rally) and remove the threat to Wheatley as his casualties. Wheatley’s medic (not in that earlier bloodbath) moves in and starts evacuating wounded. One of the helos lands at LZ Zulu, securing it (a dangerous move to occupy objective hexes with helos, as helos are terribly vulnerable while landed ... but with no VC on the table now, it’s safe enough). Bedcoe’s medic moves into the hooch to where the sniper happened to appear, not only to occupy the objective but also to get his name (you totally saved Wheatley’s section and undoubtedly the game, mate).
 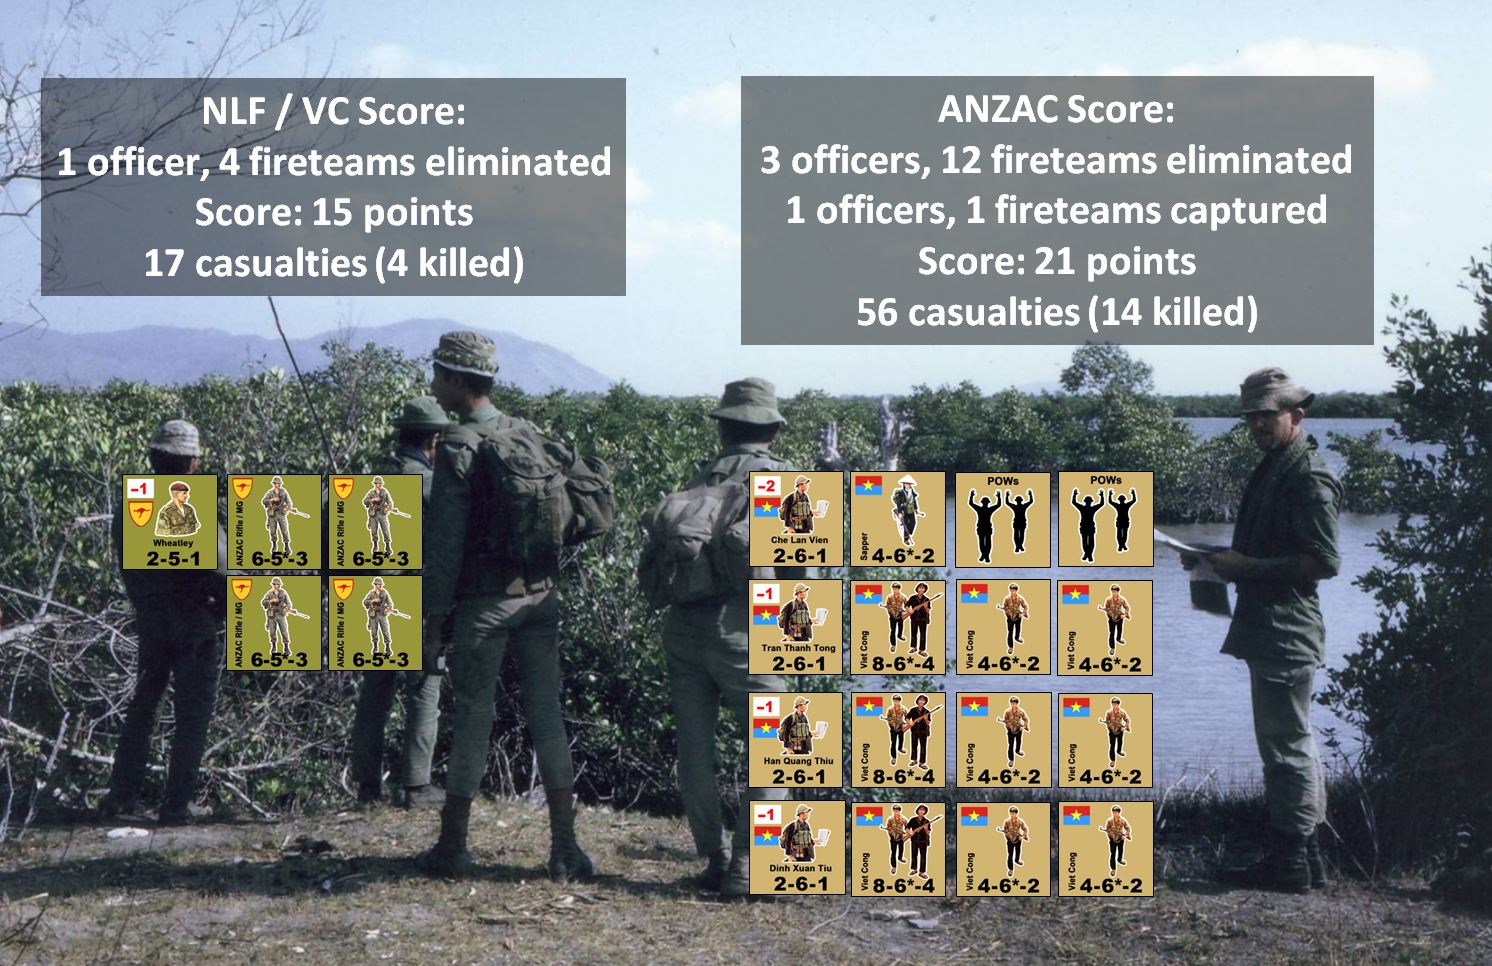 The score sheet for the game. Final score is 15 VC to 21 Australian. I have been thinking VERY hard about bumping the “Free World” casualty cost to 4, I could have sworn I did it for this game, but the victory conditions as written still has the 3 points. Even at four points, Elessar still would’ve won 21-20, but it would have been a much closer call. This is the kind of morbid, borderline excessive caution I’m trying to get into these games from the Free World forces (US, USMC, Australian, Israeli, etc.) in these modern V&V games, a real asymmetrical possibility of “winning the battle but losing the game.” For these regular armies in a counter-insurgency role, every casualty is a defeat, and a propaganda victory for the insurgent enemy. So what did you think of the game? Congrats to Elessar2590 for the win!
Live Stream at 9:00 PM UK time (4PM ETZ) - ANZACs in Vietnam
Good afternoon, OTT! We have a live stream going on the Sitrep Twitch Channel at 9:00 PM UK time, where we’ll see if @elessar2590 can lead his Australians in a successful “seek and destroy” patrol against my National Liberation Front Viet Cong (Phuoc Tuy Province, summer, 1968).
The game system, will be Valor & Victory, adopted and expanded to Vietnam. Vietnam-specific rules will include civilians, POWs, casualty evacuation, booby traps, helicopters, and obscured / hidden movement for the Viet Cong.
Check out the stream and see how we do! Hope to see some of you there!
Naval Command: Falklands
I’ve spent most of today gearing up Rory Crabb’s Naval Command system for play in the Falklands War. With a ground scale of 1cm = 1 nautical mile (roughly 1:180,000) this is really the only kind of game that even comes close to representing the scope of modern naval operations. In physical play, the table is usually 6 ‘ x 4’, and the ships re often 1:3000 with groups of aircraft represented by counters at 1:300 or 1:600. (6mm or 3mm).
Of course, to facilitate play online or take screen shots to use in battle reports of use in future Ops Center episodes, I’ve been building everything virtually.
Of course, given the historical course of events, this kind of thing might wind up being more of a “campaign tracker” than an actual live game. Then again, we can always run with the suggestion of a hypothetical game where the Argentinian Navy masses together for one all-out strike at the British, and we actually get the latter-day sea battle that (thankfully) never really happened.
Let me know what you think, or whether you’d ever be interested in trying this out over the next couple of weekends online.
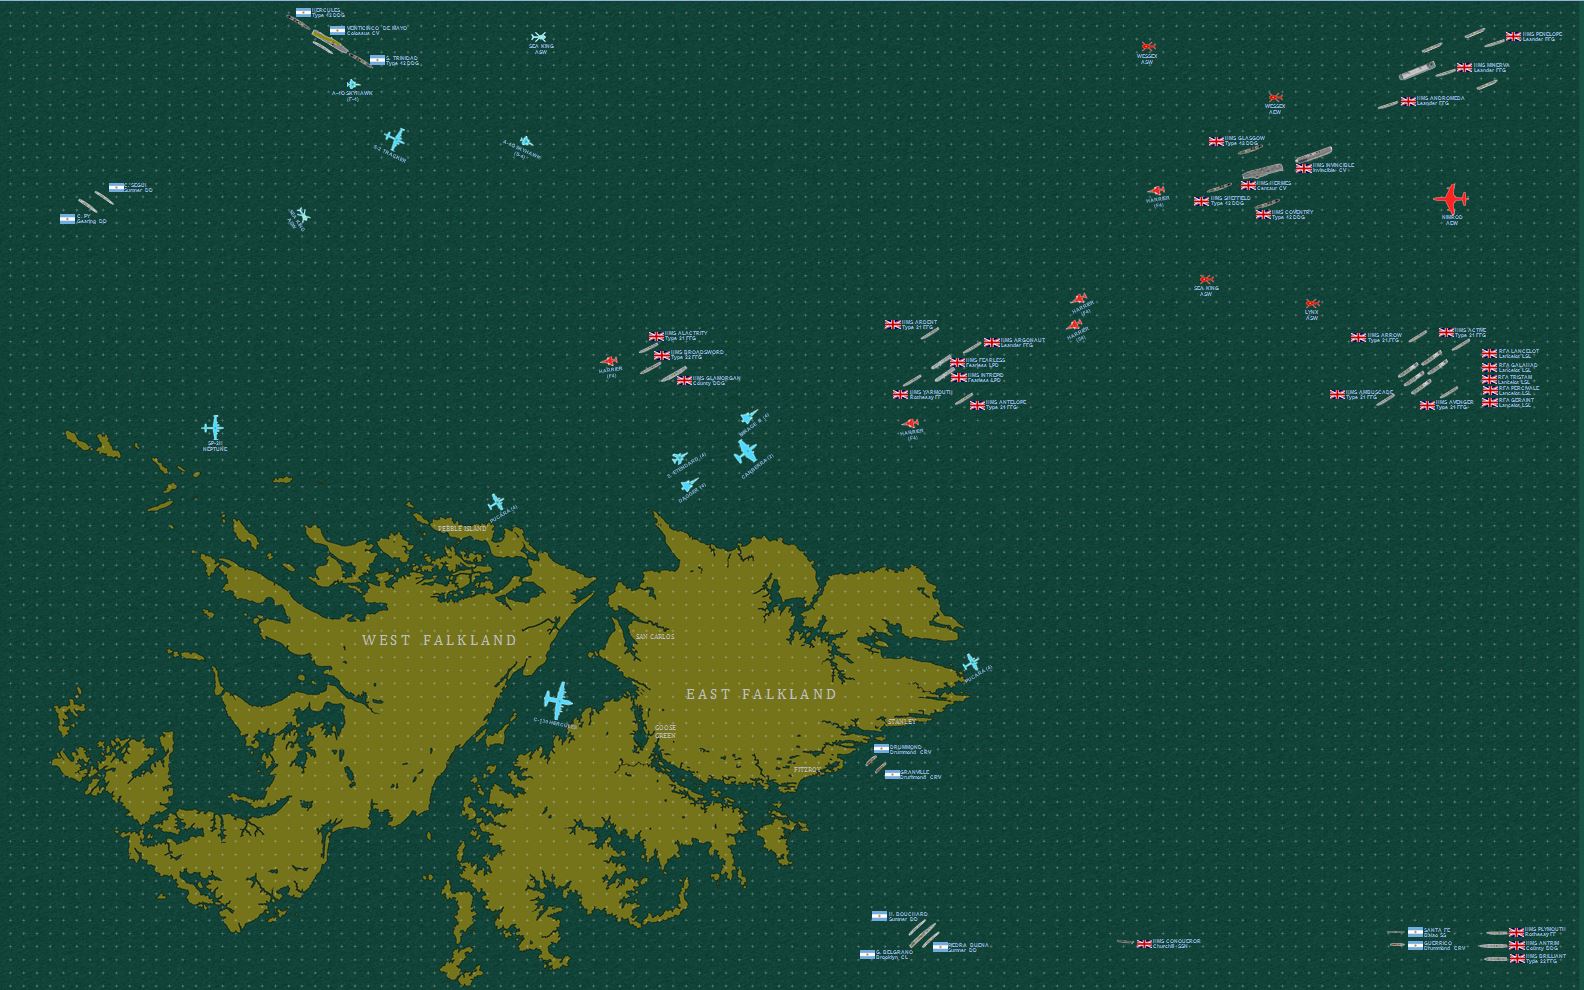 Starting off, I have a 10-foot map here (120 inches across, each grid is 1"). So, converting the game from centimeters to inches, I'm landing on ROUGHLY 1" = 2nm, which is what is scaled out here. Obviously the ships are not to scale with the map (although they are to scale with each other). Same with the aircraft, with a yellow dot in the center of each piece showing the group's actual location on the map. This map shows just about everything the two sides had INITIALLY, although of course they were never all crammed this close to the Falklands all at once like this. This is meant simply as a staging file, which can be copied and used to quickly build future scenarios by selecting items off this "shopping list." Or, we could run an alternate history all-out sea clash ...
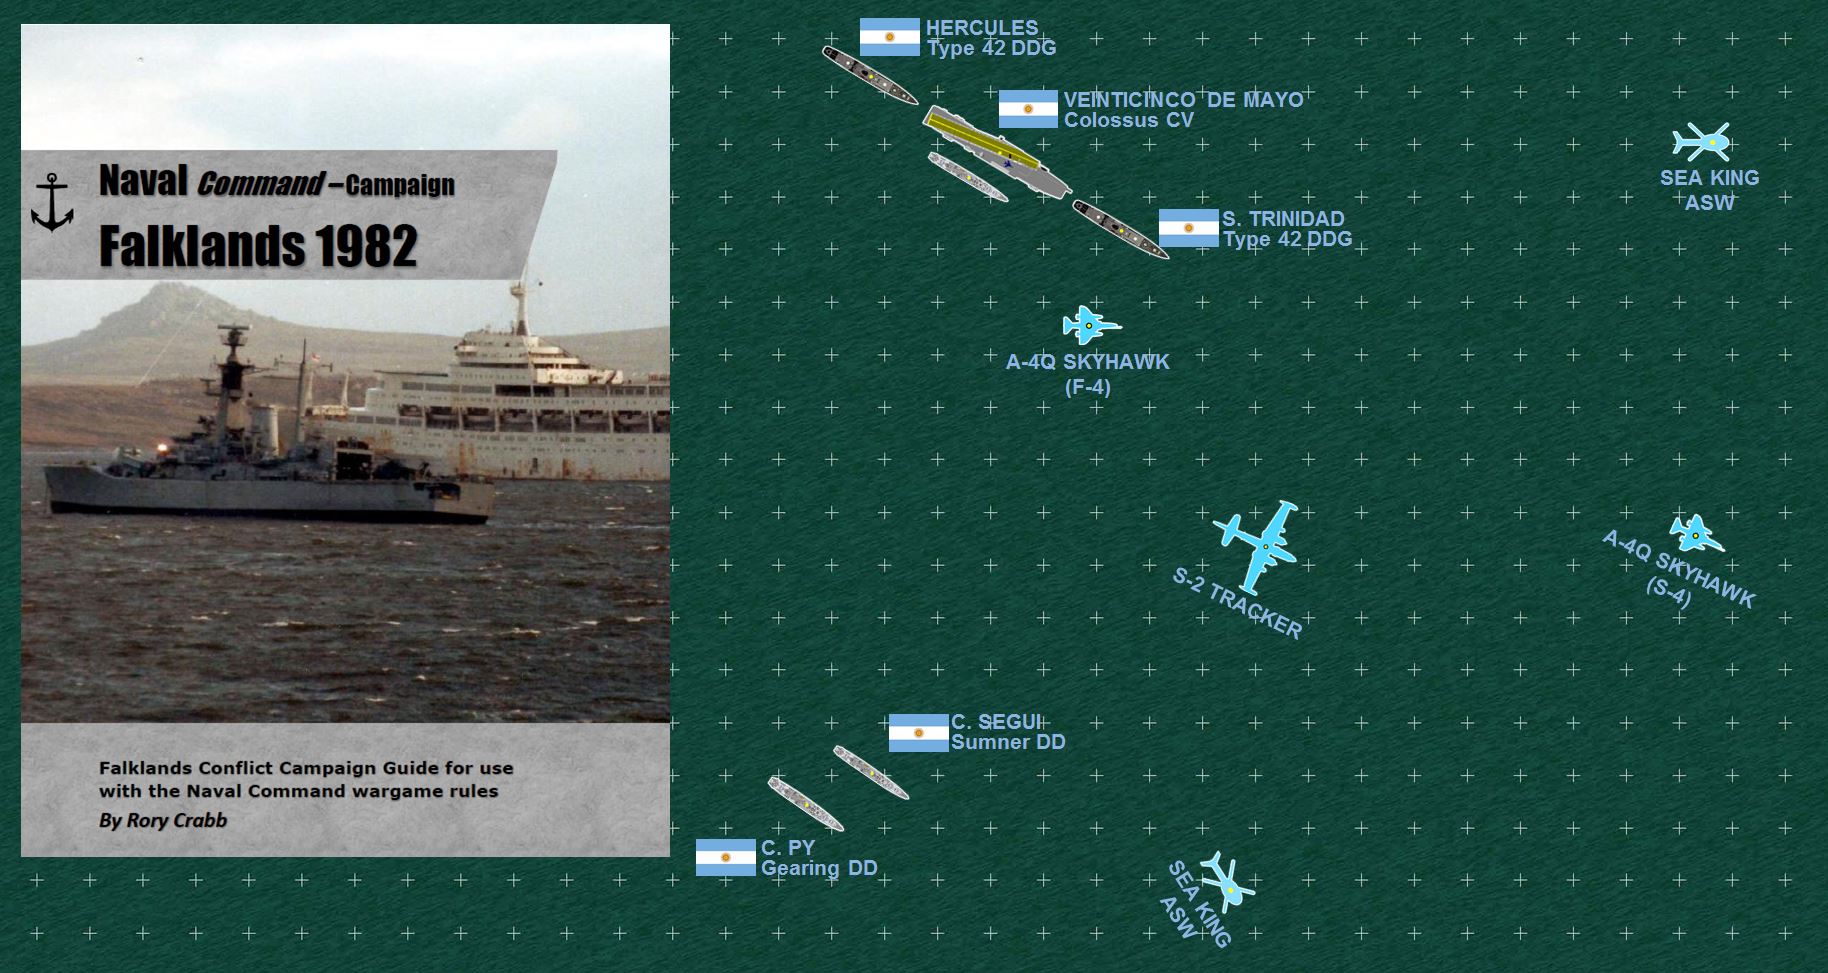 The Argentinian carrier task force, comprised of the ARA Veinticinco de Mayo and her escorts. You can see where the carrier has launched four Skyhawks on a strike mission (S-4, historically this never happened), while keeping four Skyhawks back in CAP in a "fighter" configuation (F-4). Sea King ASW (antisubmarine warfare) helos have also been launched, as well as an S-2 Tracker, keeping a wary eye out for HMS Splendid (submarine sent to sink Veinticinco de Mayo) or other British warships. Aircraft are huge in this game. Detection and electronic warfare are everything. There is no armor, and all weapons automatically hit, if they find you and reach you. Your "armor" is your electronics. Welcome to modern naval warfare.
 The spearhead of the British amphibious landing force approaches the north coast of East Falkland, and is about to attacked by a major Argentinian air strike launched off the mainland. Those British destroyers and frigates have SAMs at the ready, however, and of course two flights of FRS1 Sea Harriers are vectoring in to intercept. The Mirage IIIs and Daggers will mix up in a dogfight, while the Canberras and Etendards make their bombing runs.
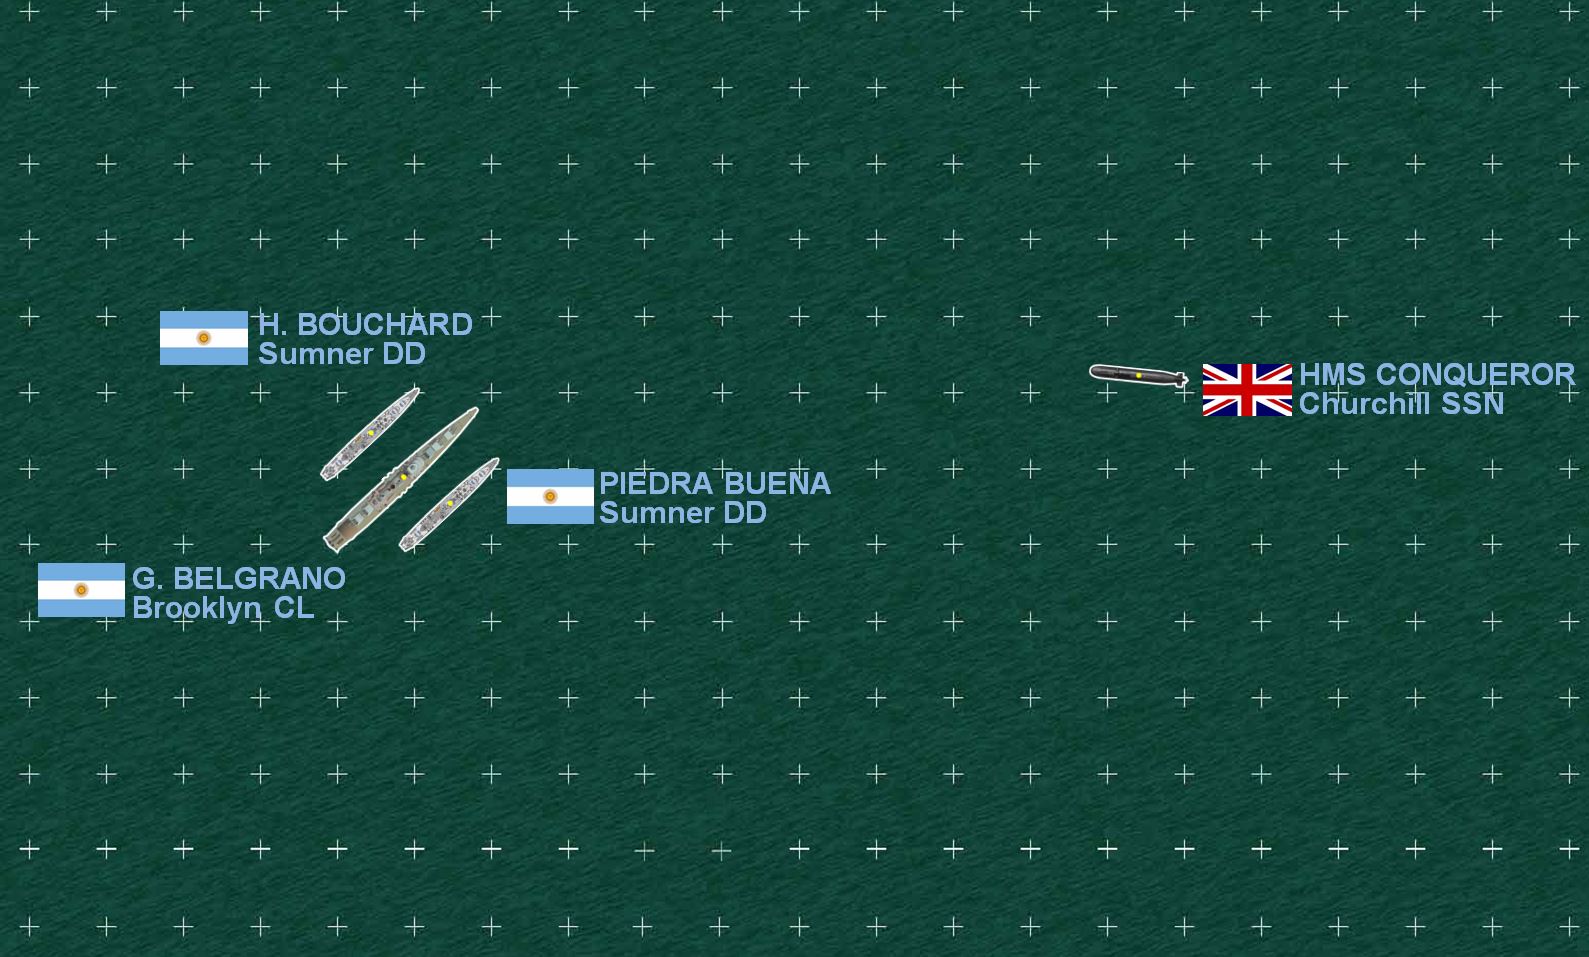 The one major part of the naval war that really did happen, the fateful encounter between the British nuclear submarine HMS Conqueror and the Argentinian cruiser Belgrano. Note there are no ASW helos launched, dropping sonobuoys or ASW torpedoes. That's because Belgrano is an old American WW2 light cruiser, and her escorts are old American WW2 Sumner class destroyers. No helicopter pads. Not good. In modern naval combat, helicopters play an absolutely crucial role - not so much in combat, but in keeping your fleet safe, and keeping you informed.
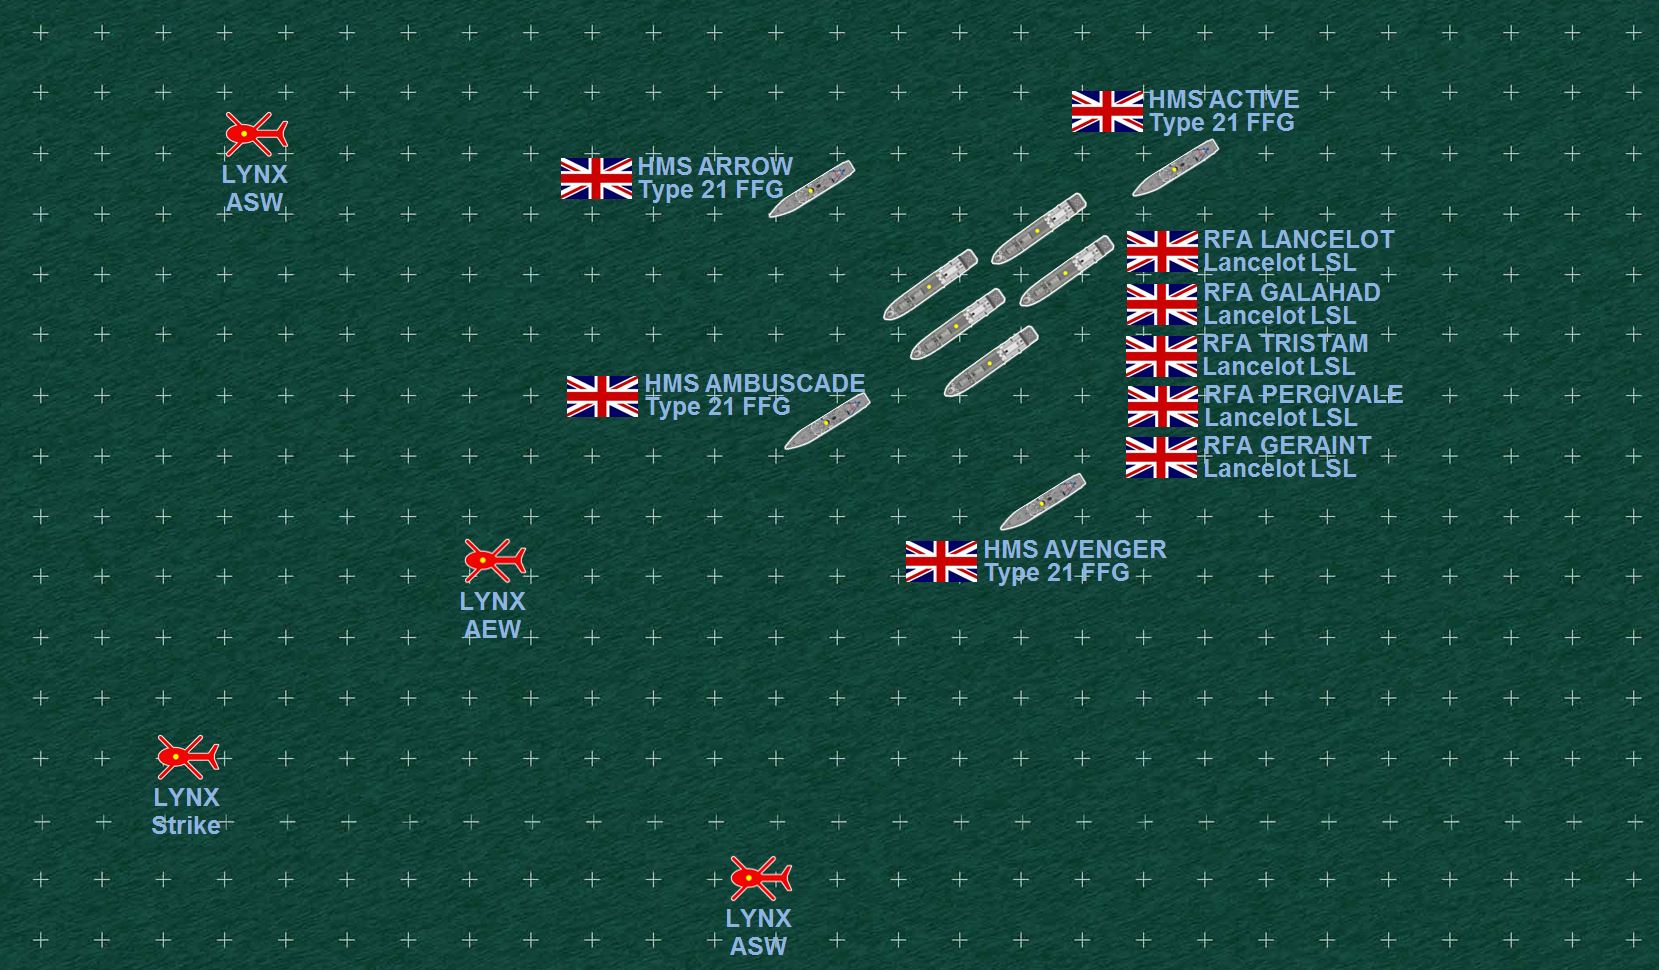 In contrast, the leading element of the British support fleet (made up of five "Round Table" logistic support ships - escorted by British frigates) has plenty of helo support. Each of these little British warships carries a Lynx helicopter, which can be configured for ASW, AEW (airborne early warning), strike, or transport roles. The Argentinian Navy did have a handful of older submarines, only one of which (ARA Santa Fe) had so far been accounted for. When it comes to enemy submarines, caution is always a good idea.
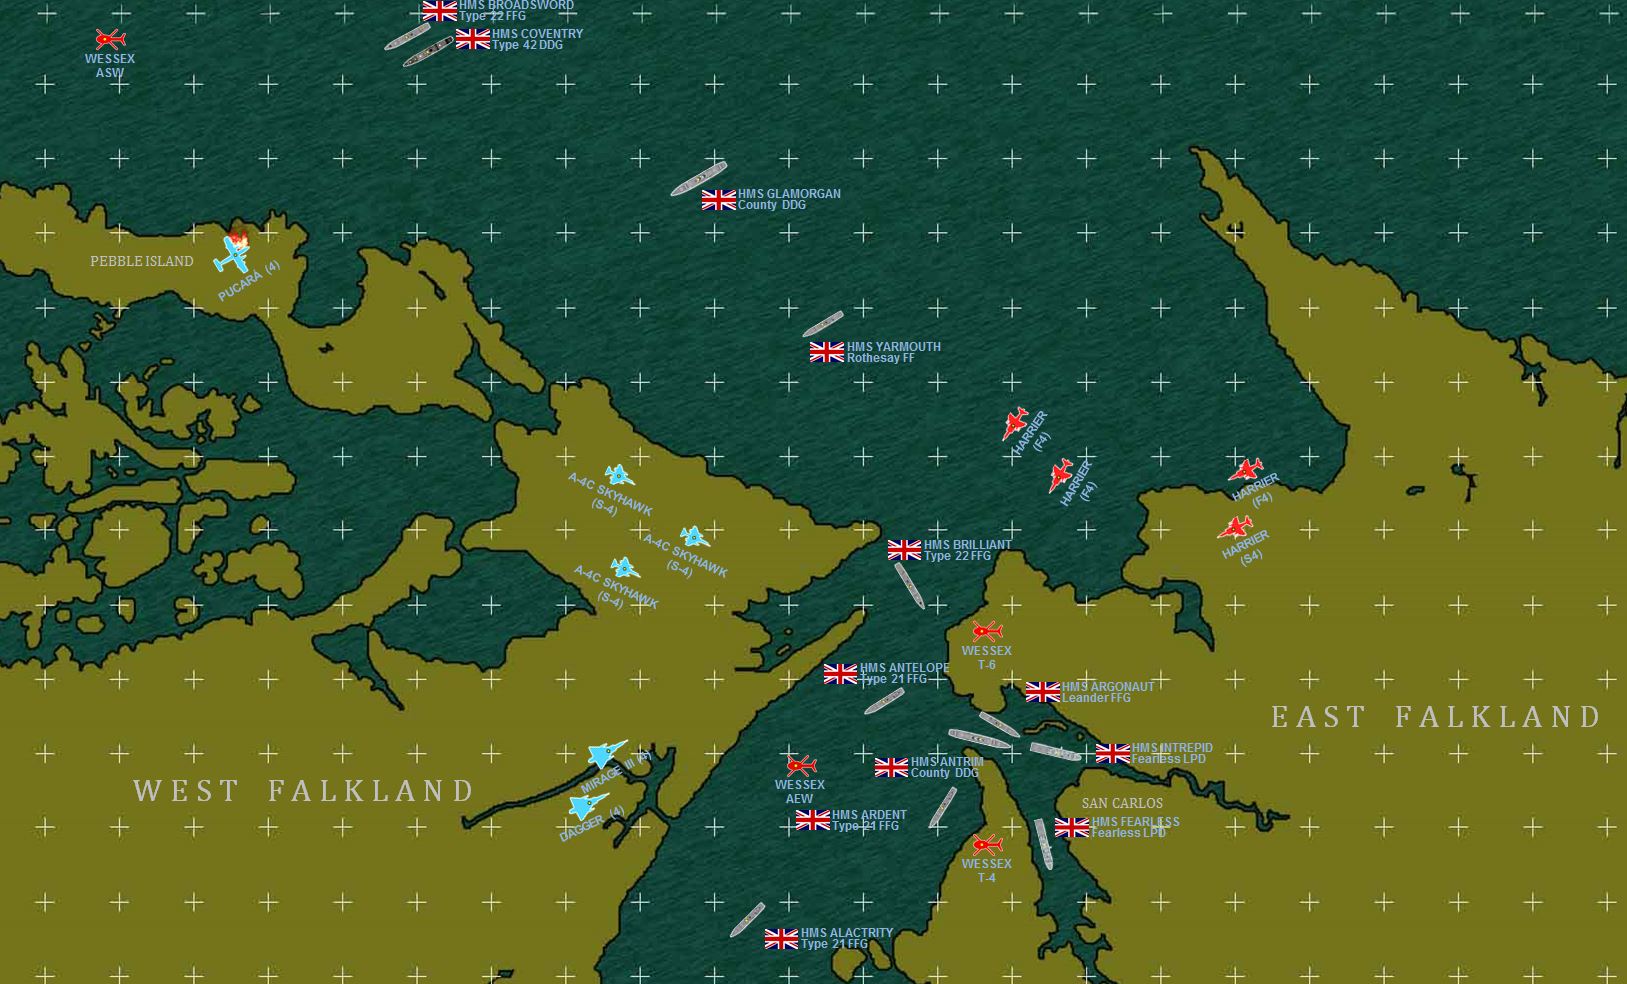 Here's a little bit of a zoom-in where things get really tight. This is a ROUGH historical approximation of the initial British landings at San Carlos. Note there are NO Argentinian ships, by now they were fighting this naval war almost entirely by air. But these airstrikes were incredibly ferocious, the British would soon call San Carlos "Bomb Alley." At least six of these British ships would be hit and three of them sunk, although Argentinian aircraft losses were also high. We also see burning "Pucara" ground attack aircraft to the northwest at Pebble Island, where SAS and SBS had landed and blown up the airfield there. Meanwhile, landings are underway, first of SAS in Gazelles (some shot down), then 3 Para and 42 Commando to the east and 40 Commando and 3 Brigade HQ to the south. 1 Para and 45 Commando would follow up.
How NOT to play Valor & Victory 1982 Lebanon ...
In addition to the Falklands wargame we’ve had recently, we’ve also had a weekend web wargame with @rasmus in Valor & Victory: expanded to 1982 Lebanon. My reinforced IDF mechanized infantry platoon was charged with going in and securing a Palestinian-help village in the norther Bekka Valley.
Things … didn’t go so well. Although I did get to RUN OVER a Palestinian technical with my Zelda APC! 😀
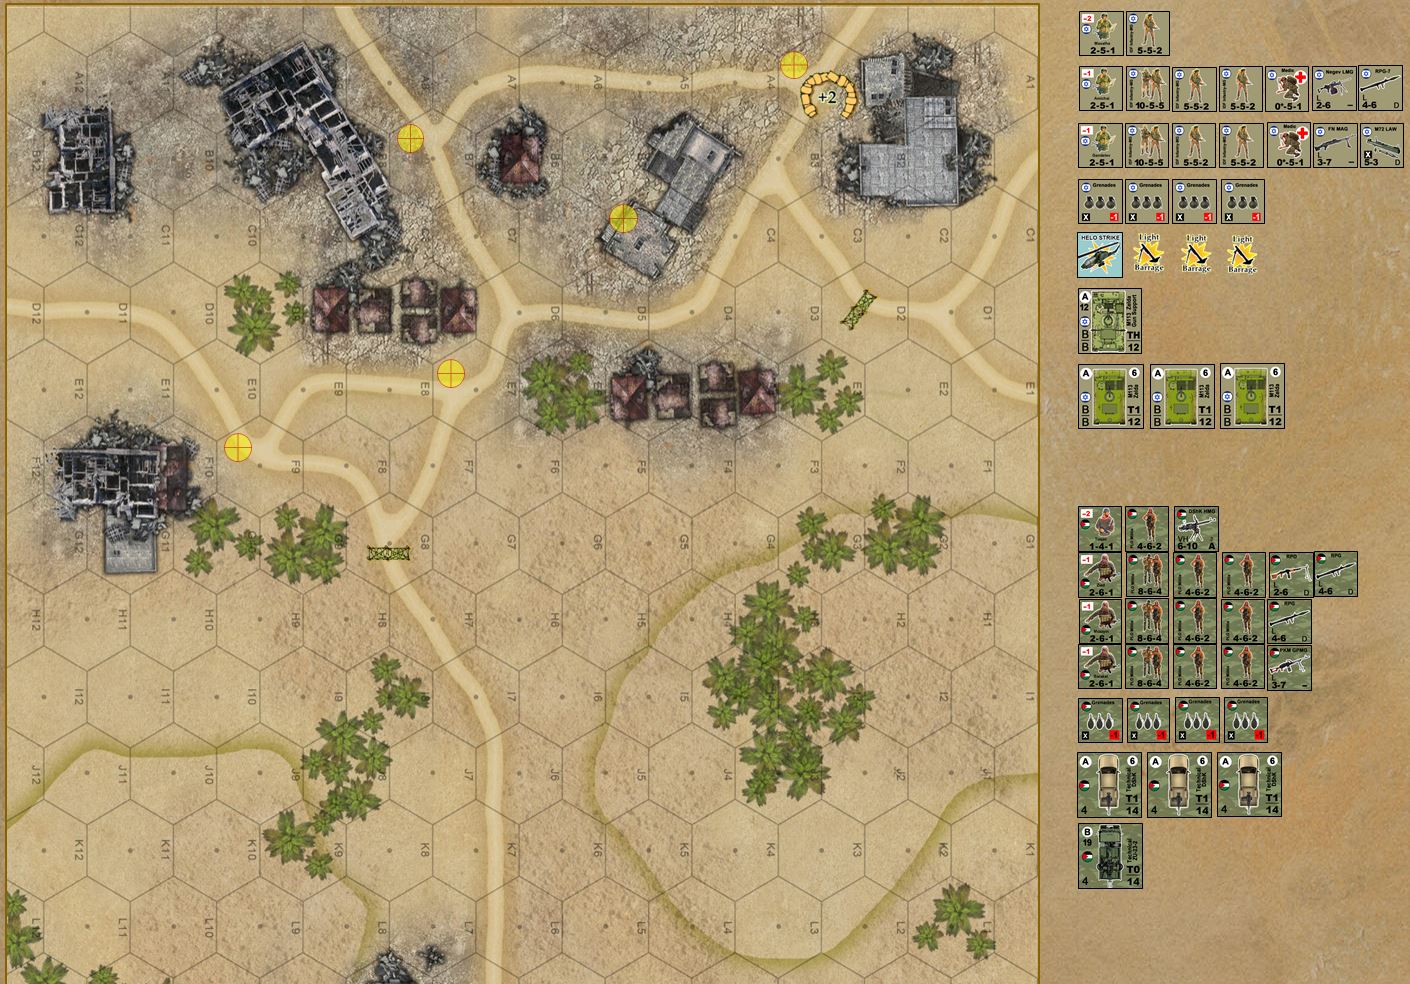 Okay, here is the map and the two forces. My IDF has to come on the map from the south, and take at least three of the hexes marked in yellow "target" icons (objective hexes).
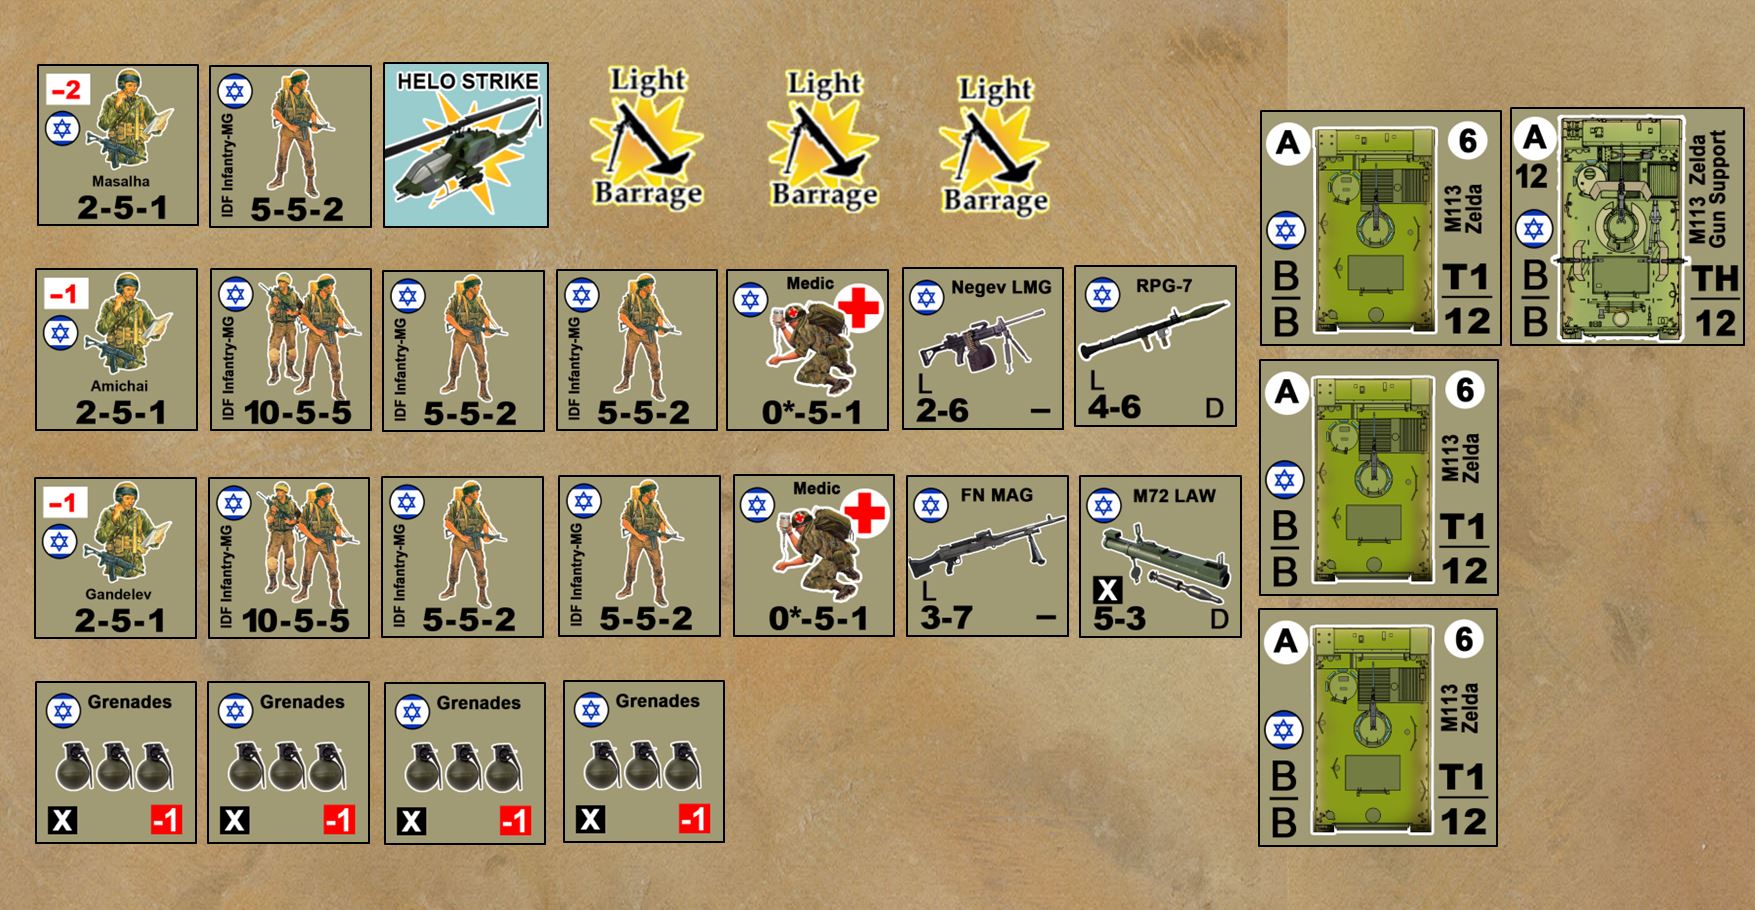 My IDF has a company commander, two under-strength platoons (or really, one reinforced platoon), and four APCs. Three of these are the M113 "Zelda" - and one is a Zelda machine gun carrier.
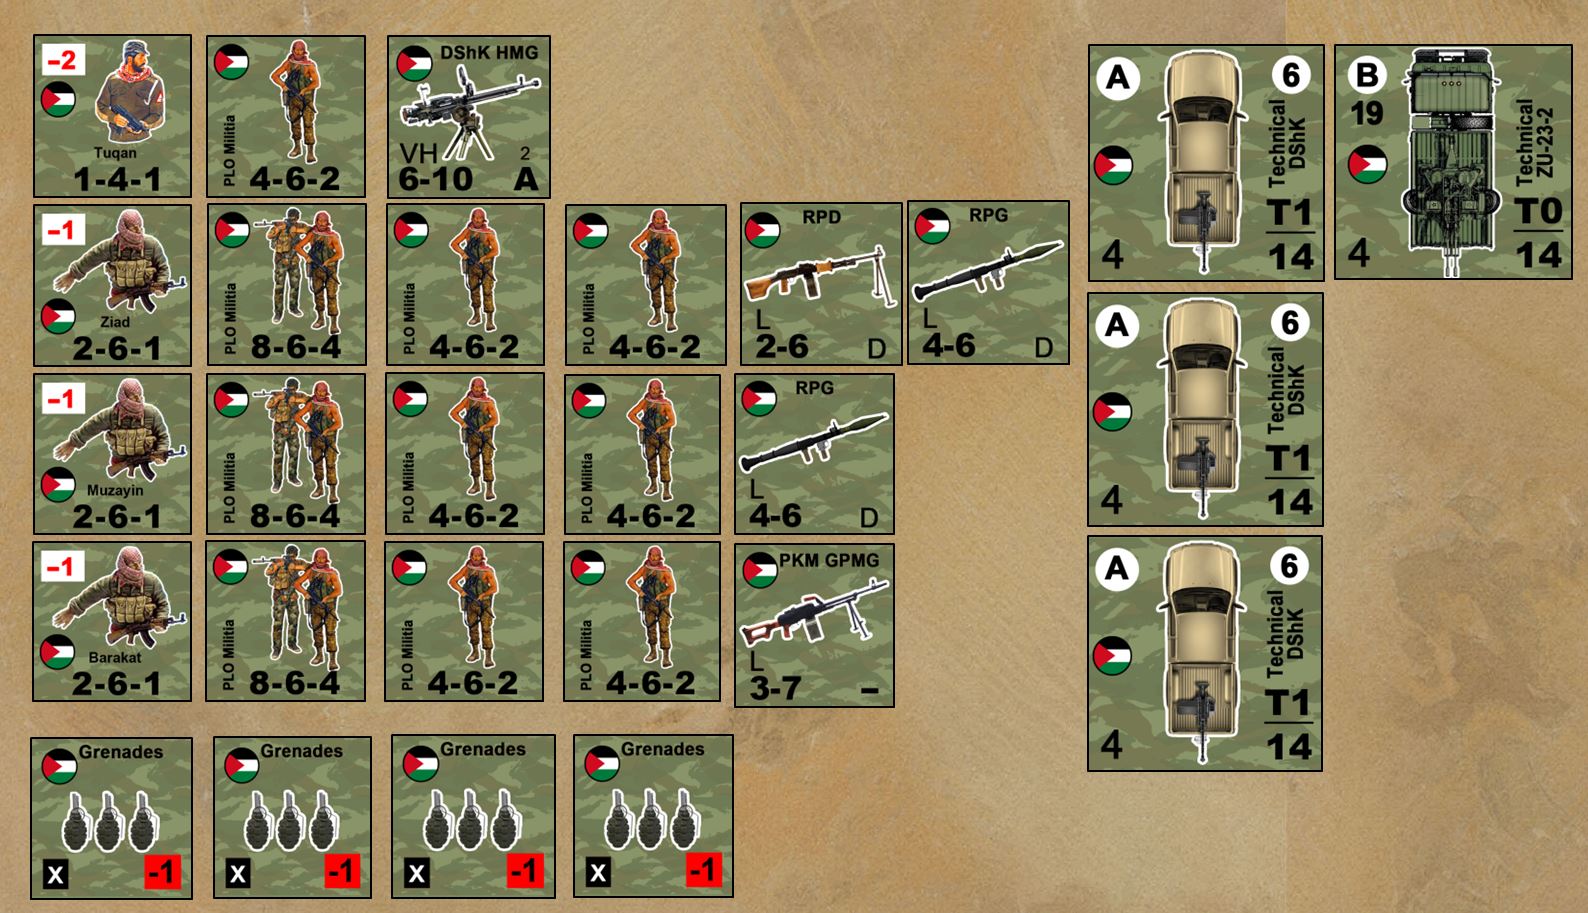 The PLO has three platoons, three technicals with DShK 12.7mm HMGs, and one big one with x2 23mm AA autocannon.
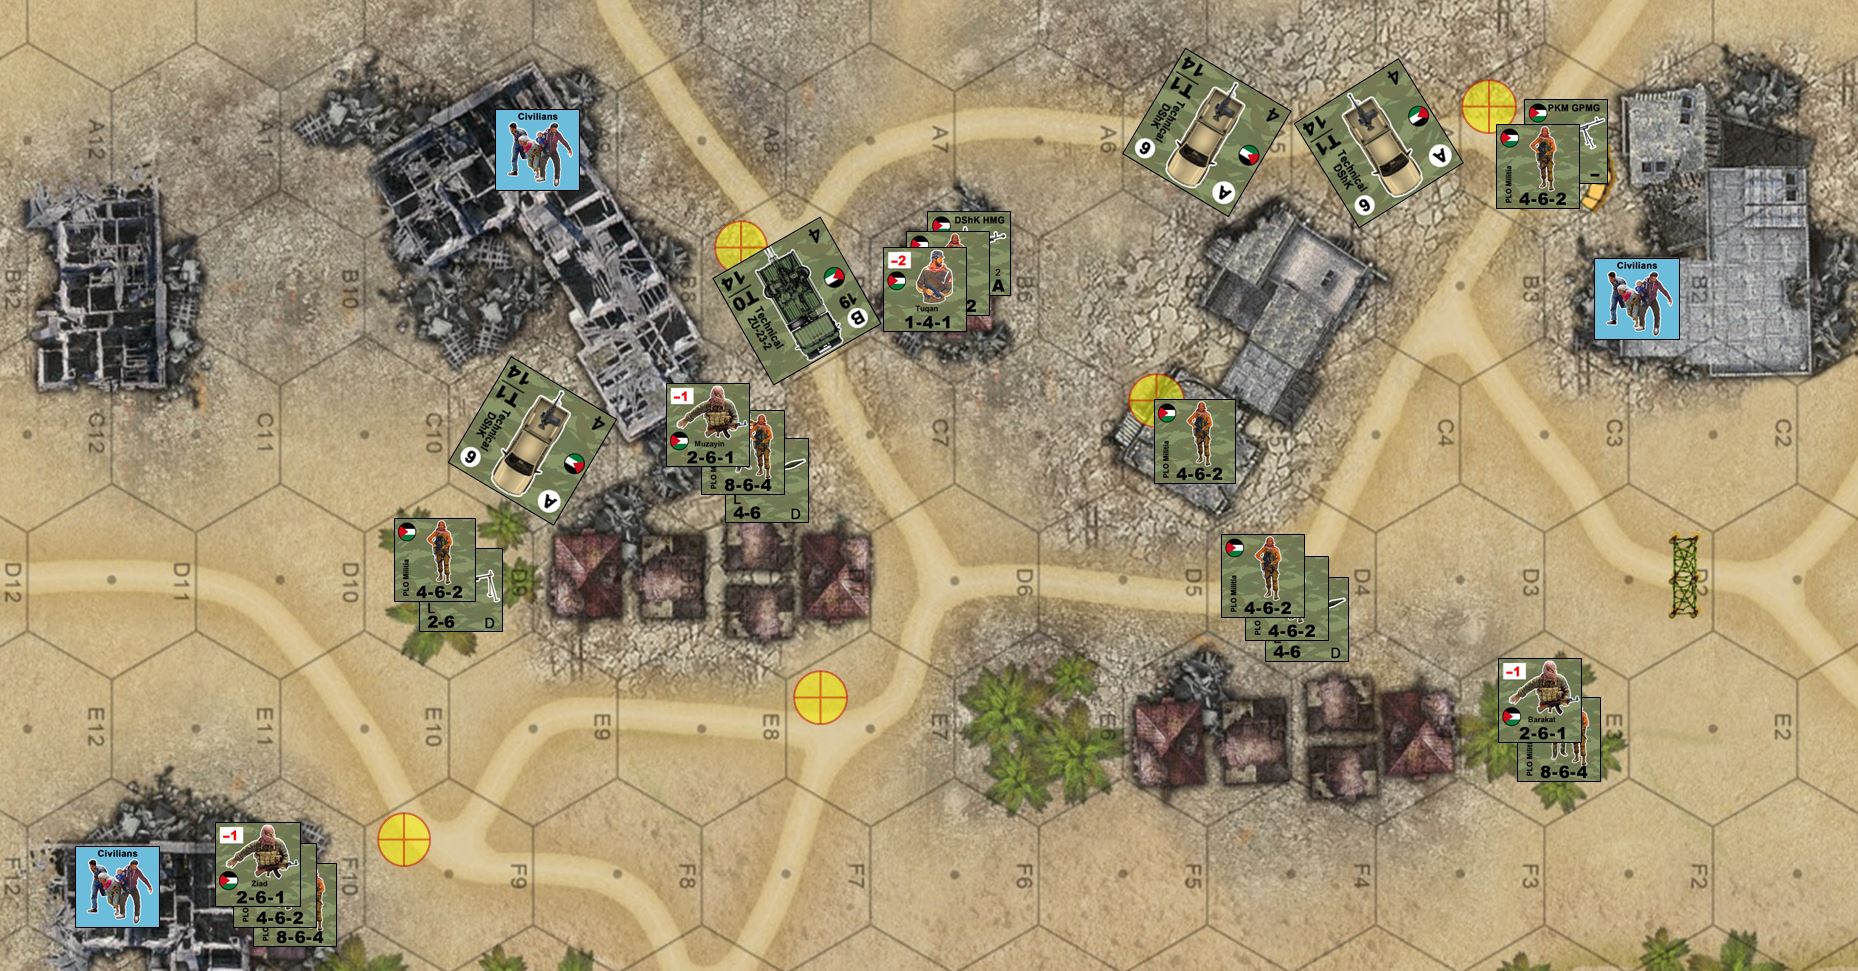 The PLO sets up on defense. They're hidden out of initial lines of sight, hoping to deny the Israelis any easy free kills with off-board mortars or their one helicopter gunship strike. Also keep an eye on those civilian counters. Neither side really controlls them, but they can definitely be used to the PLO player's advantage.
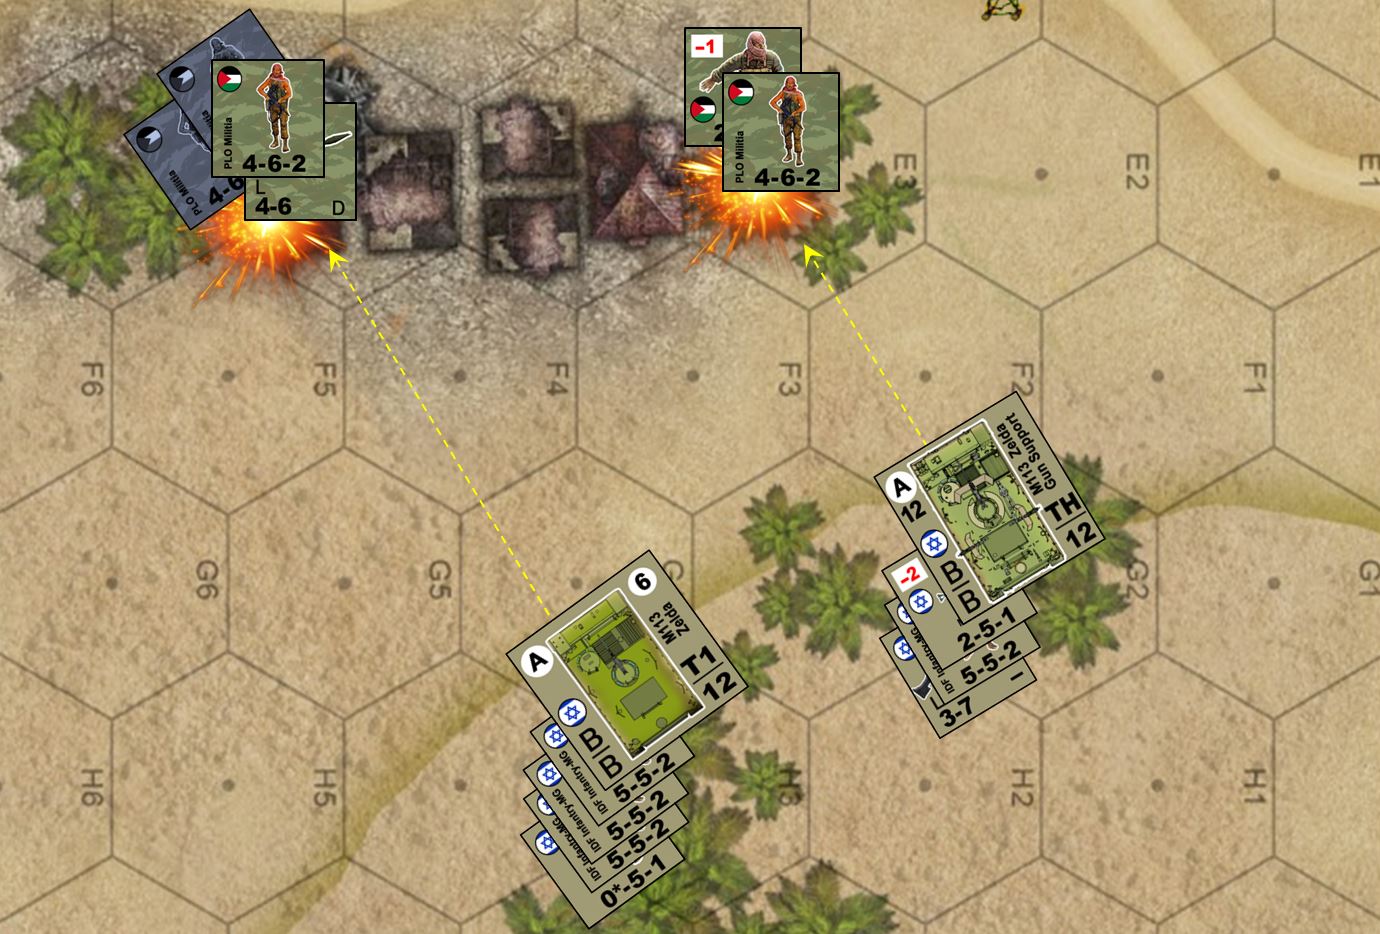 Things seems to start well. The Israeli APCs roll in, the PLO moves up RPG teams to attack them, and we get opportunity fire as they do so, killing and pinning them as they move.
 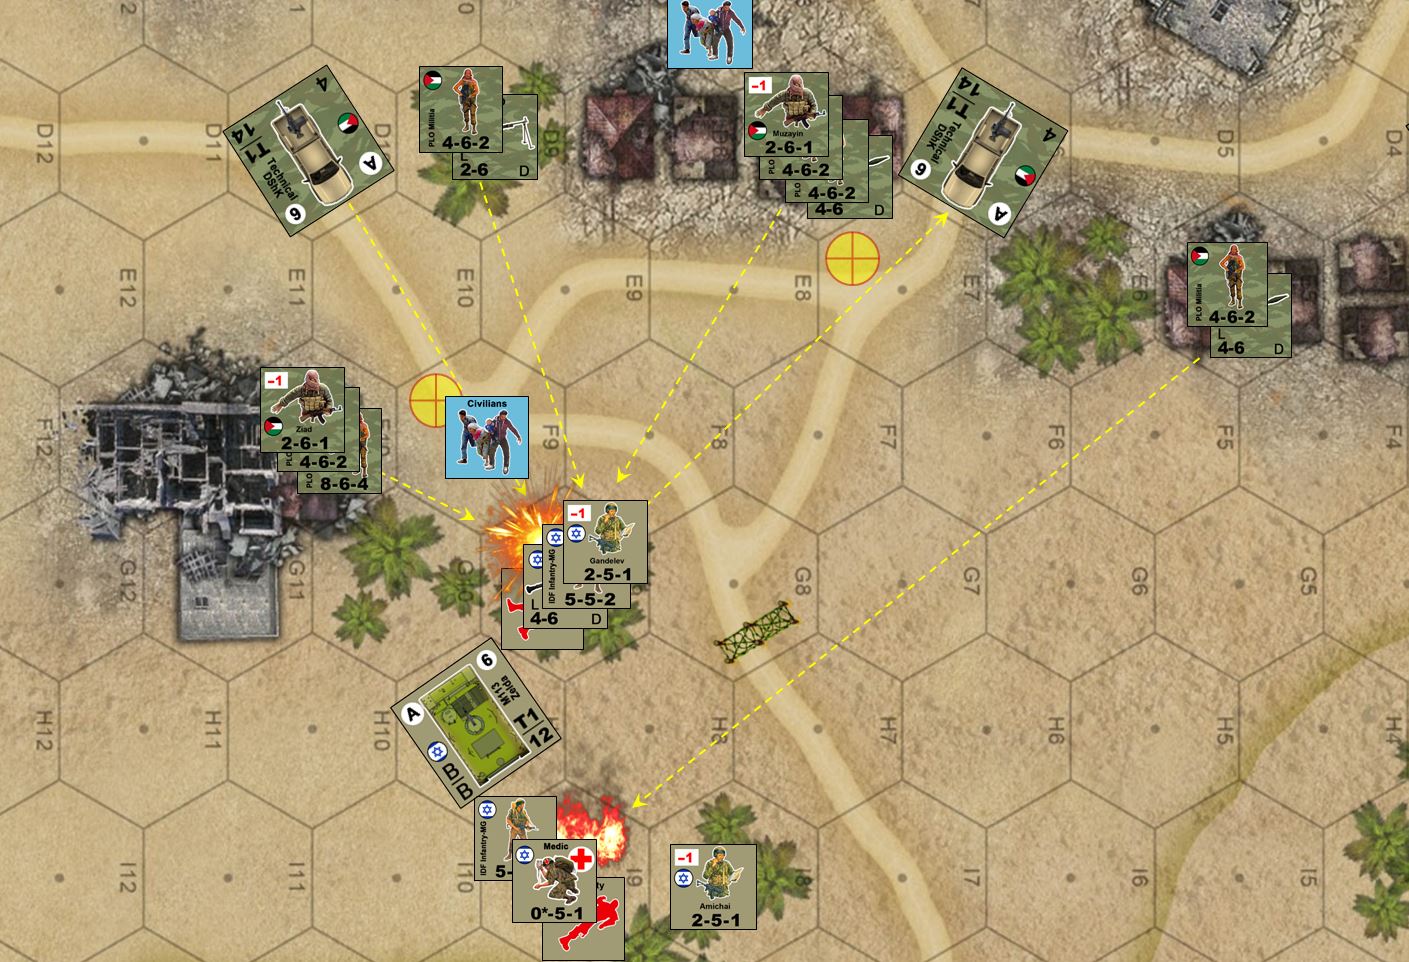 On the west flank, things go much worse. One Zelda takes a flanking RPG hit from the right, and it blows up, producing casualty token. I have to move officers and medics in to evac the casualty, but this overextends that squad and they wind up taking fire from four directions. I can even return fir in many cases because, yeah, those civilians BLOCK my line of fire, but they do NOT block PLO fire.
 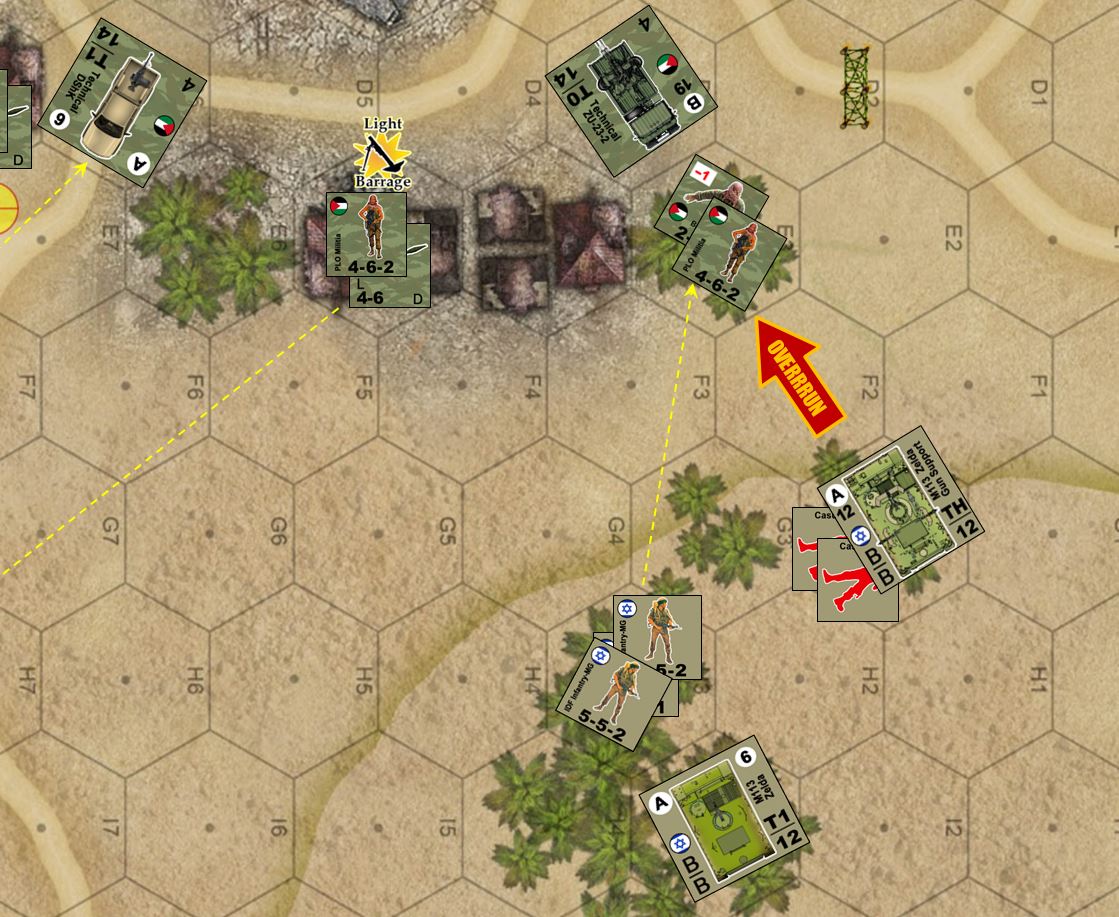 With this battle already pretty much going off the rails, I decide to get cut loose and just enjoy myself on the east wing. I try to open fire with my "gun Zelda" and her infantry squads, but roll double sixes (worst roll possible) on one of my antipersonnel firepower checks. This "summons" a PLO sniper, who brains out my company commander and his whole command team. The terrified gun Zelda crew decides to gun it, and overrun the PLO treeline! (Like I said, clearly this game is already lost, now I'm just having fun).
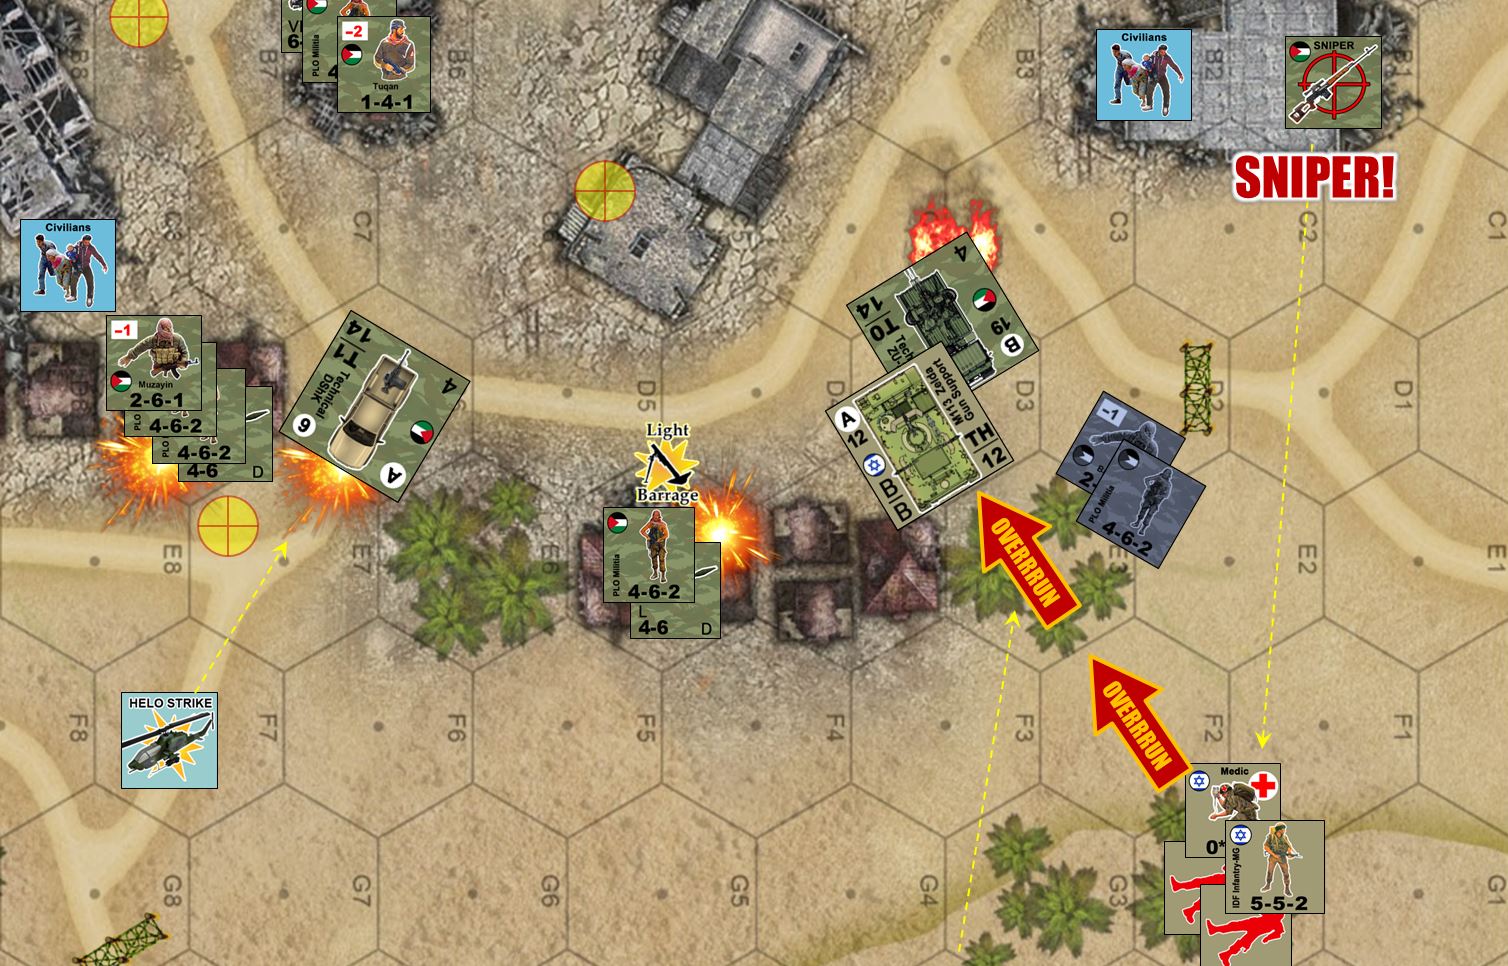 Here we can see the PLO sniper to the upper right, my gun Zelda overrunning the PLO ZU-23-2 technical (hell yeah!) ... and the helo strike taking out another PLO technical in the center. Unfortunately, the PLO with counter-assault this runaway gun Zelda, and molotov-cocktail the hell out of it, knocking it out and producing yet another casualty marker, this one behind PLO lines. I'll end in ANOTHER Zelda to try and evac that casualty, I actually manage to get the gun Zelda's crew out, but then the second Zelda is also hit and I lose that crew as KIA / POW.
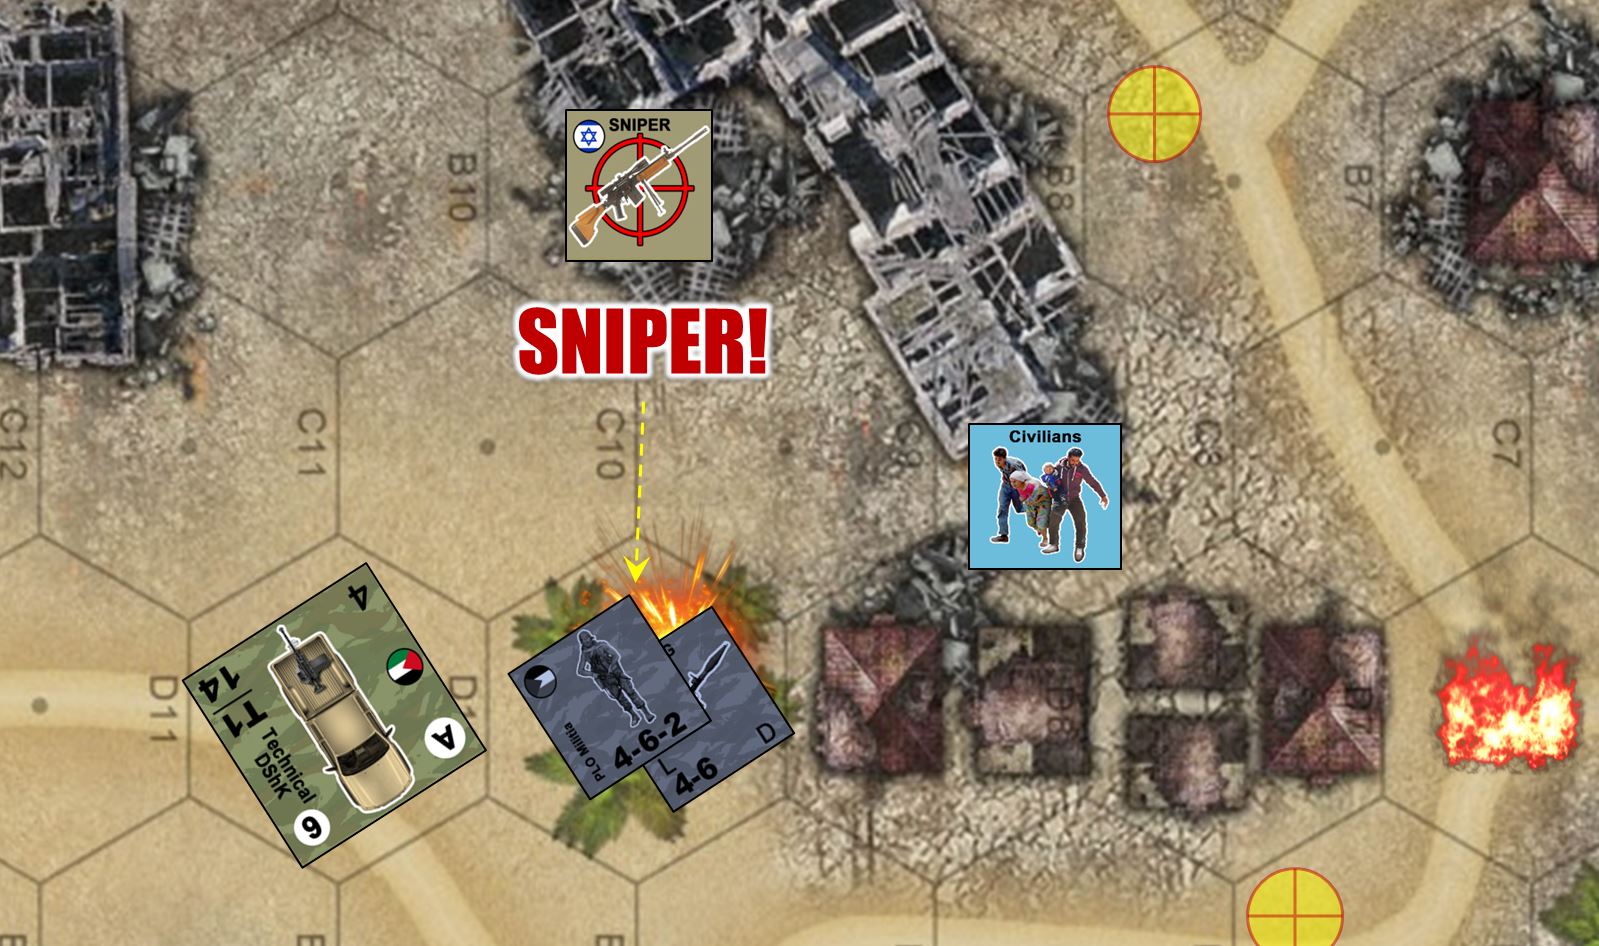 A small mercy, Rasmus also rolls double sixes at one point an an Israeli sniper also makes an appearance.
 But here's where Rasmus really wins the game. Two assaults southeast, into these woods, partially covered by orchards, ruins, and civilians. Not only are these five casualty markers inflicted on my, but since Rasmus CONTROLS these hexes in which the casualty markers are placed (successful assaults), they count as casualties in enemy hands. So these guys will be tortured or killed on the spot or held hostage until traded back for PLO prisoners, etc. In game terms, it's double victory points for Rasmus on these casualty markers, and he gets x3 what I get for a casualty marker anyway. So now it's x6 victory point awards here. Definitely a grim day for the IDF here.
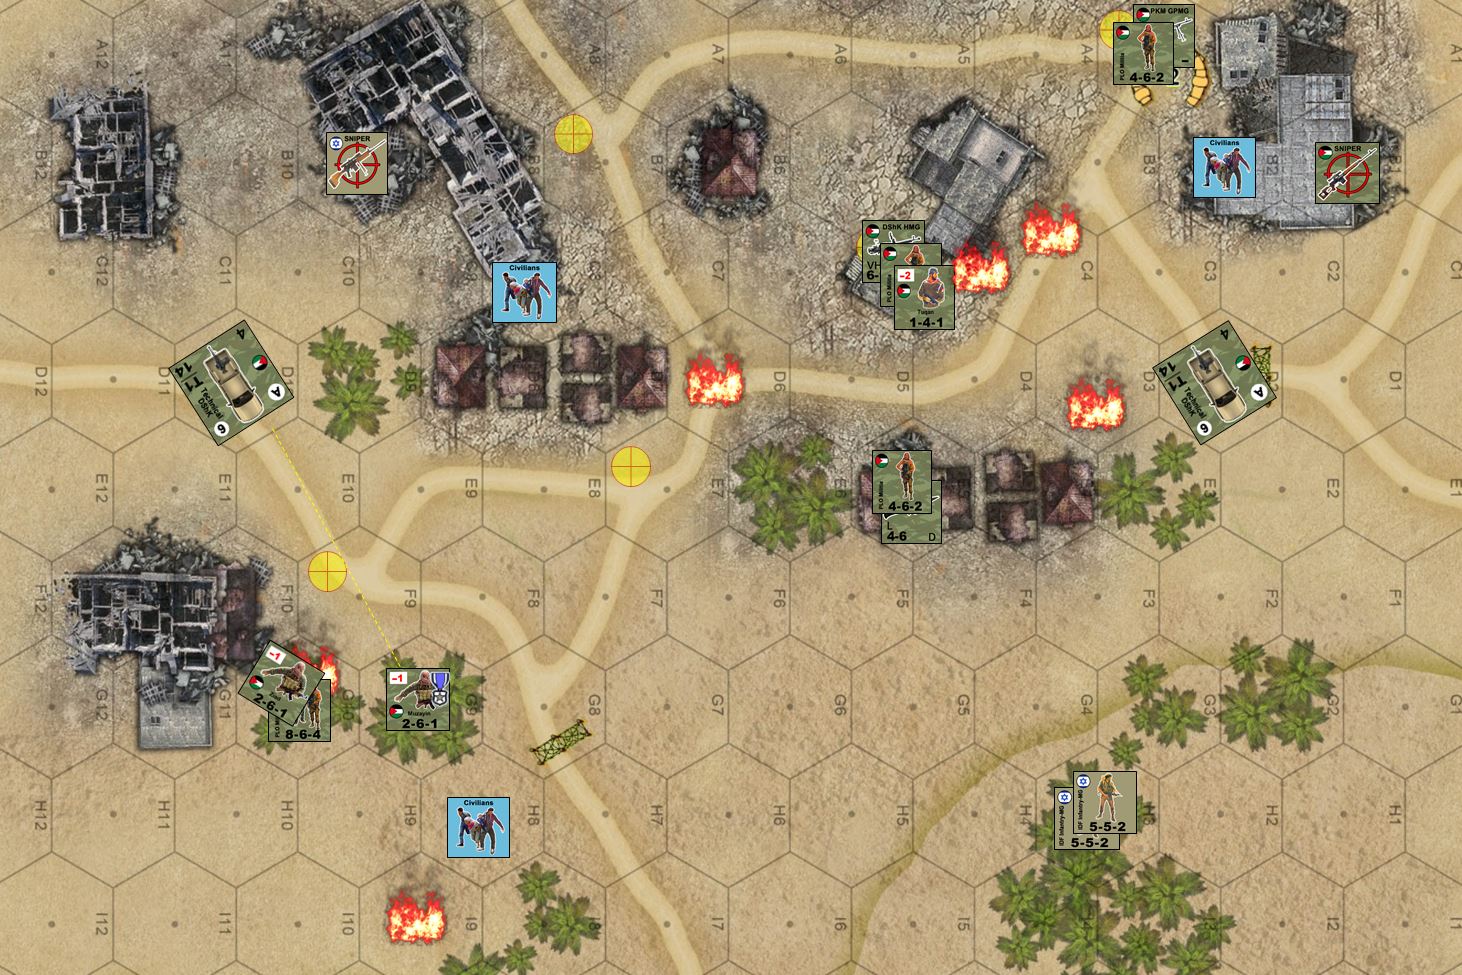 Final situation - the Israelis have lost this game 81-to-10. Yeah, THAT bad. :( But hey, congrats to Rasmus! And these games show that with a properly-designed system and scenario, asymmetrical games can still allow a big win for the side with obviously inferior firepower and resources.
Falklands Live Stream Complete! Great Game!
Thanks very much Gianna for the great game and thanks to everyone who stopped by our streams to support us. It really means a lot. So yeah, I hope we gave AirWar C21 a decent showing here. I kind of didn’t do my Immelmans correct (at least the ones that succeeded), so I that’s on me … and there are additional rules for TAILING that can make the “dice-iness” of the initiative phase a little less luck driven – IF you’ve planned ahead and get can begin an enemy (your from 180-degree arc, in enemy’s rear 60-degree arc, you go when he goes, NO MATTER WHAT THE initiative is). SO we’re still learning this system, but already having tons of fun with it, and it’s deliver great realistic results for our 1982 Falklands wargames. 😀
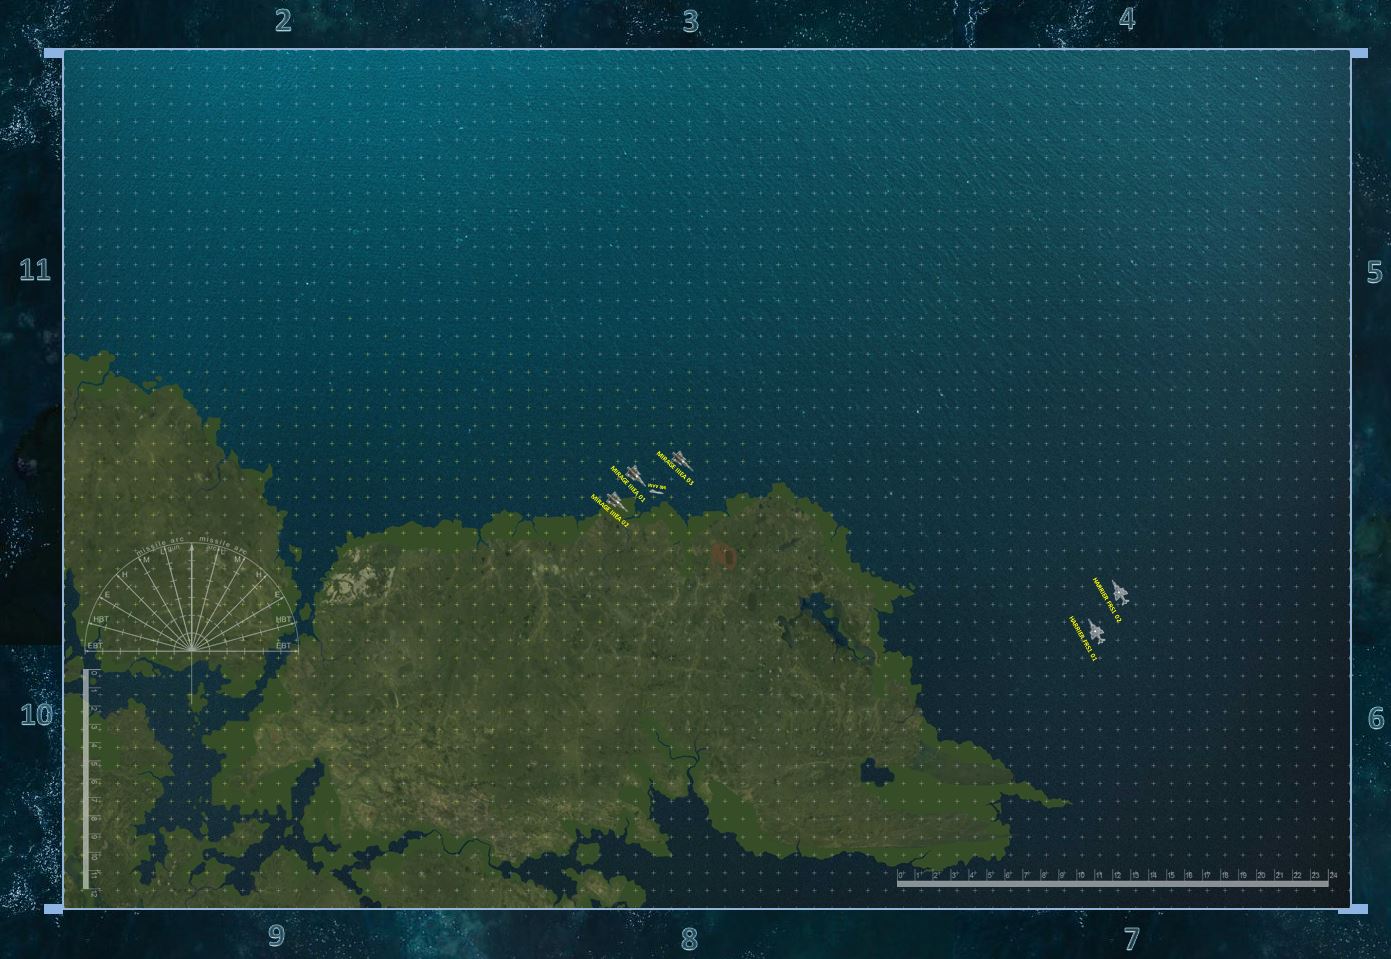 Northeastern coast of East Falkland Island, 1 May, 1982. Two FRS1 Sea Harriers of HMS Hermes have been vectored to intercept two Argentine Mirage IIIEA interceptors launched toward the battlegroup. Each grid on the map = roughly 1km (scale in the game is actually logarithmic). Each inch of movement = 50 knots air speed. Virtual gameboard is set up to reflect a 72" x 48" (6x4) gaming table.
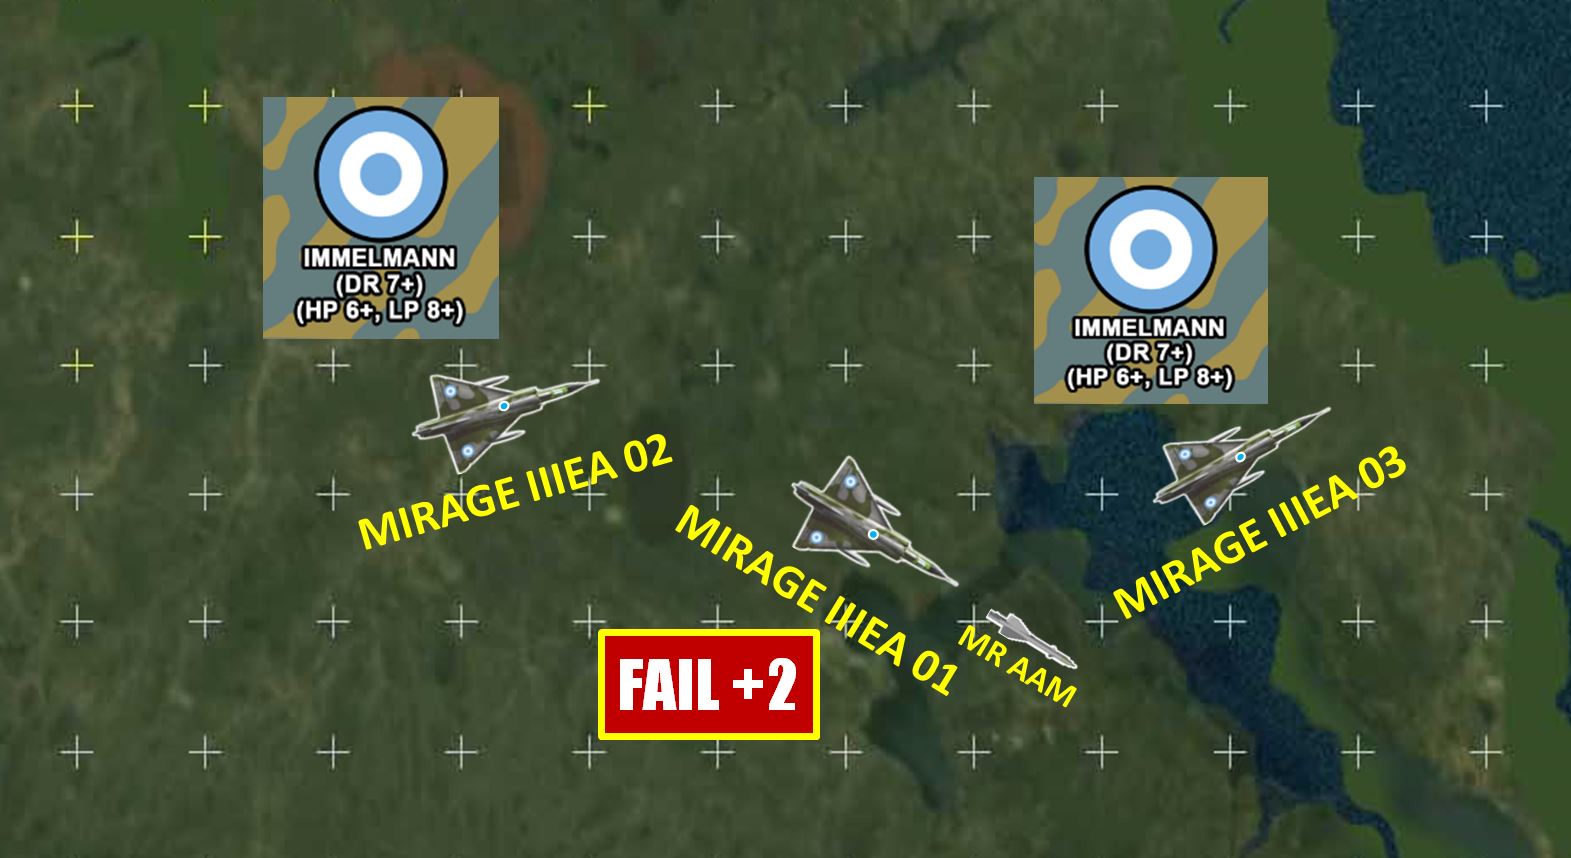 Mirages, pushing 950 knots, try to pull Immelmans to vector toward the sidestepping Harriers (both just executed successful barrel rolls + turn maneuvers). One Mirage fails the roll, but still manages a lock with SARH R.550 "Matra" medium range air-air missile. Shots fired! The Falklands War is on!
 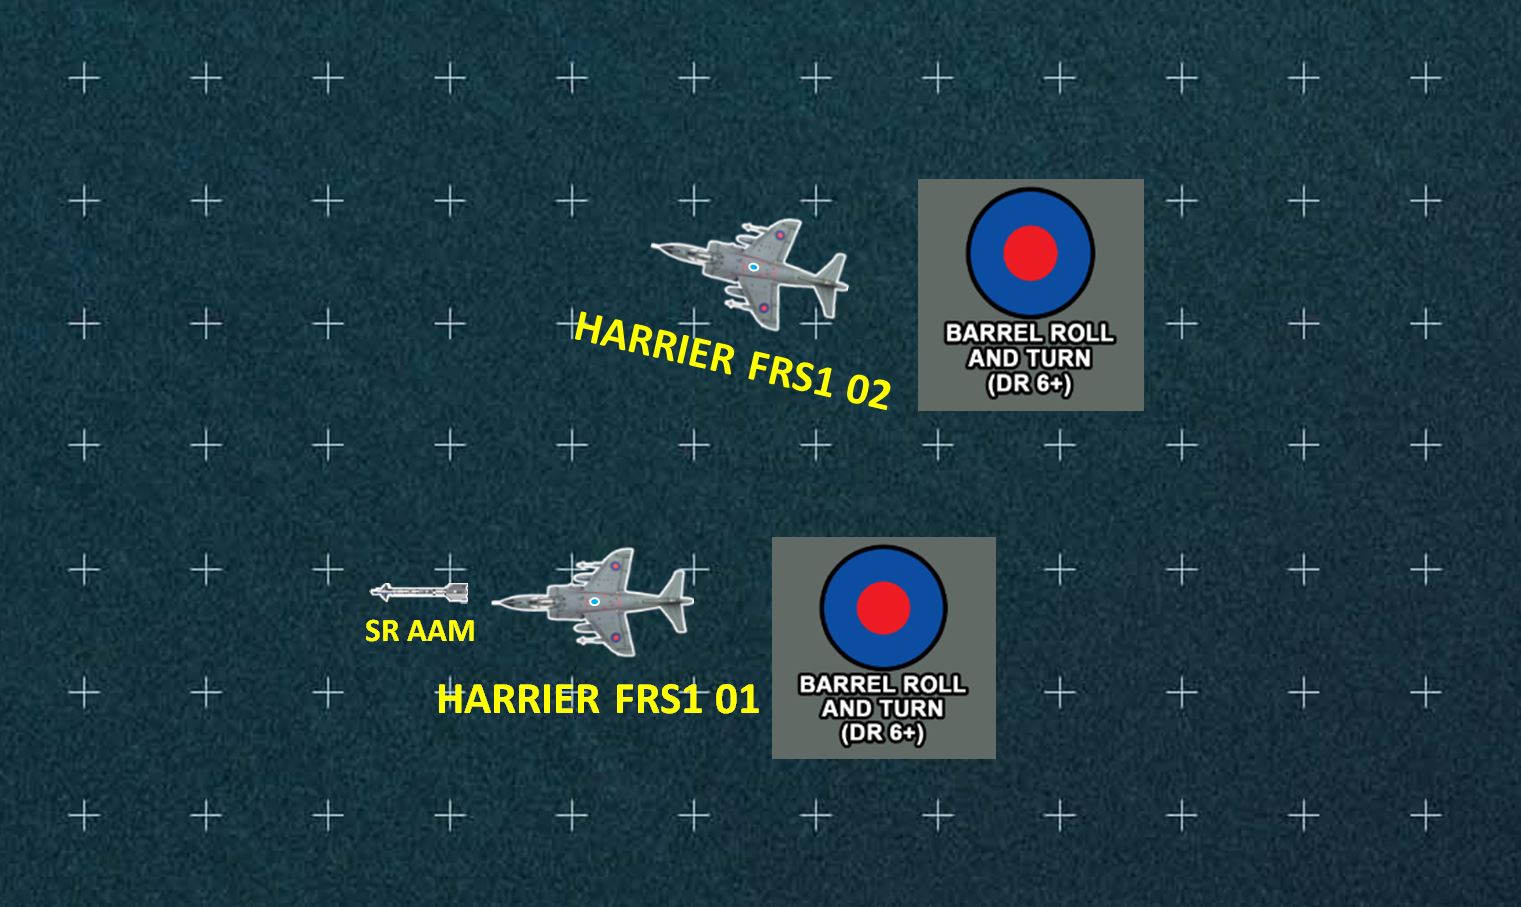 The Harriers respond. They fire American made AIM-9L Sidewinder IR-guided short-ranged air-air missiles. The keyy advantage here is that the Sidewinder "L" variants can acquire a lock from any target aspect. you do NOT have to behind the enemy plane to get a lock (although it helps when the missile has to hit). The Argentinian equivalent, much older R.530 "Magic" missiles, must be launched from behind the target aircraft. Easier said than done.
 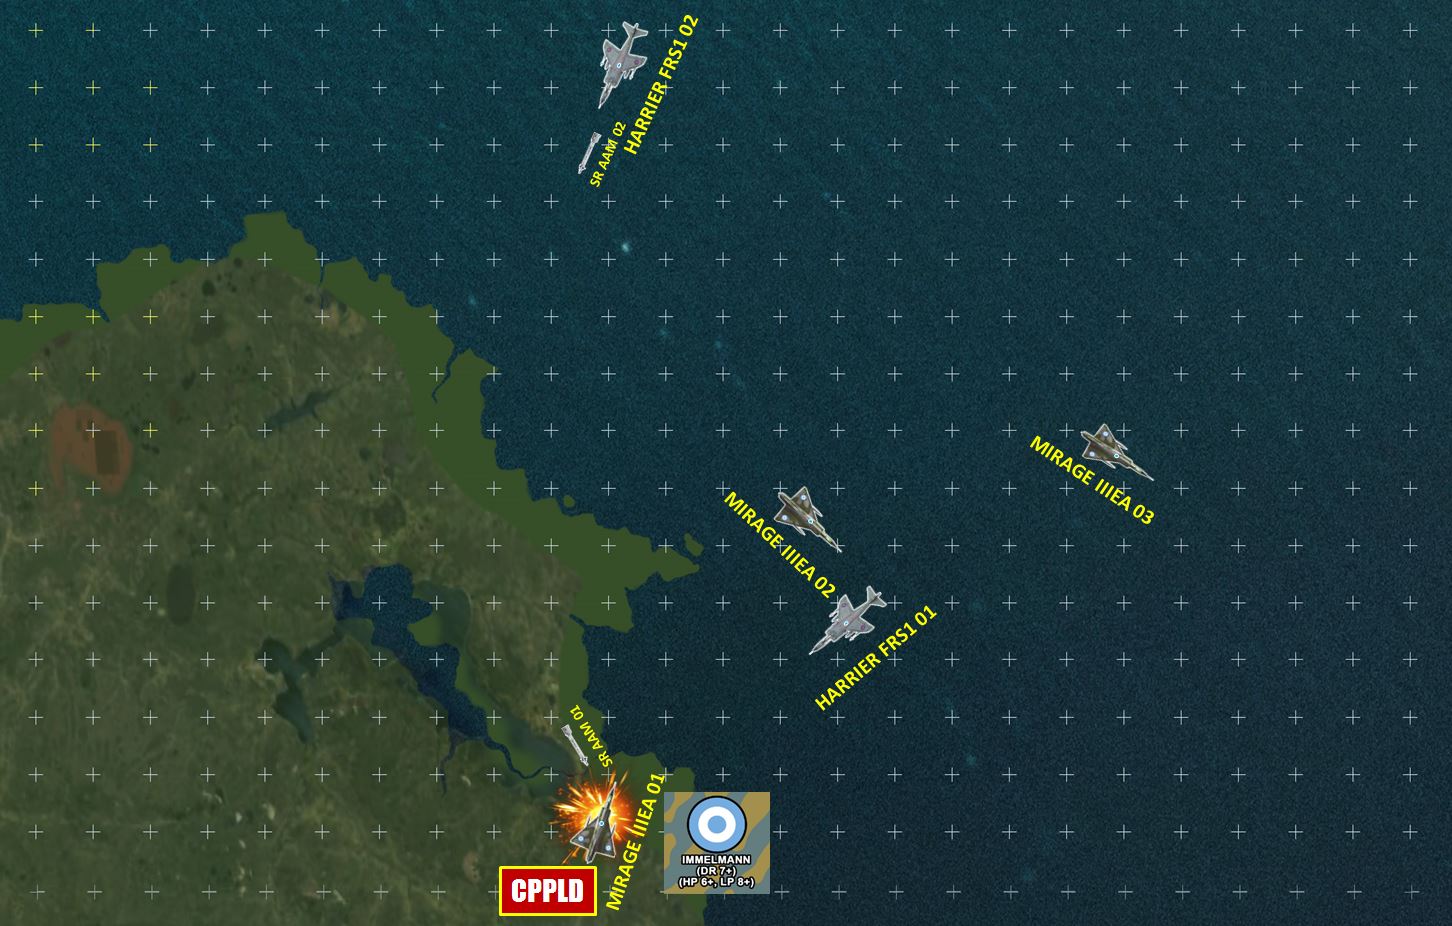 The first Sidewinder hits the lead Mirage, but explodes off my wing and only does 2 points of damage. Sea Harrier 01 is closing to guns range, however, and will score one more hit on a high-deflection, medium range extended burst from her cannon. It's just enough to cripple the Mirage, who's max safe speed drops from 1000 knots to 500 knots as a result. Too bad he's currently at 650 knots (speed 13), so that's +3 over safe speed, +3 MORE damage, so that's 6 damage total. BOOM. Mirage is down, but the pilot punches clear with a clean ejection. Still, that's SPLASH ONE!
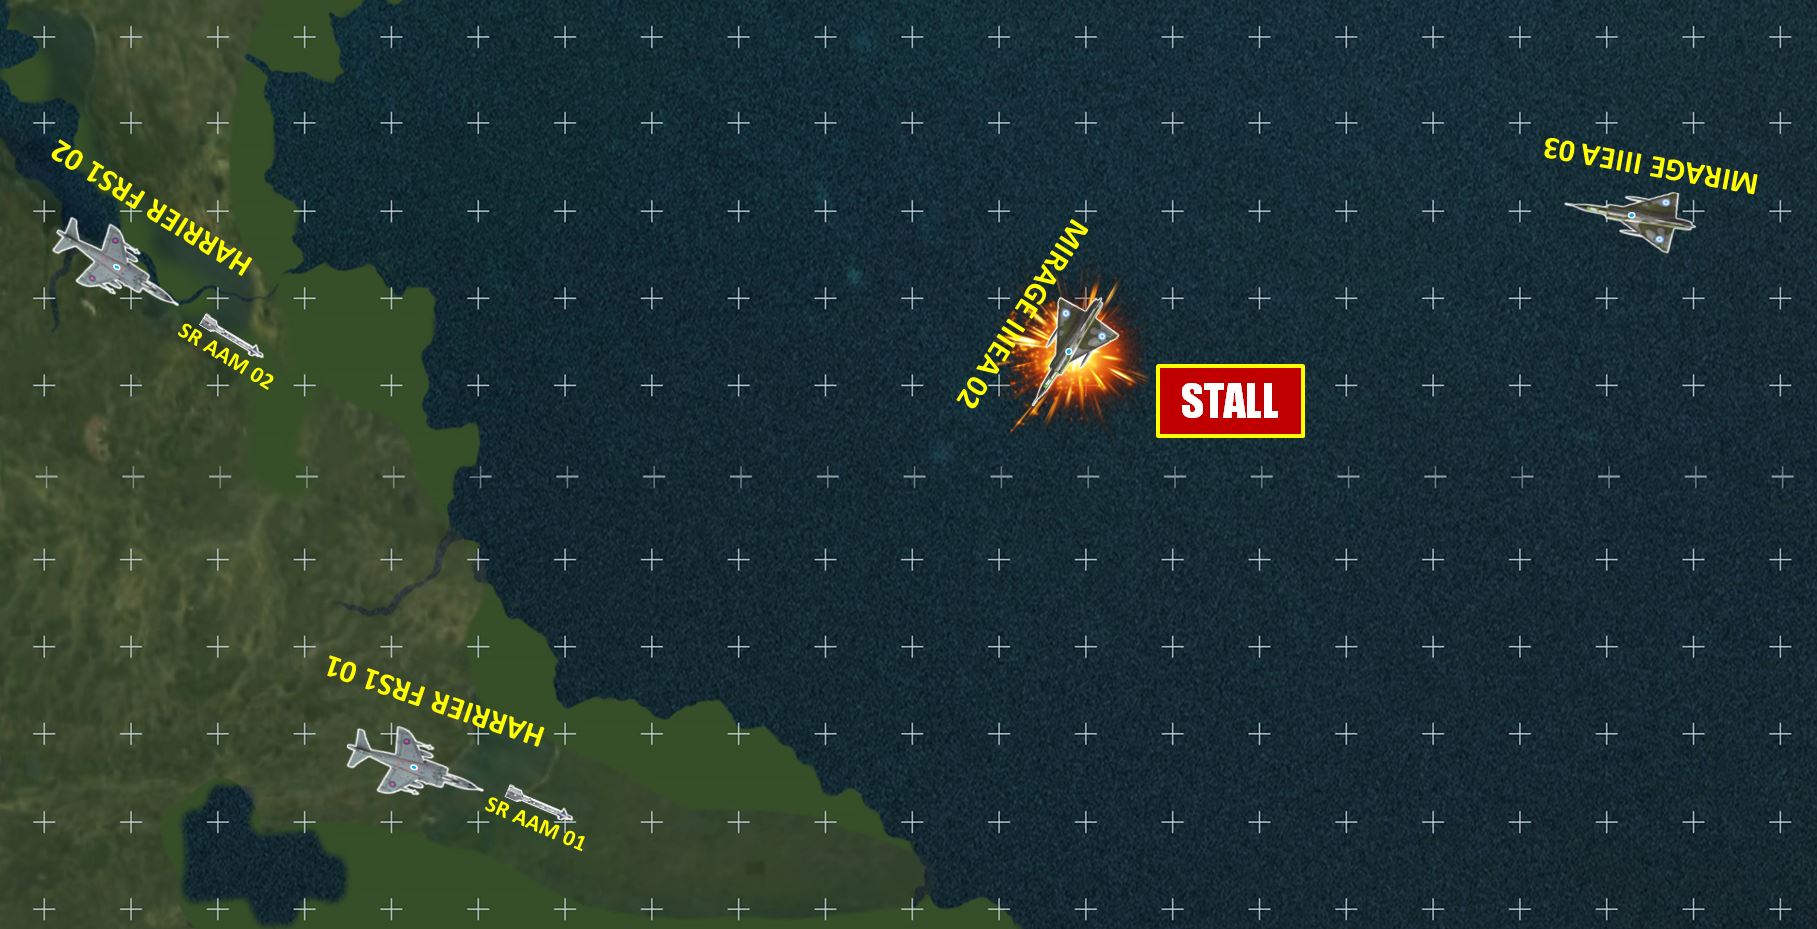 Another hit on another Mirage! Not only does Gianna score the hit, but then gets a roll on the "Golden BB" table. Compression stall in the Mirage's engine! Immediate stall and spin in a random direction, AND he's down 5 out of 6 damage points. Man, is this pilot in trouble.
 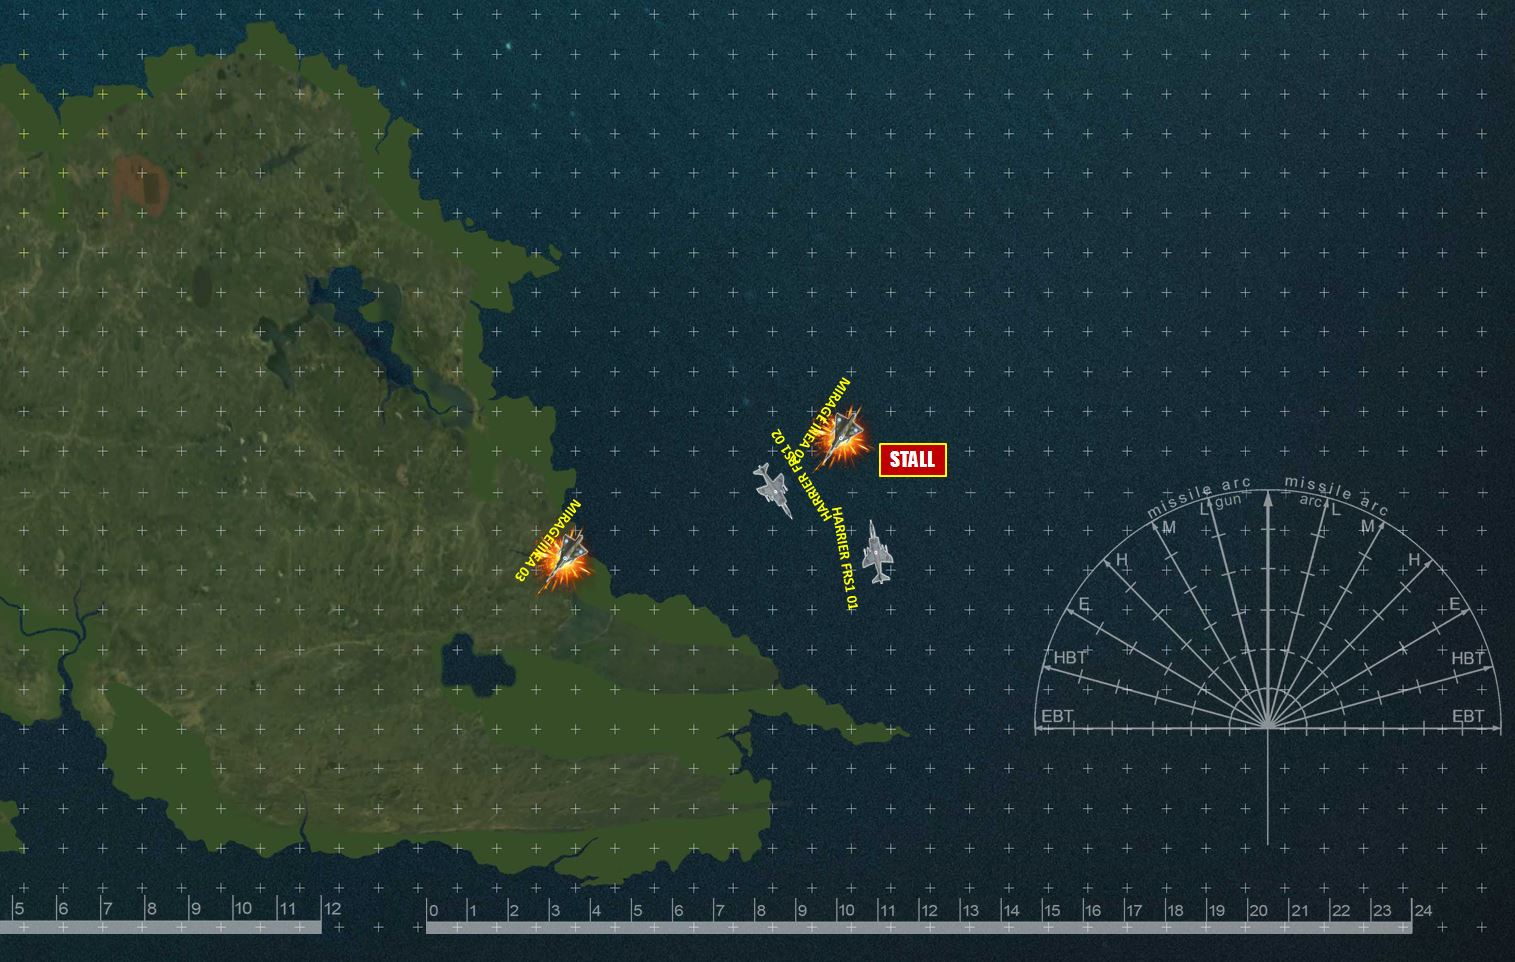 Final result at the end of Turn 3, Phase 2. British win by splashing all 3 Mirages, no loss to themselves. If this game seems unfair, it really isn't. I kind of forgot how Immelmans really work, and if EVEN ONE HARRIER goes down, automatic Argentine victory. And these Harriers are not very sturdy AT ALL. Just one burst of Mirage cannon fire is enough to put one down, so the British player really has to play it to the wire, which Gianna totally did. Well done! And thanks again for the great game and support with the stream!
 Expanded Aircraft Types - AirWar C21 Falklands
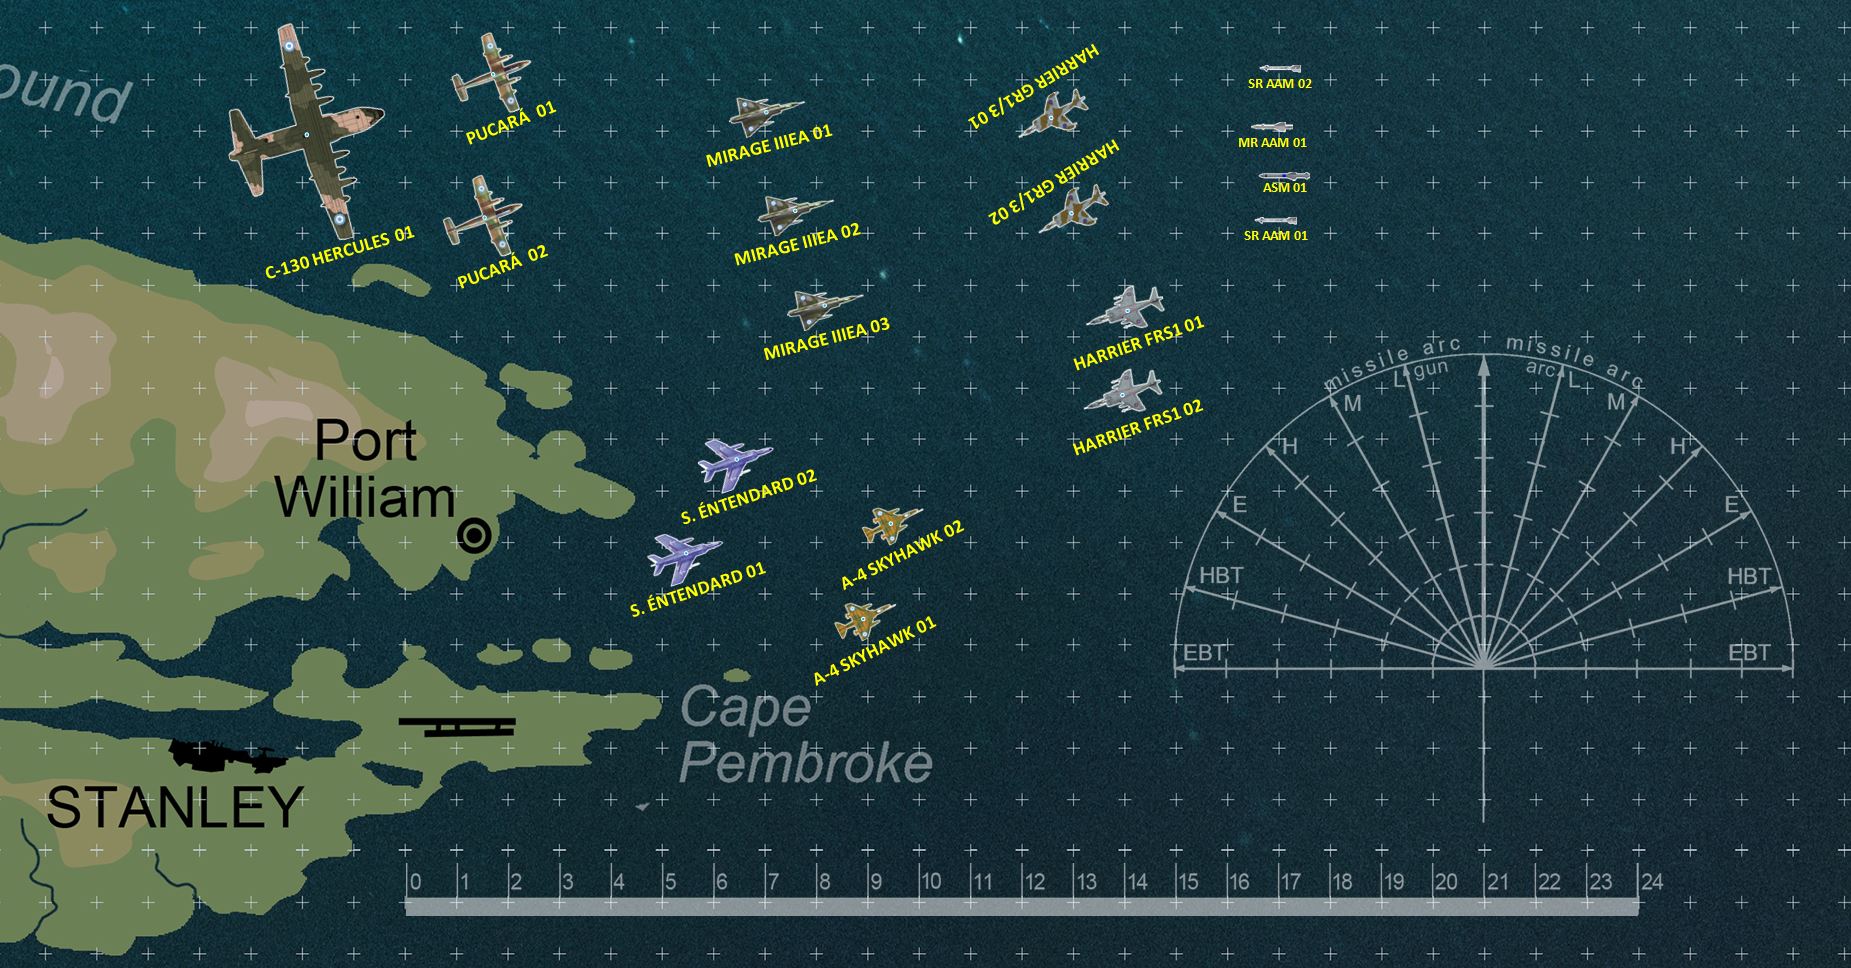 Expanded the aircraft types, trying to cover more of what is featured in the Operation Corporate AirWar C21 supplement. Added Argentinian Super Entendard (navy strike planes), C-130 Hercules (US-made transport), and IA-58 Pucara (counterinsurgency strike / recon turbo props).
 Close up of the new aircraft. The planes to to scale with each other, but not to the ground scale of the game (logarithmic, but ROUGHLY each grid is about half a nautical mile). This is why there is a blue dot in the center of each aircraft. showing its true position for ranging and movement.
More Progress Made ...
 Just one image, but it's a big one. So please click on it to expand for best viewing. A roughly 1/3 scale (each inch grid = 1 km) ops map of normal Naval Command rules scale (where 1cm = 1nm, or roughly 1:120,000 - this map is roughly 1:40,000). Ships are measured at roughly 1:3000 (750 foot carriers = 3 inches). So the ships and the map are NOT to scale, the yellow dot in the center of each ship piece marks is actual location. For the record, this is NOT how the fleets were ever deployed. As some of you may know, the Falklands NEVER looked like this. Just putting the counters on the table and seeing how they look. The actual naval operations in the Falklands War were a lot more dispersed, with smaller actions taking place across dozens or hundreds of miles at places sometimes over 1,000 miles apart (if you include the actions at the South Georgia islands). But in summary, this is the kind of game we're shaping up for naval ops in the Falklands.