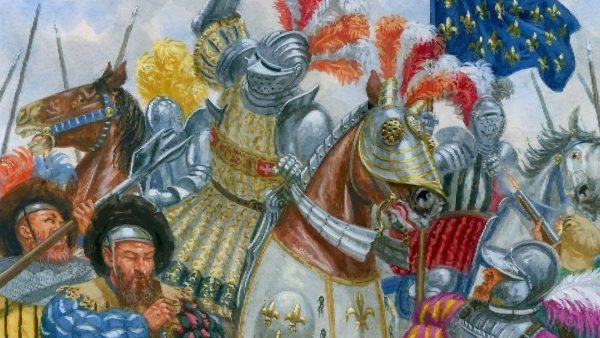


Persei-Aries War – Oriskany v. Rasmus


Recommendations: 1421
About the Project
After racking up 127 entries, 3500+ recommendations, and 600+ comments, the original Darkstar project thread was getting a little unwieldy. So I'm starting a new one, featuring a new campaign for interested players in the OTT community and beyond. So far we have five players, but there's always room for more!
Ever wonder if you had what it took to command fleet of starships in tactical combat? Darkstar offers that challenge to the hard-core wargamer, with a "Newtonian Physics" movement system, rules for astrophysical objects and phenomena, gravity, and of course dizzying amounts of 26th-century firepower. There are no aliens, no "hyperspace," no planets that look suspiciously like movie studio back lots. Just the old empires of Earth doing what they do best, colonization and kicking the hell out of anyone who gets in their way (i.e., each other).
In addition to starship tactical combat, Darkstar includes rules for carriers and aerospace craft, atmospheric operations, orbital and surface installations, boarding actions, assault landings, and a complete campaign system.
The system is free to download for members of the OTT community, and of course we play almost every weekend with a on-line version with starship commanders around the world! So if you ever want in, you know where to find us!
Related Genre: Science Fiction
This Project is Active
Skirmish at 14 Hercules (Khaizan's Haven): muakhah vs. oriskany
FROM: UNITED NATIONS REGIONAL COLONIAL CENTER
13:10 SOL GMT, 09 JULY 2521
BREAKAUTH: 181072.18J
CLEARANCE: SECRET (NATIONAL)
**UNITED NATIONS COMMUNIQUE**
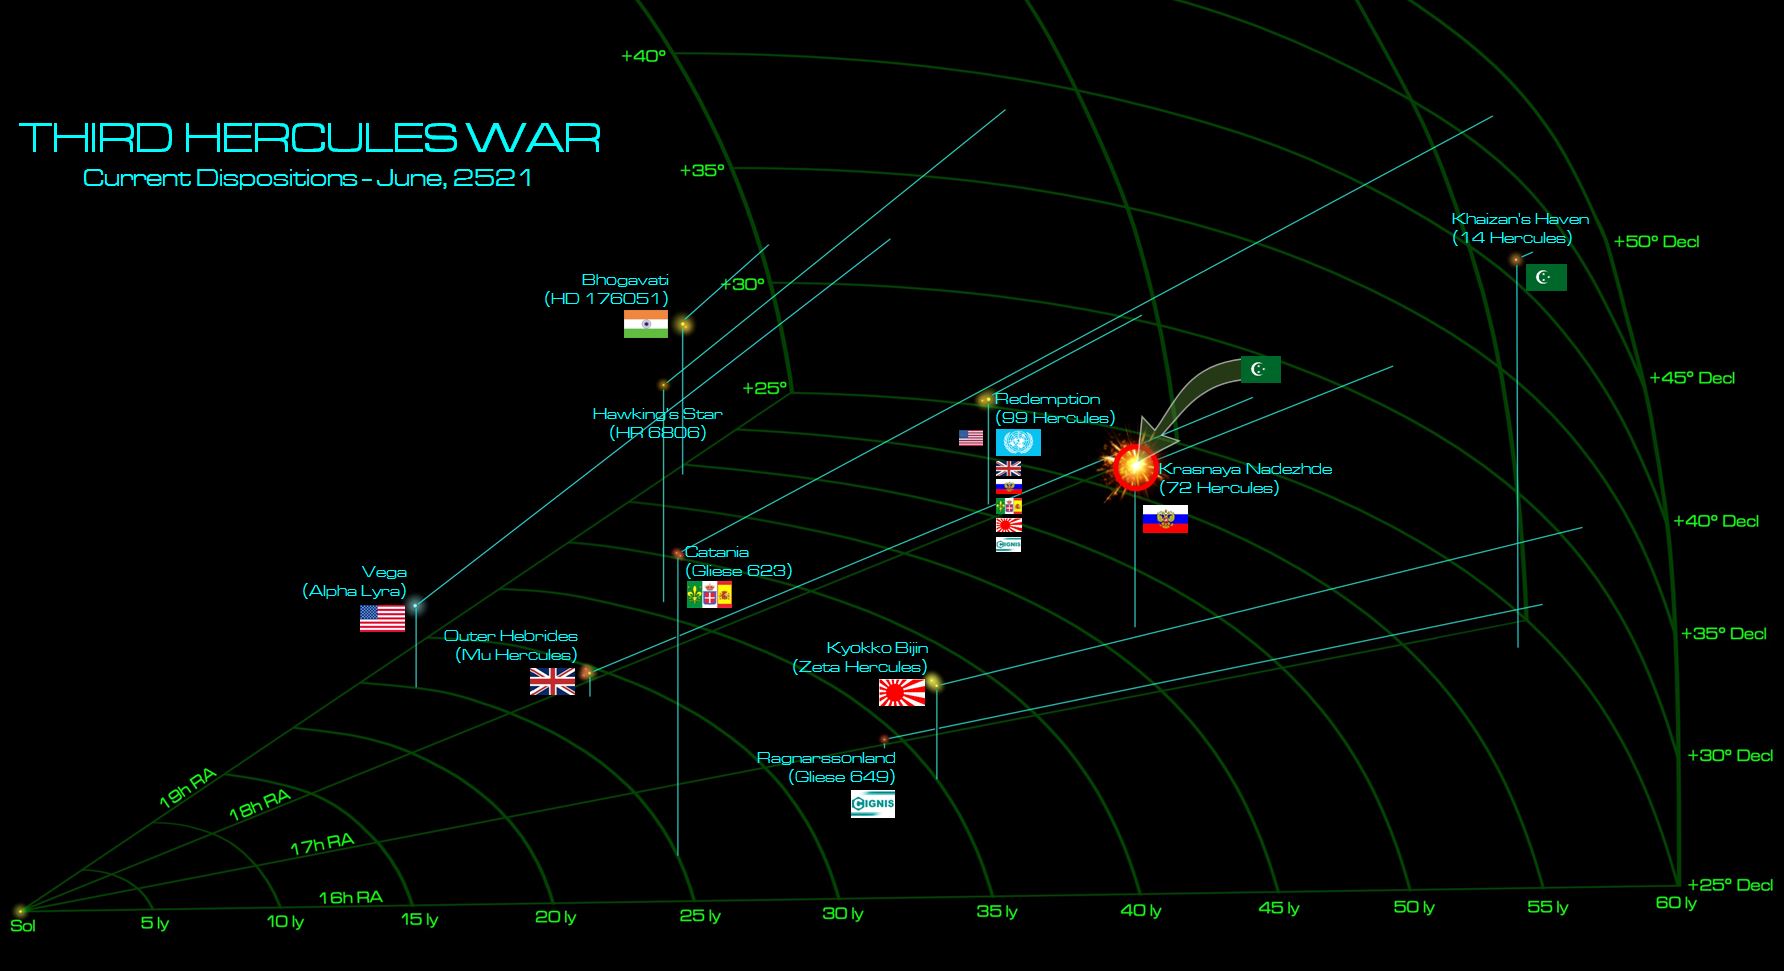
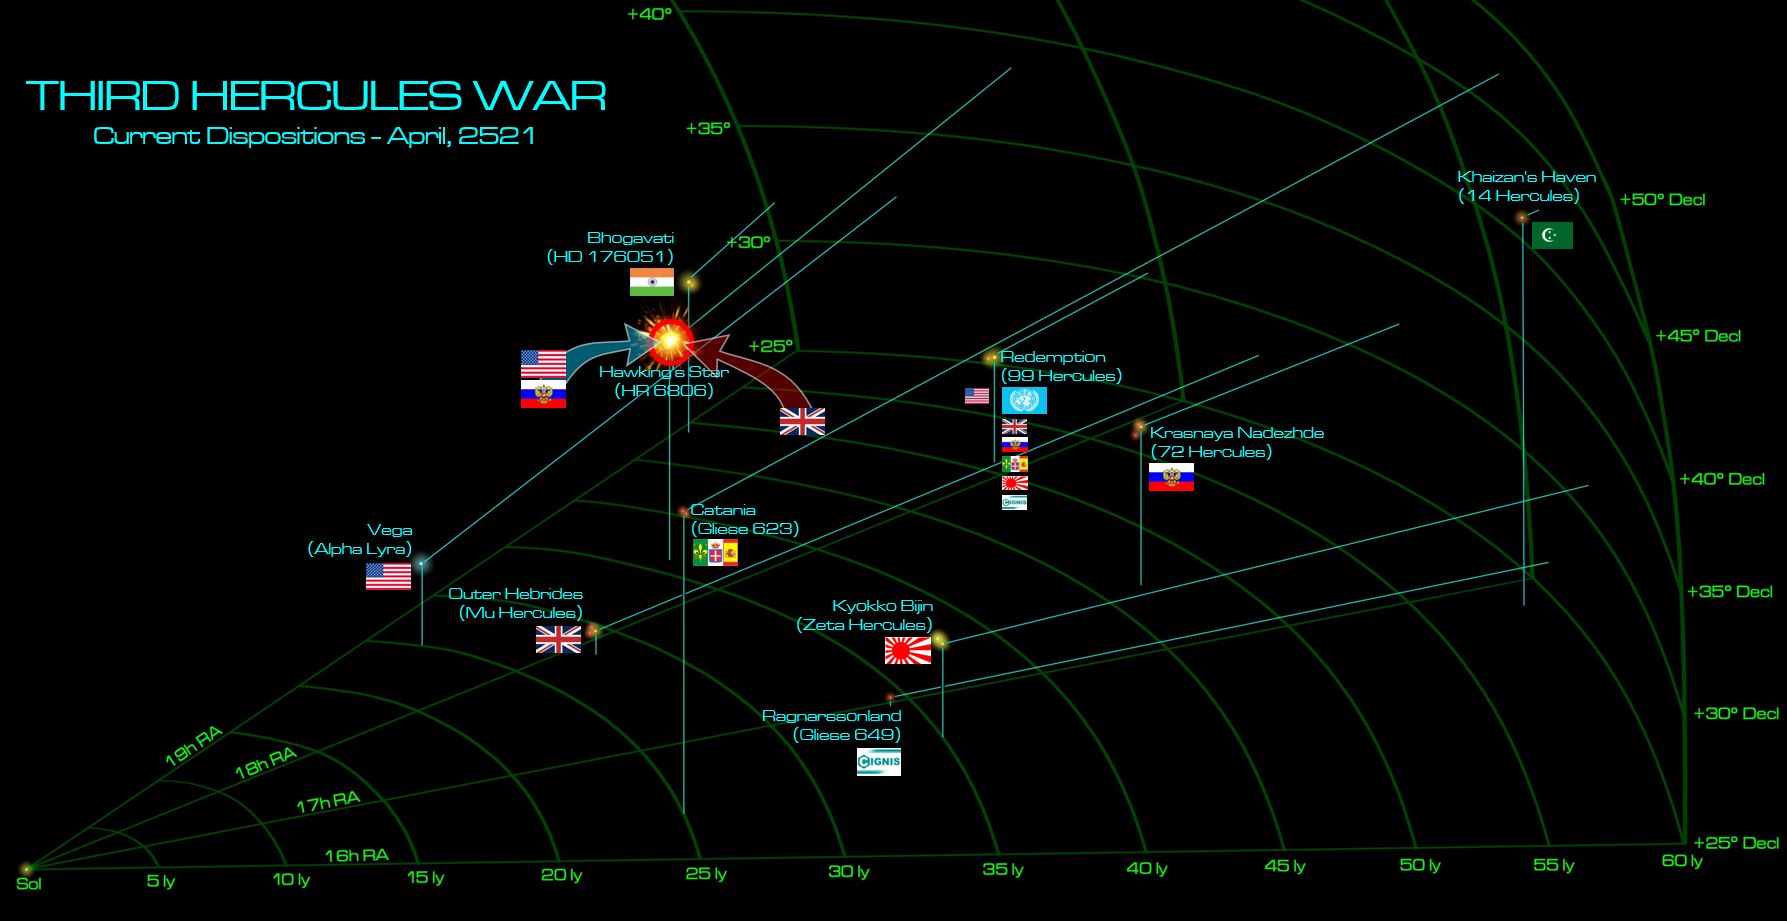
Recent weeks have seen the center of gravity in the ongoing Third Hercules War shift increasingly to the coreward star systems of the region. As the Americans and British catch their breath in the wake of the Hawking’s Star battles, the Arab League and Holy Russian Empire ratchet up the engagements on the other shoulder of the Hercules Rim. Most recently, the Arab League launched an abortive raid against KV323, innermost planet of Krasnaya Nadhezda colonies (72 Hercules). The Russians forced a bloody win at the ensuring skirmish, and emboldened by their success, have launched a counter-raid back at the Arab League’s main holding in the Hercules sector, Khaizan’s Haven (14 Hercules).
Yet the Russians aren’t going alone. Another local power supporting the Russo-American “Coalition of Eagles” is the Corporate Consortium, with important holdings at Ragnarssonland (Gliese 649). Thus far the Consortium hasn’t been involved very deeply in the war, only cooperating with the Russians in a minor battle against the Japanese at the conflict’s outset. Put more simply, the Consortium hasn’t been interested in the bloodbaths at Hawking’s Star or the stalemate at the UN Mandate at Redemption (99 Hercules). Where the Consortium is interested, however, is when the war strays too close to Ragnarssonland, and with the recent Arab League raid at KV323, they’re interested in discouraging further League sorties along the coreward Hercules Rim.
Accordingly, two Baroness class “security ships” (strike frigates) have joined a Russian raiding battlegroup made up of a Kutusov class light cruiser and a Zhukov class light strike carrier, setting a Darkstar wave toward the outer reaches of the Khaizan’s Haven colony at 14 Hercules.
The long distance of this strike, however, requires a powerful Darkstar wave to carry the ships to the target in a reasonable timeframe. High-magnitude Darkstar waves are easy to detect, and automated League outposts have done just that. With half a day’s warning, a League response force is sortied to the outer protoplanetary disc of the 14 Hercules system, where they meet the Russians and their Corporate allies amidst the dark, frozen, slowly drifting debris.
This is the newly-repaired Mutamid battle group, rebuilt from the badly-damaged Al Fihri battlegroup that took such a pounding at KV323. Now those commanders are back, some of them with new ships. For them this is more than a question of a new League caliphate in the Hercules Rim. This is also about a personal matter … of payback.
Holy Russian Empire / Corporate Consortium: Oriskany
Arab League: Muakhah
214 points per side
RAID victory rules
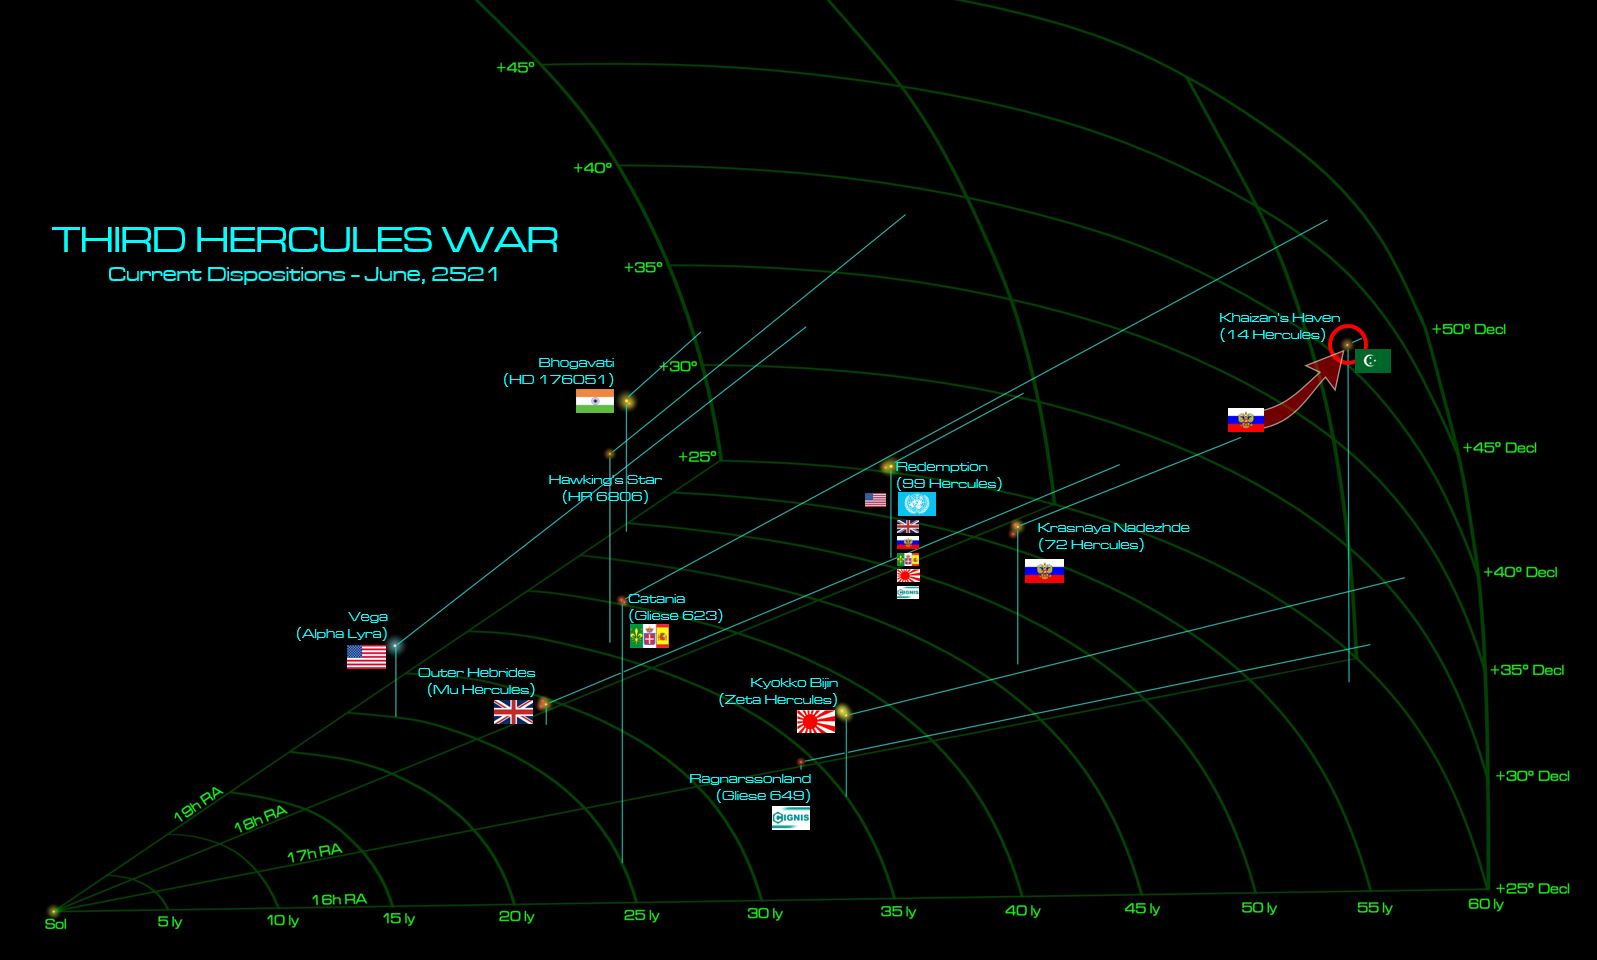 Current disposition on the Third Hercules War. An Arab League strike out of Khaizan’s Haven has recently failed at the Holy Russian Empire colony of Krasnaya Nadhezda (Red Hope). It’s time for the Russians to return the favor, along with Corporate allies from the Consortium based at Ragnarssonland. Are there ties between corporate executives and oligarchs within the Holy Russian Empire? Is the Consortium simply wary of Arab League interference along their Ragnarssonland shipping and communication routes? Does the Arab League hold important contracts with corporate rivals? Motives are rarely clear among the naval powers of Darkstar.
 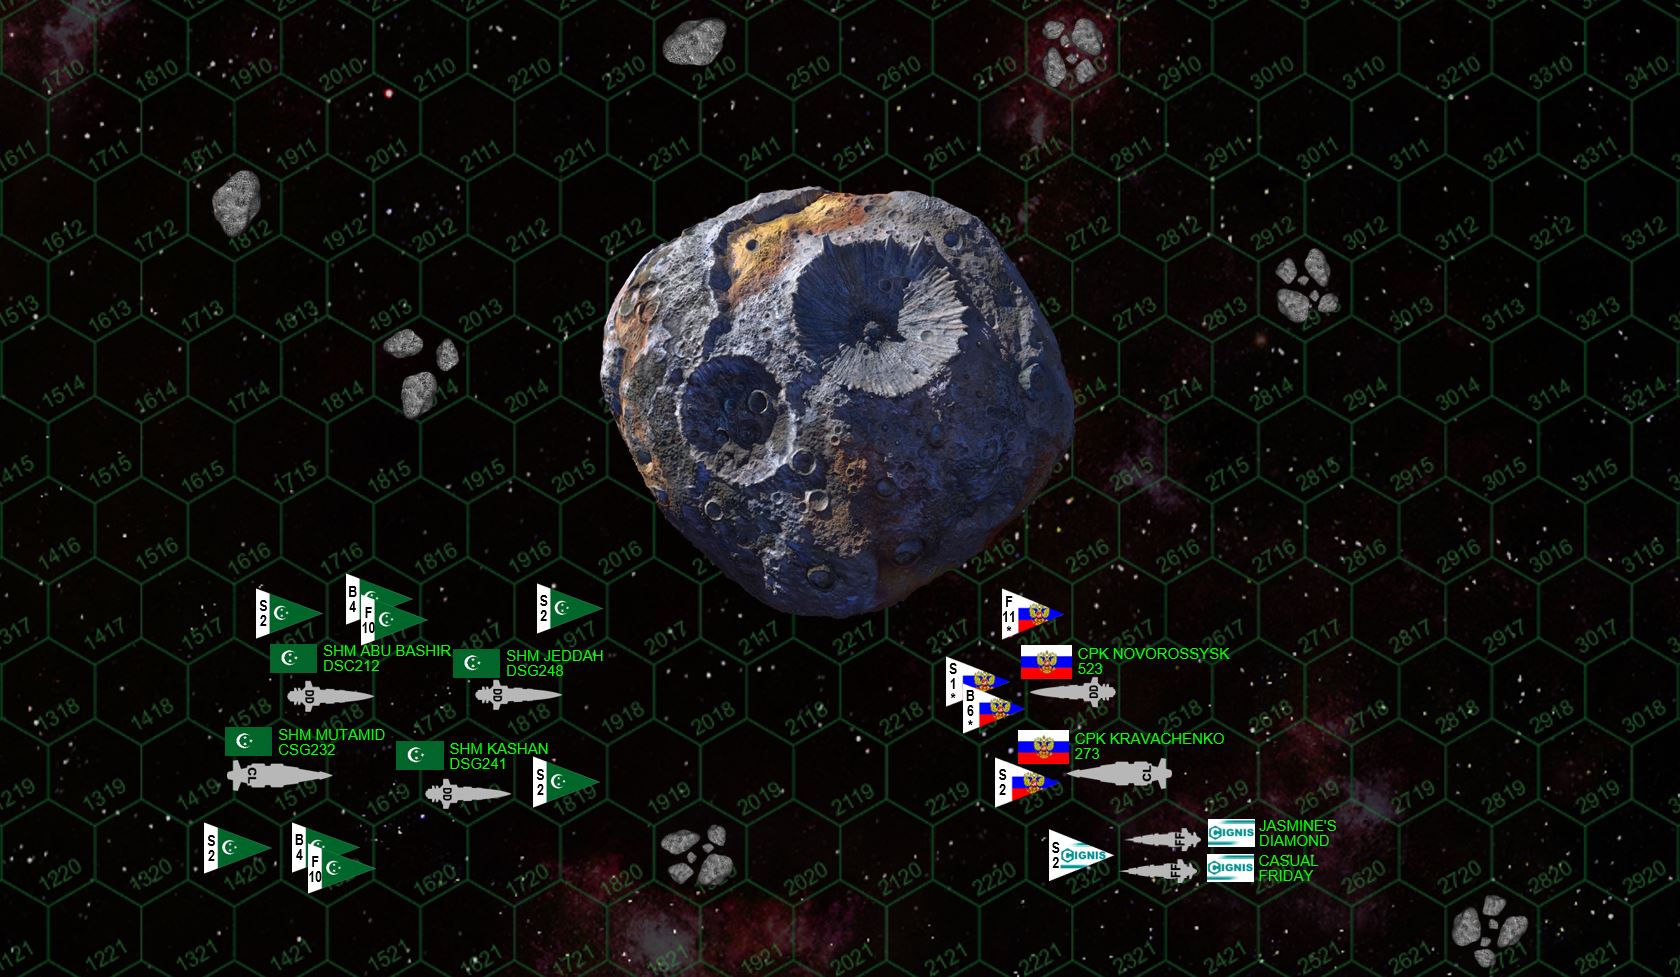 Here’s the matchup. For the League, we have community member @muakhah ‘s rebuilt task force, led by his new Almanzor-class light cruiser Mu’tamid (named for Al-Mu'tamid ibn Abbad, one of the Abbadid rulers of Seville during the time of Moorish Spain). It is escorted by the Basra class destroyers Kashan and Jeddah, also replacements for ships lost in recent battles. The only League ship here from the “original” Al Fihri battlegroup is the Khalifa class light carrier Abu Bashir. The Russians have the Kutuzov class light cruiser Kravachenko, flanked by the Zhukov class light strike carrier Novorossysk. These Zhukov class carriers were originally built as planetary assault ships (carrying drop ships, troops, tanks, and APCs), but a handful were converted to carry a bomber-heavy aerospace group for strike-role operations such as this. This carrier’s also been in previous games, where her aerospace group was rated as “double elite.” They are only “elite” now, the result of new pilots joining the squadron to replace losses suffered in earlier engagements. There are also two Baroness-class “security frigates” from Cignis Systems ... very small, very fast, very high tech ... but ultimately pretty vulnerable IF HIT because of their very small size.
 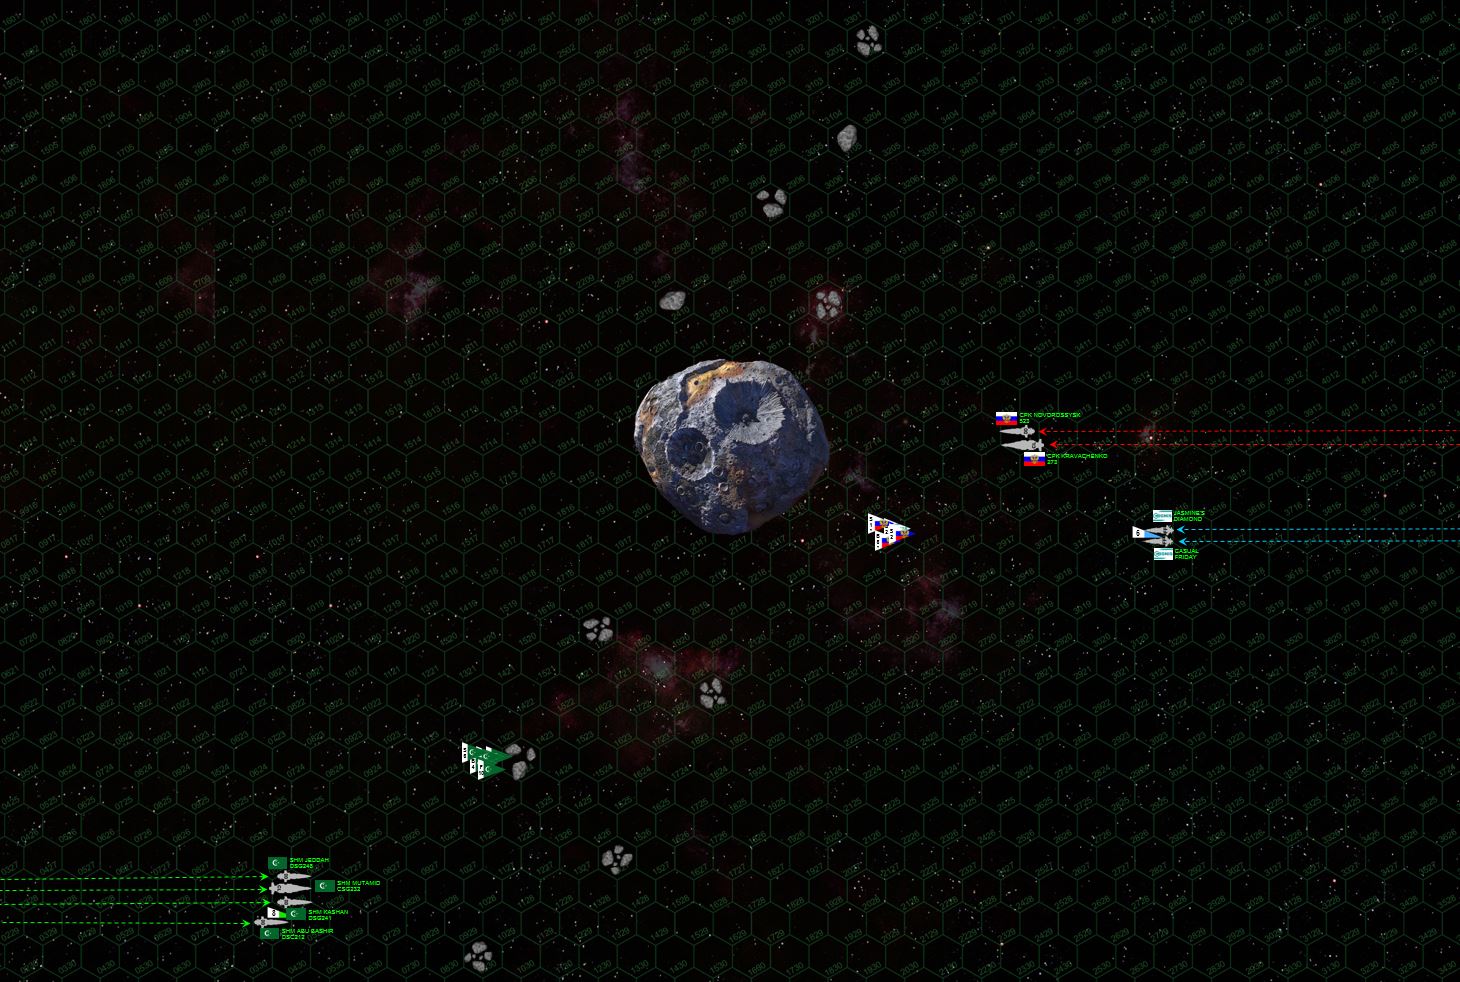 The two battlegroups vector toward each other and make their initial approach. Note the large asteroid, about 1000 kilometers across at its widest point (about the size of France), surrounded by smaller planetismals and protoplanetary debris. Fighters and bombers are launched from the Mutamid, Abu Bashir, and Novorossysk, both sides aggressively pushing bombers forward while also screening them behind asteroids and keeping them within covering range of friendly mass drivers. Only a few ships can see each other at the moment, many lines of sight are blocked by “Kuiper Belt” asteroids.
 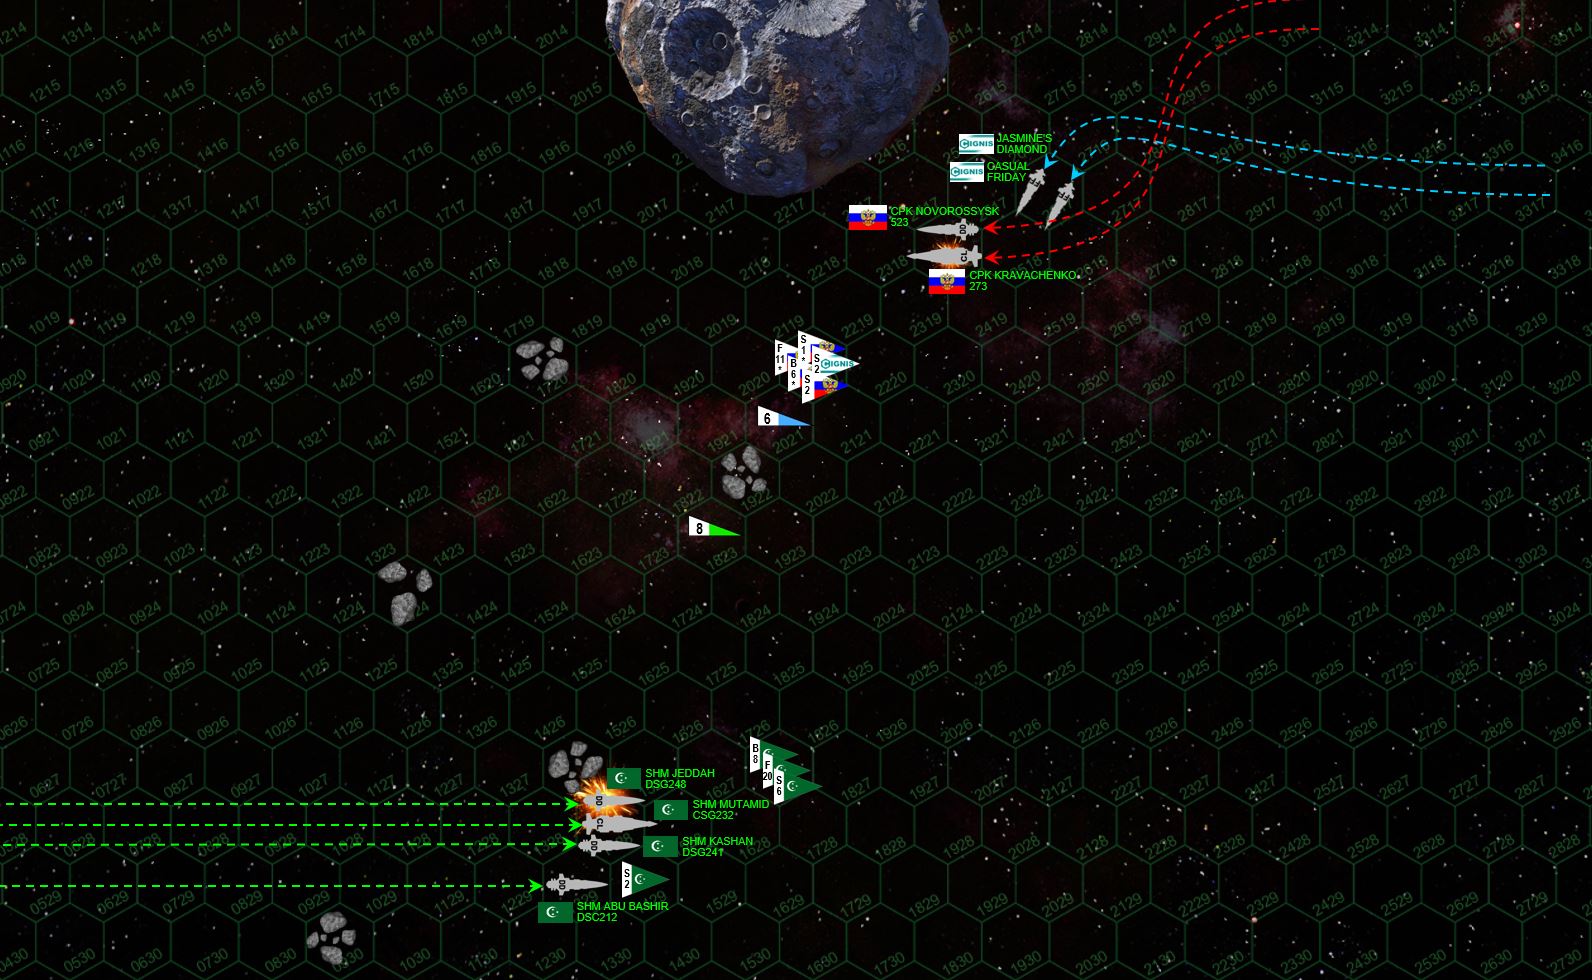 The Russians continue to close the distance, ducking behind more asteroids, hoping to remain screened until they can close to VERY short range where their EPCs and plasma weapons can really do heavy damage. The Cignis ships also maneuver to a hopeful advantage, keeping their bows pointed to the enemy so they can fire more volleys of their deadly “Sparta XII” gravitic torpedoes. The League, however, disrupts these plans, punching forward with a rapid reacceleration that puts a broadside immediately on the Russian ships. Streaking out from behind the asteroid field at 1427, they open fire into the port bow of the Kravachenko, doing incredible damage, knocking down her shielding, setting fire to the bridge, destroying portside torpedo tubes, and blowing one mass driver mount clean out of the hull. Russian and corporate return fire is even more withering, however, with one of Casual Friday’s powerful lasers hitting Kashan’s badly damaged port bow and drilling straight through the bridge, instantly crippling the ship and wounding the skipper, Commander Hayder al-Bayati.
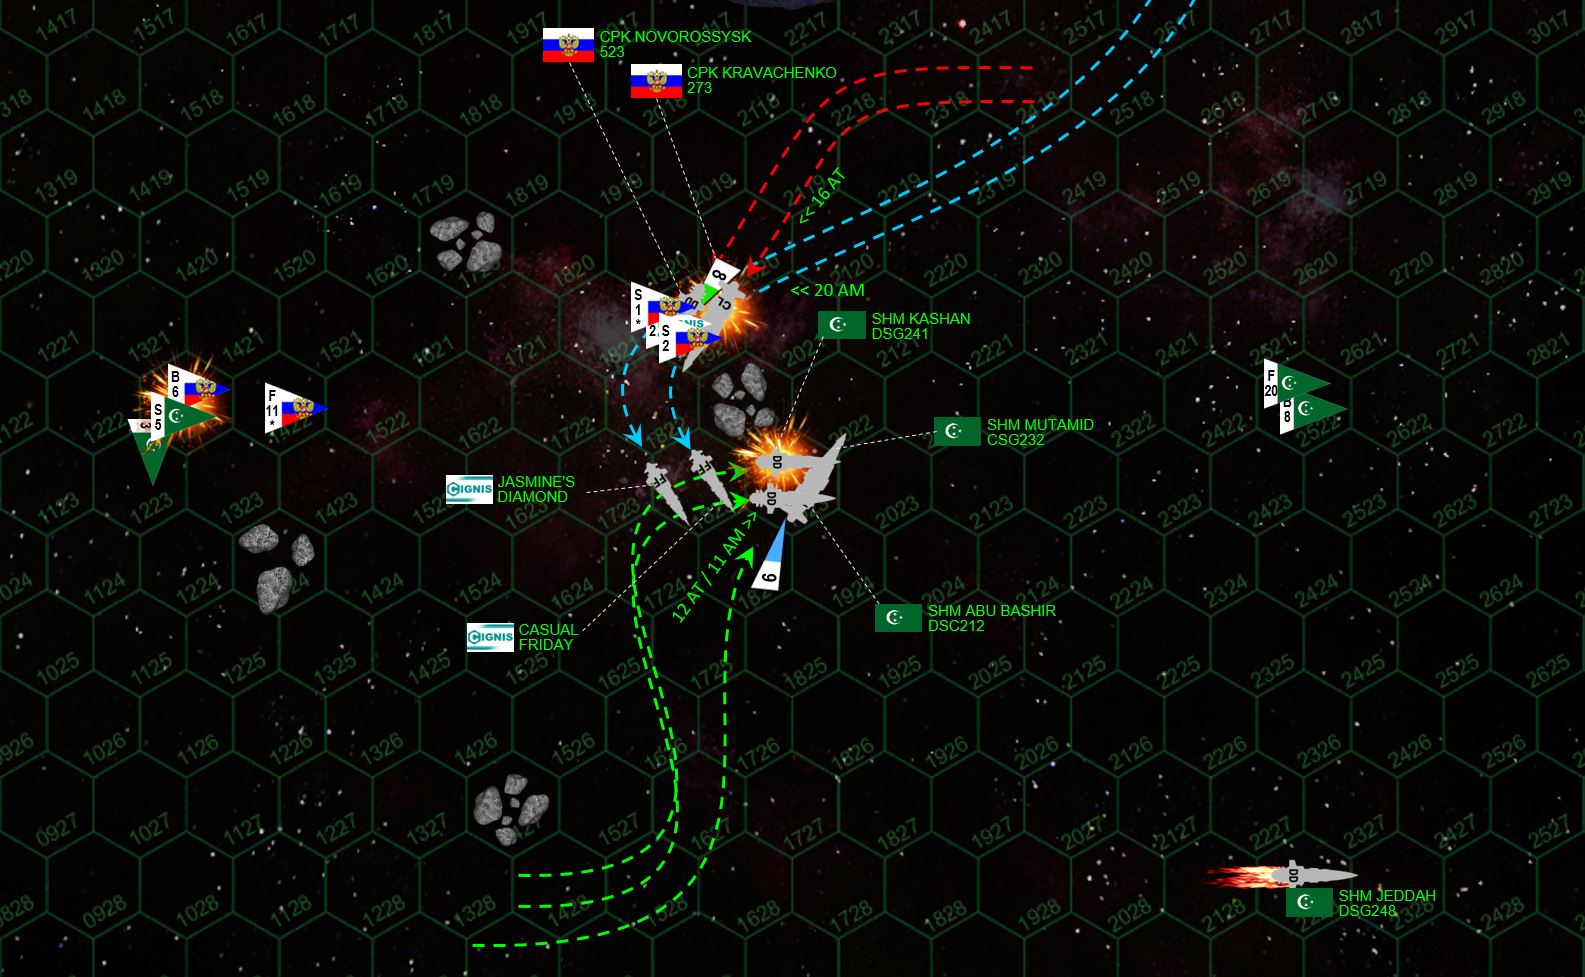 With both fleets at high speed and the Russians CLEARLY wanting to close the range as fast as possible, the League commander (Captain Rashid al-Maghrebi) realizes he come full about at this speed and re-open the range. So he dives toward the Russians, using the cover of asteroids at 1923 for the protection that sheer distance can no longer provide. This puts the Russians in a bad spot, the damaged Kravachenko cannot maneuver properly and desperately wants to use asteroids to cover her wounded port bow as well. For the moment, this completely takes the Kravachenko out of the battle, along with 80% of the coalition’s gunnery. The Jasmine’s Diamond and Casual Friday make a dive for the stern of the League destroyer and light carrier, while the Abu Bashir and the Novorossysk complete launching of aerospace groups and set up for torpedo strikes on the Kravachenko and Mutamid. The wounded Kravachenko, while safe from League gunnery, finally goes down under a hail of torpedoes and missiles. The Mutamid fares much better against the Russian MiGs and Tupolev bombers, accurate and concentrated mass driver fire largely breaking up the Russian aerospace and torpedo attack. League scouts go for the Russian bombers but shoot none them down, even as they lose three of their own to Russian mass driver guns. Another killing blow is landed by the Jasmine’s Diamond and Casual Friday, which have maneuvered for point-blank broadsides into the engines of the destroyer Jeddah.
 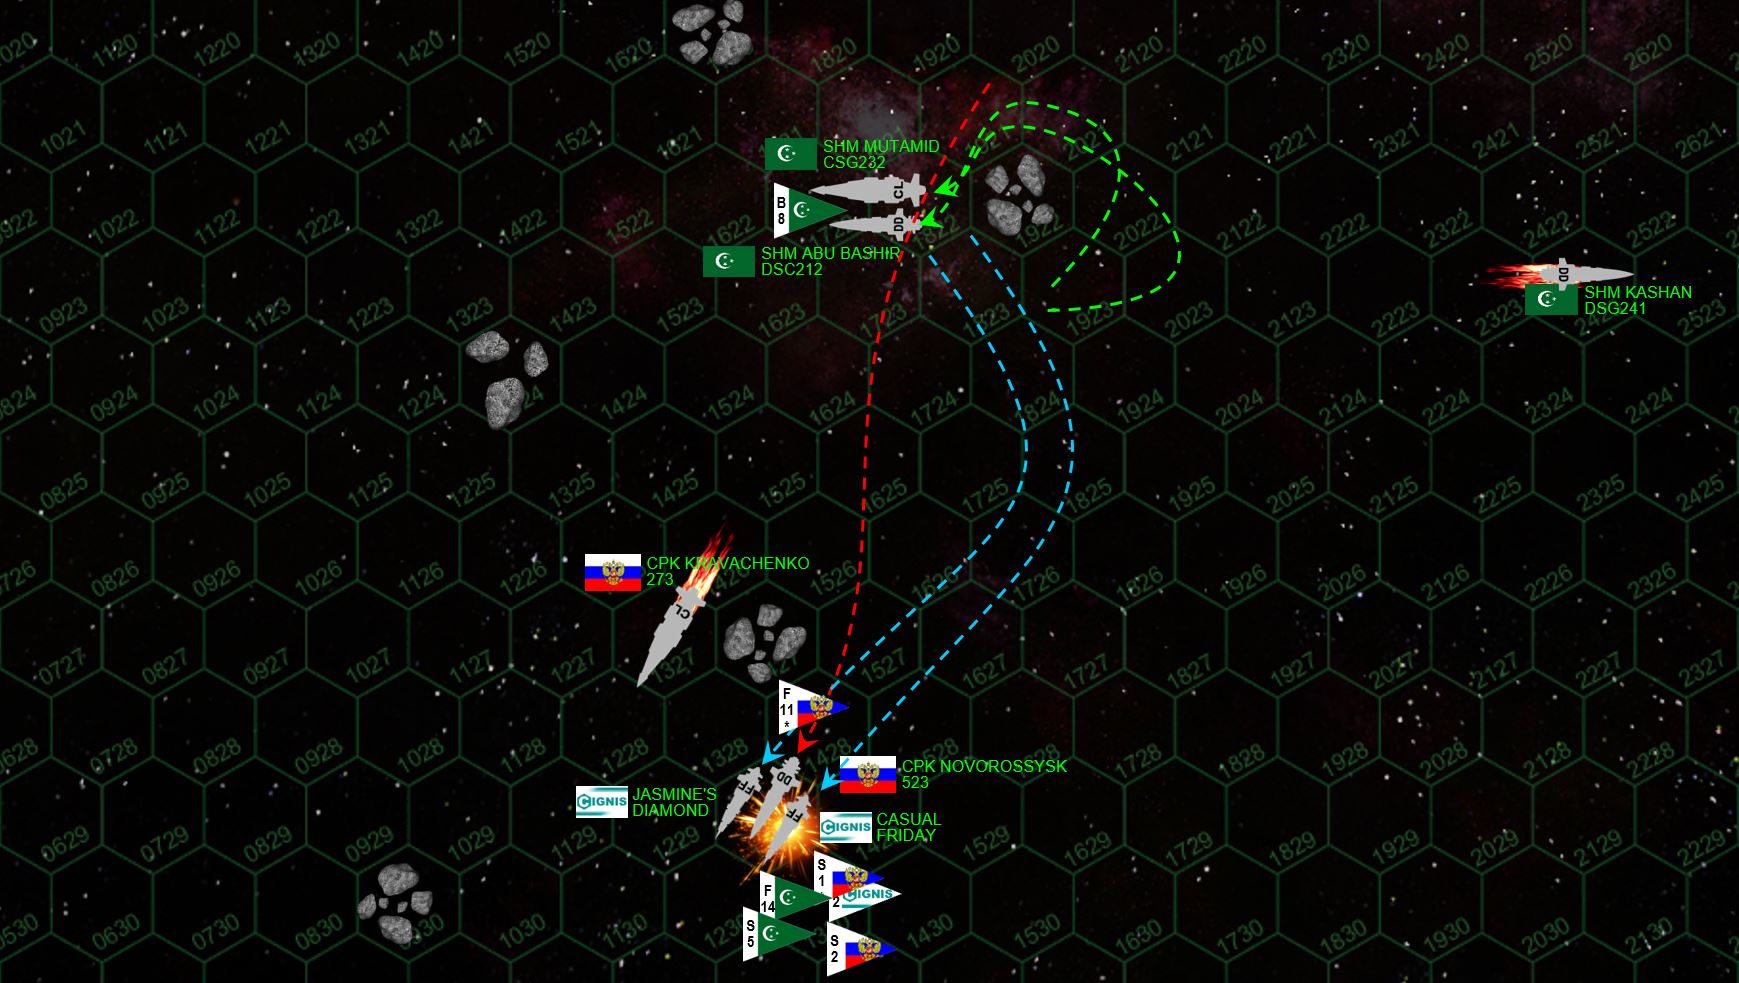 At this moment, with two destroyers and some scouts destroyed against the crippling of the Kravachenko, the Russians are narrowly winning the battle. Therefore they decide to try to break off, turning to 180 and rapidly making for the bottom of the table. They manage to get behind the asteroid field at 1427, covering their escape from Mutamid’s guns. But that doesn’t hide them from the “Mylekinir” (Fire Angel) fighters of the Mukamid and the Abu Bashir. Many are shot down by the mass driver fire of the Novorossysk and Jasmine’s Diamond, but the Casual Friday (which had lost her port bow shielding earlier to Arab League EPCs) is hit by a pin-point fighter strafing attack targeting the security frigate’s bridge. Her skipper, Sr. Director Greg Shapiro, is killed in the attack.
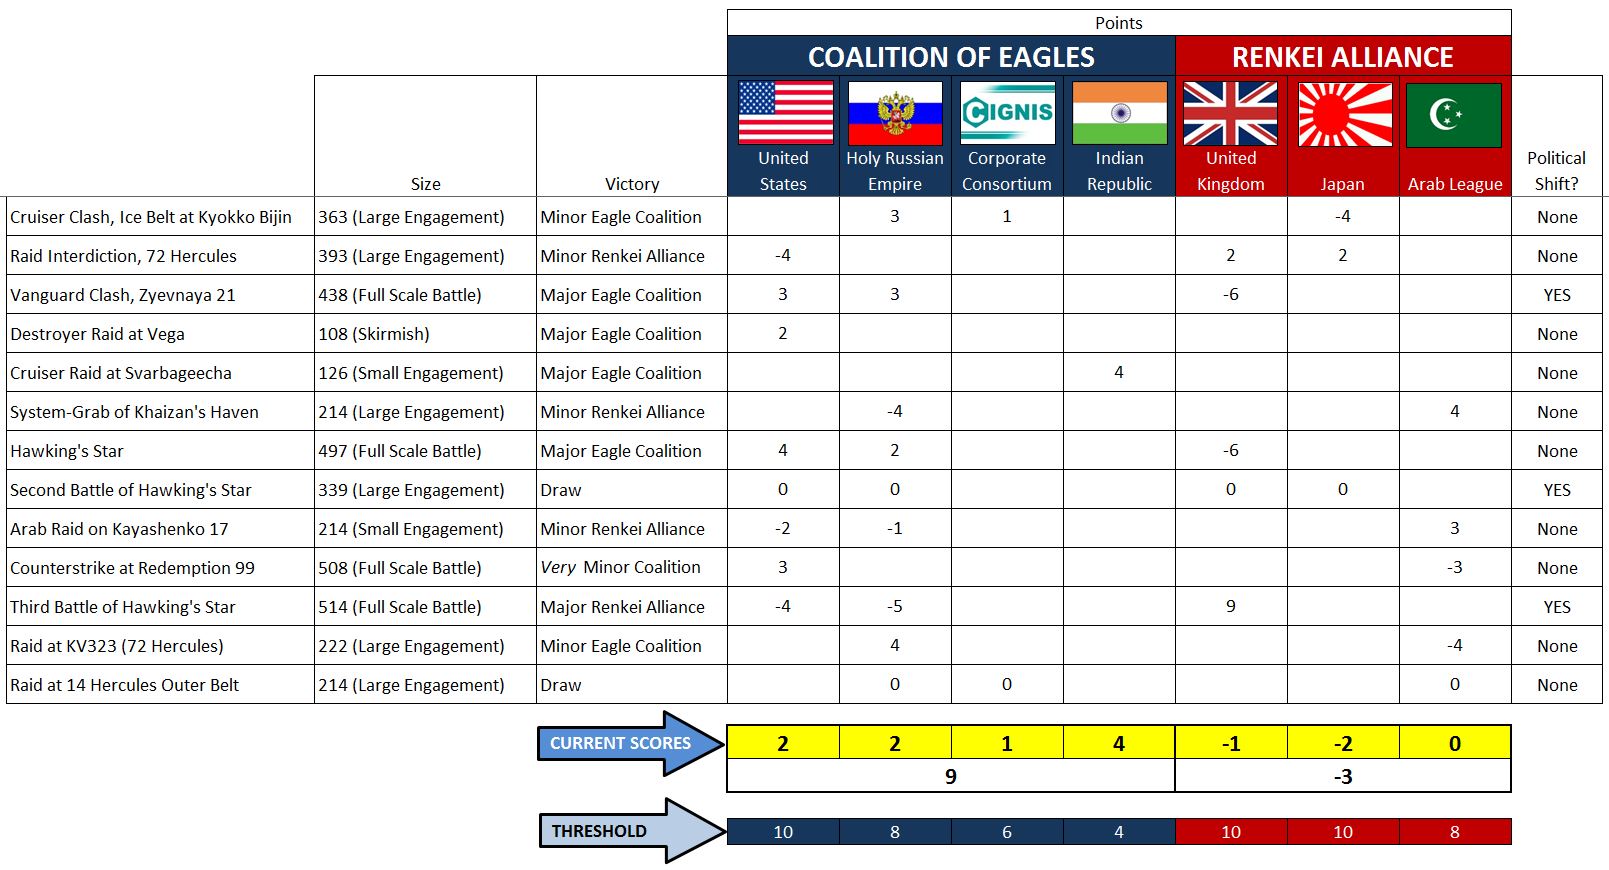 Thus ends the skirmish. From the narrow Russo-Corporate victory at the end of Turn 3, the League has managed to wrest a draw. The score is actually a League “win” at 102-95, but with only a +7 point lead in a 214-point battle (+3.3%), the battle is still recorded as a draw (reminder: to count as a “win” for campaign purposes, all Darkstar battles must be won by at least 5% of the starting points level). Thus this chart doesn’t actually change that much, the state of the Third Hercules War remains the same. What does change, however, are the campaign points and battle experience for the commanders. The officers of Battlegroup Mutamid continue to gain experience toward future campaign upgrades!
Muakhah's Writing: Aftermath of KV323
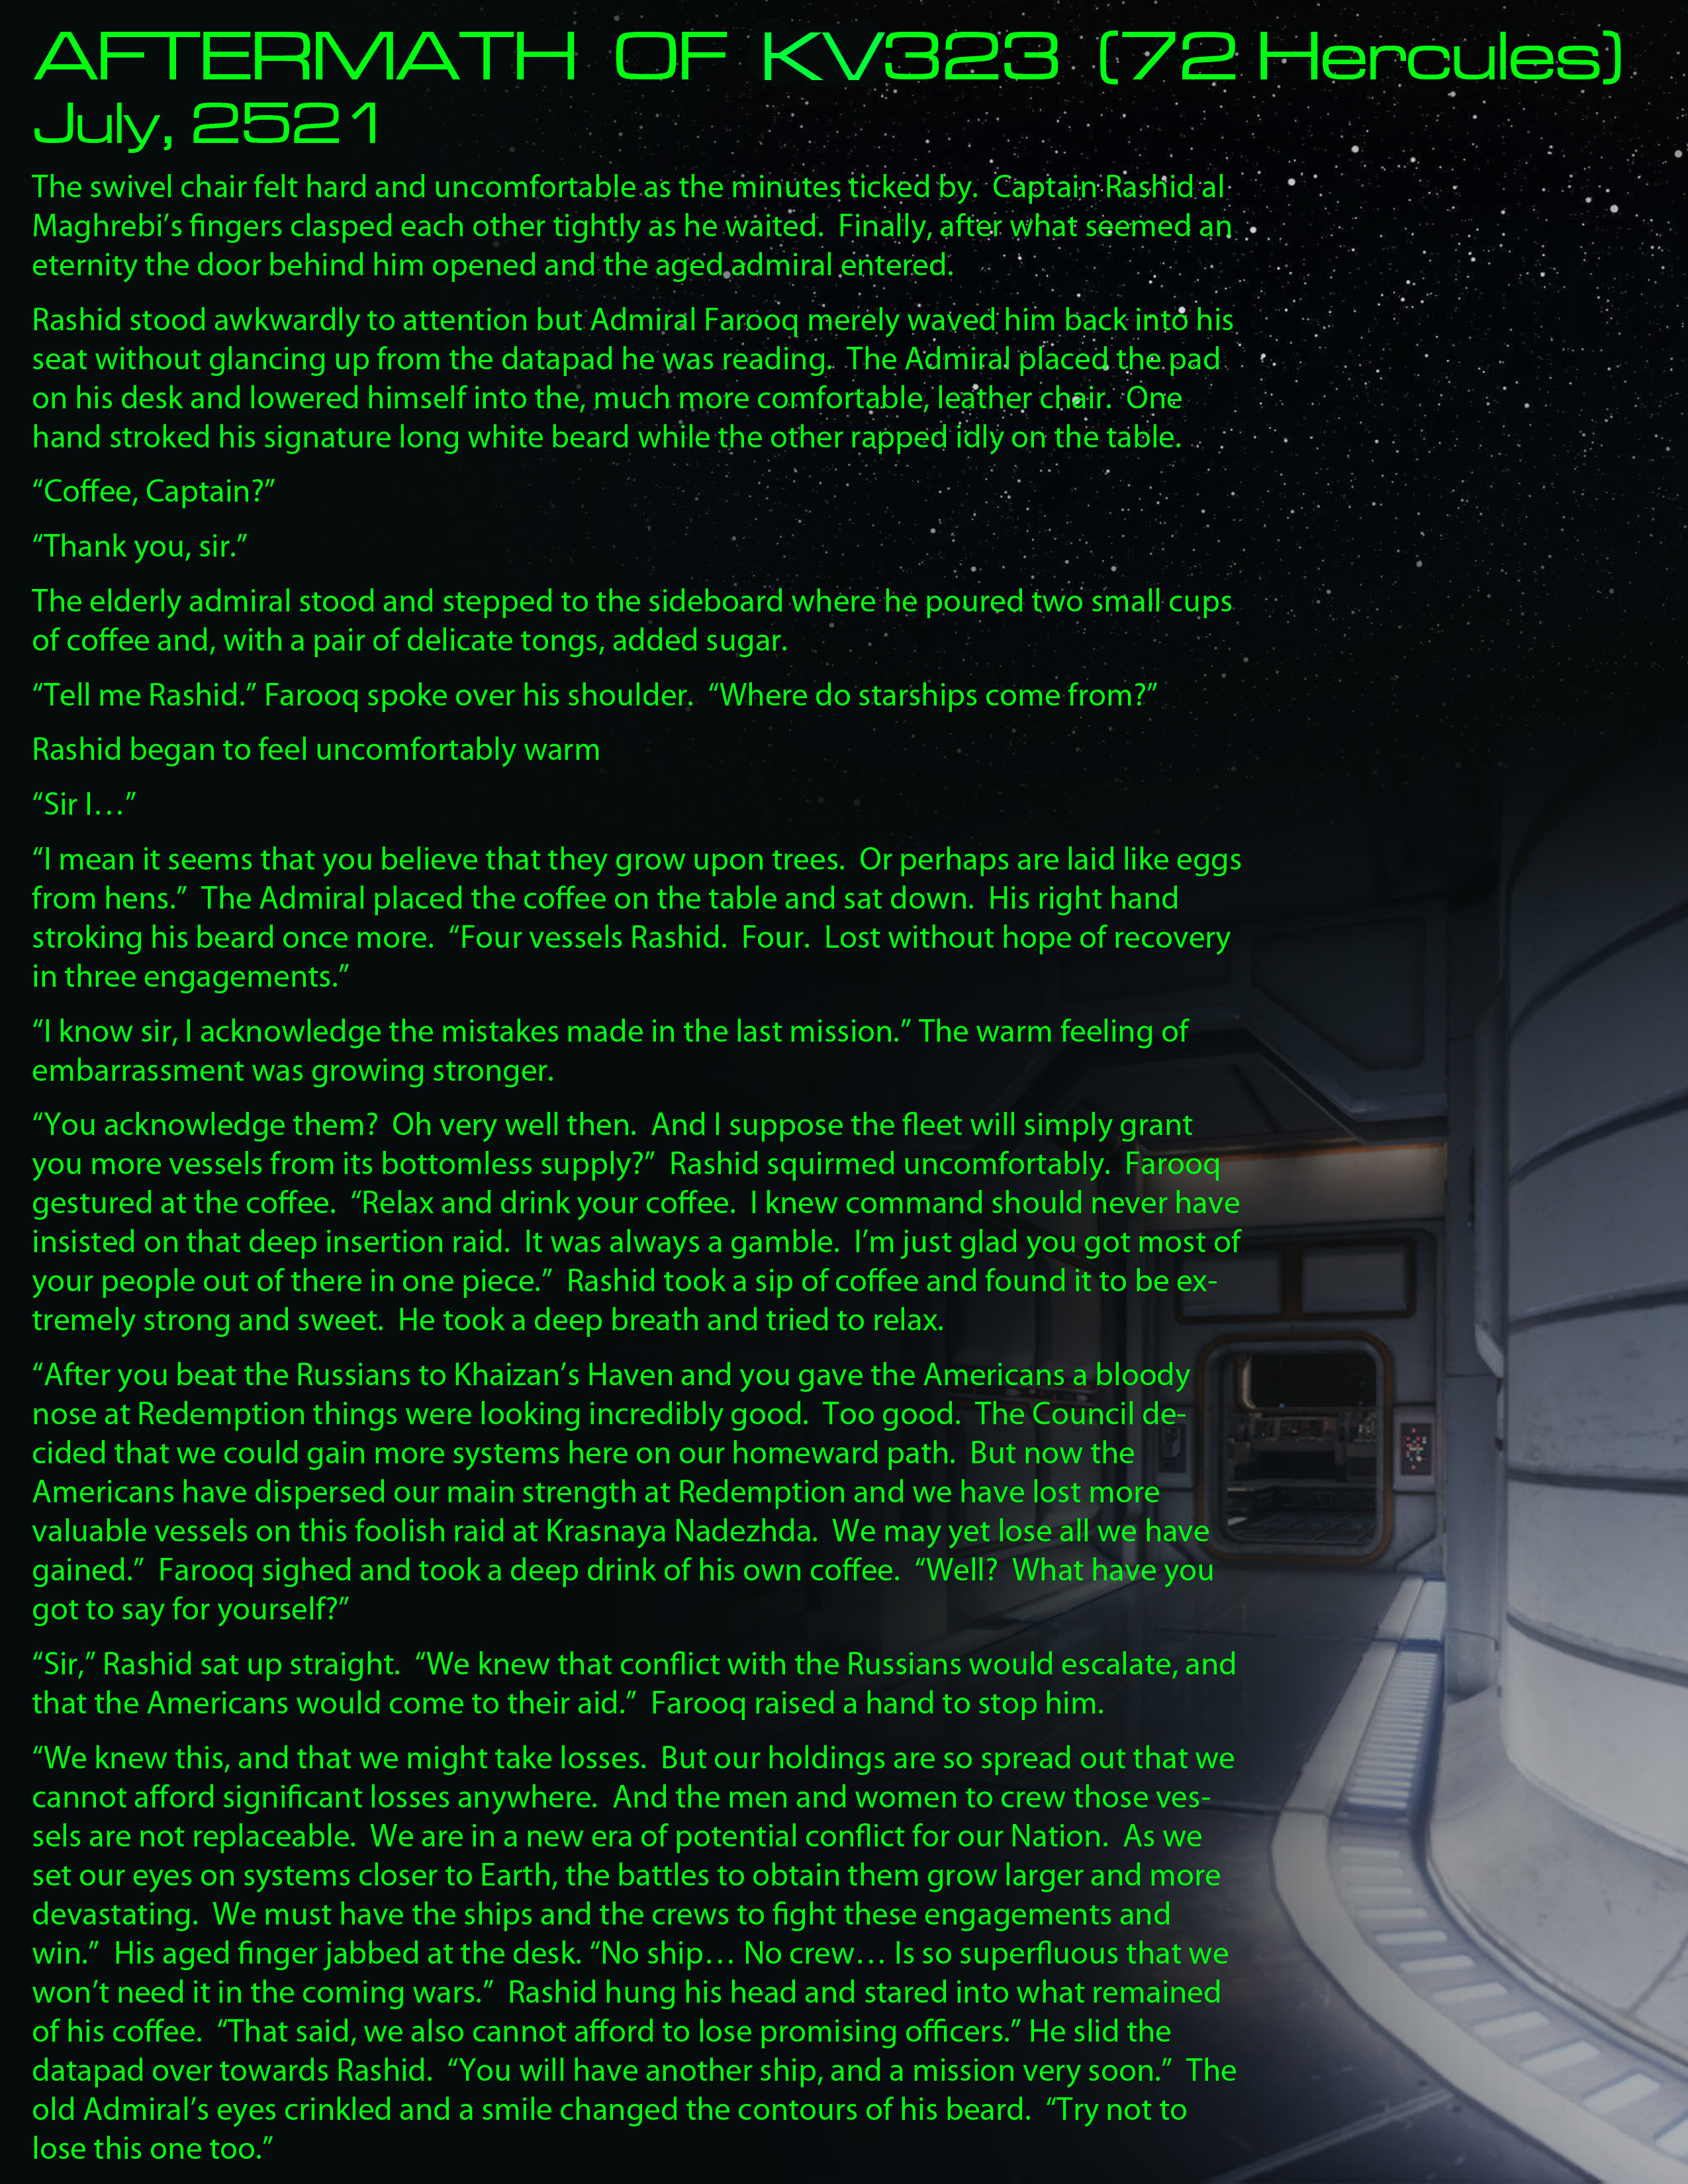
Here is some great writing community member @muakhah put together to describe some of the aftermath of the recent raid on KV323 (72 Hercules A). This was a raid carried out by the Arab League into heart of the Russian Krasnaya Nadhezda (Red Hope) colonies – part of our continuing Third Hercules War community campaign here on OTT.
Battle: Raid on KS323
Date: 16 June 2521
Planet: KV323 (72Hercules-A)
System: Krasnaya Nadhezda “Red Hope” – 72 Hercules, Hercules SCS
Points: 222 per side (Raid Rules)
Russian Players: @Rasmus / @Oriskany
British Players: @muakhah / @Oriskany
The battle settled out as a bloody, narrow Russian win, where @muakhah was able to hold the Russians to a “minor victory” in the campaign rules despite a few early missteps and some pretty bad dice.
What made the outcome especially bleak for the League, however, wasn’t just the defeat, but the permanent loss of two League ships, the destroyer SHM Mersin and light hybrid cruiser SHM Al Fihri. Not only was the Al Fihri the flagship of this battlegroup and the command of @muakhah’s main commander, but Al Fihri and Mersin were the two original ships in his task force. The commanders survived … but those ships are gone for good.
Based on all that background, @muakhah put together the writing below. The writing is his, all I added was some basic graphics.
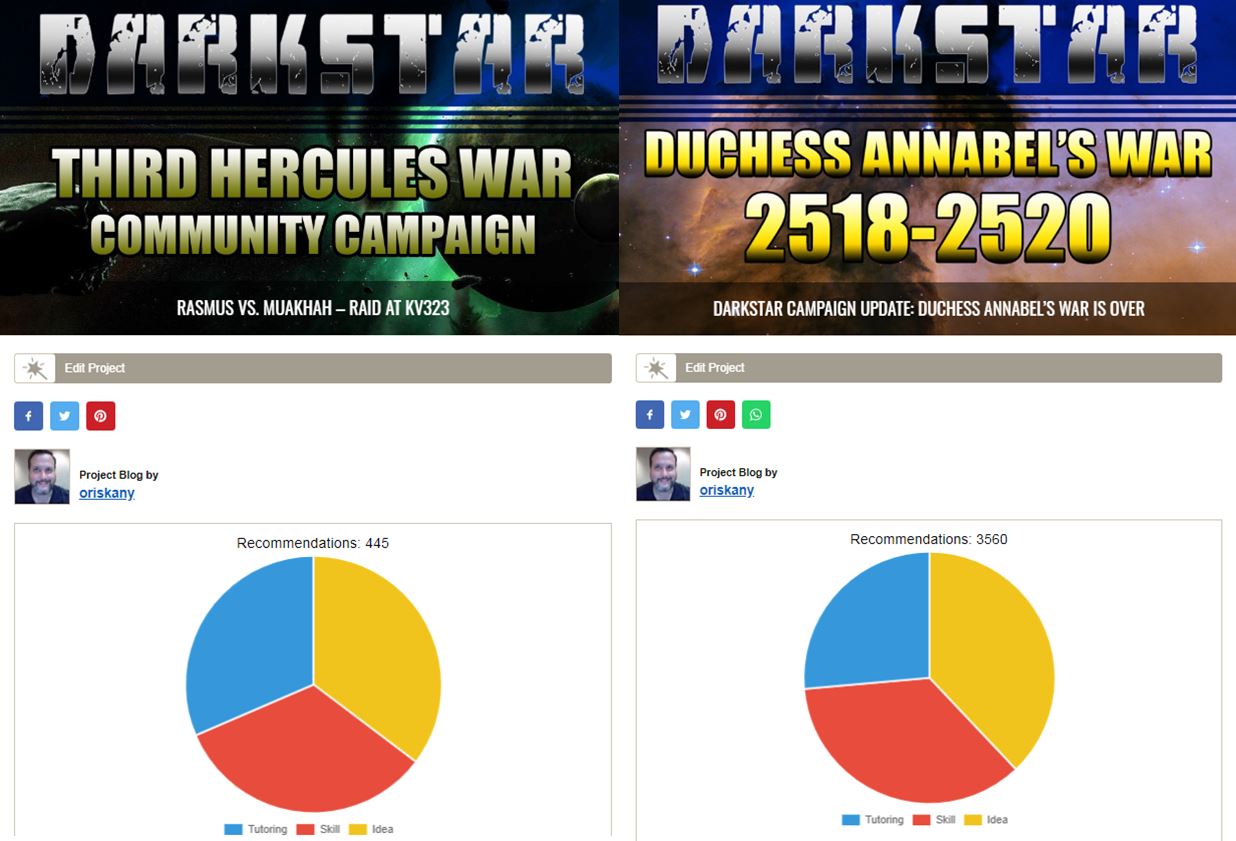
Darkstar Hits 4000 Project Recommendations!
I am both proud and humbled as the ongoing Darkstar project threads have passed the milestone today of 4,000 community recommendations.
I started the project thread soon after the launch of BoW / OTT 2.0 (25 May, 2018), almost as a “forlorn hope” as it didn’t include anything in the way of miniatures, painting, or more traditional forms of hobby.
But holy hell, did this awesome community prove me wrong.
As some of you may remember, the old Darkstar thread was retired when it grew too large (127 entries, I think). It closed out at 3,560 recommendations. Added to the new thread’s current score, the Darkstar total now stands over 4000.
This doesn’t include other threads strated by other community members, like Elessar2590 and Bloodstrike (linked below)
Seriously, everyone … thanks so much for all the great support. And thanks as always to the OTT team for hosting such a great environment where a project like this can thrive!
Here’s to more epic star conquest in the future!
Rasmus vs. Muakhah - Raid at KV323
FROM: UNITED NATIONS REGIONAL COLONIAL CENTER
03:10 SOL GMT, 16 JUNE 2521
BREAKAUTH: 181072.18J
CLEARANCE: SECRET (NATIONAL)
**UNITED NATIONS COMMUNIQUE**
Even as the ashes cool in the wake of the Third Battle of Hawking’s Star, and the shockwaves of that aftermath continue to ripple through the spinward star systems of the Hercules Rim, new battles are igniting along elsewhere in this ongoing war. Reports are now coming in of an action at KV323, a tiny Mercury-analog dwarf planet orbiting extremely close to the parent star of the 72 Hercules system. The 72 Hercules system is the home of the Russian Krasnaya Nadhezda (Red Hope) colonies, mainstay of the Holy Russian Empire in the Hercules Rim.
Raided repeatedly by the British and Japanese at the outset of this war, Krasnaya Nadhezda has since enjoyed a long stretch of calm in more recent months once the Americans started to threaten British holdings at Hawking’s Star (HR6806). But constant fighting at the Hawking’s Star colonies and the Redemption UN Mandate (99 Hercules) has stretched Russian naval forces across dozens of light years, not to mention divide the Duma’s support of this war and test the patience of the Tzar Aleksandr IX.
Choosing their moment, the Arab League, now firmly established at their new “Khaizan’s Haven” colonies in 14 Hercules, has apparently decided to bring the war back to Krasnaya Nadhezda. Swift, fast, and stealthy, the Al Fihri Battlegroup, under the flag of Captain Rashid al-Maghrebi, has been dispatched to penetrate the 72 Hercules system. strike targets of opportunity, and destabilize the Holy Russian Navy as much as possible.
Strategically, the Arab League hopes to capitalize on recent strain between the United States and the Holy Russian Empire in the wake of their defeat at Third Hawking’s Star. If the League can cause enough damage at Krasnaya Nadhezda, the Russians may demand more help from the Americans, just as the Americans demanded help from the Russians at Hawking’s Star. If the Americans help, that weakens them against the British. If the Americans don’t send help, the “Coalition of Eagles” between the Americans and Russians may well destabilize to the point of collapse.
Operationally, the League hopes to capitalize on the wide-spread, scattered deployments of the Russian Navy. Hawking’s Star is 24 light-years away, almost a month’s travel for a battlefleet of any size, and once the Russians arrived there they took heavy losses … twice. Although technically a Russo-American victory, the recent battle of Kayashenko 4 also diverted Russian naval assets 12 light-years away, defending another Russian colony world that again cost the Russian Navy dearly.
Tactically, the League has taken an unusual approach for the battlegroup’s mission. Typically, raiders set a high Darkstar wave toward the target system, stopping perhaps 500 AU outside the system’s outermost planets or debris belts. Then a new Darkstar wave is set, much slower, much more accurate, virtually impossible to detect. Perhaps moving only five times the speed of light, they “crawl” into the system and drop back into normal space in the eclipse shadow of a gas giant or just short of an asteroid belt.
Here, however, the League is trying an “inside out” approach. Rather than relying on sheer distance and the scale of empty space to hide them, the Al Fihri battlegroup is hoping to hide their approach amidst the deafening electromagnetic volcano that is the parent star of the system. A Darkstar wave set this close to the powerful gravity fields of a star, not to mention the solar wind and coronal mass ejections, is dangerous to say the least. But detecting enemy ships on a slow approach through such a firestorm is all but impossible.
The Al Fihri and her escorts manage to creep into the very heart of the Russian system. The 72 Hercules star is a G0V yellow main sequence star, perhaps 15% larger than Sol. Little more than a semi-molten ball of nickel-iron and rock, the tiny dwarf planet of KV323 lies in a blow-torched, tidally-locked orbit just 20 million kilometers from 72 Hercules, just over one-third the distance that Mercury orbits the Sun. It’s in the shadow of KV323 that the Al Fihri has been lurking, waiting for her aerospace group to find a suitable first target.
But the Russians catch a break. Detecting some of Al Fihri’s scouts and extrapolating their telemetry back to their base ship, they find the Arab League force and send two Slava class heavy cruisers to destroy them. They are only hounds, however, driving the Al Farir and her escorts around KV323 to the daylight side of the dwarf planet, where a smaller, faster Russian battlegroup … the hunters … are already in a parabolic slingshot around KV323 to intercept.
Holy Russian Empire: Rasmus (Oriskany with one ship)
Arab League: Muakhah (Oriskany with one ship)
222 points per side
RAID victory rules
 Current disposition on the Third Hercules War. With the Americans and Russians tied down in a grueling but ultimately futile effort in the Hawking’s Star colonies, the Arab League hopes for a successful incursion against a distracted, frustrated, and badly-dispersed Russian Navy at 72 Hercules (Krasnaya Nadhezda - “Red Hope”).
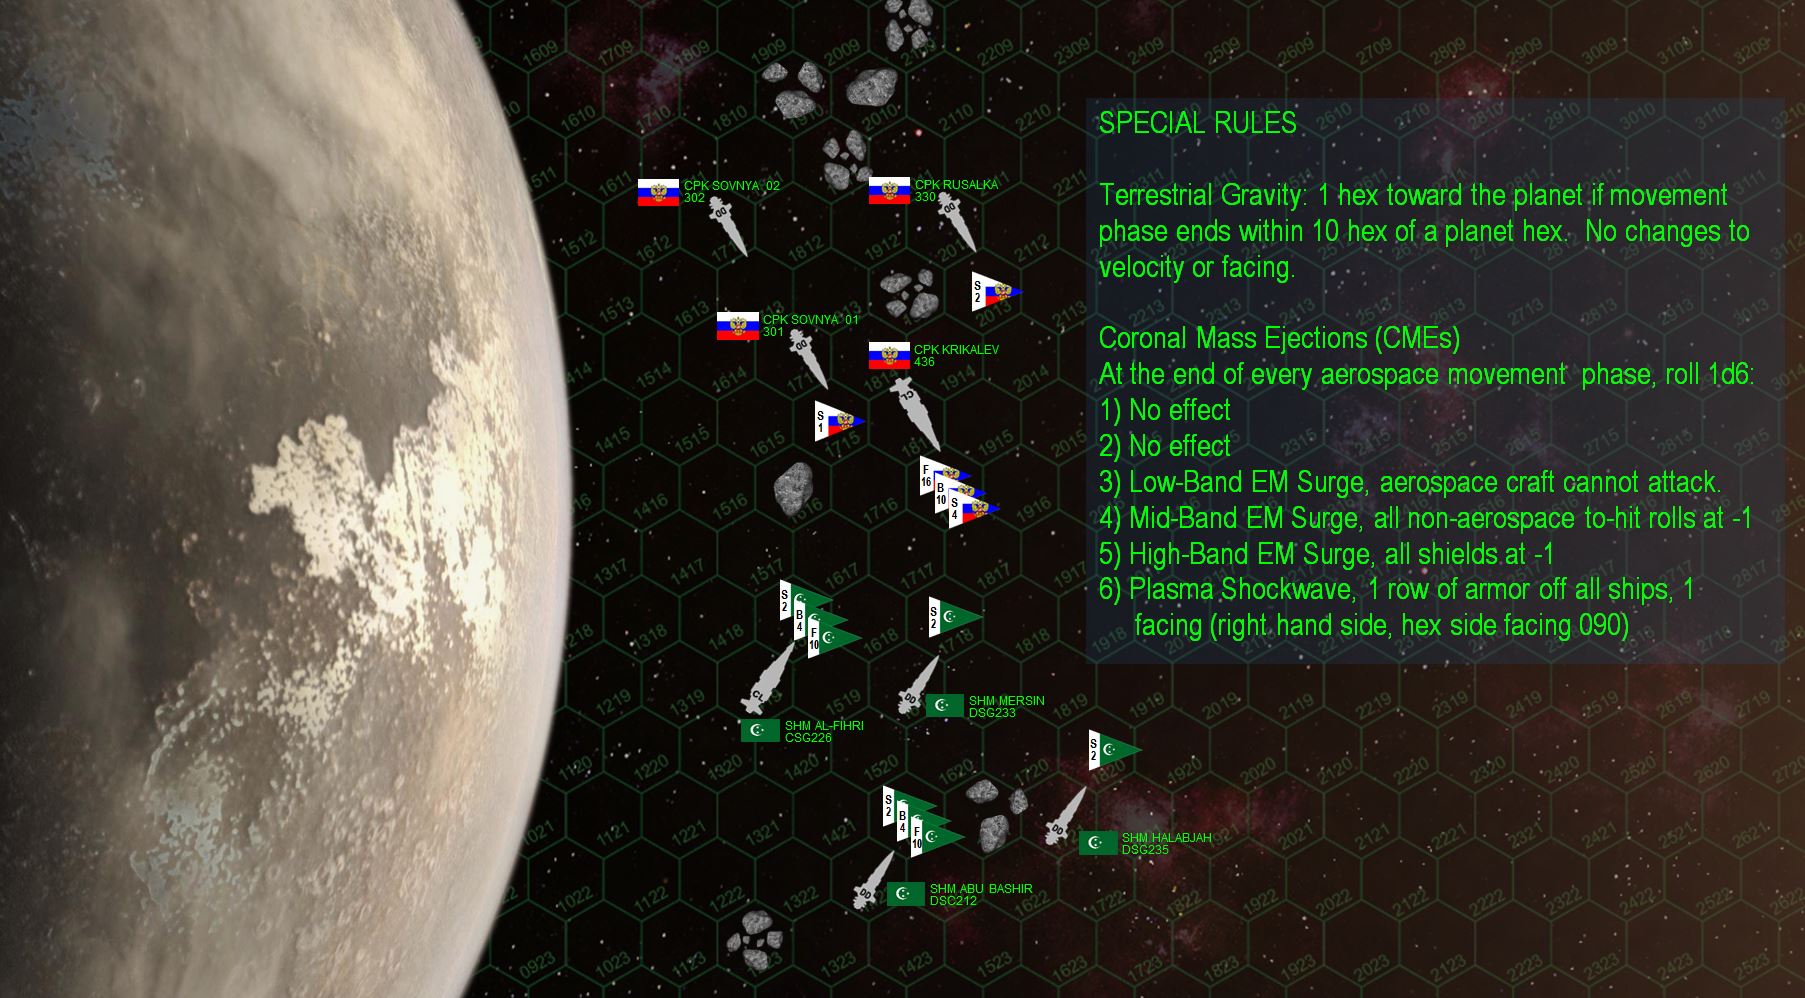 The matchup. For the League we have three ships of Muakhah’s “Al Fihri” Battlegroup. These include the Al Fihri herself (Almanzor-class light hybrid cruiser), the Basra-class destroyers Mersin and Halabjah (attached from Battlegroup Shalazar), and the Khalifa-class light carrier Abu Bashir. The Russians have Rasmus’ light fleet carrier CPK Krikalev (carrying slightly more fighters and bombers than the Abu Bashir and Al Fihri combined) and two escorting Sovnya-class destroyers. A third Sovnya-class destroyer is deployed, the CPK Rusalka (attached from Task Force Lazarev). In all, the Russian destroyers outnumber and outgun the League destroyers, while the aerospace groups are ROUGHLY equal. However, the guns of the Al Fihri may tip the balance, as that Russian “light cruiser” (actually a light fleet carrier) carries no guns at all, only fighters, bombers, and a relatively small complement of outdated P-500 Class III torpedoes. ALSO NOTE – the special rules for combat this close to main sequence star. The electromagnetic turbulence this close to a G0V main sequence star is literally off the charts, especially when the star is in a more turbulent period. Depending on the dice roll each turn, the star’s intense coronal mass ejection can effect aerospace craft, warship sensors, warship shields, or a full-blown plasma shockwave of charged particles can burn a layer of armor clean off one facing of every ship on the board.
 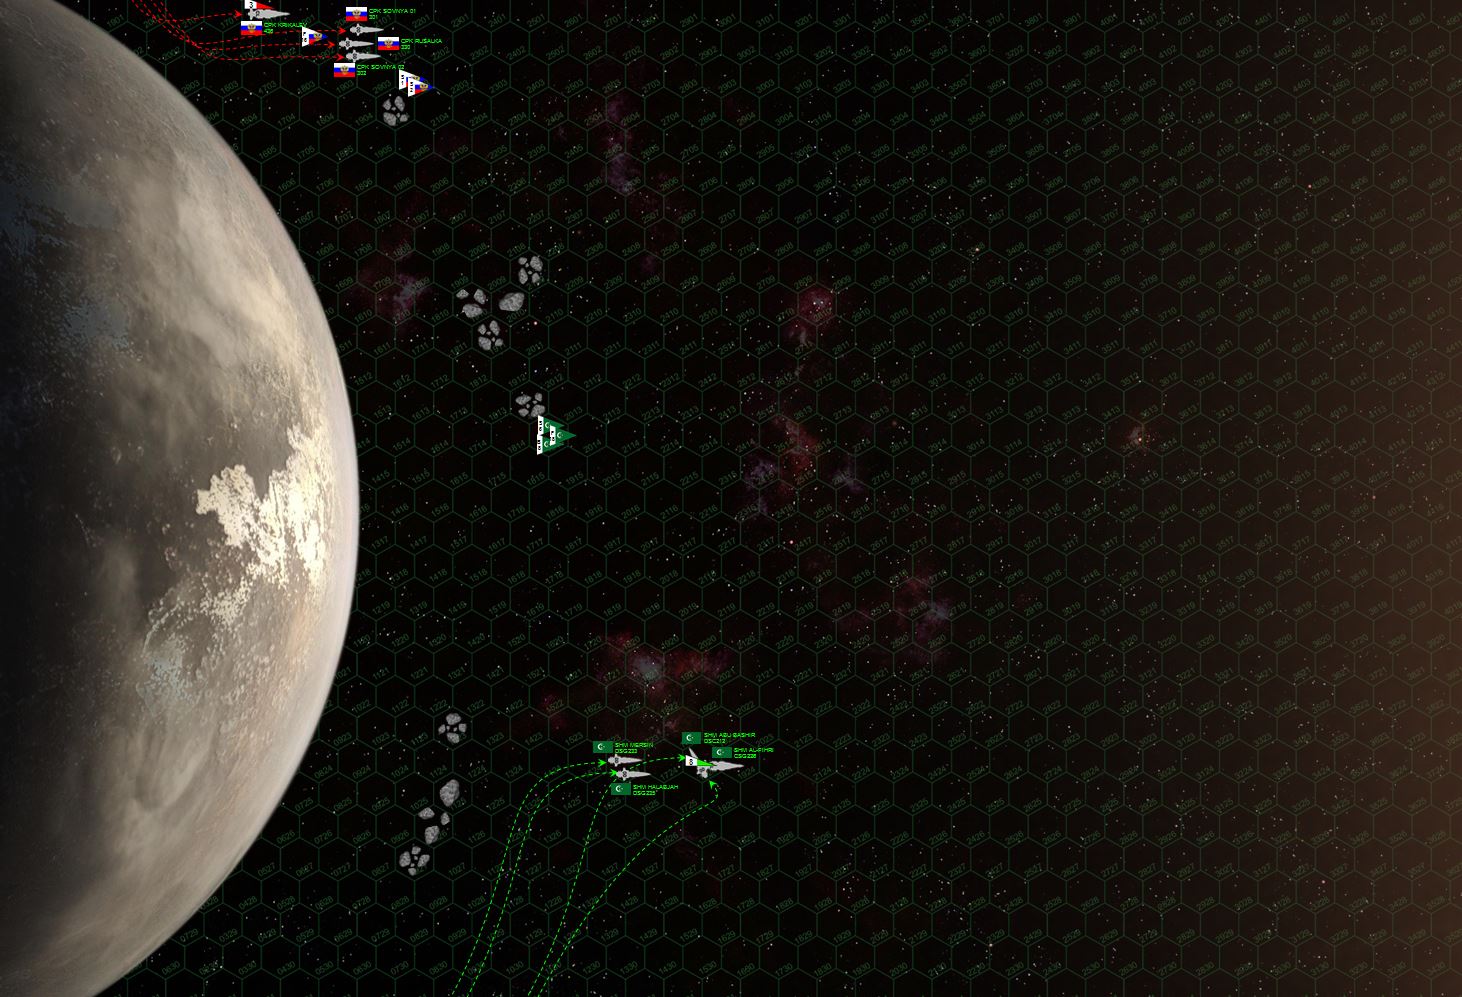 The two fleets make their approach. The Russian carrier flagship stays well clear of any potential battlezones, instead launching her fighters and sending her three destroyer escorts out to engage the League at close range. Initially the Russian destroyers are completely blind, well-hidden behind lunar debris in low orbit over KV323. Not that it matters much, the star is currently streaming out mid-frequency EM turbulence, and everyone is at -1 to hit. Still, the Al-Fihri and her escorts have the Krikalev broadsided. The range is almost 4200 kilometers, but even at this distance, even through the EM storm, the League scores the first hits, damaging the Russian flagship along her starboard bow.
 Both sides take the risky choice of cutting INSIDE the lunar debris belts over KV323 as the ships close the range to engage. But Darkstar is a subtle game, and two important factors are at play here. One, the Russians seem to have the “gravity gauge,” cutting closer to the planet and turning AWAY from KV323 to engage the League, who in contrast must turn TOWARD the planet to engage the Russians in turn. This will have fateful consequences later. Also, the League’s bombers have moved much too close to the Russians and outdistanced the mass drivers on their own warships. In short, they have no point defense cover as the Russian fighters (Mikoyan-Guyevich MiG-103 “Tunguska” class) swarm over them. The Arab League “Mylekinir” (Fire Angel) fighters sweep in to respond, and wreak heavy damage on the Russian MiGs. But it’s too late to save any of the League’s bombers. Some Russian MiGs and scouts are even able to fight back against the League’s Fire Angels. Russian bombers, meanwhile, remain at a safe distance back, comfortably under mass driver cover of their three destroyers ... who also just launched a combined 30 P-500 “Plamya” (Flame) torpedoes from their forward spreads.
 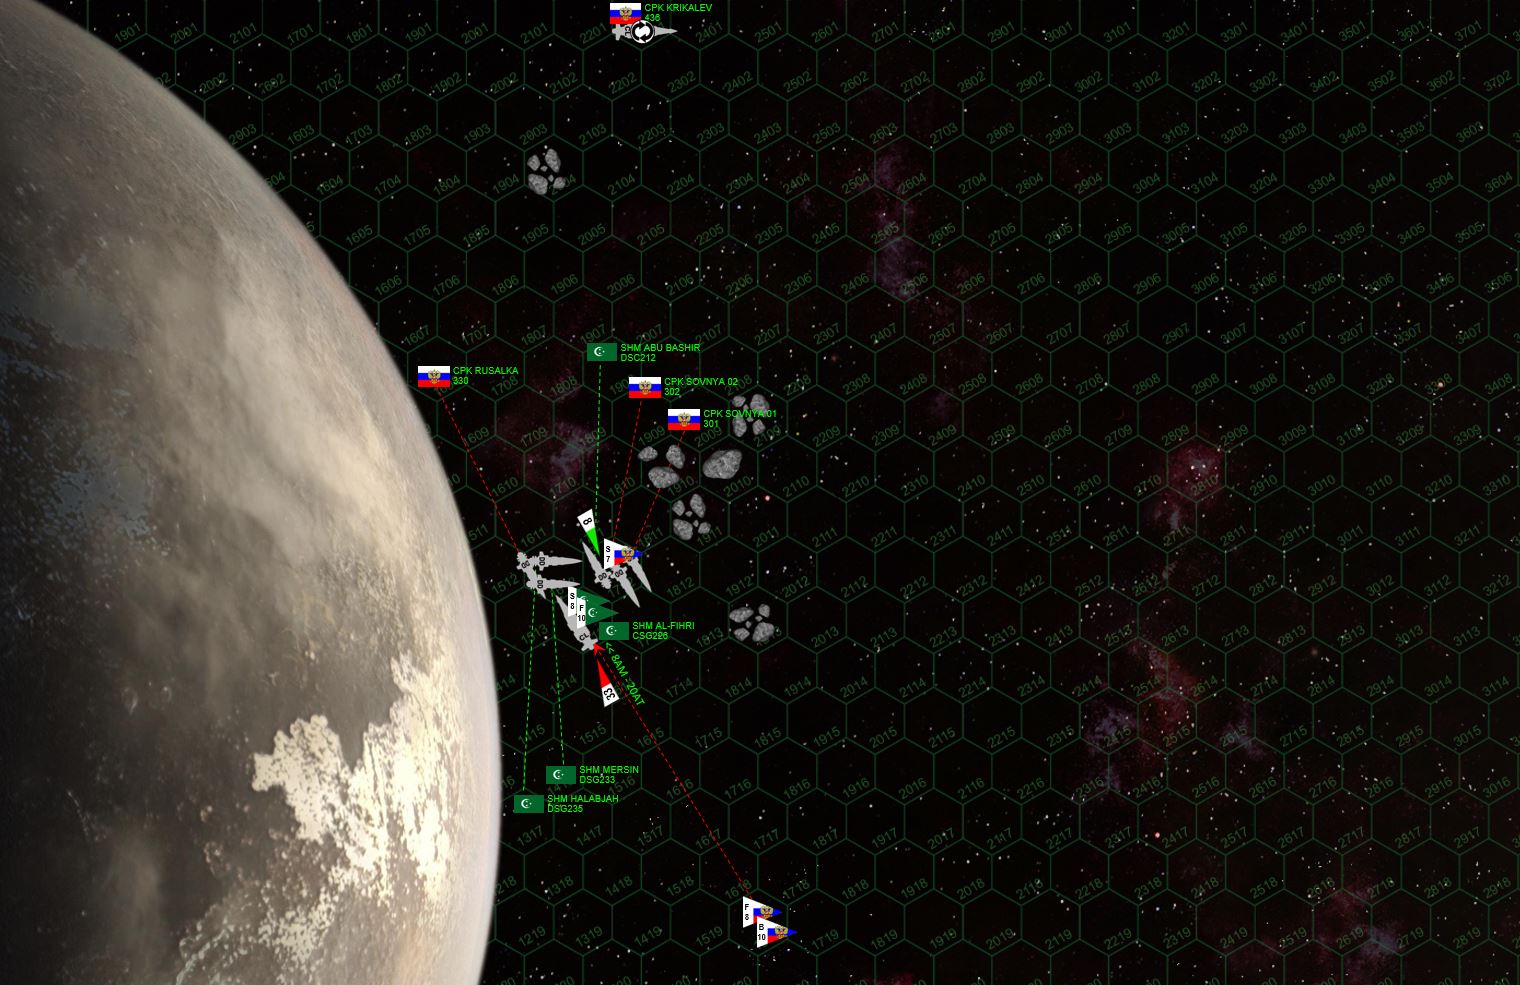 Things ... get extremely hectic here. As the League destroyers close to engage, the Russian destroyer Rusalka accelerates, cuts a shallow S-turn RIGHT AT the League destroyers, and slashes a broadside right across BOTH their sterns at point blank range. The Al Fihri rushes in to help, even though the ship’s AI warns that if she loses power at this vector, at this speed, KV323’s gravity will pull her down to a fiery crash on the planet’s surface. Russian torpedoes swarm around Al Fihri to attack her stern, followed by a hail of aerospace torpedoes launched from their Tupolev Tu-97 “Zvesburya” (Star Storm) bombers and surviving MiGs. League fighters give up the idea of a missile attack against the Russian destroyers – probably a good idea but with all their bombers already gone. Instead they return to the Al FIhri to shoot down incoming Russian torpedoes. Meanwhile, a torpedo spread from the Abu Bashir tries to hit the two Russian Sovnya-class destroyers, but these are all shot down. Meanwhile, Abu Bashir herself rushes up to provide vain mass driver support to the League flagship, and the other two Russian destroyers race up to put a point-blank broadside right into her starboard quarter.
 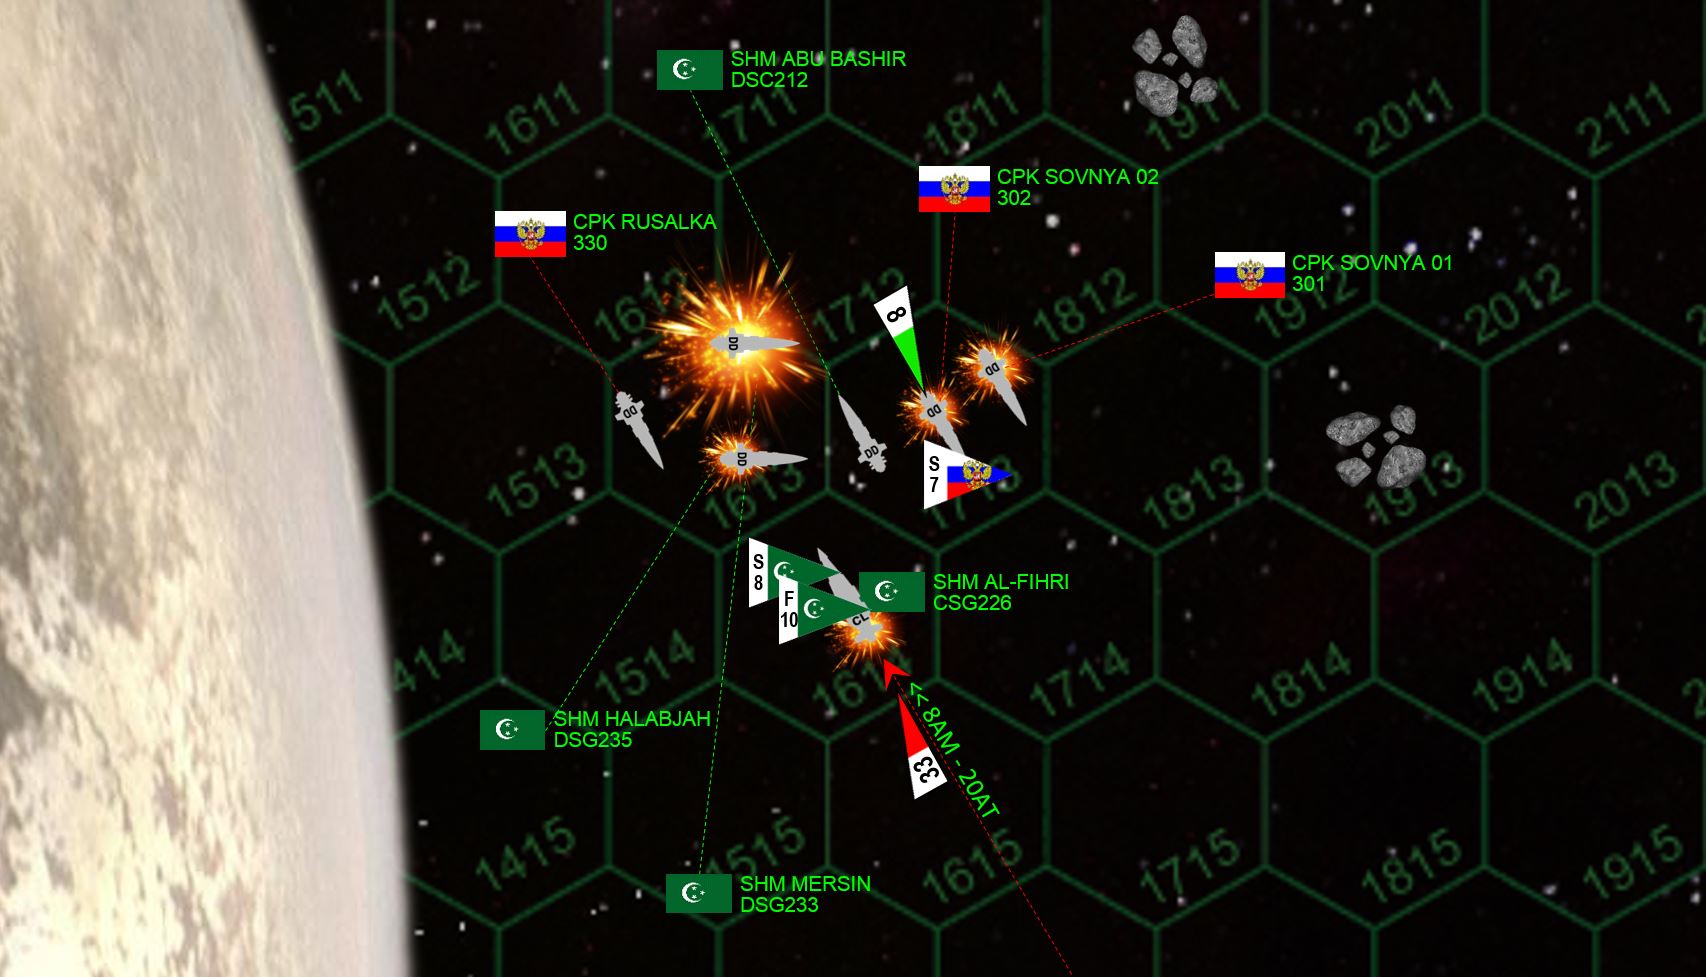 The Battle of KV323 is determined with horrific speed. As if so many ships at point-blank range weren’t bad enough, the 72 Hercules star emits a huge sheet of HIGH frequency EM radiation, taking down everyone’s shields by -1 this turn. This ... is gonna get BLOODY. First, the Mersin’s aft guns fire point-blank into the port bow of the CPK Rusalka. The Rusalka reels, but the her plasma projectors into broadside into the stern of the Mersin. Not only is the Mersin crippled, she actually EXPLODES in a cataclysmic fusion-powered blast. The Halabjah fires her after guns into the Rusalka at the same instant as the Rusalka fires her rail guns into the Halabjah’s stern. The Halabjah manages to burn her way into the Rusalka’s port bow in the same place the Mersin hit her just a moment before, striking the Rusalka’s bridge and knocking her out of the battle. But the Halabjah’s also in trouble, the Rusalka’s 7-gigawatt rail gun hits in her powerplant, plus the shockwave of the unfortunate Mersin, actually leave her crippled as well. The Al Fihri and Abu Bashir manage to shoot down most of the Russian aerospace torpedoes, and the Al Fihri’s broadside cripples the first Sovnya destroyer. But enough of the P-500s from the three destroyers hit her engineering section (as well as the two Sovnya destroyers hitting her port bow and setting off her forward magazine) to leave her crippled as well. Immediately the order is given to abandon ship since, try to the AI’s warning, the Al Fihri does NOT have escape velocity to clear KV323 on this trajectory. The second Sovnya, meanwhile, hammers the Abu Bashir, not managing to cripple her but definitely forcing her out of the battle. That second Sovnya, however, has also been damaged by Al Fihri, and a heartbeat later the blast wave from the Mersin’s explosion hits her, and actually cripples her as well. Indeed, the CPK Rusalka has thus crippled THREE warships in a single fire phase ... even if one of them was a fellow Russian ship. =*( Note that a handful of Russian scouts, League fighters and League scouts are also lost in this explosion.
 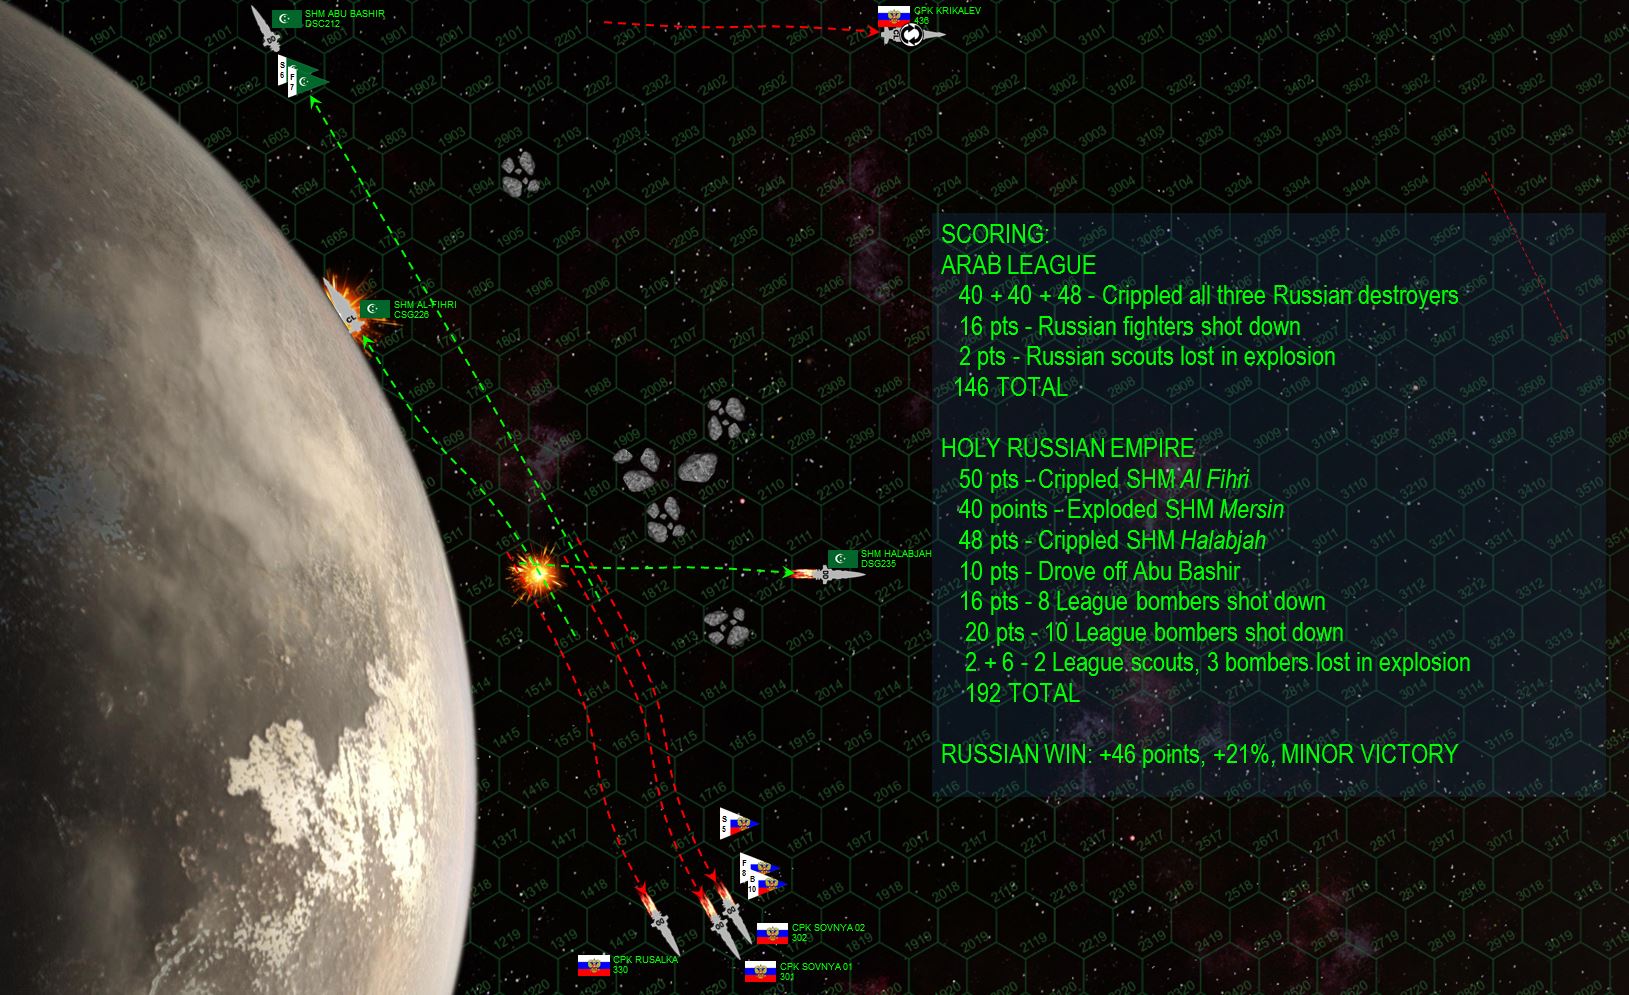 There are literally only two ships left ... the CPK Krikalev (rolled on her back to fire more torpedoes from her portside tubes) and the grievously-damaged Abu Bashir, which has already been forced for break off the action anyway. The crippled ships make their post-battle recovery rolls, some of them with Commander’s Luck points. Commander Alexander Kharichev aboard the CPK Rusalka escapes serious injury from the destruction of his bridge, he’ll also get his ship home in one piece, eventually. The Halabjah will also be recovered, but the Al Fihri is pulled down to the surface of the KV323 and vanishes in a spectacular explosion as she hits the charred dwarf planet at 18 kilometers per second. The captains of both the Al Fihri and the Mersin will live to fight another day, although again, some Commander’s Luck points had to be used.
  In overview, the Raid at KV323 is a sorely-needed victory for the Holy Russian Empire. Although three destroyers will spend months in dry dock, Arab League’s attempt to threaten 72 Hercules and destabilize the Coalition of Eagles has failed. Meanwhile, back-to-back defeats at Kayashenko 4 and KV323 has dispelled any illusions that the Arab League is in for an “easy” war here. There are now recriminations between several of their Star Caliphates, suggestions made that they should have taken the peace deal offered to them after their victory over the Americans at Kayashenko 17. Of course such options are long behind them now, the League has no choice but to knuckle down and WIN their part of this expanding and intensifying war across the Hercules Rim.
 Damon's Writing: Aftermath of Hawking's Star
Here is some great writing community member @damon put together to describe some of the aftermath of the recent Third Battle of Hawking’s Star. This was a pretty large Darkstar game we had on January 25, part of our continuing Third Hercules War community campaign here on OTT.
Battle: Third Hawking’s Star
Date: 25 May 2521
Planet: Lucy’s Hope (HR6806-D)
System: Hawking’s Star (HR6806), Hercules SCS
Points: 514 per side (Assault Rules)
Russo-American Player: Jim (Oriskany)
British Players: Damon and Jennifer (Gladesrunner)
While the battle’s outcome didn’t quite turn the course of the war outright, it was a shattering setback for naval forces of the United States and the Holy Russian Empire, a conclusive end to any Russo-American plans to take the British Hawking’s Star colonies (HR6806 star system), a desperately-needed reprieve for the British naval forces in the Hercules Rim, and a huge vindication of the Royal Navy in general.
During the game, one of Damon’s warships (HMS Retribution, a Relentless-class light cruiser, Commander Helena Seacole) had her port bow burned wide open by point-blank broadside of a Russian Slava-class heavy cruiser. While the Retribution survived the onslaught, then rolled on her back to protect this wounded side from further fire, she nevertheless could not stop all the American fighters USN Fighter squadron VSF-221 (The Dead Rabbits), who made a costly but ultimately successful gunnery strafing attack against the Retribution’s unshielded port bow. The bridge was hit, thus leaving the Retribution crippled and adrift.
After the battle, we see what crippled ships are recovered, scuttled, captured, or destroyed by enemies, and what commanders may or may not have been killed, captured, or lost in space.
Losing ALL Bridge/CIC boxes on your ship not only cripples the ship, but compels your commander to make a d10 roll for survival. This roll is 1-6 on a d10. Damon actually FAILED that roll, indicating that Commander Seacole was killed. The game does have “Commander’s Luck” upgrade that commanders can buy at their option (once they’ve accumulated enough campaign points), but Seacole did not have this upgrade purchased. So she was still dead.
Fortunately, Commander’s Luck re-rolls are transferable within a given battlegroup or Task Force, so another of Damon’s commanders, Captain Edward Cavendish (captain, HMS Agamemnon), was able to re-roll Seacole’s survival check and this time she survived.
So in game terms, Seacole survived the American fighter attack, but only through the leadership, skill, and outright luck of her task force commander. We determined that she was badly wounded, and only survived through the work of damage control / medic teams transferred from the Agamemnon to the crippled Retribution after the battle, probably after the Agamemnon had taken the Retribution in tow.
Based on all that background, Damon put together the writing below. The writing is his, all I added was some basic graphics.


Darkstar Rules and Expansion
I’ve had some requests to re-post the latest rules and expansions for Darkstar (the originals are buried many pages deep in old threads).
Meanwhile, we have more games lined up this weekend with players literally all over the world (in all we’ve had Australia, China, the UK, Europe, Canada, Puerto Rico, and the continental US).
So if you’d ever like to join or spectate in one of these games as it plays LIVE on the web, just send me a PM and we’ll get you hooked up with one of our web conference games!
The files are too big to upload here, but here are GOOGLE DRIVE links that should give you access. If you have any problems with these links, just send me a PM with a gmail address and I should be able to get you sorted.
Thanks for the continued support and interest!
Main rule book, including sample scenarios and multiple warship classes for six major factions:
Expansion for four more factions, including some of their warship classes, plus more warship classes for original factions:
Some of the background documents:
Third Battle of Hawking's Star: The Empire Strikes Back!
FROM: UNITED NATIONS REGIONAL COLONIAL CENTER
21:55 SOL GMT, 25 MAY 2521
BREAKAUTH: 181072.18J
CLEARANCE: SECRET (NATIONAL)
**UNITED NATIONS COMMUNIQUE**
Another titanic battle has taken place in the far-flung reaches of the Hercules Rim, objectively the largest yet in the Third Hercules War. After recent peripheral battles in the open UN mandate of the Redemption Colonies (99 Hercules) system, focus seems to have shifted back to what has recently become the epicenter of this war, the Hawking’s Star colonies (HR6806 system) of the United Kingdom.
Hawking’s Star is a major shipping, industrial, and population center, and a key component of the United Kingdom’s interstellar colony network. Together with the Outer Hebrides Colonies (Mu Hercules), Hawking’s Star lies directly between the American colony at Vega (Lyra Alpha) and the UN “open colonies” at Redemption. Clearly, as soon as the Americans entered the Third Hercules War with intentions on expanding into Redemption and the Hercules Rim in general, systems like Hawking’s Star found themselves in the way. At just 13 light-years from the huge American Port Halsey naval base at Alpha Lyra, Hawking’s Star in particular has been a target almost since the moment this war started.
Thus far, British fortunes in Hawking’s Star have been less than stellar. The United States Navy (with support from their allies in the Holy Russian Empire) claimed a major victory here when Task Force Liberty (Captain Zachary Irons) spearheaded the initial drive into the system, all but smashing the Royal Navy clean out of Hawking’s Star colonies in a stunning carrier/cruiser strike. Indeed, if Task Force Liberty had been supported by a US Marine Corps planetary landing force, Hawking’s Star might have fallen entirely right there.
Now firmly lodged in the outer orbital zones of the system, the Americans (Task Force Oriskany, Captain Matthew A. Spencer) and Russians then fended off a determined counterstrike by British reinforcements and their Japanese allies in a frustrating and hard-fought draw.
British plans for a second counterstrike to drive the invaders out of Hawking Star were muddled, delayed, and unfocused. The commander of the primary British naval force in the region (Task Force Agamemnon, Captain Lord Edward Cavendish), hardly held the Admiralty’s confidence at the moment. Political tension had reached as far back as Earth, where the Prime Minister struggled to hold his government together against the threat of a Vote of No Confidence. Indeed, it seemed as if no counterstrike might come at all, with Hawking’s Star traded away to the Americans in exchange for a favorable peace.
The Americans, meanwhile, were in little better shape. Admirals at Port Halsey pointed fingers for the lost opportunities of taking Hawkings’ Star with the initial Task Force Liberty strike. In truth, this strike was never intended as an “invasion,” the startling degree of its success as much a surprise to the Americans as the British. The Russians, struggling in their campaign against the newly-arrived Arab-League, bitterly complained of a lack of American assistance along the coreward shoulder of the Hercules Rim. Finally the Americans had to commit Task Force Oriskany to the Battle of Kayashenko Four in the Hercules 99 system, further delaying any renewed efforts in Hawking’s Star.
In the end, the next move in Hawking’s Star would come down to whichever side finally aligned its resources for a belated, overdue strike. As fate would have it, the Americans could win this race, albeit barely. Once again, elements of Task Force Liberty would mount a full-scale strike, once again with heavy Russian cruiser support, this time into the inner orbital zones of HR6806, this time with two US Marine Corps Saipan-class planetary assault ships standing by. Although they’d missed the chance to strike the Americans first, the Royal Navy was more than ready to meet the threat, with heavy elements of not only Task Force Agamemnon but also Cruiser Squadron Kraken, namely the carrier HMS Vigilant and the destroyer HMS Londonderry.
On 25 May 2521, Task Force Liberty (reinforced) sets a short, low-speed, high-stealth Darkstar wave to Lucy’s Hope, a small, Mars-analog terrestrial world (named for Steven Hawking’s daughter) in the heart of the embattled system. Task Force Agamemnon and Cruiser Squadron “K” move to intercept. One way or another, the fate of the HR6806 system is about to be decided. The Third Battle of Hawking’s Star is on.
United States / Holy Russian Empire: @Oriskany (Jim)
United Kingdom: @Damon and @Gladesrunner (Jenn)
514 points per side
ASSAULT victory rules
 Current disposition on the Third Hercules War. The US and UK (supported by the Russians and Japanese, respectively), have been trading heavy blows in the Hawking’s Star colonies for months now. With a battle this big, with “ASSAULT” victory conditions declared IN ADVANCE, this time there is no doubting the implications. Whoever wins this battle, gets this system. Having suffered a string a defeats already, a loss here definitively causes a change in the UK government and an ignominious exit from the Third Hercules War. If the victory is heavy enough, the Americans may be able to “cash out” of this war as victors, with a shipping path now open between Alpha Lyra and 99 Hercules via their new colonies in HR6806. If the Americans lose, it’ll be a setback, but they’ll still be in it. If the British lose ... it’s
 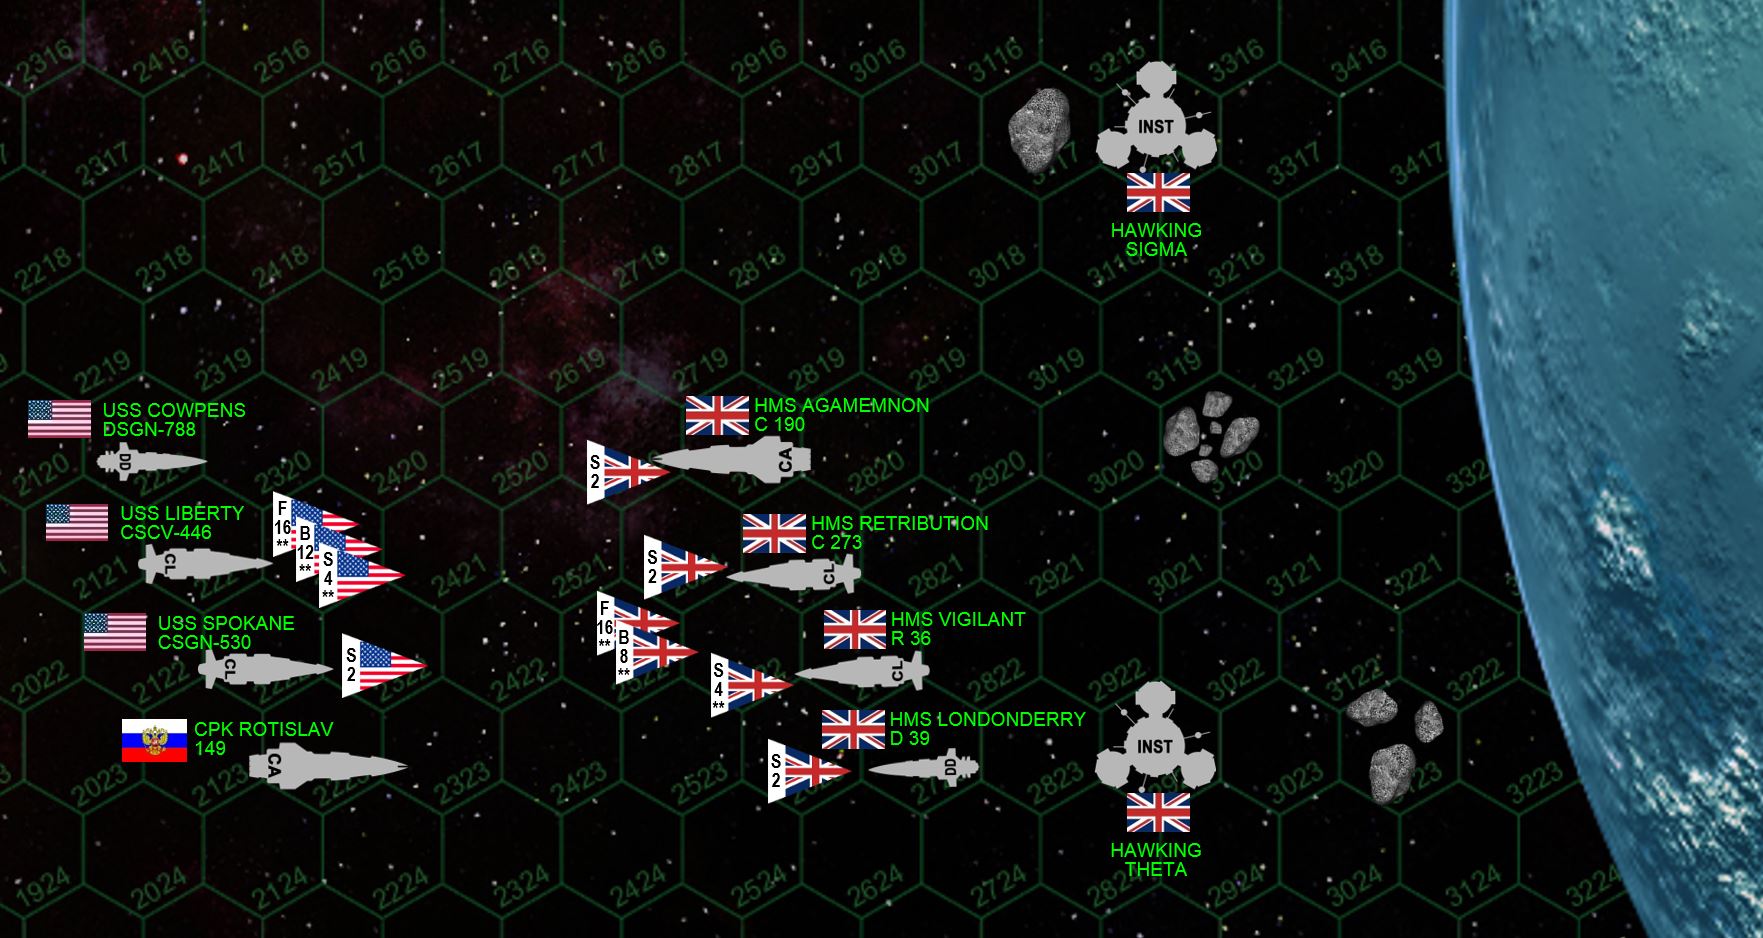 The matchup. Damon has his two heavies - the “hero ship” HMS Agamemnon (Trafalgar class heavy cruiser) under the flag of Lord Cavendish and the Relentless class light cruiser HMS Retribution. Both these ships are upgraded with elite crews and expensive enhancements, very fast for their class, and deadly accurate with hard-hitting guns. The Agamemnon in particular is the fastest heavy cruiser in Known Space. Jennifer has her Valiant-class light fleet carrier HMS Vigilant, carrying the legendary “Mad Hatters” fighter squadron and “Royal Griffins” bomber squadron, and the Commonwealth-class destroyer HMS Londonderry. The Americans have also brought their “A” game, with the veteran Endeavor-class light fleet carrier USS Liberty, carrying the fighters of VSF-221 “Dead Rabbits” Squadron and bombers of VSA-193 “Eight Ball Express” strike squadron, under the flag of Captain Zachary Irons (twice decorated with the Navy Cross). There is also the San Antonio class light cruiser USS Spokane, probably the most advanced light cruiser in Known Space after the loss of IJN Sendai in the Xi Scorpio War. Rounding out the American force is the Valcour-class destroyer USS Cowpens, sister ship of the USS Oriskany and replacement for the USS Vincennes lost last month. Providing heavy gunfire support is the Russian Slava-class heavy cruiser CPK (Holy Russian Ship) Rotislav.
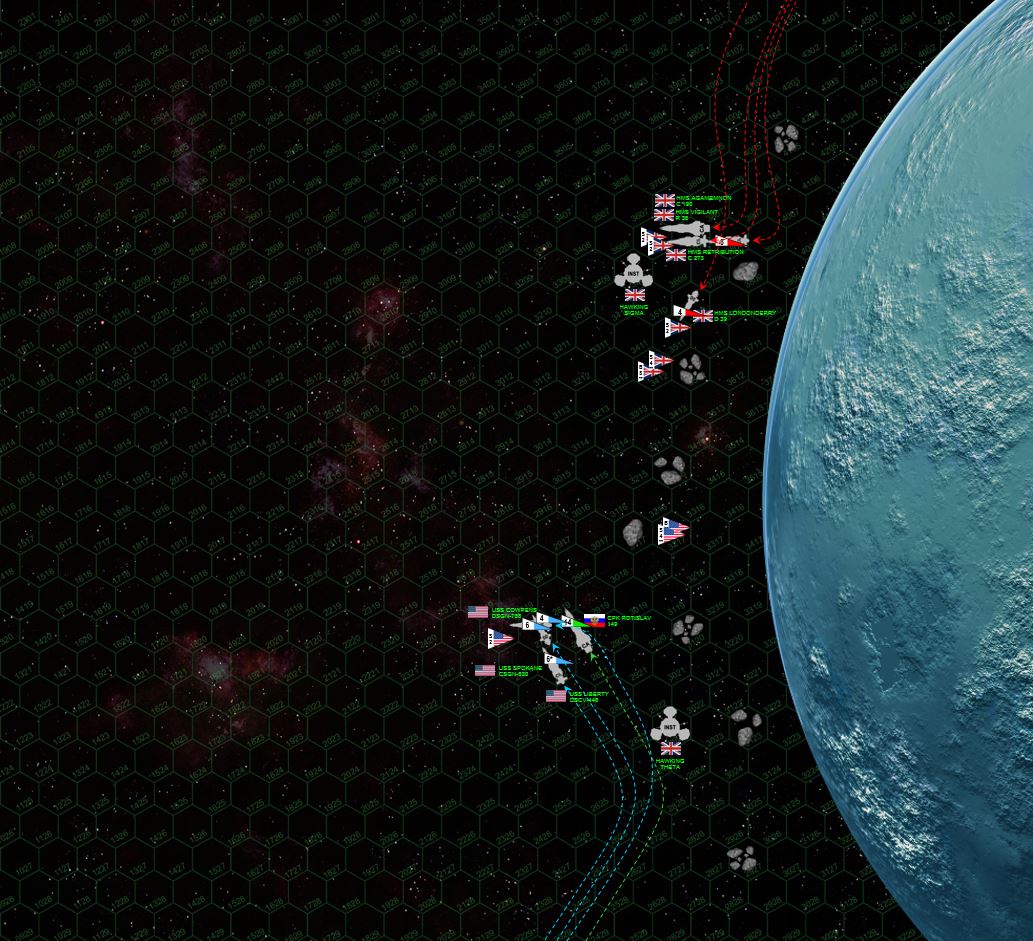 The Americans and Russians set a high-speed approach from beneath the south pole of Lucy’s Hope. The Russian cruiser Rotislav leads the way, very aggressively cutting a shallow dive toward the planet, hoping to close the range as quickly as possible and perhaps use the remains of the planet’s moon (broken up by gigantic mining installations Hawking Sigma and Theta). The American commanders are less than thrilled by this idea, preferring to engage the British at a distance (game terms: Rotislav did terrible with initiative). But with the British now approaching and the Vigilant launching her aerospace wing, the Americans have to keep pace to provide maximum point-defense support. Carefully nosing their way through the rubble of the former moon, the British have also kept close to Lucy’s Hope, neither side wanting to yield the “gravity gauge” to their enemy (many players prefer to keep themselves between the enemy and any major planetary bodies, forcing the enemy to turn dangerously TOWARDS a planet to engage them, while using the planet’s gravity as auxiliary brakes by cutting away after making high-speed attack approaches). The two fleets open fire, with the HMS Londonderry positively smashed open by a withering broadside from the Spokane and the Rotislav. However, fortune shifts to the British as 2200-kilometer broadsides from the HMS Agamemnon and Retribution savage the starboard quarter of the Spokane. Successive hits in Spokane’s starboard reactors and engines set off fires and decompressions that quickly grow out of control, and Captain Daniel Cheatham is forced to eject his reactors to save his ship. JUST THAT FAST, the biggest American warship is crippled and adrift.
  As the stricken USS Spokane careens out of the battle, the Rotislav continues to charge toward the British. Using the lunar debris to her benefit, she lines up a broadside on HMS Retribution while screening her starboard quarter (engines and reactors) from any immediate counterfire. At least that’s the idea ... until HMS Agamemnon cuts to the hair-raising close distance of less than 50 kilometers with a broadside directly across Rotislav’s stern, followed by the limping, burning destroyer HMS Londonderry. Please remember that all these ships are WELL within the gravity well of the planet, and players have to make their moves based on the previous speed, momentum, and gravity effects of their movement. If a warship ever drifts into a hex containing lunar debris, a collision automatically results and the ship in totally destroyed ... and again ... Sir Isaac Newton is steering these ships as much as the helmsman. USS Cowpens, despite protests to the Rotislav’s captain, must move in to provide gunfire and point defense support, while the carrier USS Liberty brings up the rear, trying to use the lunar debris for some protection. So does the carrier HMS Vigilant, but that same lunar debris that protects her from the guns of the Rotislav also cut her off from point-defense coverage from Agamemnon ...
 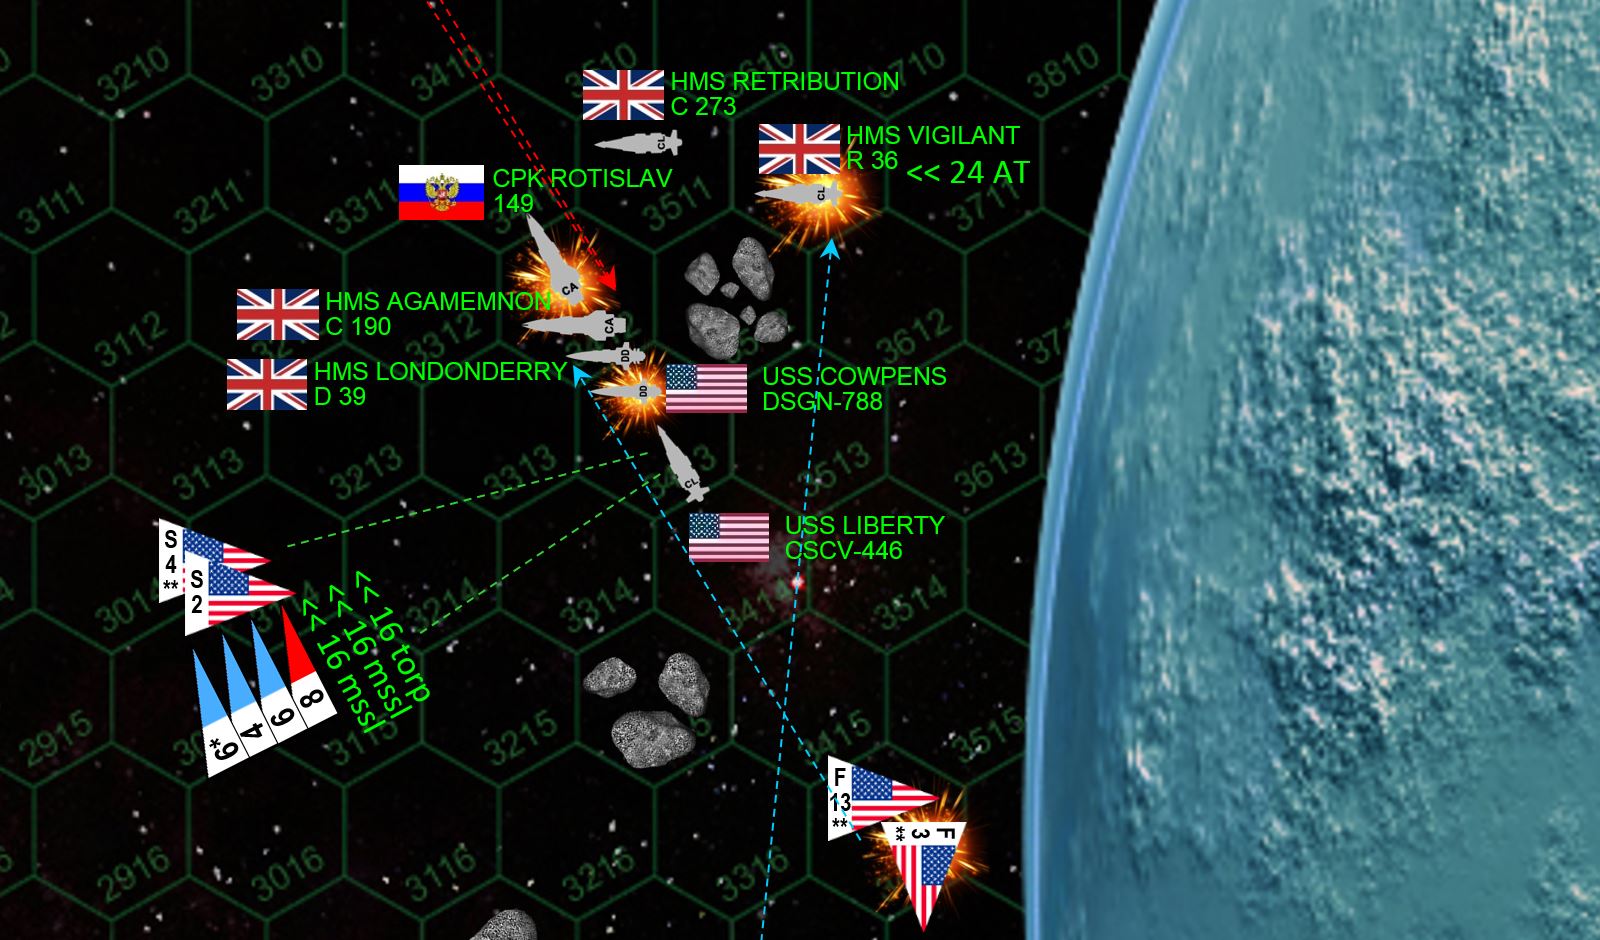 A zoom-in of what’s happening, and a LOT is happening here. First up, the Rotislav absolutely MAULS the port bow of the Retribution. But too many of her huge 30-kg plasma projectors and 10-gw rail guns hit too far forward, and while the bow of the Retribution is all but blown clean off (including an entire triple-gun laser turret), the bridge remains intact and the ship incredibly remains operational. The Rotislav survives the aerospace attack of the Royal Griffins and the Mad Hatters, mostly due to American point-defense fire. However, four Model 41 gravitic torpedoes fired from HMS Vigilant and HMS Londonderry hit the stern, one cavitating to explode INSIDE the Rotislav’s starboard engine compartments. But it’s the guns of the Londonderry and the Agamemnon which really cripple not only the huge Russian cruiser, but the destroyer USS Cowpens as well, even landing a few hits on the bow of USS Liberty. It’s not all going the Crown’s way, however ... Isolated by herself, the carrier HMS Vigilant is hit by a swarm of ASM-56 Harpoons fired from the FS/A-81 “Avenger” torpedo bombers of VSA-193 “Eight Ball Express” strike squadron. No less than 11 warheads are turned aside by the gravitic shielding, but 12 more hit the hull. The last three are in fact self-detonated by the Americans, the Vigilant is already more than crippled and whole ship comes within a hair’s breadth of exploding as it is. Other aerospace strikes by VSF-221 “Dead Rabbits” Squadron doesn’t do as well against the Londonderry (too many warheads are shot down by the Agamemnon)and even with the damage she suffered previously PLUS the last broadside from the crippled Cowpens, the Londonderry somehow survives ... although her skipper is forced to break off the action.
  Just that fast, the USS Liberty finds herself the last American warship at Lucy’s Hope. As a carrier, she is unarmed except torpedoes and point-defense guns, so Captain Irons turns away ... trying to remain within recovery range of his aerospace group while keeping lunar debris between himself and the British guns. It doesn’t work, the Agamemnon and Retribution are just too fast, powering out of Lucy’s Hope’s gravity well and drawing long-range broadside angles on Liberty’s starboard quarter. Meanwhile, the F/S-44 Star Corsairs of the Dead Rabbits, covered by a screen of Liberty’s Mk 48 gravitic torpedoes, make a run at Retribution’s ravaged port quarter. Note that Retribution has rolled on her back, trying to keep her wounded port bow away from the Americans, but this is a tactic that rarely works against fighters. With Retribution’s port bow shields gone, the elite Dead Rabbits make a deadly strafing run at her bridge, the resulting damage actually crippling the ship and badly wounding her skipper, Commander Helena Seacole. But the cost is heavy, with all of the Eight Ball Express’s bombers shot down along with most of the Dead Rabbits by the vengeful Supermarine Starfire fighter pilots of the Mad Hatters. All the while, the Liberty herself is hammered by the Agamemnon and the Retribution’s last broadside ... and although she loses her starboard reactors, “Lady Liberty” remains operational but Captain Irons has already sounded a general retreat.
 In all, the Third Battle of Hawking’s Star has lasted just four incredible minutes. The cost to both sides has been grim, but the Americans and Russians have come off the clear losers here. Although Londonderry’s retreat leaves the Agamenon the sole British warship at Lucy’s Hope, she is unscathed ... her paint not so much as scratched. And that’s a BIG damned ship to remain unchallenged over a disputed planet, or even an entire star system. This, combined with the near complete annihilation of the Dead Rabbits and Eight Ball Express ... while the elite Mad Hatters and Royal Griffins remain virtually unharmed (even if they will have to land on Lucy’s Hope to refuel and rearm) ... means that the Royal Navy remains FIRMLY in control of Lucy’s Hope.
 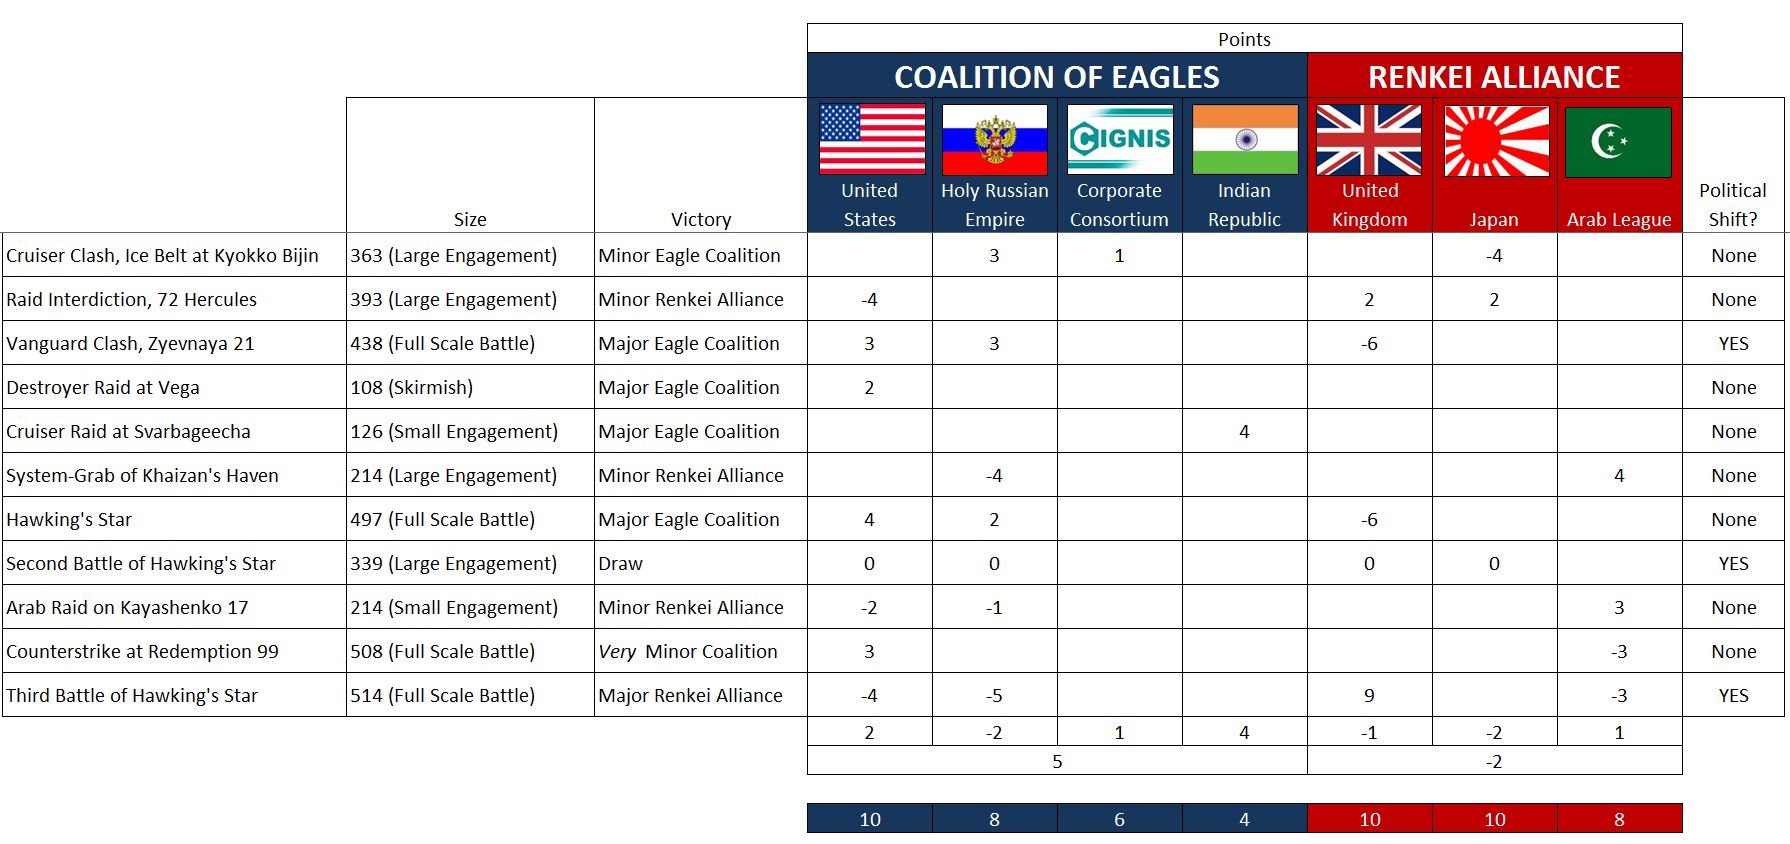 The Third Battle of Hawking’s Star has decisively ended Russo-American hopes for a conquest of this system. (Game Terms, +/-9 campaign points and 45% chance of political shift, which IS rolled). Lord Edward Cavendish is awarded the Distinguished Service Order (political shift) and promoted to Commodore (commander points at player’s option), the shadow of earlier defeats lifted at last from his record. Commander Seacole will recover from her injuries, but only after she is evacuated to the Medical Bay of HMS Agamemnon (she actually died, but a re-roll was allowed due to Cavendish’s “Commander’s Luck” upgrade). The Americans and Russians limp home after recovering their derelicts and ejected aerospace pilots. It’s a stinging blow to the US Navy, but the Russians wind up taking slightly more blame due to the reckless charge of CPK Rotislav. The US Navy, in fact, comes off is surprisingly good light for that torpedo strike against HMS Vigilant (political shift, also self-destructing those last three torpedoes ... which also helps explain why the Royal Navy allowed them time for rescue / recovery efforts in the battle’s aftermath). Make no mistake, as the charts shows above, the British are still technically on the losing end of this war. Even a victory as thunderous as Third Hawking’s Star can’t COMPLETELY balance the scales for the string of previous defeats. But no longer does the Royal Navy stand on the brink here in the Hercules Rim. Meanwhile, relations between the Americans and their Russian allies grow increasingly strained (political shift). Only time will tell if they can shake off this setback and regain the initiative in the continuing Third Hercules War.
 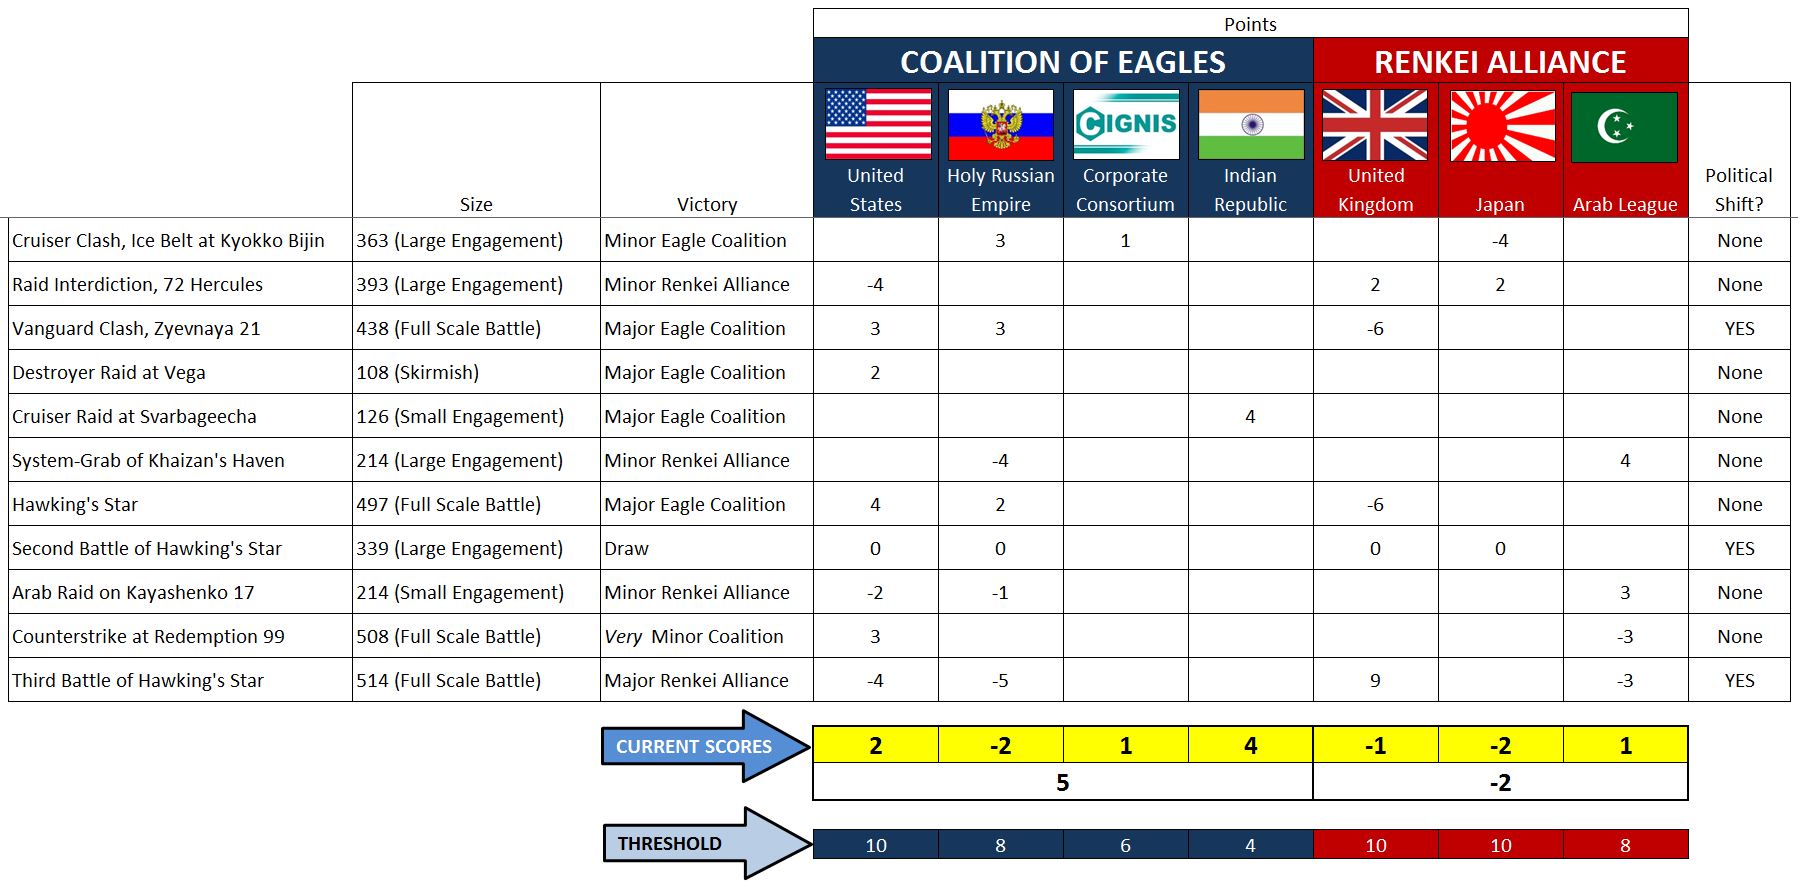 Okay, here's a revised version of that campaign chart that hopefully makes things a LITTLE more clear.
 Gettysburg and Damascus Class Heavy Cruisers
Good afternoon ~ As promised (threatened 🙂 ) – here are the design sheets, write-ups, and Warship Record Sheets (WRS) for the new heavy cruiser classes that made their combat debut this past weekend, the American Gettysburg class heavy cruiser, and the Arab League’s Damascus class heavy hybrid cruiser.
 The Gettysburg class heavy cruiser (the ships named for battles of the American Civil War) seems to be the US Navy's response to two uncomfortable strategic problems they've been facing over the last 20-30 years. First, as one of the first powers to launch into faster-than-light colonization, the American "star empire" is far flung, expansive, and scattered all over known space. Second, as other powers start to "catch up" on that wave of expansion and colonization ... all those scattered early American colonies are coming under increasing pressure. However, they can't put a Colorado class battleship or Lexington class supercarrier in every far-flung star system t they own. Enter the Gettysburg class heavy cruiser. Armed with three triple turrets of General Electric Mk 151 10-gigawatt rail guns, arrayed in a classic "Pacific Layout" with two triple turrets forward and one aft, the Gettysburg's armament is guided by a Hughes / General Dynamics SPQ-910B sensor and gunnery telemetry suite, a scaled-down version of the 910A mounted in the Colorado class. This gives the Gettysburg class good accuracy, heavy firepower, and lethal range well out past 4000 kilometers. Secondary armament was actually redesigned in the shipyards as the first three ships of the class were under construction, the original 6-gigawatt rail guns switched out for McDonnell-Douglas NGS-91 9-teravolt EPCs. This decision was undertaken when the Shepard class frigates were withdrawn off the line for refit, their 5-gw rail guns switched out for the US Navy's new EPCs. In general, the US Navy has been switching smaller-gauge naval gunnery from rail guns (which can be inefficient at smaller calibers), and the Gettysburg's secondary weapons suite has been part of that trend.
  What's a little unusal is the layout. Note that most of these weapons are mounted aft, in either stern, port quarter, or starboard quarter. The US Navy has been watching battles between the British, Russians, and Prussians, where heavy cruisers, pocket battleships, and battleships have been knocked out time and time again by smaller light cruisers and destroyers cutting daring broadsides across their sterns. Even the USS Oriskany crippled a Black Dragon Slava class heavy cruiser in the atmosphere of a gas giant with this tactic. To counter this, the Gettysburg class mounts of its secondary weapons aft to defend against such maneuvers. The mission of the Gettysburg is rather straightforward, to stand as the center of a crisis reponse task force or spearhead of a systm invasion, basically to be a US Navy flagship where it's just not feasible to send a battleship. Gettysburgs have also been seen escorting Obama class fleet carriers and Lexington class supercarriers, bombarding planets to prepare for Omaha or Saipan class planetary assault ships, or running close abeam Colorado class battleships in classic "battlefleet" doctrine. Production on the Gettysburg class was complete at 12 units (note the twelfth ship is named Appamattox, where the Americna Civil War effecively ended), until a Stage II production run was authorized which is proceeding at a slower pace. Reports are unconfirmed as to how many heavy cruisers will be included in this run.
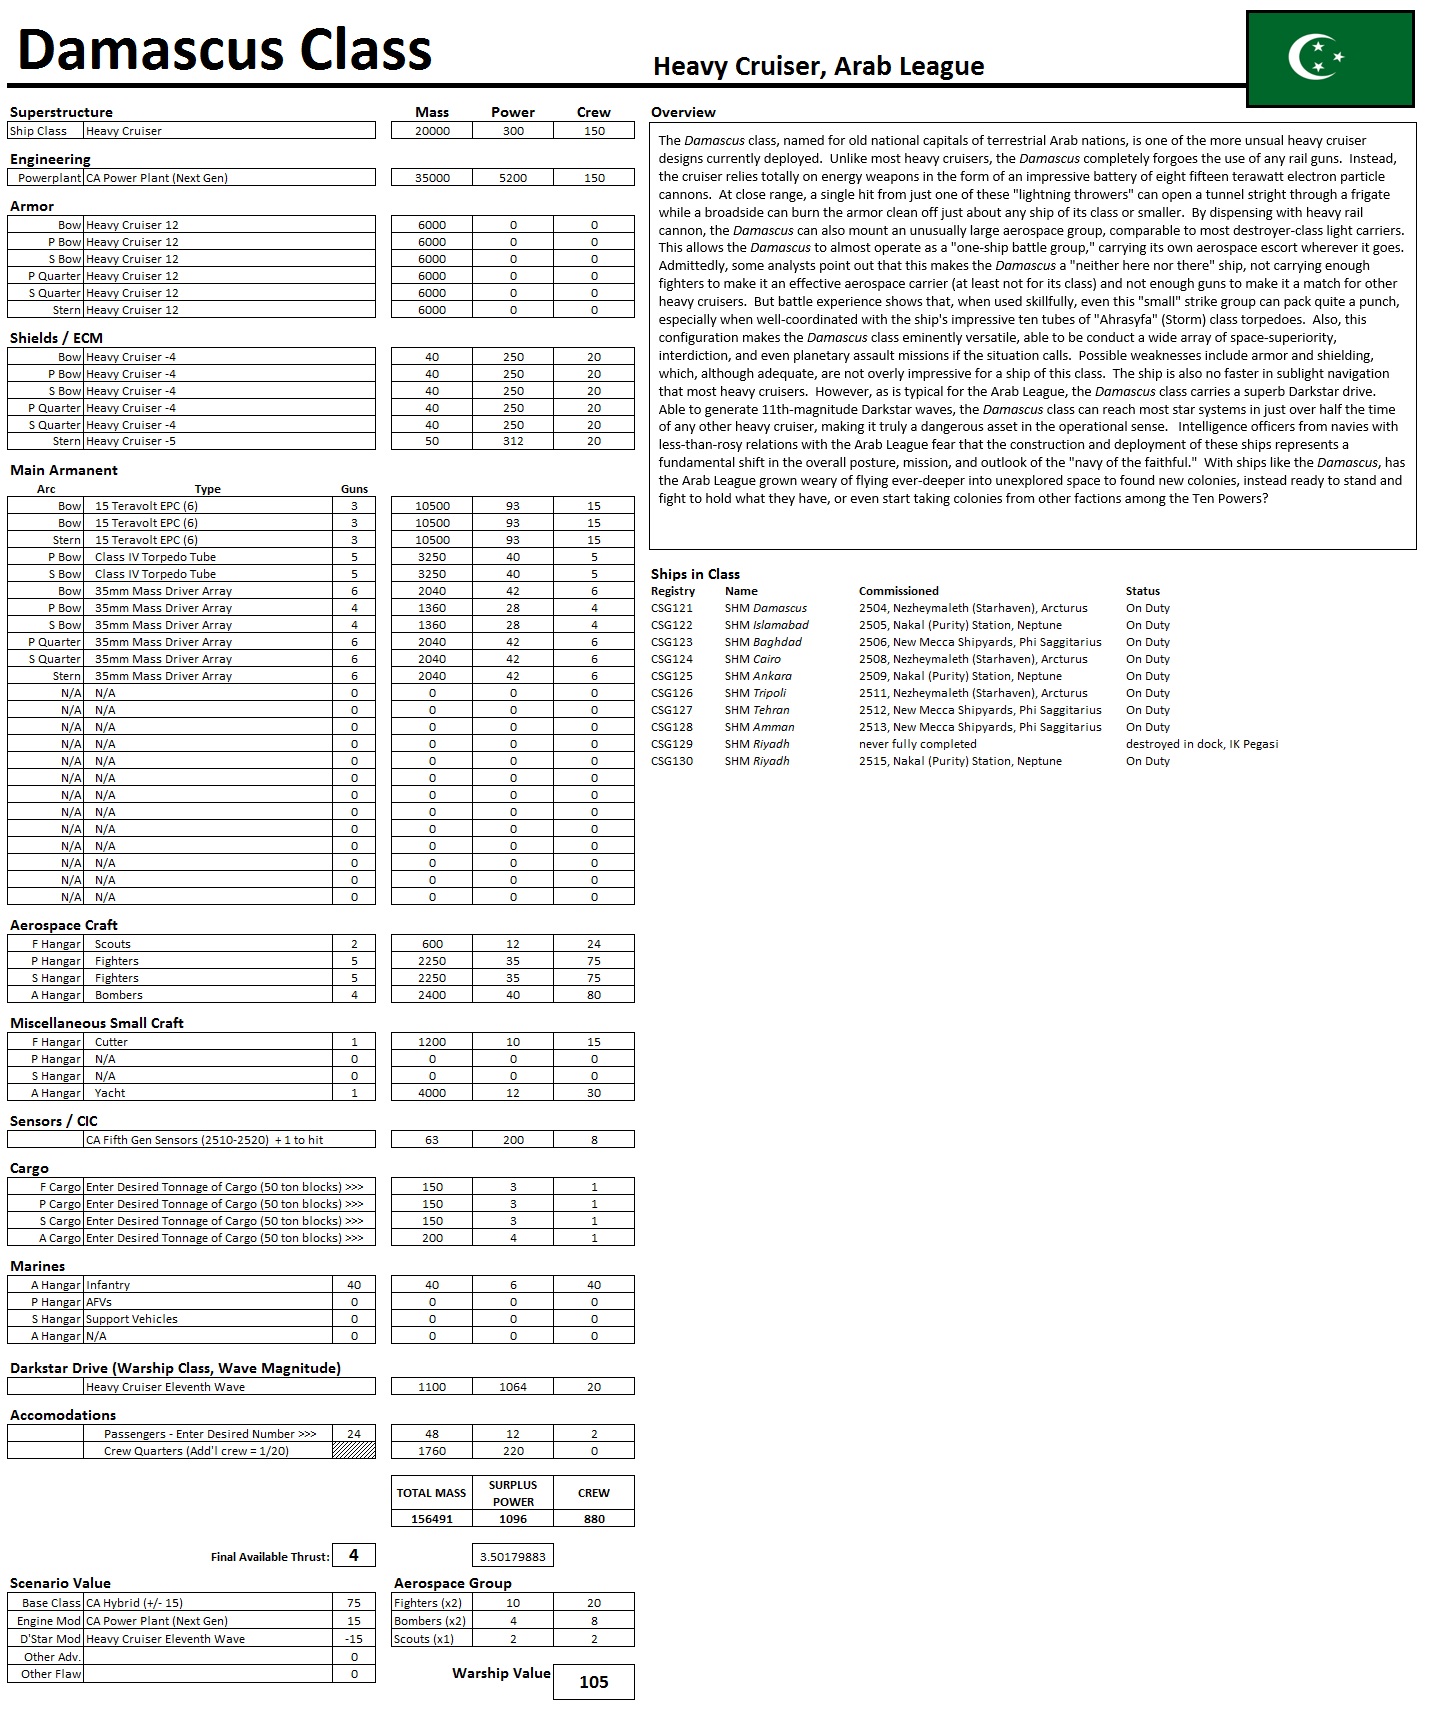 The Damascus class, named for old national capitals of terrestrial Arab nations, is one of the more unsual heavy cruiser designs currently deployed. Unlike most heavy cruisers, the Damascus completely forgoes the use of any rail guns. Instead, the cruiser relies totally on energy weapons in the form of an impressive battery of eight fifteen terawatt electron particle cannons. At close range, a single hit from just one of these "lightning throwers" can open a tunnel stright through a frigate while a broadside can burn the armor clean off just about any ship of its class or smaller. By dispensing with heavy rail cannon, the Damascus can also mount an unusually large aerospace group, comparable to most destroyer-class light carriers. This allows the Damascus to almost operate as a "one-ship battle group," carrying its own aerospace escort wherever it goes. Admittedly, some analysts point out that this makes the Damascus a "neither here nor there" ship, not carrying enough fighters to make it an effective aerospace carrier (at least not for its class) and not enough guns to make it a match for other heavy cruisers. But battle experience shows that, when used skillfully, even this "small" strike group can pack quite a punch, especially when well-coordinated with the ship's impressive ten tubes of "Ahrasyfa" (Storm) class torpedoes.
 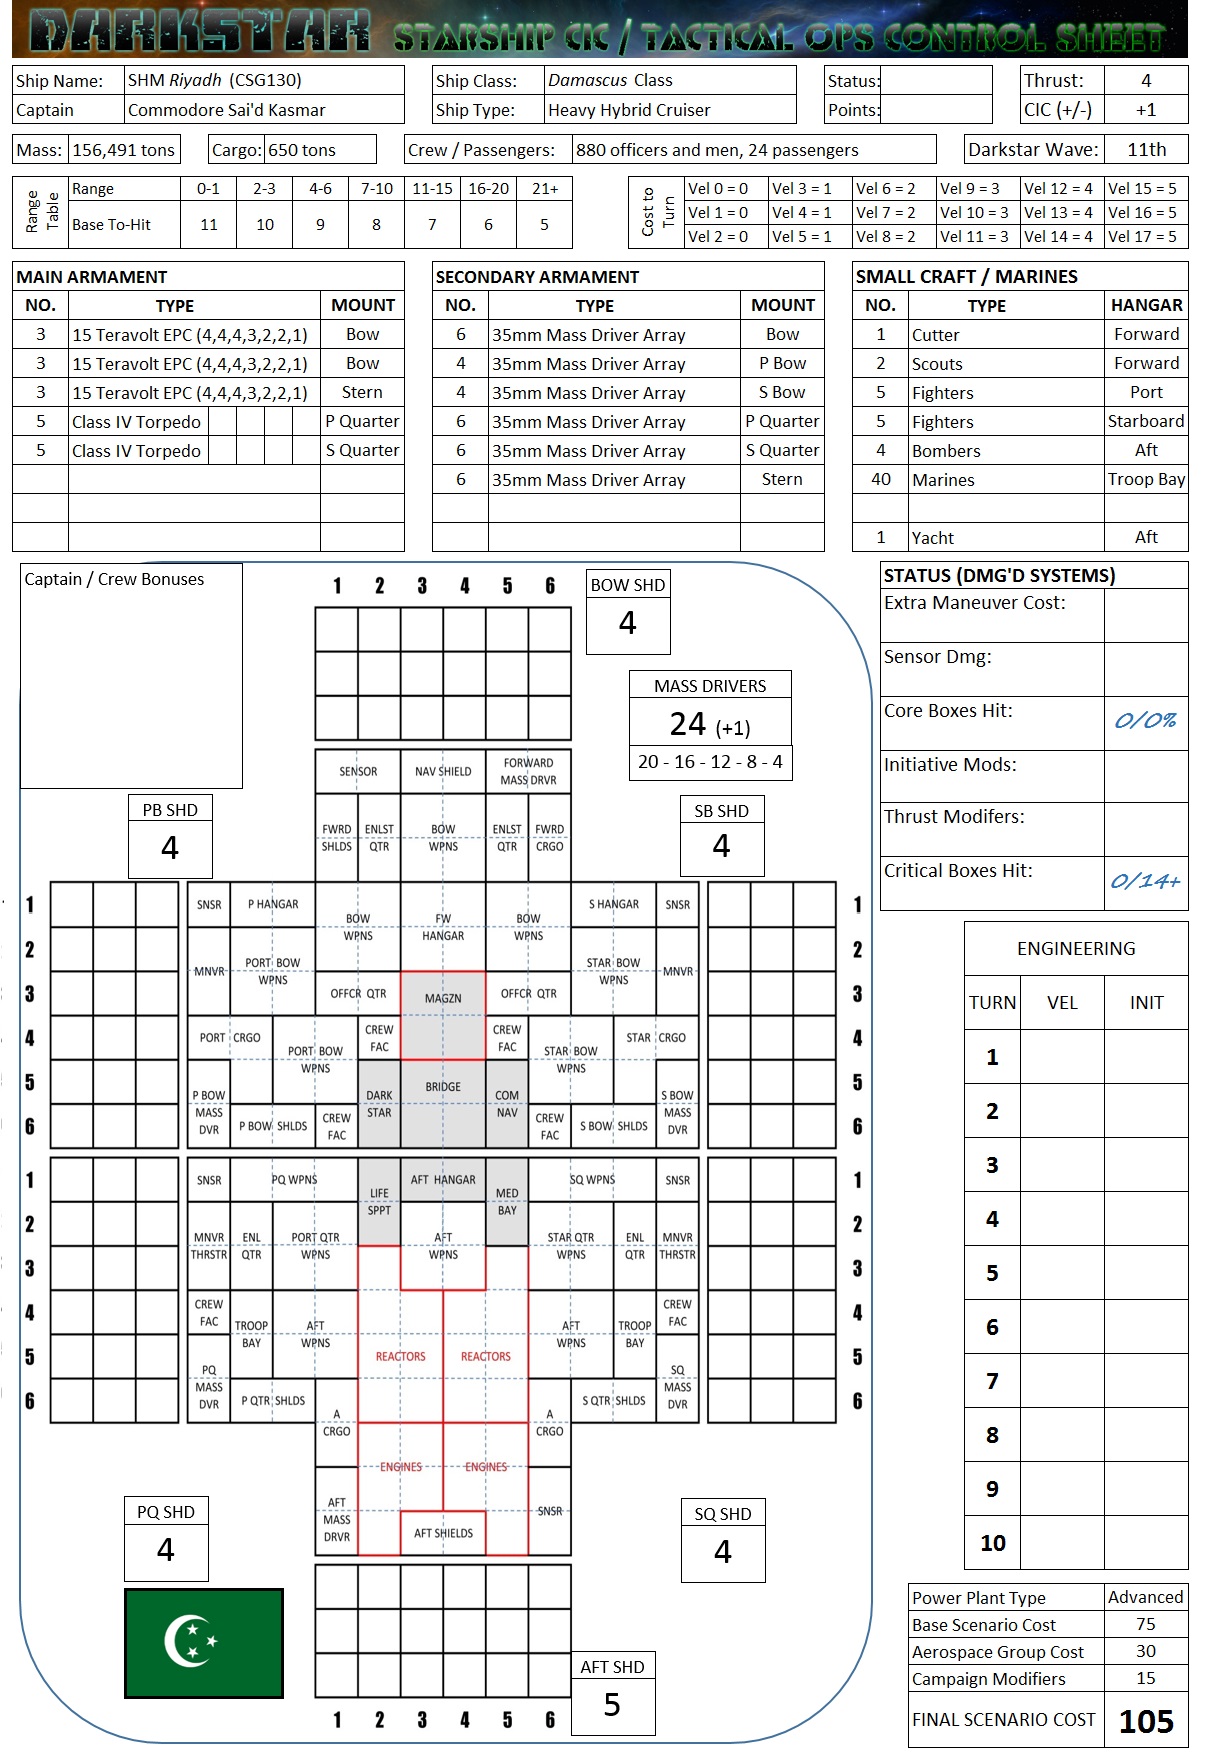 The weapons configuration of the Damascus class has been tailored with versatility in mind, and the ship is able to be conduct a wide array of space-superiority, interdiction, and even planetary assault missions if the situation calls. Possible weaknesses include armor and shielding, which, although adequate, are not overly impressive for a ship of this class. The ship is also no faster in sublight navigation that most heavy cruisers. However, as is typical for the Arab League, the Damascus class carries a superb Darkstar drive. Able to generate 11th-magnitude Darkstar waves, the Damascus class can reach most star systems in just over half the time of any other heavy cruiser, making it truly a dangerous asset in the operational sense. Intelligence officers from navies with less-than-rosy relations with the Arab League fear that the construction and deployment of these ships represents a fundamental shift in the overall posture, mission, and outlook of the "navy of the faithful." With ships like the Damascus, has the Arab League grown weary of flying ever-deeper into unexplored space to found new colonies, instead ready to stand and fight to hold what they have, or even start taking colonies from other factions among the Ten Powers?